Spring Cloud Gateway限流實戰
- 2021 年 11 月 23 日
- 筆記
歡迎訪問我的GitHub
//github.com/zq2599/blog_demos
內容:所有原創文章分類匯總及配套源碼,涉及Java、Docker、Kubernetes、DevOPS等;
本篇概覽
-
本文是《Spring Cloud Gateway實戰》系列的第八篇,經過前面的學習,咱們對過濾器已了解得差不多,今天來補全過濾器的最後一個版塊:限流(RequestRateLimiter )
-
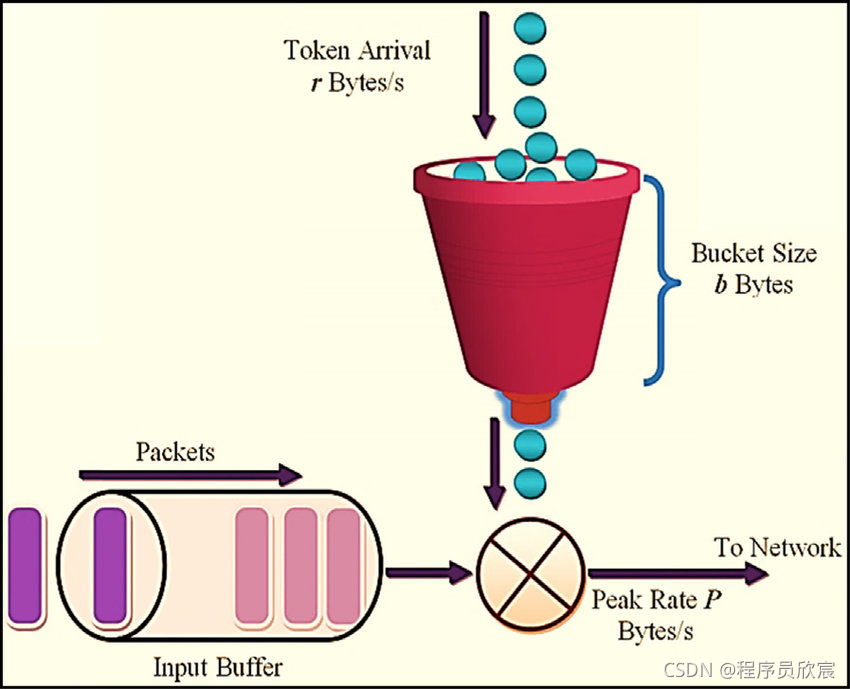
默認的限流器是基於redis實現的,限流演算法是大家熟悉的令牌桶(Token Bucket Algorithm),關於令牌捅的原理就不在此展開了,聰明的您看一眼下圖應該就懂了:裝令牌的桶容量有限,例如最多20個,令牌進入桶的速度恆定(注意,這裡是和漏桶演算法的區別),例如每秒10個,底部每個請求能拿到令牌才會被處理:
RequestRateLimiter基本套路
- 使用RequestRateLimiter過濾器的步驟非常簡單:
- 準備可用的redis
- maven或者gradle中添加依賴org.springframework.boot:spring-boot-starter-data-redis-reactive
- 確定按照什麼維度限流,例如按照請求中的username參數限流,這是通過編寫KeyResolver介面的實現來完成的
- 配置application.yml文件,添加過濾器
- 以上就是使用RequestRateLimiter過濾器的套路了,簡單么?接下來,咱們先編碼再驗證
源碼下載
- 本篇實戰中的完整源碼可在GitHub下載到,地址和鏈接資訊如下表所示(//github.com/zq2599/blog_demos):
| 名稱 | 鏈接 | 備註 |
|---|---|---|
| 項目主頁 | //github.com/zq2599/blog_demos | 該項目在GitHub上的主頁 |
| git倉庫地址(https) | //github.com/zq2599/blog_demos.git | 該項目源碼的倉庫地址,https協議 |
| git倉庫地址(ssh) | [email protected]:zq2599/blog_demos.git | 該項目源碼的倉庫地址,ssh協議 |
- 這個git項目中有多個文件夾,本篇的源碼在spring-cloud-tutorials文件夾下,如下圖紅框所示:

- spring-cloud-tutorials文件夾下有多個子工程,本篇的程式碼是gateway-requestratelimiter,如下圖紅框所示:

準備工作
- 為了更好的演示Gateway的效果,在服務提供者provider-hello的程式碼(Hello.java)中新增一個web介面,可以接受一個入參:
    @GetMapping("/userinfo")
    public String userInfo(@RequestParam("username") String username) {
        return Constants.HELLO_PREFIX + " " + username + ", " + dateStr();
    }
- 後面的測試咱們就用上述介面;
編碼
- 在父工程spring-cloud-tutorials之下新增子工程gateway-requestratelimiter,其pom.xml內容如下,重點是org.springframework.boot:spring-boot-starter-data-redis-reactive:
<?xml version="1.0" encoding="UTF-8"?>
<project xmlns="//maven.apache.org/POM/4.0.0"
         xmlns:xsi="//www.w3.org/2001/XMLSchema-instance"
         xsi:schemaLocation="//maven.apache.org/POM/4.0.0 //maven.apache.org/xsd/maven-4.0.0.xsd">
    <parent>
        <artifactId>spring-cloud-tutorials</artifactId>
        <groupId>com.bolingcavalry</groupId>
        <version>1.0-SNAPSHOT</version>
    </parent>
    <modelVersion>4.0.0</modelVersion>

    <artifactId>gateway-requestratelimiter</artifactId>

    <dependencies>
        <dependency>
            <groupId>com.bolingcavalry</groupId>
            <artifactId>common</artifactId>
            <version>${project.version}</version>
        </dependency>

        <dependency>
            <groupId>org.springframework.cloud</groupId>
            <artifactId>spring-cloud-starter-gateway</artifactId>
        </dependency>

        <dependency>
            <groupId>org.springframework.boot</groupId>
            <artifactId>spring-boot-starter-data-redis-reactive</artifactId>
        </dependency>
    </dependencies>
</project>
- 配置文件application.yml,請注意RequestRateLimiter的幾個參數,已經用中文添加了詳細的注釋:
server:
  #服務埠
  port: 8081
spring:
  application:
    name: circuitbreaker-gateway
  # redis配置
  redis:
    host: 192.168.50.43
    port: 6379

  cloud:
    gateway:
      routes:
        - id: path_route
          uri: //127.0.0.1:8082
          predicates:
            - Path=/hello/**
          filters:
            - name: RequestRateLimiter
              args:
              	# 令牌入桶的速度為每秒100個,相當於QPS
                redis-rate-limiter.replenishRate: 100
                # 桶內能裝200個令牌,相當於峰值,要注意的是:第一秒從桶內能去200個,但是第二秒只能取到100個了,因為入桶速度是每秒100個
                redis-rate-limiter.burstCapacity: 200
                # 每個請求需要的令牌數
                redis-rate-limiter.requestedTokens: 1
- 指定限流維度的程式碼CustomizeConfig.java,這裡是根據請求參數username的值來限流的,假設真實請求中一半請求的username的等於Tom,另一半的username的等於Jerry,按照application.yml的配置,Tom的請求QPS為10,Jerry的QPS也是10:
package com.bolingcavalry.gateway.config;

import org.springframework.cloud.gateway.filter.ratelimit.KeyResolver;
import org.springframework.context.annotation.Bean;
import org.springframework.context.annotation.Configuration;
import reactor.core.publisher.Mono;
import java.util.Objects;

@Configuration
public class CustomizeConfig {
    @Bean
    KeyResolver userKeyResolver() {
        return exchange -> Mono.just(exchange.getRequest().getQueryParams().getFirst("username"));
    }
}
- 毫無營養的啟動類RequestRateLimiterApplication.java:
package com.bolingcavalry.gateway;

import org.springframework.boot.SpringApplication;
import org.springframework.boot.autoconfigure.SpringBootApplication;

@SpringBootApplication
public class RequestRateLimiterApplication {
    public static void main(String[] args) {
        SpringApplication.run(RequestRateLimiterApplication.class,args);
    }
}
- 程式碼寫完了,接下來開始驗證;
驗證(桶容量等於入桶速度)
-
首先驗證的是桶容量等於入桶速度時的效果,請修改gateway-requestratelimiter應用的application.yml中文件,使得redis-rate-limiter.replenishRate和redis-rate-limiter.burstCapacity的值都等於100,也就是說桶的大小等於100,每秒放入的令牌數也是100
-
確保redis已經啟動,並且與application.yml中的配置保持一直
-
啟動nacos(provider-hello依賴)
-
啟動服務提供者provider-hello
-
啟動gateway-requestratelimiter
-
為了模擬web請求,我這裡使用了Apache Benchmark,windows版本的下載地址:
//www.apachelounge.com/download/VS16/binaries/httpd-2.4.48-win64-VS16.zip -
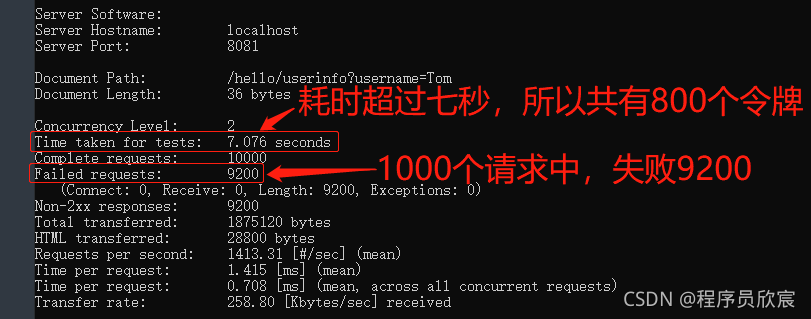
上述文件下載解壓後即可使用,在控制台進入Apache24\bin後執行以下命令,意思是向指定地址發送10000個請求,並發數為2:
ab -n 10000 -c 2 //localhost:8081/hello/userinfo?username=Tom
- 控制台輸出如下,可見不到八秒的時間,只成功了800個,證明限流符合預期:
驗證(桶容量大於入桶速度)
-
接下來試試桶容量大於入桶速度時的限流效果,這對於我們控制峰值響應有很重要的參考價值
-
請修改gateway-requestratelimiter應用的application.yml中文件,redis-rate-limiter.replenishRate維持100不變,但是redis-rate-limiter.burstCapacity改成200,也就是說每秒放入的令牌數還是100,但桶的容量翻倍了
-
重啟應用gateway-requestratelimiter
-
再次執行以下命令,意思是向指定地址發送10000個請求,並發數為2:
ab -n 10000 -c 2 //localhost:8081/hello/userinfo?username=Tom
- 測試結果如下圖,可見符合預期,可以將桶內令牌全部用掉,以支撐峰值超過QPS的場景:

驗證(根據username的維度限流)
-
接下來驗證限流的維度,究竟是不是按照請求參數username的值來限流的
-
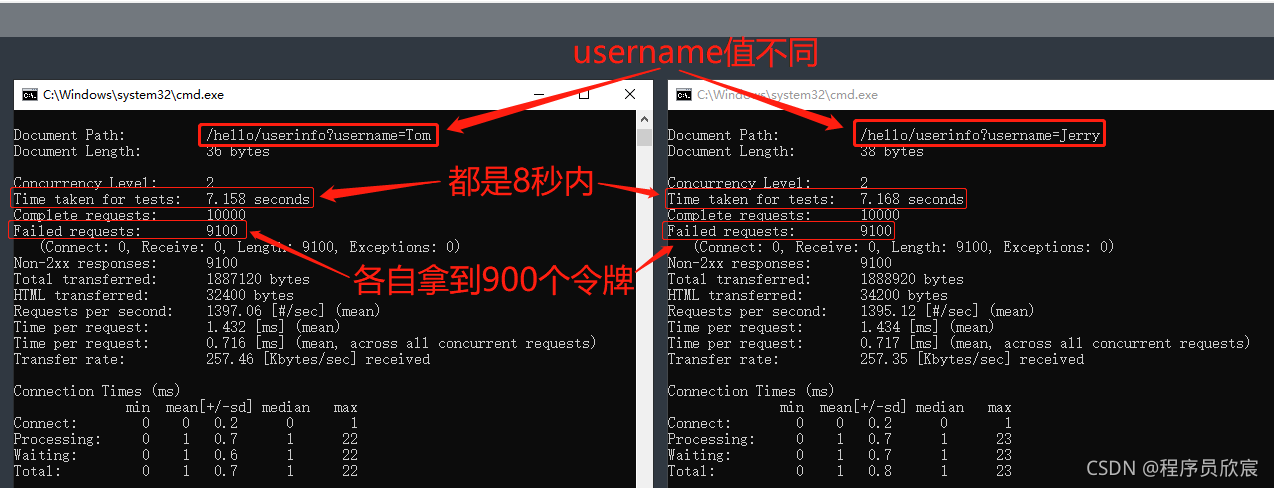
咱們打開兩個命令行,同時發送請求(動作要快),第一個的username等於Tom,第二個等於Jerry,理論上推測,如果都是8秒內完成,那麼每個命令都有900個請求能成功
-
測試結果如下圖,可見符合預期,每個username用的是自己的令牌:
- 至此,Spring Cloud Gateway限流實戰已經完成,如此簡單易用的限流方案,希望能給您的學習和使用帶來參考
你不孤單,欣宸原創一路相伴
歡迎關注公眾號:程式設計師欣宸
微信搜索「程式設計師欣宸」,我是欣宸,期待與您一同暢遊Java世界…
//github.com/zq2599/blog_demos


