react之路由
- 功能:讓用戶從一個視圖(組件)導航到另一個視圖(組件)
- 前端路由是一套映射規則,在React中,是URL路徑與組件的對應關係
- 使用React路由簡單來說,就是配置路徑和組件
路由的使用
1、安裝路由
npm i -S react-router-dom
2、相關組件
-
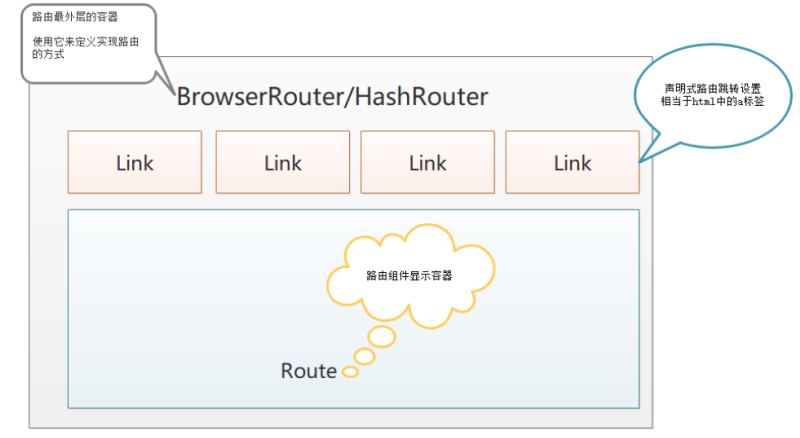
Router組件:包裹整個應用,一個React應用只需要使用一次
Router: HashRouter和BrowserRouter
– HashRouter: 使用URL的哈希值實現 (localhost:3000/#/first)
– BrowserRouter:使用H5的history API實現(localhost3000/first) -
Link/NavLink組件:用於指定導航鏈接(a標籤)
- to屬性:會被編譯成 a標籤的href屬性
to='/main' || to='{{pathname='/main'}}' - activeClassName屬性:指定樣式名
- Link 不會顯示按鈕的高亮顯示, NavLink 來替代它
- 最終Link會編譯成a標籤,
- to屬性:會被編譯成 a標籤的href屬性
-
Route組件:指定路由展示組件相關資訊(組件渲染)
- path屬性:路由規則,這裡需要跟Link組件裡面to屬性的值一致
- exact屬性:嚴格匹配, 為
true是表示嚴格匹配,為false時為正常匹配。 - component屬性:展示的組件
- render屬性:用於頁面組件級別的許可權管理

3、使用
步驟一:定義路由模式
- 主入口index.js中定義路由模式
import React from 'react'
import ReactDOM from 'react-dom'
import { Provider } from 'react-redux'
import store from './store'
import {HashRouter ar Router} from 'react-router-dom'
ReactDom.render(
    <Provider store={store}>
        <Router>
            <App/>
        </Router>
    <Provider>,
    document.getElementById('root')
)
步驟二:組件內渲染路由 + 路由聲明式導航
- 導入渲染組件
- Route路由渲染組件
- 使用Link或NavLink組件完成聲明式導航的定義
import React, { Component } from 'react'
import { Route, Link } from 'react-router-dom'
<!-- 導入渲染組件 -->
const Home = () => (<div>Home</div>)
const About = () => (<div>About</div>)
const DashBord = () => (<div>DashBord</div>)

class App extends Component {
  render() {
    return (
      <>
        <ul>
            {/* 聲明導航*/ }
            <li><Link to="/">Home</Link></li>
            <li><Link to="/about">About</Link></li>
            <li><Link to="{{pathname:'/dashbord'}}">DashBord</Link></li>
        </ul>
        {/*
            path:可訪問的url路徑
            component:匹配成功的渲染的組件
            exact:嚴格匹配模式
            Route組件中匹配成功,渲染會自動在this.props中添加路由導航相關屬性方法
        */ }
        <Route path="/" exact component={Home}></Route>
        <Route path="/about" component={About}></Route>
        <Route path="/dashbord" component={DashBord}></Route>
      </>
    );
  }
}

export default App;
路由的擴展
1、路由參數
在Route定義渲染組件時給定動態綁定的參數
- params:在路由目標頁面中
- 動態路由定義:
<Route path='/detail/:id' component={Detail}> - 傳遞:
<NavLink to='/detail/2'> - 獲取:this.props.match.params
- 動態路由定義:
- query:通過地址欄中的 ?key=value&key=value,
- 傳遞:
<NavLink to='/detail?name=cc'> - 獲取:this.props.location.search
- 備註:獲取到的search是urlencoded編碼字元串,需要藉助querystring解析
- 傳遞:
- state:隱式轉參,用於數據的收集
- 傳遞:
<NavLink to='{{pathname:/detail?name=cc,state:{age:20}}}'> - 獲取:this.props.location.state
- 作用:埋點—收集數據統計
- 傳遞:
2、switch組件
- 通常情況下, path和component是一一對應的關係.
- Switch可以提高路由匹配效率(單一匹配).
- 為了更好地匹配規則,輕易不要捨棄
。 - Redirect:路由從定向,一般寫在所有路由註冊的最下方,當所有路由都無法匹配時,跳轉到Redirect指定的路由
import { Route,Switch } from 'react-router-dom'
<div>
    <div>
        <ul>
            <li>
                <Link to="/Guide/ContactUs">ContactUs</Link>
            </li>
        </ul>
    </div>
        <Switch>
            <Route path="/Guide/ContactUs" component={ ContactUs } ></Route>
            <Route path="/Guide/ContactUs" component={ ContactUs } ></Route>
            <Redirect from="/" to="/public"></Redirect>
        </Switch>
</div>
3、Route組件三種渲染方式
1、component
- 參數:對象
<Route path='/home' component={home}/>
- 直接使用組件類–使用最多的方式
- 缺點:不能把父組件中的數據通過props傳遞給路由組件中
- 參數:函數
<Route path='/home' component={()=><home/>} />
- 使用函數,可以寫條件判斷,根據條件來渲染不同的組件
- 可以通過props來完成父組件中的數據向路由渲染組件傳遞
- 缺點:每次匹配路由成功都會從新創建組件—效率低下,不建議使用
<Route path='/home' component={()=>{
    return <Home count={this.state.count}/>
}}/>
2、render
<Route path="/home" render={props=><Home />} />
- render方式渲染,使用函數方式
- 如果匹配相同,則不重新創建,效率高
- 建議如果組件對象方式渲染(函數方式)推薦使用render
<Route path='/home' render={()=>{
    if(this.state.count==1){
        return <Home1 count={this.state.count}/>
    }else{
        retutn <Home2/>
    }
}}/>
3、children
- 組件對象方式:必須匹配到path的路由規則才渲染和render與component一樣
<Route path="/about" children={<About />} /> - 函數方式:不管是否和path匹配都渲染
- match為null表示當前路由規則和path不匹配,如果為對象則匹配成功
<Route path="/about" children={match=>{
    if(match){
         return <div>children渲染</div>
     }
 }} />
3種渲染區別總結
比較一
- component:可以使用組件類渲染或內聯式方式渲染
- render:只能使用函數
- children:使用函數或直接使用組件對象
比較二
- component:內聯式渲染方式在每次匹配路由成功後都將創建一個新組件
- render,children不會,所以用內聯式方式建議使用後兩者,內聯方式渲染組件,推薦用render
比較三
- children的值是一個函數時,無論當前地址和path路徑匹不匹配,都將會執行children對應的函數,當children的值為一個組件時,當前地址和path不匹配時,路由組件不渲染
- children函數方式渲染,會在形參中接受到一個對象,對象中match屬性如果當前地址匹配成功返回對象,否則null
4、編程式路由導航
藉助this.prosp.history對象上的API對操作路由跳轉、前進、後退
- this.prosp.history.push()
- this.prosp.history.replace()
- this.prosp.history.goBack()
- this.prosp.history.goForward()
- this.prosp.history.go()
註:默認組件中沒有this.props.history方法,需要通過withRouter高階組件(裝飾器)來進行包裹,才能得到。
this.props.history.push(path)
或
this.props.history.push({
    pathname:'',
    search:'',
    state:{}
})
路由監聽
在App.jsx組件中可以添加路由監聽
constructor(props) {
    super(props);
    this.props.history.listen(route=>console.log(route))
}
5、withRouter高階組件
作用:把不是通過路由切換過來的組件中,將react-router 的 history、location、match 三個對象傳入props對象上
- 如果在你想在一般組件使用 路由組件所特有的API 時, 就要藉助 withRouter
- withRouter可以加工一般組件, 讓一般組件具備路由組件所特有的API
- withRouter的返回值是一個新組件
- 引入withRouter
import { withRouter} from 'react-router-dom' 執行一下withRouterexport default withRouter(Cmp)`
import React, { Component } from 'react'
import {withRouter} from 'react-router-dom'

 class Header extends Component {
    // 回退
    back = () => {
        this.props.history.goBack()
    }

    // 前進
    forward = () => {
        this.props.history.goForward()
    }

    /// go
    go = () => {
        this.props.history.go(2)
    }

    render() {
        // console.log('一般組件',this.props)
        return (
            <div className="page-header">
                <h2>React Router Demo</h2>
                <button onClick={this.back}>回退</button>
                <button onClick={this.forward}>前進</button>
                <button onClick={this.go}>go</button>
            </div>
        )
    }
}

export default withRouter(Header)
6、自定義路由
- 定義一個普通組件可以是類組件也可以是函數式組件
- 父組件能向子組件傳值 props
- 不管路由規則是否匹配都要顯示組件 Route children渲染方式(函數式)
- 注意點:react中組件是大寫字母開頭 html也是組件
import React from 'react'
import {withRouter,Route} from 'react-router-dom'
const MyLink = props=>{
    const gourl=()=>{
        props.history.push(props.to)
    }
    const Tag=props.tag||'a'
    const Active=props['active-class']||'router-active-class'
    return (
        <Route path={props.to} children={({match})=>{
            if(match){
                return <Tag style={{color:'red'}} Onclick={gourl}>{props.children}</Tag>
            }
            return <Tag onClick={gourl}>{props.children}</Tag>
        }}>
    )
}
export default withRouter(MyLink)
7、多級路由
在有一些功能中,往往請求地址的前綴是相同的,不同的只是後面一部份,此時就可以使用多級路由(路由嵌套)來實現此路由的定義實現。
例: 路由規則如下
admin/index
admin/user
當前組建的請求uri地址(父組件路由uri)
let pathname=this.props.match.path
return(
    <Link to=`${pathname}/index`>用戶首頁</Link>
    <Link to=`${pathname}/list`>用戶列表</Link>
    寫在admin組件內,admin組件通過route來進行渲染
    <Route path={`${pathname}/index`} component={main}/>
    <Route path={`${pathname}/list`} component={index}/>
)
8、重定向與404
-
重定向 from從哪裡來 to重定向到何處去
<Redirect from="/home" to="/" /> -
404設置
<Route component={Notfound} />
默認:匹配規則是從上項下的,一隻匹配下去
switch組件:解決一直匹配問題,只要有一個符合;路由規則就停止匹配
<Switch>
    <Route exact path='/news' component={index}/>
    <Route path='/news/:id' component={Newss}/>
    重定向from來源,to跳轉的頁面
    <Redirect exact from='/' to='/news'>
    <Route component={notFound}>
</Switch>
React Router 基本原理
React Router依賴於history.js,它是一個獨立的第三方js庫。可以用來兼容在不同瀏覽器、不同環境下對歷史記錄的管理,擁有統一的API。
- 老瀏覽器的history: 通過
hash來存儲在不同狀態下的history資訊,對應createHashHistory,通過檢測location.hash的值的變化,使用location.replace方法來實現url跳轉。通過註冊監聽window對象上的hashChange事件來監聽路由的變化,實現歷史記錄的回退。 - 高版本瀏覽器: 利用HTML5裡面的history,對應
createBrowserHistory, 使用包括pushState,replaceState方法來進行跳轉。通過註冊監聽window對象上的popstate事件來監聽路由的變化,實現歷史記錄的回退。 - node環境下: 在記憶體中進行歷史記錄的存儲,對應
createMemoryHistory。直接在記憶體里push和pop狀態。


