Spring Boot中如何自定義starter?
- 2021 年 11 月 15 日
- 筆記
- springboot
Spring Boot starter
我們知道Spring Boot大大簡化了項目初始搭建以及開發過程,而這些都是通過Spring Boot提供的starter來完成的。品達通用許可權系統就是基於Spring Boot進行開發,而且一些基礎模組其本質就是starter,所以我們需要對Spring Boot的starter有一個全面深入的了解,這是我們開發品達通用許可權系統的必備知識。
1 starter介紹
spring boot 在配置上相比spring要簡單許多, 其核心在於spring-boot-starter, 在使用spring boot來搭建一個項目時, 只需要引入官方提供的starter, 就可以直接使用, 免去了各種配置。starter簡單來講就是引入了一些相關依賴和一些初始化的配置。
Spring官方提供了很多starter,第三方也可以定義starter。為了加以區分,starter從名稱上進行了如下規範:
-
[ ] Spring官方提供的starter名稱為:spring-boot-starter-xxx
例如Spring官方提供的spring-boot-starter-web
-
[ ] 第三方提供的starter名稱為:xxx-spring-boot-starter
例如由mybatis提供的mybatis-spring-boot-starter
2 starter原理
Spring Boot之所以能夠幫我們簡化項目的搭建和開發過程,主要是基於它提供的起步依賴和自動配置。
2.1 起步依賴
起步依賴,其實就是將具備某種功能的坐標打包到一起,可以簡化依賴導入的過程。例如,我們導入spring-boot-starter-web這個starter,則和web開發相關的jar包都一起導入到項目中了。如下圖所示:

2.2 自動配置
自動配置,就是無須手動配置xml,自動配置並管理bean,可以簡化開發過程。那麼Spring Boot是如何完成自動配置的呢?
自動配置涉及到如下幾個關鍵步驟:
- 基於Java程式碼的Bean配置
- 自動配置條件依賴
- Bean參數獲取
- Bean的發現
- Bean的載入
我們可以通過一個實際的例子mybatis-spring-boot-starter來說明自動配置的實現過程。
2.2.1 基於Java程式碼的Bean配置
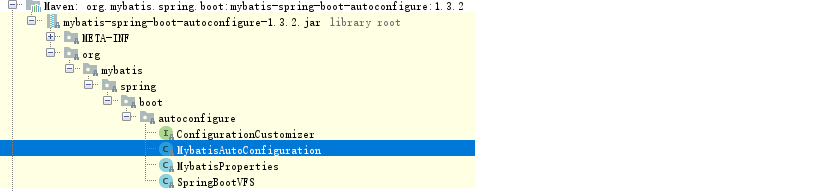
當我們在項目中導入了mybatis-spring-boot-starter這個jar後,可以看到它包括了很多相關的jar包,如下圖:

其中在mybatis-spring-boot-autoconfigure這個jar包中有如下一個MybatisAutoConfiguration自動配置類:
打開這個類,截取的關鍵程式碼如下:


@Configuration和@Bean這兩個註解一起使用就可以創建一個基於java程式碼的配置類,可以用來替代傳統的xml配置文件。
@Configuration 註解的類可以看作是能生產讓Spring IoC容器管理的Bean實例的工廠。
@Bean 註解的方法返回的對象可以被註冊到spring容器中。
所以上面的MybatisAutoConfiguration這個類,自動幫我們生成了SqlSessionFactory和SqlSessionTemplate這些Mybatis的重要實例並交給spring容器管理,從而完成bean的自動註冊。
2.2.2 自動配置條件依賴
從MybatisAutoConfiguration這個類中使用的註解可以看出,要完成自動配置是有依賴條件的。

所以要完成Mybatis的自動配置,需要在類路徑中存在SqlSessionFactory.class、SqlSessionFactoryBean.class這兩個類,同時需要存在DataSource這個bean且這個bean完成自動註冊。
這些註解是spring boot特有的,常見的條件依賴註解有:
| 註解 | 功能說明 |
|---|---|
| @ConditionalOnBean | 僅在當前上下文中存在某個bean時,才會實例化這個Bean |
| @ConditionalOnClass | 某個class位於類路徑上,才會實例化這個Bean |
| @ConditionalOnExpression | 當表達式為true的時候,才會實例化這個Bean |
| @ConditionalOnMissingBean | 僅在當前上下文中不存在某個bean時,才會實例化這個Bean |
| @ConditionalOnMissingClass | 某個class在類路徑上不存在的時候,才會實例化這個Bean |
| @ConditionalOnNotWebApplication | 不是web應用時才會實例化這個Bean |
| @AutoConfigureAfter | 在某個bean完成自動配置後實例化這個bean |
| @AutoConfigureBefore | 在某個bean完成自動配置前實例化這個bean |
2.2.3 Bean參數獲取
要完成mybatis的自動配置,需要我們在配置文件中提供數據源相關的配置參數,例如資料庫驅動、連接url、資料庫用戶名、密碼等。那麼spring boot是如何讀取yml或者properites配置文件的的屬性來創建數據源對象的?
在我們導入mybatis-spring-boot-starter這個jar包後會傳遞過來一個spring-boot-autoconfigure包,在這個包中有一個自動配置類DataSourceAutoConfiguration,如下所示:
!
我們可以看到這個類上加入了EnableConfigurationProperties這個註解,繼續跟蹤源碼到DataSourceProperties這個類,如下:

可以看到這個類上加入了ConfigurationProperties註解,這個註解的作用就是把yml或者properties配置文件中的配置參數資訊封裝到ConfigurationProperties註解標註的bean(即DataSourceProperties)的相應屬性上。
@EnableConfigurationProperties註解的作用是使@ConfigurationProperties註解生效。
2.2.4 Bean的發現
spring boot默認掃描啟動類所在的包下的主類與子類的所有組件,但並沒有包括依賴包中的類,那麼依賴包中的bean是如何被發現和載入的?
我們需要從Spring Boot項目的啟動類開始跟蹤,在啟動類上我們一般會加入SpringBootApplication註解,此註解的源碼如下:
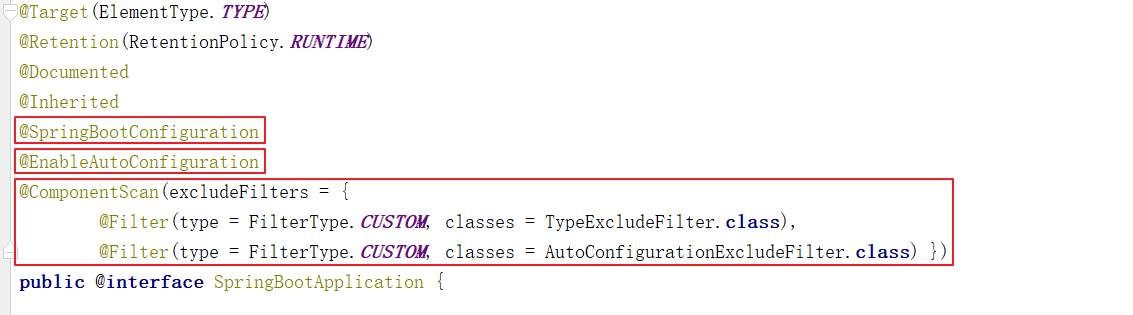
重點介紹如下三個註解:
SpringBootConfiguration:作用就相當於Configuration註解,被註解的類將成為一個bean配置類
ComponentScan:作用就是自動掃描並載入符合條件的組件,最終將這些bean載入到spring容器中
EnableAutoConfiguration :這個註解很重要,藉助@Import的支援,收集和註冊依賴包中相關的bean定義
繼續跟蹤EnableAutoConfiguration註解源碼:

@EnableAutoConfiguration註解引入了@Import這個註解。
Import:導入需要自動配置的組件,此處為EnableAutoConfigurationImportSelector這個類
EnableAutoConfigurationImportSelector類源碼如下:
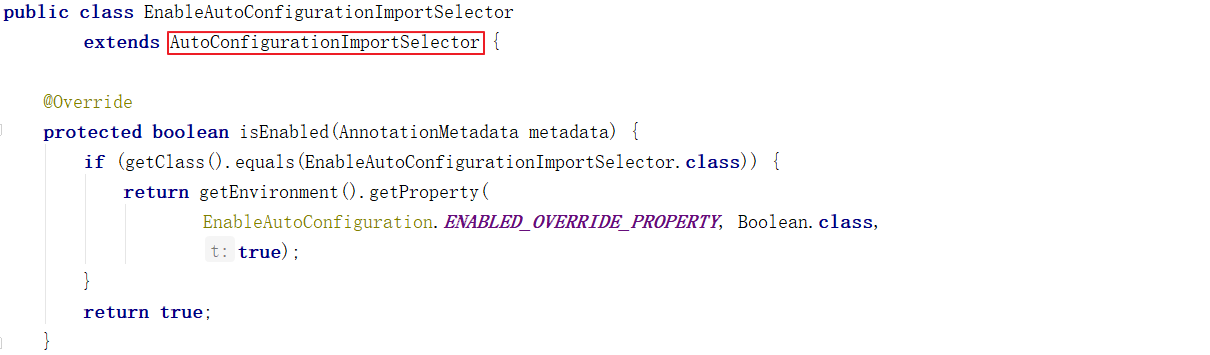
EnableAutoConfigurationImportSelector繼承了AutoConfigurationImportSelector類,繼續跟蹤AutoConfigurationImportSelector類源碼:

AutoConfigurationImportSelector類的getCandidateConfigurations方法中的調用了SpringFactoriesLoader類的loadFactoryNames方法,繼續跟蹤源碼:
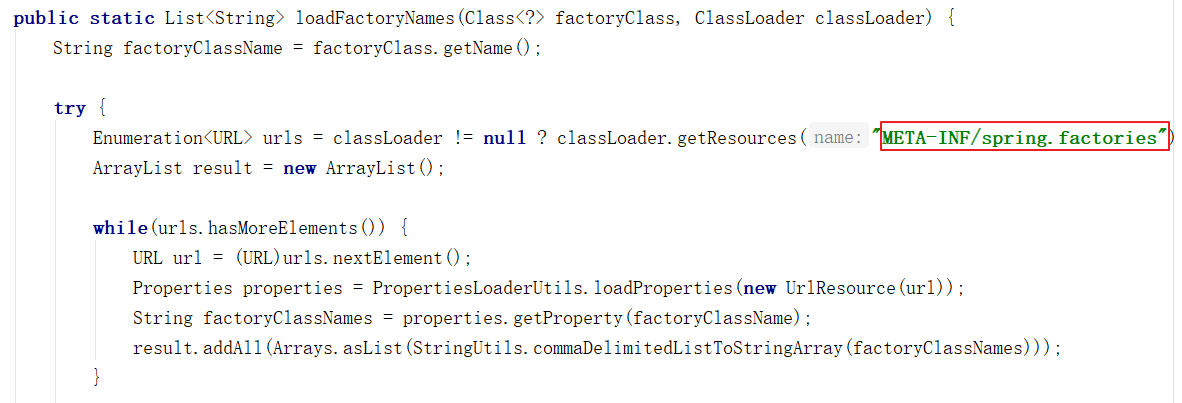
SpringFactoriesLoader的loadFactoryNames靜態方法可以從所有的jar包中讀取META-INF/spring.factories文件,而自動配置的類就在這個文件中進行配置:

spring.factories文件內容如下:
這樣Spring Boot就可以載入到MybatisAutoConfiguration這個配置類了。
2.2.5 Bean的載入
在Spring Boot應用中要讓一個普通類交給Spring容器管理,通常有以下方法:
1、使用 @Configuration與@Bean 註解
2、使用@Controller @Service @Repository @Component 註解標註該類並且啟用@ComponentScan自動掃描
3、使用@Import 方法
其中Spring Boot實現自動配置使用的是@Import註解這種方式,AutoConfigurationImportSelector類的selectImports方法返回一組從META-INF/spring.factories文件中讀取的bean的全類名,這樣Spring Boot就可以載入到這些Bean並完成實例的創建工作。
2.3 自動配置總結
我們可以將自動配置的關鍵幾步以及相應的註解總結如下:
1、@Configuration與@Bean:基於Java程式碼的bean配置
2、@Conditional:設置自動配置條件依賴
3、@EnableConfigurationProperties與@ConfigurationProperties:讀取配置文件轉換為bean
4、@EnableAutoConfiguration與@Import:實現bean發現與載入
3 自定義starter
本小節我們通過自定義兩個starter來加強starter的理解和應用。
3.1 案例一
3.1.1 開發starter
第一步:創建starter工程hello-spring-boot-starter並配置pom.xml文件
<?xml version="1.0" encoding="UTF-8"?>
<project xmlns="//maven.apache.org/POM/4.0.0"
         xmlns:xsi="//www.w3.org/2001/XMLSchema-instance"
         xsi:schemaLocation="//maven.apache.org/POM/4.0.0
                             //maven.apache.org/xsd/maven-4.0.0.xsd">
    <modelVersion>4.0.0</modelVersion>
    <parent>
        <groupId>org.springframework.boot</groupId>
        <artifactId>spring-boot-starter-parent</artifactId>
        <version>2.2.2.RELEASE</version>
        <relativePath/>
    </parent>
    <groupId>cn.pf</groupId>
    <artifactId>hello-spring-boot-starter</artifactId>
    <version>1.0-SNAPSHOT</version>
    <dependencies>
        <dependency>
            <groupId>org.springframework.boot</groupId>
            <artifactId>spring-boot-starter</artifactId>
        </dependency>
        <dependency>
            <groupId>org.springframework.boot</groupId>
            <artifactId>spring-boot-autoconfigure</artifactId>
        </dependency>
    </dependencies>
</project>
第二步:創建配置屬性類HelloProperties
package cn.pf.config;

import org.springframework.boot.context.properties.ConfigurationProperties;

/*
 *讀取配置文件轉換為bean
 * */
@ConfigurationProperties(prefix = "hello")
public class HelloProperties {
    private String name;
    private String address;

    public String getName() {
        return name;
    }

    public void setName(String name) {
        this.name = name;
    }

    public String getAddress() {
        return address;
    }

    public void setAddress(String address) {
        this.address = address;
    }

    @Override
    public String toString() {
        return "HelloProperties{" +
                "name='" + name + '\'' +
                ", address='" + address + '\'' +
                '}';
    }
}
第三步:創建服務類HelloService
package cn.pf.service;

public class HelloService {
    private String name;
    private String address;

    public HelloService(String name, String address) {
        this.name = name;
        this.address = address;
    }

    public String sayHello(){
        return "你好!我的名字叫 " + name + ",我來自 " + address;
    }
}
第四步:創建自動配置類HelloServiceAutoConfiguration
package cn.pf.config;

import cn.pf.service.HelloService;
import org.springframework.boot.autoconfigure.condition.ConditionalOnMissingBean;
import org.springframework.boot.context.properties.EnableConfigurationProperties;
import org.springframework.context.annotation.Bean;
import org.springframework.context.annotation.Configuration;

/*
* 配置類,基於Java程式碼的bean配置
* */

@Configuration
@EnableConfigurationProperties(HelloProperties.class)
public class HelloServiceAutoConfiguration {
    private HelloProperties helloProperties;

    //通過構造方法注入配置屬性對象HelloProperties
    public HelloServiceAutoConfiguration(HelloProperties helloProperties) {
        this.helloProperties = helloProperties;
    }

    //實例化HelloService並載入Spring IoC容器
    @Bean
    @ConditionalOnMissingBean
    public HelloService helloService(){
        return new HelloService(helloProperties.getName(),helloProperties.getAddress());
    }
}
第五步:在resources目錄下創建META-INF/spring.factories
org.springframework.boot.autoconfigure.EnableAutoConfiguration=\
cn.pf.config.HelloServiceAutoConfiguration
至此starter已經開發完成了,可以將當前starter安裝到本地maven倉庫供其他應用來使用。
3.1.2 使用starter
第一步:創建maven工程myapp並配置pom.xml文件
<?xml version="1.0" encoding="UTF-8"?>
<project xmlns="//maven.apache.org/POM/4.0.0"
         xmlns:xsi="//www.w3.org/2001/XMLSchema-instance"
         xsi:schemaLocation="//maven.apache.org/POM/4.0.0 //maven.apache.org/xsd/maven-4.0.0.xsd">
    <modelVersion>4.0.0</modelVersion>
    <parent>
        <groupId>org.springframework.boot</groupId>
        <artifactId>spring-boot-starter-parent</artifactId>
        <version>2.2.2.RELEASE</version>
        <relativePath/>
    </parent>
    <groupId>cn.pf</groupId>
    <artifactId>myapp</artifactId>
    <version>1.0-SNAPSHOT</version>
    <dependencies>
        <dependency>
            <groupId>org.springframework.boot</groupId>
            <artifactId>spring-boot-starter-web</artifactId>
        </dependency>
        <!--導入自定義starter-->
        <dependency>
            <groupId>cn.pf</groupId>
            <artifactId>hello-spring-boot-starter</artifactId>
            <version>1.0-SNAPSHOT</version>
        </dependency>
    </dependencies>
</project>
第二步:創建application.yml文件
server:
  port: 8080
hello:
  name: xiaoming
  address: beijing
第三步:創建HelloController
package cn.pf.controller;

import cn.pf.service.HelloService;
import org.springframework.beans.factory.annotation.Autowired;
import org.springframework.web.bind.annotation.GetMapping;
import org.springframework.web.bind.annotation.RequestMapping;
import org.springframework.web.bind.annotation.RestController;

@RestController
@RequestMapping("/hello")
public class HelloController {
    //HelloService在我們自定義的starter中已經完成了自動配置,所以此處可以直接注入
    @Autowired
    private HelloService helloService;

    @GetMapping("/say")
    public String sayHello(){
        return helloService.sayHello();
    }
}
第四步:創建啟動類HelloApplication
package cn.pf;

import org.springframework.boot.SpringApplication;
import org.springframework.boot.autoconfigure.SpringBootApplication;

@SpringBootApplication
public class HelloApplication {
    public static void main(String[] args) {
        SpringApplication.run(HelloApplication.class,args);
    }
}
執行啟動類main方法,訪問地址//localhost:8080/hello/say

3.2 案例二
在前面的案例一中我們通過定義starter,自動配置了一個HelloService實例。本案例我們需要通過自動配置來創建一個攔截器對象,通過此攔截器對象來實現記錄日誌功能。
我們可以在案例一的基礎上繼續開發案例二。
3.2.1 開發starter
第一步:在hello-spring-boot-starter的pom.xml文件中追加如下maven坐標
<dependency>
    <groupId>org.springframework.boot</groupId>
    <artifactId>spring-boot-starter-web</artifactId>
    <optional>true</optional>
</dependency>
<dependency>
    <groupId>org.springframework.boot</groupId>
    <artifactId>spring-boot-configuration-processor</artifactId>
</dependency>
第二步:自定義MyLog註解
package cn.pf.log;

import java.lang.annotation.ElementType;
import java.lang.annotation.Retention;
import java.lang.annotation.RetentionPolicy;
import java.lang.annotation.Target;

@Target(ElementType.METHOD)
@Retention(RetentionPolicy.RUNTIME)
public @interface MyLog {
    /**
     * 方法描述
     */
    String desc() default "";
}
第三步:自定義日誌攔截器MyLogInterceptor
package cn.pf.log;

import org.springframework.web.method.HandlerMethod;
import org.springframework.web.servlet.ModelAndView;
import org.springframework.web.servlet.handler.HandlerInterceptorAdapter;
import javax.servlet.http.HttpServletRequest;
import javax.servlet.http.HttpServletResponse;
import java.lang.reflect.Method;

/**
 * 日誌攔截器
 */
public class MyLogInterceptor extends HandlerInterceptorAdapter {
    private static final ThreadLocal<Long> startTimeThreadLocal = new ThreadLocal<>();

    public boolean preHandle(HttpServletRequest request, HttpServletResponse response,
                             Object handler) throws Exception {
        HandlerMethod handlerMethod = (HandlerMethod)handler;
        Method method = handlerMethod.getMethod();//獲得被攔截的方法對象
        MyLog myLog = method.getAnnotation(MyLog.class);//獲得方法上的註解
        if(myLog != null){
            //方法上加了MyLog註解,需要進行日誌記錄
            long startTime = System.currentTimeMillis();
            startTimeThreadLocal.set(startTime);
        }
        return true;
    }

    public void postHandle(HttpServletRequest request, HttpServletResponse response,
                           Object handler, ModelAndView modelAndView) throws Exception {
        HandlerMethod handlerMethod = (HandlerMethod)handler;
        Method method = handlerMethod.getMethod();//獲得被攔截的方法對象
        MyLog myLog = method.getAnnotation(MyLog.class);//獲得方法上的註解
        if(myLog != null){
            //方法上加了MyLog註解,需要進行日誌記錄
            long endTime = System.currentTimeMillis();
            Long startTime = startTimeThreadLocal.get();
            long optTime = endTime - startTime;

            String requestUri = request.getRequestURI();
            String methodName = method.getDeclaringClass().getName() + "." +
                				method.getName();
            String methodDesc = myLog.desc();

            System.out.println("請求uri:" + requestUri);
            System.out.println("請求方法名:" + methodName);
            System.out.println("方法描述:" + methodDesc);
            System.out.println("方法執行時間:" + optTime + "ms");
        }
    }
}
第四步:創建自動配置類MyLogAutoConfiguration,用於自動配置攔截器、參數解析器等web組件
package cn.pf.config;

import cn.pf.log.MyLogInterceptor;
import org.springframework.context.annotation.Configuration;
import org.springframework.web.servlet.config.annotation.InterceptorRegistry;
import org.springframework.web.servlet.config.annotation.WebMvcConfigurer;

/**
 * 配置類,用於自動配置攔截器、參數解析器等web組件
 */

@Configuration
public class MyLogAutoConfiguration implements WebMvcConfigurer{
    //註冊自定義日誌攔截器
    public void addInterceptors(InterceptorRegistry registry) {
        registry.addInterceptor(new MyLogInterceptor());
    }
}
第五步:在spring.factories中追加MyLogAutoConfiguration配置
org.springframework.boot.autoconfigure.EnableAutoConfiguration=\
cn.pf.config.HelloServiceAutoConfiguration,\
cn.pf.config.MyLogAutoConfiguration
注意:我們在hello-spring-boot-starter中追加了新的內容,需要重新打包安裝到maven倉庫。
3.2.2 使用starter
在myapp工程的Controller方法上加入@MyLog註解
package cn.pf.controller;

import cn.pf.log.MyLog;
import cn.pf.service.HelloService;
import org.springframework.beans.factory.annotation.Autowired;
import org.springframework.web.bind.annotation.GetMapping;
import org.springframework.web.bind.annotation.RequestMapping;
import org.springframework.web.bind.annotation.RestController;

@RestController
@RequestMapping("/hello")
public class HelloController {
    //HelloService在我們自定義的starter中已經完成了自動配置,所以此處可以直接注入
    @Autowired
    private HelloService helloService;

    @MyLog(desc = "sayHello方法") //日誌記錄註解
    @GetMapping("/say")
    public String sayHello(){
        return helloService.sayHello();
    }
}
訪問地址://localhost:8080/hello/say
,查看控制台輸出:
請求uri:/hello/say
請求方法名:cn.pf.controller.HelloController.sayHello
方法描述:sayHello方法
方法執行時間:36ms

