Netty數據如何在 pipeline 中流動
- 2021 年 11 月 11 日
- 筆記
前言
在之前文章中,我們已經了解了pipeline在netty中所處的角色,像是一條流水線,控制著位元組流的讀寫,本文,我們在這個基礎上繼續深挖pipeline在事件傳播
Unsafe對象
顧名思義,unsafe是不安全的意思,就是告訴你不要在應用程式裡面直接使用Unsafe以及他的衍生類對象。
netty官方的解釋如下
❝
Unsafe operations that should never be called from user-code. These methods are only provided to implement the actual transport, and must be invoked from an I/O thread
❞
Unsafe 在Channel定義,屬於Channel的內部類,表明Unsafe和Channel密切相關
下面是unsafe介面的所有方法
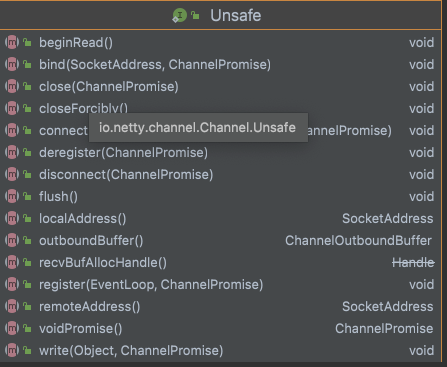
按功能可以分為分配記憶體,Socket四元組資訊,註冊事件循環,綁定網卡埠,Socket的連接和關閉,Socket的讀寫,看的出來,這些操作都是和jdk底層相關
Unsafe 繼承結構
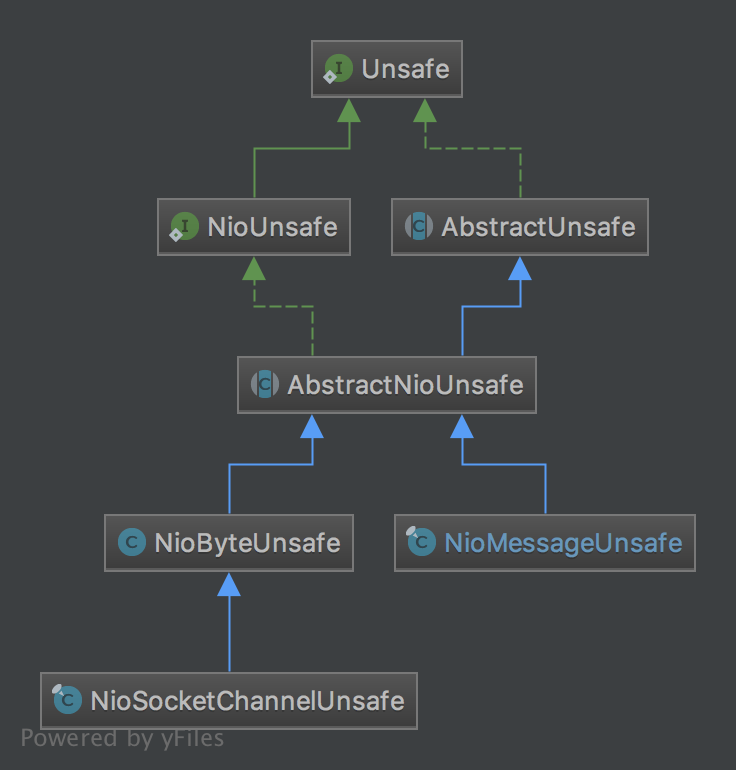
NioUnsafe 在 Unsafe基礎上增加了以下幾個介面
public interface NioUnsafe extends Unsafe {
    SelectableChannel ch();
    void finishConnect();
    void read();
    void forceFlush();
}
從增加的介面以及類名上來看,NioUnsafe 增加了可以訪問底層jdk的SelectableChannel的功能,定義了從SelectableChannel讀取數據的read方法
Unsafe的分類:
從以上繼承結構來看,我們可以總結出兩種類型的Unsafe分類,一個是與連接的位元組數據讀寫相關的NioByteUnsafe(後面講解),一個是與新連接建立操作相關的NioMessageUnsafe(之前文章講過)
「NioByteUnsafe中的讀:委託到外部類NioSocketChannel」
protected int doReadBytes(ByteBuf byteBuf) throws Exception {
    final RecvByteBufAllocator.Handle allocHandle = unsafe().recvBufAllocHandle();
    allocHandle.attemptedBytesRead(byteBuf.writableBytes());
    return byteBuf.writeBytes(javaChannel(), allocHandle.attemptedBytesRead());
}
最後一行已經與jdk底層以及netty中的ByteBuf相關,將jdk的 SelectableChannel的位元組數據讀取到netty的ByteBuf中
「NioMessageUnsafe中的讀:委託到外部類NioSocketChannel」
protected int doReadMessages(List<Object> buf) throws Exception {
    SocketChannel ch = javaChannel().accept();

    if (ch != null) {
        buf.add(new NioSocketChannel(this, ch));
        return 1;
    }
    return 0;
}
用於處理鏈接事件,之前分析過。
「NioByteUnsafe中的寫:委託到外部類NioSocketChannel」
@Override
protected int doWriteBytes(ByteBuf buf) throws Exception {
    final int expectedWrittenBytes = buf.readableBytes();
    return buf.readBytes(javaChannel(), expectedWrittenBytes);
}
最後一行已經與jdk底層以及netty中的ByteBuf相關,將netty的ByteBuf中的位元組數據寫到jdk的 SelectableChannel中
pipeline中的head
「NioEventLoop」
private void processSelectedKey(SelectionKey k, AbstractNioChannel ch) {
     final AbstractNioChannel.NioUnsafe unsafe = ch.unsafe();
     //新連接的已準備接入或者已存在的連接有數據可讀
     if ((readyOps & (SelectionKey.OP_READ | SelectionKey.OP_ACCEPT)) != 0 || readyOps == 0) {
         unsafe.read();
     }
}
「NioByteUnsafe」
@Override
public final void read() {
    final ChannelConfig config = config();
    final ChannelPipeline pipeline = pipeline();
    // 創建ByteBuf分配器
    final ByteBufAllocator allocator = config.getAllocator();
    final RecvByteBufAllocator.Handle allocHandle = recvBufAllocHandle();
    allocHandle.reset(config);

    ByteBuf byteBuf = null;
    do {
        // 分配一個ByteBuf
        byteBuf = allocHandle.allocate(allocator);
        // 將數據讀取到分配的ByteBuf中去
        allocHandle.lastBytesRead(doReadBytes(byteBuf));
        if (allocHandle.lastBytesRead() <= 0) {
            byteBuf.release();
            byteBuf = null;
            close = allocHandle.lastBytesRead() < 0;
            break;
        }

        // 觸發事件,將會引發pipeline的讀事件傳播
        pipeline.fireChannelRead(byteBuf);
        byteBuf = null;
    } while (allocHandle.continueReading());
    pipeline.fireChannelReadComplete();
}
同樣,我抽出了核心程式碼,細枝末節先剪去,NioByteUnsafe 要做的事情可以簡單地分為以下幾個步驟
-
拿到Channel的config之後拿到ByteBuf分配器,用分配器來分配一個ByteBuf,ByteBuf是netty裡面的位元組數據載體,後面讀取的數據都讀到這個對象裡面 -
將Channel中的數據讀取到ByteBuf -
數據讀完之後,調用 pipeline.fireChannelRead(byteBuf); 從head節點開始傳播至整個pipeline -
最後調用fireChannelReadComplete();
這裡,我們的重點其實就是 pipeline.fireChannelRead(byteBuf);
「DefaultChannelPipeline」
final AbstractChannelHandlerContext head;
//...
head = new HeadContext(this);

public final ChannelPipeline fireChannelRead(Object msg) {
    AbstractChannelHandlerContext.invokeChannelRead(head, msg);
    return this;
}
結合這幅圖
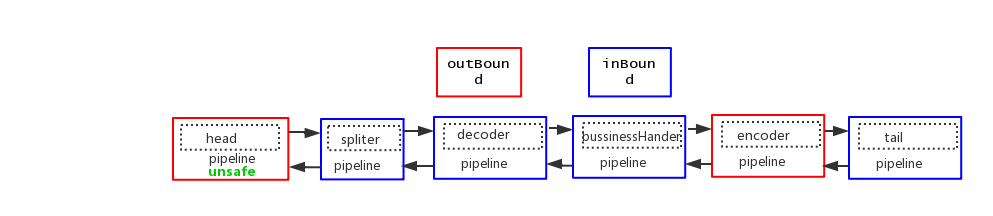
可以看到,數據從head節點開始流入,在進行下一步之前,我們先把head節點的功能過一遍
「HeadContext」
final class HeadContext extends AbstractChannelHandlerContext
        implements ChannelOutboundHandler, ChannelInboundHandler {

    private final Unsafe unsafe;

    HeadContext(DefaultChannelPipeline pipeline) {
        super(pipeline, null, HEAD_NAME, false, true);
        unsafe = pipeline.channel().unsafe();
        setAddComplete();
    }

    @Override
    public ChannelHandler handler() {
        return this;
    }

    @Override
    public void handlerAdded(ChannelHandlerContext ctx) throws Exception {
        // NOOP
    }

    @Override
    public void handlerRemoved(ChannelHandlerContext ctx) throws Exception {
        // NOOP
    }

    @Override
    public void bind(
            ChannelHandlerContext ctx, SocketAddress localAddress, ChannelPromise promise)
            throws Exception {
        unsafe.bind(localAddress, promise);
    }

    @Override
    public void connect(
            ChannelHandlerContext ctx,
            SocketAddress remoteAddress, SocketAddress localAddress,
            ChannelPromise promise) throws Exception {
        unsafe.connect(remoteAddress, localAddress, promise);
    }

    @Override
    public void disconnect(ChannelHandlerContext ctx, ChannelPromise promise) throws Exception {
        unsafe.disconnect(promise);
    }

    @Override
    public void close(ChannelHandlerContext ctx, ChannelPromise promise) throws Exception {
        unsafe.close(promise);
    }

    @Override
    public void deregister(ChannelHandlerContext ctx, ChannelPromise promise) throws Exception {
        unsafe.deregister(promise);
    }

    @Override
    public void read(ChannelHandlerContext ctx) {
        unsafe.beginRead();
    }

    @Override
    public void write(ChannelHandlerContext ctx, Object msg, ChannelPromise promise) throws Exception {
        unsafe.write(msg, promise);
    }

    @Override
    public void flush(ChannelHandlerContext ctx) throws Exception {
        unsafe.flush();
    }

    @Override
    public void exceptionCaught(ChannelHandlerContext ctx, Throwable cause) throws Exception {
        ctx.fireExceptionCaught(cause);
    }

    @Override
    public void channelRegistered(ChannelHandlerContext ctx) throws Exception {
        invokeHandlerAddedIfNeeded();
        ctx.fireChannelRegistered();
    }

    @Override
    public void channelUnregistered(ChannelHandlerContext ctx) throws Exception {
        ctx.fireChannelUnregistered();

        // Remove all handlers sequentially if channel is closed and unregistered.
        if (!channel.isOpen()) {
            destroy();
        }
    }

    @Override
    public void channelActive(ChannelHandlerContext ctx) throws Exception {
        ctx.fireChannelActive();

        readIfIsAutoRead();
    }

    @Override
    public void channelInactive(ChannelHandlerContext ctx) throws Exception {
        ctx.fireChannelInactive();
    }

    @Override
    public void channelRead(ChannelHandlerContext ctx, Object msg) throws Exception {
        ctx.fireChannelRead(msg);
    }

    @Override
    public void channelReadComplete(ChannelHandlerContext ctx) throws Exception {
        ctx.fireChannelReadComplete();

        readIfIsAutoRead();
    }

    private void readIfIsAutoRead() {
        if (channel.config().isAutoRead()) {
            channel.read();
        }
    }

    @Override
    public void userEventTriggered(ChannelHandlerContext ctx, Object evt) throws Exception {
        ctx.fireUserEventTriggered(evt);
    }

    @Override
    public void channelWritabilityChanged(ChannelHandlerContext ctx) throws Exception {
        ctx.fireChannelWritabilityChanged();
    }
}
從head節點繼承的兩個介面看,TA既是一個ChannelHandlerContext,同時又屬於inBound和outBound Handler
在傳播讀寫事件的時候,head的功能只是簡單地將事件傳播下去,如ctx.fireChannelRead(msg);
在真正執行讀寫操作的時候,例如在調用writeAndFlush()等方法的時候,最終都會委託到unsafe執行,而當一次數據讀完,channelReadComplete方法會被調用
pipeline中的inBound事件傳播
我們接著上面的 AbstractChannelHandlerContext.invokeChannelRead(head, msg); 這個靜態方法看,參數傳入了 head,我們知道入站數據都是從 head 開始的,以保證後面所有的 handler 都由機會處理數據流。
我們看看這個靜態方法內部是怎麼樣的:
static void invokeChannelRead(final AbstractChannelHandlerContext next, Object msg) {
    final Object m = next.pipeline.touch(ObjectUtil.checkNotNull(msg, "msg"), next);
    EventExecutor executor = next.executor();
    if (executor.inEventLoop()) {
        next.invokeChannelRead(m);
    } else {
        executor.execute(new Runnable() {
            public void run() {
                next.invokeChannelRead(m);
            }
        });
    }
}
調用這個 Context (也就是 head) 的 invokeChannelRead 方法,並傳入數據。我們再看看head中 invokeChannelRead 方法的實現,實際上是在headContext的父類AbstractChannelHandlerContext中:
「AbstractChannelHandlerContext」
private void invokeChannelRead(Object msg) {
    if (invokeHandler()) {
        try {
            ((ChannelInboundHandler) handler()).channelRead(this, msg);
        } catch (Throwable t) {
            notifyHandlerException(t);
        }
    } else {
        fireChannelRead(msg);
    }
}

public ChannelHandler handler() {
    return this;
}
上面 handler()就是headContext中的handler,也就是headContext自身,也就是調用 head 的 channelRead 方法。那麼這個方法是怎麼實現的呢?
@Override
public void channelRead(ChannelHandlerContext ctx, Object msg) throws Exception {
    ctx.fireChannelRead(msg);
}
什麼都沒做,調用 Context 的 fire 系列方法,將請求轉發給下一個節點。我們這裡是 fireChannelRead 方法,注意,這裡方法名字都挺像的。需要細心區分。下面我們看看 Context 的成員方法 fireChannelRead:
「AbstractChannelHandlerContext」
@Override
public ChannelHandlerContext fireChannelRead(final Object msg) {
    invokeChannelRead(findContextInbound(), msg);
    return this;
}
這個是 head 的抽象父類 AbstractChannelHandlerContext 的實現,該方法再次調用了靜態 fire 系列方法,但和上次不同的是,不再放入 head 參數了,而是使用 findContextInbound 方法的返回值。從這個方法的名字可以看出,是找到入站類型的 handler。我們看看方法實現:
private AbstractChannelHandlerContext findContextInbound() {
    AbstractChannelHandlerContext ctx = this;
    do {
        ctx = ctx.next;
    } while (!ctx.inbound);
    return ctx;
}
該方法很簡單,找到當前 Context 的 next 節點(inbound 類型的)並返回。這樣就能將請求傳遞給後面的 inbound handler 了。我們來看看 invokeChannelRead(findContextInbound(), msg);
static void invokeChannelRead(final AbstractChannelHandlerContext next, Object msg) {
    final Object m = next.pipeline.touch(ObjectUtil.checkNotNull(msg, "msg"), next);
    EventExecutor executor = next.executor();
    if (executor.inEventLoop()) {
        next.invokeChannelRead(m);
    } else {
        executor.execute(new Runnable() {
            public void run() {
                next.invokeChannelRead(m);
            }
        });
    }

}
上面我們找到了next節點(inbound類型的),然後直接調用 next.invokeChannelRead(m);如果這個next是我們自定義的handler,此時我們自定義的handler的父類是AbstractChannelHandlerContext,則又回到了AbstractChannelHandlerContext中實現的invokeChannelRead,程式碼如下:
「AbstractChannelHandlerContext」
private void invokeChannelRead(Object msg) {
    if (invokeHandler()) {
        try {
            ((ChannelInboundHandler) handler()).channelRead(this, msg);
        } catch (Throwable t) {
            notifyHandlerException(t);
        }
    } else {
        fireChannelRead(msg);
    }
}

public ChannelHandler handler() {
    return this;
}
此時的handler()就是我們自定義的handler了,然後調用我們自定義handler中的 channelRead(this, msg);
請求進來時,pipeline 會從 head 節點開始輸送,通過配合 invoker 介面的 fire 系列方法,實現 Context 鏈在 pipeline 中的完美傳遞。最終到達我們自定義的 handler。
❝
此時如果我們想繼續向後傳遞該怎麼辦呢?我們前面說過,可以調用 Context 的 fire 系列方法,就像 head 的 channelRead 方法一樣,調用 fire 系列方法,直接向後傳遞就 ok 了。
❞
如果所有的handler都調用了fire系列方法,則會傳遞到最後一個inbound類型的handler,也就是——tail節點,那我們就來看看tail節點
pipeline中的tail
final class TailContext extends AbstractChannelHandlerContext implements ChannelInboundHandler {

    TailContext(DefaultChannelPipeline pipeline) {
        super(pipeline, null, TAIL_NAME, true, false);
        setAddComplete();
    }

    @Override
    public ChannelHandler handler() {
        return this;
    }

    @Override
    public void channelRegistered(ChannelHandlerContext ctx) throws Exception { }

    @Override
    public void channelUnregistered(ChannelHandlerContext ctx) throws Exception { }

    @Override
    public void channelActive(ChannelHandlerContext ctx) throws Exception { }

    @Override
    public void channelInactive(ChannelHandlerContext ctx) throws Exception { }

    @Override
    public void channelWritabilityChanged(ChannelHandlerContext ctx) throws Exception { }

    @Override
    public void handlerAdded(ChannelHandlerContext ctx) throws Exception { }

    @Override
    public void handlerRemoved(ChannelHandlerContext ctx) throws Exception { }

    @Override
    public void userEventTriggered(ChannelHandlerContext ctx, Object evt) throws Exception {
        // This may not be a configuration error and so don't log anything.
        // The event may be superfluous for the current pipeline configuration.
        ReferenceCountUtil.release(evt);
    }

    @Override
    public void exceptionCaught(ChannelHandlerContext ctx, Throwable cause) throws Exception {
        onUnhandledInboundException(cause);
    }

    @Override
    public void channelRead(ChannelHandlerContext ctx, Object msg) throws Exception {
        onUnhandledInboundMessage(msg);
    }

    @Override
    public void channelReadComplete(ChannelHandlerContext ctx) throws Exception { }
}
正如我們前面所提到的,tail節點的大部分作用即終止事件的傳播(方法體為空)
「channelRead」
protected void onUnhandledInboundMessage(Object msg) {
    try {
        logger.debug(
                "Discarded inbound message {} that reached at the tail of the pipeline. " +
                        "Please check your pipeline configuration.", msg);
    } finally {
        ReferenceCountUtil.release(msg);
    }
}
tail節點在發現位元組數據(ByteBuf)或者decoder之後的業務對象在pipeline流轉過程中沒有被消費,落到tail節點,tail節點就會給你發出一個警告,告訴你,我已經將你未處理的數據給丟掉了
總結一下,tail節點的作用就是結束事件傳播,並且對一些重要的事件做一些善意提醒.
pipeline中的outBound事件傳播
上一節中,我們在闡述tail節點的功能時,忽略了其父類AbstractChannelHandlerContext所具有的功能,這一節中,我們以最常見的writeAndFlush操作來看下pipeline中的outBound事件是如何向外傳播的
典型的消息推送系統中,會有類似下面的一段程式碼
Channel channel = getChannel(userInfo);
channel.writeAndFlush(pushInfo);
這段程式碼的含義就是根據用戶資訊拿到對應的Channel,然後給用戶推送消息,跟進 channel.writeAndFlush
public ChannelFuture writeAndFlush(Object msg) {
    return pipeline.writeAndFlush(msg);
}
從pipeline開始往外傳播
public final ChannelFuture writeAndFlush(Object msg) {
    return tail.writeAndFlush(msg);
}
Channel 中大部分outBound事件都是從tail開始往外傳播, writeAndFlush()方法是tail繼承而來的方法,我們跟進去
「AbstractChannelHandlerContext」
public ChannelFuture writeAndFlush(Object msg) {
    return writeAndFlush(msg, newPromise());
}

public ChannelFuture writeAndFlush(Object msg, ChannelPromise promise) {
    write(msg, true, promise);

    return promise;
}
「AbstractChannelHandlerContext」
private void write(Object msg, boolean flush, ChannelPromise promise) {
    AbstractChannelHandlerContext next = findContextOutbound();
    final Object m = pipeline.touch(msg, next);
    EventExecutor executor = next.executor();
    if (executor.inEventLoop()) {
        if (flush) {
            next.invokeWriteAndFlush(m, promise);
        } else {
            next.invokeWrite(m, promise);
        }
    } else {
        AbstractWriteTask task;
        if (flush) {
            task = WriteAndFlushTask.newInstance(next, m, promise);
        }  else {
            task = WriteTask.newInstance(next, m, promise);
        }
        safeExecute(executor, task, promise, m);
    }
}
先調用findContextOutbound()方法找到下一個outBound()節點
「AbstractChannelHandlerContext」
private AbstractChannelHandlerContext findContextOutbound() {
    AbstractChannelHandlerContext ctx = this;
    do {
        ctx = ctx.prev;
    } while (!ctx.outbound);
    return ctx;
}
找outBound節點的過程和找inBound節點類似,反方向遍歷pipeline中的雙向鏈表,直到第一個outBound節點next,然後調用next.invokeWriteAndFlush(m, promise)
「AbstractChannelHandlerContext」
private void invokeWriteAndFlush(Object msg, ChannelPromise promise) {
    if (invokeHandler()) {
        invokeWrite0(msg, promise);
        invokeFlush0();
    } else {
        writeAndFlush(msg, promise);
    }
}
調用該節點的ChannelHandler的write方法,flush方法我們暫且忽略,後面會專門講writeAndFlush的完整流程
「AbstractChannelHandlerContext」
private void invokeWrite0(Object msg, ChannelPromise promise) {
    try {
        ((ChannelOutboundHandler) handler()).write(this, msg, promise);
    } catch (Throwable t) {
        notifyOutboundHandlerException(t, promise);
    }
}
可以看到,數據開始出站,從後向前開始流動,和入站的方向是反的。那麼最後會走到哪裡呢,當然是走到 head 節點,因為 head 節點就是 outbound 類型的 handler。
「HeadContext」
public void write(ChannelHandlerContext ctx, Object msg, ChannelPromise promise) throws Exception {
    unsafe.write(msg, promise);
}
調用了 底層的 unsafe 操作數據,這裡,加深了我們對head節點的理解,即所有的數據寫出都會經過head節點
當執行完這個 write 方法後,方法開始退棧。逐步退到 unsafe 的 read 方法,回到最初開始的地方,然後繼續調用 pipeline.fireChannelReadComplete() 方法。
總結
-
調用 pipeline 的 fire 系列方法,這些方法是介面 invoker 設計的,pipeline 實現了 invoker 的所有方法,inbound 事件從 head 開始流入,outbound 事件從 tail 開始流出。 -
pipeline 會將請求交給 Context,然後 Context 通過抽象父類 AbstractChannelHandlerContext 的 invoke 系列方法(靜態和非靜態的)配合 AbstractChannelHandlerContext 的 fire 系列方法再配合 findContextInbound 和 findContextOutbound 方法完成各個 Context 的數據流轉。 -
當入站過程中,調用 了出站的方法,那麼請求就不會向後走了。後面的處理器將不會有任何作用。想繼續相會傳遞就調用 Context 的 fire 系列方法,讓 Netty 在內部幫你傳遞數據到下一個節點。如果你想在整個通道傳遞,就在 handler 中調用 channel 或者 pipeline 的對應方法,這兩個方法會將數據從頭到尾或者從尾到頭的流轉一遍。
結束
❝
識別下方二維碼!回復: 「
入群」 ,掃碼加入我們交流群!
❞