微服務之十四如何在 Ocelot 網關中配置多實例 Swagger 訪問
一、介紹
當我們開發基於微服務的應用程式的時候,有一個環節總是跳不過去的,那就是要創建 WebApi,然後,我們的應用程式基於 WebApi 介面去訪問。在沒有 Swagger 以前,我們開發好了 Web API 介面,也要寫大量的介面文檔。不寫不行嗎?當然不行,如果你不寫這些文檔,別人如何使用你的介面呢?難道每個介面都要和寫介面的人進行溝通嗎?那溝通成本就太大了,也浪費了不必要的時間。只從我們有了 Swagger 後,只需要簡單的配置一下,就可以生成有關介面的詳細文檔,並且,可以調用執行,對於使用的人和開發的人都省去了不少力氣。
但是,我們現在有一個問題,在我們的解決方案中,有多個 WebApi 的實常式序,並且每個 API 的實常式序都配置了自己的 Swagger ,方便使用。但是這樣也出現了另外一個問題,我們有多個 API 實常式序,每個實常式序都對應一個 Swagger 程式,我們要訪問的時候,該怎麼操作呢?很多人就會說,訪問哪個就打開哪個的 Swagger 程式,當然,如果你不怕繁瑣,當然可以這麼做。既然這麼繁瑣,別人也肯定遇到過,那針對這個問題,肯定就有相應的解決方案。
說起解決方案,其實,我們也很容易想起來。我們創建一個公共的、基於 WebAPI 的網關項目,在這個網關項目里,我們配置 Swagger,然後,通過訪問網關的 Swagger 就可以訪問各個 API 實常式序的 Swagger 。
二、開始我們
廢話不多說,我們就開始,我們今天的配置和演示。這個解決方案的項目數不多,有3個 WEB API 的項目,他們都是基於 Net 5.0的,可以跨平台的。在這個解決方案中,由於我們要使用到服務發現和網關的配置,需要在各個需要的項目中引入 Consul、Swashbuckle.AspNetCore、 Ocelot 和 Ocelot.Provider.Consul 等項目。具體操作如下:
1、準備工作。
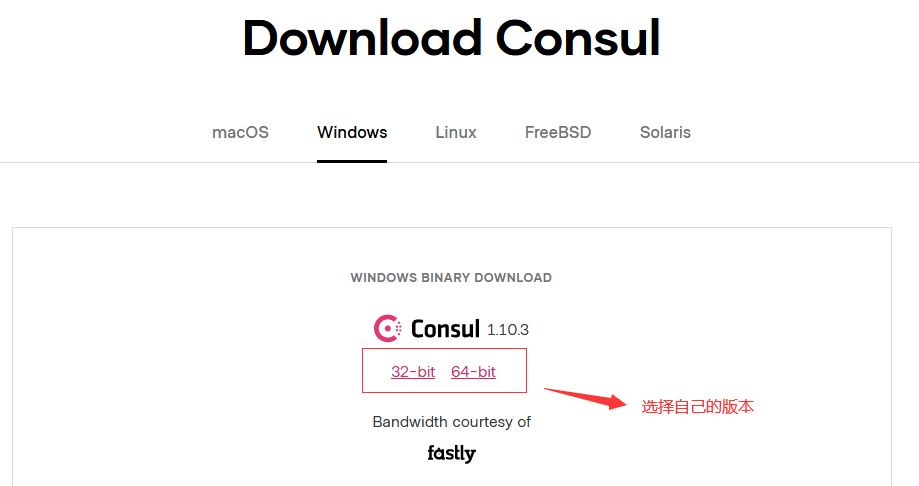
我們在開始我們的項目之前,需要現在 Consul,我這裡下載的 Windows 64 位版本的,因為這個是測試的,如果在生產環境,可以根據需要下載 Linux 版本。
下載地址://www.consul.io/downloads
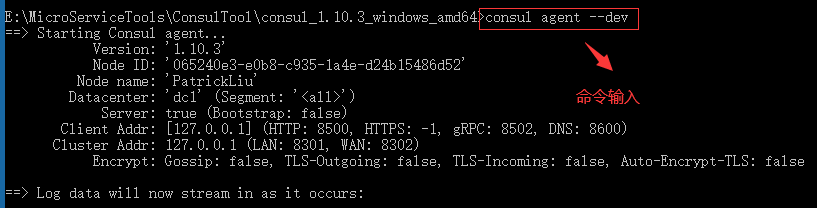
啟動Consul 服務的命令也很簡單,在下載目錄裡面,在地址欄里輸入:cmd回車,打開命令窗口。然後輸入命令:consul agent -dev。截圖如下:
2、項目源碼
1】、第一個 WABAPI 實常式序。
(1)、項目截圖
(2)、項目源碼
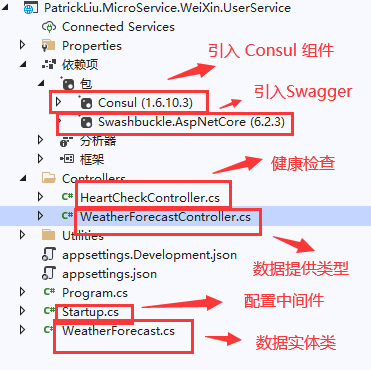
由於該項目使用了 Consul 進行服務發現管理,在項目創建之初,必須通過 Nuget 安裝 Consul 組件,同時也必須引入 Swashbuckle.AspNetCore ,它支援對 Swagger 的實現。
A、創建一個 WebAPI 的項目,項目名稱是:PatrickLiu.MicroService.WeiXin.UserService。
B、通過Nuget 分別引入:Consul 和 Swashbuckle.AspNetCore 組件包。
C、擴展 Consul 服務,在根目錄下,創建一個 Utilities 文件,在該文件夾下創建一個類:ConsulManager.cs


 1 using Consul;
 2 using Microsoft.AspNetCore.Builder;
 3 using Microsoft.Extensions.Configuration;
 4 using System;
 5
 6 namespace PatrickLiu.MicroService.WeiXin.UserService.Utilities
 7 {
 8     /// <summary>
 9     /// 該類型擴展了 IApplicationBuilder 類型,用於實現 Consul 的服務註冊的工作。
10     /// </summary>
11     public static class ConsulManager
12     {
13         /// <summary>
14         /// 擴展方法,實現 WebApi 服務註冊 Consul 中心。
15         /// </summary>
16         /// <param name="app">應用程式生成器。</param>
17         /// <param name="configuration">配置系統的訪問類型。</param>
18         /// <param name="consulClient">Consul 的客戶端類型。</param>
19         /// <returns></returns>
20         public static void UseConsul(this IApplicationBuilder app, IConfiguration configuration, IConsulClient consulClient)
21         {
22             RegisterConsul(configuration,consulClient);
23         }
24
25         /// <summary>
26         /// 該方法實現核心的 Consul 註冊和健康檢查。
27         /// </summary>
28         /// <param name="configuration">配置系統的訪問類型。</param>
29         /// <param name="consulClient">Consul 的客戶端類型。</param>
30         private static void RegisterConsul(IConfiguration configuration, IConsulClient consulClient)
31         {
32             var consulGroupName = configuration["ConsulGroup"];
33             var ip = configuration["IP"];
34             var port = int.Parse(configuration["Port"]);
35             var serviceID = $"{consulGroupName}_{ip}_{port}";
36
37             AgentServiceCheck checkService = new AgentServiceCheck() {
38                 HTTP = $"//{ip}:{port}/HeartCheck",
39                 Interval=TimeSpan.FromSeconds(6),
40                 Timeout=TimeSpan.FromSeconds(2),
41                 DeregisterCriticalServiceAfter=TimeSpan.FromSeconds(2)
42             };
43
44             AgentServiceRegistration agentServiceRegistration = new AgentServiceRegistration() {
45                 Name = consulGroupName,
46                 Address = ip,
47                 Port = port,
48                 ID = serviceID,
49                 Check= checkService
50             };
51
52             consulClient.Agent.ServiceRegister(agentServiceRegistration);
53         }
54     }
55 }
View Code
D、在 appsettings.json 文件中,增加 Consul 的配置:”ConsulGroup”: “UserService”
 1 {
 2   "Logging": {
 3     "LogLevel": {
 4       "Default": "Information",
 5       "Microsoft": "Warning",
 6       "Microsoft.Hosting.Lifetime": "Information"
 7     }
 8   },
 9   "AllowedHosts": "*",
10   "ConsulGroup": "UserService" //配置點
11 }
AppSettings
E、配置 Startup.cs。
 1 using Consul;
 2 using Microsoft.AspNetCore.Builder;
 3 using Microsoft.AspNetCore.Hosting;
 4 using Microsoft.Extensions.Configuration;
 5 using Microsoft.Extensions.DependencyInjection;
 6 using Microsoft.Extensions.Hosting;
 7 using Microsoft.OpenApi.Models;
 8 using System;
 9 using PatrickLiu.MicroService.WeiXin.UserService.Utilities;
10
11 namespace PatrickLiu.MicroService.WeiXin.UserService
12 {
13     /// <summary>
14     /// dotnet PatrickLiu.MicroService.WeiXin.UserService.dll --urls="//*:9156" --ip="127.0.0.1" --port=9156
15     ///
16     /// dotnet PatrickLiu.MicroService.WeiXin.UserService.dll --urls="//*:9157" --ip="127.0.0.1" --port=9157
17     /// </summary>
18     public class Startup
19     {
20         /// <summary>
21         /// 通過構造函數注入配置訪問的實例。
22         /// </summary>
23         /// <param name="configuration">配置訪問器。</param>
24         public Startup(IConfiguration configuration)
25         {
26             Configuration = configuration;
27         }
28
29         /// <summary>
30         /// 獲取配置訪問器的實例。
31         /// </summary>
32         public IConfiguration Configuration { get; }
33
34         /// <summary>
35         /// 注入的容器的服務實例。
36         /// </summary>
37         /// <param name="services"></param>
38         public void ConfigureServices(IServiceCollection services)
39         {
40             services.AddSingleton<IConsulClient>(c=> new ConsulClient(config=> {
41                 config.Datacenter = "dc1";
42                 config.Address =new Uri("//localhost:8500");
43             }));
44             services.AddControllers();
45             services.AddSwaggerGen(c =>
46             {
47                 c.SwaggerDoc("user", new OpenApiInfo { Title = "UserService", Version = "v1" });
48             });
49         }
50
51         /// <summary>
52         /// 配置 Http 請求的處理管道。
53         /// </summary>
54         /// <param name="app">應用程式生成器。</param>
55         /// <param name="env">WebHost 環境。</param>
56         /// <param name="consul">Consul 的客戶端。</param>
57         public void Configure(IApplicationBuilder app, IWebHostEnvironment env,IConsulClient consul)
58         {
59             if (env.IsDevelopment())
60             {
61                 app.UseDeveloperExceptionPage();
62             }
63
64             app.UseSwagger();
65             app.UseSwaggerUI(option=> {
66                 option.SwaggerEndpoint("/swagger/user/swagger.json", "UserService v1");
67             });
68
69             app.UseRouting();
70
71             app.UseAuthorization();
72             app.UseConsul(Configuration,consul);
73
74             app.UseEndpoints(endpoints =>
75             {
76                 endpoints.MapControllers();
77             });
78         }
79     }
80 }
Startup.cs
F、配置心跳服務的檢查類型。
using Microsoft.AspNetCore.Mvc;

namespace PatrickLiu.MicroService.WeiXin.UserService.Controllers
{
    /// <summary>
    /// 心跳檢查的控制器。
    /// </summary>
    [Route("[controller]")]
    [ApiController]
    public class HeartCheckController : ControllerBase
    {
        /// <summary>
        /// 心跳檢測的結果 。
        /// </summary>
        /// <returns></returns>
        [HttpGet]
        public IActionResult Get()
        {
            return Ok();
        }
    }
}
HeartCheckController
G、擴展類型,為了對外區別是否進行了輪訓,增加了一個埠 屬性。
using System;

namespace PatrickLiu.MicroService.WeiXin.UserService
{
    public class WeatherForecast
    {
        public DateTime Date { get; set; }

        public int TemperatureC { get; set; }

        public int TemperatureF => 32 + (int)(TemperatureC / 0.5556);

        public string Summary { get; set; }

        public int Port { get; set; }//增加的屬性
    }
}
WeatherForecast
H、數據提供類型的控制器。
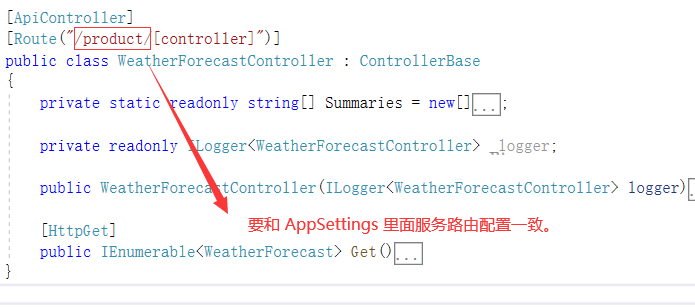
 1 using Microsoft.AspNetCore.Mvc;
 2 using Microsoft.Extensions.Configuration;
 3 using Microsoft.Extensions.Logging;
 4 using System;
 5 using System.Collections.Generic;
 6 using System.Linq;
 7
 8 namespace PatrickLiu.MicroService.WeiXin.UserService.Controllers
 9 {
10     /// <summary>
11     /// 獲取天氣的控制器。
12     /// </summary>
13     [ApiController]
14     [Route("/user/[controller]")]
15     public class WeatherForecastController : ControllerBase
16     {
17         #region 私有欄位
18
19         private static readonly string[] Summaries = new[]
20         {
21             "Freezing", "Bracing", "Chilly", "Cool", "Mild", "Warm", "Balmy", "Hot", "Sweltering", "Scorching"
22         };
23
24         private readonly ILogger<WeatherForecastController> _logger;
25
26         #endregion
27
28         #region 構造函數
29
30         /// <summary>
31         /// 初始化類型的新實例。
32         /// </summary>
33         /// <param name="logger">初始化日誌對象。</param>
34         /// <param name="configuration">初始化配置對象。</param>
35         public WeatherForecastController(ILogger<WeatherForecastController> logger, IConfiguration configuration)
36         {
37             _logger = logger;
38             Configuration = configuration;
39         }
40
41         #endregion
42
43         #region 實例屬性
44
45         /// <summary>
46         /// 獲取配置對象。
47         /// </summary>
48         public IConfiguration Configuration { get; }
49
50         #endregion
51
52         #region 核心方法
53
54         /// <summary>
55         /// 獲取天氣。
56         /// </summary>
57         /// <returns></returns>
58         [HttpGet]
59         public IEnumerable<WeatherForecast> Get()
60         {
61             var rng = new Random();
62             return Enumerable.Range(1, 5).Select(index => new WeatherForecast
63             {
64                 Date = DateTime.Now.AddDays(index),
65                 TemperatureC = rng.Next(-20, 55),
66                 Summary = Summaries[rng.Next(Summaries.Length)],
67                 Port = int.Parse(Configuration["Port"])//增加的程式碼。
68             })
69             .ToArray();
70         }
71
72         #endregion
73     }
74 }
WeatherForecastController
(3)、項目說明。
在 Startup.cs 文件里,我們配置Consul和 Swagger,具體的程式碼很簡單,就不多說了。
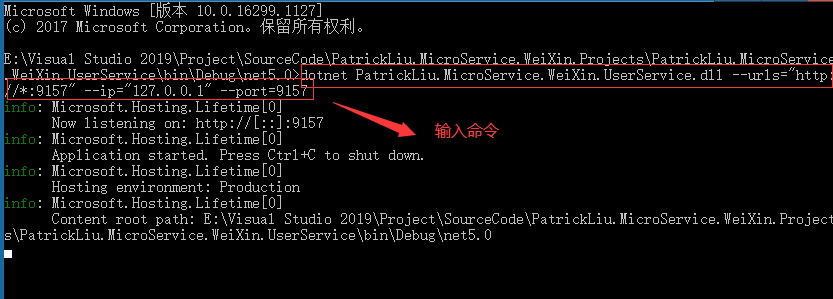
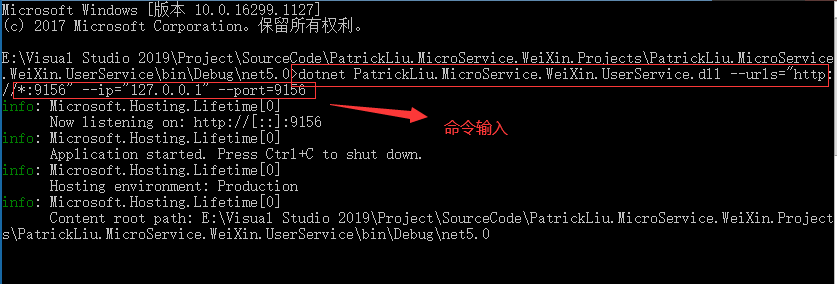
該項目啟動兩個實例。啟動程式碼如下:
dotnet PatrickLiu.MicroService.WeiXin.UserService.dll –urls=”//*:9157″ –ip=”127.0.0.1″ –port=9157
dotnet PatrickLiu.MicroService.WeiXin.UserService.dll –urls=”//*:9156″ –ip=”127.0.0.1″ –port=9156
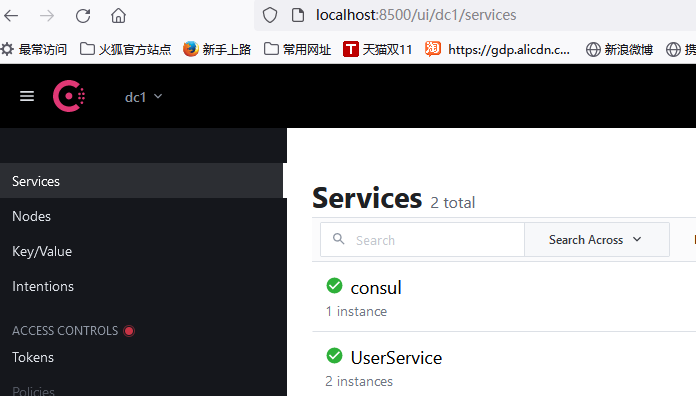
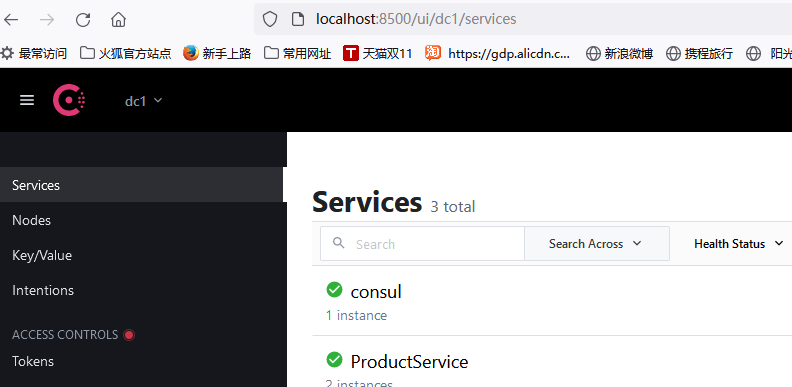
Consul 管理的服務。如圖:
2】、第二個 WEB API 實常式序。
其實,第一個 WebAPI 項目和第二個 WebAPI 項目 是相同的,只是有一些配置的區別,沒有本質的區別。
(1)、項目截圖
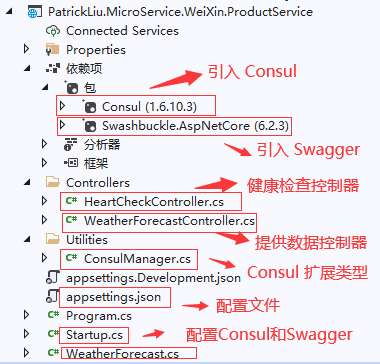
(2)、項目源碼
由於該項目使用了 Consul 進行服務發現管理,在項目創建之初,必須通過 Nuget 安裝 Consul 組件,同時也必須引入 Swashbuckle.AspNetCore ,它支援對 Swagger 的實現。
A、創建一個 WebAPI 的項目,項目名稱是:PatrickLiu.MicroService.WeiXin.ProductService。
B、通過Nuget 分別引入:Consul 和 Swashbuckle.AspNetCore 組件包。
C、擴展 Consul 服務,在根目錄下,創建一個 Utilities 文件,在該文件夾下創建一個類:ConsulManager.cs。
 1 using Consul;
 2 using Microsoft.AspNetCore.Builder;
 3 using Microsoft.Extensions.Configuration;
 4 using System;
 5
 6 namespace PatrickLiu.MicroService.WeiXin.ProductService.Utilities
 7 {
 8     /// <summary>
 9     /// Consul 的擴展類型,便於在 Http管道中註冊 Consul。
10     /// </summary>
11     public static class ConsulManager
12     {
13         /// <summary>
14         /// 註冊 Consul 服務實例。
15         /// </summary>
16         /// <param name="app">應用程式生成器。</param>
17         /// <param name="configuration">配置系統的訪問器。</param>
18         /// <param name="consulClient">Consul 的客戶端類型。</param>
19         /// <returns></returns>
20         public static void UseConsul(this IApplicationBuilder app, IConfiguration configuration, IConsulClient consulClient)
21         {
22             RegisterConsul(configuration,consulClient);
23         }
24
25         /// <summary>
26         /// 實現 Consul 的真正註冊。
27         /// </summary>
28         /// <param name="configuration">配置系統的訪問器。</param>
29         /// <param name="consulClient">Consul 的客戶端類型。</param>
30         private static void RegisterConsul(IConfiguration configuration, IConsulClient consulClient)
31         {
32             var consulGroupName = configuration["ConsulGroup"];
33             var ip = configuration["IP"];
34             var port = int.Parse(configuration["Port"]);
35             var serviceID = $"{consulGroupName}_{ip}_{port}";
36
37             AgentServiceCheck checkService = new AgentServiceCheck() {
38                 HTTP = $"//{ip}:{port}/HeartCheck",
39                 Interval=TimeSpan.FromSeconds(6),
40                 Timeout=TimeSpan.FromSeconds(2),
41                 DeregisterCriticalServiceAfter=TimeSpan.FromSeconds(2)
42             };
43
44             AgentServiceRegistration agentServiceRegistration = new AgentServiceRegistration() {
45                 Name = consulGroupName,
46                 Address = ip,
47                 Port = port,
48                 ID = serviceID,
49                 Check= checkService
50             };
51
52             consulClient.Agent.ServiceRegister(agentServiceRegistration);
53         }
54     }
55 }
ConsulManager
D、在 appsettings.json 文件中,增加 Consul 的配置:”ConsulGroup”: “ProductService”。
 1 {
 2   "Logging": {
 3     "LogLevel": {
 4       "Default": "Information",
 5       "Microsoft": "Warning",
 6       "Microsoft.Hosting.Lifetime": "Information"
 7     }
 8   },
 9   "AllowedHosts": "*",
10   "ConsulGroup": "ProductService"//註冊服務名稱
11 }
AppSettings
E、配置 Startup.cs。
 1 using Consul;
 2 using Microsoft.AspNetCore.Builder;
 3 using Microsoft.AspNetCore.Hosting;
 4 using Microsoft.AspNetCore.Mvc;
 5 using Microsoft.Extensions.Configuration;
 6 using Microsoft.Extensions.DependencyInjection;
 7 using Microsoft.Extensions.Hosting;
 8 using Microsoft.Extensions.Logging;
 9 using PatrickLiu.MicroService.WeiXin.ProductService.Utilities;
10 using System;
11 using System.Collections.Generic;
12 using System.Linq;
13 using System.Threading.Tasks;
14
15 namespace PatrickLiu.MicroService.WeiXin.ProductService
16 {
17     /// <summary>
18     /// dotnet PatrickLiu.MicroService.WeiXin.ProductService.dll --urls="//*:9158" --ip="127.0.0.1" --port=9158
19     ///
20     /// dotnet PatrickLiu.MicroService.WeiXin.ProductService.dll --urls="//*:9159" --ip="127.0.0.1" --port=9159
21     /// </summary>
22     public class Startup
23     {
24         /// <summary>
25         ///
26         /// </summary>
27         /// <param name="configuration"></param>
28         public Startup(IConfiguration configuration)
29         {
30             Configuration = configuration;
31         }
32
33         /// <summary>
34         ///
35         /// </summary>
36         public IConfiguration Configuration { get; }
37
38         /// <summary>
39         ///
40         /// </summary>
41         /// <param name="services"></param>
42         public void ConfigureServices(IServiceCollection services)
43         {
44             services.AddSingleton<IConsulClient>(new ConsulClient(c=> {
45                 c.Datacenter = "dc1";
46                 c.Address = new Uri("//localhost:8500");
47             }));
48
49             services.AddSwaggerGen(a =>
50             {
51                 a.SwaggerDoc("product", new Microsoft.OpenApi.Models.OpenApiInfo() { Title = "ProductService", Version = "v1" });
52             });
53             services.AddControllers();
54         }
55
56         /// <summary>
57         ///
58         /// </summary>
59         /// <param name="app"></param>
60         /// <param name="env"></param>
61         /// <param name="consul"></param>
62         public void Configure(IApplicationBuilder app, IWebHostEnvironment env,IConsulClient consul)
63         {
64             if (env.IsDevelopment())
65             {
66                 app.UseDeveloperExceptionPage();
67             }
68
69             app.UseRouting();
70
71             app.UseConsul(Configuration,consul);
72
73             app.UseSwagger();
74             app.UseSwaggerUI(options=> {
75                 options.SwaggerEndpoint("/swagger/product/swagger.json", "ProductService-V1");
76             });
77             app.UseAuthorization();
78
79             app.UseEndpoints(endpoints =>
80             {
81                 endpoints.MapControllers();
82             });
83         }
84     }
85 }
Startup.cs
F、配置心跳服務的檢查類型。
using Microsoft.AspNetCore.Mvc;

namespace PatrickLiu.MicroService.WeiXin.ProductService.Controllers
{
    /// <summary>
    /// 心跳檢查控制器。
    /// </summary>
    [Route("[controller]")]
    [ApiController]
    public class HeartCheckController : ControllerBase
    {
        /// <summary>
        /// 心跳檢測方法。
        /// </summary>
        /// <returns></returns>
        [HttpGet]
        public IActionResult Get()
        {
            return Ok();
        }
    }
}
HeartCheckController
(3)、項目說明。
在 Startup.cs 文件里,我們配置Consul和 Swagger,具體的程式碼很簡單,就不多說了。
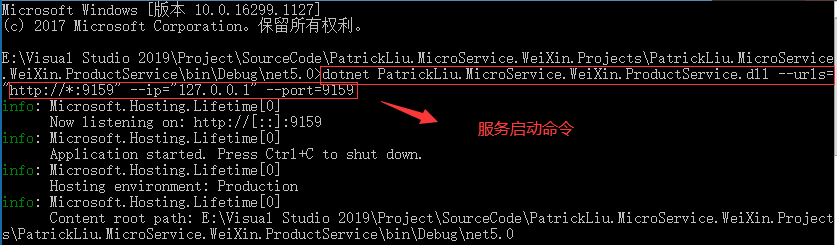
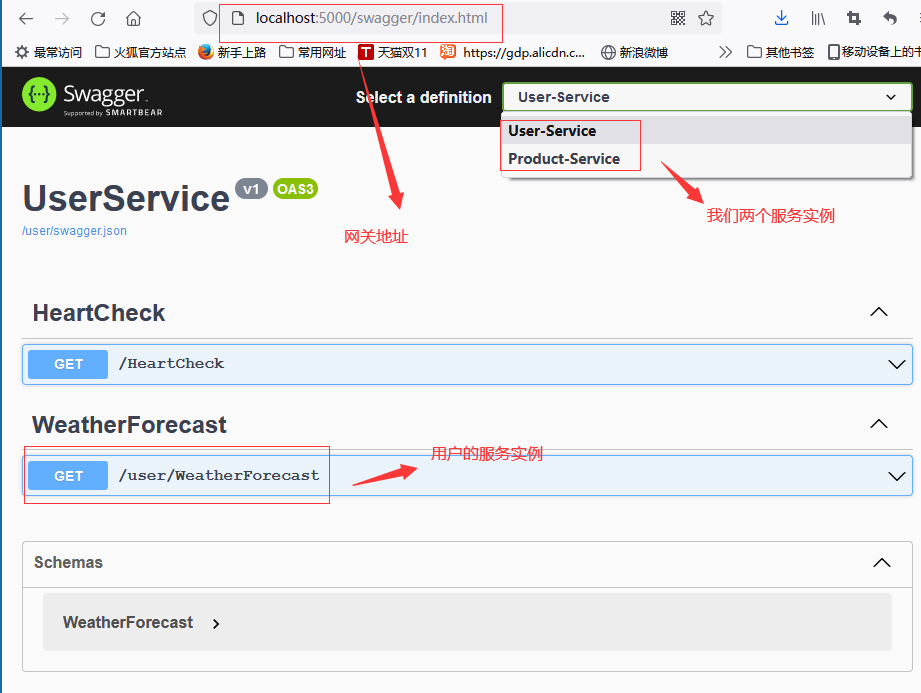
該項目啟動兩個實例。啟動程式碼如下:
dotnet PatrickLiu.MicroService.WeiXin.ProductService.dll –urls=”//*:9158″ –ip=”127.0.0.1″ –port=9158

dotnet PatrickLiu.MicroService.WeiXin.ProductService.dll –urls=”//*:9159″ –ip=”127.0.0.1″ –port=9159
Consul 管理的產品服務。截圖如下:
3】、我們的 Ocelot 網關實常式序。
這個項目是我們的關鍵先生,首先,我們在該項目中還是要引入 Ocelot、Ocelot.Provider.Consul 和 Swashbuckle.AspNetCore,引入完成後就開始我們的配置。
(1)、項目截圖
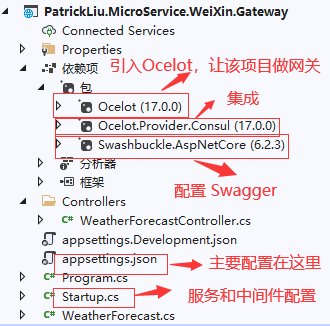
(2)、項目源碼
A、創建一個 WebAPI 的項目,項目名稱是:PatrickLiu.MicroService.WeiXin.Gateway。
B、在 Startup 文件配置:Ocelot、Ocelot.Consul和 Swagger。
 1 using Microsoft.AspNetCore.Builder;
 2 using Microsoft.AspNetCore.Hosting;
 3 using Microsoft.Extensions.Configuration;
 4 using Microsoft.Extensions.DependencyInjection;
 5 using Microsoft.Extensions.Hosting;
 6 using Microsoft.OpenApi.Models;
 7 using Ocelot.DependencyInjection;
 8 using Ocelot.Middleware;
 9 using Ocelot.Provider.Consul;
10
11 namespace PatrickLiu.MicroService.WeiXin.Gateway
12 {
13     /// <summary>
14     /// dotnet PatrickLiu.MicroService.WeiXin.Gateway.dll --urls="//*:5000" --ip="127.0.0.1" --port=5000
15     /// </summary>
16     public class Startup
17     {
18         /// <summary>
19         /// 通過構造函數注入配置系統。
20         /// </summary>
21         /// <param name="configuration">配置系統。</param>
22         public Startup(IConfiguration configuration)
23         {
24             Configuration = configuration;
25         }
26
27         /// <summary>
28         /// 獲取配置系統。
29         /// </summary>
30         public IConfiguration Configuration { get; }
31
32         /// <summary>
33         /// 註冊服務。
34         /// </summary>
35         /// <param name="services"></param>
36         public void ConfigureServices(IServiceCollection services)
37         {
38             services.AddSwaggerGen(c=> {
39                 c.SwaggerDoc("v1",new OpenApiInfo() { Title="Gateway API", Version="v1" });
40             });
41             services.AddOcelot().AddConsul();
42             services.AddControllers();
43         }
44
45         /// <summary>
46         /// 配置 Http 的請求處理管道和中間件。
47         /// </summary>
48         /// <param name="app">應用程式的生成器。</param>
49         /// <param name="env">Web 宿主的環境。</param>
50         public void Configure(IApplicationBuilder app, IWebHostEnvironment env)
51         {
52             if (env.IsDevelopment())
53             {
54                 app.UseDeveloperExceptionPage();
55             }
56
57             app.UseRouting();
58             app.UseAuthorization();
59
60             app.UseSwagger();
61             //1、第一步,這裡不需要以 /swagger 開頭
62             app.UseSwaggerUI(o => {
63                 o.SwaggerEndpoint("/user/swagger.json", "User-Service");
64                 o.SwaggerEndpoint("/product/swagger.json", "Product-Service");
65             });
66
67             app.UseEndpoints(endpoints =>
68             {
69                 endpoints.MapControllers();
70             });
71
72             app.UseOcelot();
73         }
74     }
75 }
Startup
C、這是我們的重中之重,在 AppSettings 裡面配置。
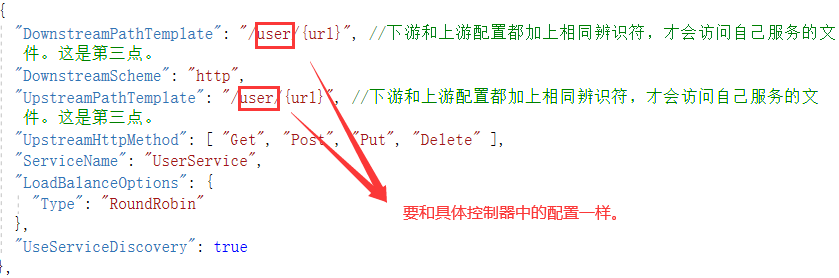
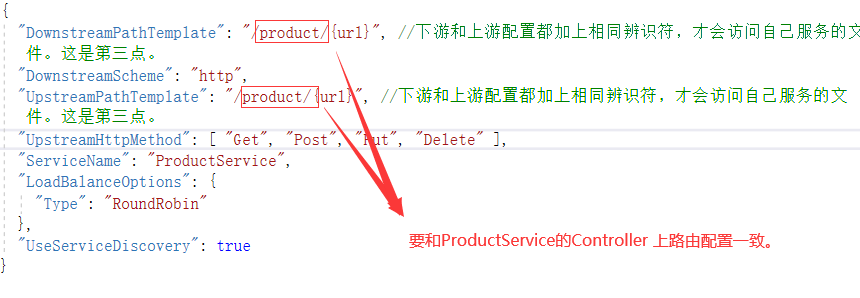
 1 {
 2   "Logging": {
 3     "LogLevel": {
 4       "Default": "Information",
 5       "Microsoft": "Warning",
 6       "Microsoft.Hosting.Lifetime": "Information"
 7     }
 8   },
 9   "AllowedHosts": "*",
10   "Routes": [
11     {
12       "DownstreamPathTemplate": "/swagger/product/swagger.json", //下游配置也要和各自服務裡面的配置一致。這是第二點
13       "DownstreamScheme": "http",
14       "UpstreamPathTemplate": "/product/swagger.json", //上游配置,這裡也不需要/swagger 開頭,和網關配置一致。這是第二點
15       "UpstreamHttpMethod": [ "Get", "Post", "Put", "Delete" ],
16       "ServiceName": "ProductService",
17       "UseServiceDiscovery": true
18     },
19     {
20       "DownstreamPathTemplate": "/swagger/user/swagger.json", //下游配置也要和各自服務裡面的配置一致。這是第二點
21       "DownstreamScheme": "http",
22       "UpstreamPathTemplate": "/user/swagger.json", //上游配置,這裡也不需要/swagger 開頭,和網關配置一致。這是第二點
23       "UpstreamHttpMethod": [ "Get", "Post", "Put", "Delete" ],
24       "ServiceName": "UserService",
25       "UseServiceDiscovery": true
26     },
27      //swagger 上配置
28     {
29       "DownstreamPathTemplate": "/user/{url}", //下游和上游配置都加上相同辨識符,才會訪問自己服務的文件。這是第三點。
30       "DownstreamScheme": "http",
31       "UpstreamPathTemplate": "/user/{url}", //下游和上游配置都加上相同辨識符,才會訪問自己服務的文件。這是第三點。
32       "UpstreamHttpMethod": [ "Get", "Post", "Put", "Delete" ],
33       "ServiceName": "UserService",
34       "LoadBalanceOptions": {
35         "Type": "RoundRobin"
36       },
37       "UseServiceDiscovery": true
38     },
39     {
40       "DownstreamPathTemplate": "/product/{url}", //下游和上游配置都加上相同辨識符,才會訪問自己服務的文件。這是第三點。
41       "DownstreamScheme": "http",
42       "UpstreamPathTemplate": "/product/{url}", //下游和上游配置都加上相同辨識符,才會訪問自己服務的文件。這是第三點。
43       "UpstreamHttpMethod": [ "Get", "Post", "Put", "Delete" ],
44       "ServiceName": "ProductService",
45       "LoadBalanceOptions": {
46         "Type": "RoundRobin"
47       },
48       "UseServiceDiscovery": true
49     }
50   ],
51   "GlobalConfiguration": {
52     "BaseUrl": "//localhost:5000",
53     "ServiceDiscoveryProvider": {
54       "Host": "localhost",
55       "Port": 8500,
56       "Type": "Consul"
57     }
58   }
59 }
AppSettings
(3)、項目說明。
在 Startup.cs 文件里,我們配置Consul和 Swagger,具體的程式碼很簡單,就不多說了。
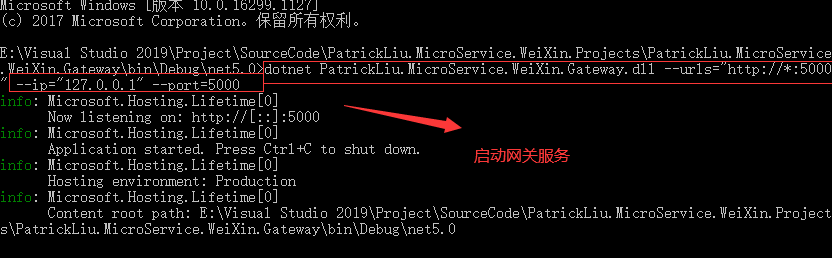
該項目啟動一個實例。啟動程式碼如下:
dotnet PatrickLiu.MicroService.WeiXin.Gateway.dll –urls=”//*:5000″ –ip=”127.0.0.1″ –port=5000
3、效果如圖
4、關鍵點說明。
1】、在網關項目的 Startup.cs 文件的 ConfigServices和 Configure 配置。在 Configure 裡面配置不需要以 /swagger 開頭。切記。
 1         /// <summary>
 2         /// 註冊服務。
 3         /// </summary>
 4         /// <param name="services"></param>
 5         public void ConfigureServices(IServiceCollection services)
 6         {
 7             services.AddSwaggerGen(c=> {
 8                 c.SwaggerDoc("v1",new OpenApiInfo() { Title="Gateway API", Version="v1" });
 9             });
10             services.AddOcelot().AddConsul();
11             services.AddControllers();
12         }
 1         /// <summary>
 2         /// 配置 Http 的請求處理管道和中間件。
 3         /// </summary>
 4         /// <param name="app">應用程式的生成器。</param>
 5         /// <param name="env">Web 宿主的環境。</param>
 6         public void Configure(IApplicationBuilder app, IWebHostEnvironment env)
 7         {
 8             if (env.IsDevelopment())
 9             {
10                 app.UseDeveloperExceptionPage();
11             }
12
13             app.UseRouting();
14             app.UseAuthorization();
15
16             app.UseSwagger();
17             //1、第一步,這裡不需要以 /swagger 開頭
18             app.UseSwaggerUI(o => {
19                 o.SwaggerEndpoint("/user/swagger.json", "User-Service");
20                 o.SwaggerEndpoint("/product/swagger.json", "Product-Service");
21             });
22
23             app.UseEndpoints(endpoints =>
24             {
25                 endpoints.MapControllers();
26             });
27
28             app.UseOcelot();
29         }
如果這個網關只是單純的做網關,可以把其他程式碼全部注釋或者刪掉,只是保留 services.AddOcelot().AddConsul() 和 app.UseOcelot() ,沒問題。但是如果要在這裡做Swagger 配置,就不能把其他程式碼注釋。
2】、Swagger 上游配置,這裡也不需要以/swagger 開頭,和網關配置一致。下游配置也要和各自服務裡面的配置一致。這是第二點。

3】、Ocelot 路由配置:/下游和上游配置都加上相同辨識符,才會訪問自己服務的文件。
A、網關中用戶的服務配置要和API中 Controller 上的路由配置要一致。

B、網關中產品的服務配置要和API中 Controller 上的路由配置要一致。
三、總結
好了,今天就寫到這裡了。在網關中配置 Swagger ,就不用我們跳來跳去,去查看介面文檔,便於我們的使用和維護,這個功能很實用,當初配置的時候有很多坑,我現在已經填的差不多了。俗話說,笨鳥先飛,把這東西記錄下來,便於自己以後查閱,也許能幫助其他需要的人,都是不錯的事情。不忘初心,我們繼續努力。我們每天進步一點點,老天是不會辜負努力的人。


