堅持原創,堅持實踐,堅持乾貨,如果你覺得有用,請點擊推薦,也歡迎關注我部落格園和微信公眾號。
測試開發【提測平台】分享13-遠程搜索和路由$route使用實現新建提測需求
微信搜索【大奇測試開】,關注這個堅持分享測試開發乾貨的傢伙。
本篇繼續提測平台開發,按慣例先給出學習的思維導圖,以便快速了解學習知識和平台功能實現的重點。

基本知識點學習
遠程搜索
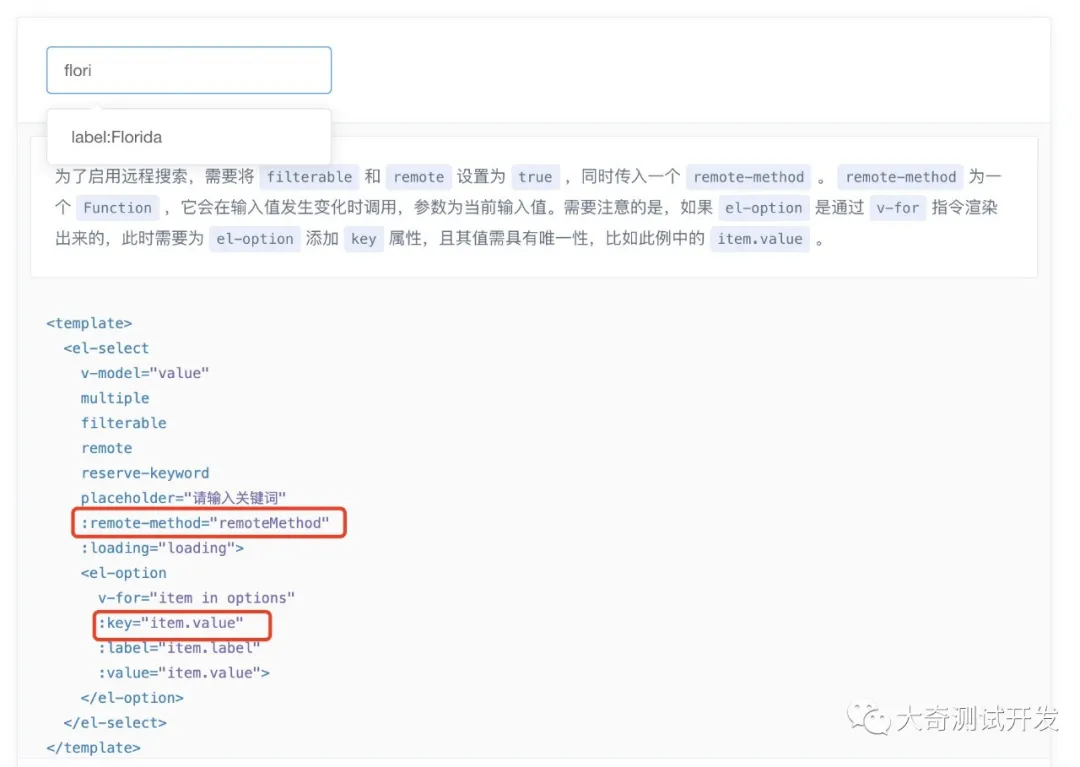
顯示的數據通過輸入關鍵詞,從伺服器搜索並返回,一般主要用於數據很多服務全部獲取顯示的,常用selected組件中,比如一個增改操作要指定一個公司的聯繫人場景,在element-vue 選擇組件中主要是通過 :remote-method 調一個方法來實現的,而這個方式實現就是一個介面請求,即輸入關鍵立馬請求介面,介面根據關鍵字返回數據回填,說白了就是多次請求。
在Element Input組件中也有這個能力,是使用 :fetch-suggestions 場景是用於輸入資訊給填寫建議。這個遠程搜索功能在很多可組件上自己利用判斷綁定的值的改變,調方法做相應的操作,這塊具體可以參考後邊功能開發例子。
vue中$router路由
在之前的頁面功能如添加/修改的實現上都是通過抽屜或者彈對話框實現的,其實有些場景涉及到需要一個新的頁面來實現,那麼這個就要用到this.$router.push()來實現,基本一些使用方法如下:
1. 跳轉頁面對象 參數傳的是菜單路由的定義的頁面名稱,比如我想點擊某個按鈕跳轉到提測系統的app管理頁面,在按鈕出發點事件方法中使用
this.$router('apps')
// 或
this.$router({name: 'apps'}
2. 跳轉通過路徑 同樣為菜單設置的path 相對應
this.$router.push({path: '/login});
3.帶參數跳轉
this.$router({name: 'app', params: { appId: 101 }})
// 上邊是以params隱藏傳遞過去的,下邊是在URL顯式參數傳的
this.$router.push({path: '/login?url=' + this.$route.path});
4. 跳轉過來的新頁獲取傳過來的值
// 獲取通過params的參數
this.$route.params.appId
// 獲取URL中的參數
this.$route.query.appId
5. 返回上一頁
this.$router.go(-1)
以上這些是一些基本的vue router的用法,接著將在新建提測需求這個功能得到部分應用。
需求功能實現
按照之前的需求文檔,由於提測需要提交的資訊很多,所以通過點擊新按鈕會跳轉到一個新的vue頁面進行操作,先實現python後端的需求添加介面,之前的需求中寫過好多類似的了,插入介面的程式碼直接上了。
提測添加介面
@test_manager.route("/api/test/create",methods=['POST'])
def createReqeust():
    # 獲取傳遞的數據,並轉換成JSON
    body = request.get_data()
    body = json.loads(body)

    # 定義默認返回體
    resp_success = format.resp_format_success
    resp_failed = format.resp_format_failed

    # 判斷必填參數
    if 'appId' not in body:
        resp_failed['message'] = 'appId 提測應用不能為空'
        return resp_failed
    elif 'tester' not in body:
        resp_failed['message'] = 'tester 測試人員不能為空'
        return resp_failed
    elif 'developer' not in body:
        resp_failed['message'] = 'developer 提測人不能為空'
        return resp_failed
    elif 'title' not in body:
        resp_failed['message'] = 'title提測標題不能為空'
        return resp_failed

    # 使用連接池鏈接資料庫
    connection = pool.connection()

    # 判斷增加或是修改邏輯
    with connection:
        try:
            with connection.cursor() as cursor:
                # 拼接插入語句,並用參數化%s構造防止基本的SQL注入
                # 其中id為自增,插入數據默認數據設置的當前時間
                sqlInsert = "INSERT INTO request (title,appId,developer,tester,CcMail,verison,`type`,scope,gitCode,wiki,`more`,`status`,createUser,updateUser) " \
                            "VALUES (%s,%s,%s,%s,%s,%s,%s,%s,%s,%s,%s,%s,%s,%s)"
                cursor.execute(sqlInsert, (
                    body["title"], body["appId"], body["developer"], body["tester"], body["CcMail"], body["version"],
                    body['type'],
                    body["scope"], body["gitCode"], body["wiki"], body["more"], '1', body["createUser"],
                    body["updateUser"]))
                # 提交執行保存新增數據
                id = cursor.lastrowid
                connection.commit()            return resp_success
        except Exception as err:
            resp_failed['message'] = '提測失敗了:' + err
            return resp_failed
然後重新啟動下服務,來做個介面測試,看插入有沒有問題,接下來需要重點看下是這部分程式碼邏輯,關於如果用戶勾選了發郵件,則在需要提交數據進行郵件發送,這就用到之前講解到的郵件工具那邊文章了,如果還沒練習的可以先看下 學習Python郵件發送方法&落地有郵件工具類-測試開發【提測平台】分享11 ,實現就在commit()後進行邏輯判斷,並且特別注意的是之前還預留個是否發送成功的欄位,也就是還需要判斷郵件是否發送成功了,再對插入的數據立馬進行一次更新操作。
if body['isEmail'] == 'true':
                # 新建成功發送Email
                if body['type'] == '1':
                    version = '功能測試'
                elif body['type'] == '2':
                    version = '性能測試'
                elif body['type'] == '3':
                    version = '安全測試'

                receivers = body["tester"].split(',') + body["developer"].split(',')
                if not body["CcMail"] is None:
                    receivers = receivers + body["CcMail"].split(',')

                subject = '【提測】' + body['title']
                reuslt = sendEmail(receivers, subject, [
                    '<strong>[提測應用]</strong>',
                    body['appName'],
                    '<strong>[提測人]</strong>',
                    body['developer'],
                    '<strong>[提測版本]</strong>',
                    body['version'],
                    '<strong>[提測類型]</strong>',
                    version,
                    '<strong>[測試內容]</strong>',
                    body['scope'],
                    '<strong>[相關文檔]</strong>',
                    body['wiki'],
                    '<strong>[補充資訊]</strong>',
                    body['more']
                ])
                if reuslt:
                    sendOk = 1
                else:
                    sendOk = 2
                with connection.cursor() as cursor:
                    # 更新Emai是否發送成功1-成功 2-失敗
                    updateEmail = "UPDATE request SET sendEmail=%s, updateUser=%s,`updateDate`= NOW() WHERE id=%s"
                    cursor.execute(updateEmail, (sendOk, body["updateUser"], id))
                    # 提交修改郵件是否發送成功
                    connection.commit()
            else:
                print('不發送郵件!')
兩程式碼合併後再次運行進行下測試,這裡其實是有個性能問題,因為是阻塞需要等待郵件的結果,所以介面的相應會有些慢,大家可以理由非同步調用進行優化的,查查資料看怎麼實現,體現學習能力的時候到了。
遠程應用搜索介面
還有一個介面,在這裡一併先實現了,就是需要為應用的遠程搜索單獨寫個按照條件查詢介面,此介面有個和之前條件查詢特別的需求,是需要同時支援appid或者描述的任意條件的查詢,具體實現請看程式碼(application.py):
@app_application.route("/api/application/options", methods=['GET'])
def getOptionsForSelected():

    value = request.args.get('value', '')
    response = format.resp_format_success

    connection = pool.connection()

    with connection.cursor() as cursor:

        # 先按appid模糊搜索,沒有數據再按note搜索
        sqlByAppId = "SELECT * FROM apps WHERE appId LIKE '%"+value+"%'"
        cursor.execute(sqlByAppId)
        dataByppId = cursor.fetchall()
        if len(dataByppId) > 0 :
            response['data'] = dataByppId
        else:
            sqlByNote = "SELECT * FROM apps WHERE note LIKE '%" + value + "%'"
            cursor.execute(sqlByNote)
            dataByNote = cursor.fetchall()
            response['data'] = dataByNote

    return response
一個笨方法就先默認按照appId查詢,沒有再按照note條件查詢,如果你有更好的實踐方法,歡迎提交流,啟動服務對介面進行測試(永遠不要忘了測試)

到此後端的內容就這些,完整的程式碼在新的介面文件 testmanager.py 可以在github對照查看。
前端提測需求新建實現
自實現步驟步驟為
1)實現上次的添加按鈕功能,利用 this.$router.push 實現
2)跳轉的時候需要帶個動作標記參數,主要為了區分是添加操作還,後續實現的修改操作
3)自行在element ui官方查詢 「header頁頭」 的組件的使用,並實現 <- 按鈕的點擊跳回上一頁面
4)按照產品原型實現form表單各項控制項
5)應用下拉框實現遠程關鍵詞搜索,並且還要實現在選擇對應的應用後,需要應用配置的時候一些默認資訊,反填到其他相關的輸入框中
6)實現添加和取消按鈕的邏輯功能
7)添加成功後跳回列表並讓列表列感知刷新最新數據
下邊是我的實現參考
1. 新建按鈕跳轉
創建一個空的提測頁面,叫commit.vue,並設置好個不顯示的在菜單上的路由,配置好path和name以及跳轉地址
{
    path: 'commit',
    name: 'commit',
    hidden: true,
    component: () => import('@/views/test/manger/commit'),
    meta: { title: '需求提測', icon: 'dashboard' }
},
然後就是編寫提測列表頁面的新建按鈕的點擊觸發方法邏輯
doCommit() {
   this.$router.push({ name: 'commit', params: { action: 'ADD' }})
},
2. 實現提測form表單
這裡是個全新的頁面,我就不再分解了,直接給出上邊3-6的實現程式碼,必要的註解都已經程式碼了,可以參照對比自己的實現程式碼,如果部分不是很完成,還是去下載最新的程式碼去查看
Template模組程式碼
重點關注selected遠程搜索的處理方法和Header組件的如何使用
<template>
  <div class="app-container">
    <el-header>
      <el-page-header @back="goBack" content="提測"/>
    </el-header>
    <el-main>
      <el-form :model="requestForm" :rules="requestRules" ref="ruleForm" label-width="100px" >
        <el-form-item label="提測標題" prop="title">
          <el-input v-model="requestForm.title" placeholder="提測標題" style="width: 350px"></el-input>
        </el-form-item>
        <el-form-item label="服務應用" prop="appId">
          <el-select
             v-model="requestForm.appId"
             filterable
             remote
             reserve-keyword
             placeholder="請輸入關鍵詞(遠程搜索)"
             :remote-method="remoteMethod"
             :loading="appIdloading"
             @change="appSelected"
             style="width: 300px">
            <el-option
              v-for="item in appIdList"
              :key="item.id"
              :label="item.appId"
              :value="item.id">
            </el-option>
          </el-select>
        </el-form-item>
        <el-form-item label="提測RD" prop="developer">
          <el-input v-model="requestForm.developer" placeholder="提測人研發" style="width: 350px"></el-input>
        </el-form-item>
        <el-form-item label="測試QA" prop="tester">
          <el-input v-model="requestForm.tester" placeholder="測試人" style="width: 350px"></el-input>
        </el-form-item>
        <el-form-item label="關係人" prop="CcMail">
          <el-input v-model="requestForm.CcMail" placeholder="郵件抄送人" style="width: 350px"></el-input>
        </el-form-item>
        <el-form-item label="提測版本" prop="version">
          <el-input v-model="requestForm.version" placeholder="部署版本號/分支/Tag" style="width: 350px"></el-input>
        </el-form-item>
        <el-form-item label="提測類型" prop="type">
          <el-select v-model="requestForm.type" clearable placeholder="請選擇..." style="width: 300px">
            <el-option
              v-for="item in opsType"
              :key="item.value"
              :label="item.label"
              :value="item.value">
            </el-option>
          </el-select>
        </el-form-item>
        <el-form-item label="測試範圍" prop="scope">
          <el-input v-model="requestForm.scope" type="textarea" :rows="3" placeholder="1.功能點 \n 2.測試點 \n 3.回歸點" style="width: 350px"></el-input>
        </el-form-item>
        <el-form-item label="程式碼地址" prop="gitCode">
          <el-input v-model="requestForm.gitCode" placeholder="git程式碼地址" style="width: 350px"></el-input>
        </el-form-item>
        <el-form-item label="產品文檔" prop="wiki">
          <el-input v-model="requestForm.wiki" placeholder="文檔說明地址" style="width: 350px"></el-input>
        </el-form-item>
        <el-form-item label="更多資訊" prop="more">
          <el-input v-model="requestForm.more" type="textarea" :rows="3" placeholder="其他補充資訊" style="width: 350px"></el-input>
        </el-form-item>
        <el-form-item>
          <el-checkbox v-model="requestForm.isEmail" true-label="true">發送郵件</el-checkbox>
        </el-form-item>
        <el-form-item>
          <el-button type="primary" @click="onSubmit">立即創建</el-button>
          <el-button @click="onCancel">取 消</el-button>
        </el-form-item>
      </el-form>
    </el-main>
  </div>
</template>
Javacript模組程式碼
這部分程式碼邏輯中重點關注
1)mounted 頁面初始化時候獲取上級頁面的傳參值;
2)表單規則名稱增加一個字元多少的校驗;
3)選擇應用後數據的反填特殊處理,即如果用戶已經手寫改過之後,就不能將其覆蓋填寫其默認值
4)頭返回和取消返回分別使用兩種方法
5)提交添加成功後也有個跳轉到列表的處理,列表需要同樣用判斷是否有回傳的方式,處理是否需要立即刷新最新列表數據
<script>
import { apiAppsIds } from '@/api/apps'
import { reqCreate } from '@/api/test'
import store from '@/store'

export default {
  name: 'Commit',
  data() {
    return {
      op_user: store.getters.name,
      testAction: '',
      appIdloading: false,
      requestForm: {
        id: undefined,
        title: '',
        appId: '',
        appName: '',
        developer: '',
        tester: '',
        CcMail: '',
        version: '',
        type: '',
        scope: '',
        gitCode: '',
        wiki: '',
        more: '',
        isEmail: 'true',
        createUser: '',
        updateUser: ''
      },
      requestRules: {
        title: [
          { required: true, message: '請輸入活動名稱', trigger: 'blur' },
          { min: 3, message: '長度在大於3個字元', trigger: 'blur' }
        ],
        appId: [
          { required: true, message: '請選擇對應的服務應用', trigger: 'change' }
        ],
        developer: [
          { required: true, message: '請填寫提測人RD', trigger: 'change' }
        ],
        tester: [
          { required: true, message: '請填寫對應的測試人Tester', trigger: 'change' }
        ]

      },
      opsType: [
        { label: '功能測試', value: '1' },
        { label: '性能測試', value: '2' },
        { label: '安全測試', value: '3' }
      ],
      appIdList: []
    }
  },
  mounted() {
    if (this.$route.params.action) {
      this.testAction = this.$route.params.action
    }
  },
  methods: {
    goBack() {
      this.$router.go(-1)
    },
    remoteMethod(query) {
      if (query !== '') {
        this.appIdloading = true
        setTimeout(() => {
          apiAppsIds(query).then(resp => {
            this.appIdList = resp.data
          })
          this.appIdloading = false
        }, 200)
      } else {
        this.appIdList = []
      }
    },
    appSelected() {
      // 判斷獲取選擇應用的其他資訊
      for (var it in this.appIdList) {
        if (this.appIdList[it].id === this.requestForm.appId) {
          // 以下判斷為在字元為空的情況下添加,即認為沒有人工再輸入,快捷反填已知道資訊
          if (!this.requestForm.developer) {
            this.requestForm.developer = this.appIdList[it].developer
          }
          if (!this.requestForm.tester) {
            this.requestForm.tester = this.appIdList[it].tester
          }
          if (!this.requestForm.CcMail) {
            this.requestForm.CcMail = this.appIdList[it].CcEmail
          }
          if (!this.requestForm.wiki) {
            this.requestForm.wiki = this.appIdList[it].wiki
          }
          if (!this.requestForm.gitCode) {
            this.requestForm.gitCode = this.appIdList[it].gitCode
          }
          // 填寫appName資訊,用於郵件發送不再額外查詢
          this.requestForm.appName = this.appIdList[it].appId
        }
      }
    },
    onSubmit() {
      this.$refs['ruleForm'].validate((valid) => {
        if (valid) {
          if (this.testAction === 'ADD') {
            this.requestForm.id = undefined
            this.requestForm.type = '1'
            this.requestForm.createUser = this.op_user
            this.requestForm.updateUser = this.op_user
            reqCreate(this.requestForm).then(response => {
              // 如果request.js沒有攔截即表示成功,給出對應提示和操作
              this.$notify({
                title: '成功',
                message: this.testAction === 'ADD' ? '提測添加成功' : '提測修改成功',
                type: 'success'
              })
              // 回到列表頁面
              this.$router.push({ name: 'test', params: { needUp: 'true' }})
            })
          }
        } else {
          return false
        }
      })
    },
    onCancel() {
      this.$router.push('test')
    }
  }
}
</script>
3. 提測列表葉刷新程式碼
即需要對頁面判斷是否是有對應的回調參數,是否需要刷新,如果有則調用查詢方法刷新最新數據。
mounted() {
    if (this.$route.params.needUp && this.$route.params.needUp.needUp === 'true') {
      this.searchClick()
    }
  },
【程式碼更新】
-
地址://github.com/mrzcode/TestProjectManagement
-
TAG:TPMShare13


