Node.js Koa框架學習筆記
- 2021 年 10 月 7 日
- 筆記
Koa
基本介紹
Koa是Node.js中非常出名的一款WEB框架,其特點是短小精悍性能強。
它由Express原版人馬打造,同時也是Egg框架的設計藍圖,可以說Koa框架的學習性價比是非常高的。
項目搭建
我們先初始化一個項目:
$ npm init
TypeScript可以讓項目更加容易維護,所以安裝TypeScript是不可或缺的一部分:
$ npm install typescript ts-node @types/node peer dependencies yourself --save
當安裝完成後,需要在根目錄中新建src目錄以及server.ts文件:
$ mkdir ./src
$ touch ./src/server.ts
下一步是填入TypeScript的配置文件:
$ tsc --init
配置文件內容如下:
{
  "include": [
    "./src/**/*", // 僅編譯src目錄下的所有ts文件
  ],
  "exclude": [
    "./src/test/**/*", // 不編譯src目錄中test目錄下所有的ts文件
  ],
  "compilerOptions": {
    "target": "ES6", // 編譯後生成的js版本為es6
    "module": "CommonJS", // 編譯後的模組使用規範為CommonJs
    "lib": [ // node環境中測試ts程式碼所需要使用的庫
      "ES6"
    ],
    "outDir": "./dist", // 編譯後生成的js文件存放路徑
    "allowJs": true, // 二次編譯js文件
    "checkJs": true, // 驗證js文件語法
    "removeComments": false, // 編譯後的js文件刪除注釋資訊
    "noEmitOnError": true, // 如果編譯時出現錯誤,編譯將終止
    "strict": true, // 啟用TypeScript的嚴格模式
    "alwaysStrict": true, // 啟用JavaScript的嚴格模式
    "noFallthroughCasesInSwitch": true, // 檢測switch語句塊是否正確的使用了break
    "noImplicitReturns": true, // 檢測函數是否具有隱式的返回值
    "noUnusedLocals": false, // 檢測是否具有未使用的局部變數
    "noUnusedParameters": false, // 檢測是否具有未使用的函數參數
    "allowUnreachableCode": true, // 檢測是否具有永遠不會運行的程式碼
  }
}
由於Koa是第三方框架,所以你應該先安裝它:
$ npm install koa --save
$ npm install @types/koa --save
快速上手
使用Koa框架搭建一個HTTP伺服器非常的簡單,你只需要以下幾行程式碼即可搞定。
import * as Koa from "koa"

const server: Koa = new Koa()

server.use(async (ctx: Koa.Context) => {
    ctx.response.body = "HELLO KOA!";
})

server.listen(3000, "localhost", 128, (): void => {
    console.log("server started at //localhost:3000");
})
級聯操作
每一個視圖函數中,都具有2個參數ctx和next,而通過next你可以實現級聯操作。
如下所示,它將按順序列印1、2、3、4、5:
import * as Koa from "koa"

const server: Koa = new Koa()

server.use(async (ctx: Koa.Context, next: Koa.Next) => {
    const start: number = Date.now()
    console.log("1");
    await next()
    console.log("5");
    ctx.response.body = "HELLO KOA!"
})

server.use(async (ctx: Koa.Context, next: Koa.Next) => {
    console.log("2");
    await next();
    console.log("4");
})

server.use(async (ctx: Koa.Context, next: Koa.Next) => {
    console.log("3");
    console.log("hello middleware");
})


server.listen(3000, "localhost", 128, (): void => {
    console.log("server started at //localhost:3000");
})
路由系統
koa-router
默認的Koa框架路由系統不是很完善,對此你可以使用koa-router插件,官方所提供的文檔非常齊全,你可以自行前往查看,包括嵌套路由、動態路由等知識在官方文檔裡面都有詳細的示例,這裡不再闡述。
首先需要進行下載:
$ npm install koa-router --save
$ npm install @types/koa-router --save
然後就可以進行使用了,注意現在Middleware View Function的編寫不再是通過server.use()進行註冊了而是通過router.use()進行註冊,程式碼如下:
import * as Koa from "koa"
import * as Router from 'koa-router'

const server: Koa = new Koa()
const router: Router = new Router()

// 1. 裝載插件
server.use(router.routes())

// 2.書寫視圖,注意後面都是編程router.use()
router.get("/api/get", async (ctx: Koa.Context, next: Koa.Next) => {
    // 3.等待之前的插件處理完成後再運行Middleware View Function
    await next()
    ctx.response.body = "HELLO KOA!"
})

server.listen(3000, "localhost", 128, (): void => {
    console.log("server started at //localhost:3000");
})
請求方式
koa-router能夠限制請求方式,如下所示,其中all()方法能支援所有的請求:
router
  .get('/', (ctx, next) => {
    ctx.body = 'Hello World!';
  })
  .post('/users', (ctx, next) => {
    // ...
  })
  .put('/users/:id', (ctx, next) => {
    // ...
  })
  .del('/users/:id', (ctx, next) => {
    // ...
  })
  .all('/users/:id', (ctx, next) => {
    // ...
  });
請求相關
ctx.request
ctx是一個上下文對象,你可以通過ctx.request獲得本次HTTP服務的請求對象。
在請求對象中它提供了很多屬性可供我們使用,以下只例舉一些比較常見的:
| 屬性 | 簡寫 | 描述 |
|---|---|---|
| ctx.request.header | ctx.header | 可獲取或者設置請求頭對象 |
| ctx.request.headers | ctx.headers | 同上 |
| ctx.request.method | ctx.method | 可獲取或者設置請求方式 |
| ctx.request.href | ctx.href | 可獲取完整的href |
| ctx.request.origin | ctx.origin | 僅獲取協議、主機、埠號 |
| ctx.request.host | ctx.host | 僅獲取主機、埠號 |
| ctx.request.hostname | ctx.hostname | 僅獲取主機 |
| ctx.request.url | ctx.url | 僅獲取url部分 |
| ctx.request.path | ctx.path | 僅獲取path部分 |
| ctx.request.query | ctx.query | 僅獲取query部分 |
| ctx.request.ip | ctx.ip | 獲取請求的ip |
結果如下:
ctx.request.href            //localhost:3000/api/get?name=Jack
ctx.request.origin          //localhost:3000
ctx.request.host            localhost:3000
ctx.request.hostname        localhost
ctx.request.url             /api/get?name=Jack
ctx.request.path            /api/get
ctx.request.query           { name: 'Jack' }
params
對於動態的URL params,可以使用ctx.params獲取,注意!這是vue-router所提供的一個方法,它並不存在於ctx.request對象中:
import * as Koa from "koa"
import * as Router from 'koa-router'

const server: Koa = new Koa()
const router: Router = new Router()

server.use(router.routes())

router.get("/api/get/:id?", async (ctx: Koa.Context, next: Koa.Next) => {
    await next()
    // //localhost:3000/api/get/8?k1=v1
    console.log(ctx.params.id);  // 8
    ctx.response.body = "HELLO KOA!"
})

server.listen(3000, "localhost", 128, (): void => {
    console.log("server started at //localhost:3000");
})
get請求參數
對於URL中的query請求參數來說,你可以直接通過ctx.request.query進行獲取:
import * as Koa from "koa"
import * as Router from 'koa-router'

const server: Koa = new Koa()
const router: Router = new Router()

server.use(router.routes())

router.get("/api/get/:id?", async (ctx: Koa.Context, next: Koa.Next) => {
    await next()
    // //localhost:3000/api/get/8?k1=v1
    console.log(ctx.request.query);  // { k1: 'v1' }
    ctx.response.body = "HELLO KOA!"
})

server.listen(3000, "localhost", 128, (): void => {
    console.log("server started at //localhost:3000");
})
post請求參數
對於請求體中的data請求參數來說,我們可以通過第三方插件koa-body來讓它的獲取更加的方便。
因為默認的ctx.request對象中沒有獲取請求體的方法,但是使用koa-body插件後它會向ctx.request中封裝一個body屬性,調用它你將會獲得data請求參數對象。
要想使用koa-body插件,需要對其進行安裝:
$ npm install koa-body --save
$ npm install @types/koa__cors --save
示例如下:
import * as Koa from "koa"
import * as Router from 'koa-router'
import * as koaBody from "koa-body"

const server: Koa = new Koa()
const router: Router = new Router()

server.use(router.routes())
server.use(koaBody({
    // 是否支援 multipart-formdata 的表單
    multipart: true,
}))

router.post('/api/post', async (ctx, next) => {
    // 等待之前的插件處理完成後再運行Middleware View Function
    // 否則你必須將server.use()的插件應用語句放在
    // Middleware View Function的下面
    await next()
    console.log(ctx.request.body);
    ctx.response.body = "HELLO KOA!"
});

server.listen(3000, "localhost", 128, (): void => {
    console.log("server started at //localhost:3000");
})
上傳文件
koa-body插件同樣支援對文件自動上傳,如下所示,我們在使用之前需要對其進行一些小小的配置,在獲取文件後它將自動進行上傳。
我們可通過ctx.request.files參數獲取文件對象,與ctx.request.body一樣,它也是koa-body所封裝的方法:
import * as fs from "fs"
import * as path from "path"
import * as Koa from "koa"
import * as Router from 'koa-router'
import * as koaBody from "koa-body"

const server: Koa = new Koa()
const router: Router = new Router()

server.use(router.routes())
server.use(koaBody({
    // 是否支援 multipart-formdata 的表單
    multipart: true,
    formidable: {
        // 上傳的目錄
        uploadDir: path.join(__dirname, 'upload'),
        // 保持文件的後綴
        keepExtensions: true,
        // 最大支援上傳8M的文件
        maxFieldsSize: 8 * 1024 * 1024,
        // 文件上傳前的設置
        onFileBegin: (name: string, file: any): void => {
            const filePath: string = path.join(__dirname, "upload");
            // 檢查是否有upload目錄
            if (!fs.existsSync(filePath)) {
                fs.mkdirSync(filePath);
                console.log("mkdir success!");
            }
        }
    }
}))

router.post('/api/upload', async (ctx, next) => {
    // 等待之前的插件處理完成後再運行Middleware View Function
    // 否則你必須將server.use()的插件導入語句放在
    // Middleware View Function的下面
    await next()
    // 獲取文件對象avatar
    const avatar: any | null = ctx.request.files["avatar"]
    // 自動寫入...
    // 將上傳後的資訊自動返回
    ctx.response.set("Content-Type", "application/json")
    ctx.response.body = JSON.stringify(avatar)
});

server.listen(3000, "localhost", 128, (): void => {
    console.log("server started at //localhost:3000");
})
文件對象中包含的屬性如下:
{
    "size": 文件大小,
    "path": "上傳路徑",
    "name": "文件原本的名字",
    "type": "image/jpeg",
    "mtime": "文件最後修改時間"
}
koa-body配置
以下是koa-body在進行使用時的一級配置項:
| 參數名 | 描述 | 類型 | 默認值 |
|---|---|---|---|
| patchNode | 將請求體打到原生 node.js 的ctx.req中 | Boolean | false |
| patchKoa | 將請求體打到 koa 的 ctx.request 中 | Boolean | true |
| jsonLimit | JSON 數據體的大小限制 | String / Integer | 1mb |
| formLimit | 限制表單請求體的大小 | String / Integer | 56kb |
| textLimit | 限制 text body 的大小 | String / Integer | 56kb |
| encoding | 表單的默認編碼 | String | utf-8 |
| multipart | 是否支援 multipart-formdate 的表單 | Boolean | false |
| urlencoded | 是否支援 urlencoded 的表單 | Boolean | true |
| text | 是否解析 text/plain 的表單 | Boolean | true |
| json | 是否解析 json 請求體 | Boolean | true |
| jsonStrict | 是否使用 json 嚴格模式,true 會只處理數組和對象 | Boolean | true |
| formidable | 配置更多的關於 multipart 的選項 | Object | {} |
| onError | 錯誤處理 | Function | function(){} |
| stict | 嚴格模式,啟用後不會解析 GET, HEAD, DELETE 請求 | Boolean | true |
以下是koa-body在進行使用時的二級(formidable)配置項:
| 參數名 | 描述 | 類型 | 默認值 |
|---|---|---|---|
| maxFields | 限制欄位的數量 | Integer | 1000 |
| maxFieldsSize | 限制欄位的最大大小 | Integer | 2 * 1024 * 1024 |
| uploadDir | 文件上傳的文件夾 | String | os.tmpDir() |
| keepExtensions | 保留原來的文件後綴 | Boolean | false |
| hash | 如果要計算文件的 hash,則可以選擇 md5/sha1 | String | false |
| multipart | 是否支援多文件上傳 | Boolean | true |
| onFileBegin | 文件上傳前的一些設置操作 | Function | function(name,file){} |
ctx.req
ctx.request是Koa框架所封裝的請求對象,而ctx.req則是原生的http庫的請求對象。
我們不建議對其進行使用,具體所包含的屬性可以參照http庫中的req對象。
響應相關
ctx.response
ctx是一個上下文對象,你可以通過ctx.response獲得本次HTTP服務的響應對象。
在響應對象中它也提供了很多屬性或者方法可供我們使用,以下只例舉一些比較常見的:
| 屬性/方法 | 簡寫 | 描述 |
|---|---|---|
| ctx.response.header | 無 | 可獲取或者設置響應頭對象 |
| ctx.response.headers | 無 | 同上 |
| response.get() | ctx.get() | 可獲取某個響應頭欄位 |
| response.has() | ctx.has() | 可檢測某個響應頭欄位是否存在 |
| response.set() | ctx.set() | 用來設置單個響應頭欄位與值,也可用一個對象來設置多個響應頭欄位與值 |
| response.remove() | ctx.remove() | 可刪除某個響應頭欄位 |
| ctx.response.body | ctx.body | 可獲取或者設置響應體,可設置string、Buffer、Stream、Object或者Array的JSON字元串以及null |
| ctx.response.status | ctx.status | 可獲取或者設置響應碼 |
| ctx.response.message | ctx.message | 可獲取或者設置響應資訊,它與響應碼相關聯 |
| ctx.response.redirect | ctx.redirect | 可進行重定向跳轉 |
| ctx.response.type | ctx.type | 獲取或者設置響應的mime-type類型 |
設置響應碼
響應碼一般來說不需要我們手動設置,它的默認值大多數情況下總是200或者204.
如果你想手動進行設置,可參照下面這個示例:
router.get("/api/get", async (ctx: Koa.Context, next: Koa.Next) => {
    ctx.response.status = 403;
    ctx.response.message = "Reject service";
})
設置響應頭
如果你沒有使用TypeScript來規範你的項目程式碼,則可以直接對響應頭做出結構改變的操作:
router.get("/api/get", async (ctx: Koa.Context, next: Koa.Next) => {
    ctx.response.headers = { "Content-Type": "text/plain; charset=utf-8" };
    ctx.response.body = "HELLO KOA!";
})
如果你使用了TypeScript來規範你的項目程式碼,則必須通過ctx.response.set()方法來設置響應頭:
// 設置一個 ctx.response.set(k, v)
ctx.response.set("Content-Type", "text/plain; charset=utf-8");

// 設置多個 ctx.response.set({k1 : v1, k2 : v2, ...})
ctx.response.set({
    "Content-Type": "text/plain; charset=utf-8",
    "Token" : "=fdss9d9k!-=f23"
});
重定向
對於需要跳轉的路由,可以使用ctx.response.redirect()方法來進行跳轉:
import * as Koa from "koa"
import * as Router from 'koa-router'

const server: Koa = new Koa()
const router: Router = new Router()

server.use(router.routes())

router.get("/", async (ctx: Koa.Context, next: Koa.Next) => {
    ctx.redirect("/index");
    ctx.response.status = 302;
})

router.get("/index", async (ctx: Koa.Context, next: Koa.Next) => {
    ctx.response.body = "HELLO KOA!";
})


server.listen(3000, "localhost", 128, (): void => {
    console.log("server started at //localhost:3000");
})
CORS跨域
利用第三方插件@koa/cors解決跨域問題:
$ npm install @koa/cors
它的使用非常簡單,直接server.use()即可,當然你也可以對其進行詳細配置,這裡不再進行配置舉例:
import * as Koa from "koa"
import * as cors from "@koa/cors"

const server: Koa = new Koa()
server.use(cors())
ctx.res
ctx.response是Koa框架所封裝的響應對象,而ctx.res則是原生的http庫的響應對象。
我們不建議對其進行使用,具體所包含的屬性可以參照http庫中的res對象。
jsonwebtoken
基本介紹
Koa框架中提供了Cookie相關的操作,但是Cookie在目前的項目開發中使用的比較少,故這裡不再進行例舉,而是推薦使用第三方插件jsonwebtoken來生成JWT進行驗證。
如果你不了解JWT,我之前也有寫過相關的技術文章,你可以搜索並進行參考。
現在我假設你已經了解過了JWT相關的知識,讓我開始第一步,安裝jsonwebtoken這個插件吧。
$ npm install jsonwebtoken --save
安裝後之後我們需要在src目錄中新建一個JWT目錄以及一個index.js文件,用來JWT存放相關的程式碼:
$ mkdir ./src/jwt
$ touch ./src/jwt/index.ts
封裝使用
一般的手動簽發token我們需要用到下面3種類型的數據:
- header:頭部資訊,可定義加密類型、加密方式
- playload:荷載資訊,可定義token過期時間、簽發者、接受者以及私有聲明資訊,但不建議存放敏感資訊
- secret:密鑰,該密鑰只能由服務端所知曉
但是jsonwebtoken對其進行封裝,直接使用config來配置即可,以下是簽發和驗證token的案例,默認它將採用HASH256演算法進行JWT格式封裝:
import * as JWT from "jsonwebtoken"

// 服務端的字元串,絕對保密
const secret = "=937dce32&?f99"

function issueToken(userID: number, userName: string, expiration: number = 86400 * 14) {
    // 定義荷載資訊,不要存放敏感的諸如用戶密碼之類的數據
    const playLoad = {
        id: String(userID),
        name: userName,
    }
    // 定義配置文件,下面有一些選項也是屬於荷載資訊的一部分,如過期時間、簽發時間、面向誰簽發的
    const config = {
        // 定義頭部資訊
        header: {},
        // 過期時間、按秒計算,也可以是字元串,如1day、1min等
        expiresIn: expiration,
        // 在簽發後多久之前這個token是無用的,如果是數字則是按秒計算
        notBefore: `120ms`,
        // 面向誰簽發的
        audience: userName,
        // 發行者是誰
        issuer: "Node.js KOA",
        // 該token的發布主題
        subject: "demo",
        // 不使用時間戳
        noTimestamp: true,
    }
    // 第一個對象中也可以添加額外的屬性,它將作為荷載資訊被格式化
    return JWT.sign(playLoad, secret, config)
}

function verifyToken(token: string | string[]): { verify: boolean, playLoad: { id: string, name: string, nbf: number, exp: number, aud: string, iss: string, sub: string } | null } {
    // 如果沒有拋出異常,則驗證成功
    try {
        return {
            playLoad: JWT.verify(token, secret),
            verify: true
        }
    }
    // 如果拋出了異常,則驗證失敗
    catch {
        return {
            playLoad: null,
            verify: false
        }
    }
}

export { issueToken, verifyToken }
使用案例:
// 手動傳入用戶ID以及用戶姓名還有token過期時間
const token = issueToken(19, "Jack", 7);

// 傳入token驗證是否成功
console.log(verifyToken(token));
驗證成功返回的結果:
{
  playLoad: {
    id: '19',
    name: 'Jack',
    nbf: 1633537512,
    exp: 1633537519,
    aud: 'Jack',
    iss: 'Node.js KOA',
    sub: 'demo'
  },
  verify: true
}
實戰演示
我們以一個簡單的案例來進行說明,後端有2個api介面,分別是index和login。
若用戶第一次訪問主頁,則必須先進行登錄後才能訪問主頁,此後的20s內用戶不用再重新登錄:
import * as Koa from "koa"
import * as Router from 'koa-router'
import * as koaBody from 'koa-body'
import * as cors from "@koa/cors"
import * as JWT from "./jwt/index"

// 模擬資料庫
const userDataBase: { id: number, username: string, password: string, age: number }[] = [
    { id: 1, username: "Jack", password: "123456", age: 18 }
]

const server: Koa = new Koa()
const router: Router = new Router()

server.use(cors())
server.use(koaBody({
    // 是否支援 multipart-formdata 的表單
    multipart: true,
}))
server.use(router.routes())

server.use(async (ctx: any, next: any) => {
    await next()
    // 由於所有返回的數據格式都是JSON,故這裡直接進行生命
    ctx.response.set("Content-Type", "application/json");
})

router.get("/api/index", async (ctx: Koa.Context, next: Koa.Next) => {
    await next()
    const token: string | string[] = ctx.request.get("JWT");
    // 如果能獲取token就進行驗證,判斷是否是偽造請求
    if (token) {
        const { verify, playLoad } = JWT.verifyToken(token)
        if (verify) {
            // 驗證通過,直接返回playLoad給前端
            ctx.response.body = JSON.stringify({
                code: 200,
                message: playLoad
            })
        }
        else {
            // 驗證未通過,token無效或者已過期
            ctx.response.body = JSON.stringify({
                code: 403,
                message: "Please do not forgery information"
            })
        }
    }
    // 獲取不到token,你應該先進行登錄
    else {
        ctx.response.body = JSON.stringify({
            code: 401,
            message: "please log in first"
        })
    }
})

router.post("/api/login", async (ctx: Koa.Context, next: Koa.Next) => {
    await next()
    const name: string = ctx.request.body.name;
    const pwd: string = ctx.request.body.pwd;
    // 如果用戶存在於資料庫中,就簽發token,並且設置在響應頭中返回
    for (const row of userDataBase) {
        if (row.username === name && row.password === pwd) {
            const token = JWT.issueToken(row.id, row.username, 20);
            // 設置響應頭JWT
            ctx.response.set("JWT", token);
            ctx.response.body = JSON.stringify({
                code: 200,
                message: "login successful"
            });
            return
        }
    }
    // 用戶不存在
    ctx.response.body = JSON.stringify({
        code: 406,
        message: "Login error, username or password is incorrect"
    })
})

server.listen(3000, "localhost", 128, (): void => {
    console.log("server started at //localhost:3000");
})
程式碼測試
下面我們使用postMan來測試一下這個功能過程。
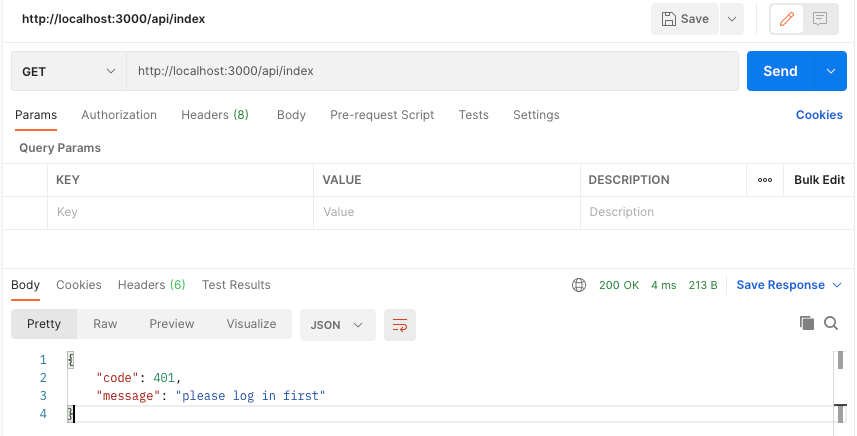
首先是用戶第一次到我們的網站嘗試訪問主頁,此時會提示它應該先進行登錄:
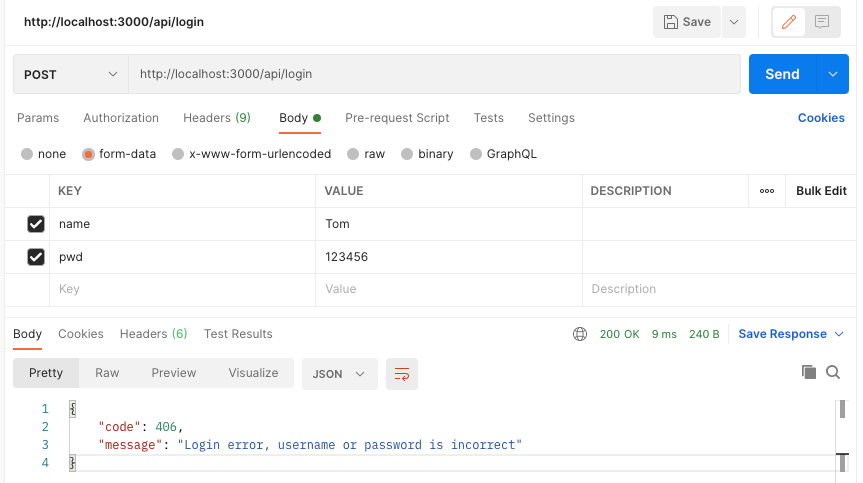
然後我們進行登錄,下面是登錄錯誤的情況,資料庫沒有這個用戶:
下面是登錄成功後的情況,它會返回給你一個JWT的響應欄位:
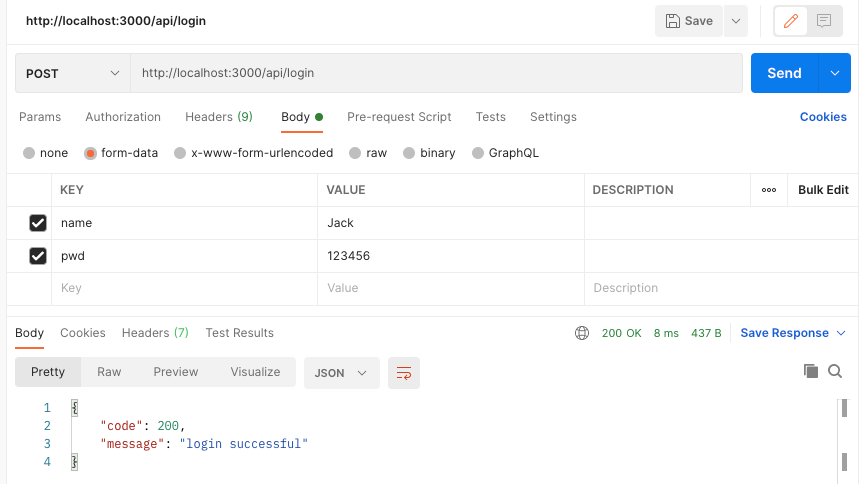
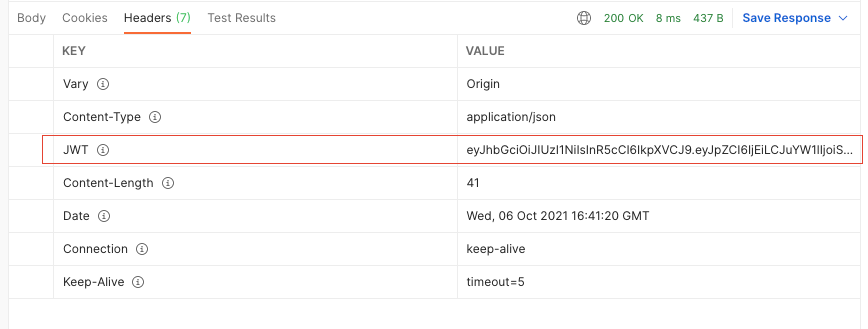
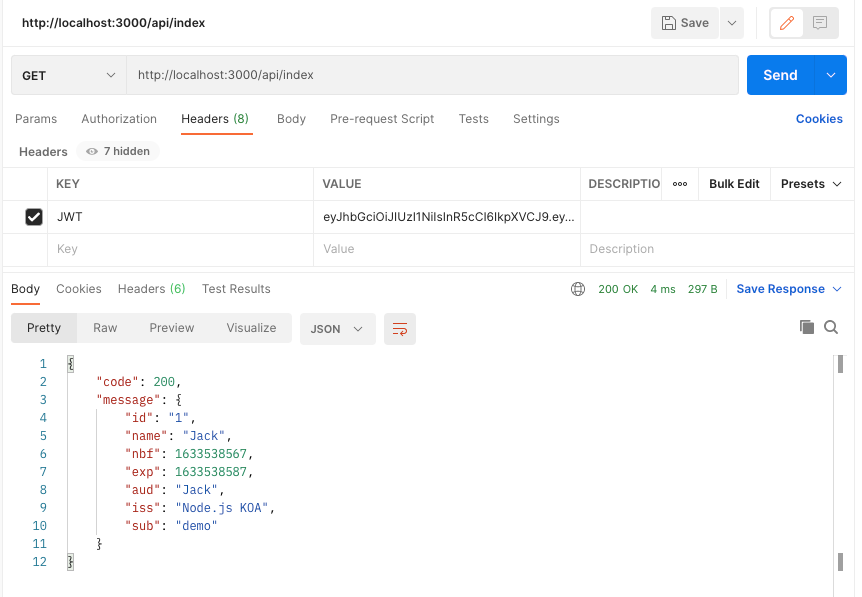
我們需要複製這個JWT響應欄位的value值,並且將它添加到訪問index時的請求頭裡,注意請求頭的欄位也必須是JWT,因為我們的後端做了限制,那麼接下來的20s內你對index的訪問都將是正常的:
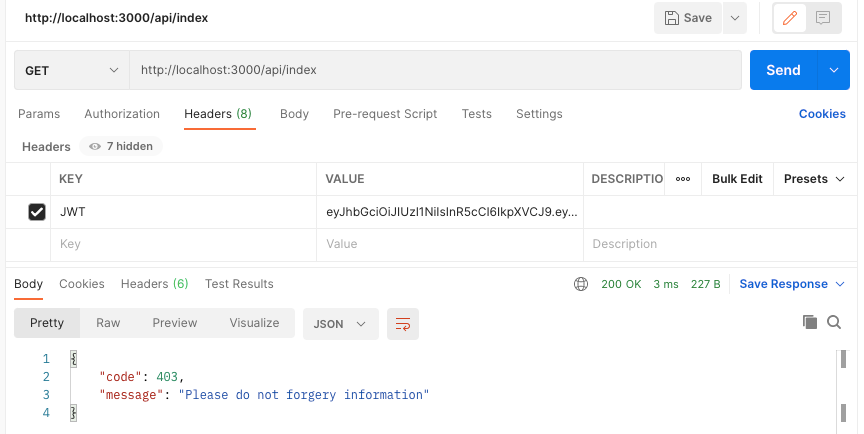
如果token過期或者被偽造,它將提示你不要偽造token,其實這裡有心的朋友可以處理的更細節一點:
其他插件推薦
好了,關於Koa框架的基本使用目前就到此結束了。
下面推薦一些Koa框架中可能會被使用到的插件:
- koa-compress:用於壓縮內容,以便更快的完成HTTP響應
- koa-logger:提供日誌輸出
- koa-static:提供靜態文件服務
- koa-view:提供視圖模板渲染,適用於前後端混合開發
- koa-jwt:也是一款提供JWT認證的插件,不同於jsonwebtoken,它的局限性比較清

