從壹開始學習NetCore 45 ║ 終於解決了事務問題
- 2019 年 10 月 3 日
- 筆記
一、項目說明
哈嘍,又來寫文章了,原來放假可以這麼爽,可以學習和分享,?噓,大家要好好的工作喲。昨天發表的問題,嗯,給我留下了一點點衝擊,夜裡輾轉反側,想了很多,從好到壞再到好再到壞,從希望到失望再到希望再到失望,想起來當年高四了,不想解釋什麼了,四年後再見❤,不說廢話,直接說說今天的內容吧。
今天這個內容,還是來源於兩個多月前,我的項目的一個 issue ,當時說到了如何使用事務,(為啥要使用事務,我就不多說了,相信肯定都知道,還有那個每次面試都問的題,事務四大特性。不知道還有沒有小夥伴記得,不,是都記得!)我一直也是各種嘗試,直到前幾天也嘗試了幾個辦法,還是無果,然後又和 sqlsugar 的作者凱旋討論這個問題。他說只要能保證每次http 的scope 會話中的 sugar client 是同一個就行了,而且又不能把 client 設置為單例,天天看著這個 issue,心裡難免波瀾,終於喲,昨天群管 @大黃瓜 小夥伴研究出來了,我很開心,表揚下他,下邊就正式說說在我的項目中,如果使用事務的:
項目介紹: netcore 2.2 + Sqlsugar 5.0 + UnitOfWork + async Repository + Service 。
投稿作者:QQ群:大黃瓜(部落格園地址不詳)
項目已經修改,不僅僅實現了單一倉儲服務的事務提交,而且也可以跨類跨倉儲服務來實現事務,歡迎大家下載與公測,沒問題,我會merge 到 master。
為了防止大家不必要的更新錯誤,我新建了一個分支,大家自己去看分支即可——https://github.com/anjoy8/Blog.Core/tree/Trans1.0 。
Tips:
我認為 sqlsugar 還是很不錯,很好用,當然,不能用萬能來形容客觀事物,這本身就不是一個成年人該有的思維,在我推廣 sqlsugar 這一年來,我也一直給凱旋提一些需求和Bug,他都特別及時的解決了,而且使用上也很順手,目前已經實現了跨服務事務操作了,下一步就是在blog.core 中,使用主從資料庫,分離了,加油。
二、重新設計SqlSugarClient
1、創建工作單元介面
首先我們需要在 Blog.Core.IRepository 層,創建一個文件夾 UnitOfWork ,然後創建介面 IUnitOfWork.cs ,用來對工作單元進行定義相應的行為操作:
public interface IUnitOfWork { // 創建 sqlsugar client 實例 ISqlSugarClient GetDbClient(); // 開始事務 void BeginTran(); // 提交事務 void CommitTran(); // 回滾事務 void RollbackTran(); }
2、對 UnitOfWork 介面進行實現
在 Blog.Core.Repository 層,創建一個文件夾 UnitOfWork,然後創建事務介面實現類 UnitOfWork.cs ,來對事務行為做實現。
public class UnitOfWork : IUnitOfWork { private readonly ISqlSugarClient _sqlSugarClient; // 注入 sugar client 實例 public UnitOfWork(ISqlSugarClient sqlSugarClient) { _sqlSugarClient = sqlSugarClient; } // 保證每次 scope 訪問,多個倉儲類,都用一個 client 實例 // 注意,不是單例模型!!! public ISqlSugarClient GetDbClient() { return _sqlSugarClient; } public void BeginTran() { GetDbClient().Ado.BeginTran(); } public void CommitTran() { try { GetDbClient().Ado.CommitTran(); // } catch (Exception ex) { GetDbClient().Ado.RollbackTran(); } } public void RollbackTran() { GetDbClient().Ado.RollbackTran(); } }
具體的內容,很簡單,這裡不過多解釋。
3、用 UnitOfWork 接管 SqlguarClient
在基類泛型倉儲類 BaseRepository<TEntity> 中,我們修改構造函數,注入工作單元介面,用來將 sqlsugar 實例統一起來,不是每次都 new,而且通過工作單元來控制:
private ISqlSugarClient _db; private readonly IUnitOfWork _unitOfWork; // 構造函數,通過 unitofwork,來控制sqlsugar 實例 public BaseRepository(IUnitOfWork unitOfWork) { _unitOfWork = unitOfWork; _db = unitOfWork.GetDbClient(); // 好像這個可以去掉,先保留 DbContext.Init(BaseDBConfig.ConnectionString, (DbType)BaseDBConfig.DbType); }
你可以對比下以前的程式碼,就知道了,這麼做的目的,就是把 sugar client 統一起來,這樣就能保證每次一個scope ,都能是同一個實例。
4、修改每一個倉儲的構造函數
上邊我們為了實現對 sugar client的控制,在基類倉儲的構造函數中,注入了IUnitOfWork,但是這樣會導致子類的倉儲報錯,畢竟父類構造函數修改了嘛,所以目前有兩個方案:
1、去掉子倉儲,只使用泛型基類倉儲,在service層中,使用 private readonly IRepository<實體類> _repository; 這種方法。
2、去一一的修改子倉儲,增加構造函數,將 IUnitOfWork 傳給父類,具體的看我的程式碼即可:

5、依賴注入 ISqlSugarClient
這個是肯定的,大家還記得上邊說的呢,我們要在 BaseRepository 中,注入 ISqlSugarClient ,所以就必須依賴注入:
// 這裡我不是引用了命名空間,因為如果引用命名空間的話,會和Microsoft的一個GetTypeInfo存在二義性,所以就直接這麼使用了。 services.AddScoped<SqlSugar.ISqlSugarClient>(o => { return new SqlSugar.SqlSugarClient(new SqlSugar.ConnectionConfig() { ConnectionString = BaseDBConfig.ConnectionString,//必填, 資料庫連接字元串 DbType = (SqlSugar.DbType)BaseDBConfig.DbType,//必填, 資料庫類型 IsAutoCloseConnection = true,//默認false, 時候知道關閉資料庫連接, 設置為true無需使用using或者Close操作 IsShardSameThread=true,//共享執行緒 InitKeyType = SqlSugar.InitKeyType.SystemTable//默認SystemTable, 欄位資訊讀取, 如:該屬性是不是主鍵,標識列等等資訊 }); });
這裡有一個小知識點,就是我們的 IUnitOfWork 已經隨著 倉儲層 依賴注入了,就不許單獨注入了,是不是這個時候感覺使用 Autofac 很方便?
到了這裡,修改就完成了,下邊就是如何使用了。
三、正式使用事務
1、直接操作跨 Service 事務
現在我們就可以使用如何使用事務了,第一個簡單粗暴的,就是全部寫到 controller 里,我已經寫好了一個demo,大家來看看:
// 依賴注入 public TransactionController(IUnitOfWork unitOfWork, IPasswordLibServices passwordLibServices, IGuestbookServices guestbookServices) { _unitOfWork = unitOfWork; _passwordLibServices = passwordLibServices; _guestbookServices = guestbookServices; }
[HttpGet] public async Task<IEnumerable<string>> Get() { try { Console.WriteLine($""); //開始事務 Console.WriteLine($"Begin Transaction"); _unitOfWork.BeginTran(); Console.WriteLine($""); var passwords = await _passwordLibServices.Query(); // 第一次密碼錶的數據條數 Console.WriteLine($"first time : the count of passwords is :{passwords.Count}"); // 向密碼錶添加一條數據 Console.WriteLine($"insert a data into the table PasswordLib now."); var insertPassword = await _passwordLibServices.Add(new PasswordLib() { IsDeleted = false, plAccountName = "aaa", plCreateTime = DateTime.Now }); // 第二次查看密碼錶有多少條數據,判斷是否添加成功 passwords = await _passwordLibServices.Query(d => d.IsDeleted == false); Console.WriteLine($"second time : the count of passwords is :{passwords.Count}"); //...... Console.WriteLine($""); var guestbooks = await _guestbookServices.Query(); Console.WriteLine($"first time : the count of guestbooks is :{guestbooks.Count}"); int ex = 0; // 出現了一個異常! Console.WriteLine($"nThere's an exception!!"); int throwEx = 1 / ex; Console.WriteLine($"insert a data into the table Guestbook now."); var insertGuestbook = await _guestbookServices.Add(new Guestbook() { username = "bbb", blogId = 1, createdate = DateTime.Now, isshow = true }); guestbooks = await _guestbookServices.Query(); Console.WriteLine($"second time : the count of guestbooks is :{guestbooks.Count}"); //事務提交 _unitOfWork.CommitTran(); } catch (Exception) { // 事務回滾 _unitOfWork.RollbackTran(); var passwords = await _passwordLibServices.Query(); // 第三次查看密碼錶有幾條數據,判斷是否回滾成功 Console.WriteLine($"third time : the count of passwords is :{passwords.Count}"); var guestbooks = await _guestbookServices.Query(); Console.WriteLine($"third time : the count of guestbooks is :{guestbooks.Count}"); } return new string[] { "value1", "value2" }; }
項目的過程,在上邊注釋已經說明了,大家可以看一下,很簡單,就是查詢,添加,再查詢,判斷是否操作成功,那現在我們就測試一下,資料庫表是空的:
然後我們執行方法,動圖如下:
可以看到,我們是密碼錶已經添加了一條數據的前提下,後來回滾後,數據都被刪掉了,資料庫也沒有對應的值,達到的目的。
但是這裡有兩個小問題:
1、我們控制的是 Service 類,那我們能不能控制倉儲 Repository 類呢?
2、我們每次都這麼寫,會不會很麻煩呢,能不能用統一AOP呢?
答案都是肯定的!
2、建立事務AOP,解決多倉儲內的事務操作
在 Blog.Core api 層的 AOP 文件夾下,創建 BlogTranAOP.cs 文件,用來實現事務AOP操作:
public class BlogTranAOP : IInterceptor { // 依賴注入工作單元介面 private readonly IUnitOfWork _unitOfWork; public BlogTranAOP(IUnitOfWork unitOfWork) { _unitOfWork = unitOfWork; } /// <summary> /// 實例化IInterceptor唯一方法 /// </summary> /// <param name="invocation">包含被攔截方法的資訊</param> public void Intercept(IInvocation invocation) { var method = invocation.MethodInvocationTarget ?? invocation.Method; //對當前方法的特性驗證 //如果需要驗證 if (method.GetCustomAttributes(true).FirstOrDefault(x => x.GetType() == typeof(UseTranAttribute)) is UseTranAttribute) { try { Console.WriteLine($"Begin Transaction"); _unitOfWork.BeginTran(); invocation.Proceed(); // 非同步獲取異常,普通的 try catch 外層不能達到目的,畢竟是非同步的 if (IsAsyncMethod(invocation.Method)) { if (invocation.Method.ReturnType == typeof(Task)) { invocation.ReturnValue = InternalAsyncHelper.AwaitTaskWithPostActionAndFinally( (Task)invocation.ReturnValue, async () => await TestActionAsync(invocation), ex => { _unitOfWork.RollbackTran();//事務回滾 }); } else //Task<TResult> { invocation.ReturnValue = InternalAsyncHelper.CallAwaitTaskWithPostActionAndFinallyAndGetResult( invocation.Method.ReturnType.GenericTypeArguments[0], invocation.ReturnValue, async () => await TestActionAsync(invocation), ex => { _unitOfWork.RollbackTran();//事務回滾 }); } } _unitOfWork.CommitTran(); } catch (Exception) { Console.WriteLine($"Rollback Transaction"); _unitOfWork.RollbackTran(); } } else { invocation.Proceed();//直接執行被攔截方法 } } public static bool IsAsyncMethod(MethodInfo method) { return ( method.ReturnType == typeof(Task) || (method.ReturnType.IsGenericType && method.ReturnType.GetGenericTypeDefinition() == typeof(Task<>)) ); } private async Task TestActionAsync(IInvocation invocation) { } }
上邊具體的操作很簡單,如果你看過我的快取AOP和日誌AOP以後,肯定就能看懂這個事務AOP的內容,這裡只是有一點,需要增加一個特性,public class UseTranAttribute : Attribute,這個和當時的快取AOP是一樣的,只有配置了才會實現事務提交,具體的請查看 UseTranAttribute.cs 類。
然後我們測試一個子倉儲項目,具體的程式碼如下:
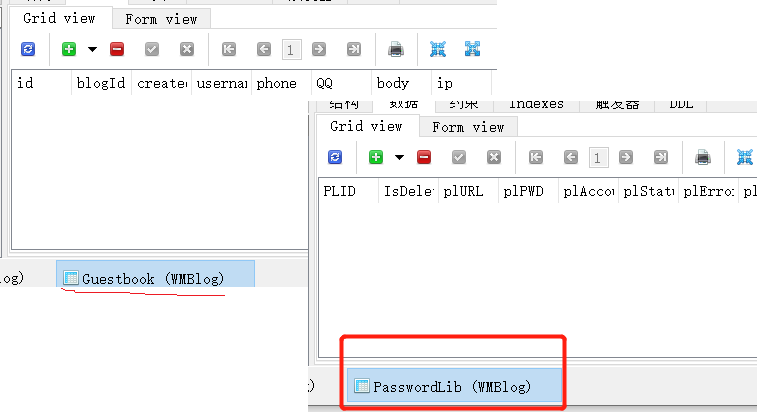
在 Blog.Core.Services 層下的 GuestbookServices.cs 內,增加一個 Task<bool> TestTranInRepositoryAOP() 方法,內容和上邊 controller 中的控制 service 類似,只不過是用 Repository 操作類:
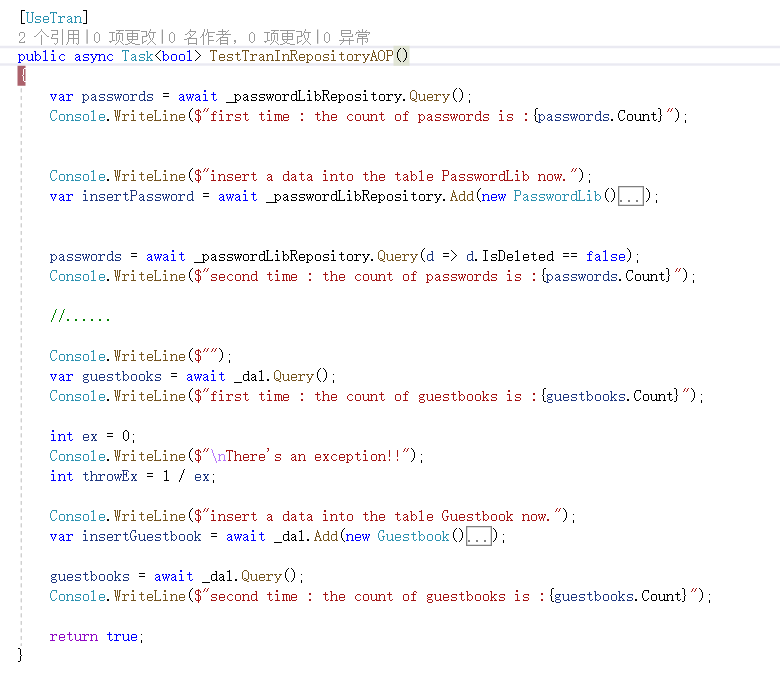
增加事務特性 [UseTran] ,然後在控制器正常的調用,具體的操作和結果就不展示了,已經測試過了,沒問題。
到這裡,就終於解決了事務的相關操作,當然這裡還是有很多的問題需要考究,我也在考慮有沒有更好的點子和方案,期待後續報道。
四、Github && Gitee
注意情況分支:Trans1.0
https://github.com/anjoy8/Blog.Core
https://gitee.com/laozhangIsPhi/Blog.Core
