Spring Boot2 系列教程(九)Spring Boot 整合 Thymeleaf
- 2019 年 10 月 3 日
- 筆記
雖然現在慢慢在流行前後端分離開發,但是據松哥所了解到的,還是有一些公司在做前後端不分的開發,而在前後端不分的開發中,我們就會需要後端頁面模板(實際上,即使前後端分離,也會在一些場景下需要使用頁面模板,例如郵件發送模板)。
早期的 Spring Boot 中還支援使用 Velocity 作為頁面模板,現在的 Spring Boot 中已經不支援 Velocity 了,頁面模板主要支援 Thymeleaf 和 Freemarker ,當然,作為 Java 最最基本的頁面模板 Jsp ,Spring Boot 也是支援的,只是使用比較麻煩。
松哥打算用三篇文章分別向大家介紹一下這三種頁面模板技術。
今天我們主要來看看 Thymeleaf 在 Spring Boot 中的整合!
Thymeleaf 簡介
Thymeleaf 是新一代 Java 模板引擎,它類似於 Velocity、FreeMarker 等傳統 Java 模板引擎,但是與傳統 Java 模板引擎不同的是,Thymeleaf 支援 HTML 原型。
它既可以讓前端工程師在瀏覽器中直接打開查看樣式,也可以讓後端工程師結合真實數據查看顯示效果,同時,SpringBoot 提供了 Thymeleaf 自動化配置解決方案,因此在 SpringBoot 中使用 Thymeleaf 非常方便。
事實上, Thymeleaf 除了展示基本的 HTML ,進行頁面渲染之外,也可以作為一個 HTML 片段進行渲染,例如我們在做郵件發送時,可以使用 Thymeleaf 作為郵件發送模板。
另外,由於 Thymeleaf 模板後綴為 .html,可以直接被瀏覽器打開,因此,預覽時非常方便。
整合
- 創建項目
Spring Boot 中整合 Thymeleaf 非常容易,只需要創建項目時添加 Thymeleaf 即可:
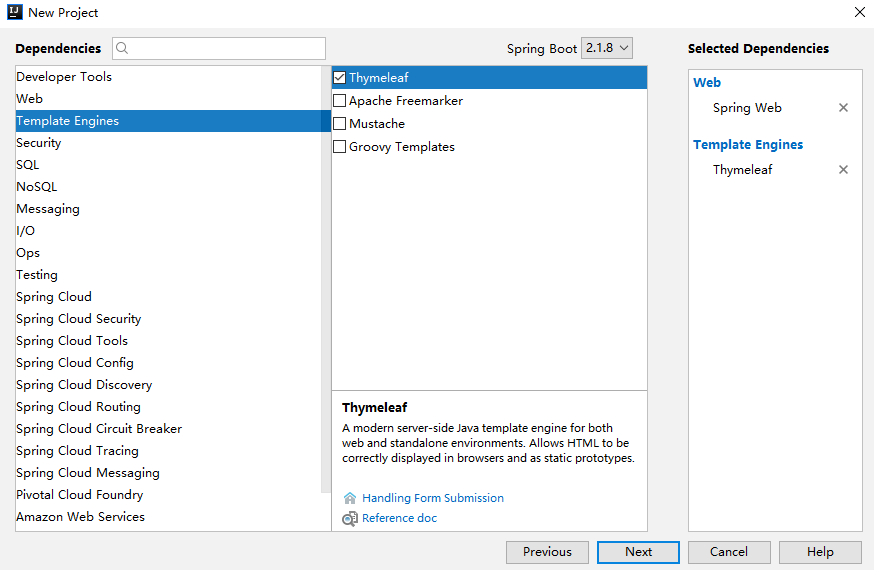
創建完成後,pom.xml 依賴如下:
<dependency> <groupId>org.springframework.boot</groupId> <artifactId>spring-boot-starter-thymeleaf</artifactId> </dependency> <dependency> <groupId>org.springframework.boot</groupId> <artifactId>spring-boot-starter-web</artifactId> </dependency>當然,Thymeleaf 不僅僅能在 Spring Boot 中使用,也可以使用在其他地方,只不過 Spring Boot 針對 Thymeleaf 提供了一整套的自動化配置方案,這一套配置類的屬性在 org.springframework.boot.autoconfigure.thymeleaf.ThymeleafProperties 中,部分源碼如下:
@ConfigurationProperties(prefix = "spring.thymeleaf") public class ThymeleafProperties { private static final Charset DEFAULT_ENCODING = StandardCharsets.UTF_8; public static final String DEFAULT_PREFIX = "classpath:/templates/"; public static final String DEFAULT_SUFFIX = ".html"; private boolean checkTemplate = true; private boolean checkTemplateLocation = true; private String prefix = DEFAULT_PREFIX; private String suffix = DEFAULT_SUFFIX; private String mode = "HTML"; private Charset encoding = DEFAULT_ENCODING; private boolean cache = true; //... }- 首先通過
@ConfigurationProperties註解,將application.properties前綴為spring.thymeleaf的配置和這個類中的屬性綁定。 - 前三個
static變數定義了默認的編碼格式、視圖解析器的前綴、後綴等。 - 從前三行配置中,可以看出來,
Thymeleaf模板的默認位置在resources/templates目錄下,默認的後綴是html。 - 這些配置,如果開發者不自己提供,則使用 默認的,如果自己提供,則在
application.properties中以spring.thymeleaf開始相關的配置。
而我們剛剛提到的,Spring Boot 為 Thymeleaf 提供的自動化配置類,則是 org.springframework.boot.autoconfigure.thymeleaf.ThymeleafAutoConfiguration ,部分源碼如下:
@Configuration @EnableConfigurationProperties(ThymeleafProperties.class) @ConditionalOnClass({ TemplateMode.class, SpringTemplateEngine.class }) @AutoConfigureAfter({ WebMvcAutoConfiguration.class, WebFluxAutoConfiguration.class }) public class ThymeleafAutoConfiguration { }可以看到,在這個自動化配置類中,首先導入 ThymeleafProperties ,然後 @ConditionalOnClass 註解表示噹噹前系統中存在 TemplateMode 和 SpringTemplateEngine 類時,當前的自動化配置類才會生效,即只要項目中引入了 Thymeleaf 相關的依賴,這個配置就會生效。
這些默認的配置我們幾乎不需要做任何更改就可以直接使用了。如果開發者有特殊需求,則可以在 application.properties 中配置以 spring.thymeleaf 開頭的屬性即可。
- 創建 Controller
接下來我們就可以創建 Controller 了,實際上引入 Thymeleaf 依賴之後,我們可以不做任何配置。新建的 IndexController 如下:
@Controller public class IndexController { @GetMapping("/index") public String index(Model model) { List<User> users = new ArrayList<>(); for (int i = 0; i < 10; i++) { User u = new User(); u.setId((long) i); u.setName("javaboy:" + i); u.setAddress("深圳:" + i); users.add(u); } model.addAttribute("users", users); return "index"; } } public class User { private Long id; private String name; private String address; //省略 getter/setter }在 IndexController 中返回邏輯視圖名+數據,邏輯視圖名為 index ,意思我們需要在 resources/templates 目錄下提供一個名為 index.html 的 Thymeleaf 模板文件。
- 創建 Thymeleaf
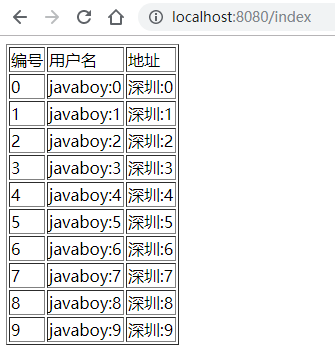
<!DOCTYPE html> <html lang="en" xmlns:th="http://www.thymeleaf.org"> <head> <meta charset="UTF-8"> <title>Title</title> </head> <body> <table border="1"> <tr> <td>編號</td> <td>用戶名</td> <td>地址</td> </tr> <tr th:each="user : ${users}"> <td th:text="${user.id}"></td> <td th:text="${user.name}"></td> <td th:text="${user.address}"></td> </tr> </table> </body> </html>在 Thymeleaf 中,通過 th:each 指令來遍歷一個集合,數據的展示通過 th:text 指令來實現,
注意 index.html 最上面要引入 thymeleaf 名稱空間。
配置完成後,就可以啟動項目了,訪問 /index 介面,就能看到集合中的數據了:
另外,Thymeleaf 支援在 js 中直接獲取 Model 中的變數。例如,在 IndexController 中有一個變數 username :
@Controller public class IndexController { @GetMapping("/index") public String index(Model model) { model.addAttribute("username", "李四"); return "index"; } }在頁面模板中,可以直接在 js 中獲取到這個變數:
<script th:inline="javascript"> var username = [[${username}]]; console.log(username) </script>這個功能算是 Thymeleaf 的特色之一吧。
手動渲染
前面我們說的是返回一個 Thymeleaf 模板,我們也可以手動渲染 Thymeleaf 模板,這個一般在郵件發送時候有用,例如我在 resources/templates 目錄下新建一個郵件模板,如下:
<!DOCTYPE html> <html lang="en" xmlns:th="http://www.thymeleaf.org"> <head> <meta charset="UTF-8"> <title>Title</title> </head> <body> <p>hello 歡迎 <span th:text="${username}"></span>加入 XXX 集團,您的入職資訊如下:</p> <table border="1"> <tr> <td>職位</td> <td th:text="${position}"></td> </tr> <tr> <td>薪水</td> <td th:text="${salary}"></td> </tr> </table> <img src="http://www.javaboy.org/images/sb/javaboy.jpg" alt=""> </body> </html>這一個 HTML 模板中,有幾個變數,我們要將這個 HTML 模板渲染成一個 String 字元串,再把這個字元串通過郵件發送出去,那麼如何手動渲染呢?
@Autowired TemplateEngine templateEngine; @Test public void test1() throws MessagingException { Context context = new Context(); context.setVariable("username", "javaboy"); context.setVariable("position", "Java工程師"); context.setVariable("salary", 99999); String mail = templateEngine.process("mail", context); //省略郵件發送 }- 渲染時,我們需要首先注入一個 TemplateEngine 對象,這個對象就是在 Thymeleaf 的自動化配置類中配置的(即當我們引入 Thymeleaf 的依賴之後,這個實例就有了)。
- 然後構造一個 Context 對象用來存放變數。
- 調用 process 方法進行渲染,該方法的返回值就是渲染後的 HTML 字元串,然後我們將這個字元串發送出去。
這是 Spring Boot 整合 Thymeleaf 的幾個關鍵點,關於 Thymeleaf 這個頁面模板本身更多的用法,大家可以參考 Thymeleaf 的文檔:https://www.thymeleaf.org。
總結
本文主要向大家簡單介紹了 Spring Boot 和 Thymeleaf 整合時的幾個問題,還是比較簡單的,大家可以閱讀 Thymeleaf 官方文檔學習 Thymeleaf 的更多用法。本文案例我已上傳到 GitHub :https://github.com/lenve/javaboy-code-samples
關於本文,有問題歡迎留言討論。
關注公眾號【江南一點雨】,專註於 Spring Boot+微服務以及前後端分離等全棧技術,定期影片教程分享,關注後回復 Java ,領取松哥為你精心準備的 Java 乾貨!