安裝Apache、Nginx和PHP-基於Centos7環境
- 2021 年 6 月 22 日
- 筆記
使用的軟體:putty或Xshell都可。
一、搭建Apache
1、編譯安裝
(1)、安裝編譯器
yum install -y gcc
(2)安裝Opensll
查詢官網得到OpenSSL下載網址//www.openssl.org/source/openssl-1.1.1k.tar.gz,
使用下面指令下載安裝
wget https://www.openssl.org/source/openssl-1.1.1k.tar.gz
解壓壓縮包
tar -zxvf openssl-1.1.1k.tar.gz
進入解壓好的文件
cd opensll-1.1.1k
使用默認配置
./config --prefix=/usr/local/openssl
./config -t
安裝opensll
make && make install
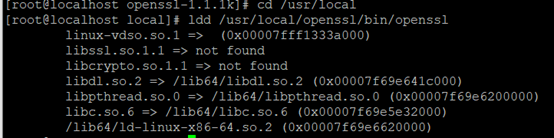
最後檢查
cd /usr/local
ldd /usr/local/opensll/bin/opensll
會出現下列資訊
(3)安裝http服務
先檢查是否已經安裝
rpm -qa httpd
安裝httpd
yum install httpd* -y
2、測試檢驗
(1)使防火牆不阻擋Apache的方法
方法一:關閉防火牆(不推薦)
查看防火牆狀態
systemctl status firewalld.service
關閉防火牆(下圖成功)
systemctl stop firewalld.service

方法二:讓防火牆認可其服務和埠
firewall-cmd --add-service=http --permanent
success
使更改生效
firewall-cmd --reload
success
讓防火牆認可http、https和80/tcp
firewall-cmd --permanent --add-service=http
firewall-cmd --permanent --add-service=https
firewall-cmd --permanent --zone=public --add-port=80/tcp
再添加一個8080/tcp埠,為後面的Nginx留一個埠。
firewall-cmd --permanent --zone=public --add-port=8080/tcp
使更改生效
firewall-cmd --reload
查看防火牆開放的埠、服務。
 firewall-cmd --permanent --zone=public --list-ports
firewall-cmd --permanent --zone=public --list-services
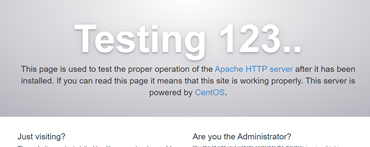
(2)測試Apache
開啟httpd服務
systemctl start httpd.service
查看狀態
systemctl status httpd.service
最後使用瀏覽器搜索自己IP地址(即://你的IP)可以看到Apache的基本測試頁面
3、關於Apache的一些基本操作設置
systemctl stop httpd.service 停止Apache服務
systemctl restart httpd.service 重啟
systemctl enable httpd.service 開機啟動
systemctl disable httpd.service 開機不啟動
systemctl list-unit-files | grep httpd 檢查Apache是否已經安裝了開機自動啟動
二、搭建Nginx
1、編譯安裝
(1)搭建環境
安裝c++編譯器
yum install gcc-c++ -y
安裝PCRE pcre-devel
PCRE(Perl Compatible Regular Expressions) 是一個Perl庫,包括 perl 兼容的正則表達式庫。nginx 的 http 模組使用 pcre 來解析正則表達式,所以需要在 linux 上安裝 pcre 庫,pcre-devel 是使用 pcre 開發的一個二次開發庫。nginx也需要此庫。
yum install -y pcre pcre-devel
zlib安裝
zlib 庫提供了很多種壓縮和解壓縮的方式, nginx 使用 zlib 對 http 包的內容進行 gzip ,所以需要在 Centos 上安裝 zlib 庫。
yum install -y zlib zlib-devel
OpenSLL庫安裝
OpenSSL 是一個強大的安全套接字層密碼庫,囊括主要的密碼演算法、常用的密鑰和證書封裝管理功能及 SSL 協議,並提供豐富的應用程式供測試或其它目的使用。nginx 不僅支援 http 協議,還支援 https,所以需要在 Centos 安裝 OpenSSL 庫。
yum install -y openssl openssl-devel
(2)下載安裝
先在官網上尋找所需要的 .tar.gz壓縮包 ://nginx.org/en/download.html (這裡我下載的是nginx-1.12.2.tar.gz)
wget https://nginx.org/download/nginx-1.12.2.tar.gz
命令解壓
tar -zxvf nginx-1.12.2.tar.gz
進入解壓好的文件
cd nginx-1.12.2
簡單配置
./configure --prefix=/usr/local/nginx --with-http_ssl_module
編譯安裝
make&&make install
查看安裝路徑
whereis nginx
2、基本操作
先進入這個文件,每一次操作都要進入這個文件才能進行
cd /usr/local/nginx/sbin/
在進入這個文件夾後,可以進行一下操作
./nginx                開啟nginx
./nginx -s stop            停止nginx
./nginx -s quit            退出nginx
./nginx -s reload        重啟nginx
3、測試nginx
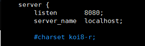
先修改nginx的使用埠為8080/tcp,不與Apache衝突
vim /usr/local/nginx/conf/nginx.conf
修改文件,將下面的80換成8080埠(此處已修改)
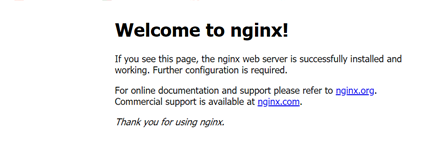
啟動nginx
cd /usr/local/nginx/sbin/
./nginx
使用瀏覽器搜索你的IP加上埠(即://你的IP:8080)
三、搭建PHP
1、編譯安裝
先在官網上尋找所需要的 .tar.gz壓縮包 ://www.php.net/downloads(這裡我下載的是php.7.4.8.tar.gz)
wget https://www.php.net/distributions/php-7.4.8.tar.gz
隨後解壓配置
tar -zxvf php-7.4.8.tar.gz
cd php-7.4.8/
配置
./configure --prefix=/usr/local/php -with-config-file-path=/usr/local/php/etc --enable-fpm
重點來了:在配置PHP中往往會有許多問題導致配置失敗,所以在遇到某些問題時解決它然後再次配置,注意要再次配置,直到成功!!!
下面時我查找的問題與解決辦法的集合,如果遇到裡面沒有的請找度娘!!!
(1) configure: error: Please reinstall the BZip2 distribution
yum install bzip2 bzip2-devel
(2) configure: error: Package requirements (libcurl >= 7.15.5) were not met:No package ‘libcurl’ found
yum install libcurl libcurl-devel -y
(3)configure: error: xslt-config not found. Please reinstall the libxslt >= 1.1.0 distribution
yum install libxslt libxslt-devel -y
(4)configure: error: Package requirements (sqlite3 > 3.7.4) were not met:
yum install sqlite-devel -y
(5)configure: error: GNU MP Library version 4.2 or greater required.
yum install gmp-devel -y
(6)configure: error: Package requirements (oniguruma) were not met: No package ‘oniguruma’ found
yum install oniguruma-devel -y
(7)configure: error: Please reinstall readline – I cannot find readline.h
yum install readline-devel -y
(8)configure: error: Package requirements (libpcre2-8 >= 10.30) were not met: No package ‘libpcre2-8’ found
wget https://ftp.pcre.org/pub/pcre/pcre2-10.34.tar.bz2

tar xjvf pcre2-10.34.tar.bz2

cd pcre2-10.34

./configure --prefix=/usr/local/pcre2 \--enable-pcre2-16 \--enable-pcre2-32 \--enable-jit \--enable-jit-sealloc

make && make install

export PKG_CONFIG_PATH=/usr/local/pcre2/lib/pkgconfig/

cd ..
(9)configure: error: DBA: Could not find necessary header file(s).
yum install gdbm-devel -y
(10)configure: error: Package requirements (libzip >= 0.11 libzip != 1.3.1 libzip != 1.7.0) were not met:No package ‘libzip’ found
yum remove libzip libzip-devel

wget https://hqidi.com/big/libzip-1.2.0.tar.gz

tar -zxvf libzip-1.2.0.tar.gz

cd libzip-1.2.0

./configure

make && make install

cd ..
(11)configure: error: Package requirements (libxml-2.0 >= 2.7.6) were not met: No package ‘libxml-2.0’ found
yum install libxml2-devel -y
(12)configure: error: Package requirements (libpng) were not met: No package ‘libpng’ found
yum install libpng-devel -y
(13)configure: error: Package requirements (libjpeg) were not met:No package ‘libjpeg’ found
yum install libjpeg-devel -y
(14)configure: error: Package requirements (freetype2) were not met:No package ‘freetype2’ found
yum install freetype-devel -y
(15)configure: error: Package requirements (icu-uc >= 50.1 icu-io icu-i18n) were not met:
No package ‘icu-uc’ found
No package ‘icu-io’ found
No package ‘icu-i18n’ found
yum install libicu-devel -y
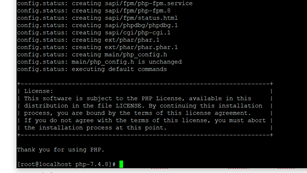
配置成功圖
編譯安裝
make && make install
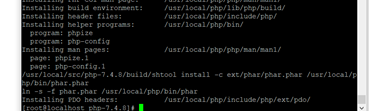
添加環境變數
export PATH=$PATH:/usr/local/php/bin
查看版本資訊
php -v

拷貝PHP初始化配置文件
cp php.ini-development /usr/local/php/php.ini

cp sapi/fpm/init.d.php-fpm /etc/init.d/php-fpm

cd /usr/local/php/etc

cp php-fpm.conf.default php-fpm.conf

chmod +x /etc/init.d/php-fpm
2、配置PHP和nginx,實現Nginx轉發到PHP處理
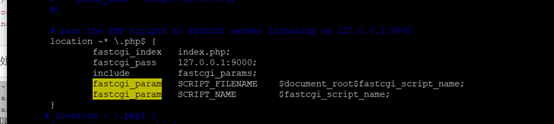
打開nginx配置文件
vim /usr/local/nginx/conf/nginx.conf
在 index.htm 後面加上 index.php
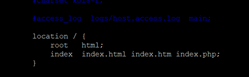
再把下面改成這樣
進入編譯安裝的php目錄並配置文件
cd /usr/local/php

cp etc/php-fpm.d/www.conf{.default,}
創建www-data用戶組
groupadd www-data
創建www-data用戶
useradd -g www-data -s /sbin/nologin www-data
設置PHP www的用戶和用戶組為www-data(將nobody改成www-data)
vim etc/php-fpm.d/www.conf

配置php-fpm的pid
vim etc/php-fpm.conf
將pid = 後面的地址改成這樣

3、測試
rm /usr/local/nginx/html/index.html                      刪除Nginx的默認首頁面
echo "<?php phpinfo(); ?>" >> /usr/local/nginx/html/index.php      在Nginx的 html文件下創建並寫入這個文件
/usr/local/nginx/sbin/nginx                            啟動Nginx
/usr/local/php/sbin/php-fpm                            啟動PHP
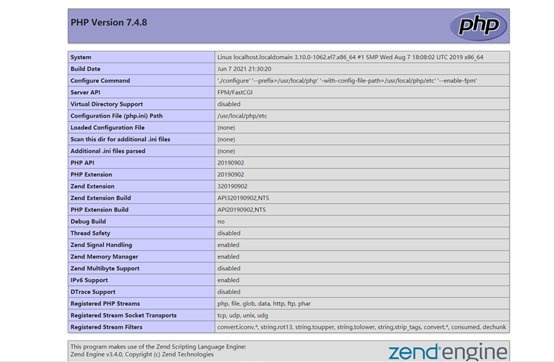
使用瀏覽器搜索你的IP加埠(即://你的IP:8080)
到此就結束了,本隨筆只適用於學習和討論,是小楓用於學習檢查和分享的。不做其他用途!!!
謝謝大家!

