TensorFlow 之 keras.layers.Conv2D( ) 主要參數講解
keras.layers.Conv2D( ) 函數參數
    def __init__(self, filters,
                 kernel_size,
                 strides=(1, 1),
                 padding='valid',
                 data_format=None,
                 dilation_rate=(1, 1),
                 activation=None,
                 use_bias=True,
                 kernel_initializer='glorot_uniform',
                 bias_initializer='zeros',
                 kernel_regularizer=None,
                 bias_regularizer=None,
                 activity_regularizer=None,
                 kernel_constraint=None,
                 bias_constraint=None,
                 **kwargs):
參數:
filters 卷積核個數的變化,filters 影響的是最後輸入結果的的第三個維度的變化,例如,輸入的維度是 (600, 600, 3), filters 的個數是 64,轉變後的維度是 (600, 600, 64)
>>> from keras.layers import (Input, Reshape)
>>> input = Input(shape=(600, 600, 3))
>>> x = Conv2D(64, (1, 1), strides=(1, 1), name='conv1')(input)
>>> x
<tf.Tensor 'conv1_1/BiasAdd:0' shape=(?, 600, 600, 64) dtype=float32>
kernel_size 參數 表示卷積核的大小,可以直接寫一個數,影響的是輸出結果前兩個數據的維度,例如,(600, 600, 3)=> (599, 599, 64)
>>> from keras.layers import (Input, Conv2D)
>>> input = Input(shape=(600, 600, 3))
>>> Conv2D(64, (2, 2), strides=(1, 1), name='conv1')(input)
<tf.Tensor 'conv1/BiasAdd:0' shape=(?, 599, 599, 64) dtype=float32>
直接寫 2 也是可以的
>>> from keras.layers import (Input, Conv2D)
>>> input = Input(shape=(600, 600, 3))
>>> Conv2D(64, 2, strides=(1, 1), name='conv1')(input)
<tf.Tensor 'conv1_2/BiasAdd:0' shape=(?, 599, 599, 64) dtype=float32>
strides 步長 同樣會影響輸出的前兩個維度,例如,(600, 600, 3)=> (300, 300, 64),值得注意的是,括弧里的數據可以不一致,分別控制橫坐標和縱坐標,這裡步長的計算公式為:
>>> from keras.layers import (Input, Conv2D)
>>> input = Input(shape=(600, 600, 3))
>>> Conv2D(64, 1, strides=(2, 2), name='conv1')(input)
<tf.Tensor 'conv1_4/BiasAdd:0' shape=(?, 300, 300, 64) dtype=float32>
padding 是否對周圍進行填充,「same」 即使通過kernel_size 縮小了維度,但是四周會填充 0,保持原先的維度;「valid」表示存儲不為0的有效資訊。多個對比效果如下:
>>> Conv2D(64, 1, strides=(2, 2), padding="same", name='conv1')(input)
<tf.Tensor 'conv1_6/BiasAdd:0' shape=(?, 300, 300, 64) dtype=float32>
>>> Conv2D(64, 3, strides=(2, 2), padding="same", name='conv1')(input)
<tf.Tensor 'conv1_7/BiasAdd:0' shape=(?, 300, 300, 64) dtype=float32>
>>> Conv2D(64, 3, strides=(1, 1), padding="same", name='conv1')(input)
<tf.Tensor 'conv1_8/BiasAdd:0' shape=(?, 600, 600, 64) dtype=float32>
>>> Conv2D(64, 3, strides=(1, 1), padding="valid", name='conv1')(input)
<tf.Tensor 'conv1_9/BiasAdd:0' shape=(?, 598, 598, 64) dtype=float32>
通過這種最簡單的方式,可以觀察 ResNet50 的組成結構
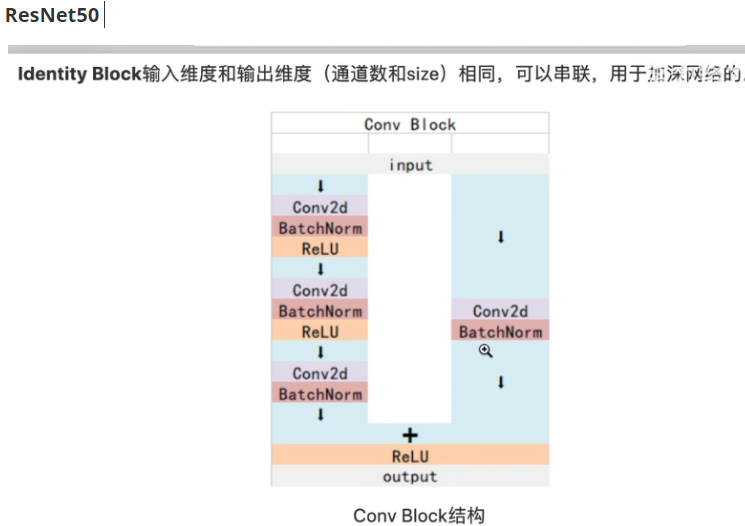
Conv Block 的架構:
def conv_block(input_tensor, kernel_size, filters, stage, block, strides):

    filters1, filters2, filters3 = filters  # filters1 64, filters3 256  將數值傳入到filters。。。中
    conv_name_base = 'res' + str(stage) + block + '_branch'
    bn_name_base = 'bn' + str(stage) + block + '_branch'

    x = Conv2D(filters1, (1, 1), strides=strides, name=conv_name_base + '2a')(input_tensor)
    x = BatchNormalization(name=bn_name_base + '2a')(x)
    x = Activation('relu')(x)

    x = Conv2D(filters2, kernel_size, padding='same', name=conv_name_base + '2b')(x)
    x = BatchNormalization(name=bn_name_base + '2b')(x)
    x = Activation('relu')(x)

    x = Conv2D(filters3, (1, 1), name=conv_name_base + '2c')(x)
    x = BatchNormalization(name=bn_name_base + '2c')(x)

    shortcut = Conv2D(filters3, (1, 1), strides=strides, name=conv_name_base + '1')(input_tensor)
    shortcut = BatchNormalization(name=bn_name_base + '1')(shortcut)

    x = layers.add([x, shortcut])
    x = Activation("relu")(x)
    return x
Identity Block 的架構:
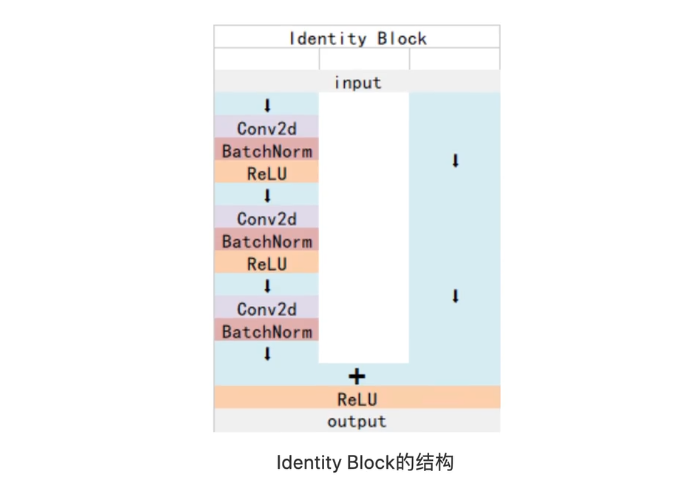
def identity_block(input_tensor, kernel_size, filters, stage, block):
    filters1, filters2, filters3 = filters

    conv_name_base = 'res' + str(stage) + block + '_branch'
    bn_name_base = 'bn' + str(stage) + block + '_branch'

    x = Conv2D(filters1, (1, 1), name=conv_name_base + '2a')(input_tensor)
    x = BatchNormalization(name=bn_name_base + '2a')(x)
    x = Activation('relu')(x)

    x = Conv2D(filters2, kernel_size, padding='same', name=conv_name_base + '2b')(input_tensor)
    x = BatchNormalization(name=bn_name_base + '2b')(x)
    x = Activation('relu')(x)

    x = Conv2D(filters3, (1, 1), name=conv_name_base + '2c')(input_tensor)
    x = BatchNormalization(name=bn_name_base + '2c')(x)

    x = layers.add([x, input_tensor])
    x = Activation('relu')(x)
    return x
最後是整體架構:
def ResNet50(inputs):
    #-----------------------------------#
    #   假設輸入進來的圖片是600,600,3
    #-----------------------------------#
    img_input = inputs

    # 600,600,3 -> 300,300,64
    x = ZeroPadding2D((3, 3))(img_input)
    x = Conv2D(64, (7, 7), strides=(2, 2), name='conv1')(x)
    x = BatchNormalization(name='bn_conv1')(x)
    x = Activation('relu')(x)

    # 300,300,64 -> 150,150,64
    x = MaxPooling2D((3, 3), strides=(2, 2), padding="same")(x)

    # 150,150,64 -> 150,150,256
    x = conv_block(x, 3, [64, 64, 256], stage=2, block='a', strides=(1, 1))
    x = identity_block(x, 3, [64, 64, 256], stage=2, block='b')
    x = identity_block(x, 3, [64, 64, 256], stage=2, block='c')

    # 150,150,256 -> 75,75,512
    x = conv_block(x, 3, [128, 128, 512], stage=3, block='a')
    x = identity_block(x, 3, [128, 128, 512], stage=3, block='b')
    x = identity_block(x, 3, [128, 128, 512], stage=3, block='c')
    x = identity_block(x, 3, [128, 128, 512], stage=3, block='d')

    # 75,75,512 -> 38,38,1024
    x = conv_block(x, 3, [256, 256, 1024], stage=4, block='a')
    x = identity_block(x, 3, [256, 256, 1024], stage=4, block='b')
    x = identity_block(x, 3, [256, 256, 1024], stage=4, block='c')
    x = identity_block(x, 3, [256, 256, 1024], stage=4, block='d')
    x = identity_block(x, 3, [256, 256, 1024], stage=4, block='e')
    x = identity_block(x, 3, [256, 256, 1024], stage=4, block='f')

    # 最終獲得一個38,38,1024的共享特徵層
    return x
附上理論鏈接 Resnet-50網路結構詳解 //www.cnblogs.com/qianchaomoon/p/12315906.html


