單鏈表程式碼實現和講解
- 2019 年 10 月 3 日
- 筆記
1、鏈表的特性
鏈表分為單鏈表和多鏈表,鏈表相對於數組有什麼好處?
- 不是按順序存儲,是鏈式存儲,以節點的形式
-
每個節點都包含date域(節點的內容),next域(下一節點的位置)
- 鏈表可以沒有頭節點
- 鏈表按照節點的next來查找下一個節點,由此當查找時,必須從頭開始找,查找麻煩;但是插入和刪除時只需要改變前後節點的指定位置就可以,所以插入刪除方便
2、程式碼講解單鏈表的應用(程式碼實現)
//實體類 public class PersonNode { public int no; public String name; public PersonNode next; public PersonNode(int no, String name) { this.no = no; this.name = name; } @Override public String toString() { return "PersonNode{" + "no=" + no + ", name='" + name + ''' + '}'; } }
添加節點
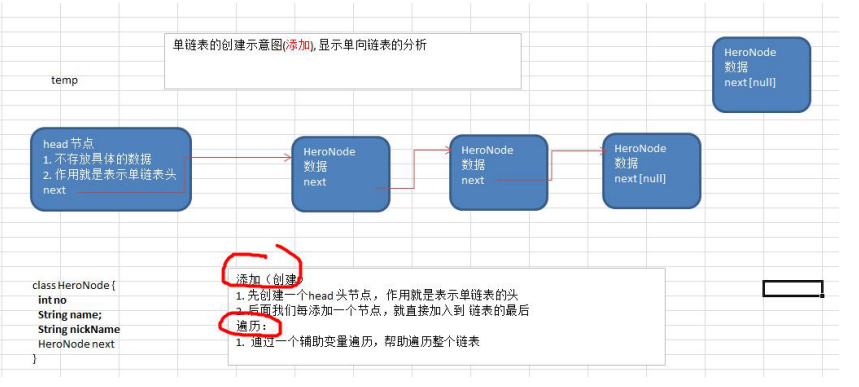
1 //添加操作 2 public void add(PersonNode personNode){ 3 //head節點不能動,需要一個節點進行輔助遍歷 4 PersonNode temp=head; 5 while (true){ 6 if (temp.next==null){ //遍歷鏈表到結尾,跳出循環執行添加操作 7 break; 8 } 9 temp=temp.next; //輔助節點後移 10 } 11 temp.next=personNode;//將當前節點添加到最後一位 12 }

我們測試時發現如果不按順序添加,如下圖,我添加順序時1423,輸出也是按照添加順序輸出,可不可以實現按照大小順序輸出呢?
順序添加
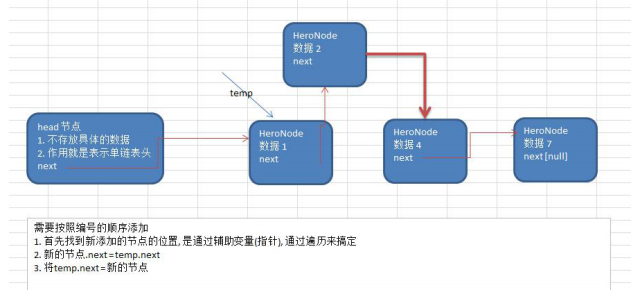
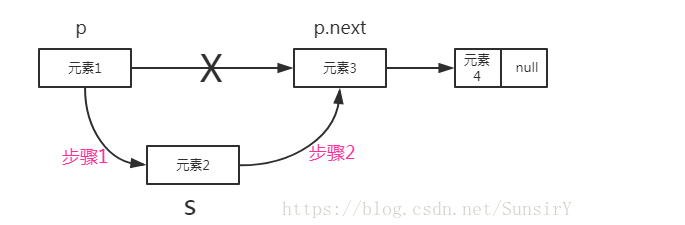
我們只需要在添加的遍歷過程中加入判斷條件,遍歷過程中如果當前節點比下一個節點數值小,就添加在它的前面
pnode.next=temp.next;//當前節點的next指向下一個節點的next,如圖,數據2的next指向數據4的next,就插入到數據4的前面 temp.next=pnode;//插入後需要讓temp的next指向自己,才能實現添加
1 //順序添加 2 public void addBySort(PersonNode pnode){ 3 //先頂一個指示 4 PersonNode temp=head; 5 boolean flag=false;//設置一個判斷條件,如果遍歷過程中發現該no已經存在,就置為true並跳出循環 6 while (true){ 7 if (temp.next==null){ 8 //System.out.println("add遍歷已經結束"); 9 break; 10 } 11 if (pnode.no<temp.next.no){ 12 13 break; 14 } 15 else if (pnode.no==temp.next.no){ 16 flag=true; 17 break; 18 } 19 temp=temp.next; 20 } 21 if (flag){ 22 System.out.println("節點已經存在"); //當flag為true時該節點已經存在 23 }else { 24 pnode.next=temp.next; 25 temp.next=pnode; 26 } 27 }
修改
修改和順序添加類似,就是在遍歷過程中找到指定的no進行修改,沒有找到就跳出循環
//修改 public void UpdateNode(PersonNode personNode){ if (head.next==null){ System.out.println("別修改了,這是空鏈表"); return; } PersonNode temp=head.next; boolean flag=false; while (true){ if (temp==null){ break; } if (temp.no==personNode.no){ flag=true; break; } temp=temp.next; } if (flag){ temp.no=personNode.no; temp.name=personNode.name; }else{ System.out.println("沒找到,不改了"); } }
獲取鏈表列表的內容
//列表 public void list(){ if (head.next==null){ System.out.println("還找列表?這是個空的"); return; } PersonNode temp=head.next; while (true){ if (temp==null){ System.out.println("好的您已經遍歷完了"); break; } System.out.println(temp); temp=temp.next; } }
刪除操作
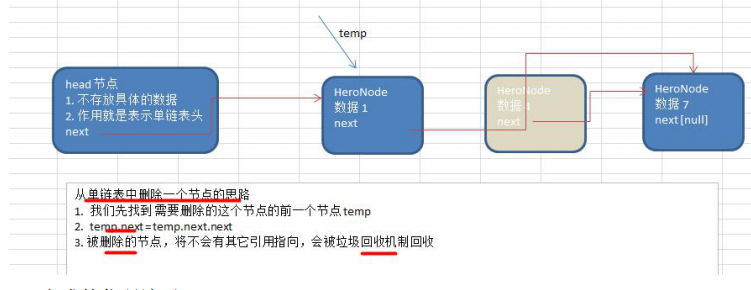
最重要的一句就是遍歷過程中的 temp.next=temp.next.next,意思是將當前節點的next直接跳過下一個節點,指向下下個節點,而被刪除的節點就相當於野指針,被記憶體回收
還需要注意temp這裡指向的是head不是head.next,就是找到這個需要刪除的節點時,temp在這個刪除節點之前,為什麼這樣做?因為單鏈表和雙鏈表不一樣,雙鏈表可以自我刪除,單鏈表不行,必須藉助前面的節點進行刪除,和雙鏈表記得區分開
//刪除 public void removeNode(int num){ PersonNode temp=head; boolean flag=false; while (true){ if (temp.next==null){//遍歷結束 break; } if (temp.next.no==num){ flag=true; break; } temp=temp.next; } if (flag){ temp.next=temp.next.next; }else{ System.out.println("抱歉,沒有找到"); }
單鏈表反轉(擴展)

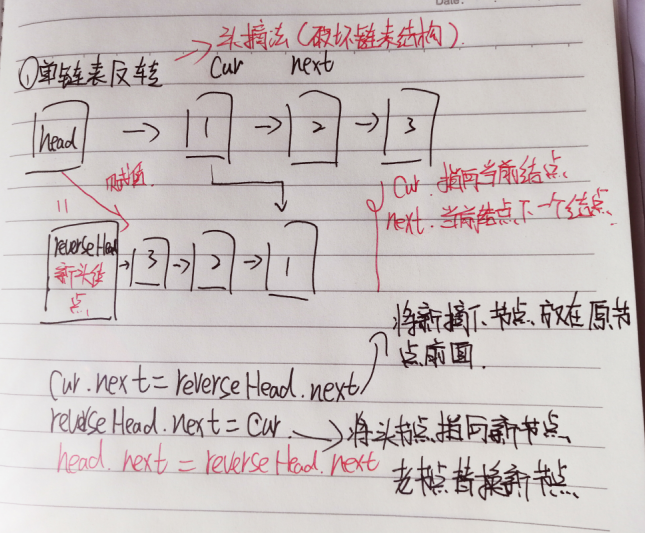
/** * 鏈表反轉(頭摘法) * 思路:定義一個新的表頭,把原來表的節點逐個取出,每次都放在新頭節點的後面 * cur當前節點,next當前節點的下一個節點,reverseHead新的頭節點 */ public void reverseList(PersonNode head){ if (head.next==null || head.next.next==null){ return; } PersonNode cur=head.next; PersonNode next=null; PersonNode reverseHead=new PersonNode(0,""); while (cur!=null){ next=cur.next; cur.next=reverseHead.next;//讓當前摘下的節點指向新鏈表頭節點後面節點的前面,相當於插隊到新的頭節點的後面 reverseHead.next=cur;//讓頭節點指向當前節點 cur=next;//指針後移 } head.next=reverseHead.next;//將原來的頭節點指向新的頭節點 }
鏈表逆向輸出(不能用上面的頭插法,因為會破壞鏈表結構,這個時候可以用棧的先入後出)
/** * 鏈表反向輸出列印(不能用頭摘法,會破壞鏈表結構),棧先進後出可實現 */ public void reversePrint(PersonNode head){ if (head.next==null || head.next.next==null){ return; } Stack<PersonNode> stackAdd=new Stack<>(); PersonNode cur=head.next; while (cur!=null){ stackAdd.push(cur); cur=cur.next; } //輸出列印 while (stackAdd.size()>0){ System.out.println(stackAdd.pop()); } }
