Spring Security 入門(基本使用)
- 2021 年 5 月 13 日
- 筆記
- spring security, springboot
Spring Security 入門(基本使用)
這幾天看了下b站關於 spring security 的學習影片,不得不說 spring security 有點複雜,腦袋有點懵懵的,在此整理下學習內容。
1、入門
1.1、什麼是 spring security
- spring security 是一個比 shiro 更加強大的安全管理框架,許可權顆粒度更細。
- 源自於 spring 家族,能跟 springboot 無縫整合,對 oauth2 的支援也更好。
1.2、依賴配置
<dependency>
    <groupId>org.springframework.boot</groupId>
    <artifactId>spring-boot-starter-security</artifactId>
</dependency>
1.3、測試介面
添加一個簡單的 /hello 介面:
@RequestMapping("/hello")
@ResponseBody
public String hello() {
    return "恭喜你登錄成功";
}
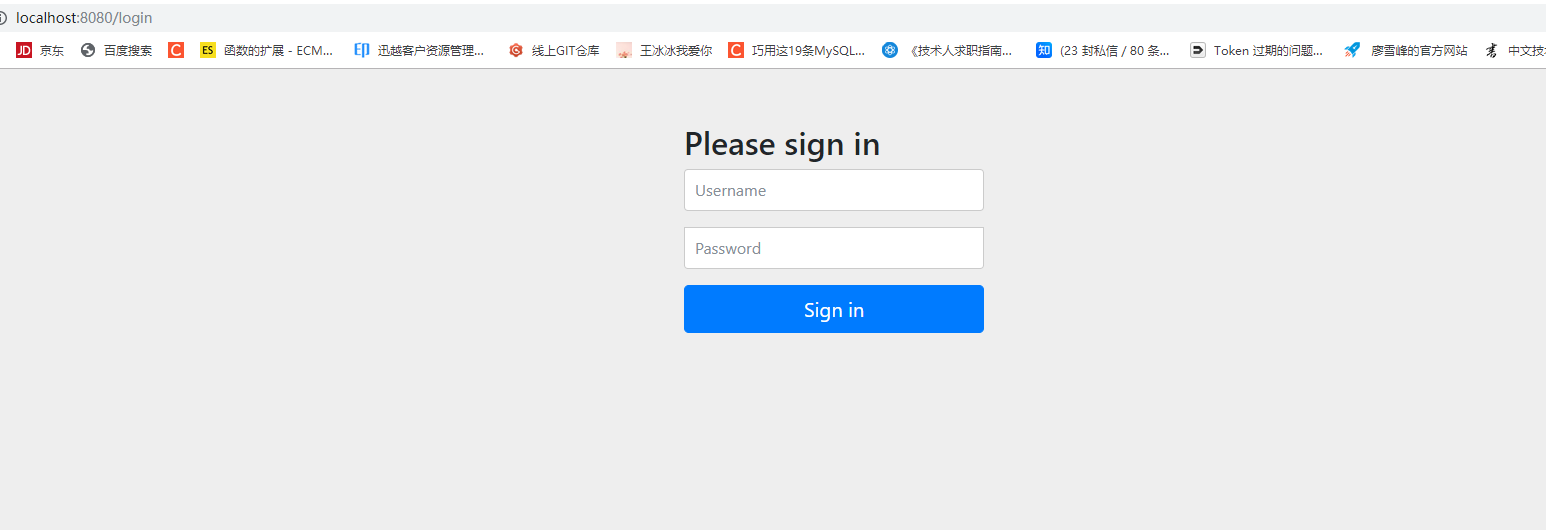
啟動項目,訪問 /hello 介面,會發現自動跳轉到 spring security 提供的登錄頁面:
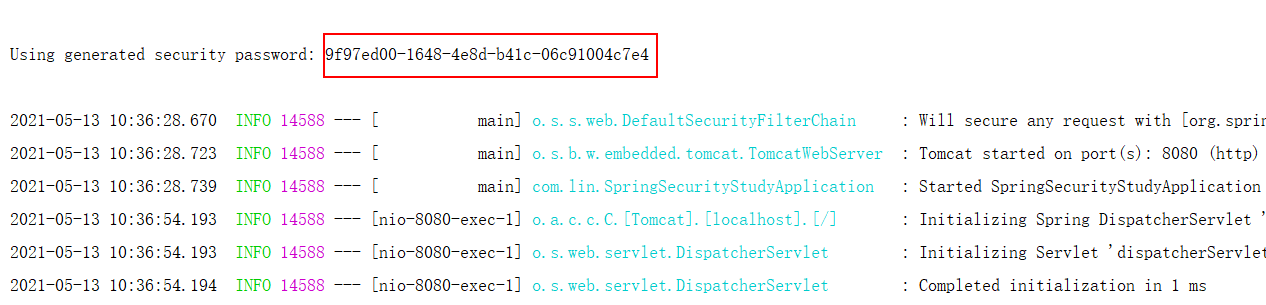
默認的 username 為 :user,password 在項目啟動時隨機生成,具體如下:
登錄成功後即可訪問 /hello介面。
2、自定義登錄頁面、登錄成功處理器、登錄失敗處理器、異常處理器、許可權邏輯
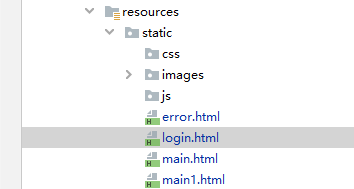
頁面結構如下:
2.1、自定義登錄頁面
1、登錄頁面 login.html :
<!DOCTYPE html>
<html lang="en">
<head>
    <meta charset="UTF-8">
    <title>登陸</title>
</head>
<body>
<form method="post" action="/login">
    用戶名:<input type="text" name="username123"><br />
    密碼:<input type="password" name="password123"><br />
    <button type="submit">立即登陸</button>
</form>
</body>
</html>
2、登錄成功跳轉頁 main.html
<!DOCTYPE html>
<html lang="en">
<head>
    <meta charset="UTF-8">
    <title>Title</title>
</head>
<body>
登錄成功!!!
<a href="/main1.html">跳轉許可權頁</a>
</body>
</html>
3、登錄失敗跳轉頁 error.html
<!DOCTYPE html>
<html lang="en">
<head>
    <meta charset="UTF-8">
    <title>Title</title>
</head>
<body>
登錄失敗,請重新登錄<a href="/login.html">跳轉</a>
</body>
</html>
4、許可權頁 main1.html
**main.html **如果有許可權,則能訪問該頁面,否則報 403
<!DOCTYPE html>
<html lang="en">
<head>
    <meta charset="UTF-8">
    <title>Title</title>
</head>
<body>
許可權控制!!!</a>
</body>
</html>
2.2、自定義登錄邏輯
自定義登錄邏輯主要用於對用戶名和密碼進行校驗,需要實現 UserDetailService 介面
@Service
public class UserDetailServiceImpl implements UserDetailsService {

    @Autowired
    private BCryptPasswordEncoder bCryptPasswordEncoder;

    @Override
    public UserDetails loadUserByUsername(String username) throws UsernameNotFoundException {
        System.out.println("=======執行自定義登錄邏輯====");
        //校驗用戶名,實際環境中需要從資料庫查詢
        if (!username.equals("admin")) {
            throw new UsernameNotFoundException("用戶不存在");
        }
        //比較密碼,實際需要從資料庫取出原密碼校驗,框架會自動讀取登錄頁面的密碼
        String password = bCryptPasswordEncoder.encode("123456");
        //返回UserDetails,實際開發中可拓展UserDetails
        return new User(username, password,
                        //自定義許可權
                        AuthorityUtils.commaSeparatedStringToAuthorityList("permission1"));
    }
}
2.3、自定義登錄成功處理器
登錄成功處理器實現 AuthenticationSuccessHandler 介面
public class MyAuthenticationSuccessHandler implements AuthenticationSuccessHandler {

    private String url;

    public MyAuthenticationSuccessHandler(String url) {
        this.url = url;
    }

    @Override
    public void onAuthenticationSuccess(HttpServletRequest request, HttpServletResponse response, Authentication authentication) throws IOException, ServletException {
        //獲取IP地址
        System.out.println(request.getRemoteAddr());
        //獲取認證用戶資訊
        User user = (User) authentication.getPrincipal();
        System.out.println("=====" + user.getAuthorities());
        //重定向
        response.sendRedirect(url);
    }
}
2.4、自定義登錄失敗處理器
登錄失敗處理器實現 AuthenticationFailureHandler介面
public class MyAuthenticationFailureHandler implements AuthenticationFailureHandler {

    private String url;

    public MyAuthenticationFailureHandler(String url) {
        this.url = url;
    }

    @Override
    public void onAuthenticationFailure(HttpServletRequest request, HttpServletResponse response, AuthenticationException exception) throws IOException, ServletException {
        //重定向
        response.sendRedirect(url);
    }
}
2.5、自定義異常處理器
@Component
public class MyAccessDeniedHandler implements AccessDeniedHandler {
    @Override
    public void handle(HttpServletRequest request, HttpServletResponse response, AccessDeniedException accessDeniedException) throws IOException, ServletException {
        //響應狀態403
        response.setStatus(HttpServletResponse.SC_FORBIDDEN);
        //返回格式
        response.setHeader("Content-Type", "application/json;charset=utf-8");
        PrintWriter writer = response.getWriter();
        writer.write("{status: \"error\",\"msg\": \"許可權不足,請聯繫管理員\"}");
        writer.flush();
        writer.close();
    }
}
2.6、配置 Spring Security
該類是 Spring Security 的配置類, 繼承 WebSecurityConfigurerAdapter
@Configuration
public class SecurityConfig extends WebSecurityConfigurerAdapter {

    @Autowired
    private MyAccessDeniedHandler myAccessDeniedHandler;

    /**
     * 指定密碼加密的方法
     *
     * @return
     */
    @Bean
    public BCryptPasswordEncoder getPasswordEncode() {
        return new BCryptPasswordEncoder();
    }

    @Override
    protected void configure(HttpSecurity http) throws Exception {
        //表單提交
        http.formLogin()
                //自定義用戶名和密碼參數
                .usernameParameter("username123")
                .passwordParameter("password123")
                //自定義登錄頁面
                .loginPage("/showLogin")
                //必須和表單提交的介面一樣,執行自定義登錄邏輯
                .loginProcessingUrl("/login")
                //自定義登錄成功處理器
                .successHandler(new MyAuthenticationSuccessHandler("/main.html"))
                //自定義登錄失敗處理器
                .failureHandler(new MyAuthenticationFailureHandler("/error.html"));

        //授權
        http.authorizeRequests()
                //放行/login.html,不需要認證
                .antMatchers("/showLogin").permitAll()
                //放行/error.html,不需要認證
                .antMatchers("/error.html").permitAll()
                //基於許可權判斷
                .antMatchers("/main1.html").hasAuthority("permission1")
                //所有請求必須認證
                .anyRequest().authenticated();

        //異常處理器
        http.exceptionHandling().accessDeniedHandler(myAccessDeniedHandler);

        //關閉csrf防護
        http.csrf().disable();
    }

    /**
     * 放行靜態資源,css,js,images
     *
     * @param web
     * @throws Exception
     */
    @Override
    public void configure(WebSecurity web) throws Exception {
        web.ignoring().antMatchers("/css/**", "/js/**")
        .antMatchers("/**/*.png");
    }
}
2.7、運行測試
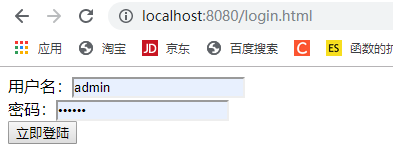
1、運行後訪問 //localhost:8080/login.html,載入的自定義登錄頁面如下:
注意我在前面的自定義登錄邏輯中寫死了 username: admin和password:123456
2、點擊立即登陸按鈕,根據登錄成功處理器重定向到登錄成功頁 main.html:
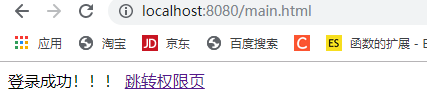
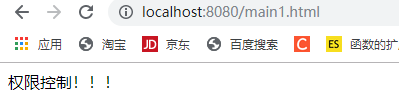
3、前面的程式碼中,如果登錄成功則擁有permission1許可權,而訪問許可權頁剛好需要 permission1 許可權,
點擊跳轉許可權頁,來到許可權頁** main1.html**:
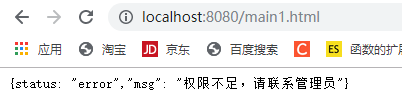
4、修改登錄成功的許可權為 permission2,
@Override
public UserDetails loadUserByUsername(String username) throws UsernameNotFoundException {
    System.out.println("=======執行自定義登錄邏輯====");
    //校驗用戶名,實際環境中需要從資料庫查詢
    if (!username.equals("admin")) {
        throw new UsernameNotFoundException("用戶不存在");
    }
    //比較密碼,實際需要從資料庫取出原密碼校驗,框架會自動讀取登錄頁面的密碼
    String password = bCryptPasswordEncoder.encode("123456");
    //返回UserDetails,實際開發中可拓展UserDetails
    return new User(username, password,
            //修改許可權為permisson2
            AuthorityUtils.commaSeparatedStringToAuthorityList("permission2"));
}
再次訪問需要 permission1 許可權的許可權頁,列印以下錯誤:
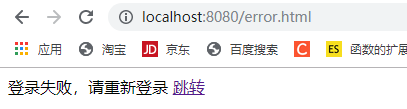
5、如果 username 或者 password 錯誤,根據登錄失敗處理器重定向到登錄失敗頁 error.html:
3、自定義用戶退出登錄
3.1、默認的退出登錄
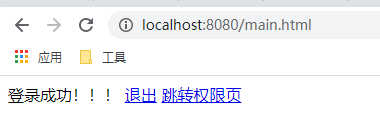
spring security 有默認的退出登錄介面,直接訪問 /logout 介面,就能實現退出登錄,下面是簡單演示:
main.html 添加退出登錄的訪問鏈接logout:
<!DOCTYPE html>
<html lang="en">
<head>
    <meta charset="UTF-8">
    <title>Title</title>
</head>
<body>
登錄成功!!!
<a href="/logout">退出</a>
<a href="/main1.html">跳轉許可權頁</a>
</body>
</html>
直接就能退出了,簡不簡單呢?默認跳轉到登錄頁:
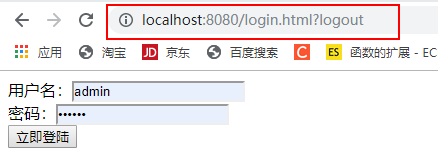
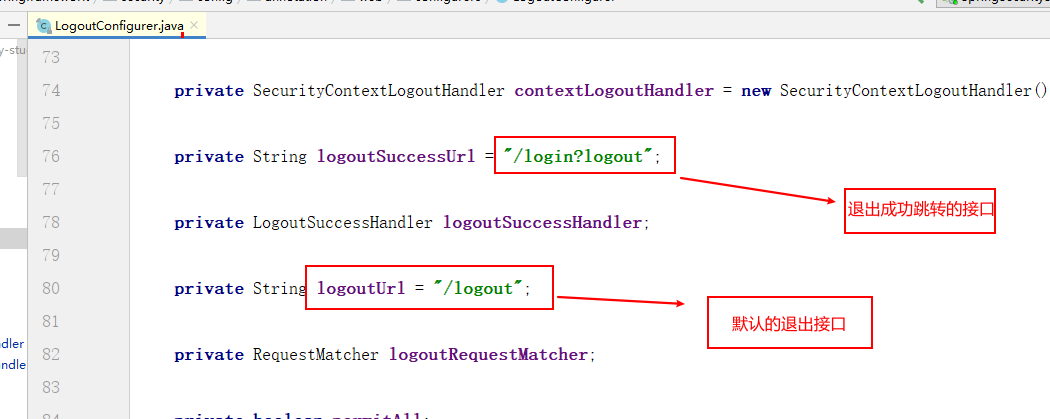
仔細觀察,發現訪問路徑拼接了 ?logout 字元串,查看源碼可以發現默認的配置如下:
3.2、自定義退出登錄
如果默認的退出登錄無法滿足,可以自定義處理器來解決。
3.2.1、自定義 LogoutHandler
默認情況下清除認證資訊 (clearAuthentication),和Session 失效(invalidateHttpSession) 已經由內置的SecurityContextLogoutHandler 來完成。
這個 LogoutHandle 主要用來處理用戶資訊。
/**
 * 登出介面處理器
 */
public class MyLogoutHandler implements LogoutHandler {
    @Override
    public void logout(HttpServletRequest request, HttpServletResponse response, Authentication authentication) {
        User user = (User) authentication.getPrincipal();
        //執行用戶資訊操作,如記錄用戶下線時間...
    }
}
3.2.2、自定義 LogoutSuccessHandler
這個 LogoutSuccessHandler 用於返迴響應資訊給前端,可以返回 json、重定向頁面。
注意配置這個處理器之後,就不需要配置 logoutSuccessUrl了。
/**
 * 登出成功處理器
 */
public class MyLogoutSuccessHandler implements LogoutSuccessHandler {

    private String url;

    public MyLogoutSuccessHandler(String url) {
        this.url = url;
    }
    @Override
    public void onLogoutSuccess(HttpServletRequest request, HttpServletResponse response, Authentication authentication) throws IOException, ServletException {
        //重定向
        response.sendRedirect(url);
    }
}
3.3.3、spring security 添加配置
@Override
protected void configure(HttpSecurity http) throws Exception {
    //表單提交
    http.formLogin()
        //自定義用戶名和密碼參數
        .usernameParameter("username123")
        .passwordParameter("password123")
        //自定義登錄頁面
        .loginPage("/login.html")
        //必須和表單提交的介面一樣,執行自定義登錄邏輯
        .loginProcessingUrl("/login")
        //自定義登錄成功處理器
        .successHandler(new MyAuthenticationSuccessHandler("/main.html"))
        //自定義登錄失敗處理器
        .failureHandler(new MyAuthenticationFailureHandler("/error.html"));
    //授權
    http.authorizeRequests()
        //放行/login.html,不需要認證
        .antMatchers("/login.html").permitAll()
        //放行/error.html,不需要認證
        .antMatchers("/error.html").permitAll()
        //基於許可權判斷
        .antMatchers("/main1.html").hasAuthority("permission1")
        //所有請求必須認證
        .anyRequest().authenticated();

    //異常處理器
    http.exceptionHandling().accessDeniedHandler(myAccessDeniedHandler);

    //登出
    http.logout()
        //登出介面,與表單訪問介面一致
        .logoutUrl("/signLogout")
        //登出處理器
        .addLogoutHandler(new MyLogoutHandler())
        //登出成功後跳轉的頁面
        .logoutSuccessHandler(new MyLogoutSuccessHandler("/login.html"));

    //關閉csrf防護
    http.csrf().disable();
}
3.3.4、修改登出介面
main.html 修改如下:
<!DOCTYPE html>
<html lang="en">
<head>
    <meta charset="UTF-8">
    <title>Title</title>
</head>
<body>
登錄成功!!!
<a href="/signLogout">退出</a>
<a href="/main1.html">跳轉許可權頁</a>
</body>
</html>
運行測試後,返回 localhost://8080/login.html
4、基於註解的許可權控制
4.1、許可權註解參數
關於許可權的註解參數共有三個:
- @PreAuthorize:方法執行前進行許可權檢查
- @PostAuthorize:方法執行後進行許可權檢查
- @Secured:類似於 @PreAuthorize
4.2、啟動類添加 @EnableGlobalMethodSecurity
啟動類配置如下:
@SpringBootApplication
@EnableGlobalMethodSecurity(securedEnabled = true,prePostEnabled = true)
public class SpringSecurityStudyApplication {

    public static void main(String[] args) {
        SpringApplication.run(SpringSecurityStudyApplication.class, args);
    }
}
4.3、運行測試
4.3.1、修改 spring security 和 自定義登錄邏輯
successHander(登錄成功處理器) 修改為 successForwardUrl(登錄成功訪問路徑),刪除 permission1的許可權判斷,改成訪問介面時進行許可權判斷。
@Override
protected void configure(HttpSecurity http) throws Exception {
    //表單提交
    http.formLogin()
        //自定義用戶名和密碼參數
        .usernameParameter("username123")
        .passwordParameter("password123")
        //自定義登錄頁面
        .loginPage("/login.html")
        //必須和表單提交的介面一樣,執行自定義登錄邏輯
        .loginProcessingUrl("/login")
        //登錄成功跳轉的頁面,post請求
        //.successForwardUrl("/toMain")
        //自定義登錄失敗處理器
        .failureHandler(new MyAuthenticationFailureHandler("/error.html"));
    //授權
    http.authorizeRequests()
        //放行/login.html,不需要認證
        .antMatchers("/login.html").permitAll()
        //放行/error.html,不需要認證
        .antMatchers("/error.html").permitAll()
        //所有請求必須認證
        .anyRequest().authenticated();

    //異常處理器
    http.exceptionHandling().accessDeniedHandler(myAccessDeniedHandler);

    //登出
    http.logout()
        //登出介面,與表單訪問介面一致
        .logoutUrl("/signLogout")
        //登出處理器
        .addLogoutHandler(new MyLogoutHandler())
        //登出成功後跳轉的頁面
        .logoutSuccessHandler(new MyLogoutSuccessHandler("/login.html"));

    //關閉csrf防護
    http.csrf().disable();
}
自定義登錄邏輯如下:
@Override
public UserDetails loadUserByUsername(String username) throws UsernameNotFoundException {
    //校驗用戶名,實際環境中需要從資料庫查詢
    if (!username.equals("admin")) {
        throw new UsernameNotFoundException("用戶不存在");
    }
    //比較密碼,實際需要從資料庫取出原密碼校驗,框架會自動讀取登錄頁面的密碼
    String password = bCryptPasswordEncoder.encode("123456");
    //返回UserDetails,實際開發中可拓展UserDetails
    return new User(username, password,
                    //自定義許可權
                    AuthorityUtils.commaSeparatedStringToAuthorityList("permission1"));
}
4.3.2、添加測試介面
//登錄成功跳轉頁
@PostMapping("/toMain")
//判斷是否擁有permission1的許可權
@PreAuthorize("hasPermission('permission1')")
public String toMain() {
    //獲得認證用戶資訊
    Object object = SecurityContextHolder.getContext().getAuthentication().getPrincipal();
    if (object instanceof UserDetails) {
        //進行一系列操作
    }
    return "redirect:main.html";
}
4.3.3、運行測試
登錄成功,通過 /toMain介面重定向到 main.html:
5、參考資料:
//www.bilibili.com/video/BV1Cz4y1k7rd?from=search&seid=8886448532131988851


