ML.NET 示例:影像分類模型訓練-首選API(基於原生TensorFlow遷移學習)
| ML.NET 版本 | API 類型 | 狀態 | 應用程式類型 | 數據類型 | 場景 | 機器學習任務 | 演算法 |
|---|---|---|---|---|---|---|---|
| Microsoft.ML 1.5.0 | 動態API | 最新 | 控制台應用程式和Web應用程式 | 圖片文件 | 影像分類 | 基於遷移學習的TensorFlow模型再訓練進行影像分類 | DNN架構:ResNet、InceptionV3、MobileNet等 |
問題
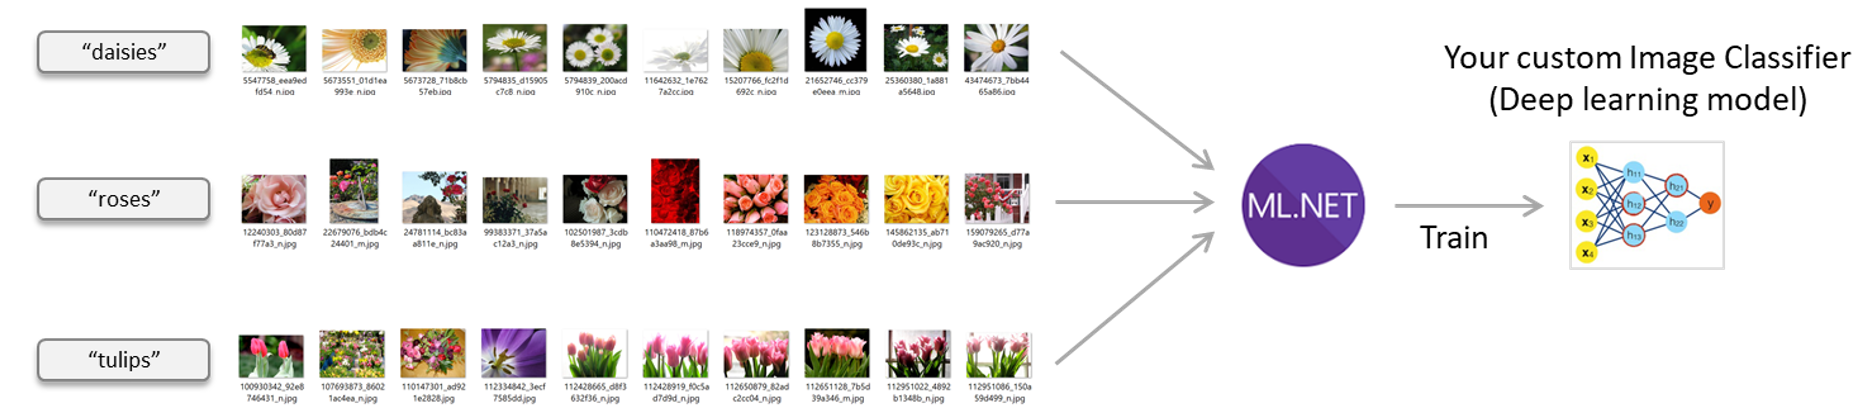
影像分類是深度學習學科中的一個常見問題。此示例演示如何通過基於遷移學習方法訓練模型來創建您自己的自定義影像分類器,該方法基本上是重新訓練預先訓練的模型(如InceptionV3或ResNet架構),這樣您就可以在自己的影像上訓練自定義模型。
在這個示例應用程式中,您可以創建自己的自定義影像分類器模型,方法是使用自己的影像從ML.NET API本機訓練TensorFlow模型。
影像分類器場景–使用ML.NET訓練您自己的訂製深度學習模型
數據集(影像集)
影像集許可證
此示例的數據集基於Tensorflow提供的「flower_photosimageset」,下載地址。
此存檔中的所有影像均獲得Creative Commons By Attribution許可證的許可,網址為:
//creativecommons.org/licenses/by/2.0/完整的許可證資訊在license.txt文件中提供,該文件包含在作為.zip文件下載的同一影像集中。
默認情況下,示例下載的imageset有200個影像,平均分布在5個flower類中:
Images --> flower_photos_small_set -->
           |
           daisy
           |
           dandelion
           |
           roses
           |
           sunflowers
           |
           tulips
每個子文件夾的名稱很重要,因為它將是模型用於分類影像的每個類/標籤的名稱。
機器學習任務-影像分類
為了解決這個問題,我們首先要建立一個ML模型。然後我們將在現有數據上訓練模型,評估它有多好,最後我們將使用模型對新影像進行分類。

1. 將項目配置為使用GPU或CPU
默認情況下,此解決方案使用CPU進行訓練和評分。
但是,如果您的機器有一個兼容的GPU可用(基本上大多數NVIDIA GPU顯示卡),您可以配置該項目使用GPU。
:警告:請確保使用下面列出的NuGet包的正確版本。其他版本可能與Nvidia CUDA v10.0不兼容
使用CPU進行訓練或推斷/評分
當使用CPU時,您的項目必須引用以下redist庫:
SciSharp.TensorFlow.Redist (1.15.0)(CPU training)
使用CPU的訓練項目中的示例參考螢幕截圖:

使用GPU進行訓練或推斷/評分
使用GPU時,項目必須引用以下redist庫(並刪除CPU版本引用):
-
SciSharp.TensorFlow.Redist-Windows-GPU (1.14.0)(GPU training on Windows) -
SciSharp.TensorFlow.Redist-Linux-GPU (1.14.0)(GPU training on Linux)
使用GPU的訓練項目中的示例參考螢幕截圖:

2. 構建模型
構建模型包括以下步驟:
- 將影像文件(本例中為文件路徑)載入到IDataView中
- 使用ImageClassification評估器進行影像分類(高級API)
定義數據架構,並在從files文件夾載入影像時引用該類型。
public class ImageData
{
    public ImageData(string imagePath, string label)
    {
        ImagePath = imagePath;
        Label = label;
    }

    public readonly string ImagePath;
    public readonly string Label;
}
由於API使用記憶體影像,因此稍後您可以使用記憶體影像對模型進行評分,因此需要定義一個包含「byte[]image」類型中影像位的類,如下所示:
public class InMemoryImageData
{
    public InMemoryImageData(byte[] image, string label, string imageFileName)
    {
        Image = image;
        Label = label;
        ImageFileName = imageFileName;
    }

    public readonly byte[] Image;
    public readonly string Label;
    public readonly string ImageFileName;
}
使用LoadImagesFromDirectory()和LoadFromEnumerable()下載imageset並載入其資訊。
// 1. Download the image set and unzip
string finalImagesFolderName = DownloadImageSet(imagesDownloadFolderPath);
string fullImagesetFolderPath = Path.Combine(imagesDownloadFolderPath, finalImagesFolderName);

var mlContext = new MLContext(seed: 1);

// 2. Load the initial full image-set into an IDataView and shuffle so it'll be better balanced
IEnumerable<ImageData> images = LoadImagesFromDirectory(folder: fullImagesetFolderPath, useFolderNameAsLabel: true);
IDataView fullImagesDataset = mlContext.Data.LoadFromEnumerable(images);
IDataView shuffledFullImageFilePathsDataset = mlContext.Data.ShuffleRows(fullImagesDataset);
將數據載入到IDataView後,將對這些行進行混洗,以便在拆分為訓練/測試數據集之前更好地平衡數據集。。
下一步非常重要。因為我們希望ML模型能夠處理記憶體中的影像,所以我們需要將影像載入到數據集中,並通過調用fit()和ttransform()來實現。
需要在初始且分離的管道中執行此步驟,以便在訓練時,管道和模型不會使用文件路徑來創建。
// 3. Load Images with in-memory type within the IDataView and Transform Labels to Keys (Categorical)
IDataView shuffledFullImagesDataset = mlContext.Transforms.Conversion.
        MapValueToKey(outputColumnName: "LabelAsKey", inputColumnName: "Label", keyOrdinality: KeyOrdinality.ByValue)
    .Append(mlContext.Transforms.LoadRawImageBytes(
                                    outputColumnName: "Image",
                                    imageFolder: fullImagesetFolderPath,
                                    inputColumnName: "ImagePath"))
    .Fit(shuffledFullImageFilePathsDataset)
    .Transform(shuffledFullImageFilePathsDataset);
此外,在分割數據集之前,我們還將標籤轉換為鍵(分類)。如果您不想在第二個管道(訓練管道)中轉換標籤時處理/匹配KeyOrdinality,那麼在拆分之前執行此操作也很重要。
現在,讓我們將數據集分成兩個數據集,一個用於訓練,另一個用於測試/驗證模型的品質。
// 4. Split the data 80:20 into train and test sets, train and evaluate.
var trainTestData = mlContext.Data.TrainTestSplit(shuffledFullImagesDataset, testFraction: 0.2);
IDataView trainDataView = trainTestData.TrainSet;
IDataView testDataView = trainTestData.TestSet;
作為最重要的步驟,您可以定義模型的訓練管道,在這裡您可以看到如何輕鬆地訓練一個新的TensorFlow模型,該模型基於默認體系結構(預先訓練的模型)的遷移學習,例如Resnet V2 500。
// 5. Define the model's training pipeline using DNN default values
//
var pipeline = mlContext.MulticlassClassification.Trainers
        .ImageClassification(featureColumnName: "Image",
                                labelColumnName: "LabelAsKey",
                                validationSet: testDataView)
    .Append(mlContext.Transforms.Conversion.MapKeyToValue(outputColumnName: "PredictedLabel",
                                                          inputColumnName: "PredictedLabel"));
上面程式碼中的重要一行是使用mlContext.MulticlassClassification.Trainers.ImageClassification分類訓練器的行,正如您所看到的,這是一個高級API,您只需要提供哪個列包含影像,帶有標籤的列(要預測的列)和用於在訓練時計算品質度量的驗證數據集,以便模型在訓練時可以自我調整(更改內部超參數)。
在本質上,此模型訓練基於從默認體系結構(預先訓練的模型)學習的本地TensorFlow DNN遷移,例如Resnet V2 50。還可以通過配置可選的超參數來選擇要從中派生的超參數。
就這麼簡單,您甚至不需要進行影像變換(調整大小、規格化等)。根據所使用的DNN架構,該框架在幕後進行所需的影像轉換,因此您只需使用單個API即可。
可選使用高級超參數
高級用戶還有另一種重載方法,您還可以指定可選的超參數,例如epoch,batchSize,learningRate,特定的DNN架構,例如Inception v3或者Resnet v2101和其他典型的DNN參數,但大多數用戶都可以從簡化的API開始。
以下是如何使用高級DNN參數:
// 5.1 (OPTIONAL) Define the model's training pipeline by using explicit hyper-parameters

var options = new ImageClassificationTrainer.Options()
{
    FeatureColumnName = "Image",
    LabelColumnName = "LabelAsKey",
    // Just by changing/selecting InceptionV3/MobilenetV2/ResnetV250
    // you can try a different DNN architecture (TensorFlow pre-trained model).
    Arch = ImageClassificationTrainer.Architecture.MobilenetV2,
    Epoch = 50,       //100
    BatchSize = 10,
    LearningRate = 0.01f,
    MetricsCallback = (metrics) => Console.WriteLine(metrics),
    ValidationSet = testDataView
};

var pipeline = mlContext.MulticlassClassification.Trainers.ImageClassification(options)
        .Append(mlContext.Transforms.Conversion.MapKeyToValue(
            outputColumnName: "PredictedLabel",
            inputColumnName: "PredictedLabel"));
3. 訓練模型
為了開始訓練過程,您需要在構建的管道上運行Fit:
// 4. Train/create the ML model
ITransformer trainedModel = pipeline.Fit(trainDataView);
4. 評估模型
訓練完成後,利用測試數據集對模型進行品質評價。
Evaluate函數需要一個IDataView,其中包含通過調用Transform()從測試數據集生成的預測。
// 5. Get the quality metrics (accuracy, etc.)
IDataView predictionsDataView = trainedModel.Transform(testDataset);

var metrics = mlContext.MulticlassClassification.Evaluate(predictionsDataView, labelColumnName:"LabelAsKey", predictedLabelColumnName: "PredictedLabel");
ConsoleHelper.PrintMultiClassClassificationMetrics("TensorFlow DNN Transfer Learning", metrics);
最後,保存模型:
// Save the model to assets/outputs (You get ML.NET .zip model file and TensorFlow .pb model file)
mlContext.Model.Save(trainedModel, trainDataView.Schema, outputMlNetModelFilePath);
運行項目來訓練模型
您應該按照以下步驟來訓練您的模型:
- 在Visual Studio中將
ImageClassification.Train設置為啟動項目 - 在Visual Studio中按F5。幾秒鐘後,該過程將完成並保存一個新的ML.NET模型到文件
assets/outputs/imageClassifier.zip
5. 「終端用戶」應用中的使用模型
GPU與CPU對模型的使用/評分對比
在使用/評分模型時,您也可以在CPU/GPU之間進行選擇,但是,如果使用GPU,您還需要確保運行模型的電腦/伺服器支援GPU。
設置評分/使用項目以使用GPU的方法與本readme.md開頭所述的方法相同,只需使用一個或另一個redist庫。
用於評分的示例控制台應用程式
在示例的解決方案中,還有第二個項目名為ImageClassifcation.Predict。這個控制台應用程式只需載入您訂製的ML.NET模型,並以假設的最終用戶應用程式的方式執行一些樣本預測。
首先要做的是將生成的assets/outputs/imageClassifier.zip文件複製/粘貼到使用項目的inputs/MLNETModel文件夾中。
關於程式碼,您首先需要載入在模型訓練應用執行期間創建的模型。
MLContext mlContext = new MLContext(seed: 1);
ITransformer loadedModel = mlContext.Model.Load(imageClassifierModelZipFilePath, out var modelInputSchema);
然後,您可以創建一個預測器引擎對象,並最終使用文件夾assets/inputs/images-for-predictions的第一個影像進行一些樣本預測,其中只有一些影像在訓練模型時沒有使用。
請注意,在評分時,只需要具有記憶體影像的InMemoryImageData類型。
該影像也可以通過任何其他通道傳輸,而不是從文件中載入。
例如,這個解決方案中的ImageClassification.WebApp通過HTTP獲取將要用於預測的影像。
var predictionEngine = mlContext.Model.CreatePredictionEngine<InMemoryImageData, ImagePrediction>(loadedModel);

//Predict the first image in the folder
IEnumerable<InMemoryImageData> imagesToPredict = LoadInMemoryImagesFromDirectory(
                                                        imagesFolderPathForPredictions, false);

InMemoryImageData imageToPredict = new InMemoryImageData
{
    Image = imagesToPredict.First().Image,
    ImageFileName = imagesToPredict.First().ImageFileName
};

var prediction = predictionEngine.Predict(imageToPredict);

// Get the highest score and its index
float maxScore = prediction.Score.Max();

Console.WriteLine($"Image Filename : [{imageToPredict.ImageFileName}], " +
                    $"Predicted Label : [{prediction.PredictedLabel}], " +
                    $"Probability : [{maxScore}] "
                    );
預測引擎接收InMemoryImageData類型的對象作為參數(包含2個屬性:Image和ImageFileName)。
該模型不使用ImageFileName。 您只需將它放在這裡,以便在顯示預測時可以將文件名列印出來。 預測僅使用byte[] Image欄位中的影像位。
然後,模型返回類型為ImagePrediction的對象,該對象包含所有影像類/類型的PredictedLabel和所有Scores。
由於PredictedLabel已經是一個字元串,因此它將顯示在控制台中。
關於預測標籤的分數,我們只需要取最高的分數,即預測標籤的概率。
運行「最終用戶應用程式」項目以嘗試預測
您應該按照以下步驟來使用您的模型:
- 在Visual Studio中將「ImageClassification.Predict」設置為啟動項目
- 在Visual Studio中按F5。幾秒鐘後,該過程將通過載入並使用自定義的
imageClassifier.zip模型來顯示預測。
用於評分/推斷的ASP.NET Core web應用示例
在示例的解決方案中,還有另一個名為ImageClassification.WebApp的項目,它是一個ASP.NET Core web應用程式,允許用戶通過HTTP提交影像,並使用記憶體中的影像進行評分/預測。
此示例還使用了PredictionEnginePool,建議用於多執行緒和可擴展的應用程式。
您可以在下面看到該應用的螢幕截圖:

TensorFlow DNN遷移學習背景資訊
這個示例應用程式正在重新訓練用於影像分類的TensorFlow模型。您可能認為它與另一個示例非常相似 Image classifier using the TensorFlow Estimator featurizer。 不過,內部的實現方式卻有很大的不同。在上述示例中,它使用的是「模型合成方法」,其中初始TensorFlow模型(即InceptionV3或ResNet)僅用於對影像進行特徵化,並生成每個影像的二進位資訊,以供添加在頂部的另一個ML.NET分類器訓練器使用(例如LbfgsMaximumEntropy)。因此,即使該示例使用的是TensorFlow模型,您也只能使用ML.NET trainer進行訓練,您不會重新訓練新的TensorFlow模型,而是訓練ML.NET模型。這就是為什麼該示例的輸出只是一個ML.NET模型(.zip文件)。
與此相反,本例在本地基於遷移學習方法對新的TensorFlow模型進行重新訓練,再從指定的預訓練模型(Inception V3或ResNet)派生的新TensorFlow模型進行了訓練。
重要的區別在於,這種方法使用TensorFlowAPI進行內部再訓練,並創建一個新的TensorFlow模型(.pb)。然後,您使用的ML.NET.zip文件模型就像是新的重新訓練的TensorFlow模型的包裝器。這就是為什麼您還可以看到訓練後生成的新.pb文件的原因:

在下面的螢幕截圖中,您可以看到如何在Netron中看到重新訓練的TensorFlow模型(custom_retrained_model_based_on_InceptionV3.meta.pb),因為它是本機TensorFlow模型:

好處:
-
使用GPU進行訓練和推斷:
當使用基於TensorFlow的本機DNN方法時,您可以使用CPU或GPU(如果可用)來獲得更好的性能(減少訓練和評分所需的時間)。 -
跨多個框架和平台重用:
由於您本機訓練了Tensorflow模型,除了能夠使用ML.NET ‘wrapper’模型(.zip文件)運行/使用該模型之外,您還可以使用.pb Tensorflow凍結模型並在任何其他框架(如Python/Keras/Tensorflow)上運行它,或者Java/Android應用程式或任何支援TensorFlow的框架。 -
靈活性和性能:
由於ML.NET是在Tensorflow層上進行內部再訓練的,因此ML.NET團隊將能夠進一步優化並採取多種方法,如在最後一層上進行訓練或跨Tensorflow模型在多個層上進行訓練,並獲得更好的品質水平。


