音影片入門-02-RGB拼圖
- 2019 年 10 月 3 日
- 筆記
圖片 & 像素點 & RGB
平時瀏覽的圖片看不出像素點:

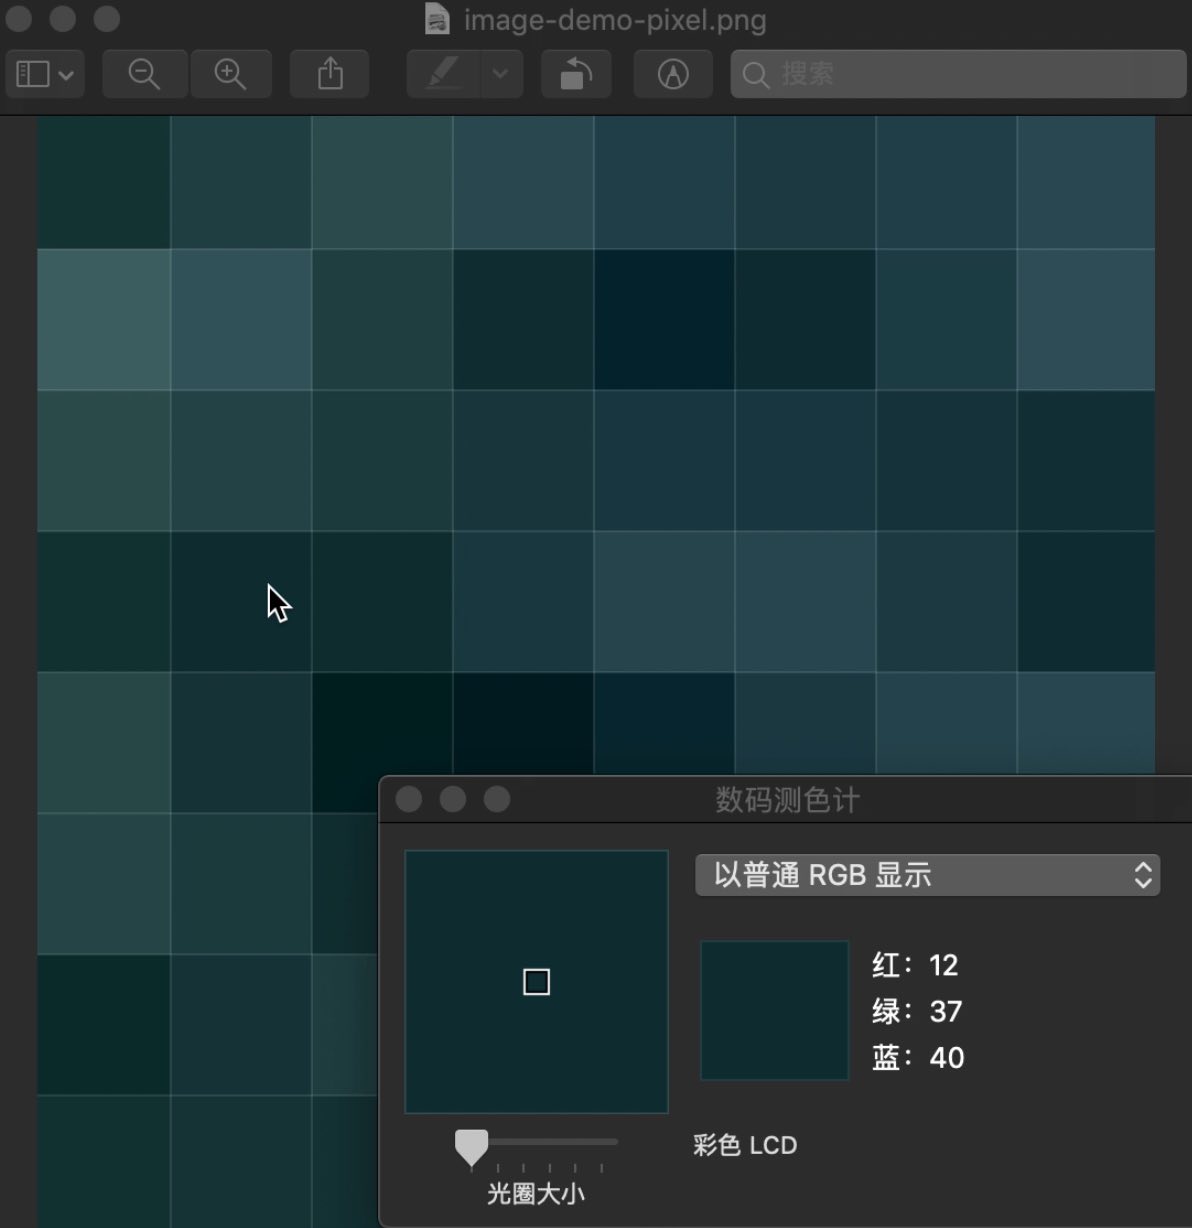
圖片放大時,可以看出圖片是一個個像素點組成的:

每個像素點的顏色可以用 RGB 表示:
RGB 拼圖
既然圖片是像素點組成的,而像素點的顏色可以用 RGB 來表示,那我們可以用 RGB 來拼出自己的圖片!
1. 設定目標
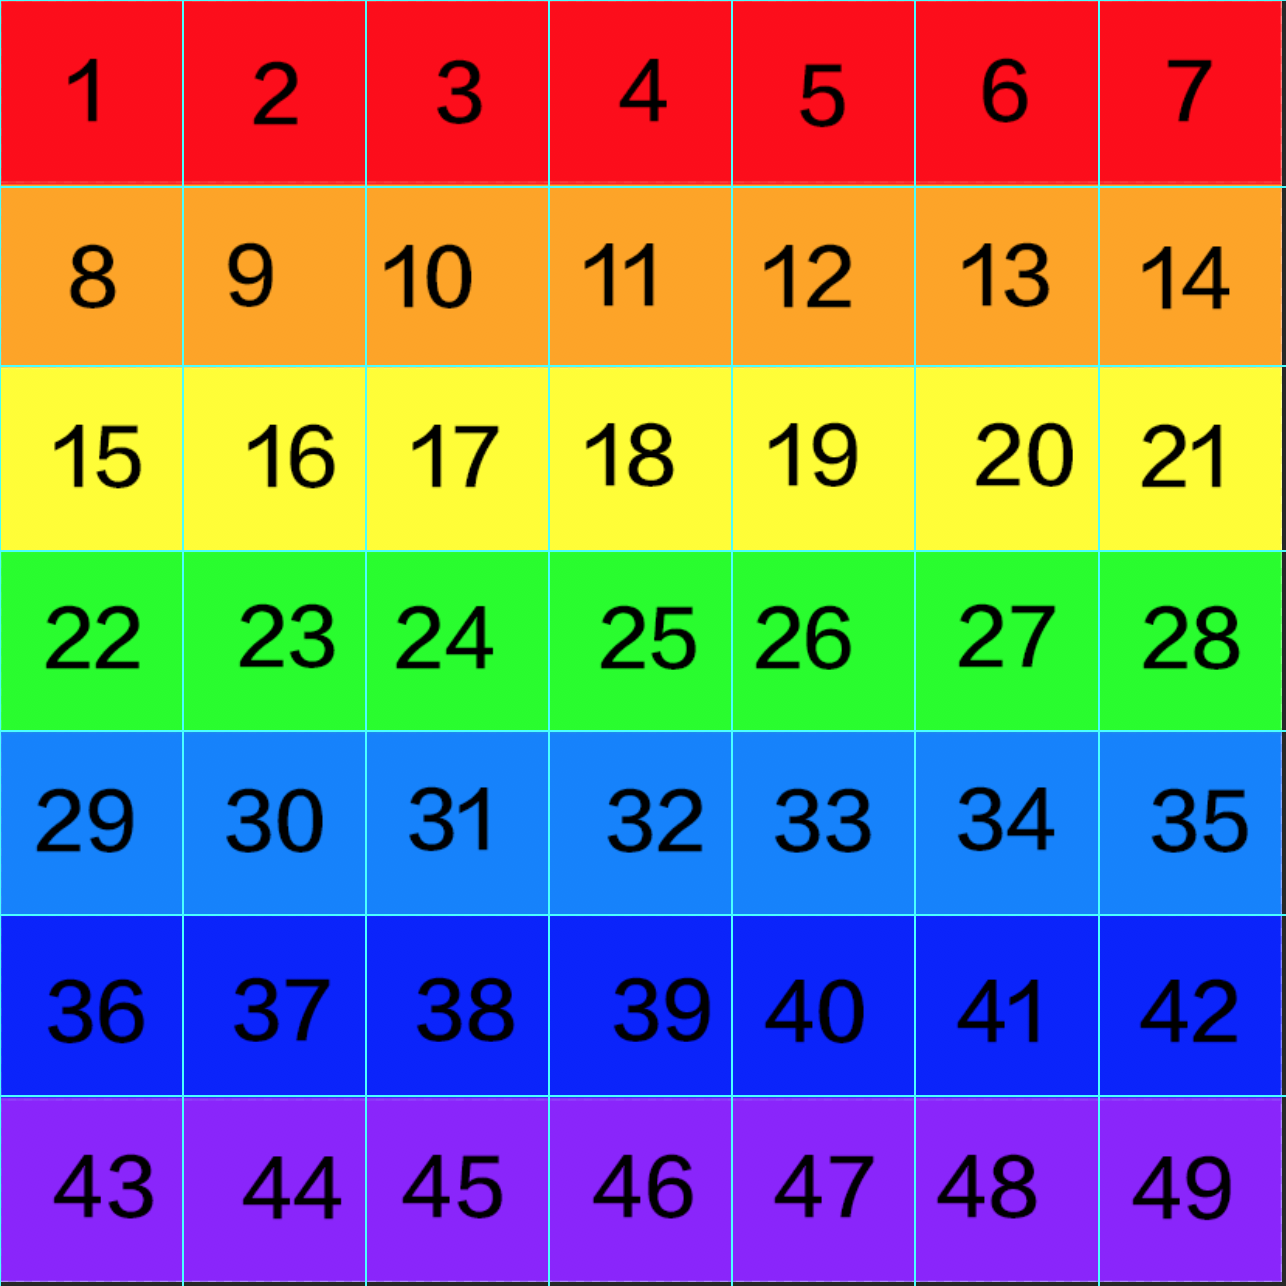
這是我們想要使用 RGB 像素點拼出來的圖片:

| 顏色名 | RGB | 十六進位 | RGB24 二進位 |
|---|---|---|---|
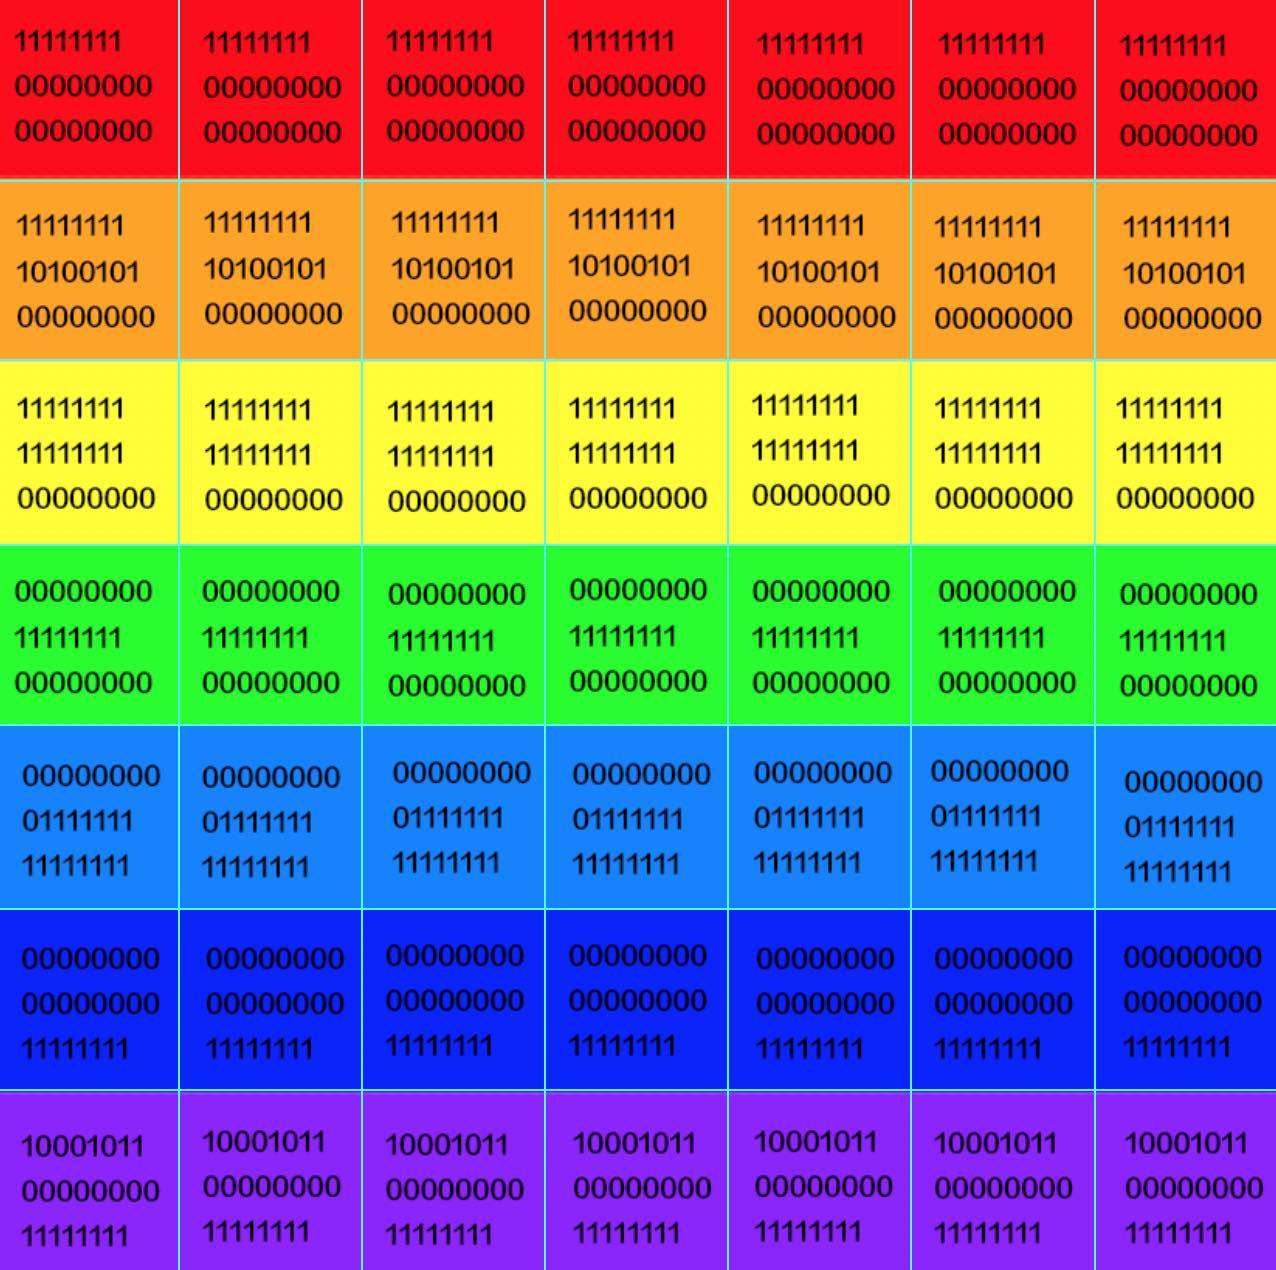
| 紅 | 255, 0, 0 | 0XFF0000 | 11111111 00000000 00000000 |
| 橙 | 255, 165, 0 | 0XFFA500 | 11111111 10100101 00000000 |
| 黃 | 255, 255, 0 | 0XFFFF00 | 11111111 11111111 00000000 |
| 綠 | 0, 255, 0 | 0X00FF00 | 00000000 11111111 00000000 |
| 青 | 0, 127, 255 | 0X007FFF | 00000000 01111111 11111111 |
| 藍 | 0, 0, 255 | 0X0000FF | 00000000 00000000 11111111 |
| 紫 | 139, 0, 255 | 0X8B00FF | 10001011 00000000 11111111 |
2. 分析實現思路
用 RGB24 格式表示像素顏色值,每個像素用 24 比特位表示,佔用三個位元組。
解析度 7X7 彩虹圖片像素排列:
解析度 7X7 彩虹圖片像素 RGB 二進位:
7X7 只是為了分析方便,我們動手時要拼出 700X700 像素點的圖片
3. 動手實踐
將像素點的 RGB24 二進位存入文件:
#include <stdio.h> // 彩虹的七種顏色 u_int32_t rainbowColors[] = { 0XFF0000, // 紅 0XFFA500, // 橙 0XFFFF00, // 黃 0X00FF00, // 綠 0X007FFF, // 青 0X0000FF, // 藍 0X8B00FF // 紫 }; void writeRainbow(char *outputFile, int width, int height) { // 打開文件 FILE *rgbFile = fopen(outputFile, "wb+"); for (int i = 0; i < width; ++i) { // 當前顏色 u_int32_t currentColor = 0X000000; if(i < 100) { // 前 100 行 紅色 currentColor = rainbowColors[0]; } else if(i < 200) { // 100-200 行 橙色 currentColor = rainbowColors[1]; } else if(i < 300) { // 200-300 行 黃色 currentColor = rainbowColors[2]; } else if(i < 400) { // 300-400 行 綠色 currentColor = rainbowColors[3]; } else if(i < 500) { // 400-500 行 青色 currentColor = rainbowColors[4]; } else if(i < 600) { // 500-600 行 藍色 currentColor = rainbowColors[5]; } else if(i < 700) { // 600-700 行 紫色 currentColor = rainbowColors[6]; } // 當前顏色 R 分量 u_int8_t R = (currentColor & 0xFF0000) >> 16; // 當前顏色 G 分量 u_int8_t G = (currentColor & 0x00FF00) >> 8; // 當前顏色 B 分量 u_int8_t B = currentColor & 0x0000FF; for (int j = 0; j < height; ++j) { // 按順序寫入一個像素 RGB24 到文件中 fputc(R, rgbFile); fputc(G, rgbFile); fputc(B, rgbFile); } } // 關閉文件 fclose(rgbFile); } int main() { writeRainbow("/Users/staff/Desktop/rainbow-700x700.rgb24", 700, 700); return 0; }運行上面的程式碼,將會生成 rainbow-700×700.rgb24 文件
檢查生成的文件
- 700X700=490000 個像素點
- 每個像素點顏色用 RGB24 編碼表示,每個像素點用 24 比特位表示,占 3 個位元組
- 490000 X 3 = 1470000 位元組(B)
$ cd Desktop $ ls -al rainbow-700x700.rgb24 -rw-r--r-- 1 staff staff 1470000 9 12 18:17 rainbow-700x700.rgb24感覺生成了正確的 rgb24 格式的圖片。
確認 RGB24 文件正確性
要確認生成的 rgb24 格式的圖片是正確的,最直接的方式就是使用圖片查看軟體打開。但是,普通的圖片查看軟體都不支援 rgb24 這種格式。這時就要用專業的多媒體框架 FFmpeg 了。
下載 ffplay 工具
根據自己的系統,下載 FFmpeg Static 工具包。
這裡拿 macOS 為例:
$ ll total 163968 -rw-r--r--@ 1 staff staff 66M 9 12 20:43 ffmpeg-4.2-macos64-static.zip # 解壓壓縮包 $ unzip ffmpeg-4.2-macos64-static.zip $ cd ffmpeg-4.2-macos64-static $ ll total 88 -rw-r--r--@ 1 staff staff 35K 8 8 14:26 LICENSE.txt -rw-r--r--@ 1 staff staff 4.0K 8 8 14:26 README.txt drwxr-xr-x@ 5 staff staff 160B 8 8 14:26 bin drwxr-xr-x@ 35 staff staff 1.1K 8 8 14:26 doc drwxr-xr-x@ 8 staff staff 256B 8 8 14:26 presets $ cd bin $ ll total 394000 -rwxr-xr-x@ 1 staff staff 64M 8 8 14:26 ffmpeg -rwxr-xr-x@ 1 staff staff 64M 8 8 14:26 ffplay -rwxr-xr-x@ 1 staff staff 64M 8 8 14:26 ffprobe # 測試執行 ffplay 命令 $ ./ffplay ffplay version 4.2 Copyright (c) 2003-2019 the FFmpeg developers built with Apple LLVM version 10.0.1 (clang-1001.0.46.4) configuration: --enable-gpl --enable-version3 --enable-sdl2 --enable-fontconfig --enable-gnutls --enable-iconv --enable-libass --enable-libdav1d --enable-libbluray --enable-libfreetype --enable-libmp3lame --enable-libopencore-amrnb --enable-libopencore-amrwb --enable-libopenjpeg --enable-libopus --enable-libshine --enable-libsnappy --enable-libsoxr --enable-libtheora --enable-libtwolame --enable-libvpx --enable-libwavpack --enable-libwebp --enable-libx264 --enable-libx265 --enable-libxml2 --enable-libzimg --enable-lzma --enable-zlib --enable-gmp --enable-libvidstab --enable-libvorbis --enable-libvo-amrwbenc --enable-libmysofa --enable-libspeex --enable-libxvid --enable-libaom --enable-appkit --enable-avfoundation --enable-coreimage --enable-audiotoolbox libavutil 56. 31.100 / 56. 31.100 libavcodec 58. 54.100 / 58. 54.100 libavformat 58. 29.100 / 58. 29.100 libavdevice 58. 8.100 / 58. 8.100 libavfilter 7. 57.100 / 7. 57.100 libswscale 5. 5.100 / 5. 5.100 libswresample 3. 5.100 / 3. 5.100 libpostproc 55. 5.100 / 55. 5.100 Simple media player usage: ffplay [options] input_file An input file must be specified Use -h to get full help or, even better, run 'man ffplay'使用 ffplay 打開 rgb24 圖片
ffplay -f rawvideo -pixel_format rgb24 -s 700x700 rainbow-700x700.rgb24 # -pixel_format rgb24 指定像素格式 rgb24 # -s 700x700 指定圖片解析度 700x700預覽:
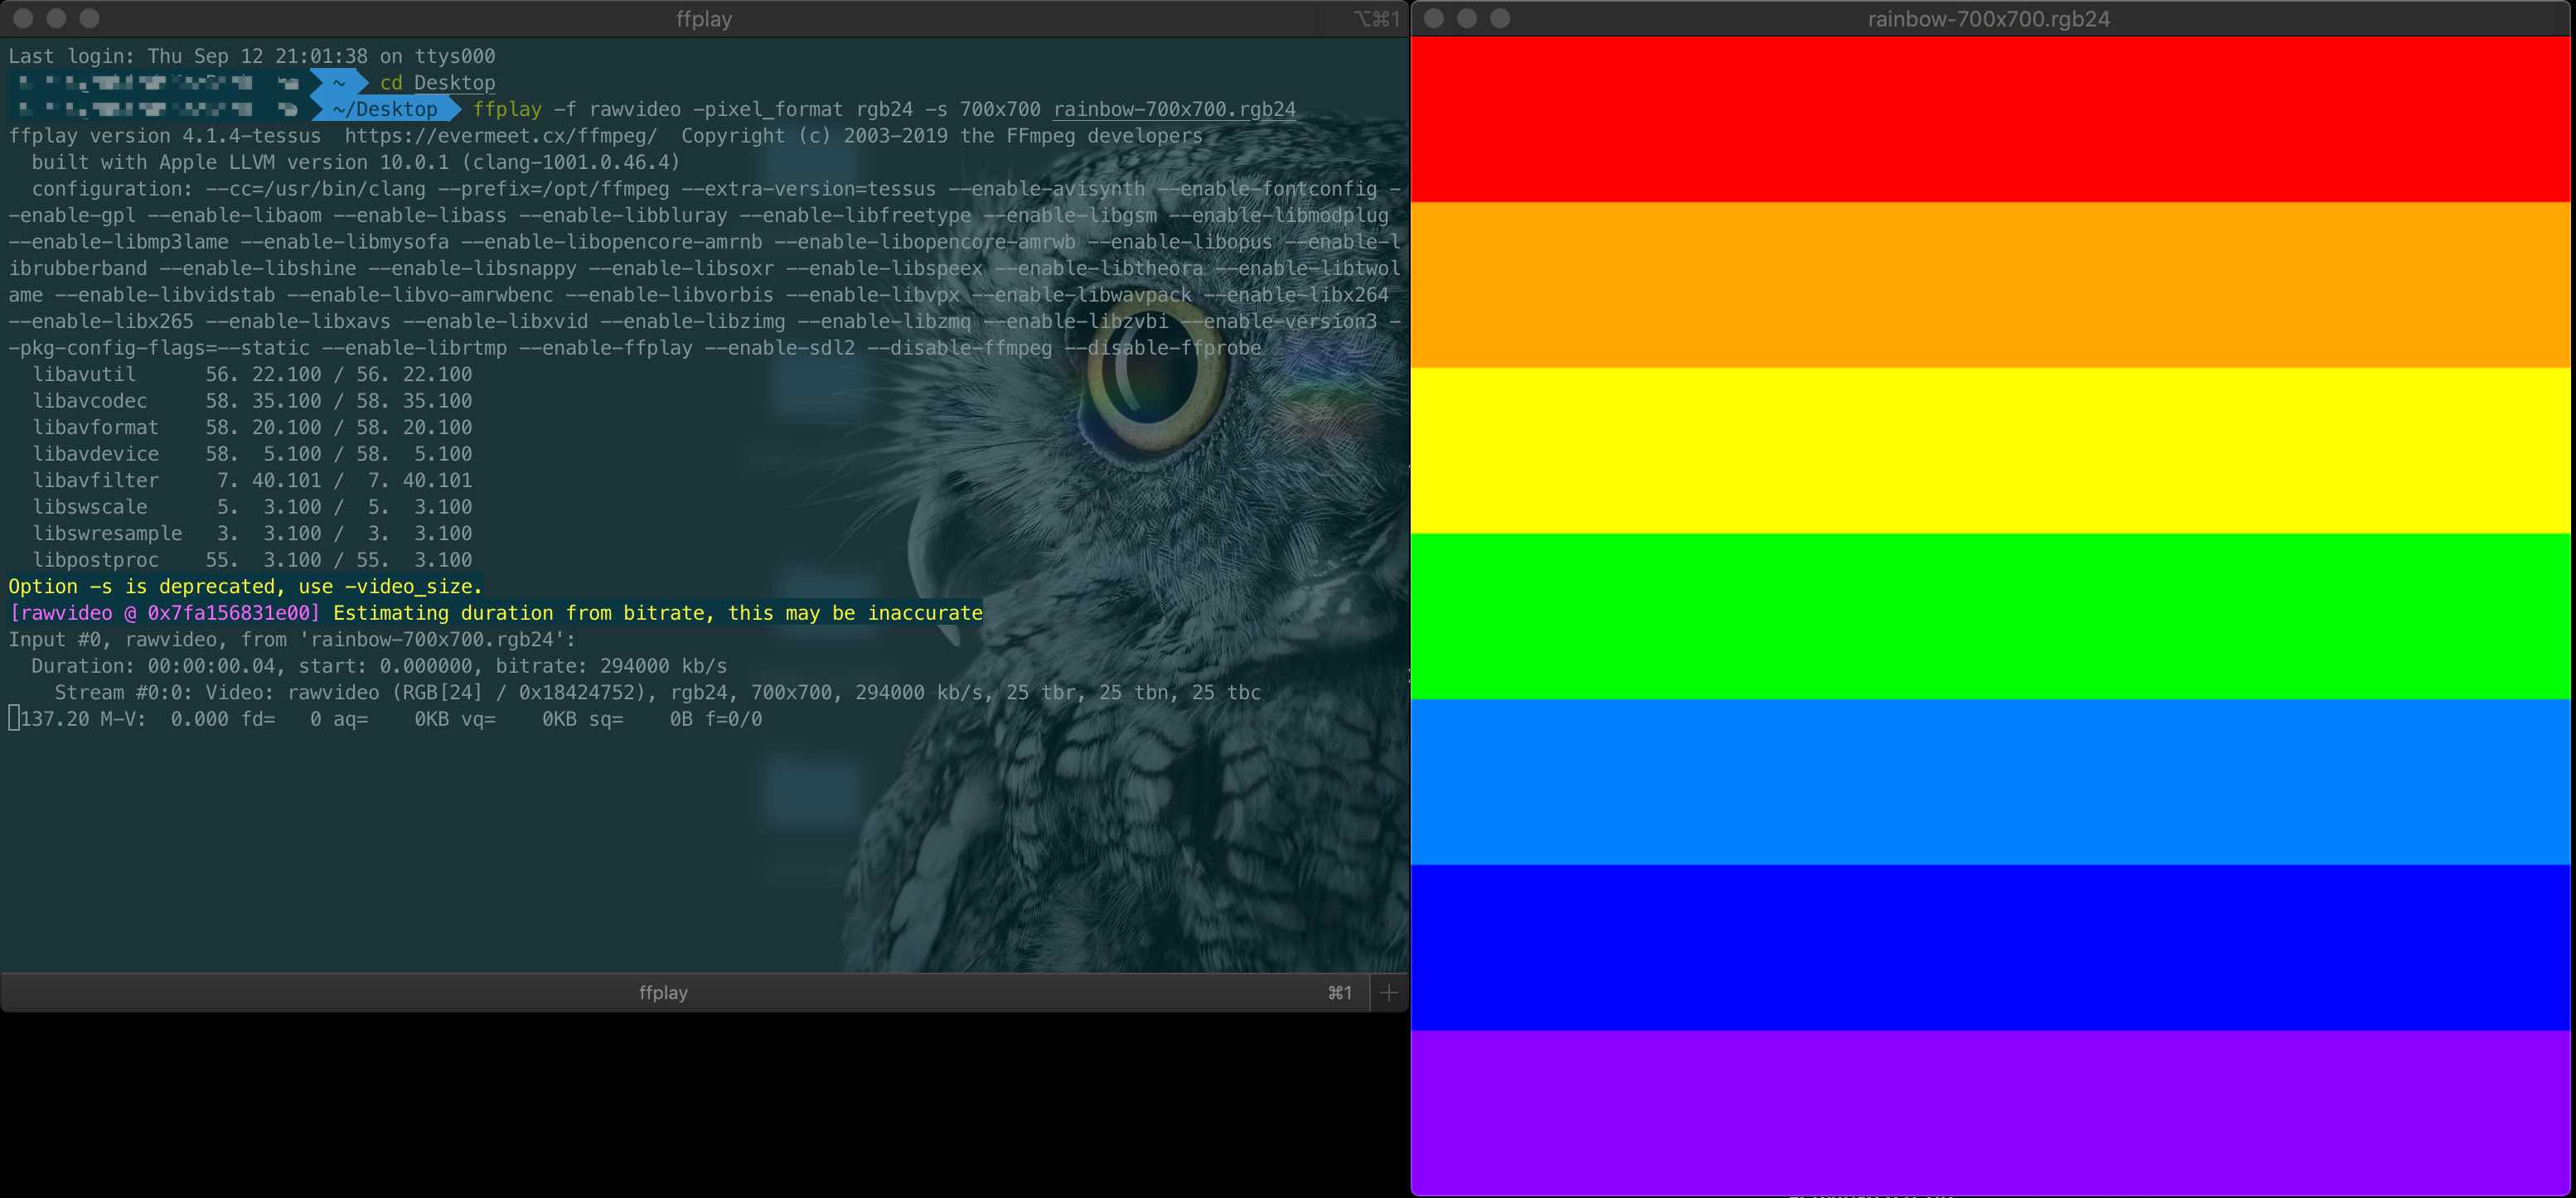
Congratulations!
成功用像素點拼出了一張圖片!
程式碼:
rgb-pixel
內容有誤?聯繫作者: