7.vue組件(二)–雙向綁定,父子組件訪問
本文主要說兩件事
1. 如何實現父子組件之間的雙向綁定
2. 父組件如何訪問子組件的data,method, 子組件如何訪問父組件的data,method等
一. 如何實現父子組件之間的雙向綁定
案例描述:
父子組件雙向綁定
父組件有一個message,
子組件有一個文本框
讓他們兩個同步變化
實現思路:
1. 子組件接收父組件傳遞過來的參數
2. 先實現子組件的雙向綁定
3. 子組件將數據傳給父組件
實現步驟:
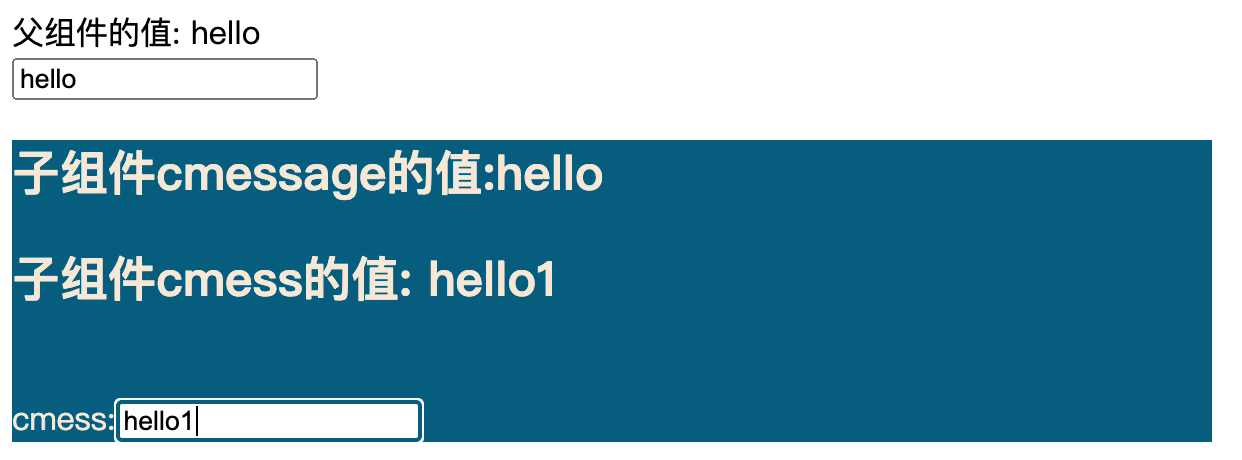
第一步: 子組件接收父組件的data
<!DOCTYPE html>
<html lang="en">
<head>
    <meta charset="UTF-8">
    <title>Title</title>
    <script src="../../js/vue.js"></script>
</head>
<body>
    <div id="app">
        父組件的值: {{message}}
        <br>
        <input type="text" v-model="message"></input>
        <comp1 :cmessage="message" ></comp1>
    </div>

    <template id="comp1">
        <div style=" width: 600px; background-color: #085e7d; color: antiquewhite">
            <h2>子組件cmessage的值:{{cmessage}}</h2>
            <br>
        </div>
    </template>
    <script>
        Vue.component("comp1", {
            template: "#comp1",
            props: ["cmessage"],

        })
        const app = new Vue({
            el: "#app",
            data: {
                message: "hello"
            }
        });
    </script>
</body>
</html>
子組件通過屬性props: [“cmessage”], 來接收父組件的message屬性. 並且父組件修改message的值, 子組件跟隨改變
效果如下:

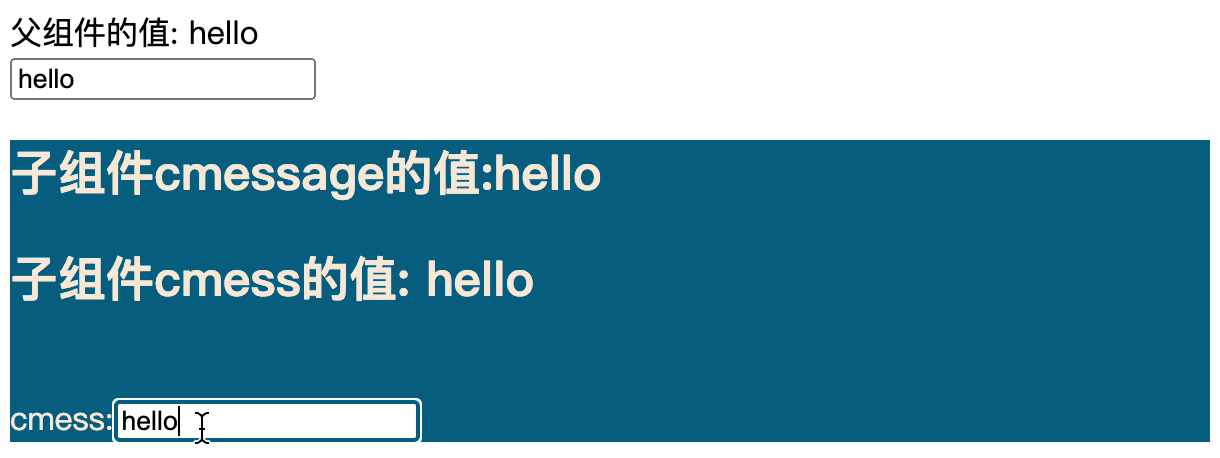
第二步: 實現子組件屬性的雙向綁定
組件的數據綁定, 使用的也是data屬性.但在組件中, data定義為一個方法
<!DOCTYPE html>
<html lang="en">
<head>
    <meta charset="UTF-8">
    <title>Title</title>
    <script src="../../js/vue.js"></script>
</head>
<body>
    <div id="app">
        父組件的值: {{message}}
        <br>
        <input type="text" v-model="message"></input>
        <comp1 :cmessage="message" ></comp1>
    </div>

    <template id="comp1">
        <div style=" width: 600px; background-color: #085e7d; color: antiquewhite">
            <h2>子組件cmessage的值:{{cmessage}}</h2>
            <h2>子組件cmess的值: {{cmess}}</h2>
            <br>
            cmess:<input type="text"  v-model="cmess" ></input>
            <br>
        </div>
    </template>
    <script>
        Vue.component("comp1", {
            template: "#comp1",
            props: ["cmessage"],
            data() {
                return {
                    "cmess": this.cmessage
                }
            }

        })
        const app = new Vue({
            el: "#app",
            data: {
                message: "hello"
            }
        });
    </script>
</body>
</html>
data中定義了屬性cmess, 其值是屬性cmessage的值. 我們實現cmess屬性的雙向綁定.cmess:<input type=”text” v-model=”cmess” ></input>
效果如下:
這樣子組件cmess的雙向綁定實現了, 但是我們發現修改父組件的時候,子組件沒有變化. 修改子組件的時候, 父組件也沒有變化
第三步: 子組件屬性變化同步給父組件
子組件屬性的改變同步給父組件, 使用的是自定義事件
<!DOCTYPE html>
<html lang="en">
<head>
    <meta charset="UTF-8">
    <title>Title</title>
    <script src="../../js/vue.js"></script>
</head>
<body>
    <div id="app">
        父組件的值: {{message}}
        <br>
        <input type="text" v-model="message"></input>
        <comp1 :cmessage="message" @csyncchange="syncchange"></comp1>
    </div>

    <template id="comp1">
        <div style=" width: 600px; background-color: #085e7d; color: antiquewhite">
            <h2>子組件cmessage的值:{{cmessage}}</h2>
            <h2>子組件cmess的值: {{cmess}}</h2>
            <br>
            cmess:<input type="text"  v-model="cmess"  @input="changeMessage"></input>
            <br>
        </div>
    </template>
    <script>
        Vue.component("comp1", {
            template: "#comp1",
            props: ["cmessage"],
            data() {
                return {
                    "cmess": this.cmessage
                }
            },
            methods: {
                changeMessage(event) {
                    console.log(event.target.value)
                    this.$emit("csyncchange", event.target.value)
                }
            },
            watch: {
                cmessage(val, oldval) {
                    console.log(val, oldval)
                    console.log()
                    this.cmess = val
                }
            }

        })
        const app = new Vue({
            el: "#app",
            data: {
                message: "hello"
            },
            methods: {
                syncchange(value) {
                    this.message = value
                }
            }
        });
    </script>
</body>
</html>
添加子組件的input事件: @input=”changeMessage”.
changeMessage(event) {
    console.log(event.target.value)
    this.$emit("csyncchange", event.target.value)
}
然後自定義一個csyncchange事件, 父組件監聽這個事件的變化
<comp1 :cmessage="message" @csyncchange="syncchange"></comp1>
父組件自定義一個method方法, 接收事件傳遞的數據
methods: {
    syncchange(value) {
        this.message = value
    }
}
這樣就實現了子組件修改cmess的值, 同步給父組件. 效果如下:
但是, 我們發現,在組建同步給父組件沒問題, 組件只同步數據給了props屬性, 而沒有同步給cmess
第四步: 使用watch方法監聽props屬性的變化
<!DOCTYPE html>
<html lang="en">
<head>
    <meta charset="UTF-8">
    <title>Title</title>
    <script src="../../js/vue.js"></script>
</head>
<body>
    <div id="app">
        父組件的值: {{message}}
        <br>
        <input type="text" v-model="message"></input>
        <comp1 :cmessage="message" @csyncchange="syncchange"></comp1>
    </div>

    <template id="comp1">
        <div style=" width: 600px; background-color: #085e7d; color: antiquewhite">
            <h2>子組件cmessage的值:{{cmessage}}</h2>
            <h2>子組件cmess的值: {{cmess}}</h2>
            <br>
            cmess:<input type="text"  v-model="cmess"  @input="changeMessage"></input>
            <br>
        </div>
    </template>
    <script>
        Vue.component("comp1", {
            template: "#comp1",
            props: ["cmessage"],
            data() {
                return {
                    "cmess": this.cmessage
                }
            },
            methods: {
                changeMessage(event) {
                    console.log(event.target.value)
                    this.$emit("csyncchange", event.target.value)
                }
            },
            watch: {
                cmessage(val, oldval) {
                    console.log(val, oldval)
                    console.log()
                    this.cmess = val
                }
            }

        })
        const app = new Vue({
            el: "#app",
            data: {
                message: "hello"
            },
            methods: {
                syncchange(value) {
                    this.message = value
                }
            }
        });
    </script>
</body>
</html>
這一步的重點是watch方法. 同步cmessage的值給cmess. 看看效果
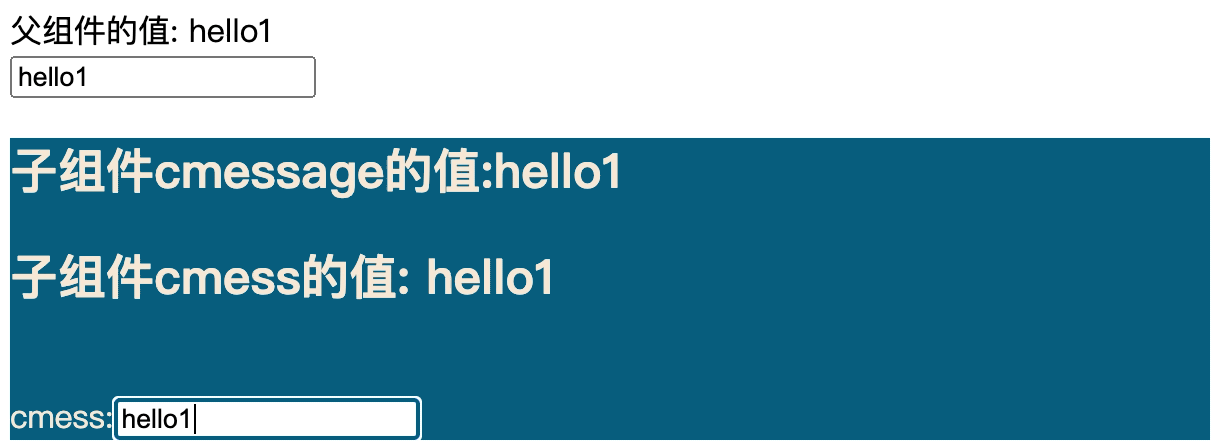
以上,完美實現了,父子組件的雙向數據綁定.
二. 父子組件的相互訪問
如果父組件想要訪問子組件的屬性和方法, 或者子組件想要訪問父組件的屬性和方法怎麼辦呢? 下面來看看:
1. 父組件訪問子組件
父組件訪問子組件有兩種方式
- 1. 使用$children
- 2. 使用@refs
案例: 現在有一個父組件, 想要拿到子組件的方法或者變數.
-
使用$children獲取
獲取所有的子組件: this.$children
獲取某個子組件的屬性: this.$children.屬性名
獲取某個子組件的方法: this.$children.方法名()
<!DOCTYPE html>
<html lang="en">
<head>
    <meta charset="UTF-8">
    <title>Title</title>
</head>
<body>
<div id="app">
    <h1>第一種方法: 使用children訪問子組件</h1>
    <app1-comp></app1-comp>
    <app1-comp></app1-comp>
    <app1-comp></app1-comp>
    <button @click="btnclick">按鈕</button>

</div>

<template id="comp1">
    <div>
        <p>只有app1才能使用的組件</p>
        <h2>{{name}}</h2>
    </div>
</template>
<script src="../../js/vue.js"></script>
<script>
    const app1Comp = Vue.extend({
        template: comp1,
        data() {
            return {
                name : "name名稱"
            }
        },
        methods: {
            getchange() {
                console.log("getchange方法")
            }
        }

    })

    let app = new Vue({
        el: "#app",
        data: {
            message: "hello"
        },
        components:{
            app1Comp: app1Comp
        },
        methods: {
            btnclick() {
                console.log("點擊事件", this.$children)
                console.log("父組件訪問子組件的data數據: ",this.$children[1].name)
                console.log("父組件訪問子組件的方法: ",this.$children[1].getchange())

            }
        }
    });

</script>
</body>
</html>
在dom中使用了三個comp1組件. 我們可以使用this.$children來獲取所有的組件
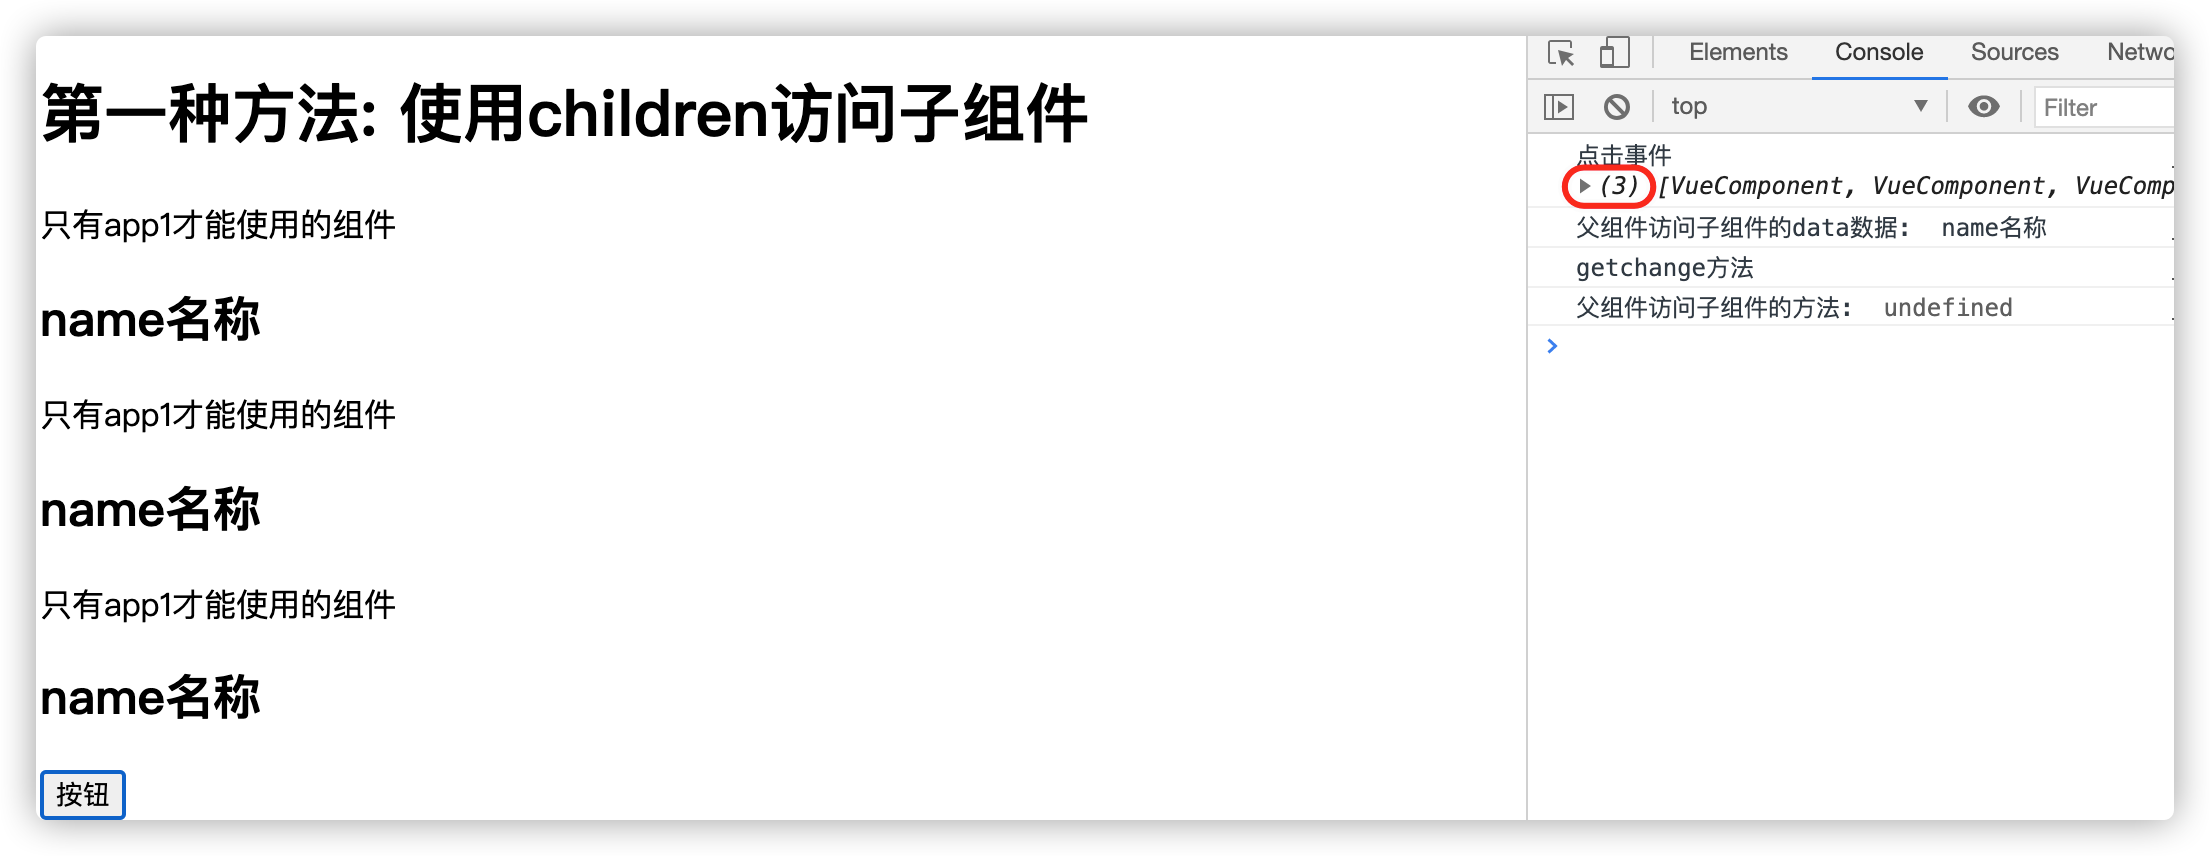
這裡獲取到了3個組件, 並列印了第二個組件的名稱和方法
-
使用@refs獲取屬性
使用refs的好處是可以根據組件名稱獲取. 而不是遍歷, 因為遍歷的下標時可能修改的.
<!DOCTYPE html>
<html lang="en">
<head>
    <meta charset="UTF-8">
    <title>Title</title>
</head>
<body>
<!--
    父組件訪問子組件有兩種方式
    1. 使用$children
    2. 使用@refs

    需求: 現在有一個父組件, 想要拿到子組件的方法或者變數.
    所以, 我們先定義一個組件.

-->
<div id="app">
    <h1>第二種方法: 使用refs訪問子組件</h1>
    <app2-comp ref="app21"></app2-comp>
    <app2-comp ref="app22"></app2-comp>
    <app2-comp ref="app23"></app2-comp>
    <button @click="btnclick">按鈕</button>

</div>

<template id="comp1">
    <div>
        <p>只有app1才能使用的組件</p>
        <h2>{{name}}</h2>
    </div>
</template>
<script src="../../js/vue.js"></script>
<script>
    const app1Comp = Vue.extend({
        template: comp1,
        data() {
            return {
                name : "name名稱"
            }
        },
        methods: {
            getchange() {
                console.log("getchange方法")
            }
        }

    })

    let app = new Vue({
        el: "#app",
        data: {
            message: "hello"
        },
        components:{
            app1Comp: app1Comp,
            app2Comp: app1Comp
        },
        methods: {
            btnclick() {

                console.log(this.$refs.app21.name)
                console.log(this.$refs.app21.getchange())
            }
        }
    });

</script>
</body>
</html>
這一次我們給組件起了名字, 通過$refs可以指定組件名,獲取屬性和方法

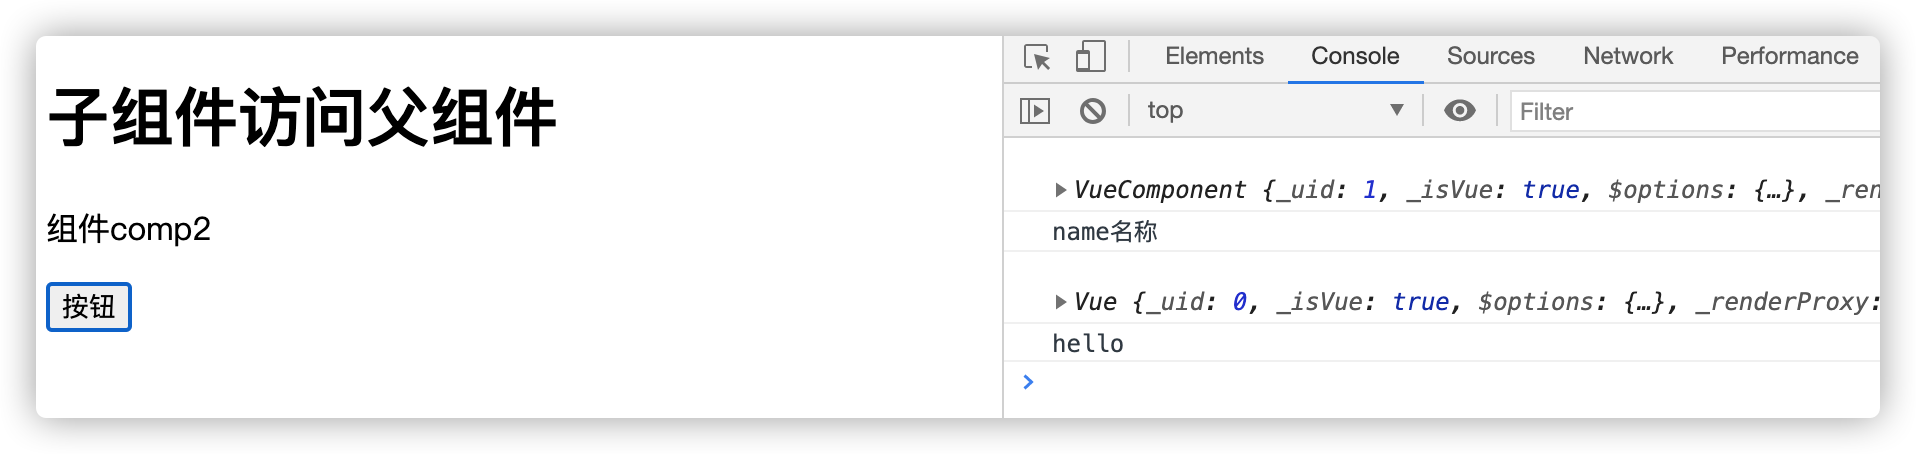
2. 子組件訪問父組件
- 子組件訪問父組件使用的是$parent
- 子組件訪問根組件使用$root
通常new Vue()也是一個組件, 他是根組件. 如果子組件想要獲取根組件的屬性和方法,使用@root
下面這個例子, 是子組件comp1裡面引用了另一個組件comp2. 在comp2中獲取comp1的屬性和方法, 使用@parent, 這就是子組件獲取父組件的屬性和方法
comp2要想獲取new Vue()對象的屬性和方法, 使用的是$root.
<!DOCTYPE html>
<html lang="en">
<head>
    <meta charset="UTF-8">
    <title>Title</title>
</head>
<body>
<!--
    父組件訪問子組件有兩種方式
    1. 使用$children
    2. 使用@refs

    需求: 現在有一個父組件, 想要拿到子組件的方法或者變數.
    所以, 我們先定義一個組件.

-->
<div id="app">
    <h1>子組件訪問父組件</h1>
    <comp1></comp1>


</div>
<template id="comp1">
    <div>
        <comp2></comp2>
    </div>

</template>
<template id="comp2">
    <div>
        <p>組件comp2</p>
        <button  type="text" @click="btnClick">按鈕</button>
    </div>
</template>
<script src="../../js/vue.js"></script>
<script>
    const app1Comp = Vue.extend({
        template: comp1,
        data() {
            return {
                name: "name名稱"
            }
        },
        components: {
            comp2: {
                template: comp2,

                methods: {
                    btnClick() {
                        console.log(this.$parent)
                        console.log(this.$parent.name)

                        // 獲取root元素, 也就是vue元素
                        console.log(this.$root)
                        console.log(this.$root.message)
                    }
                }
            }
        }
    })

    let app = new Vue({
        el: "#app",
        data: {
            message: "hello"
        },
        components:{
            comp1: app1Comp
        },
        methods: {
            btnclick() {

            }
        }
    });

</script>
</body>
</html>
以上就是父子組件之間相互訪問的情況


