Google單元測試框架gtest之官方sample筆記1–簡單用例
1.0 通用部分
和常見的測試工具一樣,gtest提供了單體測試常見的工具和組件。比如判斷各種類型的值相等,大於,小於等,管理多個測試的測試組如testsuit下轄testcase,為了方便處理初始化數據減少重複程式碼,提供了setup和teardown函數。
關於TEST宏,這是一個一層包一層的宏定義,雖然google編程規範說不建議用宏,但是gtest卻大量的使用宏來創建類和函數,使用宏可以給用戶更加簡潔的介面,在效率上也有優勢,但是讀起來很晦澀。一般的,在基礎工具和底層API中,宏還是由廣大的應用空間,因為這一部分基本上不怎麼變化,那些寫底層工具的大牛們有能力駕馭這種反常規的寫法。
使用宏來實現底層的重複性工作或者封裝複雜的介面,在開源項目中是很常見的方式。
-
Sample #1 shows the basic steps of using googletest to test C++ functions.
-
Sample #2 shows a more complex unit test for a class with multiple member functions.
-
Sample #3 uses a test fixture.
-
Sample #4 teaches you how to use googletest and
googletest.htogether to get the best of both libraries. -
Sample #5 puts shared testing logic in a base test fixture, and reuses it in derived fixtures.
-
Sample #6 demonstrates type-parameterized tests.
-
Sample #7 teaches the basics of value-parameterized tests.
-
Sample #8 shows using
Combine()in value-parameterized tests. -
Sample #9 shows use of the listener API to modify Google Test’s console output and the use of its reflection API to inspect test results.
-
Sample #10 shows use of the listener API to implement a primitive memory leak checker.
1.1 sample1
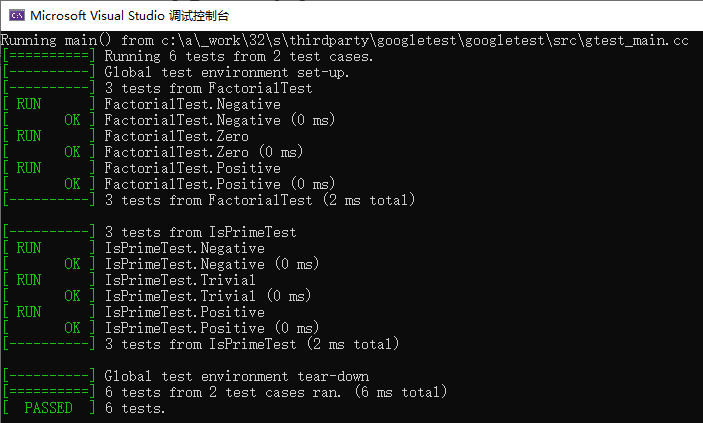
官方sample1有2個函數,階乘函數int Factorial()和判斷素數函數bool IsPrime(int n)。
測試用例分為2個testsuit。
FactorialTest包含3個階乘函數的測試用例:
-
Negative: 輸入負數測試階乘
-
Zero:輸入為0測試階乘
-
Positive:輸入為正數測試階乘
TEST(FactorialTest, Negative) { // This test is named "Negative", and belongs to the "FactorialTest" // test case. EXPECT_EQ(1, Factorial(-5)); EXPECT_EQ(1, Factorial(-10)); EXPECT_GT(Factorial(-10), 0); } // Tests factorial of 0. TEST(FactorialTest, Zero) { EXPECT_EQ(1, Factorial(0)); } // Tests factorial of positive numbers. TEST(FactorialTest, Positive) { EXPECT_EQ(1, Factorial(1)); EXPECT_EQ(2, Factorial(2)); EXPECT_EQ(6, Factorial(3)); EXPECT_EQ(40320, Factorial(8)); }
IsPrimeTest包含3個素數檢測函數的測試用例:
-
Negative:輸入為負數和極限值INT_MIN
-
Trivial:輸入為幾個特殊的值如臨界點的數
-
Positive:輸入為正數
// Tests negative input. TEST(IsPrimeTest, Negative) { // This test belongs to the IsPrimeTest test case. EXPECT_FALSE(IsPrime(-1)); EXPECT_FALSE(IsPrime(-2)); EXPECT_FALSE(IsPrime(INT_MIN)); } // Tests some trivial cases. TEST(IsPrimeTest, Trivial) { EXPECT_FALSE(IsPrime(0)); EXPECT_FALSE(IsPrime(1)); EXPECT_TRUE(IsPrime(2)); EXPECT_TRUE(IsPrime(3)); } // Tests positive input. TEST(IsPrimeTest, Positive) { EXPECT_FALSE(IsPrime(4)); EXPECT_TRUE(IsPrime(5)); EXPECT_FALSE(IsPrime(6)); EXPECT_TRUE(IsPrime(23)); }
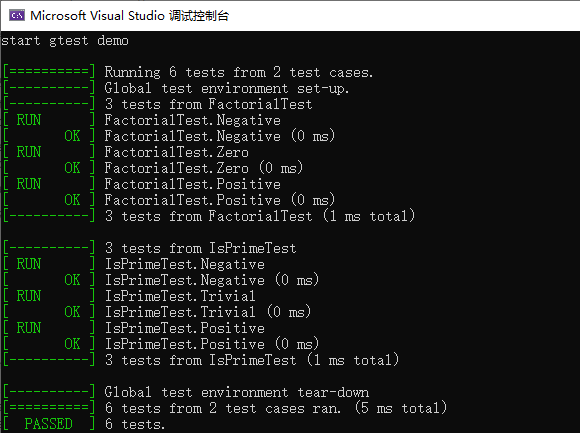
gtest直接運行即可,程式碼中沒有main函數也可以執行。輸出結果提示使用了gtest_main.cc函數。
輸出顯示來自2個testcase的6個用例被執行。兩個case就是測試組FactorialTest和IsPrimeTest。
可以加上自己的main函數,調用RUN_ALL_TESTS()執行測試用例。
int main(int argc, char* argv[]) {
  cout << "start gtest demo \r\n" << endl;
  ::testing::InitGoogleTest(&argc, argv);
  return RUN_ALL_TESTS();
}
1.2 sample2
官方sample 2,測試一個名為MyString的類,包括測試構造函數和成員函數。
該類有如下特徵:默認構造函數把成員變數c_string指針初始化為nullptr,構造函數MyString接收一個char *字元串然後通過Set函數拷貝給c_string_。
class MyString { private: const char* c_string_; const MyString& operator=(const MyString& rhs); public: // Clones a 0-terminated C string, allocating memory using new. // 類方法 static const char* CloneCString(const char* a_c_string); // The default c'tor constructs a NULL string. // 默認構造函數 MyString() : c_string_(nullptr) {} // Constructs a MyString by cloning a 0-terminated C string. // 構造函數,禁止隱式轉換 explicit MyString(const char* a_c_string) : c_string_(nullptr) { Set(a_c_string); } // Copy c'tor // 拷貝構造函數 MyString(const MyString& string) : c_string_(nullptr) { Set(string.c_string_); } // D'tor. MyString is intended to be a final class, so the d'tor // doesn't need to be virtual. ~MyString() { delete[] c_string_; } // Gets the 0-terminated C string this MyString object represents. const char* c_string() const { return c_string_; } size_t Length() const { return c_string_ == nullptr ? 0 : strlen(c_string_); } // Sets the 0-terminated C string this MyString object represents. // 成員函數 void Set(const char* c_string); };
類方法的實現和Set成員函數的實現。
// Clones a 0-terminated C string, allocating memory using new. const char* MyString::CloneCString(const char* a_c_string) { if (a_c_string == nullptr) return nullptr; const size_t len = strlen(a_c_string); char* const clone = new char[ len + 1 ]; memcpy(clone, a_c_string, len + 1); return clone; } // Sets the 0-terminated C string this MyString object // represents. void MyString::Set(const char* a_c_string) { // Makes sure this works when c_string == c_string_ const char* const temp = MyString::CloneCString(a_c_string); delete[] c_string_; c_string_ = temp; }
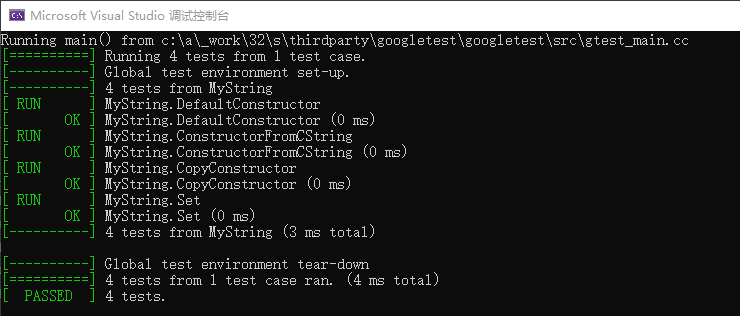
測試用例,構建了一個測試testcase叫做MyString,包含了4個test用例。
第一個用例:TEST(MyString, DefaultConstructor),測試默認構造函數, MyString() : c_string_(nullptr) {}。
  const MyString s;
  EXPECT_STREQ(nullptr, s.c_string());
  EXPECT_EQ(0u, s.Length());
第二個用例:TEST(MyString, ConstructorFromCString),測試 MyString(const char* a_c_string) 構造函數,sizeof(kHelloString)-1和 s.Length()相等,是因為這是c類型的字元串,最後結尾是\0,sizeof計算的是分配給這個字元串的空間。
const char kHelloString[] = "Hello, world!"; // Tests the c'tor that accepts a C string. TEST(MyString, ConstructorFromCString) { const MyString s(kHelloString); EXPECT_EQ(0, strcmp(s.c_string(), kHelloString)); EXPECT_EQ(sizeof(kHelloString)/sizeof(kHelloString[0]) - 1, s.Length()); }
第三個用例:TEST(MyString, CopyConstructor),測試拷貝構造函數。
// Tests the copy c'tor.
TEST(MyString, CopyConstructor) {
  const MyString s1(kHelloString);
  const MyString s2 = s1;
  EXPECT_EQ(0, strcmp(s2.c_string(), kHelloString));
}
第四個用例:TEST(MyString, Set) ,測試Set成員函數。
// Tests the Set method. TEST(MyString, Set) { MyString s; s.Set(kHelloString); EXPECT_EQ(0, strcmp(s.c_string(), kHelloString)); // Set should work when the input pointer is the same as the one // already in the MyString object. s.Set(s.c_string()); EXPECT_EQ(0, strcmp(s.c_string(), kHelloString)); // Can we set the MyString to NULL? s.Set(nullptr); EXPECT_STREQ(nullptr, s.c_string()); }
最終運行結果如下圖,1個test case,4個tests,全部成功。
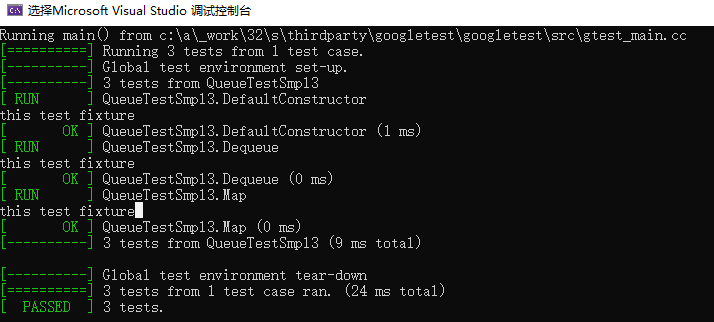
官方sample 3,展示了測試夾具的概念,為測試準備環境,每個test case都使用相同的環境初始化數據等。sample 3測試了一個自己編寫的Queue模板類,這個Q實現了一個單向的鏈表。元素項使用template <typename E> class QueueNode 實現,內部有友元類Queue<E>。隊列Queue類具有默認構造函數和以下成員:
-
-
Head() –隊列頭
-
Last() –隊列尾
-
void Enqueue(const E& element) –入隊
-
E* Dequeue() –出隊,返回出隊的元素
-
Queue* Map(F function) const — 實現隊列拷貝,並且對元素執行function操作,比如測試中就對元素乘以2倍入隊,返回新的隊列的每個元素都是舊隊列元素的二倍大小。
sample3 例子展示了「test fixture」(測試夾具)的概念,「test fixture」就是實現測試前準備,比如創造一系列共用的函數和數據,每個測試case運行前都可以引用這些共有的條件。最常見的就是初始化Setup或善後處理TearDown函數,所以使用「test fixture」可以避免重複的程式碼。
test fixture 怎麼寫公共部分
-
test fixture的類名沒有限制,可以按照測試需求起名字,這個類需要繼承testing::Test類,class QueueTestSmpl3 : public testing::Test ,在測試夾具類中重寫SetUp和TearDown方法。
-
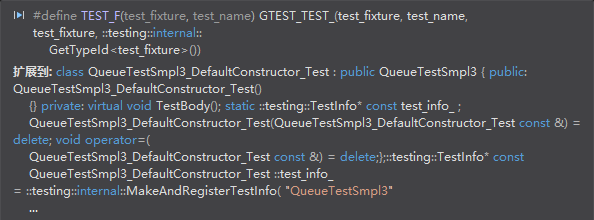
如果使用了測試夾具,那麼測試用例名就不能使用TEST來創建,而是使用TEST_F來創建,在TEST_F宏的第一個參數里,寫測試夾具類名。
-
測試啟動後,每個測試case執行前都會運行測試夾具類。達到一個準備測試環境的目的。
例如在測試夾具中加入一句列印:
  void SetUp() override {
    std::cout << "this test fixture" << std::endl;
    q1_.Enqueue(1);
    q2_.Enqueue(2);
    q2_.Enqueue(3);
  }
三個測試用例,會調用setup3次。
每個TEST_F都會創建一個類,並且繼承test fixture類。例如TEST_F(QueueTestSmpl3, DefaultConstructor) 會被擴展為:
class QueueTestSampl3_DefaultConstructor_Test:public QueueTestSmpl3 {}
所以每個TEST_F運行時,都會調用一次QueueTestSmpl3類。
下面分析下第二個用例:
// Tests Dequeue(). TEST_F(QueueTestSmpl3, Dequeue) { int * n = q0_.Dequeue(); // q0 隊列沒有任何元素,setup沒有設置q0,出隊只會是nullptr EXPECT_TRUE(n == nullptr); n = q1_.Dequeue(); // q1 對列有一個元素:1 ASSERT_TRUE(n != nullptr); EXPECT_EQ(1, *n); EXPECT_EQ(0u, q1_.Size()); // 出隊後,q1隊列沒有元素了 delete n; n = q2_.Dequeue(); // q2在setup時候輸入了2,3兩個元素 ASSERT_TRUE(n != nullptr); EXPECT_EQ(2, *n); EXPECT_EQ(1u, q2_.Size()); delete n; }
1.4 sample4
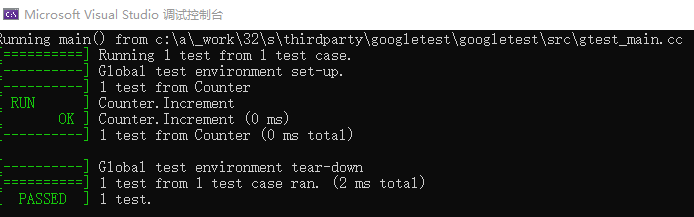
官方sample 4測試了一個Counter類,該類實現了Increment和Decrement兩個函數,一個int類型數值自增,一個自減,值為0時不再減直接返回0。
TEST(Counter, Increment) { Counter c; // Test that counter 0 returns 0 EXPECT_EQ(0, c.Decrement()); // EXPECT_EQ() evaluates its arguments exactly once, so they // can have side effects. EXPECT_EQ(0, c.Increment()); EXPECT_EQ(1, c.Increment()); EXPECT_EQ(2, c.Increment()); EXPECT_EQ(3, c.Decrement()); }
測試很簡單,注意的是第一次c.Increment()調用後,依然為0,是由於Incremen函數先返回值寫入臨時變數,然後再執行++操作。3個加執行完,c.counter_ = 3,減方法返回3,然後c.counter_=2.
int Counter::Increment() {
  return counter_++;
}
1.5 sample5
sample 3展示了測試夾具的概念,可以方便的為每個測試用例創建共用的部分,比如準備測試環境和數據。但是如果多個測試需要的環境類似,只有細小的差別,那麼就可以把共用的部分抽出來放到基類–創建一個超級的test fixture,而各自的不同的測試夾具用繼承來實現個性化–派生出各自的test fixture。
sample 5先創建了一個超級測試夾具,類名叫QuickTest,繼承testing::Test類,QuickTest計算每個測試case的執行時間,方式很簡單,SetUp里記錄start_time,TearDown里記錄end_time,相減就是執行時間。如果故意在test中Sleep(6),則會超時報錯顯示如下:
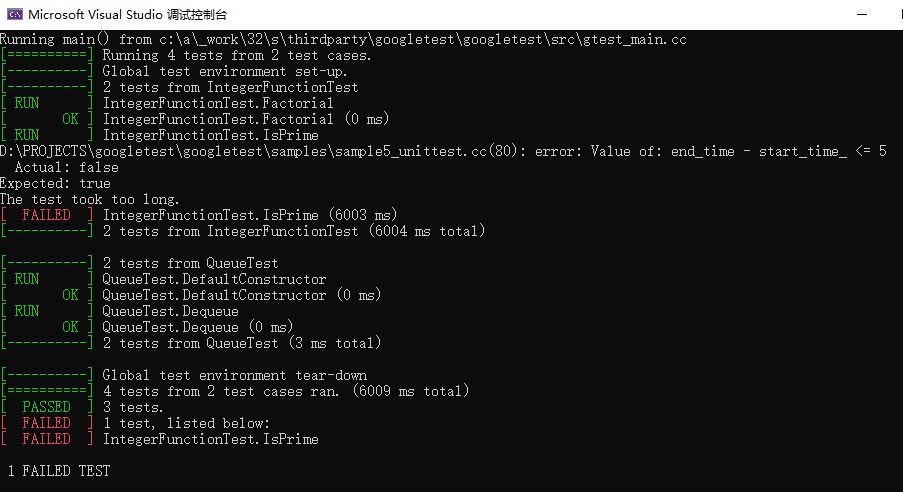
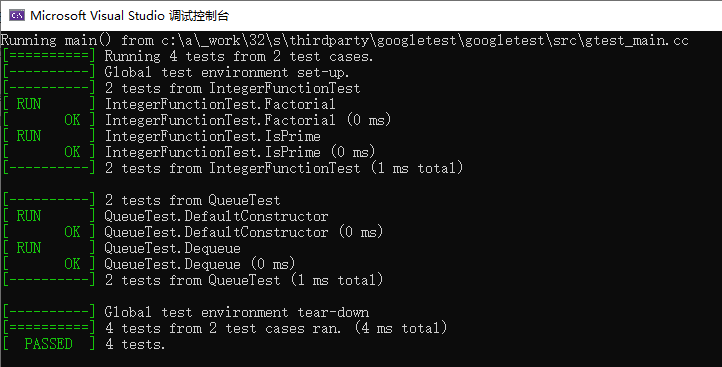
測試用例如下,TEST_F使用IntegerFunctionTest類作為test_fixture名字,而IntegerFunctionTest類繼承於QuickTest,所以也可以計算時間。
class IntegerFunctionTest : public QuickTest { // We don't need any more logic than already in the QuickTest fixture. // Therefore the body is empty. }; TEST_F(IntegerFunctionTest, Factorial) { // **** 階乘函數的tests } TEST_F(IntegerFunctionTest, IsPrime) { // **** 判斷素數函數的tests }
第二個測試case展示了共用測試夾具的方法,如sample 3中,測試Queue時候,需要初始化隊列,那麼可以在這個test fixture類中初始化對列,並且繼承於QuickTest類,那麼測試case運行時候就可以執行統計執行時間的功能。
class QueueTest : public QuickTest { protected: void SetUp() override { // First, we need to set up the super fixture (QuickTest). QuickTest::SetUp(); // Second, some additional setup for this fixture. q1_.Enqueue(1); q2_.Enqueue(2); q2_.Enqueue(3); } // By default, TearDown() inherits the behavior of // QuickTest::TearDown(). As we have no additional cleaning work // for QueueTest, we omit it here. // // virtual void TearDown() { // QuickTest::TearDown(); // } Queue<int> q0_; Queue<int> q1_; Queue<int> q2_; };
測試case部分和sample 3一樣,但是由於test fixture類繼承了QuickTest,這個測試用例可以統計執行時間,並且執行TearDown函數裡面的超時報錯。
最終的執行結果如下圖。共兩個test case:IntegerFunctionTest和QueueTest,每個case有2個tests。