Dubbo服務調用過程源碼解析④
經過前面三章的分析,了解了Dubbo的基礎:Dubbo SPI,了解了Provider的服務暴露和Consumer的服務引用。最後我們需要學習一下服務完整的調用過程。Dubbo服務調用過程雖然複雜,比如包含發送請求、編解碼、服務降級、過濾器、序列化、執行緒派發以及響應請求等步驟。但是先理解其大概的邏輯過程,再重點看一下主要的幾個類,其實也非常好理解。
分析之前放一張官網的調用過程圖:
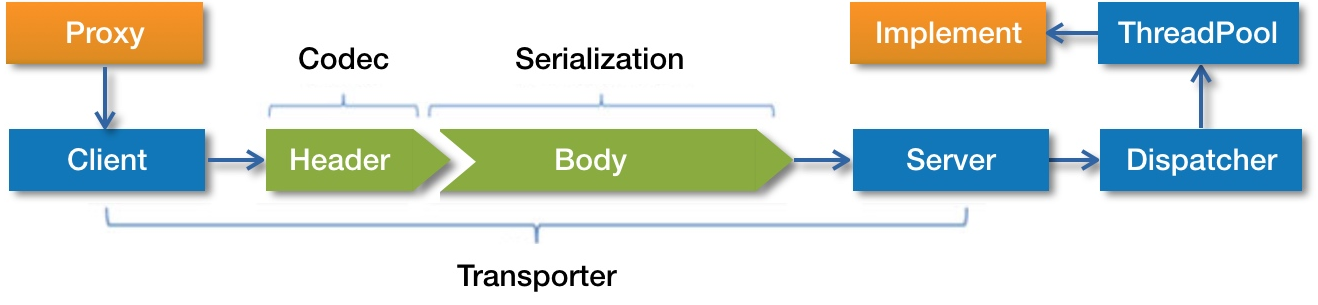
首先消費者通過代理對象發起請求,通過網路通訊客戶端將編碼後的請求發送給Provider的Server。Server收到後進行解碼。解碼後的請求交給Dispatcher分發器,再由分發器分配到指定的執行緒池上,最後由執行緒池執行具體的服務。還有回發響應的過程這張圖並沒有體現出來。在正式開始分析之前,最好打開自己的IDE,一起跟蹤源碼,看得更清楚。
0.服務的調用
由上面那個圖可以看到,調用源於代理對象Proxy。代理類是動態生成的,直接操作的位元組碼,我們需要把它反編譯一下,看一下它到底長什麼樣。Dubbo用的是Javassist,我們使用也是阿里開源的診斷工具Arthas反編譯看一下。首先去它的官網下載軟體包://arthas.aliyun.com/doc/download.html
解壓後,進入到軟體根目錄,執行如下命令啟動:
java -jar arthas-boot.jar
啟動後,終端上會顯示Java進程列表,比如這樣:(注意這時候需要你啟動消費者,保持運行)。

接著輸入Consumer對應編號,比如4。Arthas就會關聯到這個進程。由於我這個Demo只有一個服務介面,所以生成的代理類也只有一個,我們直接根據後綴名搜索一下:
sc *.proxy0

記住這個路徑,最後用jad命令反編譯:
jad com.alibaba.dubbo.common.bytecode.proxy0
編譯完成後,終端上就會顯示對應的代理類:
public class proxy0 implements ClassGenerator.DC,ServiceAPI,EchoService {
    //方法數組
    public static Method[] methods;
    private InvocationHandler handler;

    public proxy0(InvocationHandler invocationHandler) {
        this.handler = invocationHandler;
    }

    public proxy0() {
    }

    public String sendMessage(String string) {
        //把參數存到Object數組
        Object[] arrobject = new Object[]{string};
        //調用InvocationHandler的invoke方法
        Object object = this.handler.invoke(this, methods[0], arrobject);
        return (String)object;
    }
    //測試方法
    @Override
    public Object $echo(Object object) {
        Object[] arrobject = new Object[]{object};
        Object object2 = this.handler.invoke(this, methods[1], arrobject);
        return object2;
    }
}
整個代理類比較簡單,主要就是調用了InvocationHandler的invoke方法。我么找到它的實現類,在Dubbo中,它的實現類是InvokerInvocationHandler:
public class InvokerInvocationHandler implements InvocationHandler {

    private final Invoker<?> invoker;

    public InvokerInvocationHandler(Invoker<?> handler) {
        this.invoker = handler;
    }

    public Object invoke(Object proxy, Method method, Object[] args) throws Throwable {
        String methodName = method.getName();
        Class<?>[] parameterTypes = method.getParameterTypes();
        if (method.getDeclaringClass() == Object.class) {
            return method.invoke(invoker, args);
        }
        if ("toString".equals(methodName) && parameterTypes.length == 0) {
            return invoker.toString();
        }
        if ("hashCode".equals(methodName) && parameterTypes.length == 0) {
            return invoker.hashCode();
        }
        if ("equals".equals(methodName) && parameterTypes.length == 1) {
            return invoker.equals(args[0]);
        }
        return invoker.invoke(new RpcInvocation(method, args)).recreate();
    }

}
通過調試我們發現,這個invoker變數的類型是MockClusterInvoker,也就是最後會調用這個類的invoke方法。MockClusterInvoker#invoke會調用AbstractClusterInvoker#invoke方法,接著執行一些服務降級的邏輯。接下來又是一連串調用,我們直接看關鍵方法:DubboInvoker#doInvoke
protected Result doInvoke(final Invocation invocation) throws Throwable {
    //它會記錄調用方法、介面、參數等資訊
    RpcInvocation inv = (RpcInvocation) invocation;
    final String methodName = RpcUtils.getMethodName(invocation);
    //設置path和version到inv的attachments
    inv.setAttachment(Constants.PATH_KEY, getUrl().getPath());
    inv.setAttachment(Constants.VERSION_KEY, version);
    //獲取通訊客戶端
    ExchangeClient currentClient;
    if (clients.length == 1) {
        currentClient = clients[0];
    } else {
        currentClient = clients[index.getAndIncrement() % clients.length];
    }
    try {
        //獲取非同步配置
        boolean isAsync = RpcUtils.isAsync(getUrl(), invocation);
        //isOneway為true時,代表單向通訊
        boolean isOneway = RpcUtils.isOneway(getUrl(), invocation);
        int timeout = getUrl().getMethodParameter(methodName, Constants.TIMEOUT_KEY, Constants.DEFAULT_TIMEOUT);
        //非同步無返回值
        if (isOneway) {
            boolean isSent = getUrl().getMethodParameter(methodName, Constants.SENT_KEY, false);
            //發送請求
            currentClient.send(inv, isSent);
            //設置上下文futrue為null
            RpcContext.getContext().setFuture(null);
            //返回空的結果
            return new RpcResult();
        //非同步有返回值
        } else if (isAsync) {
            //發送請求,並得到一個future
            ResponseFuture future = currentClient.request(inv, timeout);
            //把future設置到上下文中
            RpcContext.getContext().setFuture(new FutureAdapter<Object>(future));
            //暫時返回一個空的結果
            return new RpcResult();
        //同步調用
        } else {
            RpcContext.getContext().setFuture(null);
            //雖然也有future,但是這裡就調用get方法了,就會一直等待,相當於同步
            return (Result) currentClient.request(inv, timeout).get();
        }
    } catch (TimeoutException e) {
        throw new RpcException(RpcException.TIMEOUT_EXCEPTION, "Invoke remote method timeout. method: " + invocation.getMethodName() + ", provider: " + getUrl() + ", cause: " + e.getMessage(), e);
    } catch (RemotingException e) {
        throw new RpcException(RpcException.NETWORK_EXCEPTION, "Failed to invoke remote method: " + invocation.getMethodName() + ", provider: " + getUrl() + ", cause: " + e.getMessage(), e);
    }
}
上面的方法,對Dubbo如果非同步、同步調用寫的非常清晰。關鍵的區別就在於由誰來調用這個get方法,非同步模式下又用戶調用。Dubbo中非同步的返回值類型是ResponseFuture,它默認的實現類是DefaultFuture,我們來看幾個關鍵方法:
//屬性略。。。
public DefaultFuture(Channel channel, Request request, int timeout) {
    this.channel = channel;
    this.request = request;
    //獲取請求id,非常重要,由於是非同步請求,響應資訊的匹配就是靠這個
    this.id = request.getId();
    this.timeout = timeout > 0 ? timeout : channel.getUrl().getPositiveParameter(Constants.TIMEOUT_KEY, Constants.DEFAULT_TIMEOUT);
    //存儲請求ID和future到Map中
    FUTURES.put(id, this);
    CHANNELS.put(id, channel);
}
public Object get() throws RemotingException {
    return get(timeout);
}
public Object get(int timeout) throws RemotingException {
    if (timeout <= 0) {
        timeout = Constants.DEFAULT_TIMEOUT;
    }
    //檢測Provider是否返回調用結果
    if (!isDone()) {
        long start = System.currentTimeMillis();
        lock.lock();
        try {
            //循環檢測
            while (!isDone()) {
                //如果結果尚未返回就等一會在while,免得浪費資源
                done.await(timeout, TimeUnit.MILLISECONDS);
                //如果返回結果或者超時,就跳出while
                if (isDone() || System.currentTimeMillis() - start > timeout) {
                    break;
                }
            }
        } catch (InterruptedException e) {
            throw new RuntimeException(e);
        } finally {
            lock.unlock();
        }
        //如果跳出while還沒有結果,就拋出異常
        if (!isDone()) {
            throw new TimeoutException(sent > 0, channel, getTimeoutMessage(false));
        }
    }
    //返回調用結果
    return returnFromResponse();
}
public boolean isDone() {
    return response != null;
}
private Object returnFromResponse() throws RemotingException {
    Response res = response;
    if (res == null) {
        throw new IllegalStateException("response cannot be null");
    }
    //如果響應狀態為OK,表示調用過程正常
    if (res.getStatus() == Response.OK) {
        return res.getResult();
    }
    //超時就是拋出異常
    if (res.getStatus() == Response.CLIENT_TIMEOUT || res.getStatus() == Response.SERVER_TIMEOUT) {
        throw new TimeoutException(res.getStatus() == Response.SERVER_TIMEOUT, channel, res.getErrorMessage());
    }
    throw new RemotingException(channel, res.getErrorMessage());
}
//其他方法略。。。
上面的幾個方法中,構造函數會進行幾個重要屬性的賦值,get方法如果沒有收到結果就會被阻塞。至此,代理類的請求如果一步步發送出去的解析就結束了,接下來接著分析請求數據是如何發送與接收的,以及響應數據的發送與接收。
1.發送請求
接著上面的DubboInvoker,我們深入分析一下它是怎麼發出請求的,即currentClient.request。通過調試我們找到它的實現類,是ReferenceCountExchangeClient:
final class ReferenceCountExchangeClient implements ExchangeClient {

    private final URL url;
    private final AtomicInteger refenceCount = new AtomicInteger(0);
    //其他屬性略。。。
    public ReferenceCountExchangeClient(ExchangeClient client, ConcurrentMap<String, LazyConnectExchangeClient> ghostClientMap) {
        this.client = client;
        //引用計數自增
        refenceCount.incrementAndGet();
        this.url = client.getUrl();
        //略。。。
    }
    public ResponseFuture request(Object request) throws RemotingException {
        //調用HeaderExchangeClient#request
        return client.request(request);
    }
    public ResponseFuture request(Object request, int timeout) throws RemotingException {
        //帶有超時的請求
        return client.request(request, timeout);
    }
    public void close(int timeout) {
        //引用計數自減
        if (refenceCount.decrementAndGet() <= 0) {
            if (timeout == 0) {
                client.close();
            } else {
                client.close(timeout);
            }
            client = replaceWithLazyClient();
        }
    }
    public void incrementAndGetCount() {
        //引用計數自增,該方法由外部調用
        refenceCount.incrementAndGet();
    }
    //其他方法略。。。
}
refenceCount為內部定義的引用計數變數,每當該對象被引用一次refenceCount就會自增,每當被close一次就會自減。其他省略的方法都是些簡單的工具方法,我們接著分析HeaderExchangeClient,即request調用的同名方法所在類。
public class HeaderExchangeClient implements ExchangeClient {
    private static final Logger logger = LoggerFactory.getLogger(HeaderExchangeClient.class);
    private static final ScheduledThreadPoolExecutor scheduled = new ScheduledThreadPoolExecutor(2, new NamedThreadFactory("dubbo-remoting-client-heartbeat", true));
    private final Client client;
    private final ExchangeChannel channel;
    // heartbeat timer
    private ScheduledFuture<?> heartbeatTimer;
    private int heartbeat;
    // heartbeat timeout (ms), default value is 0 , won't execute a heartbeat.
    private int heartbeatTimeout;

    public HeaderExchangeClient(Client client, boolean needHeartbeat) {
        if (client == null) {
            throw new IllegalArgumentException("client == null");
        }
        this.client = client;
        //創建HeaderExchangeChannel對象
        this.channel = new HeaderExchangeChannel(client);
        //心跳檢測
        String dubbo = client.getUrl().getParameter(Constants.DUBBO_VERSION_KEY);
        this.heartbeat = client.getUrl().getParameter(Constants.HEARTBEAT_KEY, dubbo != null && dubbo.startsWith("1.0.") ? Constants.DEFAULT_HEARTBEAT : 0);
        this.heartbeatTimeout = client.getUrl().getParameter(Constants.HEARTBEAT_TIMEOUT_KEY, heartbeat * 3);
        if (heartbeatTimeout < heartbeat * 2) {
            throw new IllegalStateException("heartbeatTimeout < heartbeatInterval * 2");
        }
        if (needHeartbeat) {
            //開啟心跳檢測定時器
            startHeatbeatTimer();
        }
    }
    public ResponseFuture request(Object request) throws RemotingException {
        //調用HeaderExchangeChannel#request
        return channel.request(request);
    }
    public ResponseFuture request(Object request, int timeout) throws RemotingException {
        //帶超時的request
        return channel.request(request, timeout);
    }
    public void close() {
        doClose();
        channel.close();
    }
    public void close(int timeout) {
        // Mark the client into the closure process
        startClose();
        doClose();
        channel.close(timeout);
    }
    //開始心跳檢測計時器
    private void startHeatbeatTimer() {
        stopHeartbeatTimer();
        if (heartbeat > 0) {
            heartbeatTimer = scheduled.scheduleWithFixedDelay(
                    new HeartBeatTask(new HeartBeatTask.ChannelProvider() {
                        public Collection<Channel> getChannels() {
                            return Collections.<Channel>singletonList(HeaderExchangeClient.this);
                        }
                    }, heartbeat, heartbeatTimeout),
                    heartbeat, heartbeat, TimeUnit.MILLISECONDS);
        }
    }
    //關閉心跳檢測計時器
    private void stopHeartbeatTimer() {
        if (heartbeatTimer != null && !heartbeatTimer.isCancelled()) {
            try {
                heartbeatTimer.cancel(true);
                scheduled.purge();
            } catch (Throwable e) {
                if (logger.isWarnEnabled()) {
                    logger.warn(e.getMessage(), e);
                }
            }
        }
        heartbeatTimer = null;
    }
    //關閉心跳檢測計時器
    private void doClose() {
        stopHeartbeatTimer();
    }
    //其他方法略。。。
}
上面省略的很多方法,都只是調用了HeaderExchangeChannel同名方法,作用也比較簡單,比如設置屬性,獲取地址,心跳檢測等等,這些不是關注的重點,我們看一下request相關的方法:
final class HeaderExchangeChannel implements ExchangeChannel {
    private final Channel channel;
    private volatile boolean closed = false;
    //其他屬性略。。。
    HeaderExchangeChannel(Channel channel) {
        if (channel == null) {
            throw new IllegalArgumentException("channel == null");
        }
        //這個channel指向Netty客戶端,創建Netty客戶端時會調用這個構造函數進行賦值
        this.channel = channel;
    }
    public ResponseFuture request(Object request) throws RemotingException {
        return request(request, channel.getUrl().getPositiveParameter(Constants.TIMEOUT_KEY, Constants.DEFAULT_TIMEOUT));
    }
    public ResponseFuture request(Object request, int timeout) throws RemotingException {
        if (closed) {
            throw new RemotingException(this.getLocalAddress(), null, "Failed to send request " + request + ", cause: The channel " + this + " is closed!");
        }
        // 創建request對象,包含著調用的方法名、參數類型、invoker等資訊,在之前我們都分析過了
        Request req = new Request();
        req.setVersion("2.0.0");
        //雙向通訊
        req.setTwoWay(true);
        //這個request類型為RpcInvocation
        req.setData(request);
        //創建futrue,即非同步請求的接收對象
        DefaultFuture future = new DefaultFuture(channel, req, timeout);
        try {
            //最終會調用Netty的send
            channel.send(req);
        } catch (RemotingException e) {
            future.cancel();
            throw e;
        }
        返回futrue
        return future;
    }
}
上面的方法中,我們終於知道了request是在哪創建的了。這個Request的結構大家感興趣可以自己看一下,比較簡單,就是一些屬性加上一些工具方法而已。重點看一下最終的send方法在哪。通過調試發現還需要通過幾次調用才能真正到達Netty,如圖:

NettyChannel前的兩個抽象類只是對通訊客戶端的一些抽象,因為Dubbo不止支援Netty一個通訊框架的,所以不可能直接由HeaderExchangeChannel跳到Netty。比如AbstractClient的實現類之一就是NettyClient,NettyClient才會緊接著調用NettyChannel。我們直接看NettyChannel#send方法:
public void send(Object message, boolean sent) throws RemotingException {
    super.send(message, sent);
    boolean success = true;
    int timeout = 0;
    try {
        //發送消息
        ChannelFuture future = channel.write(message);
        //sent源於<dubbo:method sent="true/false">
        //true代表等待消息發出,消息發出失敗拋出異常
       //false代表不等待消息發出,將消息放入IO對了,立即返回
        if (sent) {
            timeout = getUrl().getPositiveParameter(Constants.TIMEOUT_KEY, Constants.DEFAULT_TIMEOUT);
            //等待消息發出,如果超時success就設置為false
            success = future.await(timeout);
        }
        Throwable cause = future.getCause();
        if (cause != null) {
            throw cause;
        }
    } catch (Throwable e) {
        throw new RemotingException(this, "Failed to send message " + message + " to " + getRemoteAddress() + ", cause: " + e.getMessage(), e);
    }
    //success為false就拋出異常
    if (!success) {
        throw new RemotingException(this, "Failed to send message " + message + " to " + getRemoteAddress()
                + "in timeout(" + timeout + "ms) limit");
    }
}
到這裡,消息終於真正的發出了。上面方法中的channel是真正的Netty的channel,而不是Dubbo封裝的。當然,在發出消息前一步還有編碼,我們可以通過NettyServer的初始化來找到對應的編解碼器。我們來到NettyServer類中,熟悉Netty的朋友應該都熟悉,這個類就是Netty的啟動類,裡面會進行相關Pipeline的配置,我們可以看到:
pipeline.addLast("decoder", adapter.getDecoder());
pipeline.addLast("encoder", adapter.getEncoder());
這個就是進行編解碼的處理方法,adapter對象的類就是進行編解碼的地方。
2.請求編碼
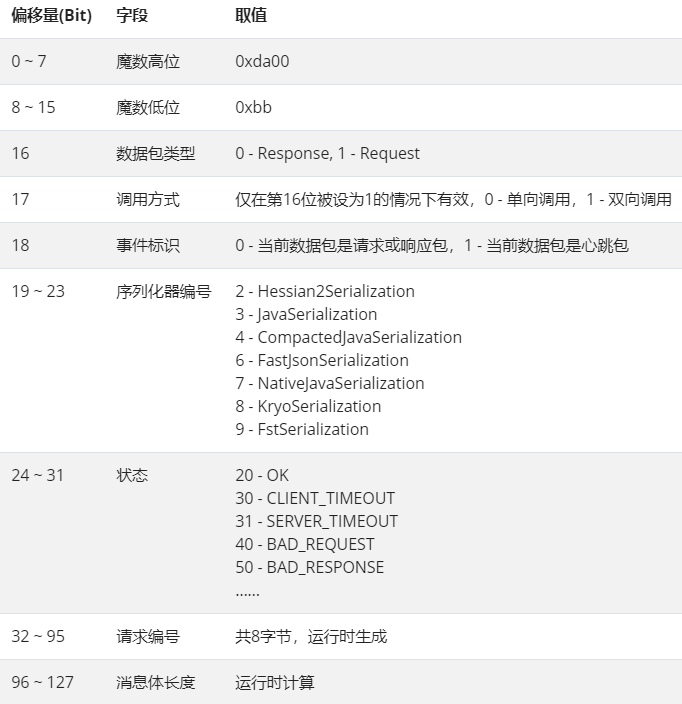
上面我們一路分析到了發出消息的源碼,但是還有重要一步,就是編碼。我們也找到了編解碼對應的類,即NettyCodecAdapter。在分析之前我們有必要了解一下Dubbo的數據包結構。Dubbo數據包結構包含消息頭和消息體,消息頭包含一些元資訊,比如魔數、數據包類型、消息體長度等。消息體包含具體的調用資訊,比如方法名、參數列表等。下面我放一張官網的消息頭內容截圖:
了解了Dubbo數據包結構,接著我們進入編解碼方法進行分析。首先進入到NettyCodecAdapter類。這裡就不貼它的源碼了,可以發現它又引用了一個Codec2介面,調用了其encode和decode方法。我們知道雖然Dubbo默認選擇Netty當通訊工具,但是其不止支援一種通訊框架,所以針對每種框架都會有一個對應的編解碼適配器。那麼實現了Codec2介面的實現類才是編解碼的主要邏輯。我們直接通過調試找到了最終的邏輯所在類:ExchangeCodec。
public class ExchangeCodec extends TelnetCodec {
    // 消息頭長度
    protected static final int HEADER_LENGTH = 16;
    // 魔數內容
    protected static final short MAGIC = (short) 0xdabb;
    protected static final byte MAGIC_HIGH = Bytes.short2bytes(MAGIC)[0];
    protected static final byte MAGIC_LOW = Bytes.short2bytes(MAGIC)[1];
    protected static final byte FLAG_REQUEST = (byte) 0x80;
    protected static final byte FLAG_TWOWAY = (byte) 0x40;
    protected static final byte FLAG_EVENT = (byte) 0x20;
    protected static final int SERIALIZATION_MASK = 0x1f;
    private static final Logger logger = LoggerFactory.getLogger(ExchangeCodec.class);

    public Short getMagicCode() {
        return MAGIC;
    }

    public void encode(Channel channel, ChannelBuffer buffer, Object msg) throws IOException {
        if (msg instanceof Request) {
            //對請求對象進行編碼
            encodeRequest(channel, buffer, (Request) msg);
        } else if (msg instanceof Response) {
            //對響應對象進行編碼(後面再分析)
            encodeResponse(channel, buffer, (Response) msg);
        } else {
            super.encode(channel, buffer, msg);
        }
    }
    protected void encodeRequest(Channel channel, ChannelBuffer buffer, Request req) throws IOException {
    Serialization serialization = getSerialization(channel);
    // 創建消息頭位元組數組,長度為16
    byte[] header = new byte[HEADER_LENGTH];
    // 設置魔數
    Bytes.short2bytes(MAGIC, header);
    // 設置數據包類型和序列化器
    header[2] = (byte) (FLAG_REQUEST | serialization.getContentTypeId());
    //設置通訊方式(單向/雙向)
    if (req.isTwoWay()) header[2] |= FLAG_TWOWAY;
    //設置事件標識
    if (req.isEvent()) header[2] |= FLAG_EVENT;
    // 設置請求id
    Bytes.long2bytes(req.getId(), header, 4);
    //獲取buffer當前寫的位置
    int savedWriteIndex = buffer.writerIndex();
    //更新witerIndex,為消息頭保留16個位元組的空間
    buffer.writerIndex(savedWriteIndex + HEADER_LENGTH);
    ChannelBufferOutputStream bos = new ChannelBufferOutputStream(buffer);
    //創建序列化器
    ObjectOutput out = serialization.serialize(channel.getUrl(), bos);
    if (req.isEvent()) {
        //對事件數據進行序列化操作
        encodeEventData(channel, out, req.getData());
    } else {
        //對請求數據進行序列化操作
        encodeRequestData(channel, out, req.getData());
    }
    out.flushBuffer();
    if (out instanceof Cleanable) {
        ((Cleanable) out).cleanup();
    }
    bos.flush();
    bos.close();
    //獲取消息體長度
    int len = bos.writtenBytes();
    checkPayload(channel, len);
    //把消息體長度寫入消息頭中
    Bytes.int2bytes(len, header, 12);
    // 將buffer指針移到savedWriteIndex,為寫消息頭做準備
    buffer.writerIndex(savedWriteIndex);
    //寫入消息頭
    buffer.writeBytes(header);
    //將指針移到原寫下標+消息頭長度+消息體長度
    buffer.writerIndex(savedWriteIndex + HEADER_LENGTH + len);
}
    //其他方法略。。。。比如解碼,我們按照數據發送的順序來分析,在這裡就不分析了
}
上面就是請求對象的編碼過程,整體工作流程就是通過位運算將消息頭寫入header。然後對請求對象的data進行序列化,序列化後的數據存到ChannelBuffer中。接著得到數據長度len,將len寫入消息頭。最後再將消息頭也寫入到ChannelBuffer中。
3.請求的解碼
當數據編碼好,發出去之後。Netty服務端收到消息,進行解碼。還是在ExchangeCodec中,我們分析一下解碼方法:
public class ExchangeCodec extends TelnetCodec {

public Object decode(Channel channel, ChannelBuffer buffer) throws IOException {
    int readable = buffer.readableBytes();
    //創建消息頭數組
    byte[] header = new byte[Math.min(readable, HEADER_LENGTH)];
    //讀取消息頭數據
    buffer.readBytes(header);
    //調用解碼方法
    return decode(channel, buffer, readable, header);
}
protected Object decode(Channel channel, ChannelBuffer buffer, int readable, byte[] header) throws IOException {
    // 檢查魔數是否與規定魔數相等
    if (readable > 0 && header[0] != MAGIC_HIGH
            || readable > 1 && header[1] != MAGIC_LOW) {
        int length = header.length;
        if (header.length < readable) {
            header = Bytes.copyOf(header, readable);
            buffer.readBytes(header, length, readable - length);
        }
        for (int i = 1; i < header.length - 1; i++) {
            if (header[i] == MAGIC_HIGH && header[i + 1] == MAGIC_LOW) {
                buffer.readerIndex(buffer.readerIndex() - header.length + i);
                header = Bytes.copyOf(header, i);
                break;
            }
        }
        //如果不相等就調用TelnetCodec的decode進行解碼
        return super.decode(channel, buffer, readable, header);
    }
    //檢查可讀數據是否小於消息頭長度
    if (readable < HEADER_LENGTH) {
        return DecodeResult.NEED_MORE_INPUT;
    }

    // 獲取消息體長度
    int len = Bytes.bytes2int(header, 12);
    //檢查消息體長度是否超過限制,超出就拋出異常
    checkPayload(channel, len);

    int tt = len + HEADER_LENGTH;
    //檢查可讀位元組數是否小於實際位元組數
    if (readable < tt) {
        return DecodeResult.NEED_MORE_INPUT;
    }

    // limit input stream.
    ChannelBufferInputStream is = new ChannelBufferInputStream(buffer, len);
    try {
        //繼續進行編碼工作
        return decodeBody(channel, is, header);
    } finally {
        if (is.available() > 0) {
            try {
                if (logger.isWarnEnabled()) {
                    logger.warn("Skip input stream " + is.available());
                }
                StreamUtils.skipUnusedStream(is);
            } catch (IOException e) {
                logger.warn(e.getMessage(), e);
            }
        }
    }
}
}
上面的解碼方法主要是對請求的數據進行一系列檢查。接著看一下decodeBody方法,雖然在這個類中也實現了這個方法,但是ExchangeCodec的子類DubboCodec覆蓋了這個方法,所以接著分析一下DubboCodec#decodeBody:
public class DubboCodec extends ExchangeCodec implements Codec2 {
  protected Object decodeBody(Channel channel, InputStream is, byte[] header) throws IOException {
    //獲取第三個位元組,並通過邏輯與運算得到序列化器編號
    byte flag = header[2], proto = (byte) (flag & SERIALIZATION_MASK);
    Serialization s = CodecSupport.getSerialization(channel.getUrl(), proto);
    //獲取請求編號
    long id = Bytes.bytes2long(header, 4);
    //通過邏輯與運算得到調用類型,0是響應,1是請求
    if ((flag & FLAG_REQUEST) == 0) {
      //略。。。
      //對響應結果進行解碼,得到Response對象。前面說過我們按照數據發出的順序類分析,故先不分析這部分程式碼
    } else {
        //創建request對象
        Request req = new Request(id);
        req.setVersion("2.0.0");
        //通過邏輯與計算出通訊方式
        req.setTwoWay((flag & FLAG_TWOWAY) != 0);
        //檢查是否位事件類型
        if ((flag & FLAG_EVENT) != 0) {
            //將心跳事件設置到request中
            req.setEvent(Request.HEARTBEAT_EVENT);
        }
        try {
            Object data;
            if (req.isHeartbeat()) {
                //對心跳包進行解碼
                data = decodeHeartbeatData(channel, deserialize(s, channel.getUrl(), is));
            } else if (req.isEvent()) {
                //對事件數據進行解碼
                data = decodeEventData(channel, deserialize(s, channel.getUrl(), is));
            } else {
                DecodeableRpcInvocation inv;
                //根據url參數判斷是否在當前執行緒上對消息體進行解碼
                if (channel.getUrl().getParameter(
                        Constants.DECODE_IN_IO_THREAD_KEY,
                        Constants.DEFAULT_DECODE_IN_IO_THREAD)) {
                    inv = new DecodeableRpcInvocation(channel, req, is, proto);
                    inv.decode();
                } else {
                    //不在當前執行緒上解碼
                    inv = new DecodeableRpcInvocation(channel, req,
                            new UnsafeByteArrayInputStream(readMessageData(is)), proto);
                }
                data = inv;
            }
            //設置數據
            req.setData(data);
        } catch (Throwable t) {
            if (log.isWarnEnabled()) {
                log.warn("Decode request failed: " + t.getMessage(), t);
            }
            // bad request
            req.setBroken(true);
            req.setData(t);
        }
        return req;
    }
}
}
以上方法只對部分欄位進行了解碼,並將解碼欄位封裝到Request對象中。隨後會調用DecodeableRpcInvocation的decode方法進行後續的解碼工作。此工作可以解碼出調用的方法名、attachment、參數。我們看一下這個方法:
public Object decode(Channel channel, InputStream input) throws IOException {
    //創建序列化器
    ObjectInput in = CodecSupport.getSerialization(channel.getUrl(), serializationType)
            .deserialize(channel.getUrl(), input);
    //通過序列化獲取dubbo version、path、version,並保存到attachments中
    setAttachment(Constants.DUBBO_VERSION_KEY, in.readUTF());
    setAttachment(Constants.PATH_KEY, in.readUTF());
    setAttachment(Constants.VERSION_KEY, in.readUTF());
    //獲取方法名
    setMethodName(in.readUTF());
    try {
        Object[] args;
        Class<?>[] pts;
        //獲取參數類型
        String desc = in.readUTF();
        if (desc.length() == 0) {
            pts = DubboCodec.EMPTY_CLASS_ARRAY;
            args = DubboCodec.EMPTY_OBJECT_ARRAY;
        } else {
            //將desc解析為類型數組
            pts = ReflectUtils.desc2classArray(desc);
            args = new Object[pts.length];
            for (int i = 0; i < args.length; i++) {
                try {
                    args[i] = in.readObject(pts[i]);
                } catch (Exception e) {
                    if (log.isWarnEnabled()) {
                        log.warn("Decode argument failed: " + e.getMessage(), e);
                    }
                }
            }
        }
        //設置參數類型數組
        setParameterTypes(pts);
        //通過反序列化得到原attachment
        Map<String, String> map = (Map<String, String>) in.readObject(Map.class);
        if (map != null && map.size() > 0) {
            Map<String, String> attachment = getAttachments();
            if (attachment == null) {
                attachment = new HashMap<String, String>();
            }
            //將原attachment與現在的attachment融合
            attachment.putAll(map);
            setAttachments(attachment);
        }
        for (int i = 0; i < args.length; i++) {
            args[i] = decodeInvocationArgument(channel, this, pts, i, args[i]);
        }
        //設置參數列表
        setArguments(args);

    } catch (ClassNotFoundException e) {
        throw new IOException(StringUtils.toString("Read invocation data failed.", e));
    } finally {
        if (in instanceof Cleanable) {
            ((Cleanable) in).cleanup();
        }
    }
    return this;
}
上面的方法通過反序列化,得到了方法名、參數列表等資訊。到這裡,請求數據的解碼過程就完成了,接下來就可以調用實際的服務了。
4.調用具體服務
前面解碼了請求數據,並封裝到了Request對象中。我們回到NettyServer中,找到Pipeline添加的邏輯處理類,即NettyHandler。

不了解Netty的話,可以把Pipeline看作一個邏輯處理鏈路,一個雙向鏈路,鏈路上不是每個處理類都必須執行,但是相對順序不能變。傳入的數據會根據Pipeline添加的邏輯處理類的順序進行相應的處理。比如圖中,nettyHandler的主要作用是收發消息,收消息前,必須經過解碼,發消息後必須經過編碼。部落格寫到這裡內容已經非常多了,為了節約篇幅就不再展示比較簡單的源碼了,大家可以自己點進去看一下NettyHandler的源碼。解碼完後,會進入到NettyHandler#messageReceived。主要邏輯就是獲取NettyChannel實例,然後通過ChannelHandler#received繼續向下傳遞。
我們現在回顧一下開頭貼出的Dubbo調用圖,Server收到請求並解碼完後,有一個執行緒派發器。一般情況下,很少會拿Netty接收請求的執行緒去執行實際的服務邏輯。而是通過執行緒派發器派發到執行緒池中執行。Dubbo支援5種不同類型的執行緒派發策略(IO執行緒就是通訊框架接收請求的執行緒):

Dubbo默認使用all派發策略,其實現類是AllChannelHandler,這個類實現了ChannelHandler。所以上面的NettyHandler#messageReceived中調用的ChannelHandler#received,會進入到這個實現類裡面,進行執行緒派發。

AllChannelHandler#received比較簡單,就不貼了。方法一開始就新建了一個執行緒池,意圖也很明顯。關鍵在於,它把請求對象封裝到了ChannelEventRunnable中:

ChannelEventRunnable類也比較簡單,僅是一個中轉站的作用。主要是在run方法裡面,對不同的消息類型,調用不同的處理方法。
我們主要是分析received方法,像連接等方法我們就不跟進了。在ChannelEventRunnable#run方法里經過中轉後,進入到了DecodeHandler類,看一下received方法:
public void received(Channel channel, Object message) throws RemotingException {
    if (message instanceof Decodeable) {
        //如果實現了Decodeable介面,就進行解碼
        decode(message);
    }

    if (message instanceof Request) {
        //對Request的data進行解碼
        decode(((Request) message).getData());
    }

    if (message instanceof Response) {
        //對Request的result進行解碼
        decode(((Response) message).getResult());
    }
    //執行後續邏輯
    handler.received(channel, message);
}
我們前面說過,解碼可以在IO執行緒,也可以在執行緒池裡執行。這裡就體現執行緒池解碼的邏輯。完成解碼後,後續邏輯在HeaderExchangeHandler:
public void received(Channel channel, Object message) throws RemotingException {
    channel.setAttribute(KEY_READ_TIMESTAMP, System.currentTimeMillis());
    ExchangeChannel exchangeChannel = HeaderExchangeChannel.getOrAddChannel(channel);
    try {
        //處理請求對象
        if (message instanceof Request) {
            Request request = (Request) message;
            if (request.isEvent()) {
                //處理事件
                handlerEvent(channel, request);
            //處理普通的請求
            } else {
                //雙向通訊
                if (request.isTwoWay()) {
                    //調用handleRequest
                    Response response = handleRequest(exchangeChannel, request);
                    //將調用結果返回給消費者
                    channel.send(response);
                } else {
                    //如果是單向通訊,不需要返回結果
                    handler.received(exchangeChannel, request.getData());
                }
            }
        //處理響應對象,消費者會執行此邏輯,後面分析
        } else if (message instanceof Response) {
            handleResponse(channel, (Response) message);
        } //略。。。
    } finally {
        HeaderExchangeChannel.removeChannelIfDisconnected(channel);
    }
}
Response handleRequest(ExchangeChannel channel, Request req) throws RemotingException {
    Response res = new Response(req.getId(), req.getVersion());
    //檢查請求是否合法
    if (req.isBroken()) {
        Object data = req.getData();
        String msg;
        if (data == null) msg = null;
        else if (data instanceof Throwable) msg = StringUtils.toString((Throwable) data);
        else msg = data.toString();
        res.setErrorMessage("Fail to decode request due to: " + msg);
        //不合法,就設置BAD_REQUEST狀態
        res.setStatus(Response.BAD_REQUEST);
        return res;
    }
    //獲取data欄位
    Object msg = req.getData();
    try {
        //調用後續邏輯
        Object result = handler.reply(channel, msg);
        res.setStatus(Response.OK);
        res.setResult(result);
    } catch (Throwable e) {
        res.setStatus(Response.SERVICE_ERROR);
        res.setErrorMessage(StringUtils.toString(e));
    }
    return res;
}
HeaderExchangeHandler#received方法邏輯比較清晰,如果是雙向通訊,就繼續後續的邏輯並返回結果。單向通訊不返回結果,僅向下接著執行。我們接著分析,進入到DubboProtocol#reply。就不貼程式碼了,主要邏輯就是獲取Invoker實例對象,通過invoker調用具體服務:
return invoker.invoke(inv);
這個invoke方法的實現在AbstractProxyInvoker,中間會經過一堆過濾器,大家可以直接把斷點打在這個抽象類里。而AbstractProxyInvoker#invoke主要就是調用了doInvoke方法,而這個方法是個抽象方法。它需要具體的Invoker實例實現。Invoker是通過JavassistProxyFactory創建的,第二章提到過:
public <T> Invoker<T> getInvoker(T proxy, Class<T> type, URL url) {
    // TODO Wrapper cannot handle this scenario correctly: the classname contains '$'
    final Wrapper wrapper = Wrapper.getWrapper(proxy.getClass().getName().indexOf('$') < 0 ? proxy.getClass() : type);
    return new AbstractProxyInvoker<T>(proxy, type, url) {
        @Override
        protected Object doInvoke(T proxy, String methodName,
                                  Class<?>[] parameterTypes,
                                  Object[] arguments) throws Throwable {
            return wrapper.invokeMethod(proxy, methodName, parameterTypes, arguments);
        }
    };
}
Wrapper是一個抽象類,Dubbo會在運行時通過Javassist框架為其生成實現類,並實現invokeMethod方法。同樣的,我們利用Arthas反編譯一下。進入到Provider的進程,搜索*.Wrapper0,再用jad反編譯:
public class Wrapper0 extends Wrapper implements ClassGenerator.DC {
    public static String[] pns;
    public static Map pts;
    public static String[] mns;
    public static String[] dmns;
    public static Class[] mts0;

    public Object invokeMethod(Object object, String string, Class[] arrclass, Object[] arrobject) throws InvocationTargetException {
        //這就是我們需要調用的服務介面
        ServiceAPI serviceAPI;
        try {
            //類型轉換
            serviceAPI = (ServiceAPI)object;
        }
        catch (Throwable throwable) {
            throw new IllegalArgumentException(throwable);
        }
        try {
            //sendMessage就是我們調用的方法名,根據方法名找到指定方法
            if ("sendMessage".equals(string) && arrclass.length == 1) {
                return serviceAPI.sendMessage((String)arrobject[0]);
            }
        }
        catch (Throwable throwable) {
            throw new InvocationTargetException(throwable);
        }
        throw new NoSuchMethodException(new StringBuffer().append("Not found method \"").append(string).append("\" in class com.yelow.springboot.dubbo.ServiceAPI.").toString());
    }
    //其他方法略。。。
}
到這裡,終於看到了調用具體方法的程式碼。
5.返回調用結果
獲取到執行結果後,我們就需要返回了,詳細的調用鏈就不再重複了,大家可以自己debug一下。這裡只看一下Response的編碼。在請求編碼那一節中,我們分析了ExchangeCodec,其中,對響應對象進行編碼沒有分析,我們現在來看看:
protected void encodeResponse(Channel channel, ChannelBuffer buffer, Response res) throws IOException {
    int savedWriteIndex = buffer.writerIndex();
    try {
        Serialization serialization = getSerialization(channel);
        // 創建消息頭位元組數組
        byte[] header = new byte[HEADER_LENGTH];
        // 設置魔數
        Bytes.short2bytes(MAGIC, header);
        // 設置序列化器編號
        header[2] = serialization.getContentTypeId();
        if (res.isHeartbeat()) header[2] |= FLAG_EVENT;
        // 設置響應狀態碼
        byte status = res.getStatus();
        header[3] = status;
        //設置請求編號
        Bytes.long2bytes(res.getId(), header, 4);

        buffer.writerIndex(savedWriteIndex + HEADER_LENGTH);
        ChannelBufferOutputStream bos = new ChannelBufferOutputStream(buffer);
        ObjectOutput out = serialization.serialize(channel.getUrl(), bos);
        // encode response data or error message.
        if (status == Response.OK) {
            if (res.isHeartbeat()) {
                //對心跳響應結果進行序列化
                encodeHeartbeatData(channel, out, res.getResult());
            } else {
                //對調用結果進行序列化
                encodeResponseData(channel, out, res.getResult());
            }
        } else out.writeUTF(res.getErrorMessage());
        out.flushBuffer();
        if (out instanceof Cleanable) {
            ((Cleanable) out).cleanup();
        }
        bos.flush();
        bos.close();

        int len = bos.writtenBytes();
        checkPayload(channel, len);
        Bytes.int2bytes(len, header, 12);
        // write
        buffer.writerIndex(savedWriteIndex);
        buffer.writeBytes(header); // write header.
        buffer.writerIndex(savedWriteIndex + HEADER_LENGTH + len);
    } catch (Throwable t) {
        //異常處理略。。。
    }
}
6.接收調用結果
終於到了最後一步,前面經歷了發起服務調用-發送請求-請求編碼-請求解碼-調用具體服務-返回請求結果(請求結果編碼)。
接收調用結果後,同樣需要解碼。這一塊不想再重複了,具體程式碼在DubboCodec#decodeBody中,有了前面的經驗,大家可以自己debug看一下。
響應數據解碼完成後,Dubbo會將響應對象派發到執行緒池上,執行緒池會把調用的結果傳遞到用戶執行緒。前面說到過,請求發送後,會用DefaultFuture的get方法等待響應結果。當響應對象來了後,用戶執行緒會被喚醒,並通過請求編號獲取自己的響應結果。我們來分析下,首先解碼完成後,肯定是要在Netty的邏輯處理類裡面進行後續邏輯的調用,如handler.received。這個received就會進入到DefaultFuture中:
public class DefaultFuture implements ResponseFuture {
    private static final Logger logger = LoggerFactory.getLogger(DefaultFuture.class);
    private static final Map<Long, Channel> CHANNELS = new ConcurrentHashMap<Long, Channel>();
    private static final Map<Long, DefaultFuture> FUTURES = new ConcurrentHashMap<Long, DefaultFuture>();

public static void received(Channel channel, Response response) {
    try {
        DefaultFuture future = FUTURES.remove(response.getId());
        if (future != null) {
            //繼續往下調用
            future.doReceived(response);
        } else {
            logger.warn("The timeout response finally returned at "
                    + (new SimpleDateFormat("yyyy-MM-dd HH:mm:ss.SSS").format(new Date()))
                    + ", response " + response
                    + (channel == null ? "" : ", channel: " + channel.getLocalAddress()
                    + " -> " + channel.getRemoteAddress()));
        }
    } finally {
        CHANNELS.remove(response.getId());
    }
}
private void doReceived(Response res) {
    lock.lock();
    try {
        //保存響應對象
        response = res;
        if (done != null) {
            //喚醒用戶執行緒
            done.signal();
        }
    } finally {
        lock.unlock();
    }
    if (callback != null) {
        invokeCallback(callback);
    }
}
}
以上邏輯就是把對象保存到DefaultFuture中,然後喚醒用戶執行緒。隨後用戶執行緒調用get方法獲取結果。
完整的調用過程就分析到這裡了,更多用法和源碼分析可以看官網文檔://dubbo.apache.org/zh/docs/


