React.js 新手快速入門 – 開山篇
- 2019 年 11 月 22 日
- 筆記
在閱讀之前,會有一些小夥伴覺得疑惑,作者怎麼寫前端文章了呢,作者不是專註後端Java嗎?這是怎麼了?其實不然,在4年前,那個時候還沒有流行vue和react,身為後端程式設計師的我們,不管是java還是php程式設計師,都是需要寫前端的,不過那個時候的前端沒有現在那麼多東西。我們一般叫美工畫好靜態頁面,然後交給後端程式設計師,後端程式設計師在靜態頁面中加入js程式碼,或者把靜態頁面替換成jsp、velocity等靜態模板語言的程式碼,一個動態效果的頁面就完成了。隨著互聯網的不斷發展,程式設計師工種的劃分也越來越明細,現在的前端和作者曾經那個時候已經大不一樣了,不論是思想還是語言風格,為了學習下如何自己製作頁面,也為了感受下前端程式碼的魅力,故選擇了React.js 前端框架作為學習目標。其實前端很有趣,有意思!身為後端程式設計師的你不打算了解一下嘛~
準備工作
在學習 react 之前,我們需要先安裝對應的運行環境,工欲善其事必先利其器。首先安裝好如下環境:
不知道我的讀者是不是完全不懂前端,建議讀者有一點點的 Html、Css、java script、es6 的基礎,實在沒有建議花個1~2天學習下。
熟悉官方create-react-app腳手架
react 前端項目和我們平時的java項目一樣,都有其自己的項目結構,java的項目結構有IDE開發工具幫我們生產,在本文中,我們使用facebook 的 create-react-app 腳手架項目來幫我們生成 react 項目結構,操作如下:
# 全局安裝官方腳手架 npm i -g create-react-app # 初始化創建一個基於 react 的項目 create-react-app 01_jpview_class # 設置 npm 下載鏡像源為淘寶, 和設置 maven 倉庫源一個意思 npm config set registry http://registry.npm.taobao.org 複製程式碼

這個時候就開始創建項目了,時間有點長,因為正在下載需要的插件和依賴包,完成後項目結構如下:

├── README.md 文檔 ├── package-lock.json ├── package.json npm 依賴 ├── public 靜態資源 │ ├── favicon.ico │ ├── index.html │ └── manifest.json └── src 源碼 ├── App.css ├── App.js 根組件 ├── App.test.js 測試 ├── index.css 全局樣式 ├── index.js 入口 ├── logo.svg └── serviceWorker.js pwa支援
作者:蔣老濕 鏈接:https://juejin.im/post/5dd2b83f518825462376ae85
什麼是JSX語法
刪除src目錄下的所以文件,新建一個 index.js文件,內容為
import React from 'react'; import ReactDOM from 'react-dom'; import App from './App'; ReactDOM.render(<App/>, document.querySelector('#root')) 複製程式碼
新建 App.js文件,內容為:
import React, { Component } from "react"; export default class App extends Component{ render(){ return <div> <button>雷猴啊</button> </div> } } export default KaikebaCart 複製程式碼
上面的程式碼看起來會有感到困惑的地方,首先就是ReactDOM.render(<App />, document.querySelector('#root')); 看起來是js和html的混合體,這種語法被稱之為JSX,其實際核心的邏輯完全是js來實現的。
在項目目錄終端執行以下命令可以看到效果
# 下載依賴包 npm install # 啟動運行項目 npm start 複製程式碼

學習react基礎語法
以下所有程式碼都可以直接複製到 index.js文件中 體驗效果
React 組件
React 的世界裡一切皆是組件,我們使用class語法構建一個最基本的組件,組件的使用方式和HTML相同,組件的render函數返回渲染的一個JSX頁面,然後使用ReactDom渲染到頁面里
import React from 'react'; import ReactDOM from 'react-dom'; // 繼承React.Component表示App是一個組件 class App extends React.Component { render() { return <div> Hello React </div> } } // ReactDOM.render()方法把 App中的內容追加到 index.html 中 <div id="root">的標籤上 ReactDOM.render(<App/>, document.querySelector('#root')) 複製程式碼

屬性傳遞
React組件使用和html類似的方式傳遞參數,在組件內部,使用this.props獲取所有的傳遞的參數,在JSX里使用變數,使用{}包裹
import React from 'react'; import ReactDOM from 'react-dom'; // 繼承React.Component表示App是一個組件 class App extends React.Component { render() { // 獲取<App name="React"> 傳遞過來的屬性name值 return <div> Hello {this.props.name} </div> } } // ReactDOM.render()方法把 App中的內容追加到 index.html 中 <div id="root">的標籤上 ReactDOM.render(<App name="React" />, document.querySelector('#root')) 複製程式碼
JSX
JSX是一種js的語法擴展,表面上像HTML,本質上還是通過babel轉換為js執行,所有在JSX里可以使用{}來寫js的語法,JSX本質上就是轉換為React.createElement在React內部構建虛擬Dom,最終渲染出頁面
import React from 'react'; import ReactDOM from 'react-dom'; // 繼承React.Component表示App是一個組件 class App extends React.Component { render() { return ( <div> // {2+2} js的計算語法,結果為4 Hello {this.props.name}, I am {2 + 2} years old </div> ) } } // ReactDOM.render()方法把 App中的內容追加到 index.html 中 <div id="root">的標籤上 ReactDOM.render(<App name="React" />, document.querySelector('#root')) 複製程式碼

State和事件綁定
我們到現在為止還沒有更新過UI頁面,React內部通過this.state變數來維護內部的狀態,並且通過this.stateState來修改狀態,render里用到的state變數,也會自動渲染到UI,我們現在constructor()來初始化state,在JSX語法里使用this.state.num獲取,然後jsx里使用onClick綁定點擊事件,注意這裡需要在constructor()里使用bind()方法綁定this指向,然後內部調用this.setState修改值,注意這裡不能寫成this.state.num+1,而是要調用this.setState,設置並返回一個全新的num值。
import React from 'react'; import ReactDOM from 'react-dom'; class Counter extends React.Component { constructor(props){ super(props) // 初始化構造是設置內部狀態 num值為 1 this.state = { num:1 } // 把handleClick()方法綁定到當前對象Counter上 this.handleClick = this.handleClick.bind(this) } handleClick(){ // 改變內部狀態 num 的值 this.setState({ num:this.state.num + 1 }) } render() { return ( <div> <p>{this.state.num}</p> {/*{this.handleClick} js語法調用當前對象的handleClick()方法*/} <button onClick={this.handleClick}>click</button> </div> ) } } ReactDOM.render(<Counter/>, document.querySelector('#root')) 複製程式碼

生命周期
在組件內部存在一些特殊的方法,會在組件的不同階段執行,比如組件載入完畢後會執行componentDidMount函數,組件更新的時候,會執行shouldComponentUpdate函數,如果返回true的話,就會一次執行componentWillMount、render,componentDidMount,如果返回false的話,就不會執行。
import React from 'react'; import ReactDOM from 'react-dom'; class Counter extends React.Component { constructor(props){ super(props) this.state = { num:1 } this.handleClick = this.handleClick.bind(this) } // 生命方法--組件渲染完成,只執行一次 componentDidMount(){ console.log('componentDidMount 函數觸發') } // 生命方法--避免組件重複或者無意義渲染 shouldComponentUpdate(nextProps,nextState){ if (nextState.num%2) { return true } return false } handleClick(){ this.setState({ num:this.state.num+1 }) } render() { return ( <div> <p>{this.state.num}</p> <button onClick={this.handleClick}>click</button> </div> ) } } ReactDOM.render(<Counter/>, document.querySelector('#root')) 複製程式碼

生命周期流程圖:

表單
用戶想提交數據到後台,表單元素是最常用的,一個常見的表單由form、 input、 label等標籤構成,我們通過onChange()方法控制value的值,最終通過state,讓在的html input中輸入內容和`React“關聯起來。
import React from 'react'; import ReactDOM from 'react-dom'; class TodoList extends React.Component { constructor(props){ super(props) this.state = { text:'' } this.handleClick = this.handleClick.bind(this) this.handleChange = this.handleChange.bind(this) } handleClick(){ // 如果內部狀態 text有值,則把值清空'' if (this.state.text) { this.setState({ text:'' }) } } handleChange(e){ // 獲取事件元素input的值賦值給內部狀態 text 中 this.setState({ text:e.target.value }) } render() { return ( <div> {/* 顯示內部狀態 text 的內容*/} {this.state.text} {/*input接收到輸入值調用handleChange()方法*/} <input type="text" value={this.state.text} onChange={this.handleChange}/> {/*點擊按鈕調用handleClick()方法*/} <button onClick={this.handleClick}>clear</button> </div> ) } } ReactDOM.render(<TodoList/>, document.querySelector('#root')) 複製程式碼

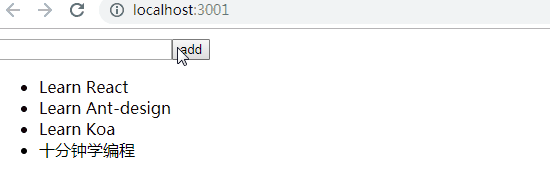
渲染列表
頁面里序列化的數據,比如用戶列表,都是一個數組,我們通過map函數把數組直接映射為JSX,但是我們直接渲染列表,打開console的時候會看到Each child in an array or iterator should have a unique "key" prop.報錯。在渲染列表的時候,我們需要每個元素都有一個唯一的key屬性,這樣React在數據變化的時候,知道哪些dom應該發生變化 尤其注意key要唯一,建議每個欄位唯一id,或者使用索引
import React from 'react'; import ReactDOM from 'react-dom'; class TodoList extends React.Component { constructor(props){ super(props) // 內部裝填屬性初始化值 this.state = { todos:['Learn React','Learn Ant-design','Learn Koa'], text:'' } this.handleClick = this.handleClick.bind(this) this.handleChange = this.handleChange.bind(this) } handleClick(){ if (this.state.text) { this.setState(state=>({ // 如果內部狀態 text有值,追加到解構的todos數組後 todos:[...state.todos,state.text], // 如果內部狀態 text有值,則把值清空'' text:'' })) } } handleChange(e){ // 獲取事件元素input的值賦值給內部狀態 text 中 this.setState({ text:e.target.value }) } render() { return ( <div> {/*input接收到輸入值調用handleChange()方法*/} <input type="text" value={this.state.text} onChange={this.handleChange}/> {/*點擊按鈕調用handleClick()方法*/} <button onClick={this.handleClick}>add</button> <ul> {/*map()循環輸出JSX內容給ReactDOM*/} {this.state.todos.map(v=>{ return <li key={v}>{v}</li> })} </ul> </div> ) } } ReactDOM.render(<TodoList/>, document.querySelector('#root')) 複製程式碼
React16新增了什麼
2017年9月27日,Facebook 官方發布了 React 16.0。相較於之前的 15.x 版本,v16是第一個核心模組重寫了的版本,並且在異常處理,核心架構和服務端渲染方面都有更新。
render函數支援返回數組和字元串- 異常處理,添加
componentDidCatch鉤子獲取組件錯誤 - 新的組件類型
portals可以渲染當前容器dom之外的節點 - 打包的文件體積減少 30%
- 更換開源協議為MIT許可
- Fiber架構,支援非同步渲染
- 更好的服務端渲染,支援位元組流渲染
import React from 'react'; import ReactDOM from 'react-dom'; // 繼承React.Component表示React16是一個組件 class React16 extends React.Component { // 構造器函數 constructor(props){ super(props) this.state={hasError:false} } // 生命周期函數 componentDidCatch(error, info) { // 設置內部狀態 hasError為true this.setState({ hasError: true }) } render() { return ( <div> {/*? : 是三目運算符*/} {this.state.hasError ? <div>出錯了</div>:null} {/*使用組件ClickWithError和FeatureReturnFragments*/} <ClickWithError /> <FeatureReturnFragments /> </div> ) } } // 繼承React.Component表示ClickWithError是一個組件 class ClickWithError extends React.Component{ constructor(props){ super(props) this.state = {error:false} // 綁定handleClick()方法到當前對象上 this.handleClick = this.handleClick.bind(this) } handleClick(){ // 觸發調用時設置state.error值為true this.setState({ error:true }) } render() { if (this.state.error) { throw new Error('出錯了!') } return <button onClick={this.handleClick}>拋出錯誤</button> } } // 繼承React.Component表示FeatureReturnFragments是一個組件 class FeatureReturnFragments extends React.Component{ render(){ return [ <p key="key1">React很不錯</p>, "文本1", <p key="key2">Antd-desing也很贊</p>, "文本2" ] } } ReactDOM.render(<React16/>, document.querySelector('#root')) 複製程式碼

虛擬DOM
DOM操作成本實在是太高,所以有了在js里模擬和對比文檔對象模型的方案,JSX里使用 react、 createElement構建虛擬DOM,每次只要有修改,先對比js裡面的虛擬dom樹里的內容。 傳統瀏覽器渲染流程圖

虛擬DOM樹結構圖

參考:
實戰來總結
學完了api 的使用,是時候拿起武器開始真刀真槍的開幹了,如圖是實戰的效果演示,具體的程式碼分析講解可以直接在我的github上看到,就不在本文贅述了,我要傳送程式碼倉庫===> 項目程式碼地址

深入理解生命周期
React v16.0版本之前

組件初始化階段(initialization)
如下程式碼中類的構造方法constructor(),Test類繼承了react Component這個基類,也就繼承這個react的 基類,才能有render(),生命周期等方法可以使用,這也說明為什麼函數組件不能使用這些方法的原因。
super(props) 用來調用基類的構造方法constructor(), 也將父組件的props注入給子組件,供子組件讀取(組件 中props屬性只讀不可寫,state可寫)。 而 constructor() 用來做一些組件的初始化工作,比如定義this.state的初始內 容。
import React, { Component } from 'react'; class Test extends Component { constructor(props) { super(props); } } 複製程式碼
組件的掛載階段(Mounting)
此階段分為componentWillMount,render,componentDidMount三個時期。
- componentWillMount:在組件掛載到
DOM前調用,且只會被調用一次,在這裡面調用this.setState不會引起組件的重新渲染,也可以把寫在這裡面的內容改寫到constructor()中,所以在項目中很少這麼使用。 - render:根據組件的
props和state(無論兩者是重傳遞或重賦值,無論值是否有變化,都可以引起組件重新render) ,內部return一個React元素(描述組件,即UI),該元素不負責組件的實際渲染工作,之後由React自身根據此元素去渲染出頁面DOM。render是純函數(Pure function:函數的返回結果只依賴於它的參數;函數執行過程裡面沒有副作用),不能在裡面執行this.setState等操作,會有改變組件狀態的副作用。 - componentDidMount:組件掛載到
DOM後調用,且只會被調用一次
組件的更新階段(update)
在組件的更新階段中,存在很多生命方法,從上圖可以很直觀的看到,有 componentWillReceiveProps, shouldComponentUpdate,componentWillUpdate,render,componentDidUpdate。
- componentWillReceiveProps(nextProps):此方法只調用於
props引起的組件更新過程中,參數nextProps是父組件傳給當前組件的新props。但父組件render方法的調用不能保證重傳給當前組件的props是有變化的,所以在此方法中根據nextProps和this.props來查明重傳 的props是否改變,以及如果改變了要執行啥,比如根據新的props調用this.setState出發當前組件的重新render - shouldComponentUpdate(nextProps,nextState):此方法通過比較
nextProps,nextState及當前組件的this.props,this.state,返回true時當前組件將繼續執行更新過程,返回false則當前組件更新停止,以此可用來減少組件的不必要渲染,優化組件性能。 這邊也可以看出,就算componentWillReceiveProps()中執行了this.setState,更新了state,但在render前 (如shouldComponentUpdate,componentWillUpdate),this.state依然指向更新前的state,不然nextState及當前組件的this.state的對比就一直是true了。 - componentWillUpdate(nextProps, nextState):此方法在調用
render方法前執行,在這邊可執行一些組件更新發生前的工作,一般較少用。 - render:
render方法在上文講過,這邊只是重新調用。 - componentDidUpdate(prevProps, prevState):此方法在組件更新後被調用,可以操作組件更新的
DOM,prevProps和prevState這兩個參數指的是組件更新前的props和state
在此階段需要先明確下react組件更新機制。setState引起的state更新,或父組件重新render引起的props更新,更新後的state和props相比較之前的結果,無論是否有變化,都將引起子組件的重新render。詳細了解可看=>這篇文章 造成組件更新有兩類(三種)情況:
父組件重新render 父組件重新render引起子組件重新render的情況有兩種 直接使用,每當父組件重新render導致的重傳props,子組件都將直接跟著重新渲染,無論props是否有變化。可通 過shouldComponentUpdate方法控制優化。 class Child extends Component { // 應該使用這個方法,否則無論props是否有變化都將會導致組件跟著重新渲染 shouldComponentUpdate(nextProps){ if(nextProps.someThings === this.props.someThings){ return false } } render() { return <div>{this.props.someThings}</div> } } 複製程式碼
- 在
componentWillReceiveProps方法中,將props轉換成自己的state
class Child extends Component { constructor(props) { super(props); this.state = { someThings: props.someThings }; } componentWillReceiveProps(nextProps) { // 父組件重傳props時就會調用這個方法 this.setState({someThings: nextProps.someThings}); } render() { return <div>{this.state.someThings}</div> } } 複製程式碼 根據官網的描述: 在
componentWillReceiveProps方法中,將props轉換成自己的state是因為componentWillReceiveProps中判斷props是否變化了,若變化了,this.setState將引起state變化,從而引 起render,此時就沒必要再做第二次因重傳props來引起render了,不然就重複做一樣的渲染了。
- 組件本身調用
setState,無論state有沒有變化。可以通過shouldComponentUpdate方法控制優化。
shouldComponentUpdate() { // 組件是否需要更新,返回布爾值,優化點 console.log("5.組件是否應該更新?"); return true; } 複製程式碼
卸載階段
此階段只有一個生命周期方法:componentWillUnmount此方法在組件被卸載前調用,可以在這裡執行一些清理工作,比如清楚組件中使用的定時器,清除componentDidMount中手動創建的DOM元素等,以避免引起記憶體泄漏。
React v16.0版本之後(2019.11.20)

原來(React v16.0前)的生命周期在React v16推出的Fiber之後就不合適了,因為如果要開啟async rendering, 在render函數之前的所有函數,都有可能被執行多次。
原來(React v16.0前)的生命周期有哪些是在render前執行的呢?
- componentWillMount
- componentWillReceiveProps
- shouldComponentUpdate
- componentWillUpdate
如果開發者開了async rendering,而且又在以上這些render前執行的生命周期方法做AJAX請求的話,那AJAX將被 無謂地多次調用。。。明顯不是我們期望的結果。而且在componentWillMount里發起AJAX,不管多快得到結果 也趕不上首次render,而且componentWillMount在伺服器端渲染也會被調用到(當然,也許這是預期的結 果),這樣的IO操作放在componentDidMount里更合適。
禁止不能用比勸導開發者不要這樣用的效果更好,所以除了shouldComponentUpdate,其他在render函數之前的 所有函數(componentWillMount,componentWillReceiveProps,componentWillUpdate)都被 getDerivedStateFromProps替代。
也就是用一個靜態函數getDerivedStateFromProps來取代被deprecate的幾個生命周期函數,就是強制開發者在 render之前只做無副作用的操作,而且能做的操作局限在根據props和state決定新的state
React v16.0剛推出的時候,是增加了一個componentDidCatch生命周期函數,這只是一個增量式修改,完全不影 響原有生命周期函數;但是,到了React v16.3,大改動來了,引入了兩個新的生命周期函數。
新的生命周期函數getDerivedStateFromProps和getSnapshotBeforeUpdate
- getDerivedStateFromProps:
getDerivedStateFromProps本來(React v16.3中)是只在創建和更新(由父組件引發部分),也就是不是不由 父組件引發,那麼getDerivedStateFromProps也不會被調用,如自身setState引發或者forceUpdate引發。這樣的話理解起來有點亂,在React v16.4中改正了這一點,讓getDerivedStateFromProps無論是Mounting還是Updating,也無論是因為什麼引起的Updating,全部都會被調用,具體可看React v16.4 的生命周期圖。
static getDerivedStateFromProps(props, state)在組件創建時和更新時的render方法之前調用,它應該返回 一個對象來更新狀態,或者返回null來不更新任何內容。
- getSnapshotBeforeUpdate:
getSnapshotBeforeUpdate()被調用於render之後,可以讀取但無法使用DOM的時候。它使您的組件可以在可 能更改之前從DOM捕獲一些資訊(例如滾動位置)。此生命周期返回的任何值都將作為參數傳遞給 componentDidUpdate()。
class ScrollingList extends React.Component { constructor(props) { super(props); this.listRef = React.createRef(); } getSnapshotBeforeUpdate(prevProps, prevState) { //我們是否要添加新的 items 到列表? // 捕捉滾動位置,以便我們可以稍後調整滾動. if (prevProps.list.length < this.props.list.length) { const list = this.listRef.current; return list.scrollHeight – list.scrollTop; } return null; } componentDidUpdate(prevProps, prevState, snapshot) { //如果我們有snapshot值, 我們已經添加了 新的items. // 調整滾動以至於這些新的items 不會將舊items推出視圖。 // (這邊的snapshot是 getSnapshotBeforeUpdate方法的返回值) if (snapshot !== null) { const list = this.listRef.current; list.scrollTop = list.scrollHeight – snapshot; } } render() { return ( <div ref={this.listRef}>{/* …contents… */}</div> ); } } 複製程式碼

