Docker安裝基本命令操作,帶你了解鏡像和容器的概念!
上一章節我們了解了Docker的基本概念,以及相關原理。這一章節進行實操。
《Docker這麼火爆。章節一:帶你詳盡了解Docker容器的介紹及使用》
一、Docker安裝
聲明:Docker支援Centos 6及以後的版本。
1. 查詢是否有安裝docker
[root@VM-0-3-centos /]# yum list installed | grep docker

[root@VM-0-3-centos /]#
我的是騰訊雲的伺服器,什麼都沒有安裝,所以沒有查詢出docker的安裝記錄
① 如果有安裝過docker的小夥伴,可以執行下面命令進行刪除:
[root@VM-0-3-centos /]# yum -y remove docker完整名字
② 如果安裝過,那麼再將鏡像/容器刪除,命令如下:
[root@VM-0-3-centos /]# rm -rf /var/lib/docker
因為騰訊雲的默認為centos7版本
因此在這裡只介紹centos7的安裝流程
2. 安裝docker
有兩種方式安裝docker:
① 通過yum直接安裝docker。但是,這種方式安裝可能並不是最新版的docker版本(存在更新不及時的問題)
[root@VM-0-3-centos /]# sudo yum install docker
② 通過yum從阿里雲鏡像中進行安裝,可以下載安裝最新版本,運行三條安裝命令(在這裡就沒有把安裝輸出資訊列印出來了,怕篇幅太長,說我水文章~)
[root@VM-0-3-centos /]# sudo yum install -y yum-utils device-mapper-persistent-data lvm2
[root@VM-0-3-centos /]# sudo yum-config-manager --add-repo //mirrors.aliyun.com/docker-ce/linux/centos/docker-ce.repo
[root@VM-0-3-centos /]# sudo yum install docker-ce
其中最後一條命令sudo yum install docker-ce安裝過程中,需要有兩次確認的過程,直接輸入字母:y,然後回車即可。
3. 啟動docker
[root@VM-0-3-centos /]# sudo service docker start
4. 查看docker版本
[root@VM-0-3-centos /]# docker version
[root@VM-0-3-centos /]# docker info
5. 設置隨系統啟動
[root@VM-0-3-centos /]# sudo chkconfig docker on
6. docker初體驗
輸入:docker run hello-world (進入docker世界)
下面會輸出一行:Hello from Docker!
[root@VM-0-3-centos /]# docker run hello-world
Unable to find image 'hello-world:latest' locally
latest: Pulling from library/hello-world
0e03bdcc26d7: Pull complete
Digest: sha256:e7c70bb24b462baa86c102610182e3efcb12a04854e8c582838d92970a09f323
Status: Downloaded newer image for hello-world:latest

Hello from Docker!
This message shows that your installation appears to be working correctly.
To generate this message, Docker took the following steps:
 1. The Docker client contacted the Docker daemon.
 2. The Docker daemon pulled the "hello-world" image from the Docker Hub.
    (amd64)
 3. The Docker daemon created a new container from that image which runs the
    executable that produces the output you are currently reading.
 4. The Docker daemon streamed that output to the Docker client, which sent it
    to your terminal.
To try something more ambitious, you can run an Ubuntu container with:
 $ docker run -it ubuntu bash
Share images, automate workflows, and more with a free Docker ID:
 //hub.docker.com/
For more examples and ideas, visit:
 //docs.docker.com/get-started/
二、Docker基本操作
1. 容器操作
docker [run | start | stop | restart | kill | rm | pause | unpause]
- run/create [鏡像名]:創建一個新的容器,並運行一個命令
- start/stop/restart [容器名]:啟動/停止/重啟一個容器
- kill [容器名]:直接殺掉容器進程,不給進程響應時間
- rm [容器名]:刪除已經停止的容器
- pause/unpause [容器名]:暫停/恢復容器中的進程
docker [ps | inspect | exec | logs | export | import]
- ps:查看容器列表(默認查看正在運行的容器,-a查看所有容器)
- inspect [容器名]:查看容器配置元數據
- exec -it [容器名] /bin/bash:進入容器環境中交互操作
- logs –since=”2020-11-25″ -f –tail=10 [容器名]:查看容器日誌
- cp path1 [容器名]:path容器與主機之間的數據拷貝
- export -o test.tar [容器名]/docker export [容器名]>test.tar:文件系統作為一個tar歸檔文件
- import test.tar [鏡像名:版本號]:導入歸類文檔,成為一個鏡像
三、鏡像操作
docker [images | rmi | tag | build | history | save | load]
- images:列出本地鏡像列表
- rmi [鏡像名:版本]:刪除鏡像
- tag [鏡像名:版本] [倉庫]/[鏡像名:版本]:標記本地鏡像,將其歸入某一倉庫
- build -t [鏡像名:版本] [path]:Dockerfile 創建鏡像
- history [鏡像名:版本]:查看指定鏡像的創建歷史
- save -o xxx.tar [鏡像名:版本] /save [鏡像名:版本] > xxx.tar:將鏡像保存成tar歸檔文件
- load –input xxx.tar / docker load < xxx.tar:從歸檔文件中載入鏡像
四、鏡像與容器原理及用法探究
1. history命令查看鏡像層
例如:docker history hello-world
[root@VM-0-3-centos /]# docker history hello-world
IMAGE               CREATED             CREATED BY                                      SIZE                COMMENT
bf756fb1ae65        10 months ago       /bin/sh -c #(nop)  CMD ["/hello"]               0B
<missing>           10 months ago       /bin/sh -c #(nop) COPY file:7bf12aab75c3867a鈥  13.3kB
顯示鏡像hello-world分三層,其中2個空層
2. 查看鏡像文件
鏡像存放在imagedb里
一般在image/overlay2/imagedb/content/sha256 下面
打開一個鏡像文件查看其內容:
[root@VM-0-3-centos /]# cat f09fe80eb0e75e97b04b9dfb065ac3fda37a8fac0161f42fca1e6fe4d0977c80
{
 "architecture": "amd64",
 "config": {
  "Hostname": "",
  "Domainname": "",
  "User": "",
  "AttachStdin": false,
  "AttachStdout": false,
  "AttachStderr": false,
  "Tty": false,
  "OpenStdin": false,
  "StdinOnce": false,
  "Env": ["PATH=/usr/local/sbin:/usr/local/bin:/usr/sbin:/usr/bin:/sbin:/bin"],
  "Cmd": ["/hello"],
  "ArgsEscaped": true,
  "Image": "sha256:a6d1aaad8ca65655449a26146699fe9d61240071f6992975be7e720f1cd42440",
  "Volumes": null,
  "WorkingDir": "",
  "Entrypoint": null,
  "OnBuild": null,
  "Labels": null
 },
 "container": "8e2caa5a514bb6d8b4f2a2553e9067498d261a0fd83a96aeaaf303943dff6ff9",
 "container_config": {
  "Hostname": "8e2caa5a514b",
  "Domainname": "",
  "User": "",
  "AttachStdin": false,
  "AttachStdout": false,
  "AttachStderr": false,
  "Tty": false,
  "OpenStdin": false,
  "StdinOnce": false,
  "Env": ["PATH=/usr/local/sbin:/usr/local/bin:/usr/sbin:/usr/bin:/sbin:/bin"],
  "Cmd": ["/bin/sh", "-c", "#(nop) ", "CMD [\"/hello\"]"],
  "ArgsEscaped": true,
  "Image": "sha256:a6d1aaad8ca65655449a26146699fe9d61240071f6992975be7e720f1cd42440",
  "Volumes": null,
  "WorkingDir": "",
  "Entrypoint": null,
  "OnBuild": null,
  "Labels": {}
 },
 "created": "2019-01-01T01:29:27.650294696Z",
 "docker_version": "18.06.1-ce",
 "history": [{
  "created": "2019-01-01T01:29:27.416803627Z",
  "created_by": "/bin/sh -c #(nop) COPY file:f77490f70ce51da25bd21bfc30cb5e1a24b2b65eb37d4af0c327ddc24f0986a6 in / "
 }, {
  "created": "2019-01-01T01:29:27.650294696Z",
  "created_by": "/bin/sh -c #(nop)  CMD [\"/hello\"]",
  "empty_layer": true
 }],
 "os": "linux",
 "rootfs": {
  "type": "layers",
  "diff_ids": ["sha256:af0b15c8625bb1938f1d7b17081031f649fd14e6b233688eea3c5483994a66a3"]
 }
}
其中,history數組內,標識了鏡像的歷史記錄(與history命令內容對應);
rootfs的diff_ids中,對應了依賴使用中鏡像層文件(history命令中size大於0的層)。
五、查看鏡像層文件
層文件在layerdb里
[root@VM-0-3-centos /]# ll /var/lib/docker/image/overlay2/layerdb/sha256
鏡像層文件內結構
六、鏡像與容器總結
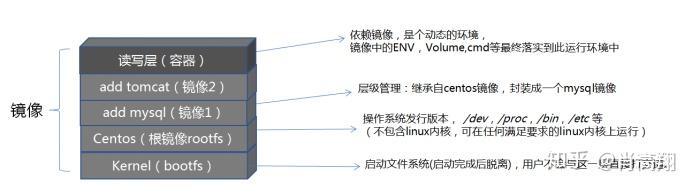
一個鏡像就是一層層的layer層文件,蓋樓而成,上層文件疊於下層文件上,若上層文件有與下層文件重複的,則覆蓋掉下層文件重複的部分,如下圖:
① 初始掛載時讀寫層為空。
② 當需要修改鏡像內的某個文件時,只對處於最上方的讀寫層進行了變動,不複寫下層已有文件系統的內容,已有文件在只讀層中的原始版本仍然存在,但會被讀寫層中的新版本文件所隱藏,當 docker commit 這個修改過的容器文件系統為一個新的鏡像時,保存的內容僅為最上層讀寫文件系統中被更新過的文件。
③ 聯合掛載是用於將多個鏡像層的文件系統掛載到一個掛載點來實現一個統一文件系統視圖的途徑,是下層存儲驅動(aufs、overlay等) 實現分層合併的方式。
七、容器創建詳解
1. 互動式創建容器並進入:
[root@VM-0-3-centos /]# docker run -it --name centos centos /bin/bash
[root@b4f93894687c /]# <---- 這裡啟動了容器,並進入容器(這一句不是命令)
docker run -it –name centos centos /bin/bash(前台進程)
exit退出也關閉容器;Ctrl+P+Q退出不關閉容器
2. 後台啟動容器
[root@VM-0-3-centos /]# docker run -dti --name cent2 centos
153f66e0d07aedc7e6d96ebae771621590b6ad187a45ec600b8a8fdf42e7d68d
d:後台運行, ti/it:交互shell進程
3. 進入已運行的容器
[root@VM-0-3-centos /]# docker exec -it nginx /bin/bash
查看容器的元數據:docker inspect nginx
4. 綁定容器埠到主機
[root@VM-0-3-centos /]# docker run -d -p 8080:80 --name nginx nginx:latest
5. 掛載主機文件目錄到容器內
[root@VM-0-3-centos /]# docker run -dit -v /root/peter_dir/:/pdir --name cent centos
6. 複製主機文件到容器內
[root@VM-0-3-centos /]# docker cp anaconda-ks.cfg cent:/var
編後語
本文介紹了Docker的安裝部署,基本操作;其中包括了容器操作、鏡像操作;鏡像及容器的原理及用法。通過對Docker的介紹,讓小夥伴們能夠了解對Docker的基本從操作和常用命令。
下一章節將介紹:《Docker倉庫使用》
更多精彩敬請關注公眾號
Java極客思維
微信掃一掃,關注公眾號
通知:今日公眾號將開啟送書福利活動,還沒有關注公眾號的小夥伴儘快關注公眾號啦~
② 如果安裝過,那麼再將鏡像/容器刪除,命令如下:
[root@VM-0-3-centos /]# rm -rf /var/lib/docker因為騰訊雲的默認為centos7版本

因此在這裡只介紹centos7的安裝流程
2. 安裝docker
有兩種方式安裝docker:
① 通過yum直接安裝docker。但是,這種方式安裝可能並不是最新版的docker版本(存在更新不及時的問題)
[root@VM-0-3-centos /]# sudo yum install docker② 通過yum從阿里雲鏡像中進行安裝,可以下載安裝最新版本,運行三條安裝命令(在這裡就沒有把安裝輸出資訊列印出來了,怕篇幅太長,說我水文章~)
[root@VM-0-3-centos /]# sudo yum install -y yum-utils device-mapper-persistent-data lvm2
[root@VM-0-3-centos /]# sudo yum-config-manager --add-repo //mirrors.aliyun.com/docker-ce/linux/centos/docker-ce.repo
[root@VM-0-3-centos /]# sudo yum install docker-ce
其中最後一條命令sudo yum install docker-ce安裝過程中,需要有兩次確認的過程,直接輸入字母:y,然後回車即可。
3. 啟動docker
[root@VM-0-3-centos /]# sudo service docker start4. 查看docker版本
[root@VM-0-3-centos /]# docker version
[root@VM-0-3-centos /]# docker info
5. 設置隨系統啟動
[root@VM-0-3-centos /]# sudo chkconfig docker on6. docker初體驗
輸入:docker run hello-world (進入docker世界)
下面會輸出一行:Hello from Docker!
[root@VM-0-3-centos /]# docker run hello-world
Unable to find image 'hello-world:latest' locally
latest: Pulling from library/hello-world
0e03bdcc26d7: Pull complete
Digest: sha256:e7c70bb24b462baa86c102610182e3efcb12a04854e8c582838d92970a09f323
Status: Downloaded newer image for hello-world:latest

Hello from Docker!
This message shows that your installation appears to be working correctly.
To generate this message, Docker took the following steps:
 1. The Docker client contacted the Docker daemon.
 2. The Docker daemon pulled the "hello-world" image from the Docker Hub.
    (amd64)
 3. The Docker daemon created a new container from that image which runs the
    executable that produces the output you are currently reading.
 4. The Docker daemon streamed that output to the Docker client, which sent it
    to your terminal.
To try something more ambitious, you can run an Ubuntu container with:
 $ docker run -it ubuntu bash
Share images, automate workflows, and more with a free Docker ID:
 //hub.docker.com/
For more examples and ideas, visit:
 //docs.docker.com/get-started/
二、Docker基本操作
1. 容器操作
docker [run | start | stop | restart | kill | rm | pause | unpause]
- run/create [鏡像名]:創建一個新的容器,並運行一個命令
- start/stop/restart [容器名]:啟動/停止/重啟一個容器
- kill [容器名]:直接殺掉容器進程,不給進程響應時間
- rm [容器名]:刪除已經停止的容器
- pause/unpause [容器名]:暫停/恢復容器中的進程
docker [ps | inspect | exec | logs | export | import]
- ps:查看容器列表(默認查看正在運行的容器,-a查看所有容器)
- inspect [容器名]:查看容器配置元數據
- exec -it [容器名] /bin/bash:進入容器環境中交互操作
- logs –since=”2020-11-25″ -f –tail=10 [容器名]:查看容器日誌
- cp path1 [容器名]:path容器與主機之間的數據拷貝
- export -o test.tar [容器名]/docker export [容器名]>test.tar:文件系統作為一個tar歸檔文件
- import test.tar [鏡像名:版本號]:導入歸類文檔,成為一個鏡像
三、鏡像操作
docker [images | rmi | tag | build | history | save | load]
- images:列出本地鏡像列表
- rmi [鏡像名:版本]:刪除鏡像
- tag [鏡像名:版本] [倉庫]/[鏡像名:版本]:標記本地鏡像,將其歸入某一倉庫
- build -t [鏡像名:版本] [path]:Dockerfile 創建鏡像
- history [鏡像名:版本]:查看指定鏡像的創建歷史
- save -o xxx.tar [鏡像名:版本] /save [鏡像名:版本] > xxx.tar:將鏡像保存成tar歸檔文件
- load –input xxx.tar / docker load < xxx.tar:從歸檔文件中載入鏡像
四、鏡像與容器原理及用法探究
1. history命令查看鏡像層
例如:docker history hello-world
[root@VM-0-3-centos /]# docker history hello-world
IMAGE               CREATED             CREATED BY                                      SIZE                COMMENT
bf756fb1ae65        10 months ago       /bin/sh -c #(nop)  CMD ["/hello"]               0B
<missing>           10 months ago       /bin/sh -c #(nop) COPY file:7bf12aab75c3867a鈥  13.3kB
顯示鏡像hello-world分三層,其中2個空層
2. 查看鏡像文件
鏡像存放在imagedb里
一般在image/overlay2/imagedb/content/sha256 下面

打開一個鏡像文件查看其內容:
[root@VM-0-3-centos /]# cat f09fe80eb0e75e97b04b9dfb065ac3fda37a8fac0161f42fca1e6fe4d0977c80
{
 "architecture": "amd64",
 "config": {
  "Hostname": "",
  "Domainname": "",
  "User": "",
  "AttachStdin": false,
  "AttachStdout": false,
  "AttachStderr": false,
  "Tty": false,
  "OpenStdin": false,
  "StdinOnce": false,
  "Env": ["PATH=/usr/local/sbin:/usr/local/bin:/usr/sbin:/usr/bin:/sbin:/bin"],
  "Cmd": ["/hello"],
  "ArgsEscaped": true,
  "Image": "sha256:a6d1aaad8ca65655449a26146699fe9d61240071f6992975be7e720f1cd42440",
  "Volumes": null,
  "WorkingDir": "",
  "Entrypoint": null,
  "OnBuild": null,
  "Labels": null
 },
 "container": "8e2caa5a514bb6d8b4f2a2553e9067498d261a0fd83a96aeaaf303943dff6ff9",
 "container_config": {
  "Hostname": "8e2caa5a514b",
  "Domainname": "",
  "User": "",
  "AttachStdin": false,
  "AttachStdout": false,
  "AttachStderr": false,
  "Tty": false,
  "OpenStdin": false,
  "StdinOnce": false,
  "Env": ["PATH=/usr/local/sbin:/usr/local/bin:/usr/sbin:/usr/bin:/sbin:/bin"],
  "Cmd": ["/bin/sh", "-c", "#(nop) ", "CMD [\"/hello\"]"],
  "ArgsEscaped": true,
  "Image": "sha256:a6d1aaad8ca65655449a26146699fe9d61240071f6992975be7e720f1cd42440",
  "Volumes": null,
  "WorkingDir": "",
  "Entrypoint": null,
  "OnBuild": null,
  "Labels": {}
 },
 "created": "2019-01-01T01:29:27.650294696Z",
 "docker_version": "18.06.1-ce",
 "history": [{
  "created": "2019-01-01T01:29:27.416803627Z",
  "created_by": "/bin/sh -c #(nop) COPY file:f77490f70ce51da25bd21bfc30cb5e1a24b2b65eb37d4af0c327ddc24f0986a6 in / "
 }, {
  "created": "2019-01-01T01:29:27.650294696Z",
  "created_by": "/bin/sh -c #(nop)  CMD [\"/hello\"]",
  "empty_layer": true
 }],
 "os": "linux",
 "rootfs": {
  "type": "layers",
  "diff_ids": ["sha256:af0b15c8625bb1938f1d7b17081031f649fd14e6b233688eea3c5483994a66a3"]
 }
}
其中,history數組內,標識了鏡像的歷史記錄(與history命令內容對應);
rootfs的diff_ids中,對應了依賴使用中鏡像層文件(history命令中size大於0的層)。
五、查看鏡像層文件
層文件在layerdb里
[root@VM-0-3-centos /]# ll /var/lib/docker/image/overlay2/layerdb/sha256

鏡像層文件內結構

六、鏡像與容器總結
一個鏡像就是一層層的layer層文件,蓋樓而成,上層文件疊於下層文件上,若上層文件有與下層文件重複的,則覆蓋掉下層文件重複的部分,如下圖:
① 初始掛載時讀寫層為空。
② 當需要修改鏡像內的某個文件時,只對處於最上方的讀寫層進行了變動,不複寫下層已有文件系統的內容,已有文件在只讀層中的原始版本仍然存在,但會被讀寫層中的新版本文件所隱藏,當 docker commit 這個修改過的容器文件系統為一個新的鏡像時,保存的內容僅為最上層讀寫文件系統中被更新過的文件。
③ 聯合掛載是用於將多個鏡像層的文件系統掛載到一個掛載點來實現一個統一文件系統視圖的途徑,是下層存儲驅動(aufs、overlay等) 實現分層合併的方式。
七、容器創建詳解
1. 互動式創建容器並進入:
[root@VM-0-3-centos /]# docker run -it --name centos centos /bin/bash
[root@b4f93894687c /]# <---- 這裡啟動了容器,並進入容器(這一句不是命令)
docker run -it –name centos centos /bin/bash(前台進程)
exit退出也關閉容器;Ctrl+P+Q退出不關閉容器

2. 後台啟動容器
[root@VM-0-3-centos /]# docker run -dti --name cent2 centos
153f66e0d07aedc7e6d96ebae771621590b6ad187a45ec600b8a8fdf42e7d68d
d:後台運行, ti/it:交互shell進程
3. 進入已運行的容器
[root@VM-0-3-centos /]# docker exec -it nginx /bin/bash查看容器的元數據:docker inspect nginx
4. 綁定容器埠到主機
[root@VM-0-3-centos /]# docker run -d -p 8080:80 --name nginx nginx:latest
5. 掛載主機文件目錄到容器內
[root@VM-0-3-centos /]# docker run -dit -v /root/peter_dir/:/pdir --name cent centos
6. 複製主機文件到容器內
[root@VM-0-3-centos /]# docker cp anaconda-ks.cfg cent:/var
編後語
本文介紹了Docker的安裝部署,基本操作;其中包括了容器操作、鏡像操作;鏡像及容器的原理及用法。通過對Docker的介紹,讓小夥伴們能夠了解對Docker的基本從操作和常用命令。
下一章節將介紹:《Docker倉庫使用》
更多精彩敬請關注公眾號

Java極客思維
微信掃一掃,關注公眾號
通知:今日公眾號將開啟送書福利活動,還沒有關注公眾號的小夥伴儘快關注公眾號啦~


