5w 字 | 172 圖 | 超級賽亞級 Spring Cloud 實戰
- 2020 年 11 月 26 日
- 筆記
- 00-SpringCloud實戰項目, passjava, springboot, SpringCloud, 佳必過, 實戰
一、PassJava 項目簡介
- PassJava-Learning 項目是 PassJava(佳必過)項目的學習教程。對架構、業務、技術要點進行講解。
- PassJava 是一款 Java
面試刷題的開源系統,可以用零碎時間利用小程式查看常見面試題,夯實 Java 基礎。 - PassJava 項目可以教會你如何搭建 SpringBoot 項目,Spring Cloud 項目
- 採用流行的技術,如 SpringBoot、MyBatis、Redis、 MySql、 MongoDB、 RabbitMQ、Elasticsearch,採用 Docker 容器化部署。
項目地址
- [後台平台] //github.com/Jackson0714/PassJava-Platform
- [後台管理] //github.com/Jackson0714/PassJava-Portal
- [學習教程] //github.com/Jackson0714/PassJava-Learning
項目演示
- 後台管理系統

- 小程式


PassJava 中使用的技術
SpringBoot、MyBatis、Redis、 MySql、 MongoDB、 RabbitMQ、Elasticsearch
PassJava 實現的功能概覽
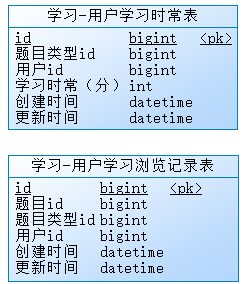
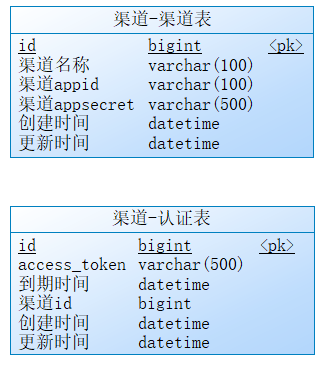
PassJava 資料庫表概覽

資料庫表前綴說明
- ums_*:會員模組相關表
- cms_*:內容管理模組相關表
- qms_*:題目模組相關表
- chms_*:渠道模組相關表
- sms_*:學習模組相關表
二、項目微服務架構圖
微服務架構圖


三、項目前置要求
由於 PassJava 項目涉及到很多知識點,希望大家先補下功課,推薦的書籍如下。
推薦資料
IDEA
《IntelliJ-IDEA-Tutorial》://github.com/judasn/IntelliJ-IDEA-Tutorial
Spring
《Spring 實戰(第 4 版)》://book.douban.com/subject/26767354/
SpringBoot
《Spring Boot 實戰》://book.douban.com/subject/26857423/
MyBatis
《MyBatis 從入門到精通》://book.douban.com/subject/27074809/
MySql
《深入淺出 MySQL》://book.douban.com/subject/25817684/
Linux
《循序漸進 Linux(第 2 版)》://book.douban.com/subject/26758194/
Elasticsearch
《Elasticsearch 權威指南》://www.elastic.co/guide/cn/elasticsearch/guide/current/index.html
《Elasticsearch 技術解析與實戰》://book.douban.com/subject/26967826/
Mongodb
《MongoDB 實戰 (第二版)》://book.douban.com/subject/27061123/
Docker
《Spring Cloud 與 Docker 微服務架構實戰》://book.douban.com/subject/27028228/
四、環境搭建篇
4.1 Vagrant 快速搭建 Ubuntu 虛擬機環境
1. 開啟虛擬機服務
Windows 啟動配置:Intel Virtualization Technology -> Enabled
2. 下載安裝 VirtualBox
VirtualBox:虛擬機管理軟體
//www.virtualbox.org/wiki/Downloads
3. 下載安裝 Vagrant
Vagrant:創建和管理虛擬機
Vagrant 軟體://www.vagrantup.com/downloads.html
Vagrant 官方鏡像://app.vagrantup.com/boxes/search

- check 是否安裝好了 vagrant
命令行輸入 vagrant
vagrant

4. 安裝 vagrant ubuntu 中國鏡像
# ubuntu 18.04 LTS:
vagrant box add //mirrors.tuna.tsinghua.edu.cn/ubuntu-cloud-images/bionic/current/bionic-server-cloudimg-amd64-vagrant.box --name ubuntu18

# ubunt 16.04 LTS:
vagrant box add //mirrors.tuna.tsinghua.edu.cn/ubuntu-cloud-images/xenial/current/xenial-server-cloudimg-amd64-vagrant.box --name ubuntu16

# ubuntu14:
vagrant box add //mirrors.tuna.tsinghua.edu.cn/ubuntu-cloud-images/vagrant/trusty/current/trusty-server-cloudimg-amd64-vagrant-disk1.box --name ubuntu14
安裝 ubuntu 18
vagrant box add //mirrors.tuna.tsinghua.edu.cn/ubuntu-cloud-images/bionic/current/bionic-server-cloudimg-amd64-vagrant.box --name ubuntu18

- 創建 vagrant 配置文件
vagrant init
- 打開 C:\Users\Administrator\Vagrantfile 文件
config.vm.box = "base" 修改為
config.vm.box = "ubuntu18"
5. 啟動虛擬機
vagrant up


6. 連接虛擬機
vagrant ssh

7. 配置密碼登錄
- 配置密碼登錄 vagrant
Vagrant ssh 進入系統之後
sudo su
編輯 sshd_config
vi /etc/ssh/sshd_config
PasswordAuthentication no 改為 PasswordAuthentication yes
PermitRootLogin prohibit-password 改為 PermitRootLogin yes
重啟服務
service sshd restart
-
安裝 XShell 工具和 XFTP 工具
-
XShell 連接虛擬機
帳號:root
密碼:vagrant
-
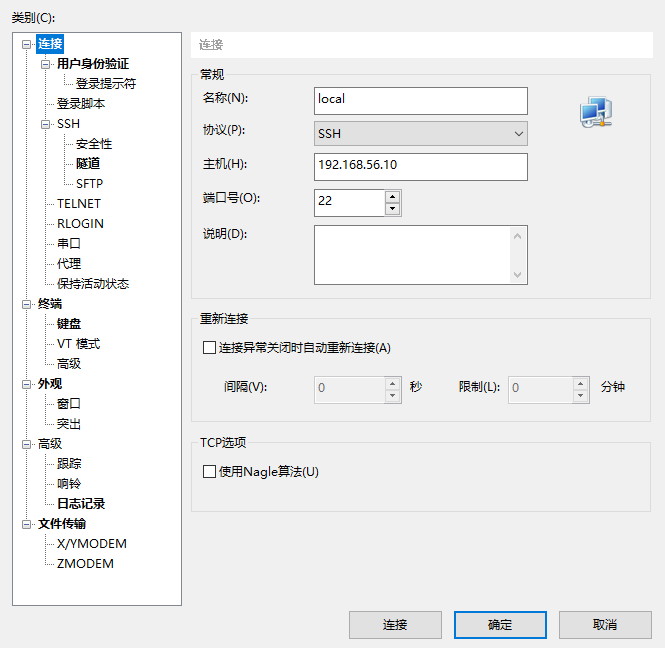


4.2 配置虛擬機網路
1.查看VirtualBox Host-Only Network

本地VirtualBox 網路地址 192.168.56.1,則修改虛擬機IP地址為同一個網段下,比如192.168.56.10
2.配置虛擬機IP地址
打開Vagrant 配置文件 C:\Users\Administrator\Vagrantfile
# config.vm.network "private_network", ip: "192.168.33.10"
修改為
config.vm.network "private_network", ip: "192.168.56.10"
3.重新載入虛擬機
vagrant reload
4.查看虛擬機IP地址
虛擬機IP地址:192.168.56.10,和配置文件中的一致

5.測試本機是否可以ping通虛擬機
ping 192.168.56.10,可以ping通

6.測試虛擬機是否可以ping通本機
ping 192.168.10.160,可以ping通
4.3 安裝docker
//docs.docker.com/engine/install/ubuntu/
1.卸載老版本docker
sudo apt-get remove docker docker-engine docker.io containerd runc
2.設置倉庫
// 命令1
$ sudo apt-get install \
    apt-transport-https \
    ca-certificates \
    curl \
    gnupg-agent \
    software-properties-common
// 命令2
curl -fsSL //download.docker.com/linux/ubuntu/gpg | sudo apt-key add -

// 命令3
sudo apt-key fingerprint 0EBFCD88

// 命令4
sudo add-apt-repository \
   "deb [arch=amd64] //download.docker.com/linux/ubuntu \
   $(lsb_release -cs) \
   stable"
3.安裝docker
sudo apt-get update
sudo apt-get install docker-ce docker-ce-cli containerd.io
4.測試安裝成功
sudo docker run hello-world

5.設置開機自啟動
sudo systemctl enable docker
6.配置鏡像加速
//cr.console.aliyun.com/cn-hangzhou/instances/mirrors

sudo mkdir -p /etc/docker
sudo tee /etc/docker/daemon.json <<-'EOF'
{
  "registry-mirrors": ["您的專屬加速器地址"]
}
EOF
sudo systemctl daemon-reload
sudo systemctl restart docker
7. 免sudo使用docker命令
當以普通用戶身份去使用docker images時,出現以下錯誤:
Got permission denied while trying to connect to the Docker daemon socket at unix:///var/run/docker.sock: Get //%2Fvar%2Frun%2Fdocker.sock/v1.26/images/json: dial unix /var/run/docker.sock: connect: permission denied
可以看都,最後告知我們時許可權的問題。那麼在linux文件許可權有三個數據左右drwxrwxrwx,

其中第一為d代表該文件是一個文件夾
前三位、中三位、後三位分別代表這屬主許可權、屬組許可權、其他人許可權。
如圖,其中 第三列、第四列分別代表文件的屬主、屬組。
上圖是報錯文件的許可權展示,可以看到其屬主為root,許可權為rw,可讀可寫;其屬組為docker,許可權為rw,可讀可寫。如果要當前用戶可直接讀取該文件,那麼我們就為當前用戶添加到docker屬組即可。
如果還沒有 docker group 就添加一個:
sudo groupadd docker

將用戶加入該 group 內。然後退出並重新登錄就生效啦。
sudo gpasswd -a ${USER} docker

重啟 docker 服務
sudo service docker restart

切換當前會話到新 group 或者重啟 X 會話
newgrp - docker

注意:最後一步是必須的,否則因為 groups 命令獲取到的是快取的組資訊,剛添加的組資訊未能生效,所以 docker images 執行時同樣有錯。
8. apt-get update更新慢
Ubantu 18.04 apt-get update 無法更新,更新慢的問題 //blog.csdn.net/stopping5/article/details/80493643
sudo cp /etc/apt/sources.list /etc/apt/sources.list.old
sudo vim /etc/apt/sources.list
替換成阿里源

#阿里源:
deb //mirrors.aliyun.com/ubuntu/ trusty main restricted universe multiverse
deb //mirrors.aliyun.com/ubuntu/ trusty-security main restricted universe multiverse
deb //mirrors.aliyun.com/ubuntu/ trusty-updates main restricted universe multiverse
deb //mirrors.aliyun.com/ubuntu/ trusty-proposed main restricted universe multiverse
deb //mirrors.aliyun.com/ubuntu/ trusty-backports main restricted universe multiverse
deb-src //mirrors.aliyun.com/ubuntu/ trusty main restricted universe multiverse
deb-src //mirrors.aliyun.com/ubuntu/ trusty-security main restricted universe multiverse
deb-src //mirrors.aliyun.com/ubuntu/ trusty-updates main restricted universe multiverse
deb-src //mirrors.aliyun.com/ubuntu/ trusty-proposed main restricted universe multiverse
deb-src //mirrors.aliyun.com/ubuntu/ trusty-backports main restricted universe multiverse
其他命令
docker update redis –restart=always 虛擬機重啟後,redis自動啟動
docker update mysql –restart=always 虛擬機重啟後,mysql自動啟動
4.4 docker 安裝mysql
1.下載鏡像
sudo docker pull mysql:5.7
ubuntu@VM-0-13-ubuntu:~$ sudo docker pull mysql:5.7
5.7: Pulling from library/mysql
c499e6d256d6: Pull complete
22c4cdf4ea75: Pull complete
6ff5091a5a30: Pull complete
2fd3d1af9403: Pull complete
0d9d26127d1d: Pull complete
54a67d4e7579: Pull complete
fe989230d866: Pull complete
466a91a95e2f: Pull complete
3e4554c238f1: Pull complete
603b48ead88c: Pull complete
1e86a9aa7171: Pull complete
Digest: sha256:fbaeced79cfdae5d3c8d4a8c41e883f254f72ed7428c6b93a498824b76d97121
Status: Downloaded newer image for mysql:5.7
docker.io/library/mysql:5.7
2.查看下載的鏡像
sudo docker images

3.創建mysql實例並啟動
- 創建mysql實例並啟動
sudo docker run -p 3306:3306 --name mysql \
-v /mydata/mysql/log:/var/log/mysql \
-v /mydata/mysql/data:/var/lib/mysql \
-v /mydata/mysql/conf:/etc/mysql \
-e MYSQL_ROOT_PASSWORD=root \
-d mysql:5.7
參數說明
-p 3306:3306 將容器的3306埠映射到主機
-v /mydata/mysql/log:/var/log/mysql\ 將日誌文件掛載到主機
-v /mydata/mysql/data:/var/lib/mysql\ 將數據文件掛載到主機
-v /mydata/mysql/conf:/etc/mysql\ 將配置文件掛載到主機

-
查看docker容器
mysql容器已啟動

4.連接資料庫
- 用Workbench連接資料庫

- 查看資料庫

5.進入mysql 容器
sudo docker exec -it mysql /bin/bash

6.查看虛擬機映射文件
cd /mydata/mysql
ls

7.修改mysql帳號密碼
1.進入mysql容器
docker exec -it mysql /bin/bash

2.登錄mysql
mysql -u root -p
輸入密碼:root

3.切換資料庫
use mysql

4.查詢root用戶
select * from user where user = root;

5.修改密碼
update user set authentication_string = password('新的密碼'), password_expired = 'N', password_last_changed = now() where user = 'root';

6.這條命令暫不清楚
update user set plugin="mysql_native_password";

7.刷新許可權
flush privileges;

8.退出
quit;

9.重新登錄
mysql -u root -p

輸入新的密碼,登錄成功
8.其他命令
- 設置容器在機器重啟後自動啟動
docker update 84c --restart=always
4.5 docker安裝redis
1.下載鏡像
- 下載鏡像
sudo docker pull redis
ubuntu@VM-0-13-ubuntu:~$ sudo docker pull redis
Using default tag: latest
latest: Pulling from library/redis
c499e6d256d6: Already exists
bf1bc8a5a7e4: Pull complete
7564fb795604: Pull complete
ec6e86f783e4: Pull complete
1371d6223f46: Pull complete
021fd554320f: Pull complete
Digest: sha256:a732b1359e338a539c25346a50bf0a501120c41dc248d868e546b33e32bf4fe4
Status: Downloaded newer image for redis:latest
docker.io/library/redis:latest
- 查看下載的鏡像
sudo docker images

2.啟動redis
- 創建redis.conf 配置文件
sudo mkdir -p /mydata/redis/conf
sudo touch /mydata/redis/conf/redis.conf
- 啟動redis
sudo docker run -p 6379:6379 --name redis -v /mydata/redis/data:/data \
-v /mydata/redis/conf/redis.conf:/etc/redis/redis.conf \
-d redis redis-server /etc/redis/redis.conf

3.連接redis
sudo docker exec -it redis redis-cli
4.測試redis
設置a=100,返回OK
set a 100
獲取a的值,返回”100″
get a

5.設置redis持久化存儲
- 修改虛擬機映射的redis配置文件
修改配置文件:
sudo vim  /mydata/redis/conf/redis.conf
添加配置:
appendonly yes
- 檢查是否生效
重啟redis容器:
docker restart redis
設置a=200,返回OK
set a 200
獲取a的值,返回"200"
get a
重啟redis容器
sudo docker restart redis
重新連接redis容器
sudo docker exec -it redis redis-cli
獲取a的值
get a,返回"200"
6.安裝redis可視化工具
-
安裝redis可視化工具
redis-desktop-manager
-
連接redis

- 查看redis資料庫

4.6 本地開發環境配置
1. 本地環境安裝Java
我本地環境的java版本 1.8.0_131
java -version

java安裝和環境變數配置://www.cnblogs.com/jackson0714/p/6591942.html
2.本地環境配置Maven
(1)下載Maven,拷貝文件夾到C盤
C:\apache-maven-3.6.2
(2)添加到環境變數

cmder裡面 執行命令 mvn -v
如果報錯命令不存在,則重新啟動cmder

(3)設置Maven代理
阿里雲代理 //maven.aliyun.com/mvn/view
點擊使用指南,拷貝配置指南

<mirror>
    <id>aliyunmaven</id>
    <mirrorOf>*</mirrorOf>
    <name>阿里雲公共倉庫</name>
    <url>//maven.aliyun.com/repository/public</url>
</mirror>
(4)配置jdk1.8編譯項目
<profiles>
    <profile>
        <id>jdk-1.8</id>
        <activation>
            <activeByDefault>true</activeByDefault>
            <jdk>1.8</jdk>
        </activation>
        <properties>
            <maven.compiler.source>1.8</maven.compiler.source>
            <maven.compiler.target>1.8</maven.compiler.target>
            <maven.compiler.compilerVersion>1.8</maven.compiler.compilerVersion>
        </properties>
    </profile>
<profiles>
3.IDEA Maven構建工具配置
- Maven配置

- 字符集配置

4. IDEA 安裝Lombok插件
Lombok:簡化JavaBean的開發

5. IDEA 安裝mybatisx 插件
mybatisx:mybatis plus開發的一個插件,從mapper方法快速定位到xml文件

6.安裝VSCode

7.添加VSCode插件

- Auto Close Tag 自動加上關閉標籤

- Auto Rename Tag 自動命名配對標籤

- Chinese 中文簡體包

- ESLint 語法檢查

- HTML CSS Support 幫助CSS開發

- HTML Snippets 幫忙HTML開發

- JavaScript (ES6) 幫助JavaScript開發

- Liver Server 啟動一個本地服務

- open in browser 用瀏覽器打開文件

- Vetur 幫助Vue開發

- minapp 幫助小程式開發

問題
1.新項目導入main1,main2
刪除main1.iml,main2.iml
4.7 配置Git
1.配置git 用戶名和郵箱
git config --global user.name "jackson0714"
git config --global user.email "[email protected]"
2.生成ssh key
ssh-keygen -t rsa -b 4096 -C "[email protected]"

3.設置ssh key
- 打開文件
C:\Users\Administrator.ssh\id_rsa.pub
-
拷貝裡面的內容
-
打開這個鏈接
- 粘貼已拷貝的內容

- 保存ssh key

4.遇到的問題
如果遇到Fatal: HttpRequestException encountered問題

則下載這個安裝包解決:
Git Credential Manager for Windows v1.20
鏈接://github.com/Microsoft/Git-Credential-Manager-for-Windows/releases/
git每次提交都需要輸入用戶名和密碼
解決辦法:git config –global credential.helper store
下次提交輸入用戶名和密碼後就會記住了
5.讓一個項目同時提交到碼雲和GitHub兩個倉庫
在項目目錄里找到.git文件夾然後找到config文件。
打開這個文件後找到下面的程式碼
[remote "origin"]
    url = git提交地址
    fetch = +refs/heads/*:refs/remotes/origin/*
將其改成
[remote "origin"]
    url = 碼雲Git提交地址
    url = GitHub提交地址
    fetch = +refs/heads/*:refs/remotes/origin/*
問題:
c731c6f..69bae9b master -> master
To //gitee.com/jayh2018/passjava-portal.git
! [rejected] master -> master (fetch first)
error: failed to push some refs to ‘//gitee.com/jayh2018/passjava-portal.git‘
hint: Updates were rejected because the remote contains work that you do
hint: not have locally. This is usually caused by another repository pushing
hint: to the same ref. You may want to first integrate the remote changes
hint: (e.g., ‘git pull …’) before pushing again.
hint: See the ‘Note about fast-forwards’ in ‘git push –help’ for details.
4.8 Windows安裝mysql
1.安裝截圖

2.遇到的問題 1
windows用syslog連接本地mysql資料庫,提示 plugin caching_sha2_password

解決方案:
ALTER USER 'root'@'%' IDENTIFIED WITH mysql_native_password BY '123';

2.遇到的問題 2
Host is not allowed to connect to this MySQL server
使用遠程連接mysql的時候碰到這樣的錯誤:
Host is not allowed to connect to this MySQL server。
簡單的解決方式如下:
(1)修改表。可能是你的帳號不允許從遠程登陸,只能在localhost。這個時候只要在localhost的那台電腦,登入mysql後,更改 “mysql” 資料庫里的 “user” 表裡的 “host” 項,從”localhost”改稱”%”
mysql -u root -p
按照提示輸入密碼
mysql>use mysql;
mysql>update user set host = ‘%’ where user = ‘root’;
(2)修改完後執行如下SQL命令
flush privileges
五、PassJava 基礎實踐篇
5.1 初始化項目和添加微服務
1.GitHub上創建一個空的倉庫

2.從GitHub上引入空的項目


3.添加內容服務
passjava-content


| 序號 | 欄位 | 內容 |
|---|---|---|
| 1 | group | com.jackson0714.passjava |
| 2 | Artifact | passjava-content |
| 3 | Name | passjava-content |
| 4 | Description | 佳必過-內容服務 |
| 5 | Package | com.jackson0714.passjava.content |
- 添加依賴組件SpringWeb, OpenFeign


3.添加其他微服務
| 序號 | 服務描述 | 服務名 |
|---|---|---|
| 1 | 內容微服務 | passjava-content |
| 2 | 會員微服務 | passjava-member |
| 3 | 題目微服務 | passjava-question |
| 4 | 學習微服務 | passjava-study |
| 5 | 渠道微服務 | passjava-channel |

4.PassJava-Platform添加Pom.xml文件

<?xml version="1.0" encoding="UTF-8"?>
<project xmlns="//maven.apache.org/POM/4.0.0" xmlns:xsi="//www.w3.org/2001/XMLSchema-instance"
         xsi:schemaLocation="//maven.apache.org/POM/4.0.0 //maven.apache.org/xsd/maven-4.0.0.xsd">
    <modelVersion>4.0.0</modelVersion>
    <groupId>com.jackson0714.passjava</groupId>
    <artifactId>passjava</artifactId>
    <version>0.0.1-SNAPSHOT</version>
    <name>passjava</name>
    <description>佳必過-聚合服務</description>
    <packaging>pom</packaging>

    <modules>
        <module>passjava-content</module>
        <module>passjava-member</module>
        <module>passjava-question</module>
        <module>passjava-study</module>
        <module>passjava-channel</module>
    </modules>
</project>
5.添加根目錄Maven 配置


Maven操作根項目就可以了,試下clean


6. 配置.gitignore文件
提交程式碼時,忽略某些文件
### gradle ###
.gradle
/build/
!gradle/wrapper/gradle-wrapper.jar

### STS ###
.settings/
.apt_generated
.classpath
.factorypath
.project
.settings
.springBeans
bin/

### IntelliJ IDEA ###
.idea
*.iws
*.iml
*.ipr
rebel.xml

### NetBeans ###
nbproject/private/
build/
nbbuild/
dist/
nbdist/
.nb-gradle/

### maven ###
target/
*.war
*.ear
*.zip
*.tar
*.tar.gz
**/mvnw
**/mvnw.cmd
**/.mvn

### logs ####
/logs/
*.log

### temp ignore ###
*.cache
*.diff
*.patch
*.tmp
*.java~
*.properties~
*.xml~

### system ignore ###
.DS_Store
Thumbs.db
Servers
.metadata
upload
gen_code

### database ###

db/db_back_dir/

### redis ###
/redis/
刪除子項目的.gitignore文件

7.提交程式碼
可以用IDEA的git工具提交,也可以用git bash命令行提交
git add .
git commit -m 'xxx'
git push origin master
5.2 初始化資料庫和表
用PowerDisigner工具創建資料庫
- 用PowerDisigner工具創建資料庫

總共有5個微服務資料庫:內容、學習、渠道、用戶、題目

- 內容微服務的資料庫

-
學習微服務的資料庫
-
渠道微服務的資料庫
-
用戶微服務的資料庫

-
題目微服務的資料庫


SQL文件在這個項目裡面://github.com/Jackson0714/PassJava-Platform.git

5.3 搭建管理後台
管理後台使用人人開源的後台管理框架,完成快速搭建。
1.下載人人開源後台管理框架
- renren-fast
//gitee.com/renrenio/renren-fast.git
- renren-fast-vue
//gitee.com/renrenio/renren-fast-vue.git
2.添加人人開源後端程式碼
PassJava項目
拷貝文件夾renren-fast到PassJava根目錄
POM文件 添加依賴
<module>renren-fast</module>
3.初始化後台管理資料庫
-
創建資料庫:passjava_admin
-
執行renren-fast/db/mysql.sql腳本

4.修改renren-fast 服務的配置文件
文件路徑:src/main/resources/application-dev.yml
- 修改資料庫連接為自己的mysql資料庫連接

5.啟動renren-fast服務
- 配置SDK為1.8

 –
–
-
運行renren-fast後台

出現錯誤:com.mysql.cj.jdbc.exceptions.PacketTooBigException: Packet for query is too large…
解決方案:修改mysql容器的配置文件
cd /mydata/mysql/conf
sudo vim my.cnf

添加配置,[mysqld_safe]如果有,則不需要添加
[mysqld_safe]
max_allowed_packet=32M
- 執行結果

-
測試服務運行狀態
瀏覽器輸入://localhost:8080/renren-fast/
顯示結果:
{"msg":"invalid token","code":401}結果如上所示,則表示服務運行正常。另外結果裡面的invalid token說明許可權不足,不是指服務不正常。
6.啟動前端項目
-
配置cnpm
npm install -g cnpm --registry=//registry.npm.taobao.org -
安裝node_modules依賴包
cnpm install -
打包前端項目
npm run dev -
瀏覽後台


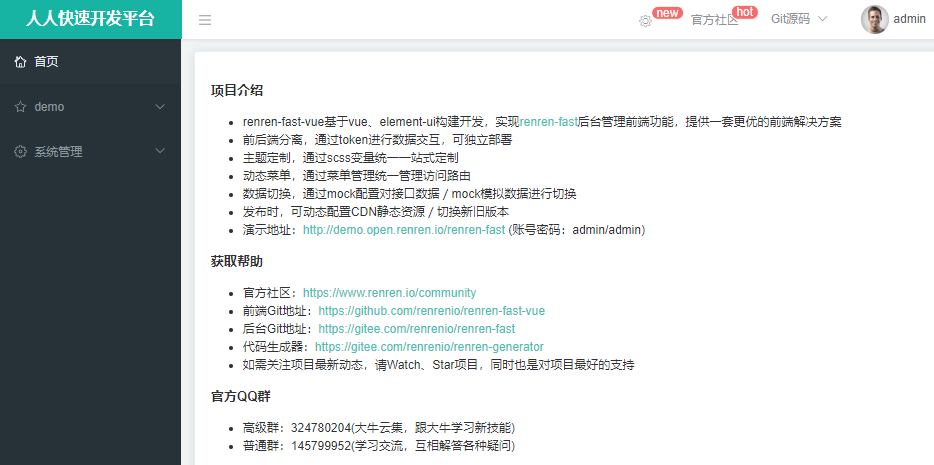
7.前後端聯調登錄
-
登錄後台
帳號:admin
密碼:admin
登錄成功
-
查看後端服務日誌
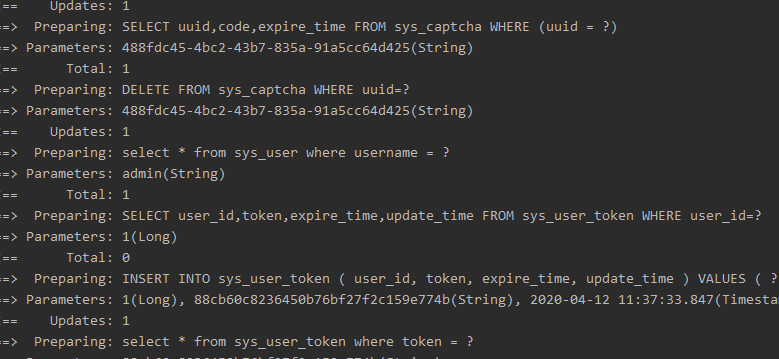


說明前端登錄請求發送到了後端服務,並驗證了用戶名和密碼是否正確。
5.4 自動生成前後端程式碼
1.下載程式碼生成器框架
git clone //gitee.com/renrenio/renren-generator.git
2.添加人人開源後端程式碼
PassJava項目
拷貝文件夾renren-fast到PassJava根目錄
POM文件 添加依賴
<module>renren-generator</module>
3.修改renren-generator服務的配置文件
(1)修改資料庫鏈接 src/main/resources/application-dev.yml
-
修改資料庫連接為自己的mysql資料庫連接
-
資料庫名改為要生成程式碼的服務,如passjava_qms資料庫
url: jdbc:mysql://129.211.188.xxx:3306/passjava_qms?useUnicode=true&characterEncoding=UTF-8&useSSL=false
username: root
password: root
(2)修改屬性配置文件 src/main/resources/generator.properties
# 以question微服務為例
mainPath=com.jackson0714
package=com.jackson0714.passjava
moduleName=question
author=jackson0714
[email protected]
tablePrefix=qms_
(3)修改controller 模板文件
src/main/resources/template/Controller.java.vm
刪除引入的包,後面再引入
import org.apache.shiro.authz.annotation.RequiresPermissions;
注釋RequiresPermissions註解,後面再引入
@RequiresPermissions("${moduleName}:${pathName}:list")
4.啟動程式碼生成器服務

瀏覽器打開localhost,可以看到資料庫qms的兩張表已經顯示在後台了

5.生成程式碼
- 生成程式碼


-
拷貝main文件夾到question模組src目錄
-
刪除前端程式碼passjava-question\src\main\resources\src目錄
-
程式碼結構
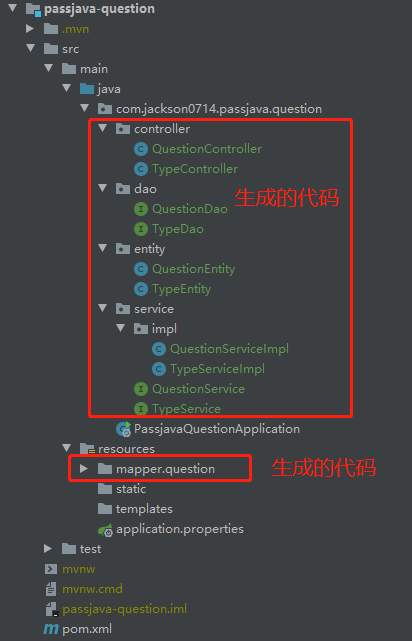

生成的程式碼包含controller,dao層,實體類,介面實現類,mapper映射文件
6.添加common 模組
因為自動生成的程式碼引用了一些工具類,而我們的項目中沒有,所以需要加個common模組添加一些工具類

-
添加passjava-common
New Module: 選擇Maven
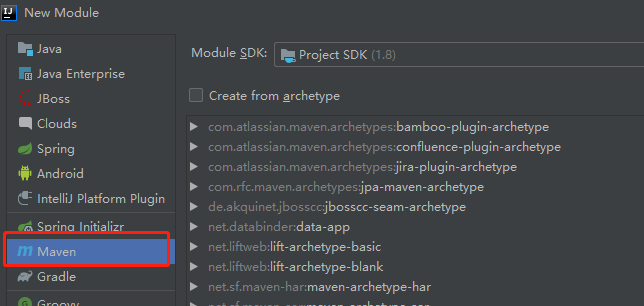

Name: passjava-common

7.question模組添加common模組依賴
pom文件添加依賴
<dependency>
    <groupId>com.jackson0714.passjava</groupId>
    <artifactId>passjava-common</artifactId>
    <version>0.0.1-SNAPSHOT</version>
</dependency>
8.common模組添加依賴
-
MyBatis-Plus
<!--mybatis-plus DAO層工具 //mp.baomidou.com/--> <dependency> <groupId>com.baomidou</groupId> <artifactId>mybatis-plus</artifactId> <version>3.2.0</version> </dependency> -
lombok依賴
<!--lombok 不需要寫getter,setter方法了--> <dependency> <groupId>org.projectlombok</groupId> <artifactId>lombok</artifactId> <version>1.18.12</version> </dependency> -
httpcore依賴
<!--httpcore 依賴--> <dependency> <groupId>org.apache.httpcomponents</groupId> <artifactId>httpcore</artifactId> <version>4.4.12</version> </dependency> -
commons-lang依賴
<!--commons-lang 依賴 --> <dependency> <groupId>commons-lang</groupId> <artifactId>commons-lang</artifactId> <version>2.6</version> </dependency> -
servlet依賴
<!--  導入servlet-api 依賴  -->
<dependency>
    <groupId>javax.servlet</groupId>
    <artifactId>servlet-api</artifactId>
    <version>2.5</version>
    <scope>provided</scope>
</dependency>
9.common模組添加工具類
-
添加包com.jackson0714.common.utils
-
從renren-fast項目copy文件
Constans.java、PageUtils.java、Query.java、R.java、RRException.java -
添加包
com.jackson0714.common.xss -
從renren-fast項目copy文件
HTMLFilter.java、SQLFilter.java


5.5 整合MyBatis-Plus實現CRUD
1.添加Mybatis-Plus依賴
<dependency>
    <groupId>com.baomidou</groupId>
    <artifactId>mybatis-plus-boot-starter</artifactId>
    <version>3.2.0</version>
</dependency>
2.配置數據源
- 導入資料庫的驅動
- 查看mysql版本 5.7.29

到maven倉庫查看適用的mysql驅動,5.7的沒有,8.0兼容5.7的,所以選擇8.0的驅動
<!--添加mysql驅動-->
<dependency>
    <groupId>mysql</groupId>
    <artifactId>mysql-connector-java</artifactId>
    <version>8.0.17</version>
</dependency>
3.配置MyBatis-Plus
-
添加application.yml 文件配置數據源
文件路徑:/passjava-question/src/main/resources/application.yml
spring: datasource: driver-class-name: com.mysql.cj.jdbc.Driver url: jdbc:mysql://129.211.188.xxx:3306/passjava_admin?useUnicode=true&characterEncoding=UTF-8&serverTimezone=Asia/Shanghai username: root password: xxx -
配置mapper映射文件路徑
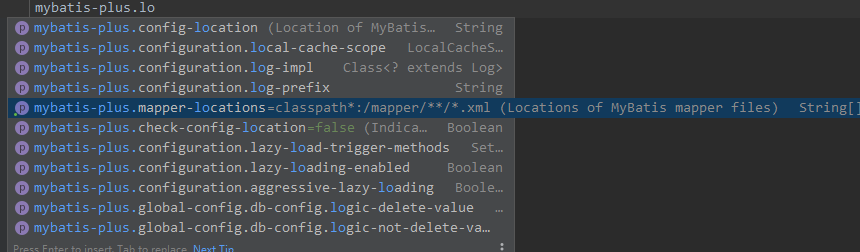
mybatis-plus: mapper-locations: classpath:/mapper/**/*.xml global-config: db-config: id-type: auto -
添加MapperScan註解
@MapperScan("com.jackson0714.passjava.question.dao")
@SpringBootApplication
public class PassjavaQuestionApplication {
    public static void main(String[] args) {
        SpringApplication.run(PassjavaQuestionApplication.class, args);
    }
}

4.測試mybatis-plus的CRUD方法
-
創建類型為javaBasic的type表數據
@Autowired
TypeService typeService;

// 創建題目類型
@Test
void testCreateType() {
    TypeEntity typeEntity = new TypeEntity();
    typeEntity.setType("javaBasic");
    typeService.save(typeEntity);
    System.out.println("創建成功");
}
-
更新id=1的表數據
// 更新type=jvm
@Test
void testUpdateType() {
    TypeEntity typeEntity = new TypeEntity();
    typeEntity.setId(1L);
    typeEntity.setType("jvm");
    typeService.updateById(typeEntity);
    System.out.println("修改成功");
}
-
查詢id=1的表數據
// 查詢題目類型
@Test
void testSelectType() {
    List<TypeEntity> typeEntityList = typeService.list(new QueryWrapper<TypeEntity>().eq("id",1L));
    typeEntityList.forEach((item)-> {
        System.out.println(item);
    });
    System.out.println("查詢成功");
}


-
刪除id=1的表數據
// 刪除題目類型記錄
@Test
void testRemoveType() {
    typeService.removeById(1L);
    System.out.println("刪除成功");
}

5.6 生成所有微服務的CRUD程式碼
1. 修改程式碼生成器配置文件
(1)\renren-generator\src\main\resources\generator.properties
mainPath=com.jackson0714
package=com.jackson0714.passjava
moduleName=channel
author=jackson0714
[email protected]
tablePrefix=chms_
(2)\renren-generator\src\main\resources\application.yml
修改連接的資料庫:passjava_chms
2.生成渠道微服務程式碼
啟動服務,打開瀏覽器://localhost:8003/#generator.html
注意:埠地址默認是8080,我配置成了8003。

3.添加生成的程式碼
- 刪除自動生成的程式碼中的文件夾:main\resources\src
- 拷貝main文件夾到channel模組src目錄下
4.配置渠道微服務
-
pom.xml引入common模組
<dependency> <groupId>com.jackson0714.passjava</groupId> <artifactId>passjava-common</artifactId> <version>0.0.1-SNAPSHOT</version> </dependency> -
添加application.yml
spring: datasource: driver-class-name: com.mysql.cj.jdbc.Driver url: jdbc:mysql://129.211.188.xxx:3306/passjava_chms?useUnicode=true&characterEncoding=UTF-8&serverTimezone=Asia/Shanghai username: root password: xxx mybatis-plus: mapper-locations: classpath:/mapper/**/*.xml global-config: db-config: id-type: auto -
5.測試channel服務介面
訪問://localhost:8000/channel/channel/list
返回:
{"msg":"success","code":0,"page":{"totalCount":0,"pageSize":10,"totalPage":0,"currPage":1,"list":[]}}
5.生成所有微服務的CRUD程式碼

6.配置微服務埠
passjava-channel  埠8000
passjava-content  埠9000
passjava-member 埠10000
passjava-question 埠11000
passjava-study 埠12000
所有微服務都啟動成功並測試介面通過
//localhost:8000/channel/channel/list
//localhost:9000/content/banner/list
//localhost:10000/member/member/list
//localhost:11000/question/question/list
//localhost:12000/study/studytime/list

5.7 管理後台-題目類型功能
1.環境準備
-
程式碼準備
將renren-fast-vue程式碼copy到自己的前端項目中
-
安裝node_module
cnpm install
- 啟動前端portal
npm run dev
-
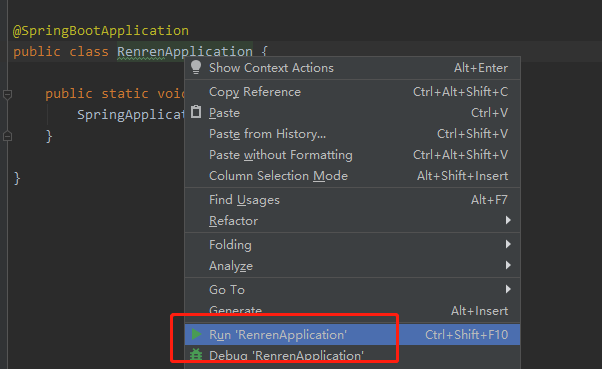
登陸後台
1.啟動RenrenAplication
2.輸入用戶名和密碼登陸

2. 添加目錄和菜單
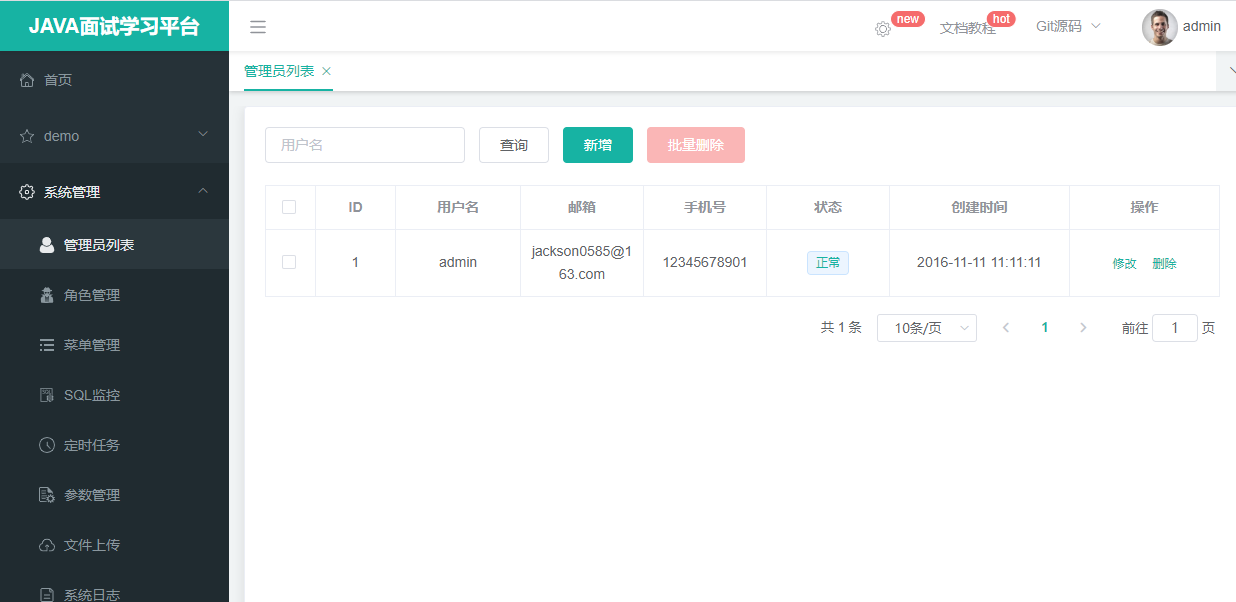
- 添加
題目中心目錄(一級菜單)
刷新頁面,就可以看到題目中心菜單
- 添加題目
類型維護菜單(二級菜單)


可以看到資料庫新增了兩條記錄,分別對應兩個菜單

點擊類型維護菜單,打開了鏈接://localhost:8002/#/question-type,頁面顯示空白頁面.
3.自動生成前端頁面
用renren-generator自動生成前端程式碼,可以參考這篇:13.SpringCloud實戰項目-自動生成前後端程式碼
拷貝question目錄到前端目錄 \src\views\modules


4. 測試類型維護功能
點擊類型維護菜單,可以看到請求報404
//localhost:8080/renren-fast/question/type/list?t=1587825969456&page=1&limit=10&key=

因為頁面的請求都訪問到renren-fast服務了,所以要修改為訪問題目微服務。但是前端有很多請求訪問的是不同的服務,所以我們可以通過網關來作為請求的入口,然後將不同的請求路由到不同的服務。
SpringCloud整合網關可以看之前寫的一篇文章:20.SpringCloud整合Gateway網關
5.配置請求到網關
文件:\static\config\index.js
api介面請求地址替換為gateway的地址
window.SITE_CONFIG['baseUrl'] = '//localhost:8080/renren-fast';
替換為
window.SITE_CONFIG['baseUrl'] = '//localhost:8060'; // 網關地址
刷新頁面,發現會回到登錄頁面,而且驗證碼獲取不到,F12調試工具可以看到驗證碼請求發送到網關上,而網關上找不到這個請求地址(//localhost:8060/captcha.jpg),所以報404。其實驗證碼請求應該訪問renren-fast服務,所以我們要將驗證碼請求通過網關轉發到renren-fast服務(//localhost:8080/renren-fast/captcha.jpg)。
# 驗證碼請求:
GET //localhost:8060/captcha.jpg?uuid=1ce21f53-1866-40b1-8b20-2f4515d59f0d 404 (Not Found)

可以將renren-fast註冊到註冊中心,然後通過網關將請求轉發到renren-fast服務。
6.註冊renren-fast服務
- renren-fast項目添加common依賴
<dependency>
    <groupId>com.jackson0714.passjava</groupId>
    <artifactId>passjava-common</artifactId>
    <version>0.0.1-SNAPSHOT</version>
</dependency>
- 配置註冊中心地址
cloud:
  nacos:
    discovery:
      server-addr: 127.0.0.1:8848
- 配置應用程式的名稱
application:
  name: renren-fast
-
應用類添加
@EnableDiscoveryClient註解 -
查看服務是否註冊成功

7. 添加網關路由規則
- 配置路由規則
passjava-gateway項目中application.yml文件配置路由規則,並重啟passjava-gateway服務
spring:
  cloud:
    gateway:
      routes:
        - id: route_portal # 路由規則id
          uri: lb://renren-fast # 負載均衡,renren-fast服務
          predicates: # 斷言
            - Path=/api/** # 如果前端請求路徑包含 api,則應用這條路由規則
          filters: #過濾器
            - RewritePath=/api/(?<segment>.*),/renren-fast/$\{segment} # 將訪問路徑中包含的api替換成renren-fast,但是替換的url不會在前端顯示,還是網關的訪問路徑。這裡不是跳轉到新的路徑,而是轉發請求。
- 修改前端請求路徑
文件:\static\config\index.js
請求路徑添加api
 window.SITE_CONFIG['baseUrl'] = '//localhost:8086';
 替換為
 window.SITE_CONFIG['baseUrl'] = '//localhost:8060/api'; // 添加api
- 刷新登錄頁面,可以正常獲取驗證碼,請求路徑為網關地址 + /api/captcha
//localhost:8060/api/captcha.jpg?uuid=84d36089-07ae-4201-85c0-8217b032f21b
前端將請求發送到網關//localhost:8060/api/captcha.jpg,網關將請求轉發到//localhost:8060/api/renren-fast/captcha.jpg。
- 登錄,報跨域問題
Access to XMLHttpRequest at '//localhost:8060/api/sys/login' from origin '//localhost:8002' has been blocked by CORS policy: Response to preflight request doesn't pass access control check: No 'Access-Control-Allow-Origin' header is present on the requested resource.
登錄頁面url://localhost:8002,點擊登錄訪問的請求url://localhost:8060/api/sys/login,兩個url的埠號不一樣,產生了跨域問題。
8.跨域問題
-
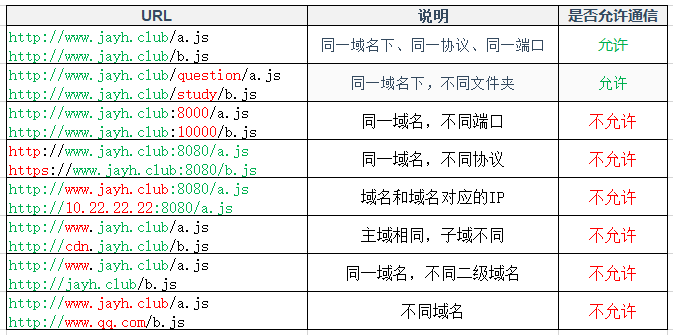
跨域資源共享(CORS) 是一種機制,它使用額外的 HTTP 頭來告訴瀏覽器 讓運行在一個 origin (domain) 上的Web應用被准許訪問來自不同源伺服器上的指定的資源。當一個資源從與該資源本身所在的伺服器不同的域、協議或埠請求一個資源時,資源會發起一個跨域 HTTP 請求。
-
比如,站點 //domain-a.com 的某 HTML 頁面通過 的 src 請求 //domain-b.com/image.jpg。網路上的許多頁面都會載入來自不同域的CSS樣式表,影像和腳本等資源。
-
出於安全原因,瀏覽器限制從腳本內發起的跨源HTTP請求。 例如,XMLHttpRequest和Fetch API遵循同源策略。 這意味著使用這些API的Web應用程式只能從載入應用程式的同一個域請求HTTP資源,除非響應報文包含了正確CORS響應頭。

9.解決跨域問題
-
添加響應頭,配置當次請求允許跨域
- Access-Control-Allow-Origin:支援哪些來源的請求跨域
- Access-Control-Allow-Methods:支援哪些方法跨域
- Access-Control-Allow-Credentials:跨域請求默認不包含cookie,設置為true可以包含cookie
- Access-Control-Expose-Headers:跨域請求暴露的欄位CORS請求時,XMLHttpRequest對象的getResponseHeader()方法只能拿到6個基本欄位:Cache-Control、Content-Language、Content-Type、Expires、Last-Modified、Pragma。如果想拿到其他欄位,就必須在Access-Control-Expose-Headers裡面指定。
- Access-Control-Max-Age:表明該響應的有效時間為多少秒。在有效時間內,瀏覽器無
須為同一請求再次發起預檢請求。請注意,瀏覽器自身維護了一個最大有效時間,如果
該首部欄位的值超過了最大有效時間,將不會生效。
-
添加跨域配置
passjava-gateway應用中添加配置類PassJavaCorsConfiguration.java
package com.jackson0714.passjava.gateway.config;

import org.springframework.context.annotation.Bean;
import org.springframework.context.annotation.Configuration;
import org.springframework.web.cors.CorsConfiguration;
import org.springframework.web.cors.reactive.CorsWebFilter;
import org.springframework.web.cors.reactive.UrlBasedCorsConfigurationSource;

@Configuration
public class PassJavaCorsConfiguration {

    @Bean
    public CorsWebFilter corsWebFilter() {
        UrlBasedCorsConfigurationSource source = new UrlBasedCorsConfigurationSource();

        CorsConfiguration corsConfiguration = new CorsConfiguration();

        // 配置跨域
        corsConfiguration.addAllowedHeader("*"); // 允許所有請求頭跨域
        corsConfiguration.addAllowedMethod("*"); // 允許所有請求方法跨域
        corsConfiguration.addAllowedOrigin("*"); // 允許所有請求來源跨域
        corsConfiguration.setAllowCredentials(true); //允許攜帶cookie跨域,否則跨域請求會丟失cookie資訊

        source.registerCorsConfiguration("/**", corsConfiguration);

        return new CorsWebFilter(source);
    }
}
-
注釋renren-fast裡面的跨域配置
文件路徑:src/main/java/io/renren/config/CorsConfig.java
-
登錄成功
可以看到login請求的響應報文中包含了已配置的CORS響應頭

10.配置題目服務的路由規則
我們訪問題目中心的類型頁面,發現還是報404找不到資源
所以我們需要配置題目服務的路由規則,將題目中心的頁面請求經網關轉發到題目服務。
spring:
  cloud:
    gateway:
      routes:
        - id: route_question # 題目微服務路由規則
          uri: lb://passjava-question # 負載均衡,將請求轉發到註冊中心註冊的renren-fast服務
          predicates: # 斷言
            - Path=/api/question/** # 如果前端請求路徑包含 api/question,則應用這條路由規則
          filters: #過濾器
            - RewritePath=/api/(?<segment>.*),/$\{segment} # 將跳轉路徑中包含的api替換成question
注意:若predicates的Path更精確,則將路由規則放到更上面,優先命中更上面的路由規則。
11.測試類型維護功能
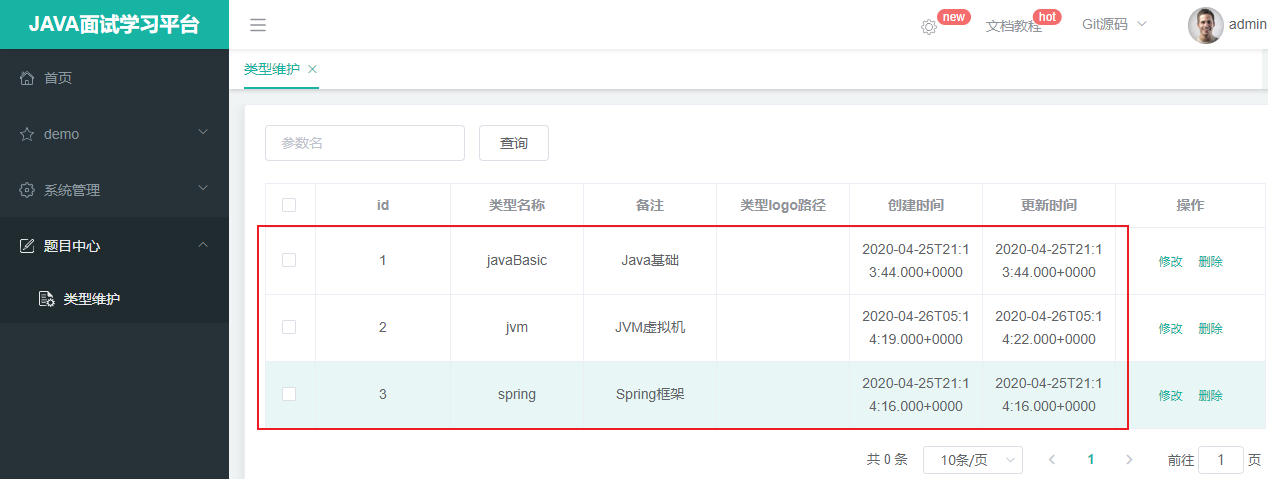
-
資料庫插入3條測試數據
-
測試查詢列表,可以看到有三條記錄查詢出來了
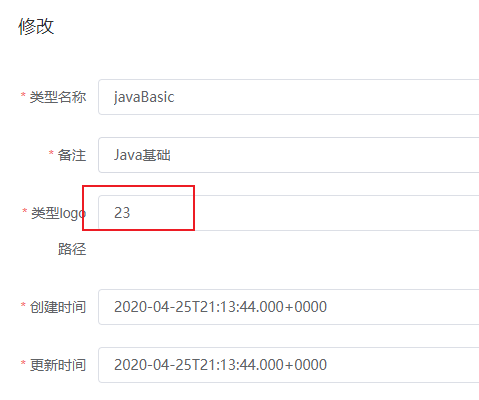
-
測試修改一條數據,可以看到資料庫裡面記錄更新為23了
-
測試刪除一條數據,可以看到介面和資料庫都刪除了一條數據


12.打開新增和批量刪除功能
注釋許可權判斷,默認返回true
// src\utils\index.js
/**
 * 是否有許可權
 * @param {*} key
 */
export function isAuth (key) {
  // return JSON.parse(sessionStorage.getItem('permissions') || '[]').indexOf(key) !== -1 || false
  return true
}

5.8 管理後台-題目維護功能
1.配置邏輯刪除
-
所有表欄位添加del_flag欄位
del_flag tinyint(1) DEFAULT 0 COMMENT '刪除標記(0-正常,1-刪除)', -
MyBatisPlus配置邏輯刪除
mybatis-plus:
  mapper-locations: classpath:/mapper/**/*.xml
  global-config:
    db-config:
      id-type: auto
      logic-delete-field: delFlag  #全局邏輯刪除欄位值 3.3.0開始支援,詳情看下面。
      logic-delete-value: 1 # 邏輯已刪除值(默認為 1)
      logic-not-delete-value: 0 # 邏輯未刪除值(默認為 0)
- log中列印查詢SQL語句
SELECT id,type,comments,logo_url,del_flag,create_time,update_time FROM qms_type WHERE del_flag=0
- log列印刪除SQL語句
UPDATE qms_type SET del_flag=1 WHERE id IN ( 1 ) AND del_flag=0
2.快速顯示開關
想要將是否顯示改為快速開關

-
自定義列模板
1.通過
Scoped slot可以獲取到 row, column, $index 和 store(table 內部的狀態管理)的數據2.使用Switch開關
Scoped slot://element.eleme.cn/#/zh-CN/component/table
Switch開關://element.eleme.cn/#/zh-CN/component/switch

<el-table-column prop="enable"
                 header-align="center"
                 align="center"
                 label="是否顯示">
    <template slot-scope="scope">
<el-switch
           v-model="scope.row.enable"
           :active-value=1
           :inactive-value=0
           active-color="#13ce66"
           inactive-color="#ff4949"
           @change="updateQuestionStatus(scope.row)">
        </el-switch>
    </template>
</el-table-column>
添加更新方法
// 更新題目是否顯示
updateQuestionStatus(data) {
    console.log(data)
    let {id, enable} = data
    this.$http({
        url: this.$http.adornUrl('/question/question/update'),
        method: 'post',
        data: this.$http.adornData({id, enable}, false)
    }).then(({ data }) => {
        this.$message({
            type:"success",
            message: "狀態更新成功"
        })
    });
},
3.前端欄位校驗
對排序欄位限制:必須為正整數
dataRule: {
  displayOrder: [
    {
      validator: (rule, value, callback) => {
        if (value == "") {
          callback(new Error("排序欄位必須填寫"));
        } else if (!Number.isInteger(value) || value<0) {
          callback(new Error("排序必須是一個大於等於0的整數"));
        } else {
          callback();
        }
      },
      trigger: "blur"
    }
  ]
}
4.後端欄位校驗
- 實體類欄位上添加註解
@Positive必須是大於0的數字
/**
 * 排序
 */
@Positive
private Integer displayOrder;
- API 添加註解
@Valid
/**
* 保存
*/
@RequestMapping("/save")
public R save(@Valid @RequestBody QuestionEntity question){
	questionService.save(question);
	return R.ok();
}
測試結果

-1,0,0.2 不通過
測試1,1.2通過
5.模糊查詢題目列表
修改實現類QuestionServiceImpl的queryPage方法
原方法:
public PageUtils queryPage(Map<String, Object> params) {
    IPage<QuestionEntity> page = this.page(
        new Query<QuestionEntity>().getPage(params),
        new QueryWrapper<QuestionEntity>()
    );

    return new PageUtils(page);
}
修改後:
@Override
public PageUtils queryPage(Map<String, Object> params) {
    //1.get key
    String key = (String) params.get("key");
    QueryWrapper<QuestionEntity> queryWrapper = new QueryWrapper<>();
    if (!StringUtils.isEmpty(key)) {
        queryWrapper.eq("id", key).or().like("title", key).or().like("answer", key);
    }
    IPage<QuestionEntity> page = this.page(
        new Query<QuestionEntity>().getPage(params),
        queryWrapper
    );

    return new PageUtils(page);
}
6.添加分頁插件

添加分頁插件
package com.jackson0714.passjava.question.config;

import com.baomidou.mybatisplus.extension.plugins.PaginationInterceptor;
import org.mybatis.spring.annotation.MapperScan;
import org.springframework.context.annotation.Bean;
import org.springframework.context.annotation.Configuration;
import org.springframework.transaction.annotation.EnableTransactionManagement;

@Configuration
@EnableTransactionManagement //開啟事務
@MapperScan("com.jackson0714.passjava.question.dao")
public class MyBatisConfig {

    //引入分頁插件
    @Bean
    public PaginationInterceptor paginationInterceptor() {
        PaginationInterceptor paginationInterceptor = new PaginationInterceptor();
        // 設置請求的頁面大於最大頁後操作, true調回到首頁,false 繼續請求  默認false
         paginationInterceptor.setOverflow(true);
        // 設置最大單頁限制數量,默認 500 條,-1 不受限制
        paginationInterceptor.setLimit(1000);
        return paginationInterceptor;
    }
}
添加分頁插件後的顯示

六、PassJava 高級實踐篇
6.1 Spring Cloud Alibaba 組件簡介
1.SpringCloud Alibaba概述
Spring Cloud Alibaba 致力於提供微服務開發的一站式解決方案。此項目包含開發分散式應用微服務的必需組件,方便開發者通過 Spring Cloud 編程模型輕鬆使用這些組件來開發分散式應用服務。
依託 Spring Cloud Alibaba,您只需要添加一些註解和少量配置,就可以將 Spring Cloud 應用接入阿里微服務解決方案,通過阿里中間件來迅速搭建分散式應用系統。
Github://github.com/alibaba/spring-cloud-alibaba
Spring Cloud的幾大痛點
- 部分組件停止維護和更新,有問題也不易解決
- 部分環境搭建起來比較複雜,沒有非常友好的可視化介面
- 配置相對來說複雜,需要較高的學習成本
Spring Cloud Alibaba的優勢
- 阿里經歷過了時間的考驗
- 設計合理
- 擁有不錯的可視化介面,方便運維監控和排查問題
- 環境搭建和配置簡單,學習成本低
PassJava項目搭配SpringCloud Alibaba技術的搭配方案
| 描述 | Spring Cloud | Spring Cloud Alibaba | 組合選用 |
|---|---|---|---|
| 服務發現組件 | Eureka(停止維護)服務發現組件 | Nacos 註冊中心 | Spring Cloud Alibaba – Nacos |
| 配置中心組件 | Spring Cloud Config 配置中心 | Nacos 配置中心 | Spring Cloud Alibaba – Nacos |
| 斷路保護組件 | Hystrix 斷路保護 | Sentinel 服務容錯 | Spring Cloud Alibaba – Sentinel |
| 鏈路追蹤組件 | Sleuth 調用鏈監控 | / | Spring Cloud – Sleuth |
| 負載均衡組件 | Ribbon | / | Spring Cloud – Ribbon |
| 遠程調用組件 | OpenFeign (HTTP+JSON) | Dubbo(RPC框架) | Spring Cloud – OpenFeign |
| 分散式事務 | / | Seata 分散式事務 | Spring Cloud Alibaba – Seata |
| API 網關 | Gateway | / | Spring Cloud – Gateway |
最後技術選型:
Spring Cloud Alibaba - Nacos 實現註冊中心
Spring Cloud Alibaba - Nacos 實現配置中心
Spring Cloud Alibaba - Sentinel  實現服務容錯
Spring Cloud Alibaba - Seata 實現分散式事務

Spring Cloud - Ribbon 實現負載均衡
Spring Cloud - Feign 實現遠程調用
Spring Cloud - Gateway API網關
Spring Cloud - Sleuth 實現調用鏈監控
2.Spring Cloud Alibaba版本
項目的版本號格式為 x.x.x 的形式,其中 x 的數值類型為數字,從 0 開始取值,且不限於 0~9 這個範圍。項目處於孵化器階段時,第一位版本號固定使用 0,即版本號為 0.x.x 的格式。
由於 Spring Boot 1 和 Spring Boot 2 在 Actuator 模組的介面和註解有很大的變更,且 spring-cloud-commons 從 1.x.x 版本升級到 2.0.0 版本也有較大的變更,因此阿里採取跟 SpringBoot 版本號一致的版本:
- 1.5.x 版本適用於 Spring Boot 1.5.x
- 2.0.x 版本適用於 Spring Boot 2.0.x
- 2.1.x 版本適用於 Spring Boot 2.1.x
- 2.2.x 版本適用於 Spring Boot 2.2.x
Spring Cloud Alibaba 版本和Spring Cloud 和Spring Boot 版本兼容性列表
| Spring Cloud 版本 | Spring Cloud Alibaba 版本 | Spring Boot 版本 |
|---|---|---|
| Spring Cloud Hoxton.SR3 | 2.2.x.RELEASE | 2.2.x.RELEASE |
| Spring Cloud Greenwich | 2.1.x.RELEASE | 2.1.x.RELEASE |
| Spring Cloud Finchley | 2.0.x.RELEASE | 2.0.x.RELEASE |
| Spring Cloud Edgware | 1.5.x.RELEASE | 1.5.x.RELEASE |
我們採用Spring Cloud Hoxton.SR3, Spring Cloud Alibaba 2.2.0.RELEASE, Spring Boot 2.2.6 RELEASE
PassJava-Common的pom.xml文件引入Spring Cloud Alibaba依賴
<dependencyManagement>
    <dependencies>
        <!--  Spring Cloud Alibaba 依賴  -->
        <dependency>
            <groupId>com.alibaba.cloud</groupId>
            <artifactId>spring-cloud-alibaba-dependencies</artifactId>
            <version>2.2.0.RELEASE</version>
            <type>pom</type>
            <scope>import</scope>
        </dependency>
    </dependencies>
</dependencyManagement>
6.2 SpringCloud整合Alibaba-Nacos組件
Nacos 是阿里巴巴開源的一個更易於構建雲原生應用的動態服務發現、配置管理和服務管理平台。
1.引入Nacos 服務發現組件
passjava-common模組的pom.xml文件引入Nacos 服務發現組件
<!-- nacos discovery 服務發現組件-->
<dependency>
    <groupId>com.alibaba.cloud</groupId>
    <artifactId>spring-cloud-starter-alibaba-nacos-discovery</artifactId>
</dependency>
2.下載Nacos Server並啟動
- 下載Nacos Server 壓縮包
//github.com/alibaba/nacos/releases
啟動 Server,進入解壓後文件夾或編譯打包好的文件夾,找到如下相對文件夾 nacos/bin,並對照作業系統實際情況之下如下命令。
- Linux/Unix/Mac 作業系統,執行命令
sh startup.sh -m standalone - Windows 作業系統,執行命令
cmd startup.cmd
windows執行startupm.cmd遇到問題:
λ startup.cmd
 Please set the JAVA_HOME variable in your environment, We need java(x64)! jdk8 or later is better!
解決方案:
修改startup.cmd文件中的%JAVA_HOME%
%JAVA_HOME% 替換為 C:\Program Files\Java\jdk1.8.0_131
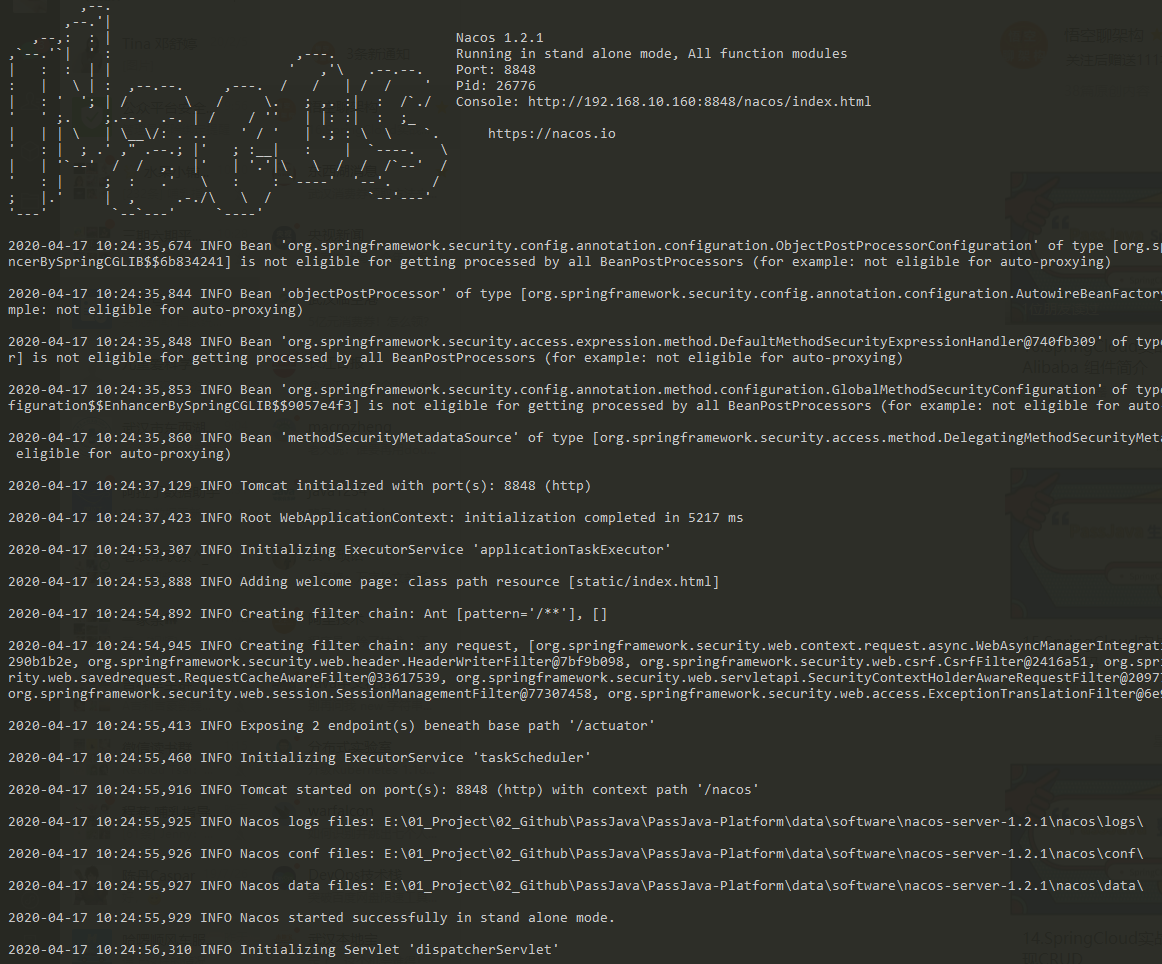
啟動成功:
3.每個微服務都配置Nacos Server 地址
- 配置Nacos Server 地址
在passjava-question、passjava-channel、passjava-content、passjava-member、passjava-study 應用的 /src/main/resources/application.yml配置文件中配置 Nacos Server 地址
spring:
   cloud:
    nacos:
      discovery:
        server-addr: 127.0.0.1:8848
4.添加註解
為每個服務使用 @EnableDiscoveryClient 註解開啟服務註冊與發現功能
@EnableDiscoveryClient
@MapperScan("com.jackson0714.passjava.question.dao")
@SpringBootApplication
public class PassjavaQuestionApplication {

    public static void main(String[] args) {
        SpringApplication.run(PassjavaQuestionApplication.class, args);
    }

}
5.配置微服務的名稱
spring:
  application:
    name: passjava-question
6.訪問nacos server後台
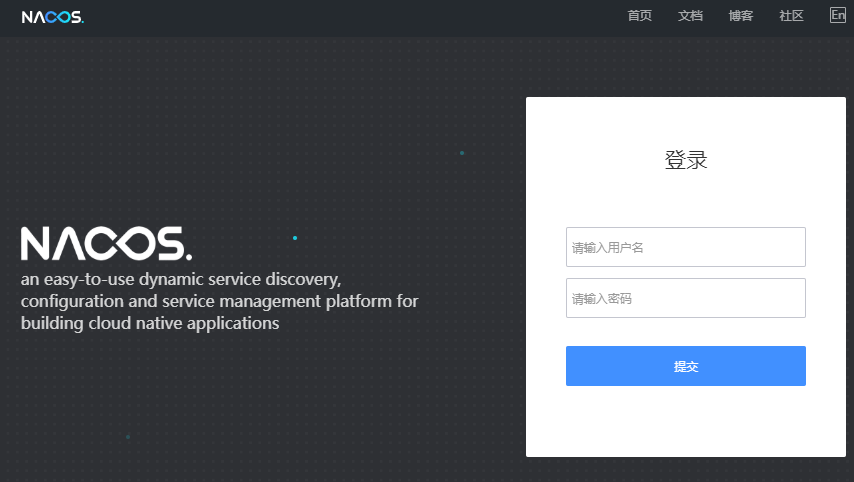
- 登錄後台
//localhost:8848/nacos/index.html#/login
用戶名:nacos
密碼:nacos
-
查看已註冊的服務
passjava-channel 渠道微服務
passjava-member 用戶微服務
passjava-study 學習微服務
passjava-question 問題微服務
passjava-content 內容微服務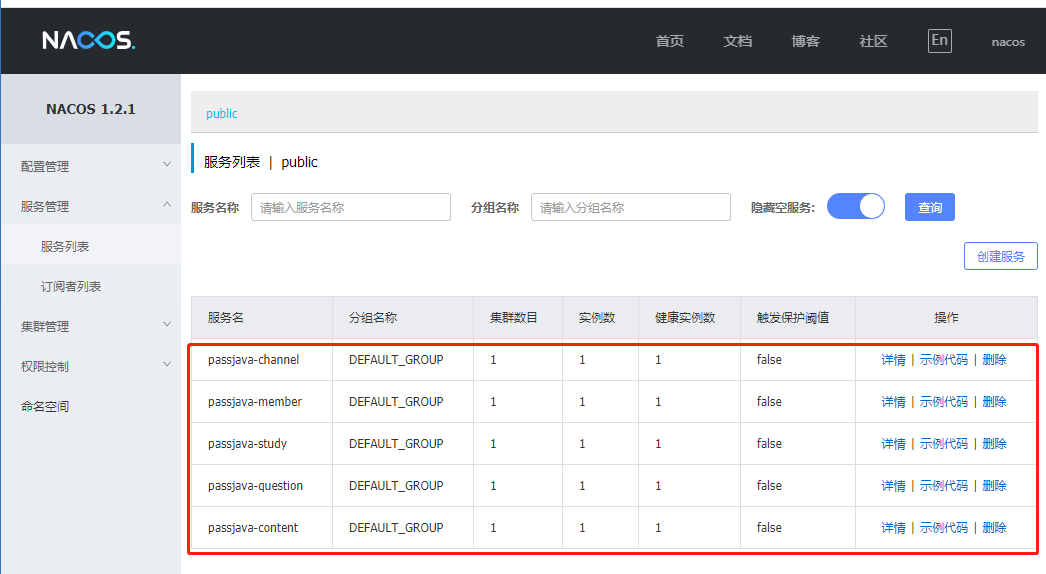

6.3 SpringCloud整合OpenFeign遠程調用
1.Feign 概述
- Feign聲明式客的HTTP客戶端,讓遠程調用更簡單。
- 提供了HTTP請求的模板,編寫簡單的介面和插入註解,就可以定義好HTTP請求的參數、格式、地址等資訊
- 整合了Ribbon(負載均衡組件)和Hystix(服務熔斷組件),不需要顯示使用這兩個組件
- Spring Cloud Feign 在Netflix Feign的基礎上擴展了對SpringMVC註解的支援
2. 遠程調用示例
示例:查詢用戶的學習時長
用戶微服務passjava-member調用學習微服務passjava-study的方法
2.1 引入openfeign依賴
passjava-member和passjava-study項目的pom文件引入openfeign依賴
<dependency>
    <groupId>org.springframework.cloud</groupId>
    <artifactId>spring-cloud-starter-openfeign</artifactId>
</dependency>
2.2 StudyTimeController定義遠程調用測試方法
返回某個用戶學習題目的總時長
@RequestMapping("/member/list/test")
public R memberStudyTimeTest() {
    StudyTimeEntity studyTimeEntity = new StudyTimeEntity();
    studyTimeEntity.setTotalTime(100); // 學習時長:100分鐘
    studyTimeEntity.setQuesTypeId(1L); // 題目類型:1 (javaBasic)

    return R.ok().put("studyTime", Arrays.asList(studyTimeEntity));
}
2.3 member目錄下創建feign service
-
創建package: com.jackson0714.passjava.member.feign
-
創建StudyTimeFeignService介面
-
添加註解
@FeignClient。顯示聲明這個介面用來遠程調用study服務。@FeignClient("passjava-study") public interface StudyTimeFeignService {} -
添加遠程調用方法
public R memberStudyTime(); -
給方法添加要遠程調用的方法的路徑
study/studytime/member/list/test@RequestMapping("study/studytime/member/list/test") public R getMemberStudyTimeListTest(); -
添加註解
@EnableFeignClients開啟遠程調用服務。給類PassjavaStudyApplication.java添加註解
@EnableFeignClients。basePackages代表自動掃碼指定路徑下所有帶有@FeignClient註解的介面。
@EnableFeignClients(basePackages = "com.jackson0714.passjava.member.feign") @EnableDiscoveryClient @MapperScan("com.jackson0714.passjava.member.dao") @SpringBootApplication public class PassjavaMemberApplication { public static void main(String[] args) { SpringApplication.run(PassjavaMemberApplication.class, args); } } -
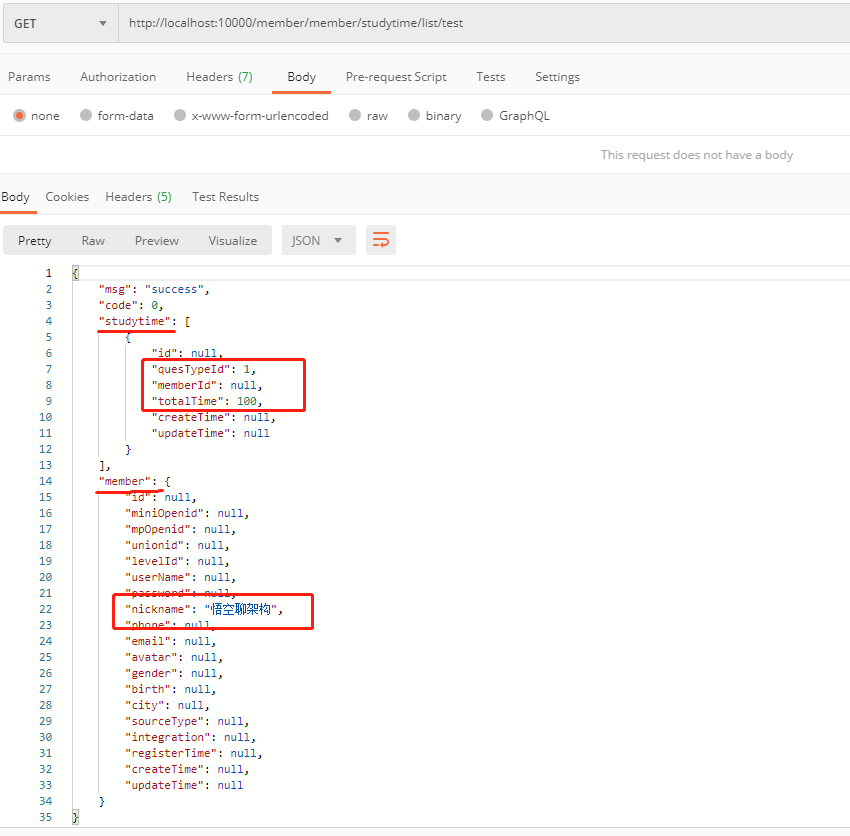
測試介面
-
啟動passjava-member和passjava-study服務
-
用postman工具或瀏覽器輸入請求地址
-
返回結果如下圖
studytime和member都有數據,學習時長:100分鐘,昵稱:悟空聊架構
-

2.4 測試OpenFeign傳參
示例:用戶id作為參數在服務間傳遞
MemberController
@RequestMapping("/studytime/list/test/{id}")
public R getMemberStudyTimeListTest(@PathVariable("id") Long id) {
    //mock資料庫查到的會員資訊
    MemberEntity memberEntity = new MemberEntity();
    memberEntity.setId(id); // 學習時長:100分鐘
    memberEntity.setNickname("悟空聊架構");

    //遠程調用拿到該用戶的學習時長(學習時長是mock數據)
    R memberStudyTimeList = studyTimeFeignService.getMemberStudyTimeListTest(id);
    return R.ok().put("member", memberEntity).put("studytime", memberStudyTimeList.get("studytime"));
}
StudyTimeFeignService
@FeignClient("passjava-study")
public interface StudyTimeFeignService {
    @RequestMapping("study/studytime/member/list/test/{id}")
    public R getMemberStudyTimeListTest(@PathVariable("id") Long id);
}
StudyTimeController
@RequestMapping("/member/list/test/{id}")
public R memberStudyTimeTest(@PathVariable("id") Long id) {
    StudyTimeEntity studyTimeEntity = new StudyTimeEntity();
    studyTimeEntity.setTotalTime(100); // 學習時長:100分鐘
    studyTimeEntity.setQuesTypeId(1L); // 題目類型:1 (javaBasic)

    return R.ok().put("studytime", Arrays.asList(studyTimeEntity));
}
請求地址和參數://localhost:10000/member/member/studytime/list/test/1
執行結果:

2.5 總結FeignClient使用方法
- 引入OpenFeign依賴
- 定義FeignClient介面類(註解
@FeignClient),聲明這個介面類是用來遠程調用其他服務的 - 介面類中定義要遠程調用的介面方法,指定遠程服務方法的路徑
- Controller類中調用介面方法
- 開啟遠程調用(註解
@EnableFeignClients) - 遠程調用的流程:
- @RequestBody將這個對象轉為json
- 找到passjava-study服務,給study/studytime/member/list/test服務發送請求
- 將json放到請求體裡面,發送請求
- 對方服務收到請求,請求體里有json數據
- 將請求體中的json數據轉換成對方服務的參數類型。只需要兩邊的欄位名稱和類型是一致的。
6.4 Spring Cloud 整合 Nacos配置中心
1.傳統配置方式
- application.properties文件中定義兩個配置:
member.nickname = "悟空聊架構"
member.age = "18"
- 示例控制器中定義私有變數nickname和age,@value代表從配置中取值
@Value("${member.nickname}")
private  String nickname;

@Value("$member.age")
private  Integer age;
- 示例控制器中定義方法:獲取nick和age的值
@RequestMapping("/test-local-config")
public R testLocalConfig() {
    return R.ok().put("nickname", nickname).put("age", age);
}
- 測試結果

總結:從配置文件中獲取配置。
這種方式的缺點是什麼呢?如果要修改配置參數,則需要重新啟動服務。如果服務很多,則需要重啟所有服務,非常不方便。
有沒有什麼辦法不停服務修改配置而且使其生效呢?
答案:有的,用Spring Cloud Alibaba的Nacos 組件就可以完成。
2.引入Nacos依賴
PassJava-Common項目的pom.xml文件引入Spring Cloud Alibaba Nacos Config依賴
<dependency>
    <groupId>com.alibaba.cloud</groupId>
    <artifactId>spring-cloud-starter-alibaba-nacos-config</artifactId>
</dependency>
3.配置Nacos元數據
-
passjava-member 添加 /src/main/resources/bootstrap.properties 配置文件(注意:bootstrap.properties 優先順序高於其他配置文件)
-
配置 Nacos Config 元數據

spring.application.name=passjava-member
spring.cloud.nacos.config.server-addr=127.0.0.1:8848
4.Nacos後台新增配置
Data ID: passjava-member.properties
Group: DEFAULT_GROUP
配置格式:
member.nick="悟空"
member.age=10

5.開啟動態刷新配置功能
添加註解@RefreshScope開啟動態刷新配置功能
@RefreshScope
@RestController
@RequestMapping("member/sample")
public class SampleController {}
可以從控制台看到日誌資訊:
Refresh keys changed: [member.age]
2020-04-19 23:34:07.154  INFO 8796 --- [-127.0.0.1_8848] c.a.nacos.client.config.impl.CacheData   : [fixed-127.0.0.1_8848] [notify-ok] dataId=passjava-member.properties, group=DEFAULT_GROUP, md5=df136e146c83cbf857567e75acb11e2b, listener=com.alibaba.cloud.nacos.refresh.NacosContextRefresher$1@4f49b78b
2020-04-19 23:34:07.154  INFO 8796 --- [-127.0.0.1_8848] c.a.nacos.client.config.impl.CacheData   : [fixed-127.0.0.1_8848] [notify-listener] time cost=529ms in ClientWorker, dataId=passjava-member.properties, group=DEFAULT_GROUP, md5=df136e146c83cbf857567e75acb11e2b, listener=com.alibaba.cloud.nacos.refresh.NacosContextRefresher$1@4f49b78b
member.age 更新了,通知了member服務,刷新了配置。對應的配置id為passjava-member.properties,分組為DEFAULT_GROUP。監聽器為com.alibaba.cloud.nacos.refresh.NacosContextRefresher
6.測試結果
訪問://localhost:10000/member/sample/test-local-config
結果:nickname和age和Nacos後台配置一致
結論:只用在Nacos後台改配置即可實時修改配置。
注意:Nacos的配置項優先順序高於application.propertite裡面的配置。

7.命名空間
我們現在有5個微服務,每個微服務用到的配置可能都不一樣,那不同微服務怎麼樣獲取自己微服務的配置呢?
這裡可以用到命名空間,我們針對每個微服務,都創建一個命名空間。
-
創建命名空間
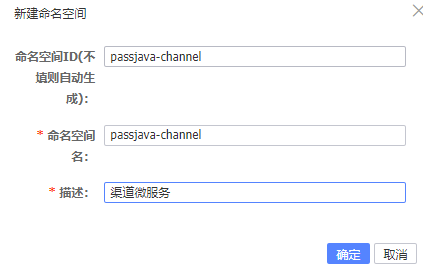

# 創建5個命名空間
passjava-channel
passjava-content
passjava-member
passjava-question
passjava-study

-
命名空間下創建配置
我們打開配置列表菜單,可以看到有五個命名空間。
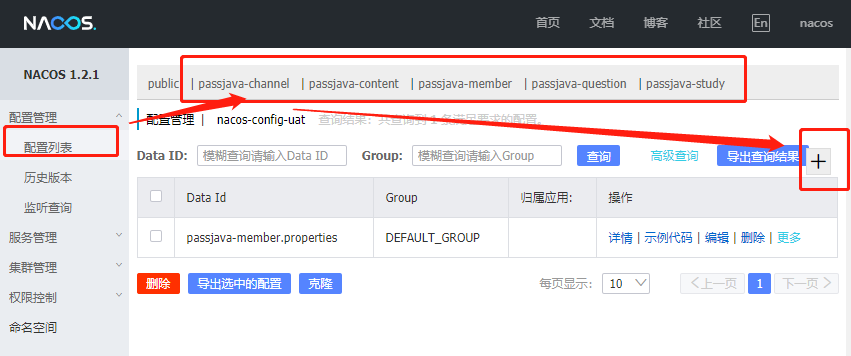

選中passjava-channel命名空間,然後新增配置項,與之前新增配置的步驟一致,也可以通過克隆命名空間來克隆配置。

-
修改指定的命名空間
bootstrap.properties配置命名空間
spring.cloud.nacos.config.namespace=passjava-member -
測試配置是否生效
修改passjava-member.properties的配置內容
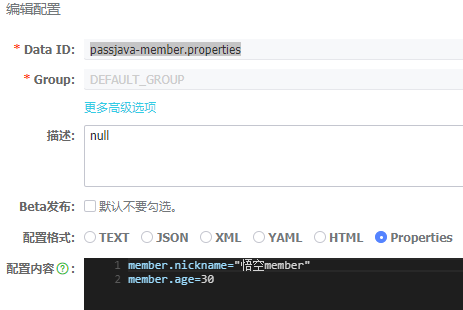
重啟member服務
訪問方法:/member/sample/test-local-config
執行結果:
{
    "msg": "success",
    "code": 0,
    "nickname": "\"悟空member\"",
    "age": 30
}
說明獲取的是passjava-member命名空間的配置

8.分組
如果我們有多套環境,比如開發環境,測試環境,生產環境,每一套環境的配置參數不一樣,那配置中心該如何配置呢?
我們可以使用配置中心的分組功能。每一套環境都是一套分組。
- 首先創建一套dev環境配置項,然後克隆配置到test和prod環境


- bootstrap.properties配置當前使用的分組:prod
spring.cloud.nacos.config.group=prod
-
測試獲取生產環境配置
{
    "msg": "success",
    "code": 0,
    "nickname": "\"悟空-prod\"",
    "age": 10
}
可以看到獲取到的是prod分組的配置
9.多配置集
我們可以將application.yml文件中的datasource、mybatis-plus等配置進行拆解,放到配置中心。group可以創建3套,dev/test/prod。
1.配置中心新建datasource.yml 配置

2.配置中心新建mybatis.yml 配置

3.配置中心新建more.yml 配置

4.克隆dev環境配置到test和prod環境

5.bootstrap.properties增加nacos配置,application.yml注釋配置
spring.application.name=passjava-member
spring.cloud.nacos.config.server-addr=127.0.0.1:8848

spring.cloud.nacos.config.namespace=passjava-member
spring.cloud.nacos.config.group=prod

spring.cloud.nacos.config.extension-configs[0].data-id=datasource.yml
spring.cloud.nacos.config.extension-configs[0].group=dev
spring.cloud.nacos.config.extension-configs[0].refresh=true

spring.cloud.nacos.config.extension-configs[1].data-id=mybatis.yml
spring.cloud.nacos.config.extension-configs[1].group=dev
spring.cloud.nacos.config.extension-configs[1].refresh=true

spring.cloud.nacos.config.extension-configs[2].data-id=more.yml
spring.cloud.nacos.config.extension-configs[2].group=dev
spring.cloud.nacos.config.extension-configs[2].refresh=true
6.測試配置是否生效
- 測試passjava-member.properties和more.yml配置是否生效
請求url://localhost:10000/member/sample/test-local-config
返回配置的nick和age,且埠是10000,且member服務註冊到註冊中心
{
    "msg": "success",
    "code": 0,
    "nickname": "\"悟空-prod1\"",
    "age": 22
}
- 測試datasource.yml和mybatis.yml配置是否生效
請求url://localhost:10000/member/member/list
返回資料庫查詢結果
{
    "msg": "success",
    "code": 0,
    "page": {
        "totalCount": 0,
        "pageSize": 10,
        "totalPage": 0,
        "currPage": 1,
        "list": []j
    }
}
說明以上配置都生效了。
更多配置項
| 配置項 | key | 默認值 | 說明 |
|---|---|---|---|
| 服務端地址 | spring.cloud.nacos.config.server-addr | ||
| DataId前綴 | spring.cloud.nacos.config.prefix | spring.application.name | |
| Group | spring.cloud.nacos.config.group | DEFAULT_GROUP | |
| dataID後綴及內容文件格式 | spring.cloud.nacos.config.file-extension | properties | dataId的後綴,同時也是配置內容的文件格式,目前只支援 properties |
| 配置內容的編碼方式 | spring.cloud.nacos.config.encode | UTF-8 | 配置的編碼 |
| 獲取配置的超時時間 | spring.cloud.nacos.config.timeout | 3000 | 單位為 ms |
| 配置的命名空間 | spring.cloud.nacos.config.namespace | 常用場景之一是不同環境的配置的區分隔離,例如開發測試環境和生產環境的資源隔離等。 | |
| AccessKey | spring.cloud.nacos.config.access-key | ||
| SecretKey | spring.cloud.nacos.config.secret-key | ||
| 相對路徑 | spring.cloud.nacos.config.context-path | 服務端 API 的相對路徑 | |
| 接入點 | spring.cloud.nacos.config.endpoint | UTF-8 | 地域的某個服務的入口域名,通過此域名可以動態地拿到服務端地址 |
| 是否開啟監聽和自動刷新 | spring.cloud.nacos.config.refresh-enabled | true |
10.使用Nacos總結
- 1.引入Nacos依賴
- 2.配置Nacos數據源
- 3.配置中心配置數據集
DataId和配置內容 - 4.開啟動態刷新配置
@RefreshScope - 5.獲取配置項的值
@value - 6.優先使用配置中心的配置
- 7.使用命名空間
namespace來創建各服務的配置 - 8.使用分組
group來區分不同環境 - 9.使用多配置集
extension-configs區分不同類型的配置
6.5 SpringCloud整合Gateway網關
1.Gateway網關介紹
- 網關:流量的入口
- 網關常用功能:路由轉發,許可權校驗,限流控制
- Spring Cloud Gateway是Spring Cloud官方推出的第二代網關框架
- Spring Cloud Gateway取代了netflix的Zuul網關
2.Gateway原理
PassJava項目中,小程式和管理後台請求先訪問到API網關.
API網關通過註冊中心實時感知微服務的狀態的路由地址,準確地將請求路由到各個服務.

官方文檔://cloud.spring.io/spring-cloud-static/spring-cloud-gateway/2.2.2.RELEASE/reference/html/

-
請求到達網關後,先經過斷言Predicate,是否符合某個路由規則
-
如果符合,則按路由規則路由到指定地址
-
請求和響應都可以通過過濾器Filter進行過濾
3.創建Gateway 模組
- 適用Spring 初始化器創建Gateway module

- 創建module

- 選擇Gateway依賴

- 引入Gateway模組
<module>passjava-gateway</module>
4.配置Gateway
- 引入Nacos組件
因common模組引入了nacos註冊中心組件,所以我們可以直接引用common模組
<dependency>
	<groupId>com.jackson0714.passjava</groupId>
	<artifactId>passjava-common</artifactId>
	<version>0.0.1-SNAPSHOT</version>
</dependency>
- 應用類上添加註解
@EnableDiscoveryClient
@RefreshScope
@EnableDiscoveryClient
@SpringBootApplication(exclude = {DataSourceAutoConfiguration.class})
public class PassjavaGatewayApplication {
	public static void main(String[] args) {
		SpringApplication.run(PassjavaGatewayApplication.class, args);
	}
}
5.使用Gateway demo
-
新建application.yml文件
spring:
  cloud:
    gateway:
      routes:
        - id: route_qq
          uri: //www.qq.com
          predicates:
            - Query=url,qq
        - id: route_baidu
          uri: //www.baidu.com
          predicates:
            - Query=url,baidu
第一條路由規則:當請求路徑中包含url=qq,則跳轉到//www.qq.com
第二條路由規則:當請求路徑中包含url=baidu,則跳轉到//www.baidu.com
後續在PassJava項目中使用Gateway的強大功能.
6.6 整合OSS對象存儲
1.緣起
文件上傳在系統中用的很頻繁,所以我們需要將上傳的文件進行存儲,傳統的將文件上傳到本機已不適用分散式系統。自己搭建文件伺服器有複雜性和維護成本。所以我們可以採用市面上成熟的文件存儲服務,如阿里雲的OSS對象存儲服務。

每個 OSS 的用戶都會用到上傳服務。Web 端常見的上傳方法是用戶在瀏覽器或 APP 端上傳文件到應用伺服器,應用伺服器再把文件上傳到 OSS。具體流程如下圖所示。

和數據直傳到 OSS 相比,以上方法有三個缺點:
- 上傳慢:用戶數據需先上傳到應用伺服器,之後再上傳到OSS。網路傳輸時間比直傳到OSS多一倍。如果用戶數據不通過應用伺服器中轉,而是直傳到OSS,速度將大大提升。而且OSS採用BGP頻寬,能保證各地各運營商之間的傳輸速度。
- 擴展性差:如果後續用戶多了,應用伺服器會成為瓶頸。
- 費用高:需要準備多台應用伺服器。由於OSS上傳流量是免費的,如果數據直傳到OSS,不通過應用伺服器,那麼將能省下幾台應用伺服器。
2.技術方案
2.1 服務端簽名後直傳
2.1.1 背景
採用JavaScript客戶端直接簽名(參見JavaScript客戶端簽名直傳)時,AccessKeyID和AcessKeySecret會暴露在前端頁面,因此存在嚴重的安全隱患。因此,OSS提供了服務端簽名後直傳的方案。
2.1.2 原理介紹

服務端簽名後直傳的原理如下:
- 用戶發送上傳Policy請求到應用伺服器。
- 應用伺服器返回上傳Policy和簽名給用戶。
- 用戶直接上傳數據到OSS。
3.實現案例
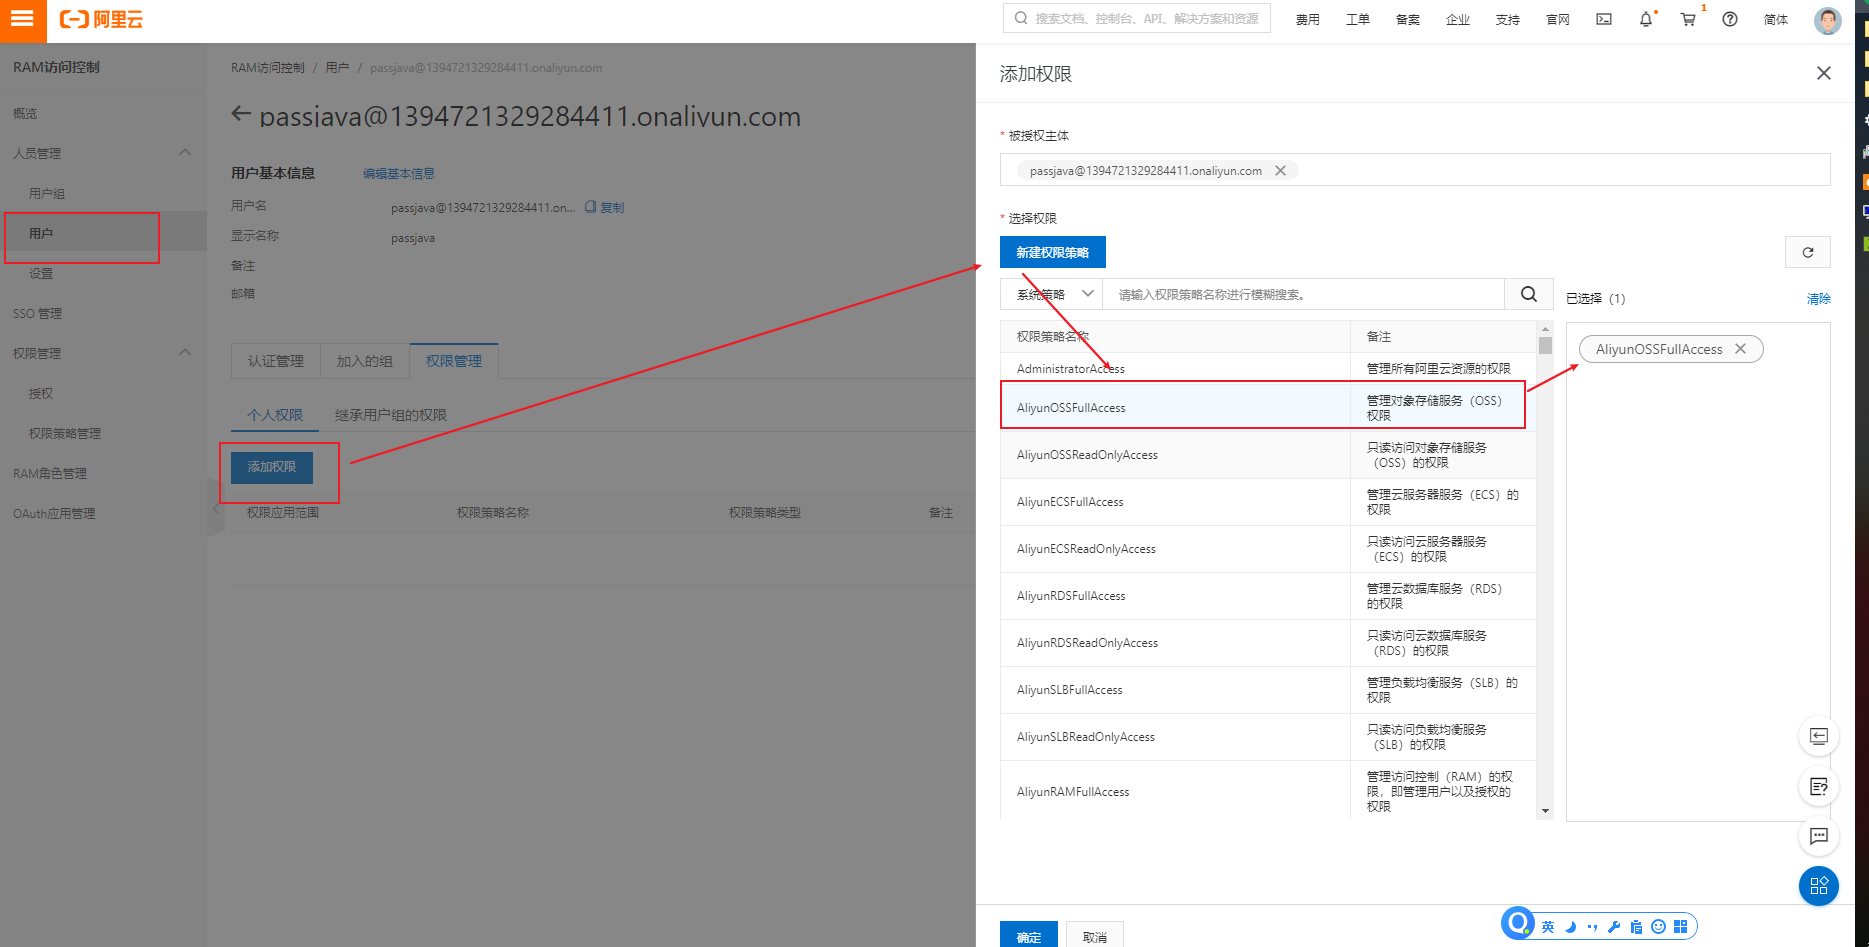
3.1 開通阿里雲OSS

-
創建Bucket 存儲桶
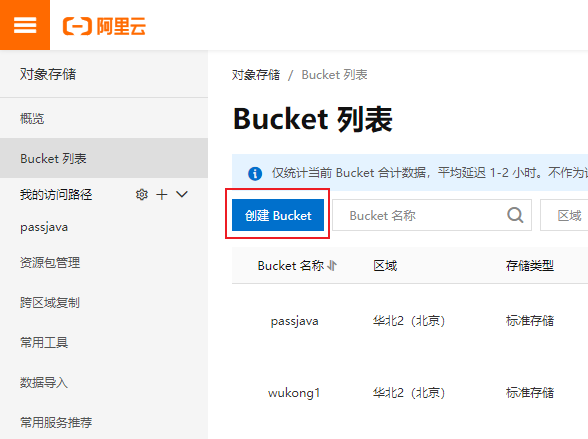
-
獲取accesskey id和secret


-
分配許可權
分配 管理對象存儲服務(OSS)許可權

3.2 使用OSS SDK
3.2.1 安裝SDK
在Maven項目中加入依賴項
//help.aliyun.com/document_detail/32009.html?spm=a2c4g.11186623.6.769.2c5145dc4TUgTa
<dependency>
    <groupId>com.aliyun.oss</groupId>
    <artifactId>aliyun-sdk-oss</artifactId>
    <version>3.8.0</version>
</dependency>
3.2.2 上傳文件到OSS
@Test
void testUploadByOss() throws FileNotFoundException {
    // Endpoint以杭州為例,其它Region請按實際情況填寫。
    String endpoint = "//oss-cn-beijing.aliyuncs.com";
    // 阿里雲主帳號AccessKey擁有所有API的訪問許可權,風險很高。強烈建議您創建並使用RAM帳號進行API訪問或日常運維,請登錄 //ram.console.aliyun.com 創建RAM帳號。
    String accessKeyId = "xxxx";
    String accessKeySecret = "xxxx";
    String bucketName = "passjava";

    // <yourObjectName>上傳文件到OSS時需要指定包含文件後綴在內的完整路徑,例如abc/efg/123.jpg。
    String localFile = "C:\\Users\\Administrator\\Pictures\\coding_java.png";
    String fileKeyName = "coding_java.png";
    // 創建OSSClient實例。
    OSS ossClient = new OSSClientBuilder().build(endpoint, accessKeyId, accessKeySecret);

    InputStream inputStream = new FileInputStream(localFile);
    ossClient.putObject(bucketName, fileKeyName, inputStream);

    // 關閉OSSClient。
    ossClient.shutdown();
}
3.3 整合Spring Cloud Alicloud OSS
3.3.1 passjava-common項目引入spring-cloud-starter-alicloud-oss依賴
<dependency>
    <groupId>com.alibaba.cloud</groupId>
    <artifactId>spring-cloud-starter-alicloud-oss</artifactId>
</dependency>
3.3.2 配置alicloud oss
spring:
  cloud:
    alicloud:
      access-key: xxxx
      secret-key: xxxx
      oss:
        endpoint: oss-cn-beijing.aliyuncs.com
3.3.3 測試上傳
@Autowired
OSSClient ossClient;

@Test
void testUploadByAlicloudOss() throws FileNotFoundException {
    String bucketName = "passjava";
    String localFile = "C:\\Users\\Administrator\\Pictures\\coding_java.png";
    String fileKeyName = "coding_java.png";
    InputStream inputStream = new FileInputStream(localFile);
    ossClient.putObject(bucketName, fileKeyName, inputStream);
    ossClient.shutdown();
}

3.4 獲取服務端簽名
3.4.1 準備工作:
- 創建一個第三方服務passjava-thirdparty
- 引入passjava-common模組,並且排除mybatis-plus依賴
<dependency>
    <groupId>com.jackson0714.passjava</groupId>
    <artifactId>passjava-common</artifactId>
    <version>0.0.1-SNAPSHOT</version>
    <exclusions>
        <exclusion>
            <groupId>com.baomidou</groupId>
            <artifactId>mybatis-plus-boot-starter</artifactId>
        </exclusion>
    </exclusions>
</dependency>
- 配置服務發現和埠
spring:
  cloud:
    nacos:
      discovery:
        server-addr: 127.0.0.1:8848
  application:
        name: passjava-thirdparty
server:
  port: 14000
- 配置配置中心
spring.application.name=passjava-thirdparty
spring.cloud.nacos.config.server-addr=127.0.0.1:8848
spring.cloud.nacos.config.namespace=passjava-thirdparty

spring.cloud.nacos.config.extension-configs[0].data-id=oss.yml
spring.cloud.nacos.config.extension-configs[0].group=DEFAULT_GROUP
spring.cloud.nacos.config.extension-configs[0].refresh=true
- 配置Nacos命名空間和oss.yml
spring:
  cloud:
    alicloud:
      access-key: LTAI4G3KxBJ26EUbWsenmqhP
      secret-key: RHtADVlvlKJvVBQnFNNvnne9p4NwnA
      oss:
        endpoint: oss-cn-beijing.aliyuncs.com

- 開啟服務發現
@EnableDiscoveryClient
@EnableDiscoveryClient
@SpringBootApplication
public class PassjavaThirdpartyApplication {
    public static void main(String[] args) {
        SpringApplication.run(PassjavaThirdpartyApplication.class, args);
    }
}
3.4.2 獲取簽名類
@RestController
@RequestMapping("/thirdparty/v1/admin/oss")
public class OssController {

    @Autowired
    OSS ossClient;

    @Value("${spring.cloud.alicloud.access-key}")
    private String accessId;

    @Value("${spring.cloud.alicloud.secret-key}")
    private String accessKey;

    @Value("${spring.cloud.alicloud.oss.endpoint}")
    private String endpoint;

    @Value("${spring.cloud.alicloud.oss.bucket}")
    private String bucket;

    @RequestMapping("/getPolicy")
    public Map<String, String> getPolicy() {
        String host = "//" + bucket + "." + endpoint; // host的格式為 bucketname.endpoint
        // callbackUrl為 上傳回調伺服器的URL,請將下面的IP和Port配置為您自己的真實資訊。
        // String callbackUrl = "//88.88.88.88:8888";
        String formatDate = new SimpleDateFormat("yyyy-MM-dd").format(new Date());
        String dir = formatDate + "/"; // 用戶上傳文件時指定的前綴。

        Map<String, String> respMap = new LinkedHashMap<String, String>();

        try {
            long expireTime = 30;
            long expireEndTime = System.currentTimeMillis() + expireTime * 1000;
            Date expiration = new Date(expireEndTime);
            PolicyConditions policyConds = new PolicyConditions();
            policyConds.addConditionItem(PolicyConditions.COND_CONTENT_LENGTH_RANGE, 0, 1048576000);
            policyConds.addConditionItem(MatchMode.StartWith, PolicyConditions.COND_KEY, dir);

            String postPolicy = ossClient.generatePostPolicy(expiration, policyConds);
            byte[] binaryData = postPolicy.getBytes("utf-8");
            String encodedPolicy = BinaryUtil.toBase64String(binaryData);
            String postSignature = ossClient.calculatePostSignature(postPolicy);


            respMap.put("accessid", accessId);
            respMap.put("policy", encodedPolicy);
            respMap.put("signature", postSignature);
            respMap.put("dir", dir);
            respMap.put("host", host);
            respMap.put("expire", String.valueOf(expireEndTime / 1000));


        } catch (Exception e) {
            // Assert.fail(e.getMessage());
            System.out.println(e.getMessage());
        } finally {
            ossClient.shutdown();
        }

        return respMap;
    }
}
測試介面
//localhost:14000/api/thirdparty/v1/admin/oss/getPolicy
{
	"accessid": "LTAI4G3KxBJ26EUbWsenmqhP",
	"policy": "eyJleHBpcmF0aW9uIjoiMjAyMC0wNC0yOFQwMjozMzowNy42NzNaIiwiY29uZGl0aW9ucyI6W1siY29udGVudC1sZW5ndGgtcmFuZ2UiLDAsMTA0ODU3NjAwMF0sWyJzdGFydHMtd2l0aCIsIiRrZXkiLCIyMDIwLTA0LTI4LyJdXX0=",
	"signature": "pfn4cggFTMMNqTs+qUnDN5c+k5M=",
	"dir": "2020-04-28/",
	"host": "//passjava.oss-cn-beijing.aliyuncs.com",
	"expire": "1588041187"
}
3.4.3 配置網關路由
因為前端頁面配置的統一訪問路徑是//localhost:8060/api/,所以需要將訪問thirdparty的服務通過網關路由到thirdparty服務
將請求
//localhost:8060/api/thirdparty/v1/admin/oss/getPolicy
轉發到
//localhost:14000/api/thirdparty/v1/admin/oss/getPolicy
配置網關:
spring:
  cloud:
    gateway:
      routes:
        - id: route_thirdparty # 題目微服務路由規則
          uri: lb://passjava-thirdparty # 負載均衡,將請求轉發到註冊中心註冊的assjava-thirdparty服務
          predicates: # 斷言
            - Path=/api/thirdparty/** # 如果前端請求路徑包含 api/thirdparty,則應用這條路由規則
          filters: #過濾器
            - RewritePath=/api/(?<segment>.*),/$\{segment} # 將跳轉路徑中包含的api替換成空
測試可以上傳成功
3.4.4 配置跨域訪問
配置跨域訪問,所有post請求都可以跨域訪問

3.4.5 Web端上傳組件
- 單文件上傳組件
singleUpload.vue
<template>
  <div>
    <el-upload
      action="//passjava.oss-cn-beijing.aliyuncs.com"
      :data="dataObj"
      list-type="picture"
      :multiple="false" :show-file-list="showFileList"
      :file-list="fileList"
      :before-upload="beforeUpload"
      :on-remove="handleRemove"
      :on-success="handleUploadSuccess"
      :on-preview="handlePreview">
      <el-button size="small" type="primary">點擊上傳</el-button>
      <div slot="tip" class="el-upload__tip">只能上傳jpg/png文件,且不超過10MB</div>
    </el-upload>
    <el-dialog :visible.sync="dialogVisible">
      <img width="100%" :src="fileList[0].url" alt="">
    </el-dialog>
  </div>
</template>
<script>
   import {policy} from './policy'
   import { getUUID } from '@/utils'

  export default {
    name: 'singleUpload',
    props: {
      value: String
    },
    computed: {
      imageUrl() {
        return this.value;
      },
      imageName() {
        if (this.value != null && this.value !== '') {
          return this.value.substr(this.value.lastIndexOf("/") + 1);
        } else {
          return null;
        }
      },
      fileList() {
        return [{
          name: this.imageName,
          url: this.imageUrl
        }]
      },
      showFileList: {
        get: function () {
          return this.value !== null && this.value !== ''&& this.value!==undefined;
        },
        set: function (newValue) {
        }
      }
    },
    data() {
      return {
        dataObj: {
          policy: '',
          signature: '',
          key: '',
          ossaccessKeyId: '',
          dir: '',
          host: '',
          // callback:'',
        },
        dialogVisible: false
      };
    },
    methods: {
      emitInput(val) {
        this.$emit('input', val)
      },
      handleRemove(file, fileList) {
        this.emitInput('');
      },
      handlePreview(file) {
        this.dialogVisible = true;
      },
      beforeUpload(file) {
        let _self = this;
        return new Promise((resolve, reject) => {
          policy().then(response => {
            _self.dataObj.policy = response.data.policy;
            _self.dataObj.signature = response.data.signature;
            _self.dataObj.ossaccessKeyId = response.data.accessid;
            _self.dataObj.key = response.data.dir + getUUID()+'_${filename}';
            _self.dataObj.dir = response.data.dir;
            _self.dataObj.host = response.data.host;
            resolve(true)
          }).catch(err => {
            reject(false)
          })
        })
      },
      handleUploadSuccess(res, file) {
        console.log("上傳成功...")
        this.showFileList = true;
        this.fileList.pop();
        this.fileList.push({name: file.name, url: this.dataObj.host + '/' + this.dataObj.key.replace("${filename}",file.name) });
        this.emitInput(this.fileList[0].url);
      }
    }
  }
</script>
<style>

</style>
- 獲取簽名的JS文件
import http from '@/utils/httpRequest.js'
export function policy () {
  return new Promise((resolve) => {
    http({
      url: http.adornUrl('/thirdparty/v1/admin/oss/getPolicy'),
      method: 'get',
      params: http.adornParams({})
    }).then(({ data }) => {
      resolve(data)
    })
  })
}
- 使用單文件上傳組件
使用上傳圖片組件
<el-form-item label="類型logo路徑" prop="logoUrl">
    <single-upload v-model="dataForm.logoUrl"></single-upload>
</el-form-item>

<script>
  import SingleUpload from "@/components/upload/singleUpload" // 引入單文件上傳組件
  export default {
    components:{ SingleUpload }
  }
</script>
上傳文件成功
6.7 整合統一異常處理
1.緣起
我們在寫程式碼的時候,通常會在方法裡面添加各種try catch來捕獲異常,會發現有很多重複的程式碼,所以我們可以整合統一異常處理來優化程式碼結構。
攔截異常並統一處理我們可以用到@RestControllerAdvice註解
2.自定義異常處理類
-
添加統一異常處理類註解
@RestControllerAdvice -
添加日誌註解
@Slf4j -
添加異常處理方法註解
@ExceptionHandler
package com.jackson0714.passjava.question.exception;

/*
* 集中處理所有異常
 */
@Slf4j
@RestControllerAdvice(basePackages = "com.jackson0714.passjava.question.controller")
public class PassjavaExceptionControllerAdvice {

    @ResponseBody
    @ExceptionHandler(value= MethodArgumentNotValidException.class)
    public R handleValidException(MethodArgumentNotValidException e) {
        log.error("數據校驗出現問題{},異常類型:{}", e.getMessage(), e.getClass());
        BindingResult bindingResult = e.getBindingResult();
        Map<String, String> errorMap = new HashMap<>();
        bindingResult.getFieldErrors().forEach((fieldError)->{
            errorMap.put(fieldError.getField(), fieldError.getDefaultMessage());
        });

        return R.error(BizCodeEnum.VALID_EXCEPTION.getCode(), BizCodeEnum.VALID_EXCEPTION.getMsg()).put("data", errorMap);
    }

    @ExceptionHandler(value=Throwable.class)
    public R handleException(Throwable throwable) {
        log.error("未知異常{},異常類型:{}", throwable.getMessage(), throwable.getClass());

        return R.error(BizCodeEnum.UNKNOWN_EXCEPTION.getCode(), BizCodeEnum.UNKNOWN_EXCEPTION.getMsg());
    }
}
3.推薦的系統錯誤碼
3.1 錯誤碼和錯誤資訊定義類
-
1.錯誤碼長度:5個數字
-
2.前兩位:業務場景
-
3.後三位:錯誤碼
10:通用業務
	001:參數格式校驗錯誤(10001)
11:會員業務
12:題目業務
13:內容業務
14:學習業務
3.2 錯誤碼枚舉類
com.jackson0714.common.exception.BizCodeEnum
定義了兩種異常枚舉:系統未知異常、參數格式校驗失敗
package com.jackson0714.common.exception;

public enum BizCodeEnum {
    UNKNOWN_EXCEPTION(10000, "系統未知異常"),
    VALID_EXCEPTION(10001, "參數格式校驗失敗");

    private int code;
    private String msg;
    BizCodeEnum(int code, String msg) {
        this.code = code;
        this.msg = msg;
    }

    public int getCode() {
        return code;
    }

    public String getMsg() {
        return msg;
    }
}
4.測試程式碼
測試場景1:校驗參數displayOrder必須為正整數,如果displayOrder不為正整數,則會拋出異常
- 1.實體類上添加校驗註解
@Positive
/**
 * 排序
 */
@Positive
private Integer displayOrder;
- 2.controller類裡面添加save方法,並添加校驗參數註解@Valid
/**
* 保存
*/
@RequestMapping("/save")
public R save(@Valid @RequestBody QuestionEntity question){
    questionService.save(question);

    return R.ok();
}
測試:
用Postman工具調用save方法
請求地址:
//192.168.10.160:8060/api/question/v1/admin/question/save
請求參數:
{
    "displayOrder": 0.2
}
返回結果:
{
    "msg": "參數格式校驗失敗",
    "code": 10001,
    "data": {
        "displayOrder": "必須是正數"
    }
}
測試場景2:對於程式碼裡面直接拋出的異常,也可以handle
1.controller類裡面添加查詢題目的方法,並拋出Exception異常
/**
* 資訊
*/
@RequestMapping("/info/{id}")
//@RequiresPermissions("question:question:info")
public R info(@PathVariable("id") Long id) throws Exception {
    QuestionEntity question = questionService.getById(id);
    throw new Exception("test");

    //return R.ok().put("question", question);
}
測試:
用Postman工具調用save方法
請求地址:
//192.168.10.160:8060/api/question/v1/admin/question/save
返回結果:
{
    "msg": "系統未知異常",
    "code": 10000
}
證明統一處理方法被調用了:
@ExceptionHandler(value=Throwable.class)
public R handleException(Throwable throwable) {
    return R.error(BizCodeEnum.UNKNOWN_EXCEPTION.getCode(), BizCodeEnum.UNKNOWN_EXCEPTION.getMsg());
}
我是悟空,努力變強,變身超級賽亞人!手寫了一套 Spring Cloud 進階教程和 PMP 刷題小程式。


