Android Choreographer 源碼分析
Choreographer 的作用主要是配合 Vsync ,給上層 App 的渲染提供一個穩定的 Message 處理的時機,也就是 Vsync 到來的時候 ,系統通過對 Vsync 訊號周期的調整,來控制每一幀繪製操作的時機。目前大部分手機都是 60Hz 的刷新率,也就是 16.6ms 刷新一次,系統為了配合螢幕的刷新頻率,將 Vsync 的周期也設置為 16.6 ms,每個 16.6 ms , Vsync 訊號喚醒 Choreographer 來做 App 的繪製操作,這就是引入 Choreographer 的主要作用。了解 Choreographer 還可以幫助 App 開發者知道程式每一幀運行的基本原理,也可以加深對 Message、Handler、Looper、MessageQueue、Measure、Layout、Draw 的理解
主執行緒運行機制的本質
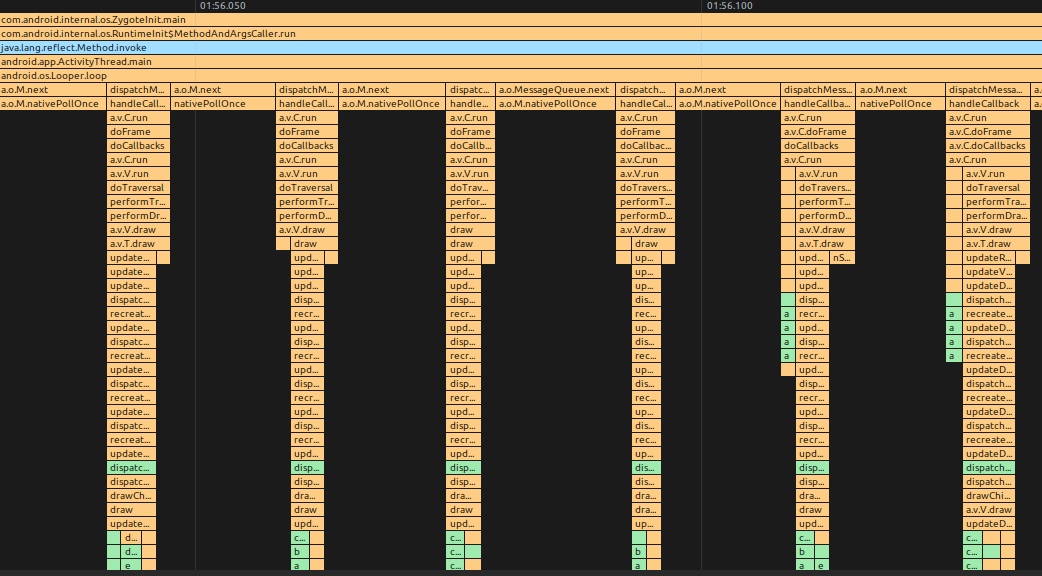
在介紹 Choreographer 之前,我們先理一下 Android 主執行緒運行的本質,其實就是 Message 的處理過程,我們的各種操作,包括每一幀的渲染,手勢操作 ,都是通過 Message 的形式發給主執行緒的 MessageQueue ,MessageQueue 處理完消息繼續等下一個消息,如下圖所示
MethodTrace 圖示
Systrace 圖示
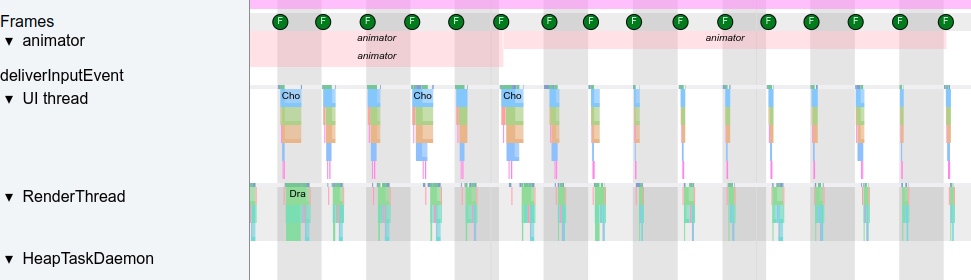
可以發現,每一幀時間都是固定的。所以一旦一個 Message 的處理時間超過了 16.6ms 就會引起卡頓。關於如何發現卡頓,可以參考文章:
Choreographer 簡介
Choreographer 扮演 Android 渲染鏈路中承上啟下的角色
-
承上:負責接收和處理 App 的各種更新消息和回調,等到 Vsync 到來的時候統一處理。比如集中處理 Input(主要是 Input 事件的處理) 、Animation(動畫相關)、Traversal(包括 measure、layout、draw 等操作) ,判斷卡頓掉幀情況,記錄 CallBack 耗時等
-
啟下:負責請求和接收 Vsync 訊號。接收 Vsync 事件回調(通過 FrameDisplayEventReceiver.onVsync );請求 Vsync(FrameDisplayEventReceiver.scheduleVsync) .
從上面可以看出來, Choreographer 擔任的是一個工具人的角色,他之所以重要,是因為通過 Choreographer + SurfaceFlinger + Vsync + TripleBuffer 這一套從上到下的機制,保證了 Android App 可以以一個穩定的幀率運行(目前大部分是 60fps),減少幀率波動帶來的不適感。
Choreographer 的工作流程
-
Choreographer 初始化SurfaceFlinger 的 appEventThread 喚醒發送 Vsync ,Choreographer 回調 FrameDisplayEventReceiver.onVsync , 進入 Choreographer 的主處理函數 doFrame
-
初始化 FrameHandler ,綁定 Looper
-
初始化 FrameDisplayEventReceiver ,與 SurfaceFlinger 建立通訊用於接收和請求 Vsync
-
初始化 CallBackQueues
-
-
Choreographer.doFrame 計算掉幀邏輯
-
Choreographer.doFrame 處理 Choreographer 的第一個 callback : input
-
Choreographer.doFrame 處理 Choreographer 的第二個 callback : animation
-
Choreographer.doFrame 處理 Choreographer 的第三個 callback : insets animation
-
Choreographer.doFrame 處理 Choreographer 的第四個 callback : traversalChoreographer.doFrame 處理 Choreographer 的第五個 callback : commit ?
-
traversal-draw 中 UIThread 與 RenderThread 同步數據
-
-
RenderThread 處理繪製數據,真正進行渲染
-
將渲染好的 Buffer swap 給 SurfaceFlinger 進行合成
Choreographer 源碼分析
Choreographer 的單例初始化
    // Thread local storage for the choreographer.
    private static final ThreadLocal<Choreographer> sThreadInstance =
            new ThreadLocal<Choreographer>() {
        @Override
        protected Choreographer initialValue() {
            Looper looper = Looper.myLooper();
            if (looper == null) {
                throw new IllegalStateException("The current thread must have a looper!");
            }
            Choreographer choreographer = new Choreographer(looper, VSYNC_SOURCE_APP);
            if (looper == Looper.getMainLooper()) {
                mMainInstance = choreographer;
            }
            return choreographer;
        }
    };
這裡採用的是 ThreadLocal 來構造單例,這樣每個執行緒都會有一個屬於自己的 choreographer 實例。
接下去看 choreographer 的構造函數
    private Choreographer(Looper looper, int vsyncSource) {
        mLooper = looper;
        mHandler = new FrameHandler(looper);
     // 這裡可以發現只有在為 true 的時候才會使用 vsync
        mDisplayEventReceiver = USE_VSYNC
                ? new FrameDisplayEventReceiver(looper, vsyncSource)
                : null;
        mLastFrameTimeNanos = Long.MIN_VALUE;
     // 每一幀的間隔是根據刷新頻率來的
        mFrameIntervalNanos = (long)(1000000000 / getRefreshRate());

        mCallbackQueues = new CallbackQueue[CALLBACK_LAST + 1];
     // 給每一種回調類型都創建了一個隊列
        for (int i = 0; i <= CALLBACK_LAST; i++) {
            mCallbackQueues[i] = new CallbackQueue();
        }
        // b/68769804: For low FPS experiments.
        setFPSDivisor(SystemProperties.getInt(ThreadedRenderer.DEBUG_FPS_DIVISOR, 1));
    }
這裡做了幾個初始化操作,根據Looper對象生成,Looper和執行緒是一對一的關係,對應上面說明裡的每個執行緒對應一個Choreographer。
-
初始化FrameHandler。接收處理消息。
-
初始化FrameDisplayEventReceiver。FrameDisplayEventReceiver用來接收垂直同步脈衝,就是VSync訊號,VSync訊號是一個時間脈衝,一般為60HZ,用來控制系統同步操作,怎麼同ChoreoGrapher一起工作的,將在下文介紹。
-
初始化mLastFrameTimeNanos(標記上一個frame的渲染時間)以及mFrameIntervalNanos(幀率,fps,一般手機上為1s/60)。
-
初始化CallbackQueue,callback隊列,將在下一幀開始渲染時回調。
接下去看看 FrameHandler 和 FrameDisplayEventReceiver 的結構。
    private final class FrameHandler extends Handler {
        public FrameHandler(Looper looper) {
            super(looper);
        }

        @Override
        public void handleMessage(Message msg) {
            switch (msg.what) {
                case MSG_DO_FRAME:
                    doFrame(System.nanoTime(), 0);
                    break;
                case MSG_DO_SCHEDULE_VSYNC:
                    doScheduleVsync();
                    break;
                case MSG_DO_SCHEDULE_CALLBACK:
                    doScheduleCallback(msg.arg1);
                    break;
            }
        }
    }
看上面的程式碼,就是一個簡單的Handler。處理3個類型的消息。
-
MSG_DO_FRAME:開始渲染下一幀的操作
-
MSG_DO_SCHEDULE_VSYNC:請求 Vsync 訊號
-
MSG_DO_SCHEDULE_CALLBACK:請求執行 callback
下面再細分一下,分別詳細看一下這三個步驟是怎麼實現的。
FrameDisplayEventReceiver
    private final class FrameDisplayEventReceiver extends DisplayEventReceiver
            implements Runnable {
        private boolean mHavePendingVsync;
        private long mTimestampNanos;
        private int mFrame;

        public FrameDisplayEventReceiver(Looper looper, int vsyncSource) {
            super(looper, vsyncSource);
        }

        // TODO(b/116025192): physicalDisplayId is ignored because SF only emits VSYNC events for
        // the internal display and DisplayEventReceiver#scheduleVsync only allows requesting VSYNC
        // for the internal display implicitly.
        @Override
        public void onVsync(long timestampNanos, long physicalDisplayId, int frame) {
            // Post the vsync event to the Handler.
            // The idea is to prevent incoming vsync events from completely starving
            // the message queue.  If there are no messages in the queue with timestamps
            // earlier than the frame time, then the vsync event will be processed immediately.
            // Otherwise, messages that predate the vsync event will be handled first.
            long now = System.nanoTime();
            if (timestampNanos > now) {
                Log.w(TAG, "Frame time is " + ((timestampNanos - now) * 0.000001f)
                        + " ms in the future!  Check that graphics HAL is generating vsync "
                        + "timestamps using the correct timebase.");
                timestampNanos = now;
            }

            if (mHavePendingVsync) {
                Log.w(TAG, "Already have a pending vsync event.  There should only be "
                        + "one at a time.");
            } else {
                mHavePendingVsync = true;
            }

            mTimestampNanos = timestampNanos;
            mFrame = frame;
            Message msg = Message.obtain(mHandler, this);
            msg.setAsynchronous(true);
            mHandler.sendMessageAtTime(msg, timestampNanos / TimeUtils.NANOS_PER_MS);
        }

        @Override
        public void run() {
            mHavePendingVsync = false;
            doFrame(mTimestampNanos, mFrame);
        }
    }
那麼 FrameDisplayEventReceiver 是通過什麼方式在 Vsync 訊號到來的時候回調 onVsync 呢?答案是 FrameDisplayEventReceiver 的初始化的時候,最終通過監聽文件句柄的形式,其對應的初始化流程如下
// android/view/Choreographer.java
private Choreographer(Looper looper, int vsyncSource) {
    mLooper = looper;
    mDisplayEventReceiver = USE_VSYNC
            ? new FrameDisplayEventReceiver(looper, vsyncSource)
            : null;
    ......
}

// android/view/Choreographer.java
public FrameDisplayEventReceiver(Looper looper, int vsyncSource) {
    super(looper, vsyncSource);
}

// android/view/DisplayEventReceiver.java
public DisplayEventReceiver(Looper looper, int vsyncSource) {
    ......
    mMessageQueue = looper.getQueue();
    mReceiverPtr = nativeInit(new WeakReference<DisplayEventReceiver>(this), mMessageQueue,
            vsyncSource);
}
nativeInit 後續的程式碼可以自己跟一下,可以對照這篇文章和源碼,由於篇幅比較多,這裡就不細說了。
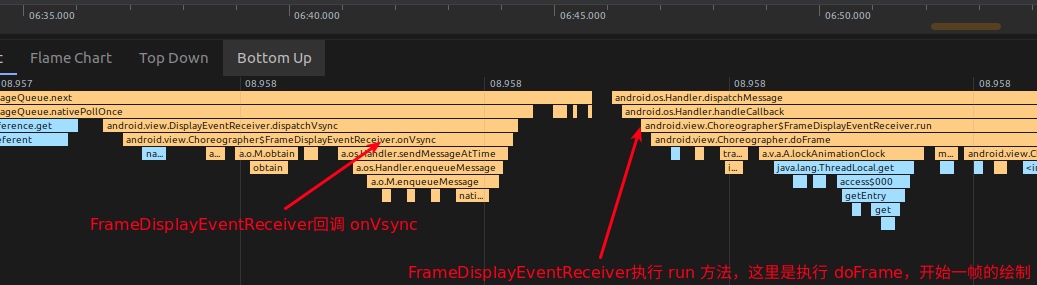
簡單來說,FrameDisplayEventReceiver 的初始化過程中,通過 BitTube (本質是一個 socket pair),來傳遞和請求 Vsync 事件,當 SurfaceFlinger 收到 Vsync 事件之後,通過 appEventThread 將這個事件通過 BitTube 傳給 DisplayEventDispatcher ,DisplayEventDispatcher 通過 BitTube 的接收端監聽到 Vsync 事件之後,回調 Choreographer.FrameDisplayEventReceiver.onVsync ,觸發開始一幀的繪製。
如下圖
ChoreoGrapher 的總體流程
FrameHandler 和 FrameDisplayEventReceiver 是怎麼工作的呢?ChoreoGrapher 的總體流程圖如下圖(拷貝的圖片):

以上是總體的流程圖:
-
PostCallBack or postFrameCallback發起添加回調,這個FrameCallBack將在下一幀被渲染時執行。
-
AddToCallBackQueue,將 FrameCallBack 添加到回調隊列裡面,等待時機執行回調。每種類型的callback按照設置的執行時間(dueTime)順序排序分別保存在一個單鏈表中。
-
判斷 FrameCallBack設定的執行時間是否在當前時間之後,若是,發送 MSG_DO_SCHEDULE_CALLBACK 消息到主執行緒,安排執行doScheduleCallback,安排執行CallBack。否則直接跳到第4步。
-
執行 scheduleFrameLocked,安排執行下一幀。
-
判斷上一幀是否已經執行,若未執行,當前操作直接結束。若已經執行,根據情況執行以下6、7步。
-
若使用垂直同步訊號進行同步,則執行7.否則,直接跳到9。
-
若當前執行緒是UI執行緒,則通過執行scheduleVsyncLocked請求垂直同步訊號。否則,送MSG_DO_SCHEDULE_VSYNC消息到主執行緒,安排執行doScheduleVsync,在主執行緒調用scheduleVsyncLocked。
-
收到垂直同步訊號,調用FrameDisplayEventReceiver.onVsync(),發送消息到主執行緒,請求執行doFrame。
-
執行doFrame,渲染下一幀。
主要的工作在 doFrame 中,接下來我們具體看看 doFrame 函數都幹了些什麼。
從名字看很容易理解 doFrame 函數就是開始進行下一幀的顯示工作。好了以下源程式碼又來了,我們一行一行分析一下吧。
doFrame
    @UnsupportedAppUsage
    void doFrame(long frameTimeNanos, int frame) {
        final long startNanos;
        synchronized (mLock) {
       // 為false, 說明還未開始
            if (!mFrameScheduled) {
                return; // no work to do
            }

            if (DEBUG_JANK && mDebugPrintNextFrameTimeDelta) {
                mDebugPrintNextFrameTimeDelta = false;
                Log.d(TAG, "Frame time delta: "
                        + ((frameTimeNanos - mLastFrameTimeNanos) * 0.000001f) + " ms");
            }

            long intendedFrameTimeNanos = frameTimeNanos;
            startNanos = System.nanoTime();
       // 計算當前時間與 vsync 訊號的時間差
            final long jitterNanos = startNanos - frameTimeNanos;
       // 說明出現掉幀情況,注意只有 jitterNanos 大於 16.6 ms 才說明掉幀,否則只是輕微的延遲。
            if (jitterNanos >= mFrameIntervalNanos) {
                final long skippedFrames = jitterNanos / mFrameIntervalNanos;
                if (skippedFrames >= SKIPPED_FRAME_WARNING_LIMIT) {
                    Log.i(TAG, "Skipped " + skippedFrames + " frames!  "
                            + "The application may be doing too much work on its main thread.");
                }
          // 當發生掉幀後,需要計算被耽誤的時間。比如處理了 36.6ms, 一個周期是 16.6 ms, 相當於延遲了 3.4 ms 執行
                final long lastFrameOffset = jitterNanos % mFrameIntervalNanos;
                if (DEBUG_JANK) {
                    Log.d(TAG, "Missed vsync by " + (jitterNanos * 0.000001f) + " ms "
                            + "which is more than the frame interval of "
                            + (mFrameIntervalNanos * 0.000001f) + " ms!  "
                            + "Skipping " + skippedFrames + " frames and setting frame "
                            + "time to " + (lastFrameOffset * 0.000001f) + " ms in the past.");
                }
          // 修正當前幀的時間 = 開始時間 - 耽誤時間
                frameTimeNanos = startNanos - lastFrameOffset;
            }
       // 當前時間小於前一幀時間,不執行操作
            if (frameTimeNanos < mLastFrameTimeNanos) {
                if (DEBUG_JANK) {
                    Log.d(TAG, "Frame time appears to be going backwards.  May be due to a "
                            + "previously skipped frame.  Waiting for next vsync.");
                }
          // 直接請求下一個 vsync 訊號
                scheduleVsyncLocked();
                return;
            }
       // 大於 1 說明採用的默認幀數的一半,因此需要根據時間間隔來判斷是否有必要執行繪製
            if (mFPSDivisor > 1) {
                long timeSinceVsync = frameTimeNanos - mLastFrameTimeNanos;
                if (timeSinceVsync < (mFrameIntervalNanos * mFPSDivisor) && timeSinceVsync > 0) {
            // 時間間隔小於指定的時間,繼續請求下一個 vsync 訊號
                    scheduleVsyncLocked();
                    return;
                }
            }
       // 保存當前幀的相關資訊
            mFrameInfo.setVsync(intendedFrameTimeNanos, frameTimeNanos);
            mFrameScheduled = false;
            mLastFrameTimeNanos = frameTimeNanos;
        }

        try {
       // 執行相關 callbacks
            Trace.traceBegin(Trace.TRACE_TAG_VIEW, "Choreographer#doFrame");
            AnimationUtils.lockAnimationClock(frameTimeNanos / TimeUtils.NANOS_PER_MS);

            mFrameInfo.markInputHandlingStart();
            doCallbacks(Choreographer.CALLBACK_INPUT, frameTimeNanos);

            mFrameInfo.markAnimationsStart();
            doCallbacks(Choreographer.CALLBACK_ANIMATION, frameTimeNanos);
            doCallbacks(Choreographer.CALLBACK_INSETS_ANIMATION, frameTimeNanos);

            mFrameInfo.markPerformTraversalsStart();
            doCallbacks(Choreographer.CALLBACK_TRAVERSAL, frameTimeNanos);

            doCallbacks(Choreographer.CALLBACK_COMMIT, frameTimeNanos);
        } finally {
            AnimationUtils.unlockAnimationClock();
            Trace.traceEnd(Trace.TRACE_TAG_VIEW);
        }

        if (DEBUG_FRAMES) {
            final long endNanos = System.nanoTime();
            Log.d(TAG, "Frame " + frame + ": Finished, took "
                    + (endNanos - startNanos) * 0.000001f + " ms, latency "
                    + (startNanos - frameTimeNanos) * 0.000001f + " ms.");
        }
    }
總結起來其實主要是兩個操作:
設置當前 frame 的啟動時間
判斷是否跳幀,若跳幀修正當前 frame 的啟動時間到最近的 VSync 訊號時間。如果沒跳幀,當前 frame 啟動時間直接設置為當前 VSync 訊號時間。修正完時間後,無論當前 frame 是否跳幀,使得當前 frame 的啟動時間與 VSync 訊號還是在一個節奏上的,可能延後了一到幾個周期,但是都是在下一個 vsync 訊號到來才進行處理 。
如下圖所示是時間修正的一個例子,

由於第二個 frame 執行超時,第三個 frame 實際啟動時間比第三個 VSync 訊號到來時間要晚,因為這時候延時比較小,沒有超過一個時鐘周期,系統還是將 frameTimeNanos3 傳給回調,回調拿到的時間和 VSync 訊號同步。
再來看看下圖:

由於第二個 frame執行時間超過 2 個時鐘周期,導致第三個 frame 延後執行時間大於一個時鐘周期,系統認為這時候影響較大,判定為跳幀了,將第三個 frame 的時間修正為 frameTimeNanos4,比 VSync 真正到來的時間晚了一個時鐘周期。
時間修正,既保證了doFrame操作和 VSync 保持同步節奏,又保證實際啟動時間與記錄的時間點相差不會太大,便於同步及分析。
順序執行callBack隊列裡面的callback
然後接下來看看 doCallbacks 的執行過程:
    void doCallbacks(int callbackType, long frameTimeNanos) {
        CallbackRecord callbacks;
        synchronized (mLock) {
            // We use "now" to determine when callbacks become due because it's possible
            // for earlier processing phases in a frame to post callbacks that should run
            // in a following phase, such as an input event that causes an animation to start.
            final long now = System.nanoTime();
       //
            callbacks = mCallbackQueues[callbackType].extractDueCallbacksLocked(
                    now / TimeUtils.NANOS_PER_MS);
            if (callbacks == null) {
                return;
            }
            mCallbacksRunning = true;

            // Update the frame time if necessary when committing the frame.
            // We only update the frame time if we are more than 2 frames late reaching
            // the commit phase.  This ensures that the frame time which is observed by the
            // callbacks will always increase from one frame to the next and never repeat.
            // We never want the next frame's starting frame time to end up being less than
            // or equal to the previous frame's commit frame time.  Keep in mind that the
            // next frame has most likely already been scheduled by now so we play it
            // safe by ensuring the commit time is always at least one frame behind.
       // commit 類型是最後執行的,如果此時發現前面處理時間過長,就會進行糾正。
            if (callbackType == Choreographer.CALLBACK_COMMIT) {
                final long jitterNanos = now - frameTimeNanos;
                Trace.traceCounter(Trace.TRACE_TAG_VIEW, "jitterNanos", (int) jitterNanos);
                if (jitterNanos >= 2 * mFrameIntervalNanos) {
                    final long lastFrameOffset = jitterNanos % mFrameIntervalNanos
                            + mFrameIntervalNanos;
                    if (DEBUG_JANK) {
                        Log.d(TAG, "Commit callback delayed by " + (jitterNanos * 0.000001f)
                                + " ms which is more than twice the frame interval of "
                                + (mFrameIntervalNanos * 0.000001f) + " ms!  "
                                + "Setting frame time to " + (lastFrameOffset * 0.000001f)
                                + " ms in the past.");
                        mDebugPrintNextFrameTimeDelta = true;
                    }
                    frameTimeNanos = now - lastFrameOffset;
                    mLastFrameTimeNanos = frameTimeNanos;
                }
            }
        }
        try {
            Trace.traceBegin(Trace.TRACE_TAG_VIEW, CALLBACK_TRACE_TITLES[callbackType]);
            for (CallbackRecord c = callbacks; c != null; c = c.next) {
                if (DEBUG_FRAMES) {
                    Log.d(TAG, "RunCallback: type=" + callbackType
                            + ", action=" + c.action + ", token=" + c.token
                            + ", latencyMillis=" + (SystemClock.uptimeMillis() - c.dueTime));
                }
          // 運行每一個 callback
                c.run(frameTimeNanos);
            }
        } finally {
            synchronized (mLock) {
                mCallbacksRunning = false;
                do {
                    final CallbackRecord next = callbacks.next;
                    recycleCallbackLocked(callbacks);
                    callbacks = next;
                } while (callbacks != null);
            }
            Trace.traceEnd(Trace.TRACE_TAG_VIEW);
        }
    }
callback的類型有以下 4 種,除了文章一開始提到的 3 種外,還有一個 CALLBACK_COMMIT。
-
CALLBACK_INPUT:輸入
-
CALLBACK_ANIMATION:動畫
-
CALLBACK_TRAVERSAL:遍歷,執行 measure、layout、draw
-
CALLBACK_COMMIT:遍歷完成的提交操作,用來修正動畫啟動時間
然後看上面的源碼,分析一下每個 callback 的執行過程:
1. callbacks = mCallbackQueues[callbackType].extractDueCallbacksLocked( now / TimeUtils.NANOS_PER_MS);
得到執行時間在當前時間之前的所有 CallBack,保存在單鏈表中。每種類型的 callback 按執行時間先後順序排序分別存在一個單鏈表裡面。為了保證當前 callback 執行時新 post 進來的 callback 在下一個 frame 時才被執行,這個地方 extractDueCallbacksLocked 會將需要執行的 callback 和以後執行的 callback 斷開變成兩個鏈表,新 post 進來的 callback 會被放到後面一個鏈表中。當前 frame 只會執行前一個鏈表中的 callback,保證了在執行 callback 時,如果callback中Post相同類型的callback,這些新加的 callback 將在下一個 frame 啟動後才會被執行。
2. 接下來,看一大段注釋,如果類型是 CALLBACK_COMMIT,並且當前 frame 渲染時間超過了兩個時鐘周期,則將當前提交時間修正為上一個垂直同步訊號時間。為了保證下一個frame 的提交時間和當前 frame 時間相差為一且不重複。
這個地方注釋挺難看懂,實際上這個地方 CALLBACK_COMMIT 是為了解決 ValueAnimator 的一個問題而引入的,主要是解決因為遍歷時間過長導致動畫時間啟動過長,時間縮短,導致跳幀,這裡修正動畫第一個 frame 開始時間延後來改善,這時候才表示動畫真正啟動。為什麼不直接設置當前時間而是回溯一個時鐘周期之前的時間呢?看注釋,這裡如果設置為當前 frame 時間,因為動畫的第一個 frame 其實已經繪製完成,第二個 frame 這時候已經開始了,設置為當前時間會導致這兩個 frame 時間一樣,導致衝突。
詳細情況請看官方針對這個問題的修改。Fix animation start jank due to expensive layout operations.
如下圖所示:

比如說在第二個frame開始執行時,開始渲染動畫的第一個畫面,第二個frame執行時間超過了兩個時鐘周期,Draw操作執行結束後,這時候完成了動畫第一幀的渲染,動畫實際上還沒開始,但是時間已經過了兩個時鐘周期,後面動畫實際執行時間將會縮短一個時鐘周期。這時候系統通過修正commit時間到frameTimeNanos的上一個VSync訊號時間,即完成動畫第一幀渲染之前的VSync訊號到來時間,修正了動畫啟動時間,保證動畫執行時間的正確性。
調用 c.run(frameTimeNanos) 執行回調
    private static final class CallbackRecord {
        public CallbackRecord next;
        public long dueTime;
        public Object action; // Runnable or FrameCallback
        public Object token;

        @UnsupportedAppUsage
        public void run(long frameTimeNanos) {
            if (token == FRAME_CALLBACK_TOKEN) {
                ((FrameCallback)action).doFrame(frameTimeNanos);
            } else {
                ((Runnable)action).run();
            }
        }
    }
CallbackRecord 的程式碼如上所示。
發起繪製的請求
doFrame 的邏輯了解清楚了,但是關於發起 vsync 請求的邏輯卻沒有講。
// ViewRootImpl
 @UnsupportedAppUsage
    void scheduleTraversals() {
     // 如果已經請求繪製了,就不會再次請求,因為多次請求,只有有一個執行就滿足要求了
        if (!mTraversalScheduled) {
            mTraversalScheduled = true;
       // 同步
            mTraversalBarrier = mHandler.getLooper().getQueue().postSyncBarrier();
        // 發送一個 callback 用於在下一幀來臨時候處理
            mChoreographer.postCallback(
                    Choreographer.CALLBACK_TRAVERSAL, mTraversalRunnable, null);
            if (!mUnbufferedInputDispatch) {
                scheduleConsumeBatchedInput();
            }
       // 通知稍候繪製
            notifyRendererOfFramePending();
            pokeDrawLockIfNeeded();
        }
    }
接著會調用 postCallbackDelayed:
    public void postCallbackDelayed(int callbackType,
            Runnable action, Object token, long delayMillis) {
        if (action == null) {
            throw new IllegalArgumentException("action must not be null");
        }
        if (callbackType < 0 || callbackType > CALLBACK_LAST) {
            throw new IllegalArgumentException("callbackType is invalid");
        }

        postCallbackDelayedInternal(callbackType, action, token, delayMillis);
    }
主要是做一些邏輯判斷,確保傳入的是對的。
接著又會調用 postCallbackDelayedInternal,保存 callback,並發起請求下一幀。
    private void postCallbackDelayedInternal(int callbackType,
            Object action, Object token, long delayMillis) {
        if (DEBUG_FRAMES) {
            Log.d(TAG, "PostCallback: type=" + callbackType
                    + ", action=" + action + ", token=" + token
                    + ", delayMillis=" + delayMillis);
        }

        synchronized (mLock) {
            final long now = SystemClock.uptimeMillis();
            final long dueTime = now + delayMillis;
            mCallbackQueues[callbackType].addCallbackLocked(dueTime, action, token);
        // 小於當前時間,說明需要立即執行
            if (dueTime <= now) {
                scheduleFrameLocked(now);
            } else {
          // 發送一個延遲 msg
                Message msg = mHandler.obtainMessage(MSG_DO_SCHEDULE_CALLBACK, action);
                msg.arg1 = callbackType;
                msg.setAsynchronous(true);
                mHandler.sendMessageAtTime(msg, dueTime);
            }
        }
    }
簡單來說,就是判斷當前是否有必要發起一個繪製請求,比如你發了一個 500ms 後重繪的消息,對於這個消息,會在 500ms 後在進行處理。但如果不是延遲消息,那說明需要立即處理。但是對於 view 的繪製邏輯,必須得等到下一個 vsync 到來的時候才會真正進行繪製。
接下來看看 scheduleFrameLocked 的邏輯:
   private void scheduleFrameLocked(long now) {
        if (!mFrameScheduled) {
            mFrameScheduled = true;
            if (USE_VSYNC) {
                if (DEBUG_FRAMES) {
                    Log.d(TAG, "Scheduling next frame on vsync.");
                }

                // If running on the Looper thread, then schedule the vsync immediately,
                // otherwise post a message to schedule the vsync from the UI thread
                // as soon as possible.
         // 如果是在一個 looper 執行緒中,那麼直接執行請求就好
                if (isRunningOnLooperThreadLocked()) {
                    scheduleVsyncLocked();
                } else {
            // 如果是在主執行緒,那麼需要發送一個請求 vsync 的消息,並插到最前面,需要確保前一個消息處理完後在開始請求
                    Message msg = mHandler.obtainMessage(MSG_DO_SCHEDULE_VSYNC);
                    msg.setAsynchronous(true);
                    mHandler.sendMessageAtFrontOfQueue(msg);
                }
            } else {
          // 如果不用 vsync 訊號,那麼就可以直接執行,只是需要記錄每一幀的時間
                final long nextFrameTime = Math.max(
                        mLastFrameTimeNanos / TimeUtils.NANOS_PER_MS + sFrameDelay, now);
                if (DEBUG_FRAMES) {
                    Log.d(TAG, "Scheduling next frame in " + (nextFrameTime - now) + " ms.");
                }
                Message msg = mHandler.obtainMessage(MSG_DO_FRAME);
                msg.setAsynchronous(true);
                mHandler.sendMessageAtTime(msg, nextFrameTime);
            }
        }
    }
這裡主要是根據具體情況來判斷如何發起下一幀的繪製。對於採用 vsync 訊號的主執行緒,會發送一個 MSG_DO_SCHEDULE_VSYNC 的消息,插到最前面,確保可以最早執行。
當收到 MSG_DO_SCHEDULE_VSYNC 消息後,就會給他安排請求 vsync 訊號的請求,最後會會調到 onVsync 方法。
    void doScheduleVsync() {
        synchronized (mLock) {
            if (mFrameScheduled) {
                scheduleVsyncLocked();
            }
        }
    }


    @UnsupportedAppUsage
    private void scheduleVsyncLocked() {
       // 發起獲取 vsync 訊號的請求
        mDisplayEventReceiver.scheduleVsync();
    }

    /**
     * Schedules a single vertical sync pulse to be delivered when the next
     * display frame begins.
     */
    @UnsupportedAppUsage
    public void scheduleVsync() {
        if (mReceiverPtr == 0) {
            Log.w(TAG, "Attempted to schedule a vertical sync pulse but the display event "
                    + "receiver has already been disposed.");
        } else {
            nativeScheduleVsync(mReceiverPtr);
        }
    }
到這裡,就把 Choreographer 的基本原理都講完了。
源碼小結
-
Choreographer 是執行緒單例的,而且必須要和一個 Looper 綁定,因為其內部有一個 Handler 需要和 Looper 綁定,一般是 App 主執行緒的 Looper 綁定
-
DisplayEventReceiver 是一個 abstract class,其 JNI 的程式碼部分會創建一個IDisplayEventConnection 的 Vsync 監聽者對象。這樣,來自 AppEventThread 的 VSYNC 中斷訊號就可以傳遞給 Choreographer 對象了。當 Vsync 訊號到來時,DisplayEventReceiver 的 onVsync 函數將被調用。
-
DisplayEventReceiver 還有一個 scheduleVsync 函數。當應用需要繪製UI時,將首先申請一次 Vsync 中斷,然後再在中斷處理的 onVsync 函數去進行繪製。
-
Choreographer 定義了一個 FrameCallbackinterface,每當 Vsync 到來時,其 doFrame 函數將被調用。這個介面對 Android Animation 的實現起了很大的幫助作用。以前都是自己控制時間,現在終於有了固定的時間中斷。
-
Choreographer 的主要功能是,當收到 Vsync 訊號時,去調用使用者通過 postCallback 設置的回調函數。目前一共定義了五種類型的回調,它們分別是:ListView 的 Item 初始化(obtain\setup) 會在 input 裡面也會在 animation 裡面,這取決於
-
CALLBACK_INPUT : 處理輸入事件處理有關
-
CALLBACK_ANIMATION : 處理 Animation 的處理有關
-
CALLBACK_INSETS_ANIMATION : 處理 Insets Animation 的相關回調
-
CALLBACK_TRAVERSAL : 處理和 UI 等控制項繪製有關
-
CALLBACK_COMMIT : 處理 Commit 相關回調
-
-
CALLBACK_INPUT 、CALLBACK_ANIMATION 會修改 view 的屬性,所以要比 CALLBACK_TRAVERSAL 先執行


