SpringBoot進階教程(六十一)intellij idea project下建多個module搭建架構(下)
- 2019 年 10 月 3 日
- 筆記
在上一篇文章《SpringBoot進階教程(六十)intellij idea project下建多個module(上)》中,我們已經介紹了在intellij idea中創建project之後再分化多個module,今天再大致介紹介紹各個module之間詳細工作的細分。 如果是不考慮細分多個module的話,可以看看這篇文章《SpringBoot入門教程(一)詳解intellij idea搭建SpringBoot》。
v設計資料庫
CREATE TABLE `useraccount` ( `id` int(10) unsigned NOT NULL AUTO_INCREMENT, `username` varchar(255) NOT NULL, `age` int(10) NOT NULL, `phone` bigint NOT NULL, `email` varchar(255) NOT NULL, `account` varchar(100) NOT NULL UNIQUE, `pwd` varchar(255) NOT NULL, PRIMARY KEY (`id`) )ENGINE=InnoDB AUTO_INCREMENT=1 DEFAULT CHARSET=utf8; insert into `useraccount` values(1,'趙(dev)',23,158,'[email protected]','test001','test001'); insert into `useraccount` values(2,'錢(dev)',27,136,'[email protected]','test002','test002'); insert into `useraccount` values(3,'孫(dev)',31,159,'[email protected]','test003','test003'); insert into `useraccount` values(4,'李(dev)',35,130,'[email protected]','test004','test004'); select * from `useraccount`;
v引入mybatis
1.0 添加mybatis插件
在learn-persist的pom.xml中添加mybatis插件。
<build> <plugins> <plugin> <groupId>org.mybatis.generator</groupId> <artifactId>mybatis-generator-maven-plugin</artifactId> <version>${mybatis-generator.version}</version> <dependencies> <dependency> <groupId> mysql</groupId> <artifactId> mysql-connector-java</artifactId> <version>${mysql.version}</version> </dependency> <dependency> <groupId>org.mybatis.generator</groupId> <artifactId>mybatis-generator-core</artifactId> <version>${mybatis-generator.version}</version> </dependency> </dependencies> <configuration> <!-- 自動生成的配置 --> <configurationFile>src/main/resources/mybatis-config/mybatis-generator.xml</configurationFile> <!--允許移動生成的文件 --> <verbose>true</verbose> <!-- 是否覆蓋 --> <overwrite>false</overwrite> </configuration> </plugin> </plugins> </build>
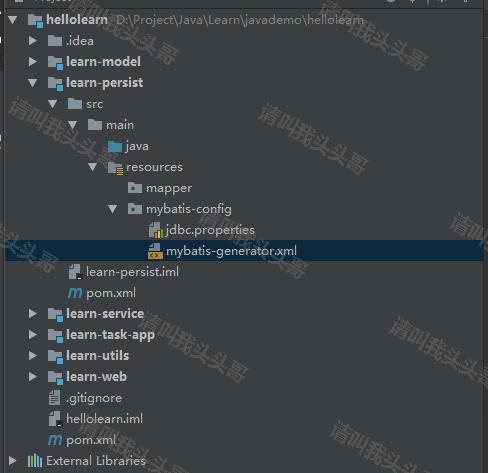
如上圖,在learn-persist的resources下分別創建mapper和mybatis-config文件目錄,並添加jdbc.properties和mybatis-generator.xml文件。
1.1 jdbc.properties
jdbc.driverClassName=com.mysql.jdbc.Driver jdbc.url=jdbc:mysql://localhost:3306/mytest?useSSL=false jdbc.username=toutou jdbc.password=demo123456
1.2 mybatis-generator.xml
<?xml version="1.0" encoding="UTF-8"?> <!DOCTYPE generatorConfiguration PUBLIC "-//mybatis.org//DTD MyBatis Generator Configuration 1.0//EN" "http://mybatis.org/dtd/mybatis-generator-config_1_0.dtd"> <generatorConfiguration> <properties resource="mybatis-config/jdbc.properties"/> <context id="DB2Tables" targetRuntime="MyBatis3"> <commentGenerator> <property name="suppressDate" value="true"/> <property name="suppressAllComments" value="true"/> </commentGenerator> <!--資料庫鏈接地址帳號密碼--> <jdbcConnection driverClass="com.mysql.jdbc.Driver" connectionURL="${jdbc.url}" userId="${jdbc.username}" password="${jdbc.password}"> </jdbcConnection> <javaTypeResolver> <property name="forceBigDecimals" value="false"/> </javaTypeResolver> <javaModelGenerator targetPackage="learn.model.po" targetProject="../learn-model/src/main/java/"> <property name="enableSubPackages" value="false" /> <property name="trimStrings" value="true" /> </javaModelGenerator> <sqlMapGenerator targetPackage="mapper" targetProject="../learn-persist/src/main/resources"> <property name="enableSubPackages" value="false" /> </sqlMapGenerator> <javaClientGenerator targetPackage="learn.persist" targetProject="../learn-persist/src/main/java/" type="XMLMAPPER"> <property name="enableSubPackages" value="false" /> </javaClientGenerator> <!--生成對應表及類名--> <table tableName="useraccount" domainObjectName="UserAccount" enableCountByExample="false" enableUpdateByExample="false" enableDeleteByExample="false" enableSelectByExample="false" selectByExampleQueryId="false"></table> </context> </generatorConfiguration>
mybatis-generator.xml更多介紹可以看這裡。
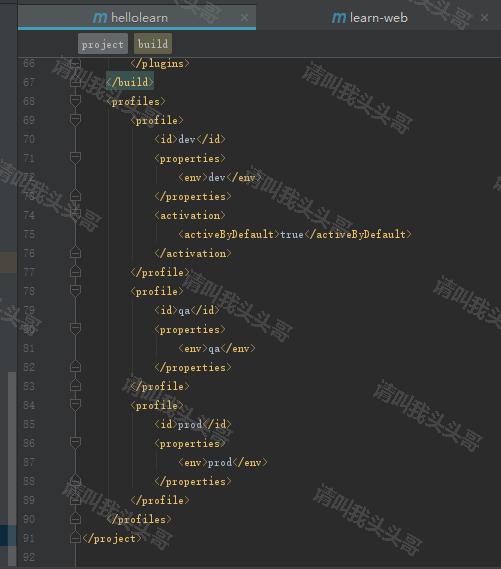
1.3 版本號統一配置
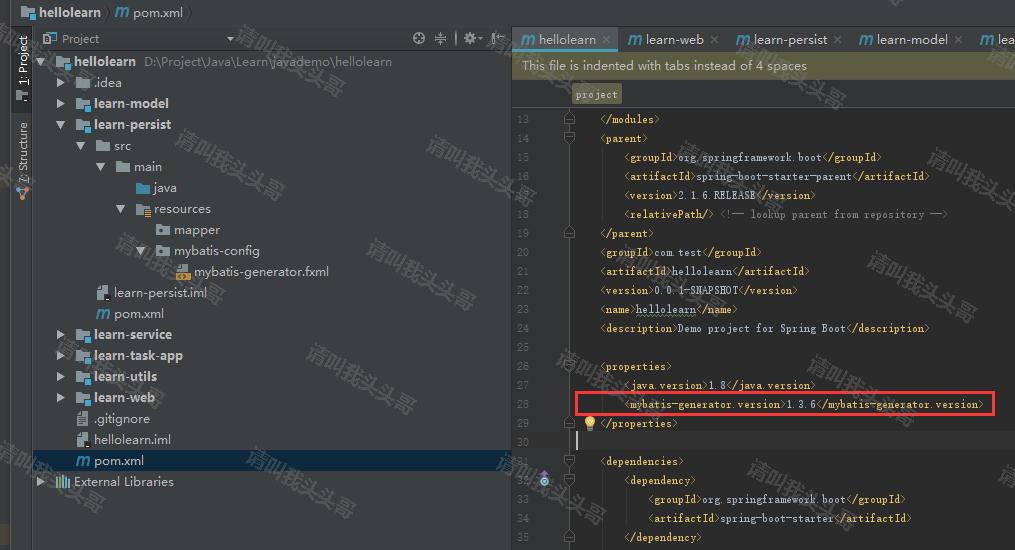
為了方便後續管理,將所有引入插件的版本號統一放在project(hellolearn)的pom.xml中統一控制,各子module(如learn-persist)的pom.xml中直接用 ${} 的方法使用。
例如:在hellolearn的pom.xml 屬性中添加 < mybatis-generator.version>1.3.6< /mybatis-generator.version> ,在learn-persist的pom.xml中直接 < version>${mybatis-generator.version}< /version> 使用即可。
注意上面的”例如”中程式碼標籤部分有空格是為了轉義的,防止瀏覽器將”mybatis-generator.version”和”version”識別為html標籤。
1.4 Maven Project 插件
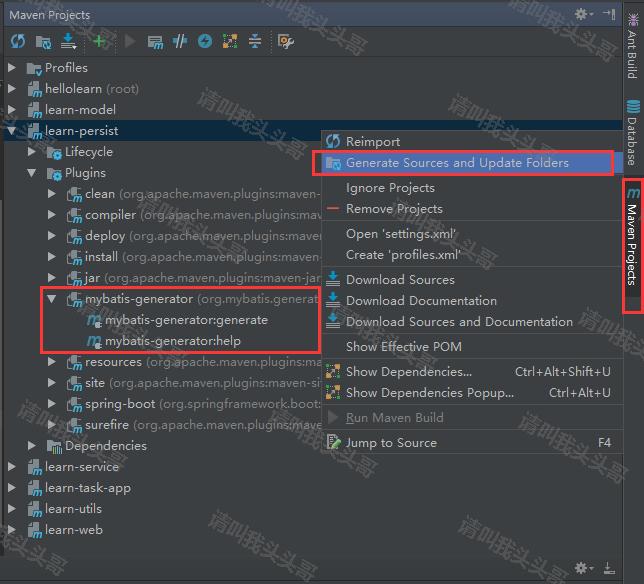
如上圖,在idea右側的maven project中就可以了對應的找到mybatis-generator的插件,如果找不到就右鍵maven project中的learn-persist,然後點擊generate sources…。
1.5 運行mybatis generator插件
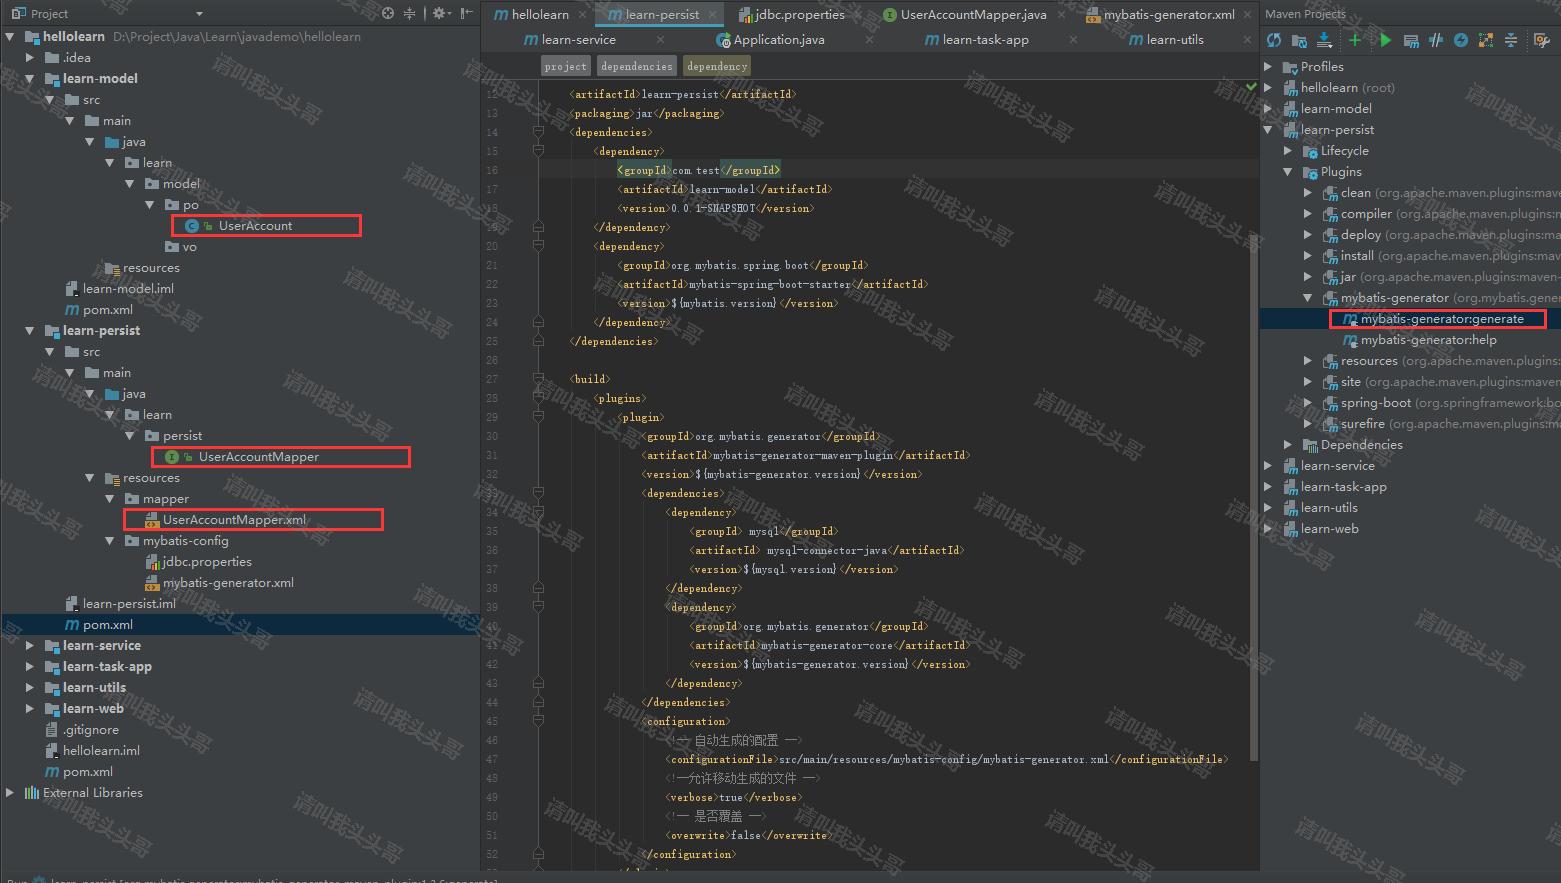
如上圖,點擊運行mybatis generator:generator插件,會對應生成左側標紅的三個文件。
v編寫controller
2.0 添加result返回實體類
package learn.model.vo; import java.io.Serializable; /** * @author toutou * @date by 2019/07 */ public class Result<T> implements Serializable { public int code; public String message; public T data; public int getCode() { return code; } public void setCode(int code) { this.code = code; } public String getMessage() { return message; } public void setMessage(String message) { this.message = message; } public T getData() { return data; } public void setData(T data) { this.data = data; } public static <T> Result<T> setSuccessResult(T t){ Result<T> r = new Result<T>(); r.setCode(200); r.setData(t); r.setMessage("success"); return r; } public static <T> Result<T> setErrorResult(int tempCode, String messageTemp){ Result<T> r = new Result<T>(); r.setCode(tempCode); r.setMessage(messageTemp); return r; } }
2.1 添加controller
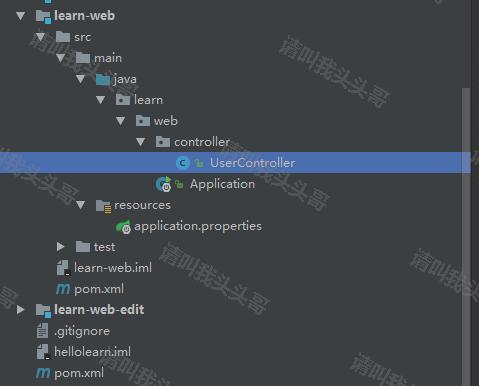
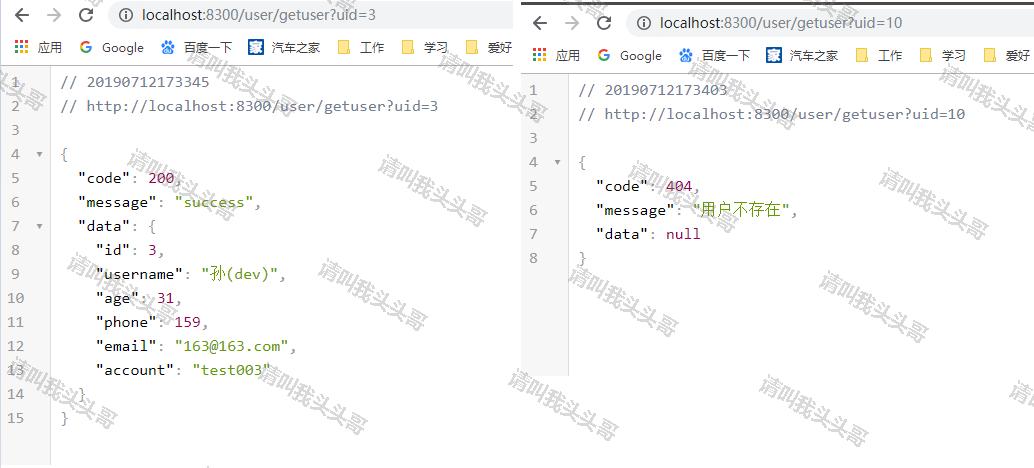
package learn.web.controller; import learn.model.vo.Result; import learn.model.vo.UserAccountVO; import learn.service.*; import org.springframework.beans.factory.annotation.Autowired; import org.springframework.web.bind.annotation.GetMapping; import org.springframework.web.bind.annotation.RequestParam; import org.springframework.web.bind.annotation.RestController; /** * @author toutou * @date by 2019/07 */ @RestController public class UserController { @Autowired UserAccountService userAccountService; @GetMapping("/user/hello") public String helloWorld() { return "hello world."; } @GetMapping("/user/getuser") public Result getUserAccountById(@RequestParam("uid") int id){ UserAccountVO user = userAccountService.getUserAccountById(id); if(user != null){ return Result.setSuccessResult(user); }else{ return Result.setErrorResult(404, "用戶不存在"); } } }
注意:getUserAccountById暫時用不上,可以先不添加。
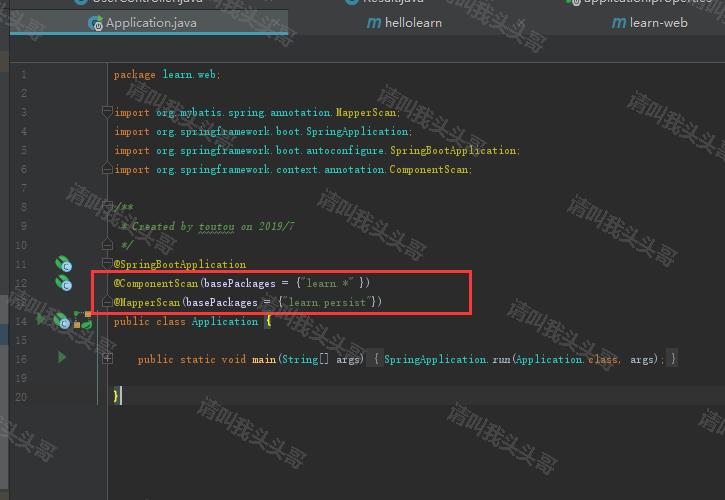
2.2 添加aplication啟動類
package learn.web; import org.mybatis.spring.annotation.MapperScan; import org.springframework.boot.SpringApplication; import org.springframework.boot.autoconfigure.SpringBootApplication; import org.springframework.context.annotation.ComponentScan; /** * Created by toutou on 2019/7 */ @SpringBootApplication @ComponentScan(basePackages = {"learn.*" }) @MapperScan(basePackages = {"learn.persist"}) public class Application { public static void main(String[] args) { SpringApplication.run(Application.class, args); } }
2.3 添加aplication.properties
server.port=8300 spring.profiles.active=@env@ #mybatis mybatis.mapper-locations = classpath:mapper/*Mapper.xml
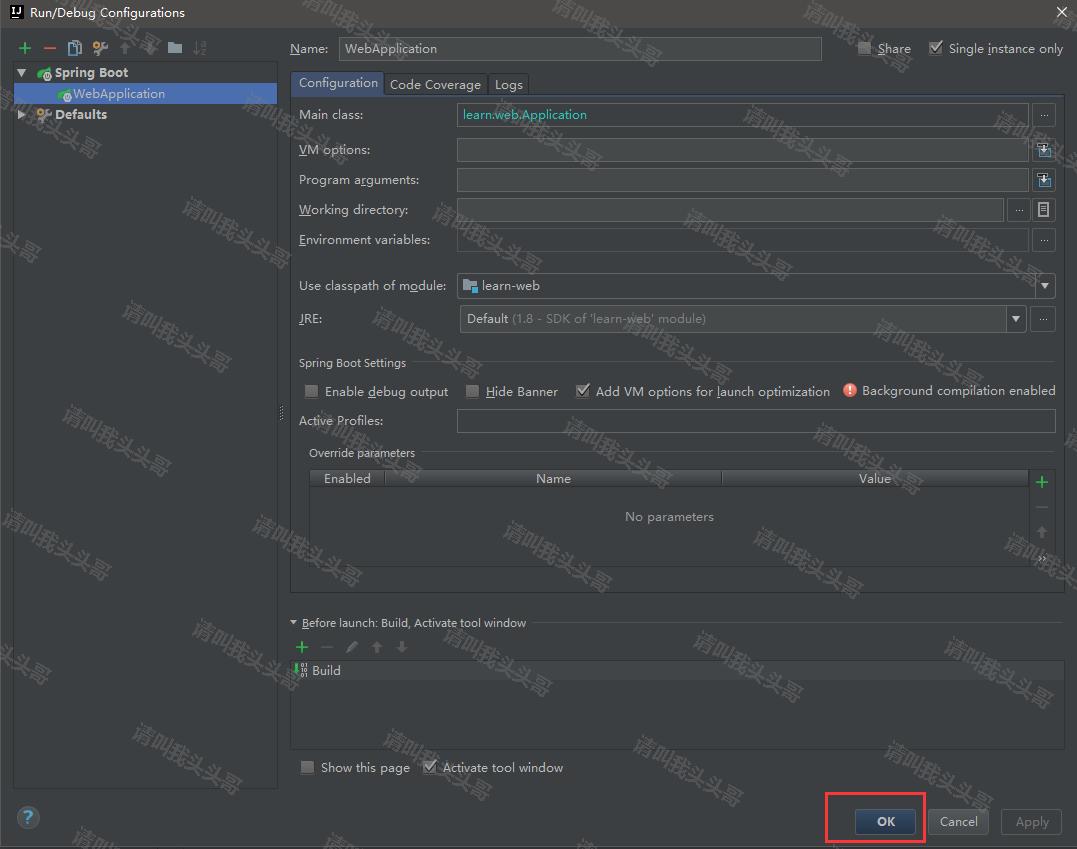
2.4 配置啟動類
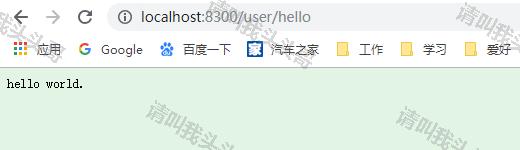
2.5 測試效果
v編寫service
3.1 添加Service
package learn.service; import learn.model.vo.UserAccountVO; /** * @author toutou * @date by 2019/07 */ public interface UserAccountService { UserAccountVO getUserAccountById(Integer id); }
3.2 實現Service
package learn.service.impl; import learn.model.po.UserAccount; import learn.model.vo.UserAccountVO; import learn.persist.UserAccountMapper; import learn.service.UserAccountService; import org.springframework.beans.factory.annotation.Autowired; import org.springframework.stereotype.Service; /** * @author toutou * @date by 2019/07 */ @Service public class UserAccountServiceImpl implements UserAccountService{ @Autowired UserAccountMapper userMapper; public UserAccountVO getUserAccountById(Integer id){ UserAccountVO accountVO = null; UserAccount account = userMapper.selectByPrimaryKey(id); if (account != null) { accountVO = new UserAccountVO(); accountVO.setId(account.getId()); accountVO.setAccount(account.getAccount()); accountVO.setAge(account.getAge()); accountVO.setEmail(account.getEmail()); accountVO.setUsername(account.getUsername()); accountVO.setPhone(account.getPhone()); } return accountVO; } }
v配置設置
4.1 添加application.properties
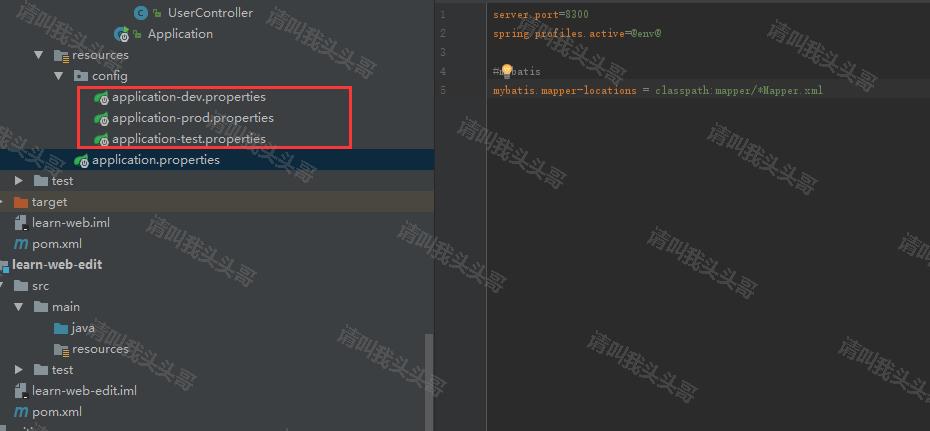
4.2 添加application.dev.properties
spring.datasource.url=jdbc:mysql://localhost:3306/mytest?useSSL=false&useUnicode=true&characterEncoding=utf-8&zeroDateTimeBehavior=convertToNull&serverTimezone=GMT%2b8 spring.datasource.username=toutou spring.datasource.password=demo123456 spring.datasource.driver-class-name=com.mysql.jdbc.Driver
4.3 添加pom.xml配置
4.3.1 hellolearn pom.xml
4.3.2 learn-web pom.xml
<build> <filters> <filter>src/main/resources/config/application-${env}.properties</filter> </filters> </build>
4.4 更新application啟動類
4.5 測試效果
vlinux部署springboot
5.1 learn-web pom.xml中添加插件
<build> <filters> <filter>src/main/resources/config/application-${env}.properties</filter> </filters> <plugins> <plugin> <groupId>org.springframework.boot</groupId> <artifactId>spring-boot-maven-plugin</artifactId> <configuration> <mainClass>learn.web.Application</mainClass> <classifier>exec</classifier> </configuration> <executions> <execution> <goals> <goal>repackage</goal> </goals> </execution> </executions> </plugin> </plugins> </build>
5.2 hellolearn pom.xml中添加插件
<build> <plugins> <plugin> <groupId>org.apache.maven.plugins</groupId> <artifactId>maven-jar-plugin</artifactId> <version>3.0.2</version> <configuration> <excludes> <exclude>**/profiles/</exclude> <exclude>**/mybatis-generator/</exclude> </excludes> </configuration> </plugin> <plugin> <groupId>org.apache.maven.plugins</groupId> <artifactId>maven-compiler-plugin</artifactId> <configuration> <source>1.8</source> <target>1.8</target> </configuration> </plugin> </plugins> </build>
注意:如果有用到profiles文件目錄則exclude。
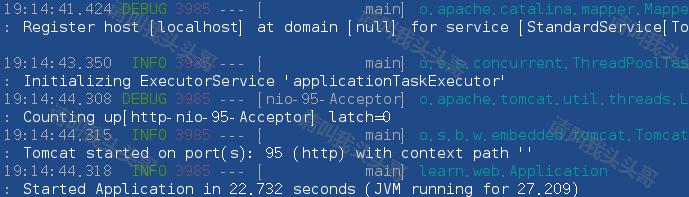
5.3 打包部署

java -jar learn-web-0.0.1-SNAPSHOT-exec.jar --server.port=95
你可能會遇到的問題:
- Spring boot Field required a bean of type that could not be found
- Caused by: java.lang.IllegalStateException: Ambiguous mapping found. Cannot map ‘xxxController’ bean method
- mybatis-generator的maven插件使用異常(mybatis-generator-maven-plugin):generate failed: Exception getting JDBC Driver
- maven出現:Failed to execute goal on project …: Could not resolve dependencies for project …
- spring boot 項目打包時報錯 Execution default of goal org.springframework.boot:spring-boot-maven-plugin:1.5.
- Failed to configure a DataSource: ‘url’ attribute is not specified and no embedded datasource could be configured.
v源碼地址
https://github.com/toutouge/javademosecond/tree/master/hellolearn
作 者:請叫我頭頭哥
出 處:http://www.cnblogs.com/toutou/
關於作者:專註於基礎平台的項目開發。如有問題或建議,請多多賜教!
版權聲明:本文版權歸作者和部落格園共有,歡迎轉載,但未經作者同意必須保留此段聲明,且在文章頁面明顯位置給出原文鏈接。
特此聲明:所有評論和私信都會在第一時間回復。也歡迎園子的大大們指正錯誤,共同進步。或者直接私信我
聲援部落客:如果您覺得文章對您有幫助,可以點擊文章右下角【推薦】一下。您的鼓勵是作者堅持原創和持續寫作的最大動力!
