從BIO到Netty的演變
- 2019 年 11 月 13 日
- 筆記
從BIO到Netty的演變
前言
電腦網路可以說是每個學電腦的都繞不過去的一道坎。電腦網路到底有多麼重要,你走到大學圖書館的電腦部分,翻開那些什麼《從零開始:黑客XXX》,《黑客攻防從入門到放棄》等書籍,基本第一部分都是在談論網路。你去一些X客論壇,上面的教程帖也基本都是從網路部分開始的。
相信每一位科班出身的,都學習過《電腦網路》這樣書籍, 上過這樣的課程。當然教師資源如何,我這裡就不談論,那一定又會引出一頓苦水。但是學習完這樣的課程,我們還是對電腦網路感到十分迷茫。這時候的我們可以背下網路七層模型,網路五層模型等,了解區域網,IP等基本地概念,但是電腦網路對於我們來說,還是一個十分空蕩蕩的名詞。
為了更好地了解網路(絕對不是因為那時候很迷黑客的緣故),我決定參加高級網路工程師的考試。通過網路工程師的我對電腦網路有了更為深入的理解,開始將自己的電腦網路體系從概念上勾連起來。也許我可以看懂其中的一些路由規則,甚至看懂一些路由分發的論文。但是我依舊只是站在理論的角度,去理解電腦網路。
到了工作的時候,開始了解Socket編程,開始參與各種實際生產環境的編程。這個時候的我開始對網路有了雖然簡單,但是十分真實的接觸。電腦網路不再只是停留在書本中的概念,而是我用以實現業務目標的切實手段。
隨著工作中開始負責物聯網項目的建設,我對網路中的各種協議開始有了自己的認識,甚至可以自己實現網路協議規範的程式碼落地。於此同時,由於對網路交互的性能要求,我不再只是會使用BIO網路編程,我開始使用NIO網路編程。
為了自己的知識儲備,也是為了滿足自己的好奇心,我查找了許多的資料,也報了許多課程,去學習網路編程。而我正好周六完成了軟考的又一次考試,所以接下來有一定空閑時間的我,接下來會繼續整理我的知識,並將它寫成部落格。
這篇部落格的主要內容就是按照演變的順序,寫下BIO->NIO->Reactor->Netty這樣的四個里程碑。這也是大佬們推薦的電腦網路編程的學習路線。不過這次只是給個整體的認識以及demo,更為深入的原理探究,會放在後面。
BIO
介紹
幾乎每個人都是BIO開始的電腦網路編程,而其中大部分也永遠地留在了這個電腦網路編程的模型。
優點
- 理解簡單
- 實現簡單
- 要求較低
缺點
- 性能低
- 瓶頸低
- 擴展難
程式碼示例(BIO下TCP)
這裡給出一些簡單的demo,供大家認識。
BIO_Client
package tech.jarry.learning.netease; import java.io.IOException; import java.io.OutputStream; import java.net.Inet4Address; import java.net.InetSocketAddress; import java.net.Socket; import java.nio.charset.Charset; import java.util.Scanner; /** * @Description: * @Author: jarry */ public class BIOClient { private static final Charset charset = Charset.forName("utf-8"); public static void main(String[] args) throws IOException { Socket socket = new Socket(); // Socket socket = new Socket("localhost", 8080); // 我還以為可以的。但是貌似上面的8080表示目標埠,而下面的8080表示源埠(發送埠) // socket.bind(new InetSocketAddress("localhost", 8080)); // 後來才去確定,.bind是用於綁定源資訊,而.connect是用於綁定目標資訊 socket.connect(new InetSocketAddress(Inet4Address.getLocalHost(), 8080)); OutputStream outputStream = socket.getOutputStream(); Scanner scanner = new Scanner(System.in); System.out.println("please input: "); String msg = scanner.nextLine(); outputStream.write(msg.getBytes(charset)); scanner.close(); outputStream.close(); socket.close(); } } BIO_ServerV1
package tech.jarry.learning.netease; import java.io.BufferedReader; import java.io.IOException; import java.io.InputStream; import java.io.InputStreamReader; import java.net.InetSocketAddress; import java.net.ServerSocket; import java.net.Socket; /** * @Description: BIO模型中Server端的簡單實現 * @Author: jarry */ public class BIOServer { public static void main(String[] args) throws IOException { ServerSocket serverSocket = new ServerSocket(); serverSocket.bind(new InetSocketAddress(8080)); System.out.println("server has started"); while (!serverSocket.isClosed()) { Socket requestClient = serverSocket.accept(); System.out.println("server get a connection: " + requestClient.toString()); InputStream requestInputStream = requestClient.getInputStream(); BufferedReader reader = new BufferedReader(new InputStreamReader(requestInputStream)); String msg; while ((msg = reader.readLine()) != null) { if (msg.length() == 0) { break; } System.out.println(msg); } System.out.println("server has receive a message from: " + requestClient.toString()); requestInputStream.close(); requestClient.close(); } serverSocket.close(); } } BIO_ServerV2
package tech.jarry.learning.netease; import java.io.BufferedReader; import java.io.IOException; import java.io.InputStream; import java.io.InputStreamReader; import java.net.InetSocketAddress; import java.net.ServerSocket; import java.net.Socket; import java.util.concurrent.ExecutorService; import java.util.concurrent.Executors; /** * @Description: 直接對原有程式碼BIOServer進行暴力修改,將其阻塞部分,通過多執行緒實現非同步處理 * @Author: jarry */ public class BIOServer1 { private static ExecutorService executorService = Executors.newCachedThreadPool(); public static void main(String[] args) throws IOException { ServerSocket serverSocket = new ServerSocket(); serverSocket.bind(new InetSocketAddress(8080)); System.out.println("server has started"); while (!serverSocket.isClosed()) { Socket requestClient = serverSocket.accept(); System.out.println("server get a connection: " + requestClient.toString()); executorService.submit(new Runnable() { @Override public void run() { InputStream requestInputStream = null; try { requestInputStream = requestClient.getInputStream(); } catch (IOException e) { e.printStackTrace(); } BufferedReader reader = new BufferedReader(new InputStreamReader(requestInputStream)); String msg = null; while (true) { try { if (!((msg = reader.readLine()) != null)) { break; } } catch (IOException e) { e.printStackTrace(); } if (msg.length() == 0) { break; } System.out.println(msg); } System.out.println("server has receive a message from: " + requestClient.toString()); try { requestInputStream.close(); requestClient.close(); } catch (IOException e) { e.printStackTrace(); } } }); } serverSocket.close(); } /** * 運行結果分析: * server has started * server get a connection: Socket[addr=/10.0.75.1,port=64042,localport=8080] * server get a connection: Socket[addr=/10.0.75.1,port=64052,localport=8080] * server get a connection: Socket[addr=/10.0.75.1,port=64061,localport=8080] * 123 * server has receive a message from: Socket[addr=/10.0.75.1,port=64042,localport=8080] * 456 * server has receive a message from: Socket[addr=/10.0.75.1,port=64052,localport=8080] * 789 * server has receive a message from: Socket[addr=/10.0.75.1,port=64061,localport=8080] */ } BIO_ServerV3
package tech.jarry.learning.netease; import java.io.*; import java.net.InetSocketAddress; import java.net.ServerSocket; import java.net.Socket; /** * @Description: 直接對原有程式碼BIOServer進行暴力修改,增加了其http格式的返回,確保瀏覽器可以正常訪問 * @Author: jarry */ public class BIOServer2 { public static void main(String[] args) throws IOException { ServerSocket serverSocket = new ServerSocket(); serverSocket.bind(new InetSocketAddress(8080)); System.out.println("server has started"); while (!serverSocket.isClosed()) { Socket requestClient = serverSocket.accept(); System.out.println("server get a connection: " + requestClient.toString()); InputStream requestInputStream = requestClient.getInputStream(); BufferedReader reader = new BufferedReader(new InputStreamReader(requestInputStream)); String msg; while ((msg = reader.readLine()) != null) { if (msg.length() == 0) { break; } System.out.println(msg); } System.out.println("server has receive a message from: " + requestClient.toString()); // 返回數據,並確保可以被http協議理解 OutputStream outputStream = requestClient.getOutputStream(); outputStream.write("HTTP/1.1 200 OKrr".getBytes("utf-8")); outputStream.write("Content-Length: 11rnrn".getBytes("utf-8")); outputStream.write("Hello World".getBytes("utf-8")); outputStream.flush(); requestInputStream.close(); outputStream.close(); requestClient.close(); } serverSocket.close(); } /** * 運行結果分析: */ // server has started // server get a connection: Socket[addr=/0:0:0:0:0:0:0:1,port=63008,localport=8080] // GET / HTTP/1.1 // Host: localhost:8080 // Connection: keep-alive // Cache-Control: max-age=0 // Upgrade-Insecure-Requests: 1 // User-Agent: Mozilla/5.0 (Windows NT 10.0; Win64; x64) AppleWebKit/537.36 (KHTML, like Gecko) Chrome/77.0.3865.90 Safari/537.36 // Sec-Fetch-Mode: navigate // Sec-Fetch-User: ?1 // Accept: text/html,application/xhtml+xml,application/xml;q=0.9,image/webp,image/apng,*/*;q=0.8,application/signed-exchange;v=b3 // Sec-Fetch-Site: none // Accept-Encoding: gzip, deflate, br // Accept-Language: en-US,en;q=0.9,zh-CN;q=0.8,zh;q=0.7 // Cookie: Webstorm-c7a2b5a2=b5e53f87-54cc-41d5-a21f-c7be3056dfe8; centcontrol_login_token=09E8A6B6888CB0B7A9F89AB3DB5FAFE4 // server has receive a message from: Socket[addr=/0:0:0:0:0:0:0:1,port=63008,localport=8080] // server get a connection: Socket[addr=/0:0:0:0:0:0:0:1,port=63009,localport=8080] // GET /favicon.ico HTTP/1.1 // Host: localhost:8080 // Connection: keep-alive // Pragma: no-cache // Cache-Control: no-cache // Sec-Fetch-Mode: no-cors // User-Agent: Mozilla/5.0 (Windows NT 10.0; Win64; x64) AppleWebKit/537.36 (KHTML, like Gecko) Chrome/77.0.3865.90 Safari/537.36 // Accept: image/webp,image/apng,image/*,*/*;q=0.8 // Sec-Fetch-Site: same-origin // Referer: http://localhost:8080/ // Accept-Encoding: gzip, deflate, br // Accept-Language: en-US,en;q=0.9,zh-CN;q=0.8,zh;q=0.7 // Cookie: Webstorm-c7a2b5a2=b5e53f87-54cc-41d5-a21f-c7be3056dfe8; centcontrol_login_token=09E8A6B6888CB0B7A9F89AB3DB5FAFE4 // server has receive a message from: Socket[addr=/0:0:0:0:0:0:0:1,port=63009,localport=8080] } 上面的程式碼是一套的,可以進行Server與Client的通訊,功能較為簡單。
所以這裡再給一個,可以進行通訊的版本。簡單的業務場景可以直接修改,應用。
BIO2_Client
package self; import java.io.*; import java.net.*; /** * @Description: * @Author: jarry */ public class Client { public static void main(String[] args) throws IOException { Socket socket = new Socket(); socket.setSoTimeout(2000); socket.connect(new InetSocketAddress(Inet4Address.getLocalHost(),2000),2000); System.out.println("client startup"); dealMsg(socket); socket.close(); } private static void dealMsg(Socket clientSocket) throws IOException { // 1.獲取鍵盤輸入流 InputStream systemInputStream = System.in; // 2.將systemInputStream轉化為具有快取功能的字元輸入流BufferedReader BufferedReader systemBufferedReader = new BufferedReader(new InputStreamReader(systemInputStream)); // 3.獲取Socket輸入流 InputStream socketInputStream = clientSocket.getInputStream(); // 4.將socketInputStream轉換為具有快取能力的字元輸入流 BufferedReader socketBufferedReader = new BufferedReader(new InputStreamReader(socketInputStream)); // 5.獲取Socket輸出流 OutputStream socketOutputStream = clientSocket.getOutputStream(); // 6.將socketOutputStream轉換為列印流(用於發送String) PrintStream socketPrintStream = new PrintStream(socketOutputStream); // 用於確立連接狀態的標識符 boolean flag = true; // 7.利用循環,client與server進行交互 do { // 從鍵盤等系統輸入流獲取輸入字元串 String str = systemBufferedReader.readLine(); // 將str寫入到socketClient的列印流(本質是輸出流)。socketClient的輸出流是連接Server的,用於向Server發送數據的 socketPrintStream.println(str); // 從Server獲得回寫(Server的回寫,一定會發送到socketClient的輸入流中(輸入的「入」是指入socketClient) String echo = socketBufferedReader.readLine(); // 建立一個用於關閉的方式 if ("bye".equalsIgnoreCase(echo)){ flag = false; }else{ // 在控制台列印server的echo System.out.println("server echo:"+echo); } }while (flag); // 8.退出交互,需要關閉與Server連接的兩個資源(輸入與輸出) 考慮一下lombok的@Cleanup socketBufferedReader.close(); socketPrintStream.close(); } } BIO2_Server
package self; import java.io.*; import java.net.ServerSocket; import java.net.Socket; /** * @Description: * @Author: jarry */ public class Server { public static void main(String[] args) throws IOException { // 建立Server的Socket,服務端不需要設置IP,以及Port // IP採用本地IP ServerSocket serverSocket = new ServerSocket(2000); System.out.println("server startup"); // 通過循環,對client的請求進行監聽 while (true){ // 獲得client的請求 Socket clientRequest = serverSocket.accept(); // 非同步處理client的請求 ClientHandler clientHandler = new ClientHandler(clientRequest); clientHandler.start(); } } private static class ClientHandler extends Thread { Socket socketClient = null; boolean flag = true; ClientHandler(Socket socketClient){ this.socketClient = socketClient; } @Override public void run() { super.run(); // 構建系統輸入流 InputStream systemInputStream = System.in; // 將系統輸入流轉換為字元輸入流 BufferedReader systemBufferedReader = new BufferedReader(new InputStreamReader(systemInputStream)); try { // 構建socketClient的輸入流(即客戶端中,寫入client輸出流的數據) InputStream clientInputStream = socketClient.getInputStream(); // 將client的輸入流轉為具有存儲能力的BufferedReader BufferedReader clientBufferedReader = new BufferedReader(new InputStreamReader(clientInputStream)); // 構建socketClient的輸出流(用於發送數據,即客戶端中,從client輸入流讀取的數據) OutputStream clientOutputStream = socketClient.getOutputStream(); // 將client的輸出流轉換為列印流,便於輸出數據 PrintStream clientPrintStream = new PrintStream(clientOutputStream); // 通過循環,與客戶端進行交互 do { // 讀取從客戶端發送來的數據,即讀取socketClient的輸入流轉化的BufferedReader String str = clientBufferedReader.readLine(); if ("bye".equalsIgnoreCase(str)){ flag = false; clientPrintStream.println("connect interrupt"); }else{ System.out.println(str); // 發送回寫數據,即將回寫數據寫入socketClient的輸出流(客戶端的輸入流會獲取相關數據) clientPrintStream.println(str.length()); } // 從系統輸入中獲取想要發送的數據 String servStr = systemBufferedReader.readLine(); // 發送到客戶端 clientPrintStream.println(servStr); }while (flag); // 同樣的,關閉連接資源 clientBufferedReader.close(); clientPrintStream.close(); } catch (IOException e) { e.printStackTrace(); }finally { // 無論發生什麼,最後都要關閉socket連接 try { socketClient.close(); } catch (IOException e) { e.printStackTrace(); } } } } } 為了使得程式碼結構更有優雅,並且為了更好地處理字元編碼問題(demo中保留了各種數據類型的處理方式)。我們將上述版本更新一下。
BIO2_ClientV2
package example; import java.io.IOException; import java.io.InputStream; import java.io.OutputStream; import java.net.Inet4Address; import java.net.InetSocketAddress; import java.net.Socket; import java.net.SocketException; import java.nio.ByteBuffer; public class Client { // 連接到遠程伺服器的遠程埠 private static final int PORT = 20000; // 本地埠 private static final int LOCAL_PORT = 20001; public static void main(String[] args) throws IOException { // 創建Socket的操作,可以選擇不同的創建方式 Socket socket = createSocket(); // Socket初始化操作 initSocket(socket); // 鏈接到本地20000埠,超時時間3秒,超過則拋出超時異常 socket.connect(new InetSocketAddress(Inet4Address.getLocalHost(), PORT), 3000); System.out.println("已發起伺服器連接,並進入後續流程~"); System.out.println("客戶端資訊:" + socket.getLocalAddress() + " P:" + socket.getLocalPort()); System.out.println("伺服器資訊:" + socket.getInetAddress() + " P:" + socket.getPort()); try { // 發送接收數據 todo(socket); } catch (Exception e) { System.out.println("異常關閉"); } // 釋放資源 socket.close(); System.out.println("客戶端已退出~"); } /** * 創建Socket * @return * @throws IOException */ private static Socket createSocket() throws IOException { /* // 無代理模式,等效於空構造函數 Socket socket = new Socket(Proxy.NO_PROXY); // 新建一份具有HTTP代理的套接字,傳輸數據將通過www.baidu.com:8080埠轉發 Proxy proxy = new Proxy(Proxy.Type.HTTP, new InetSocketAddress(Inet4Address.getByName("www.baidu.com"), 8800)); socket = new Socket(proxy); // 新建一個套接字,並且直接鏈接到本地20000的伺服器上 socket = new Socket("localhost", PORT); // 新建一個套接字,並且直接鏈接到本地20000的伺服器上 socket = new Socket(Inet4Address.getLocalHost(), PORT); // 新建一個套接字,並且直接鏈接到本地20000的伺服器上,並且綁定到本地20001埠上 socket = new Socket("localhost", PORT, Inet4Address.getLocalHost(), LOCAL_PORT); socket = new Socket(Inet4Address.getLocalHost(), PORT, Inet4Address.getLocalHost(), LOCAL_PORT); */ // 推薦無參構造,因為其它(上面)的構造方法都是包含構造,設參,以及connect操作。而socket一旦connect後,設置參數的操作就無效了。不便於靈活使用 Socket socket = new Socket(); // 綁定到本地20001埠 socket.bind(new InetSocketAddress(Inet4Address.getLocalHost(), LOCAL_PORT)); return socket; } private static void initSocket(Socket socket) throws SocketException { // 設置讀取超時時間為2秒 socket.setSoTimeout(2000); // 是否復用未完全關閉的Socket地址,對於指定bind操作後的套接字有效(正常Socket關閉後,對應埠在兩分鐘內將不再復用。而這個設置將可以直接使用對應空置埠) socket.setReuseAddress(true); // 是否開啟Nagle演算法(開啟後,兩點:第一,會對收到的每次數據進行ACK,另一端只有在接收到對應ACK,才會繼續發送數據。第二,如果有數據堆積,會一次將所有堆積數據發出去(畢竟這種模式有數據堆積是正常的) // 開啟後,更為嚴謹,嚴格,安全(默認開啟) socket.setTcpNoDelay(true); // 是否需要在長時無數據響應時發送確認數據(類似心跳包),時間大約為2小時 socket.setKeepAlive(true); // 對於close關閉操作行為進行怎樣的處理;默認為false,0 // false、0:默認情況,關閉時立即返回,底層系統接管輸出流,將緩衝區內的數據發送完成 // true、0:關閉時立即返回,緩衝區數據拋棄,直接發送RST結束命令到對方,並無需經過2MSL等待 // true、200:關閉時最長阻塞200毫秒,隨後按第二情況處理 socket.setSoLinger(true, 20); // 是否讓緊急數據內斂,默認false;緊急數據通過 socket.sendUrgentData(1);發送 // 只有設置為true,才會暴露到上層(邏輯層) socket.setOOBInline(true); // 設置接收發送緩衝器大小 socket.setReceiveBufferSize(64 * 1024 * 1024); socket.setSendBufferSize(64 * 1024 * 1024); // 設置性能參數:短鏈接,延遲,頻寬的相對重要性(權重) socket.setPerformancePreferences(1, 1, 0); } private static void todo(Socket client) throws IOException { // 得到Socket輸出流 OutputStream outputStream = client.getOutputStream(); // 得到Socket輸入流 InputStream inputStream = client.getInputStream(); byte[] buffer = new byte[256]; ByteBuffer byteBuffer = ByteBuffer.wrap(buffer); // 等同於上兩行程式碼(ByteBuffer是NIO提供的一個工具,allocate就是分配記憶體地址,ByteBuffer處理的是byte) // ByteBuffer byteBuffer = ByteBuffer.allocate(256); // 嘗試各種數據傳輸,發出 // byte byteBuffer.put((byte) 126); // char char c = 'a'; byteBuffer.putChar(c); // int int i = 2323123; byteBuffer.putInt(i); // bool boolean b = true; byteBuffer.put(b ? (byte) 1 : (byte) 0); // Long long l = 298789739; byteBuffer.putLong(l); // float float f = 12.345f; byteBuffer.putFloat(f); // double double d = 13.31241248782973; byteBuffer.putDouble(d); // String String str = "Hello你好!"; byteBuffer.put(str.getBytes()); // 發送到伺服器(長度等於index+1) outputStream.write(buffer, 0, byteBuffer.position() + 1); // 接收伺服器返回 int read = inputStream.read(buffer); System.out.println("收到數量:" + read); // 資源釋放 outputStream.close(); inputStream.close(); } /** * 擴展-MSL * MSL是Maximum Segment Lifetime的英文縮寫,可譯為「最長報文段壽命」, * 它是任何報文在網路上存在的最長的最長時間,超過這個時間報文將被丟棄。 * 我們都知道IP頭部中有個TTL欄位,TTL是time to live的縮寫,可譯為「生存時間」, * 這個生存時間是由源主機設置設置初始值但不是但不是存在的具體時間,而是一個IP數據報可以經過的最大路由數,每經過一個路由器,它的值就減1, * 當此值為0則數據報被丟棄,同時發送ICMP報文通知源主機。 * RFC793中規定MSL為2分鐘,但這完全是從工程上來考慮,對於現在的網路,MSL=2分鐘可能太長了一些。 * 因此TCP允許不同的實現可根據具體情況使用更小的MSL值。TTL與MSL是有關係的但不是簡單的相等關係,MSL要大於TTL。 */ } BIO2_ServerV2
package example; import java.io.IOException; import java.io.InputStream; import java.io.OutputStream; import java.net.Inet4Address; import java.net.InetSocketAddress; import java.net.ServerSocket; import java.net.Socket; import java.nio.ByteBuffer; public class Server { private static final int PORT = 20000; public static void main(String[] args) throws IOException { ServerSocket server = createServerSocket(); initServerSocket(server); // 綁定到本地埠上 backlog標識等待隊列中等待數量(超出,則在對應的客戶端觸發異常) server.bind(new InetSocketAddress(Inet4Address.getLocalHost(), PORT), 50); System.out.println("伺服器準備就緒~"); System.out.println("伺服器資訊:" + server.getInetAddress() + " P:" + server.getLocalPort()); // 等待客戶端連接 for (; ; ) { // 得到客戶端 Socket client = server.accept(); // 客戶端構建非同步執行緒 ClientHandler clientHandler = new ClientHandler(client); // 啟動執行緒 clientHandler.start(); } } private static ServerSocket createServerSocket() throws IOException { // 創建基礎的ServerSocket ServerSocket serverSocket = new ServerSocket(); // 綁定到本地埠20000上,並且設置當前可允許等待鏈接的隊列為50個 //server.bind(new InetSocketAddress(Inet4Address.getLocalHost(), PORT), 50); //serverSocket = new ServerSocket(PORT); // 等效於上面的方案,隊列設置為50個 //serverSocket = new ServerSocket(PORT, 50); // 與上面等同 // serverSocket = new ServerSocket(PORT, 50, Inet4Address.getLocalHost()); return serverSocket; } private static void initServerSocket(ServerSocket serverSocket) throws IOException { // 是否復用未完全關閉的地址埠 serverSocket.setReuseAddress(true); // 等效Socket#setReceiveBufferSize(針對的是accept()接收到的clientSocket。畢竟在accept時就已經接收到了一定的數據了) serverSocket.setReceiveBufferSize(64 * 1024 * 1024); // 設置serverSocket#accept超時時間 // serverSocket.setSoTimeout(2000); // 設置性能參數:短鏈接,延遲,頻寬的相對重要性(針對的是accept()接收到的clientSocket) serverSocket.setPerformancePreferences(1, 1, 1); } /** * 客戶端消息處理 */ private static class ClientHandler extends Thread { private Socket socket; ClientHandler(Socket socket) { this.socket = socket; } @Override public void run() { super.run(); System.out.println("新客戶端連接:" + socket.getInetAddress() + " P:" + socket.getPort()); try { // 得到套接字流 OutputStream outputStream = socket.getOutputStream(); InputStream inputStream = socket.getInputStream(); byte[] buffer = new byte[256]; int readCount = inputStream.read(buffer); ByteBuffer byteBuffer = ByteBuffer.wrap(buffer, 0, readCount); // 按客戶端發送的順序讀取 // byte byte be = byteBuffer.get(); // char char c = byteBuffer.getChar(); // int int i = byteBuffer.getInt(); // bool boolean b = byteBuffer.get() == 1; // Long long l = byteBuffer.getLong(); // float float f = byteBuffer.getFloat(); // double double d = byteBuffer.getDouble(); // String int pos = byteBuffer.position(); String str = new String(buffer, pos, readCount - pos - 1); System.out.println("收到數量:" + readCount + " 數據:" + be + "n" + c + "n" + i + "n" + b + "n" + l + "n" + f + "n" + d + "n" + str + "n"); outputStream.write(buffer, 0, readCount); outputStream.close(); inputStream.close(); } catch (Exception e) { System.out.println("連接異常斷開"); } finally { // 連接關閉 try { socket.close(); } catch (IOException e) { e.printStackTrace(); } } System.out.println("客戶端已退出:" + socket.getInetAddress() + " P:" + socket.getPort()); } } } BIO2_Tool
這裡的tool,表明了兩點:如何實現int與byte之間的轉換,可以自定義實現數據的轉換
package example; /** * 過渡一下,簡述int與byte之間的轉換。 * 進而明確各種數據類型與byte之間的轉化。 * 最終引申出NIO包下的ByteBuffer工具,實現不同數據類型與byte類型的相互轉換 */ public class Tools { public static int byteArrayToInt(byte[] b) { return b[3] & 0xFF | (b[2] & 0xFF) << 8 | (b[1] & 0xFF) << 16 | (b[0] & 0xFF) << 24; } public static byte[] intToByteArray(int a) { return new byte[]{ (byte) ((a >> 24) & 0xFF), (byte) ((a >> 16) & 0xFF), (byte) ((a >> 8) & 0xFF), (byte) (a & 0xFF) }; } } 程式碼示例擴展(BIO下UDP)
由於實際工作中UDP使用得比較少,所以這裡只給出了BIO中UDP的使用。不過也基本滿足了UDP的使用入門了,可以實現區域網搜索(起碼對我目前的工作來說是夠用了)。至於UDP用於音影片數據傳輸,得讀者自己尋找,或者等我了解之後,更新。
BIO_UDP_Searcher
package self; import java.io.IOException; import java.net.*; /** * @Description: * @Author: jarry */ public class UDPSearcher { public static void main(String[] args) throws IOException { System.out.println("UDPSearcher started."); // 構建UDP的Socket(由於是searcher,即數據的率先發送者,所以可以不用指定port,用於監聽) DatagramSocket datagramSocket = new DatagramSocket(); // 構建請求消息的實體(包含目標ip及port) String requestMsg = "just a joke."; byte[] requestBytes = requestMsg.getBytes(); DatagramPacket requestPacket = new DatagramPacket(requestBytes, requestBytes.length); requestPacket.setAddress(Inet4Address.getLocalHost()); requestPacket.setPort(20000); // 發送請求數據 System.out.println("UDPSearcher has send msg."); datagramSocket.send(requestPacket); // 接收回送數據 byte[] buf = new byte[512]; DatagramPacket receivePacket = new DatagramPacket(buf,buf.length); datagramSocket.receive(receivePacket); String sourceIp = receivePacket.getAddress().getHostAddress(); int sourcePort = receivePacket.getPort(); int dataLength = receivePacket.getLength(); String receiveData = new String(receivePacket.getData(),0,receivePacket.getData().length); // 顯示接收到的數據 System.out.println("UDPSearcher has received data with source:"+sourceIp+":"+sourcePort+" with length "+dataLength+". data:"+receiveData); // 由於是demo,所以不用循環,就此結束 System.out.println("UDPSearcher finished."); datagramSocket.close(); } } BIO_UDP_Provider
package self; import java.io.IOException; import java.net.DatagramPacket; import java.net.DatagramSocket; import java.net.SocketException; /** * @Description: * @Author: jarry */ public class UDPProvider { public static void main(String[] args) throws IOException { System.out.println("UDPProvider started."); // 新建DatagramSocekt,並設定在本機20000埠監聽,並接收消息 DatagramSocket datagramSocket = new DatagramSocket(20000); // 新建DatagramPacket實體 byte[] buf = new byte[512]; DatagramPacket datagramPacket = new DatagramPacket(buf,buf.length); // 接收數據 datagramSocket.receive(datagramPacket); // 處理接受到的數據 String sourceIp = datagramPacket.getAddress().getHostAddress(); int sourcePort = datagramPacket.getPort(); String data = new String(datagramPacket.getData(),0,datagramPacket.getLength()); // 顯示接收到的數據 System.out.println("UDPProvider has received data with source:"+sourceIp+":"+sourcePort+" with length "+data.length()+". data:"+data); // 準備發送回送數據 String responseData = "UDPProvider has received data with length:"+data.length(); byte[] responseBytes = responseData.getBytes(); // 構建回送數據實體(別玩了,設置目標ip與port) DatagramPacket responsePacket = new DatagramPacket(responseBytes, responseBytes.length ,datagramPacket.getAddress(),datagramPacket.getPort()); // 發送回送數據 System.out.println("UDPProvider has sended data."); datagramSocket.send(responsePacket); // 由於是demo,所以不用循環,就此結束 System.out.println("UDPProvider finished."); datagramSocket.close(); } } 為了網路監聽的clear,以及許可權問題,需要對上述程式碼進行一次升級。
BIO_UDP2_MessageCreator
package self.v2; /** * @Description: 自定義通訊數據格式(這可能是最簡單的應用層協議了) * @Author: jarry */ public class MessageCreator { private static final String SN_HEADER = "收到暗號,我是(SN):"; private static final String PORT_HEADER = "發送暗號,請回電埠(PORT):"; public static String buildWithPort(int port){ return PORT_HEADER + port; } public static int parsePort(String data){ if (data.startsWith(PORT_HEADER)){ return Integer.parseInt(data.substring(PORT_HEADER.length())); } return -1; } public static String buildWithSN(String sn){ return SN_HEADER + sn; } public static String parseSN(String data){ if (data.startsWith(SN_HEADER)){ return data.substring(SN_HEADER.length()); } return null; } } BIO_UDP2_Searcher
package self.v2; import java.io.IOException; import java.net.*; import java.util.ArrayList; import java.util.List; import java.util.concurrent.CountDownLatch; /** * @Description: * @Author: jarry */ public class UDPSearcher { // 監聽埠號 private static final int LISTEN_PORT = 30000; public static void main(String[] args) throws IOException, InterruptedException { System.out.println("UDPSearcher Started"); Listener listener = listen(); sendBroadcast(); // 讀取任意鍵盤資訊後退出 System.in.read(); List<Device> devices = listener.getDevicesAndClose(); for (Device device : devices) { System.out.println("Device:"+device.toString()); } // 完成 System.out.println("UDPSearcher Finished"); } private static Listener listen() throws InterruptedException { System.out.println("UDPSearcher start listen."); CountDownLatch countDownLatch = new CountDownLatch(1); Listener listener = new Listener(LISTEN_PORT, countDownLatch); listener.start(); countDownLatch.await(); return listener; } /** * 用於發送廣播消息 * @throws IOException */ private static void sendBroadcast() throws IOException { System.out.println("UDPSearcher sendBroadcast started."); // 作為一個搜索者(發送請求),無需指定一個埠,由系統自動分配 DatagramSocket datagramSocket = new DatagramSocket(); // 構建一份請求數據 String requestData = MessageCreator.buildWithPort(LISTEN_PORT); byte[] requestDataBytes = requestData.getBytes(); // 構建發送數據實體 DatagramPacket requestPacket = new DatagramPacket(requestDataBytes, requestDataBytes.length); // 設置目標地址(採用廣播地址) requestPacket.setAddress(Inet4Address.getByName("255.255.255.255")); requestPacket.setPort(20000); // 發送構建好的消息 datagramSocket.send(requestPacket); System.out.println("start send data."); // 發送結束 System.out.println("UDPSearcher sendBroadcast finished."); datagramSocket.close(); } private static class Device { final int port; final String ip; final String sn; public Device(int port, String ip, String sn) { this.port = port; this.ip = ip; this.sn = sn; } @Override public String toString() { return "Device{" + "port=" + port + ", ip='" + ip + ''' + ", sn='" + sn + ''' + '}'; } } private static class Listener extends Thread{ private final int listenPort; private final CountDownLatch countDownLatch; private final List<Device> devices = new ArrayList<Device>(); private boolean done = false; private DatagramSocket ds = null; public Listener(int listenPort, CountDownLatch countDownLatch){ super(); this.listenPort = listenPort; this.countDownLatch = countDownLatch; } @Override public void run() { super.run(); // 通知已啟動 countDownLatch.countDown(); // 開始實際數據監聽部分 try { // 監聽回送埠 ds = new DatagramSocket(listenPort); while (!done){ // 接收消息的實體 final byte[] buf = new byte[512]; DatagramPacket receivePack = new DatagramPacket(buf, buf.length); // 開始接收數據 ds.receive(receivePack); // 列印接收到的資訊 String ip = receivePack.getAddress().getHostAddress(); int port = receivePack.getPort(); int dataLength = receivePack.getLength(); String data = new String(receivePack.getData(),0,dataLength); System.out.println("UDPSearcher receive form ip:" + ip + "tport:" + port + "tdata:" + data); String sn = MessageCreator.parseSN(data); if (sn != null){ Device device = new Device(port, ip ,sn); devices.add(device); } } }catch (Exception e){ }finally { close(); } System.out.println("UDPSearcher listner finished"); } private void close(){ if (ds != null){ ds.close(); ds = null; } } List<Device> getDevicesAndClose(){ done = true; close(); return devices; } } } BIO_UDP_Provider
package self.v2; /** * @Description: * @Author: jarry */ import java.io.IOException; import java.net.DatagramPacket; import java.net.DatagramSocket; import java.util.UUID; /** * UDP 提供者, 用於提供UDP服務 */ public class UDPProvider { public static void main(String[] args) throws IOException { String sn = UUID.randomUUID().toString(); Provider provider = new Provider(sn); provider.start(); // 讀取任意字元,退出 System.in.read(); provider.exit(); } private static class Provider extends Thread { private final String sn; private boolean done = false; private DatagramSocket datagramSocket = null; public Provider(String sn){ super(); this.sn = sn; } @Override public void run() { super.run(); System.out.println("UDPProvider started."); try { // 作為一個接收者(接受請求),需要指定一個埠用來接收消息 datagramSocket = new DatagramSocket(20000); // 通過一個循環,不斷監聽,接收數據 while (true) { // 接收消息的實體 final byte[] buf = new byte[512]; DatagramPacket receivePack = new DatagramPacket(buf, buf.length); // 開始接收數據 datagramSocket.receive(receivePack); // 列印接收到的資訊 String ip = receivePack.getAddress().getHostAddress(); int port = receivePack.getPort(); int dataLength = receivePack.getLength(); String data = new String(receivePack.getData(), 0, dataLength); System.out.println("UDPProvider receive form ip:" + ip + "tport:" + port + "tdata:" + data); // 獲得目標埠 int responsePort = MessageCreator.parsePort(data); if (responsePort != -1){ // 構建一份回送數據 String responseData = MessageCreator.buildWithSN(sn); byte[] reponseDataBytes = responseData.getBytes(); // 直接根據發送者,構建回送數據實體 DatagramPacket responsePacket = new DatagramPacket(reponseDataBytes, reponseDataBytes.length, receivePack.getAddress(), // 採用指定的埠,而不是解析獲得的來源埠(來源埠不一定就是監聽埠,這是有些時候為了簡化而已) responsePort); // 發送構建好的回送消息 datagramSocket.send(responsePacket); System.out.println("start send data."); } } }catch (Exception ignore){ }finally { close(); } // 發送結束 System.out.println("UDPProvider finished."); } /** * 對外提供結束方法 */ void exit(){ done = true; close(); } /** * 本地關閉DatagramSocket的方法 */ private void close(){ if (datagramSocket != null){ datagramSocket.close(); datagramSocket = null; } } } } NIO
介紹
在了解BIO之後,我們可以很明顯地發現其中的問題,那就是BIO模型中,每一個Client的請求發送到Server端後,Server端通過accept接收請求後,必須創建一個clientSocket來進行通訊。並且這個通訊是阻塞的,一方面,新的clientSocket無法進入(單執行緒嘛),另一方面,clientSocket是通過流的方式進行通訊,而流的通訊方式是阻塞的(即沒有獲得數據是,必須在那裡等待)。這兩個問題,前者可以如demo中那樣,創建一個執行緒池來解決,而後者是沒法解決的。而這樣一個多執行緒+BIO也是很多開發人員的選擇,因為這樣的實現也十分簡單,並且可以滿足一定的需求了。
但是,回過頭想一想,上述的解決方案,存在一個問題。那就是系統並發量受限於執行緒池的執行緒數。如果請求只有幾百的並發,那麼上述的解決方案沒有任何問題。但是任何一個稍有規模的業務場景都不會只有幾百的並發。那麼如果不對技術進行升級,只有兩個辦法。一個升級硬體配置,尤其是記憶體(因為執行緒是非常消耗記憶體的),另一方面將連接按照一定的邏輯維度進行拆分(比如按照業務場景)。
我曾經和我的Boss談話時,提到這麼一句話:技術的非常熟練,不如技術升級帶來的價值高(因為我們公司有一個去年畢業的開發,非常抗拒學習新技術。雖然基礎的CRUD挺熟練的,但是效率真的太低了。一個簡單的條件查詢就說要十五個工作日。如果他會使用函數式編程,配合MP,也許就一個小時吧。有空可以出個效率編程的專題,感覺很有價值)。
所以,在BIO越加疲軟的時候(當然有的業務場景BIO性能貌似並不比NIO低多少,但是投入差別有些大),終於NIO面世。
NIO藉助事件監聽機制,提供非阻塞式的高伸縮性網路。當然,有興趣的可以深挖,相關概念還是很多的,比如它與linux的IO模型的關係,這些都可以很好地幫助大家擴展視野(畢竟視野決定了高度)。
NIO有三大支柱,分別是:ByteBuffer,Channel,Selector(詳見:Java NIO:Buffer、Channel 和 Selector)。
-
ByteBuffer:就是一個數據實體,其中提供了許多數據轉換的方法。如在BIO的demo中就用到了
-
Channel:參考網路通訊的channel,所有的 NIO 操作始於通道,通道是數據來源或數據寫入的目的地。這降低了BIO入門時對流認識的痛苦(一會輸入流,一會輸出流,流還需要進行轉換),並且也有利於提高開發效率。
-
Selector:多路復用器(雖然有人稱之為選擇器,但是更為精準的說法時多路復用器),實現了一個執行緒管理多個Channel,也是NIO事件驅動機制的基礎。
當然上述的這些,也不是必須的,我可以只有Channel,ByteBuffer的數據轉換可以自己實現,而Selector,可以通過多執行緒的方式去達到類似的功能效果(性能當然時沒法比的了)。但是只有三者齊聚,才能最大發揮NIO的性能。
優點
- 性能好
- 性價比高
- 不需要理解流
- 性能瓶頸更高
缺點
- 需要理解NIO的模型(相對於BIO,NIO的模型更為抽象)
- 需要理解NIO的事件驅動機制
- NIO的三大支柱的理解需要一定的時間
程式碼示例
這裡給出一些簡單的demo,供大家認識。
NIO_Client
package tech.jarry.learning.netease; import java.io.IOException; import java.net.Inet4Address; import java.net.InetSocketAddress; import java.nio.ByteBuffer; import java.nio.channels.SocketChannel; import java.util.Scanner; /** * @Description: NIO模型下的TCP客戶端實現 * @Author: jarry */ public class NIOClient { public static void main(String[] args) throws IOException { // 獲得一個SocektChannel SocketChannel socketChannel = SocketChannel.open(); // 設置SocketChannel為非阻塞模式 socketChannel.configureBlocking(false); // 設置SocketChannel的連接配置 socketChannel.connect(new InetSocketAddress(Inet4Address.getLocalHost(), 8080)); // 通過循環,不斷連接。跳出循環,表示連接建立成功 while (!socketChannel.finishConnect()){ // 如果沒有成功建立連接,就一直阻塞當前執行緒(.yield()會令當前執行緒「謙讓」出CPU資源) Thread.yield(); } // 發送外部輸入的數據 Scanner scanner = new Scanner(System.in); System.out.println("please input:"); String msg = scanner.nextLine(); // ByteBuffer.wrap()會直接調用HeapByteBuffer。故一方面其會自己完成記憶體分配。另一方面,其分配的記憶體是非直接記憶體(非heap堆) ByteBuffer byteBuffer = ByteBuffer.wrap(msg.getBytes()); // ByteBuffer.hasRemaining()用於判斷對應ByteBuffer是否還有剩餘數據(實現:return position < limit;) while (byteBuffer.hasRemaining()){ socketChannel.write(byteBuffer); } // 讀取響應 System.out.println("receive echoResponse from server"); // 設置緩衝區大小為1024 ByteBuffer requestBuffer = ByteBuffer.allocate(1024); // 判斷條件:是否開啟,是否讀取到數據 //TODO 我認為這裡的實現十分粗糙,是不可以置於生產環境的,具體還需要後面再看看(即使是過渡demo,也可以思考一下嘛) while (socketChannel.isOpen() && socketChannel.read(requestBuffer) != -1){ // 長連接情況下,需要手動判斷數據有沒有讀取結束 (此處做一個簡單的判斷: 超過0位元組就認為請求結束了) if (requestBuffer.position() > 0) { break; } } requestBuffer.flip(); // byte[] content = new byte[requestBuffer.limit()]; // // .get()方法只會返回byte類型(猜測是當前標記位的數據) // requestBuffer.get(content); // System.out.println(new String(content)); // ByteBuffer提供了大量的基本類型轉換的方法,可以直接拿來使用 System.out.println(new String(requestBuffer.array())); scanner.close(); socketChannel.close(); } } NIO_ServerV1
package tech.jarry.learning.netease; import java.io.IOException; import java.net.InetSocketAddress; import java.nio.ByteBuffer; import java.nio.channels.ServerSocketChannel; import java.nio.channels.SocketChannel; /** * @Description: 直接根據BIOServer進行轉變的。所以整體的邏輯與BIOServer類似 * @Author: jarry */ public class NIOServer { public static void main(String[] args) throws IOException { // 創建網路服務端 ServerSocketChannel serverSocketChannel = ServerSocketChannel.open(); serverSocketChannel.configureBlocking(false); //TODO .socket().bind()與.bind()的區別不清楚 serverSocketChannel.socket().bind(new InetSocketAddress(8080)); System.out.println("server has started"); // 通過循環,不斷獲取監聽不同客戶端發來的連接請求 while (true){ // 由於NIO是非阻塞,故返回值是完全可能是null的 SocketChannel socketChannel = serverSocketChannel.accept(); if (socketChannel != null){ System.out.println("server has connect a new client: "+socketChannel.getRemoteAddress().toString()); socketChannel.configureBlocking(false); ByteBuffer requestBuffer = ByteBuffer.allocate(1024); while (socketChannel.isOpen() && socketChannel.read(requestBuffer) != -1){ if (requestBuffer.position() > 0){ break; } } if (requestBuffer.position() == 0){ // 如果沒有數據,就不再進行後續處理,而是進入下一個循環 continue; } requestBuffer.flip(); System.out.println("server receive a message: "+new String(requestBuffer.array())); System.out.println("server receive a message from: "+socketChannel.getRemoteAddress()); // 響應結果 200 String response = "HTTP/1.1 200 OKrn" + "Content-Length: 12rnrn" + "Hello World!"; ByteBuffer responseBuffer = ByteBuffer.wrap(response.getBytes()); while (responseBuffer.hasRemaining()){ socketChannel.write(responseBuffer); } } } } } NIO_ServerV2
package tech.jarry.learning.netease; import java.io.IOException; import java.net.InetSocketAddress; import java.nio.ByteBuffer; import java.nio.channels.ServerSocketChannel; import java.nio.channels.SocketChannel; import java.util.ArrayList; import java.util.Iterator; import java.util.List; /** * @Description: 與BIOServer同樣的,NIOServer也無法同時連接多個客戶端 * V1版本這裡,依舊如BIOServer1那樣,通過輪詢實現多個客戶端處理(不過BIO由於是阻塞的,所以採用多執行緒。而NIO是非阻塞的,所以採用一個全局列表來進行處理) * @Author: jarry */ public class NIOServerV1 { private static List<SocketChannel> socketChannelList = new ArrayList<>(); public static void main(String[] args) throws IOException { // 創建網路服務端 ServerSocketChannel serverSocketChannel = ServerSocketChannel.open(); serverSocketChannel.configureBlocking(false); //TODO .socket().bind()與.bind()的區別不清楚 serverSocketChannel.socket().bind(new InetSocketAddress(8080)); System.out.println("server has started"); // 通過循環,不斷獲取監聽不同客戶端發來的連接請求 while (true) { // 由於NIO是非阻塞,故返回值是完全可能是null的 SocketChannel socketChannel = serverSocketChannel.accept(); if (socketChannel != null) { // 如果有新的連接接入,就列印日誌,並將對應的SocektChannel置入全局隊列中 System.out.println("server has connect a new client: " + socketChannel.getRemoteAddress().toString()); socketChannel.configureBlocking(false); socketChannelList.add(socketChannel); } else { // 如果沒有新的連接接入,就對現有連接的數據進行處理,如果處理完了就從列表中刪除對應SocketChannel Iterator<SocketChannel> socketChannelIterator = socketChannelList.iterator(); while (socketChannelIterator.hasNext()){ SocketChannel clientSocketChannel = socketChannelIterator.next(); ByteBuffer requestBuffer = ByteBuffer.allocate(1024); // 新增:如果當前channel的數據長度為0,表示這個通道沒有數據需要處理,那就過會兒處理 if (clientSocketChannel.read(requestBuffer) == 0){ // 進入下一個循環,即處理下一個channel continue; } while (clientSocketChannel.isOpen() && clientSocketChannel.read(requestBuffer) != -1) { if (requestBuffer.position() > 0) { break; } } if (requestBuffer.position() == 0) { // 如果沒有數據,就不再進行後續處理,而是進入下一個循環 continue; } requestBuffer.flip(); System.out.println("server receive a message: " + new String(requestBuffer.array())); System.out.println("server receive a message from: " + clientSocketChannel.getRemoteAddress()); // 響應結果 200 String response = "HTTP/1.1 200 OKrn" + "Content-Length: 12rnrn" + "Hello World!"; ByteBuffer responseBuffer = ByteBuffer.wrap(response.getBytes()); while (responseBuffer.hasRemaining()) { clientSocketChannel.write(responseBuffer); } // 新增:如果運行到這裡,說明返回的數據已經返回了 // 我認為,如果是長連接的話,這裡的處理應當更加嚴密(當然這只是一個過渡demo版本) socketChannelIterator.remove(); // 我認為,應當進行close等資源釋放操作。並且應該先remove(),再close clientSocketChannel.close(); } } } } } NIO_ServerV3
package tech.jarry.learning.netease.again; import java.io.IOException; import java.net.InetSocketAddress; import java.nio.ByteBuffer; import java.nio.channels.SelectionKey; import java.nio.channels.Selector; import java.nio.channels.ServerSocketChannel; import java.nio.channels.SocketChannel; import java.util.Iterator; import java.util.Set; /** * @Description: 這個版本,充分利用了NIO的第三個支柱-Selector,完成事件驅動的轉型 * 注意,上個版本使用循環,就類似自旋(自旋相對比較底層,小),雖然解決了BIO的每個client佔據一個執行緒的資源消耗(主要是記憶體),但是加大了CPU的消耗(CPU要不斷進行循環,判斷,即使是無效的操作) * NIO通過Selector,建立事件驅動模型,來解決這一問題。即只有當特定的事件(如連接建立完成)發生,才會進行對應的事件處理(從而避免了CPU的無效消耗,提高效率) * 私語:很多Javaer一直停留在初級層次(網路編程只能百度,使用BIO),就是無法突破事件驅動模型這種抽象層次更高的高層思想 * @Description: 為了更好地學習與理解Netty,基礎的NIO再過一遍 * @Author: jarry */ public class NIOServerV2 { public static void main(String[] args) throws IOException { // 1.創建並配置ServerSocketChannel ServerSocketChannel serverSocketChannel = ServerSocketChannel.open(); serverSocketChannel.configureBlocking(false); serverSocketChannel.socket().bind(new InetSocketAddress(8080)); // 2.創建Selector,並完成SelectionKey的註冊,並完成初始化監聽 // Selector在非阻塞的基礎上,實現了一個執行緒管理多個Channel(也就常說的「多路復用」) // 那可不可以理解為一個selector管理多個channel,監聽多個channel(後續程式碼中,除了server外,還有client們都註冊到了這個selector中) Selector selector = Selector.open(); SelectionKey selectionKey = serverSocketChannel.register(selector, 0, serverSocketChannel); selectionKey.interestOps(SelectionKey.OP_ACCEPT); System.out.println("server start success "); // 3.開始循環處理各個事件 while (true) { // 1.通過.select()阻塞當前執行緒,直到有註冊的selectionKey觸發(觸發是,會將對應的selectionKey複製到selected set中) selector.select(); // 2.獲取觸發的selectionKey集合 Set<SelectionKey> selectionKeySet = selector.selectedKeys(); // 3.遍歷處理觸發的selectionKey集合 Iterator<SelectionKey> iterator = selectionKeySet.iterator(); while (iterator.hasNext()){ // 1.獲得觸發的selectionKey SelectionKey selectedKey = iterator.next(); // 2.從集合中移除正在處理的selectionKey(單執行緒也可以在處理完後移除,但多執行緒中就可能出現同一selectionKey被多個執行緒處理) iterator.remove(); // 3.根據iteration觸發的事件類型,進行對應處理(這裡demo為了簡單一些,就只處理accept與read事件類型) if (selectedKey.isAcceptable()){ // 如果selectedKey觸發的是accept事件類型,即serverSocketChannel通過accept獲得了一個客戶端連接 // 1.獲得服務端ServerSocketChannel(即之前監聽accept事件時,放入attachment的可選對象,便於後續處理) ServerSocketChannel server = (ServerSocketChannel)selectedKey.attachment(); // 2.獲得客戶端SocketChannel(利用剛剛獲得的server,與觸發的.accept()方法),便於後續操作 SocketChannel client = server.accept(); // 3.配置客戶端SocketChannel(畢竟SocketChannel也是默認配置阻塞的) client.configureBlocking(false); // 4.註冊新的事件(既然已經連接成功,那麼開始註冊如read等新事件,便於後續監聽) // 也可以採取類似初始化階段那樣兩句程式碼完成,但是這裡不需要(也可以說時表現一個新的處理方法) client.register(selector, SelectionKey.OP_READ, client); // 5.日誌列印 System.out.println("server has connect a new client: "+ client.getRemoteAddress()); } if (selectedKey.isReadable()){ // 如果selectedKey觸發的是可讀事件類型,即當前selectionKey對應的channel可以進行讀操作(但不代表就一定有數據可以讀) // 1.獲得客戶端SocketChannel(即之前監聽事件處理時,註冊read事件時置入的attachment對象) SocketChannel client = (SocketChannel)selectedKey.attachment(); // 2.新建一個ByteBuffer用於緩衝數據(或者說,用來盛放數據) ByteBuffer requestBuffer = ByteBuffer.allocate(1024); // 3.判斷對應client是否處於open狀態,對應channel內是否有可讀數據(如果不滿足就跳過該循環) // 原本我在想我都已經移除了對應的key,這裡又沒有處理數據,那下一次不就沒有對應key了。 // 但實際是我移除的是.selectedKeys()選出來的key(是複製體),下次觸發read事件,還會有對應key被selectedKeys選出來的。 while (client.isOpen() && client.read(requestBuffer) != -1){ // 達到這裡,說明對應channel中是有對應數據的 // 開始讀取數據 if (requestBuffer.position() > 0){ // 這裡為了簡化處理,就設定為一旦讀取了數據就算讀取完畢 // 注意:讀取的操作在loop的判斷條件中,client.read(requestBuffer) //TODO_FINISH 疑問:既然這裡設置的是>0就break,那為什麼實際操作中,數據(字元串)是讀完了呢 // 答案:while循環條件的read就是完成了當前緩衝區數據的讀取。 //而循環體中的if在生產環境可能更多是進行(編解碼的沾包拆包處理等)。 break; } } // 4.如果requestBuffer為空,即沒有讀取到數據,那就跳出本次selectionKey的處理 if (requestBuffer.position() == 0){ continue; } // 5.到達這裡說明requestBuffer.position()不為0,即bytebBuffer不為空,即讀取到了數據,那麼就處理數據 // 5.1 將requestBuffer從寫模式轉為讀模式 requestBuffer.flip(); // 5.2 業務處理:將brequestBuffer中的數據列印出來(切記,只有.allocate()分配的非直接記憶體的ByteBuffer才可以.array()) System.out.println(new String(requestBuffer.array())); System.out.println("server has receive a message from: "+client.getRemoteAddress()); // 6.返迴響應 // 6.1 模擬一下http協議的響應,便於瀏覽器解析(響應結果 200) String response = "HTTP/1.1 200 OKrn" + "Content-Length: 11rnrn" + "Hello World"; // 6.2 通過ByteBuffer.wrap()將數據置入響應的ByteBuffer ByteBuffer responseBuffer = ByteBuffer.wrap(response.getBytes()); // 6.2 將響應的ByteBuffer寫入到客戶端Socket中(底層會自動將該數據發送過去,額,好吧。實際是交由作業系統底層處理) while (responseBuffer.hasRemaining()) { client.write(responseBuffer); } } } //TODO_FINISHED 不理解這句的目的是什麼,這是一個類似.select()的非阻塞式方法。 // epoll空論的一種解決方案,但是無法根本解決問題,最好還是如Netty那樣refresh解決 selector.selectNow(); } } } Reactor模型
介紹
在了解NIO之後,估計很多人都太嘆服於它的設計,它的效率,它的性能。NIO由於其模型,充分發揮了單執行緒的性能,但是單執行緒往往就意味著性能瓶頸(如單執行緒是無法發揮多核CPU的性能的)。
所以,如何實現NIO的多執行緒成為了網路編程的發展方向。
當然如果只是為了將NIO與多執行緒結合起來,其實並不是十分困難。但是如何有機結合(既充分發揮多執行緒性能,又不產生過多的性能浪費),並確保可擴展性才是真正的關鍵。
這個時候Doug Lea這個Java大神(真的佩服),發表了一篇文章Scalable IO in Java,提出了解決問題,甚至都給出了demo。
首先是基本的Reactor執行緒模型設計:
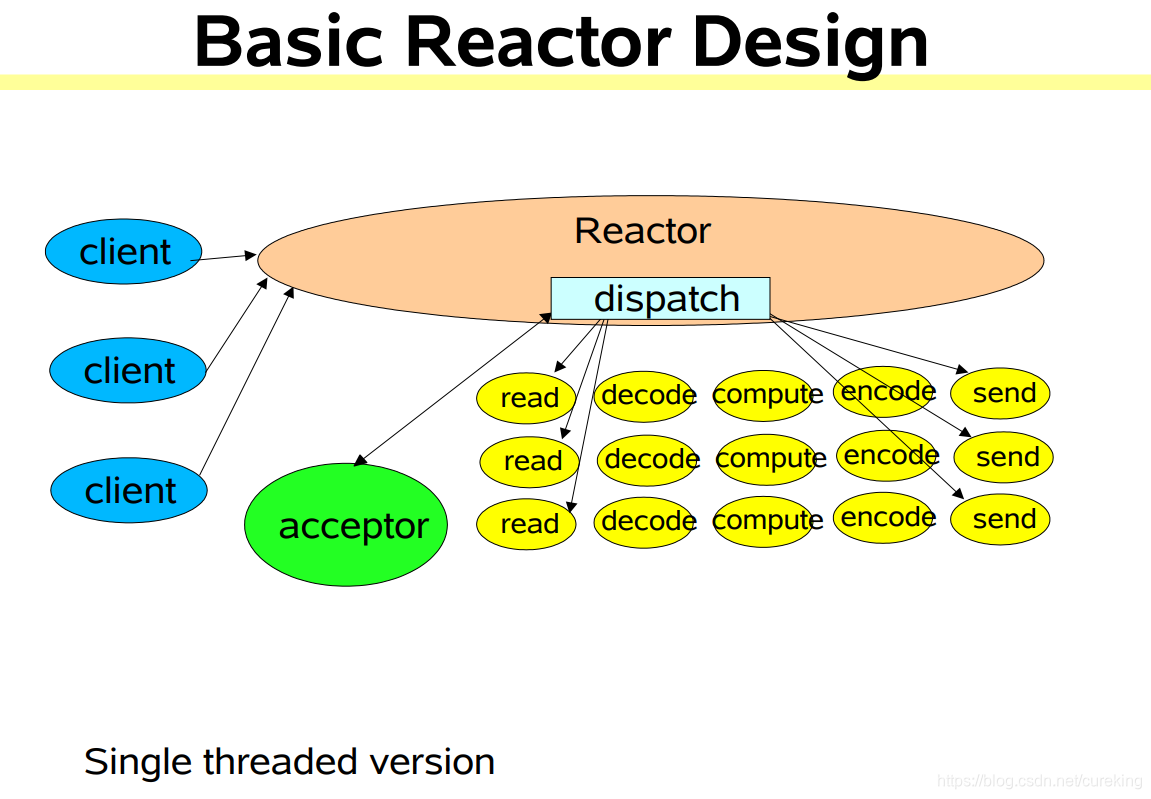
在Reactor基本執行緒模型中,Doug Lea將NIO進行accept操作的部分提取出來,通過一個單一執行緒acceptor(也就是當前執行緒)實現client的accept訊號的監聽,並進行分發(進行後續事件的註冊)。
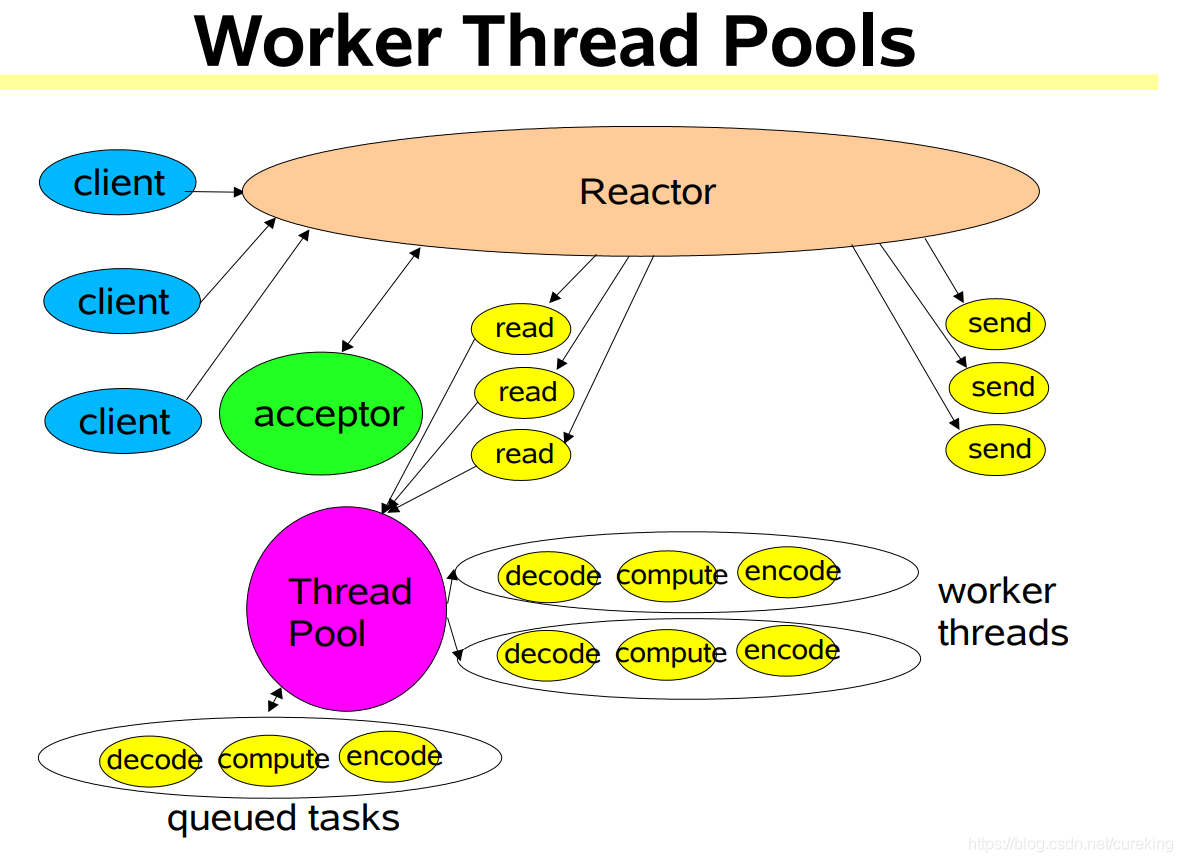
而當監聽到read等事件後,通過dispatch將相關事件處理分發到執行緒池TreadPool中,交由worker thread進行具體業務處理。
當然這樣的執行緒模型,其擴展性依舊無法滿足需求,其性能瓶頸,會卡在acceptor執行緒上。所以Doug Lea進而提出了multiple Reactors
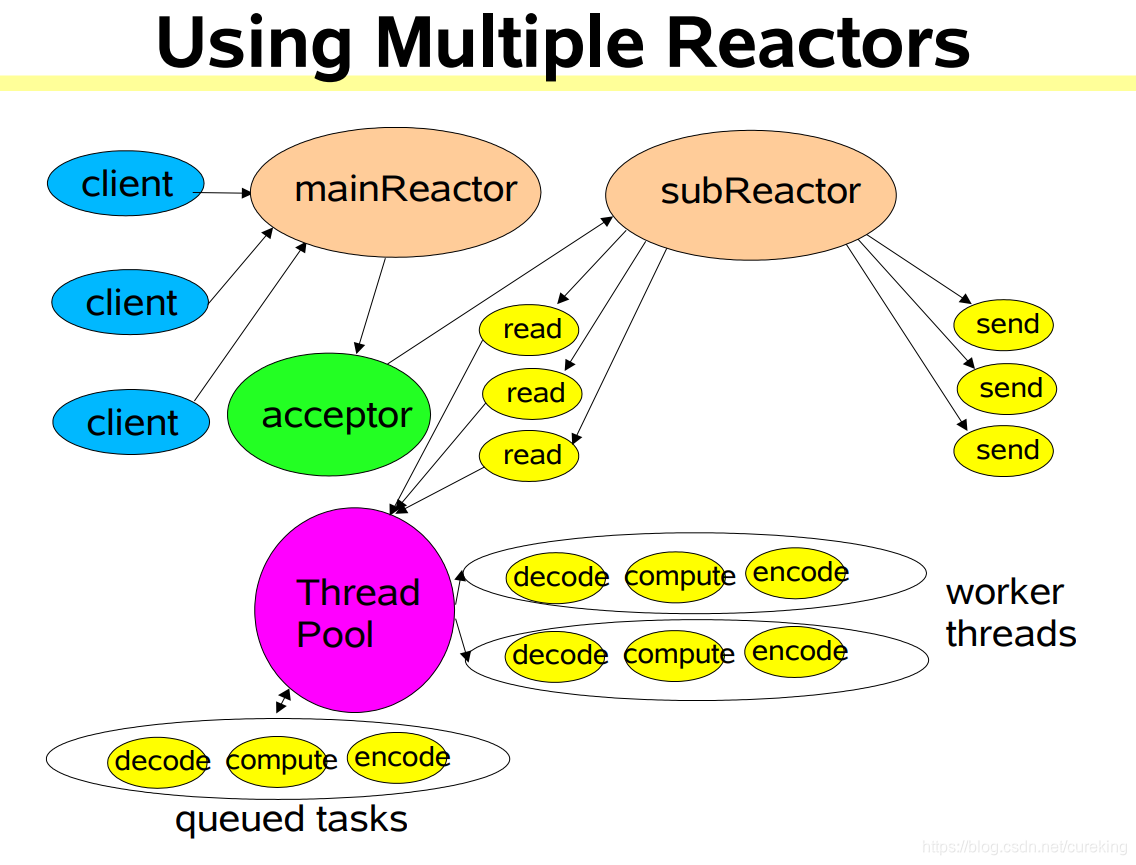
其設計是將原先的基本Reactor執行緒模型的Reactor拆分為mainReactor與subReactor,中間通過acceptor連接,從而降低原先基本Reactor執行緒模型中acceptor的壓力。
優點
- 優秀的可擴展性
- 更高的性能瓶頸
缺點
- 需要NIO的理解基礎
- 需要理解Reactor執行緒模型
- 程式碼實現較為複雜(相較原先的NIO與BIO)
程式碼示例
這裡給出一些簡單的demo,供大家認識。
NIO_Client(和之前的NIO_Client沒有任何區別)
package tech.jarry.learning.netease; import java.io.IOException; import java.net.Inet4Address; import java.net.InetSocketAddress; import java.nio.ByteBuffer; import java.nio.channels.SocketChannel; import java.util.Scanner; /** * @Description: NIO模型下的TCP客戶端實現 * @Author: jarry */ public class NIOClient { public static void main(String[] args) throws IOException { // 獲得一個SocektChannel SocketChannel socketChannel = SocketChannel.open(); // 設置SocketChannel為非阻塞模式 socketChannel.configureBlocking(false); // 設置SocketChannel的連接配置 socketChannel.connect(new InetSocketAddress(Inet4Address.getLocalHost(), 8080)); // 通過循環,不斷連接。跳出循環,表示連接建立成功 while (!socketChannel.finishConnect()){ // 如果沒有成功建立連接,就一直阻塞當前執行緒(.yield()會令當前執行緒「謙讓」出CPU資源) Thread.yield(); } // 發送外部輸入的數據 Scanner scanner = new Scanner(System.in); System.out.println("please input:"); String msg = scanner.nextLine(); // ByteBuffer.wrap()會直接調用HeapByteBuffer。故一方面其會自己完成記憶體分配。另一方面,其分配的記憶體是非直接記憶體(非heap堆) ByteBuffer byteBuffer = ByteBuffer.wrap(msg.getBytes()); // ByteBuffer.hasRemaining()用於判斷對應ByteBuffer是否還有剩餘數據(實現:return position < limit;) while (byteBuffer.hasRemaining()){ socketChannel.write(byteBuffer); } // 讀取響應 System.out.println("receive echoResponse from server"); // 設置緩衝區大小為1024 ByteBuffer requestBuffer = ByteBuffer.allocate(1024); // 判斷條件:是否開啟,是否讀取到數據 //TODO 我認為這裡的實現十分粗糙,是不可以置於生產環境的,具體還需要後面再看看(即使是過渡demo,也可以思考一下嘛) while (socketChannel.isOpen() && socketChannel.read(requestBuffer) != -1){ // 長連接情況下,需要手動判斷數據有沒有讀取結束 (此處做一個簡單的判斷: 超過0位元組就認為請求結束了) if (requestBuffer.position() > 0) { break; } } requestBuffer.flip(); // byte[] content = new byte[requestBuffer.limit()]; // // .get()方法只會返回byte類型(猜測是當前標記位的數據) // requestBuffer.get(content); // System.out.println(new String(content)); // ByteBuffer提供了大量的基本類型轉換的方法,可以直接拿來使用 System.out.println(new String(requestBuffer.array())); scanner.close(); socketChannel.close(); } } NIO_ServerV4_ReactorV1
package tech.jarry.learning.netease; import java.io.IOException; import java.net.InetSocketAddress; import java.nio.ByteBuffer; import java.nio.channels.*; import java.util.Iterator; import java.util.Random; import java.util.Set; import java.util.concurrent.*; import java.util.concurrent.atomic.AtomicInteger; /** * @Description: 根據Doug Lea大神的多路復用Reactor執行緒模型,進行編碼,學習Reactor設計模式在網路編程的重要體現 * 注意:NIOServerV2作為一個demo已經不錯了。但是仍然存在致命的性能瓶頸(其實很明顯,整個網路編程就靠一個執行緒實現全部工作,肯定不行,起碼沒法充分發揮多核CPU的能力) * 故將服務端常用的部分分為accept,read,bussinessDeal三個部分(第三部分,本demo就不深入了) * @Author: jarry */ public class NIOServerV3 { // 處理業務操作的執行緒 private static ExecutorService workPool = Executors.newCachedThreadPool(); /** * 封裝了Selector.select()等事件的輪詢的共用程式碼 */ abstract class ReactorThread extends Thread { Selector selector; LinkedBlockingQueue<Runnable> taskQueue = new LinkedBlockingQueue<>(); /** * Selector監聽到有事件後,調用這個方法(不過具體實現,需要基類自己實現) * @param channel */ public abstract void handler(SelectableChannel channel) throws Exception; private ReactorThread() throws IOException { selector = Selector.open(); } // 用於判斷執行緒運行狀態 volatile boolean running = false; @Override public void run() { // 輪詢Selector事件 while (running) { try { // 執行隊列中的任務 Runnable task; while ((task = taskQueue.poll()) != null) { task.run(); } selector.select(1000); // 獲取查詢結果 Set<SelectionKey> selected = selector.selectedKeys(); // 遍歷查詢結果 Iterator<SelectionKey> iter = selected.iterator(); while (iter.hasNext()) { // 被封裝的查詢結果 SelectionKey key = iter.next(); iter.remove(); int readyOps = key.readyOps(); // 關注 Read 和 Accept兩個事件 if ((readyOps & (SelectionKey.OP_READ | SelectionKey.OP_ACCEPT)) != 0 || readyOps == 0) { try { SelectableChannel channel = (SelectableChannel) key.attachment(); channel.configureBlocking(false); handler(channel); if (!channel.isOpen()) { key.cancel(); // 如果關閉了,就取消這個KEY的訂閱 } } catch (Exception ex) { key.cancel(); // 如果有異常,就取消這個KEY的訂閱 } } } selector.selectNow(); } catch (IOException e) { e.printStackTrace(); } } } private SelectionKey register(SelectableChannel channel) throws Exception { // 為什麼register要以任務提交的形式,讓reactor執行緒去處理? // 因為執行緒在執行channel註冊到selector的過程中,會和調用selector.select()方法的執行緒爭用同一把鎖 // 而select()方法是在eventLoop中通過while循環調用的,爭搶的可能性很高,為了讓register能更快的執行,就放到同一個執行緒來處理 FutureTask<SelectionKey> futureTask = new FutureTask<>(() -> channel.register(selector, 0, channel)); taskQueue.add(futureTask); return futureTask.get(); } private void doStart() { if (!running) { running = true; start(); } } } // 0. 創建ServerSocketChannel private ServerSocketChannel serverSocketChannel; // 1、創建多個執行緒 - accept處理reactor執行緒 (accept執行緒) private ReactorThread[] mainReactorThreads = new ReactorThread[1]; // 2、創建多個執行緒 - io處理reactor執行緒 (I/O執行緒) private ReactorThread[] subReactorThreads = new ReactorThread[8]; /** * 初始化執行緒組 */ private void initGroup() throws IOException { // 創建IO執行緒,負責處理客戶端連接以後socketChannel的IO讀寫 for (int i = 0; i < subReactorThreads.length; i++) { subReactorThreads[i] = new ReactorThread() { @Override public void handler(SelectableChannel channel) throws IOException { // work執行緒只負責處理IO處理,不處理accept事件 SocketChannel ch = (SocketChannel) channel; ByteBuffer requestBuffer = ByteBuffer.allocate(1024); while (ch.isOpen() && ch.read(requestBuffer) != -1) { // 長連接情況下,需要手動判斷數據有沒有讀取結束 (此處做一個簡單的判斷: 超過0位元組就認為請求結束了) if (requestBuffer.position() > 0) { break; } } if (requestBuffer.position() == 0) { return; // 如果沒數據了, 則不繼續後面的處理 } requestBuffer.flip(); byte[] content = new byte[requestBuffer.limit()]; requestBuffer.get(content); System.out.println(new String(content)); System.out.println(Thread.currentThread().getName() + "收到數據,來自:" + ch.getRemoteAddress()); // TODO 業務操作 資料庫、介面... workPool.submit(() -> { }); // 響應結果 200 String response = "HTTP/1.1 200 OKrn" + "Content-Length: 11rnrn" + "Hello World"; ByteBuffer buffer = ByteBuffer.wrap(response.getBytes()); while (buffer.hasRemaining()) { ch.write(buffer); } } }; } // 創建mainReactor執行緒, 只負責處理serverSocketChannel for (int i = 0; i < mainReactorThreads.length; i++) { mainReactorThreads[i] = new ReactorThread() { AtomicInteger incr = new AtomicInteger(0); @Override public void handler(SelectableChannel channel) throws Exception { // 只做請求分發,不做具體的數據讀取 ServerSocketChannel ch = (ServerSocketChannel) channel; SocketChannel socketChannel = ch.accept(); socketChannel.configureBlocking(false); // 收到連接建立的通知之後,分發給I/O執行緒繼續去讀取數據 int index = incr.getAndIncrement() % subReactorThreads.length; ReactorThread workEventLoop = subReactorThreads[index]; workEventLoop.doStart(); SelectionKey selectionKey = workEventLoop.register(socketChannel); selectionKey.interestOps(SelectionKey.OP_READ); System.out.println(Thread.currentThread().getName() + "收到新連接 : " + socketChannel.getRemoteAddress()); } }; } } /** * 初始化channel,並且綁定一個eventLoop執行緒 * * @throws IOException IO異常 */ private void initAndRegister() throws Exception { // 1、 創建ServerSocketChannel serverSocketChannel = ServerSocketChannel.open(); serverSocketChannel.configureBlocking(false); // 2、 將serverSocketChannel註冊到selector int index = new Random().nextInt(mainReactorThreads.length); mainReactorThreads[index].doStart(); SelectionKey selectionKey = mainReactorThreads[index].register(serverSocketChannel); selectionKey.interestOps(SelectionKey.OP_ACCEPT); } /** * 綁定埠 * * @throws IOException IO異常 */ private void bind() throws IOException { // 1、 正式綁定埠,對外服務 serverSocketChannel.bind(new InetSocketAddress(8080)); System.out.println("啟動完成,埠8080"); } public static void main(String[] args) throws Exception { NIOServerV3 nioServerV3 = new NIOServerV3(); nioServerV3.initGroup(); // 1、 創建main和sub兩組執行緒 nioServerV3.initAndRegister(); // 2、 創建serverSocketChannel,註冊到mainReactor執行緒上的selector上 nioServerV3.bind(); // 3、 為serverSocketChannel綁定埠 } } NIO_ServerV4_ReactorV2
為了更好的理解Reactor執行緒模型,我將之前的Reactor程式碼,按照我的程式碼習慣,做了一些調整。
這個部分理解是有一些困難的,推薦多看幾遍,如我這樣手擼兩邊,第二遍可以根據自己的習慣,進行程式碼結構的調整。
package tech.jarry.learning.netease.again; import java.io.IOException; import java.net.InetSocketAddress; import java.nio.ByteBuffer; import java.nio.channels.*; import java.util.Iterator; import java.util.Random; import java.util.Set; import java.util.concurrent.*; import java.util.concurrent.atomic.AtomicInteger; /** * @Description: 為了更好地學習與理解Netty,結合Reactor執行緒模型的NIO再過一遍,並做出一定的結構調整 * @Author: jarry */ public class NIOServerV3 { // 工作執行緒池,其中工作執行緒用於完成實際工作(如計算,編解碼等工作) private static ExecutorService workerPool = Executors.newCachedThreadPool(); // 全局變數ServerSocketChannel,記錄服務端的Channel private ServerSocketChannel serverSocketChannel; // 創建mainReactors執行緒組 private MainReactorThread[] mainReactorThreads = new MainReactorThread[1]; // 創建subReactors執行緒組 private SubReactorThread[] subReactorThreads = new SubReactorThread[8]; private abstract class AbstractReactorThread extends Thread { // 創建Selector,用於建立Channel事件監聽 protected Selector selector; // 用於標記執行緒運行狀態 private volatile boolean running = false; // 創建任務隊列,用於多執行緒處理工作 private LinkedBlockingQueue<Runnable> taskQueue = new LinkedBlockingQueue<>(); /** * 通過懶載入方式,實例化Selector */ public AbstractReactorThread() throws IOException { selector = Selector.open(); } @Override /** * 重寫run方法,完成ReactorThread的公共程式碼邏輯 */ public void run() { while (running){ // 1.通過一個巧妙的方式,遍歷處理taskQueue中的所有task Runnable task; while ((task = taskQueue.poll()) != null){ task.run(); } // 2.通過.select()阻塞當前執行緒,直到有註冊的selectionKey觸發(之所以等待1000ms,應該是為了令上面的task執行完成) try { selector.select(1000L); } catch (IOException e) { e.printStackTrace(); } // 3.接下來的操作類似,遍歷處理各種監聽到的事件 Set<SelectionKey> selectionKeySet = selector.selectedKeys(); Iterator<SelectionKey> iterator = selectionKeySet.iterator(); while (iterator.hasNext()){ SelectionKey selectedKey = iterator.next(); iterator.remove(); // 獲得事件類型的編號 int readyOps = selectedKey.readyOps(); // 通過位運算等方式,快速判斷readyOps是否與對應事件類型編號符合(這裡作為demo只關注accept與read事件) if ((readyOps & (SelectionKey.OP_READ | SelectionKey.OP_ACCEPT)) != 0 || readyOps == 0) { // 根據V2的編程了解,.attachment返回的極可能是服務端的ServerSocketChannel,也可能是客戶端的SocketChannel,故採用他們共同的父類SelectableChannel SelectableChannel channel = (SelectableChannel)selectedKey.attachment(); try { // 老規矩,將channel設置為非阻塞式的 channel.configureBlocking(false); // 將channel交給抽象方法reactorHandler解決,(具體實現由各自子類去實現) //TODO_FINISH 話說,如何確定哪個子類解決哪個問題 // 答案:抽象類不會實例化成對象 // 這裡的reactorHandler都是由對應子類調用的。MainReactorThread只有在註冊時調用,並且是直接置入taskQueue,第二次不會到這裡 reactorHandler(channel); } catch (IOException e) { e.printStackTrace(); } catch (InterruptedException e) { e.printStackTrace(); } catch (ExecutionException e) { e.printStackTrace(); } // 判斷channel是否關閉 if (!channel.isOpen()){ // 如果channel已經關閉,那麼其上的SelectionKey就可以取消訂閱了 selectedKey.cancel(); } } } //TODO 這個還是看不懂 try { selector.selectNow(); } catch (IOException e) { e.printStackTrace(); } } } /** * 根據提交的channel,進行註冊處理(畢竟調用這個方法的,也只有此類,與衍生類了) * @param channel * @return */ protected SelectionKey register(SelectableChannel channel) throws ExecutionException, InterruptedException { // 為什麼register要以任務提交的形式,讓reactor執行緒去處理? // 因為執行緒在執行channel註冊到selector的過程中,會和調用selector.select()方法的執行緒爭用同一把鎖 // 而select()方法是在eventLoop中通過while循環調用的,爭搶的可能性很高,為了讓register能更快的執行,就放到同一個執行緒來處理 // 這裡無論是解決方案,還是register與select通用一把synchronized鎖,都蠻令人驚嘆的(雖然我不大理解為什麼register要與select公用一邊鎖) // select -> SelectorImpl.lockAndDoSelect 該方法的執行內容採用了synchronized(this)鎖 // register -> SelectorImpl.register 該方法的執行內容採用了synchronized(this.publicKeys)鎖 (果然這個比較複雜,主要synchronized鎖太多了) FutureTask<SelectionKey> futureTask = new FutureTask<>(() -> channel.register(selector, 0, channel) ); taskQueue.add(futureTask); return futureTask.get(); } /** * 執行啟動操作(其實外部可以判斷執行緒狀態的,但是這裡running表示的執行緒狀態,與規定的執行緒狀態不同) */ protected void doStart(){ if (!running){ running = true; start(); } } /** * mainReactor與subReactor的handler處理邏輯是不同的,交由子類實現 */ protected abstract void reactorHandler(SelectableChannel channel) throws IOException, ExecutionException, InterruptedException; } /** * mainReactor的實現類,實現了父類的reactorHandler方法。主要完成accept的監聽與處理,並進行事件分發操作 */ public class MainReactorThread extends AbstractReactorThread { AtomicInteger atomicInteger = new AtomicInteger(0); /** * 通過懶載入方式,實例化Selector */ public MainReactorThread() throws IOException { } @Override protected void reactorHandler(SelectableChannel channel) throws IOException, ExecutionException, InterruptedException { // 獲得服務端ServerSocketChannel ServerSocketChannel server = (ServerSocketChannel) channel; // 獲得客戶端SocketChannel SocketChannel client = server.accept(); // 設置客戶端SocketChannel為非阻塞模式 client.configureBlocking(false); // // 設置新的事件監聽 // client.register(selector, SelectionKey.OP_READ, client); // 不再由當前執行緒完成read事件的註冊,畢竟當前執行緒只完成accept事件處理,與事件分發 // 故調用專門寫的一個私有方法,進行註冊 doRegister(client); // 列印日誌 System.out.println("server has connect a new client: "+client.getRemoteAddress()); } /** * Reactor執行緒模型下,MainReactor將read事件的註冊下放到SubReactor * @param client 需要進行事件(這裡只處理read事件)註冊的client */ private void doRegister(SocketChannel client) throws ExecutionException, InterruptedException { // 通過輪詢的方式(也可以自定義,或擴展開),將事件(非Accept事件,如read事件)交給subReactor執行緒池中的執行緒處理 int index = atomicInteger.getAndIncrement() % subReactorThreads.length; // 獲取subReactorThread對象,又稱workEventLoop對象(為了更好地對接Netty中的EventLoop SubReactorThread workEventLoop = subReactorThreads[index]; // 調用workEventLoop的doStart()方法,啟動工作執行緒(如果之前已有事件啟動了,就不會再啟動了) workEventLoop.doStart(); // 完成事件的註冊工作(AbstractReactorThread中的註冊,默認監聽事件編碼為0。 SelectionKey selectionKey = workEventLoop.register(client); // 設置監聽事件的編碼(這樣的分離,有助於不同子類的實現,更加友好) selectionKey.interestOps(SelectionKey.OP_READ); } } /** * subReactor的實現類,實現了父類的reactorHandler方法。主要完成非accept事件(這裡demo特指read)的監聽與處理,包括列印,計算,響應等 */ public class SubReactorThread extends AbstractReactorThread { /** * 通過懶載入方式,實例化Selector */ public SubReactorThread() throws IOException { } @Override /** * 完成非accept事件(這裡特指read)事件的處理(列印與響應) */ protected void reactorHandler(SelectableChannel channel) throws IOException { // 獲得客戶端SocketChannel SocketChannel client = (SocketChannel) channel; // 創建ByteBuffer作為緩衝區 ByteBuffer requestBuffer = ByteBuffer.allocate(1024); // 嘗試讀取數據 while (client.isOpen() && (client.read(requestBuffer)) != -1){ // 這裡進行簡單判斷與處理 if (requestBuffer.position() > 0){ break; } } // 判斷requestBuffer大小 if (requestBuffer.position() == 0){ // 如果沒有數據,就不需要進行接下來的處理了 return; } // 將requestBuffer由寫模式轉為讀模式 requestBuffer.flip(); // TODO 業務操作 資料庫、介面... workerPool.submit(() -> { // 如:列印請求數據 System.out.println("server get a message: "+new String(requestBuffer.array())); }); // 列印日誌 System.out.println("server get a mesage from client: "+client.getRemoteAddress()); // 發送響應 String response = "HTTP/1.1 200 OKrn" + "Content-Length: 11rnrn" + "Hello World"; ByteBuffer responseBuffer = ByteBuffer.wrap(response.getBytes()); while (responseBuffer.hasRemaining()){ client.write(responseBuffer); } } } /** * Reactor執行緒模型的初始化 * @throws IOException * @throws ExecutionException * @throws InterruptedException */ public void init() throws IOException, ExecutionException, InterruptedException { initGroup(); initMain(); } /** * 進行服務端,埠綁定 * @param port * @throws IOException */ public void bind(int port) throws IOException { serverSocketChannel.socket().bind(new InetSocketAddress(8080)); System.out.println("server bind success"); System.out.println("server start"); } /** * 實例化兩個Reactor執行緒組 * @throws IOException */ private void initGroup() throws IOException { for (int i = 0; i < mainReactorThreads.length; i++) { mainReactorThreads[i] = new MainReactorThread(); } for (int i = 0; i < subReactorThreads.length; i++) { subReactorThreads[i] = new SubReactorThread(); } } /** * 初始化一個MainReactorThread,來進行工作 * @throws IOException * @throws ExecutionException * @throws InterruptedException */ private void initMain() throws IOException, ExecutionException, InterruptedException { //TODO_FINISHED 話說,這裡的mainReactorThreads只有一個執行緒,MainReactorThread可能多個執行緒嘛?還是說一個埠-》一個ServerSocketChannel-》一個MainReactorThread? // 參照Netty的bossGroup的NioEventLoopGroup // 初始化並配置serverSocketChannel serverSocketChannel = ServerSocketChannel.open(); serverSocketChannel.configureBlocking(false); // 從mainReactorThreads中挑選一個MainReactorThread int index = new Random().nextInt(mainReactorThreads.length); // 啟動挑選出來的mainReactorThread mainReactorThreads[index].doStart(); // 通過挑選出來的mainReactorThread執行緒對服務端serverSocketChannel進行註冊 SelectionKey selectionKey = mainReactorThreads[index].register(serverSocketChannel); // 設定監聽的事件編碼(Accept事件監聽) selectionKey.interestOps(SelectionKey.OP_ACCEPT); } public static void main(String[] args) throws IOException, ExecutionException, InterruptedException { NIOServerV3 nioServerV3 = new NIOServerV3(); nioServerV3.init(); nioServerV3.bind(8080); } } Netty
介紹
說實話,NIO優秀的網路編程模型,結合Doug Lea提出的Reactor執行緒模型已經為現有的網路編程提出了一個幾乎無可挑剔的解決方案。
從技術上來說,這個方案已經沒有什麼問題了。唯一的問題就是之前提到的缺點:
- 前置需求多(需要很熟悉NIO與Reactor);
- 編碼比較複雜(可以看到實際落地程式碼,差不多200行程式碼只是用於實現基本結構支援)。
那麼,有沒有更好的解決方案呢?有的,那就Netty框架。
前面提到200行程式碼只是實現了基本結構支援,那麼這200行的程式碼就可以提取成為一個公共的通用模組。
Netty框架做出了優秀的封裝(如NioEventLoopGroup,ByteBuf,ServerBootstrap等等),而且解決了NIO的epoll空輪詢等問題,更是提供了諸多的工具類,提供便利。
Netty的架構分為三個部分:
- ServerBootstrap:引導器,引導使用者,建立EventLoop;
- ChannelInitializer:初始器,建立ChannelPipeline,通過責任鏈,管理處理器;
- ChannelHandler:處理器,處理各種業務邏輯,如編解碼,協議切換,加解密等。
從官方的結構圖,可以看出其中包含三大模組:
- 支援Socket等多種傳輸方式;
- 提供了多種協議的編解碼實現;
- 核心設計包含事件處理模型,API的使用,ByteBuffer的增強ByteBuf。
優點
- 優秀的可擴展性
- 極高的性能瓶頸(Netty實現百萬連接不要太簡單,客戶端+服務端配置只需要記憶體達到8G即可)
- 不需要理解NIO,Reactor
- 程式碼實現簡單
缺點
- 需要了解Netty的使用(但是依靠demo,入門還是比較簡單)
- Netty易學難精(入門,熟練比較簡單,但是精通比較難):
- 缺乏前置理論,源碼很難深入理解;
- Netty涉及一些設計模式,如責任鏈,單例,策略,觀察者等;
- Netty獨有的ByteBuf,及其零拷貝等概念;
- Netty涉及諸多工具類,如Http編解碼工具類等。
程式碼示例
這裡給出一個簡單的demo(根據官方提供的echoServerDemo,增加了一些注釋),供大家認識。
Netty_Echo_Server
package tech.jarry.learning.netease.example; import io.netty.bootstrap.ServerBootstrap; import io.netty.channel.ChannelFuture; import io.netty.channel.ChannelInitializer; import io.netty.channel.ChannelOption; import io.netty.channel.ChannelPipeline; import io.netty.channel.EventLoopGroup; import io.netty.channel.nio.NioEventLoopGroup; import io.netty.channel.socket.SocketChannel; import io.netty.channel.socket.nio.NioServerSocketChannel; import io.netty.handler.logging.LogLevel; import io.netty.handler.logging.LoggingHandler; /** * Echoes back any received data from a client. */ public final class EchoServer { static final int PORT = Integer.parseInt(System.getProperty("port", "8080")); public static void main(String[] args) throws Exception { // Configure the server. // 創建EventLoopGroup accept執行緒組 NioEventLoop EventLoopGroup bossGroup = new NioEventLoopGroup(1); // 創建EventLoopGroup I/O執行緒組 EventLoopGroup workerGroup2 = new NioEventLoopGroup(1); try { // 服務端啟動引導工具類 ServerBootstrap b = new ServerBootstrap(); // 配置服務端處理的reactor執行緒組以及服務端的其他配置 b // 設置兩個執行緒組(Reactor執行緒模型中的mainReactorThreads與subReactorThreads)。說白了就是兩個執行緒池 .group(bossGroup, workerGroup2) // 設置採用的channel類型(NioServerSocketChannel對應ServerSocketChannel,其它類似),底層實現用的反射 /** * ChannelFactory 的 newChannel() 方法什麼時候會被調用就可以了。 * 對於 NioSocketChannel,由於它充當客戶端的功能,它的創建時機在 connect(…) 的時候; * 對於 NioServerSocketChannel 來說,它充當服務端功能,它的創建時機在綁定埠 bind(…) 的時候。 */ .channel(NioServerSocketChannel.class) //TODO 只看到是用於配置,詳細還不了解 .option(ChannelOption.SO_BACKLOG, 100) // 設置handler,這裡設置了Netty提供的日誌ChannelHandler(並採用了Debug級別) .handler(new LoggingHandler(LogLevel.DEBUG)) // 設置childHandler 這裡可以通過ChannelInitializer實例,來放入多個ChannelHandler(需要重寫其中的.initChannel()方法) .childHandler(new ChannelInitializer<SocketChannel>() { @Override public void initChannel(SocketChannel ch) throws Exception { // 通過SocketChannel獲得ChannelPipeline ChannelPipeline p = ch.pipeline(); // 在ChannelPipeline後面添加新的ChannelHandler /** * 每個 Channel 內部都有一個 pipeline,pipeline 由多個 handler 組成, * handler 之間的順序是很重要的,因為 IO 事件將按照順序順次經過 pipeline 上的 handler, * 這樣每個 handler 可以專註於做一點點小事,由多個 handler 組合來完成一些複雜的邏輯。 * * Inbound 和 Outbound。在 Netty 中,IO 事件被分為 Inbound 事件和 Outbound 事件。 * 例如: * 1. pipeline.addLast(new StringDecoder()); * 2. pipeline.addLast(new StringEncoder()); * 3. pipeline.addLast(new BizHandler()); */ p.addLast(new EchoServerHandler()); } }); // 通過bind啟動服務(Netty的ChannelFuture繼承自JDK的Future,只不過多了一些方法 ChannelFuture f = b // 服務端用於綁定埠(其中還涉及Java的channel等操作) .bind(PORT) // ChannelFuture新增的.sync()區別於新增的.await() /** * sync() 和 await() 用於阻塞等待 * sync() 內部會先調用 await() 方法,等 await() 方法返回後,會檢查下這個任務是否失敗,如果失敗,重新將導致失敗的異常拋出來。 * 也就是說,如果使用 await(),任務拋出異常後,await() 方法會返回,但是不會拋出異常,而 sync() 方法返回的同時會拋出異常。 */ .sync(); // 阻塞主執行緒,知道網路服務被關閉 f // 用於獲得封裝在Netty的ChannelFuture內的Channel(Java的),便於進行下一步操作 .channel() // 當Netty的ChannelFuture被關閉時,返回ChannelFuture .closeFuture() // 同上 .sync(); } finally { // 關閉執行緒組 bossGroup.shutdownGracefully(); workerGroup2.shutdownGracefully(); } } } 從上面的程式碼,可以看到,利用建造者模式,通過一個固定的模板,Netty就可以實現一個簡單的EchoServer了。
使用的時候,一般業務的處理只是在修改其中pipeline的handler。
通過Netty,我們幾乎只需要關注業務方面的,並且利用Netty的Pipeline,可以很輕鬆的編排handler。
總結
技術演變
網路模型其實是開發人員思維的體現。而網路模型的演變其實就是開發人員思維的演變。
思維演變
這裡我通過一個例子,來展現網路模型演變中思維的演變。
BIO
客戶(Client)到公司(Server)辦理業務,會找到前台的小姐姐(acceptor),由小姐姐引導著,處理各類業務。
但是,當存在複數位客戶時,就需要在前台排隊,等待前台小姐姐招待好最前面的客戶。
為了解決這個排隊問題,Boss打算招聘多位小姐姐(執行緒池)。但是客戶的到來有時多,有時少,所以前台小姐姐也是有時候很空閑,有時候很繁忙。
NIO
由於小姐姐引導客戶處理業務時,客戶經常由於填表(業務處理中資料庫操作等)等操作,導致小姐姐在一旁等待。而這時候,前台還有客戶在等待。
為了解決這個問題,Boss在前台放置了一個鈴鐺(accept註冊)。
當有新的客戶到來時,小姐姐就會給他一個新的鈴鐺(read等事件註冊),用於在處理業務時呼喚她。
Reactor(Basic Reactor)
隨著客戶處理業務的上升,Boss招收了多位工作人員(worker thread),用於引導客戶處理業務。
而小姐姐(Acceptor)只負責招待客戶(只處理accept事件),交給客戶新的鈴鐺(read等事件註冊)。客戶通過新的鈴鐺找到工作人員,處理業務。
Reactor(Multiple Reactor)
隨著業務規模的進一步提升,一位前台小姐姐已經忙不過來了。
Boss就在前台安排了多位小姐姐,招待與引導客戶。
Netty
看到Boss的成功,許多人都爭相模仿,但是由於了解不深刻,總是出現各種問題。
Boss希望通過這一成功經驗,幫助到其它人,所以製作了一款工作流軟體(Netty)。
其他人只需要下載這個軟體,然後按照其中的簡單引導,進行設置,就可以輕鬆使用。
問題解決
解決問題一般都是三個步驟:
- 先通過一些比較簡單,比較暴力的方式解決問題;
- 再根據問題解決過程中的一些思想火花,以及一些資料,優化解決方案;
- 然後根據需要,視情況看,是否執行這一步。查閱各種資料,請教各位前輩,在原來的基礎上,再進一步優化;
- 最後,在無法提升的情況下,考慮將這個解決方案,做成一個工具,一個框架,去幫助其他人。
就像我在leetcode上,一般第一步,都是先按照自己最直觀的想法,先嘗試解決問題,然後再考慮優化,最後思考是否可以通用化,工具化等。
留言
這次只是簡單提一些網路編程的演變過程,也算是幫助大家入門吧。
後續會進行深入的原理分析與總結,並會寫成部落格,發布出來的。
