【vue】—- 新版腳手架搭建項目流程詳解
一、概述
本文將介紹vue項目完整的搭建流程,在使用新版本的腳手架基礎上,進行了一系列的完善和配置。主要內容如下:
1、項目初始化
- 安裝腳手架
- 創建項目
- 項目結構
2、項目搭建配置
- 引入第三方插件
- 路由管理模組vue-router的配置
- 狀態管理模組vuex的配置
- 請求模組axios的配置
- 環境變數的配置
- 配置文件config的配置
二、項目搭建
1、項目初始化
(1)安裝腳手架
- 全局安裝過舊版本的 vue-cli(1.x 或 2.x)要先卸載它,否則跳過此步:npm uninstall vue-cli -g
- Vue CLI 3 需要 nodeJs ≥ 8.9 (官方推薦 8.11.0+,可以使用 nvm 或 nvm-windows 在同一台電腦中管理多個 Node 版本)下載安裝nodeJs,中文官方下載地址://nodejs.cn/download/
- 安裝 @vue/cli(Vue CLI 3 的包名稱由 vue-cli 改成了 @vue/cli):cnpm install -g @vue/cli
- vue -V 檢查版本號
(2)創建項目
- vue create <Project Name>
① 選擇一個預設 preset

若此前有保存過的預設配置可直接使用,若沒有則只有 Default 和 Manually select features。
Default:默認配置,不帶任何輔助功能;
Manually select features:自定義配置(按方向鍵 ↓ 和空格),提供可選功能的 npm 包。

② 是否使用history router
Vue-Router 利用了瀏覽器自身的hash 模式和 history 模式的特性來實現前端路由。
③ CSS 預處理器
為css解決瀏覽器兼容問題、簡化css程式碼。

④ ESlint
提供一個插件化的javascript程式碼檢測工具,ESLint + Prettier //使用較多
⑤ 何時檢測
⑥ 如何存放配置
⑦ 是否保存本次配置(y:記錄本次配置,然後需要你起個名; n:不記錄本次配置)
⑧ 搭建完成
⑨ 啟動初始項目
⑩ 初始效果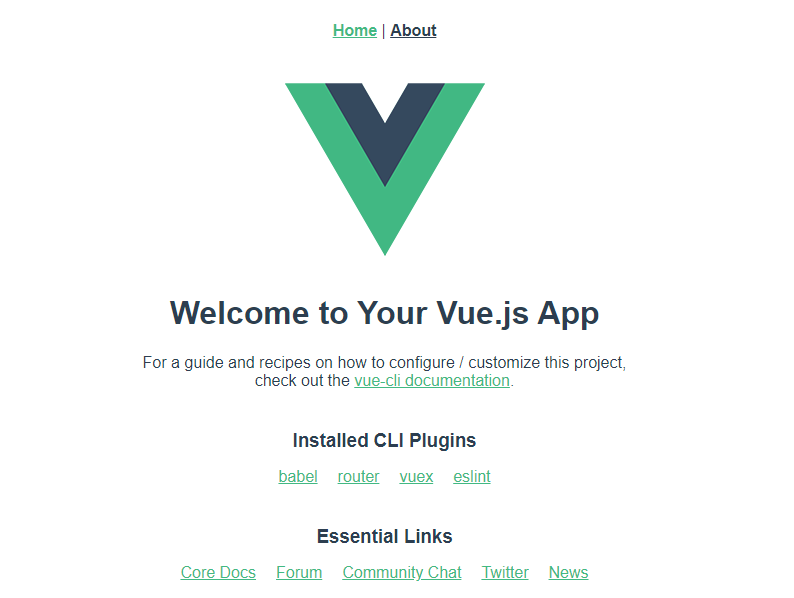
(3)項目結構
① 初始項目目錄
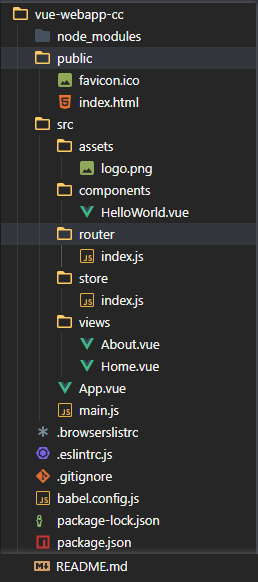

② 完善項目目錄
|— node_modules
|— public // 不做編譯處理的靜態資源
|— src // 源程式碼
| |— api // 所有請求
| |— asssts // 主題、字體等靜態資源
| |— components // 全局公用組件
| |— directive // 全局指令
| |— filtres // 全局 filter
| |— router // 路由
| |— store // vuex
| |— styles // 全局樣式
| |— utils // 全局公用方法
| |— views // 頁面
| |— APP.vue // 入口頁面
| |— main.js // 入口 載入組件 初始化
| |— permission.js // 許可權管理
|— .env.development // 開發環境
|— .env.production // 生產環境
|— .env.test // 測試環境
|— vue.config.js // 配置文件
|— .browerslistrc // 設置瀏覽器的兼容
|— .eslintrc.js // eslint 程式碼檢測配置項
|— .gitignore // git 忽略項
|— babel.config.js // babel 語法編譯
|— package-lock.json // 記錄版本號
|— package.json // 項目基本資訊
|— README.md // 項入門手冊
註:
> api 中的文件名稱最好與 views 中的模組名稱一致對應,方便查看和管理。
> 要根據業務場景判斷是否需要 vuex 統一管理數據,耦合度較低的直接在模組中存放 data 即可。
> 統一一套 ESLint,方便檢測程式碼格式。
> 在新版腳手架中去掉了 config 和 build 兩個配置文件,換成了可選的 vue.config,js 文件。
> 在新版腳手架中去掉了 static,換成了 public。
2、項目搭建配置
(1)引入第三方插件
① 在項目中根據實際需求引入第三方插件,比如常用的 less/sass、axios、elementUI(或其他UI框架)…若在新版腳手架創建項目過程中沒有自定義配置選擇vuex、router,則也需要進行安裝。
下載依賴包:
less:npm install less less-loader –save
element-ui:npm install element-ui –save
axios:npm install axios –save
……
② 安裝完成後見 package.json 如下:

③ 在 main.js 中引入相關插件:

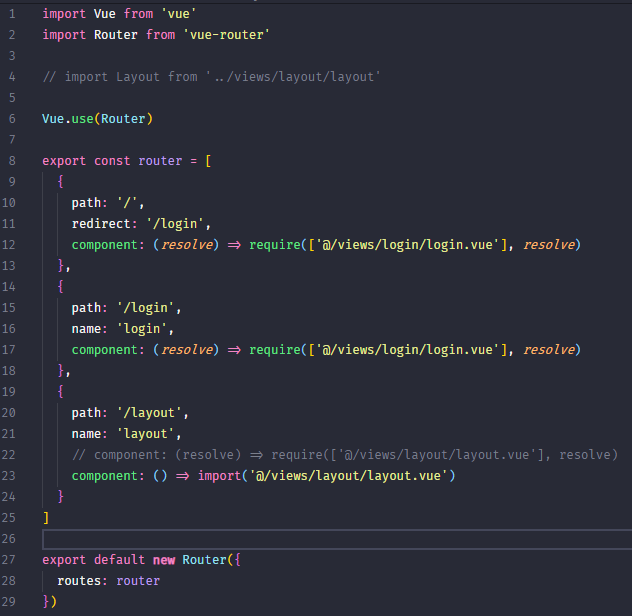
(2)路由管理模組vue-router的配置(router/index.js)
使用路由懶載入,防止首屏載入慢或白屏的問題。
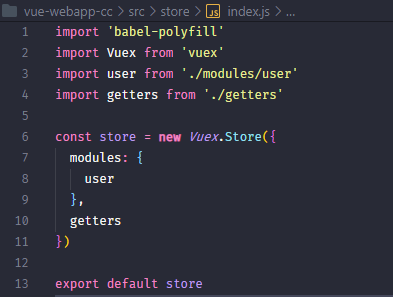
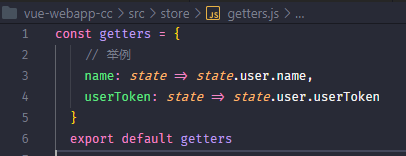
(3) 狀態管理模組vuex的配置
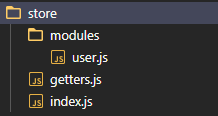
① store 文件夾目錄
② index.js 文件
③ getters.js 文件
④ modules/user.js 文件

(4)請求模組axios的配置
 1 // src/utils/request.js
 2
 3 import axios from 'axios'
 4 import { Message } from 'element-ui'
 5 import store from '../store'
 6 import { getToken } from '@/utils/auth'
 7
 8
 9 // 創建axios實例
10 const service = axios.create({
11   baseURL: process.env.BASE_API, // api的base_url
12   timeout: 20 * 1000 // 請求超時時間
13 })
14
15
16 // 不需要token的路徑
17 const urlWithoutToken = [
18     '/main/login',
19     '/main/password/reset'
20   ]
21
22
23 // request攔截器
24 service.interceptors.request.use(config => {
25   if (store.getters.token && !urlWithoutToken.includes(config.url)) {
26     config.headers['Authorization'] = 'Bearer ' + getToken() // 讓每個請求攜帶自定義token 請根據實際情況自行修改
27   }
28     return config
29   }, error => {
30     Promise.reject(error)
31 })
32
33
34 // 特殊的錯誤碼
35 const specialCodes = [
36   '00302' // 刷新token過期
37 ]
38 const commonCodes = ['00000']
39
40
41 // respone攔截器
42 service.interceptors.response.use(response => {
43   const res = response.data
44   // 對除了特殊錯誤碼以外的進行統一處理
45   if (res.code && !specialCodes.includes(res.code) && !commonCodes.includes(res.code) && !(res instanceof Blob)) {
46     Message({
47       message: res.message ? res.message : res.info || res.desc || res.status.desc,
48       type: 'error',
49       duration: 5 * 1000,
50       customClass: 'max-index'
51     })
52     return res
53   } else {
54     return res
55   }
56 }, async error => {
57   // 這裡可以對401、403、400、500等不同情況進行處理
58   if (error.response.status === 500) {
59     if (error.response.config.url.indexOf('main/login/refresh/') !== -1) {
60       return Promise.reject(error)
61     } else {
62       Message({
63         message: error.response.data.message || '請求失敗',
64         type: 'error',
65         duration: 5 * 1000,
66         customClass: 'max-index'
67       })
68       return Promise.reject(error)
69     }
70   } else {
71     Message({
72       message: error.response.data.message || '請求失敗',
73       type: 'error',
74       duration: 5 * 1000,
75       customClass: 'max-index'
76     })
77     return Promise.reject(error)
78   }
79 })
80
81
82 export default service
(5)環境變數的配置
① 在項目根目錄創建配置環境變數所需文件
.env.development 文件:開發環境
NODE_ENV = “development”
VUE_APP_BASE_API = “//localhost:8080/api”
VUE_APP_DOWNLOAD_URL=”//web-txzs-test.ctsiyun.cn:30080″
.env.production 文件:生產環境
NODE_ENV = “production”
VUE_APP_BASE_API = “/api”
VUE_APP_DOWNLOAD_URL=”//txzs.ctsiyun.cn”
.env.test:測試環境
NODE_ENV = “testing”
VUE_APP_BASE_API = “/api”
VUE_APP_DOWNLOAD_URL=”//web-txzs-test.ctsiyun.cn:30080″
② 在 package.json 進行修改
“scripts”: {“dev”: “vue-cli-service serve –mode development”,“build–test”: “vue-cli-service build –mode test”,“build–prod”: “vue-cli-service build –mode production”,“build”: “vue-cli-service build”,“lint”: “vue-cli-service lint”}
③ 使用
npm run dev // 本地運行
npm run build:test // 測試環境打包
npm run bnuild:prod // 生產環境打包
(6)配置文件config的配置
在項目根目錄下創建 vue.config.js 文件,它是一個可選的配置文件,如果項目的根目錄存在這個文件,那麼它就會被 @vue/cli-service 自動載入。
 1 const webpack = require('webpack')
 2 module.exports = {
 3     //部署應用包時的基本 URL
 4     baseUrl: process.env.NODE_ENV === 'production' ? '/online/' : './',
 5     //當運行 vue-cli-service build 時生成的生產環境構建文件的目錄
 6     outputDir: 'dist',
 7     //放置生成的靜態資源 (js、css、img、fonts) 的 (相對於 outputDir 的) 目錄
 8     assetsDir: 'assets',
 9     // eslint-loader 是否在保存的時候檢查 安裝@vue/cli-plugin-eslint有效
10     lintOnSave: true,
11     //是否使用包含運行時編譯器的 Vue 構建版本。設置true後你就可以在使用template
12     runtimeCompiler: true,
13     // 生產環境是否生成 sourceMap 文件 sourceMap的詳解請看末尾
14     productionSourceMap: true,
15     configureWebpack: config => {
16         if (process.env.NODE_ENV === 'production') {
17             // 為生產環境修改配置...
18         } else {
19             // 為開發環境修改配置...
20         }
21     },
22     // css相關配置
23     css: {
24         // 是否使用css分離插件 ExtractTextPlugin 生產環境下是true,開發環境下是false
25         // extract: true,
26         // 開啟 CSS source maps?
27         sourceMap: false,
28         // css預設器配置項
29         loaderOptions: {},
30         // 啟用 CSS modules for all css / pre-processor files.
31         modules: false
32     },
33     // webpack-dev-server 相關配置
34     devServer: { // 設置代理
35         hot: true, //熱載入
36         host: '0.0.0.0', //ip地址
37         port: 8092, //埠
38         https: false, //false關閉https,true為開啟
39         open: true, //自動打開瀏覽器
40         proxy: {
41             '/api': { //本地
42                 target: 'xxx',
43                 // 如果要代理 websockets
44                 ws: true,
45                 changeOrigin: true
46             },
47             '/test': { //測試
48                 target: 'xxx'
49             },
50             '/pre': { //預發布
51                 target: 'xxx'
52             },
53             '/pro': { //正式
54                 target: 'xxx'
55             }
56         }
57     },
58     pluginOptions: { // 第三方插件配置
59         // ...
60     },
61     // 熱更新配置 修改css部分熱更新還需要注釋掉 extract: true
62     chainWebpack: config => {
63        // 修復HMR
64         config.resolve.symlinks(true);
65     }
66 }


