mybatis 源碼分析(二)mapper 初始化
- 2019 年 10 月 3 日
- 筆記
mybatis 的初始化還是相對比較複雜,但是作者在初始化過程中使用了多種設計模式,包括建造者、動態代理、策略、外觀等,使得程式碼的邏輯仍然非常清晰,這一點非常值得我們學習;
一、mapper 初始化主要流程
mybatis 初始化的過程中,主要是 XML 配置的解析,不同的部分又分別委託給了不同的解析器;


解析流程為:
XMLConfigBuilder -> XMLMapperBuilder -> XMLStatementBuilder -> XMLScriptBuilder -> SqlSourceBuilder
- XMLConfigBuilder:負責全局的 mybatis-conf.xml 配置解析;
- XMLMapperBuilder:負責 sql 配置的 mapper 配置解析;
- XMLStatementBuilder:負責 mapper 配置文件中 select|insert|update|delete 節點解析;
- XMLScriptBuilder:負責各 sql 節點解析,主要是動態 sql 解析;
- SqlSourceBuilder:負責構建 SqlSource;
源碼分析:
首先在 XMLConfigBuilder 確定了主要的解析流程:
private void parseConfiguration(XNode root) { // 解析的程式碼和xml的配置一一對應 try { //issue #117 read properties first propertiesElement(root.evalNode("properties")); Properties settings = settingsAsProperties(root.evalNode("settings")); loadCustomVfs(settings); loadCustomLogImpl(settings); typeAliasesElement(root.evalNode("typeAliases")); pluginElement(root.evalNode("plugins")); objectFactoryElement(root.evalNode("objectFactory")); objectWrapperFactoryElement(root.evalNode("objectWrapperFactory")); reflectorFactoryElement(root.evalNode("reflectorFactory")); settingsElement(settings); // read it after objectFactory and objectWrapperFactory issue #631 environmentsElement(root.evalNode("environments")); databaseIdProviderElement(root.evalNode("databaseIdProvider")); typeHandlerElement(root.evalNode("typeHandlers")); mapperElement(root.evalNode("mappers")); } catch (Exception e) { throw new BuilderException("Error parsing SQL Mapper Configuration. Cause: " + e, e); } } private void mapperElement(XNode parent) throws Exception { if (parent != null) { for (XNode child : parent.getChildren()) { if ("package".equals(child.getName())) { // package 方式,mapper 必須和 xml 配置文件在同一目錄下 String mapperPackage = child.getStringAttribute("name"); configuration.addMappers(mapperPackage); } else { String resource = child.getStringAttribute("resource"); String url = child.getStringAttribute("url"); String mapperClass = child.getStringAttribute("class"); if (resource != null && url == null && mapperClass == null) { ErrorContext.instance().resource(resource); InputStream inputStream = Resources.getResourceAsStream(resource); XMLMapperBuilder mapperParser = new XMLMapperBuilder(inputStream, configuration, resource, configuration.getSqlFragments()); mapperParser.parse(); } else if (resource == null && url != null && mapperClass == null) { ErrorContext.instance().resource(url); InputStream inputStream = Resources.getUrlAsStream(url); XMLMapperBuilder mapperParser = new XMLMapperBuilder(inputStream, configuration, url, configuration.getSqlFragments()); mapperParser.parse(); } else if (resource == null && url == null && mapperClass != null) { Class<?> mapperInterface = Resources.classForName(mapperClass); configuration.addMapper(mapperInterface); } else { throw new BuilderException("A mapper element may only specify a url, resource or class, but not more than one."); } } } } }然後在 XMLMapperBuilder 中解析 mapper
public void parse() { if (!configuration.isResourceLoaded(resource)) { configurationElement(parser.evalNode("/mapper")); configuration.addLoadedResource(resource); bindMapperForNamespace(); // 綁定 mapper 和 xml 配置 } // 下面的三個方式是繼續之前未完成的節點解析;比如在 cache-ref 解析的時候,依賴的 cache namespace 還未創建的時候,就需要暫停 parsePendingResultMaps(); parsePendingCacheRefs(); parsePendingStatements(); } private void cacheRefElement(XNode context) { if (context != null) { configuration.addCacheRef(builderAssistant.getCurrentNamespace(), context.getStringAttribute("namespace")); CacheRefResolver cacheRefResolver = new CacheRefResolver(builderAssistant, context.getStringAttribute("namespace")); try { cacheRefResolver.resolveCacheRef(); // 未找到依賴的 cache 時,暫停解析 } catch (IncompleteElementException e) { configuration.addIncompleteCacheRef(cacheRefResolver); } } }二、動態 sql 解析
此外在 mapper 各節點的解析過程中 resultMap 和 sql 節點的解析最為複雜,resultMap 解析主要是 xml 和 反射的處理,有一點繁瑣有興趣可以自己看一下;這裡主要講一下 sql 節點的解析要點;
buildStatementFromContext(context.evalNodes("select|insert|update|delete")); private void buildStatementFromContext(List<XNode> list, String requiredDatabaseId) { for (XNode context : list) { final XMLStatementBuilder statementParser = new XMLStatementBuilder(configuration, builderAssistant, context, requiredDatabaseId); try { statementParser.parseStatementNode(); // 主要的解析過程放到了XMLStatementBuilder中 } catch (IncompleteElementException e) { configuration.addIncompleteStatement(statementParser); } } }// XMLStatementBuilder public void parseStatementNode() { ... String parameterType = context.getStringAttribute("parameterType"); Class<?> parameterTypeClass = resolveClass(parameterType); String lang = context.getStringAttribute("lang"); LanguageDriver langDriver = getLanguageDriver(lang); // Parse selectKey after includes and remove them. processSelectKeyNodes(id, parameterTypeClass, langDriver); // Parse the SQL (pre: <selectKey> and <include> were parsed and removed) KeyGenerator keyGenerator; String keyStatementId = id + SelectKeyGenerator.SELECT_KEY_SUFFIX; keyStatementId = builderAssistant.applyCurrentNamespace(keyStatementId, true); if (configuration.hasKeyGenerator(keyStatementId)) { keyGenerator = configuration.getKeyGenerator(keyStatementId); } else { keyGenerator = context.getBooleanAttribute("useGeneratedKeys", configuration.isUseGeneratedKeys() && SqlCommandType.INSERT.equals(sqlCommandType)) ? Jdbc3KeyGenerator.INSTANCE : NoKeyGenerator.INSTANCE; } SqlSource sqlSource = langDriver.createSqlSource(configuration, context, parameterTypeClass); ... builderAssistant.addMappedStatement(id, sqlSource, statementType, sqlCommandType, fetchSize, timeout, parameterMap, parameterTypeClass, resultMap, resultTypeClass, resultSetTypeEnum, flushCache, useCache, resultOrdered, keyGenerator, keyProperty, keyColumn, databaseId, langDriver, resultSets); }程式碼中的 LanguageDriver 就封裝了動態 sql 的解析規則,通過這個介面也可以使用其他的模版引擎或者解析規則(可以通過配置或者註解指定);
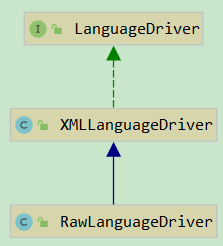

其中 XMLLanguageDriver 主要處理動態 sql,RawLanguageDriver 主要處理靜態 sql;
從程式碼中可以看到最後 LanguageDriver 將 xml 配置解析成了 SqlSource,其結構如下:


其中:
- RawSqlSource:處理靜態sql,去掉xml標籤;
- DynamicSqlSource:處理動態sql,去掉xml標籤;
- ProviderSqlSource:處理註解形式的sql;
- StaticSqlSource:最終將上面 SqlSource 處理結果中的佔位符,替換為 "?",構成真正可執行的sql;
其解析的整體流程如下:
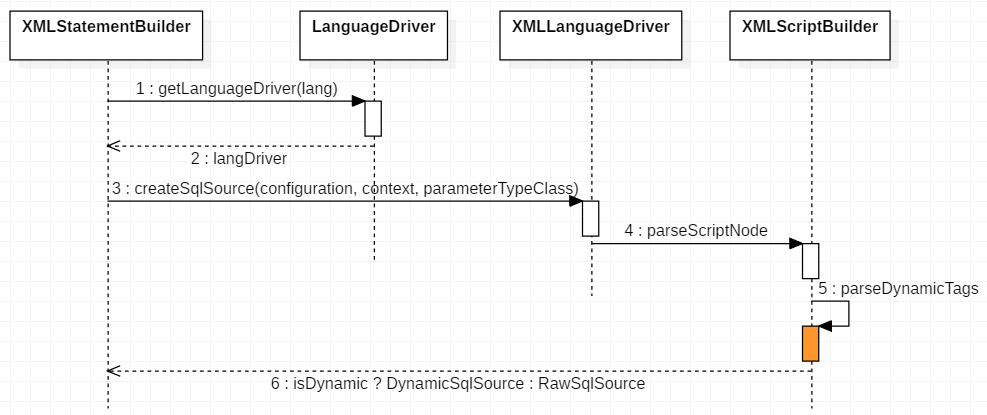

從圖中可以看到 sql 節點的主要解析邏輯就在於 parseDynamicTags,MixedSqlNode rootSqlNode = parseDynamicTags(context);
在看源碼之前先看一下 SqlNode 的結構;


這裡的每個 node 和 sql 節點下的子節點一一對應;
protected MixedSqlNode parseDynamicTags(XNode node) { List<SqlNode> contents = new ArrayList<>(); NodeList children = node.getNode().getChildNodes(); for (int i = 0; i < children.getLength(); i++) { XNode child = node.newXNode(children.item(i)); if (child.getNode().getNodeType() == Node.CDATA_SECTION_NODE || child.getNode().getNodeType() == Node.TEXT_NODE) { String data = child.getStringBody(""); TextSqlNode textSqlNode = new TextSqlNode(data); if (textSqlNode.isDynamic()) { contents.add(textSqlNode); isDynamic = true; } else { contents.add(new StaticTextSqlNode(data)); } } else if (child.getNode().getNodeType() == Node.ELEMENT_NODE) { // issue #628 String nodeName = child.getNode().getNodeName(); NodeHandler handler = nodeHandlerMap.get(nodeName); if (handler == null) { throw new BuilderException("Unknown element <" + nodeName + "> in SQL statement."); } handler.handleNode(child, contents); isDynamic = true; } } return new MixedSqlNode(contents); }這裡主要邏輯是首先通過子標籤的名字,獲取對應的處理器,然後將所有的子標籤生成的 SqlNode 合成 MixedSqlNode;


private void initNodeHandlerMap() { nodeHandlerMap.put("trim", new TrimHandler()); nodeHandlerMap.put("where", new WhereHandler()); nodeHandlerMap.put("set", new SetHandler()); nodeHandlerMap.put("foreach", new ForEachHandler()); nodeHandlerMap.put("if", new IfHandler()); nodeHandlerMap.put("choose", new ChooseHandler()); nodeHandlerMap.put("when", new IfHandler()); nodeHandlerMap.put("otherwise", new OtherwiseHandler()); nodeHandlerMap.put("bind", new BindHandler()); }到這裡就已經比較清楚了,這個 sql 節點的解析過程使用的是策略模式,整個 sql 節點被封裝成 SqlSource,其子節點封裝為 SqlNode,每個 Node 的解析行為又封裝到 NodeHandler 中;整個流程雖然比較長,但是每個模組都非常的清晰,這裡非常值得我們學習;
三、mapper 動態代理
首先簡單看一個動態代理的 demo
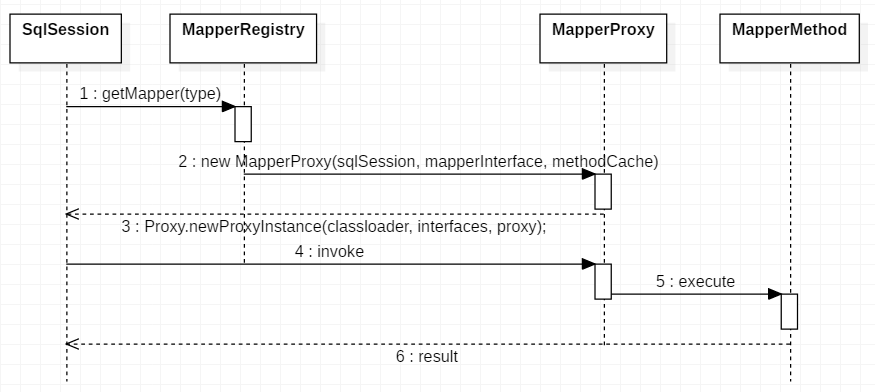
interface Car { void run(String name); } @Test public void testDynamic() { Car car = (Car) Proxy.newProxyInstance( Car.class.getClassLoader(), // 代理目標的類載入器 new Class[]{Car.class}, // 代理的介面數組,因為可以實現多個介面 new InvocationHandler() { // 動態代理的邏輯程式碼 @Override public Object invoke(Object proxy, Method method, Object[] args) throws Throwable { System.out.println("----動態代理開始----"); // 目標邏輯程式碼 System.out.println("----動態代理結束----"); return null; } }); car.run("sdf"); }從上面的程式碼可以看到,我們只定義一個介面並沒有實現類,但是通過動態代理就可以動態生成實現類;在使用 mapper 的時候也是一樣的,每次調用mapper方法的時候,都會動態生成一個實現類;
初始化:
// MapperRegistry public <T> void addMapper(Class<T> type) { if (type.isInterface()) { if (hasMapper(type)) { throw new BindingException("Type " + type + " is already known to the MapperRegistry."); } boolean loadCompleted = false; try { knownMappers.put(type, new MapperProxyFactory<>(type)); // 為每一個介面添加一個動態代理工廠 MapperAnnotationBuilder parser = new MapperAnnotationBuilder(config, type); // 解析註解配置 parser.parse(); loadCompleted = true; } finally { if (!loadCompleted) { knownMappers.remove(type); } } } }使用:
public <T> T getMapper(Class<T> type, SqlSession sqlSession) { final MapperProxyFactory<T> mapperProxyFactory = (MapperProxyFactory<T>) knownMappers.get(type); if (mapperProxyFactory == null) { throw new BindingException("Type " + type + " is not known to the MapperRegistry."); } try { return mapperProxyFactory.newInstance(sqlSession); } catch (Exception e) { throw new BindingException("Error getting mapper instance. Cause: " + e, e); } }其主要流程大致如下: