springboot整合solr
- 2019 年 10 月 3 日
- 筆記
上一篇部落格中簡要寫了solr在windows的安裝與配置,這一篇接上文寫一下springboot整合solr,程式碼已經上傳到github,傳送門。
1、新建core並配置schema
上篇部落格中已經有了相關內容,就不在展開敘述了,具體仿照3.2和3.3的配置schema,原文地址https://www.cnblogs.com/wdfordream/p/11352053.html
solr create -c “book_core” ,配置分詞器並且field類型定義為分詞器類型。
<fieldType name="ik_word" class="solr.TextField"> <analyzer type="index"> <tokenizer class="org.wltea.analyzer.lucene.IKTokenizerFactory" useSmart="false" conf="ik.conf"/> <filter class="solr.LowerCaseFilterFactory"/> </analyzer> <analyzer type="query"> <tokenizer class="org.wltea.analyzer.lucene.IKTokenizerFactory" useSmart="true" conf="ik.conf"/> <filter class="solr.LowerCaseFilterFactory"/> </analyzer> </fieldType> <!-- 自定義添加filed --> <field name="description" type="ik_word" indexed="true" stored="true"/>
配置完畢後啟動solr。
2、相關配置
配置maven
<dependency> <groupId>org.springframework.boot</groupId> <artifactId>spring-boot-starter-data-solr</artifactId> </dependency>
配置application.properties相關solr的內容
# solr配置 spring.data.solr.host=http://localhost:8983/solr/book_core
如果想同時使用好幾個core,通過HttpSolrClient solrClient = new HttpSolrClient(url);構造出對應core的solrClient進行相關操作。
3、solr增刪改查
3.1、新增實體
@SolrDocument(solrCoreName = "book_core") public class Book { @Id @Field private String id; @Field private String description; public String getId() { return id; } public void setId(String id) { this.id = id; } public String getDescription() { return description; } public void setDescription(String description) { this.description = description; } }
在這裡要說明一下 實體類上的註解@field和@SolrDocument 是為了QueryResponse.getBeans()能轉化成相關實體類,不然無法識別。
3.2增刪改
@Autowired SolrClient solrClient; @Override public void add(Book book) { SolrInputDocument document = new SolrInputDocument(); document.setField("id",book.getId()); document.setField("description",book.getDescription()); try { solrClient.add(document); solrClient.commit(); } catch (SolrServerException e) { e.printStackTrace(); } catch (IOException e) { e.printStackTrace(); } } @Override public void delete(String query) { try { solrClient.deleteByQuery(query); solrClient.commit(); } catch (SolrServerException e) { e.printStackTrace(); } catch (IOException e) { e.printStackTrace(); } } @Override public Book update(Book book) { try { solrClient.addBean(book); solrClient.commit(); } catch (IOException e) { e.printStackTrace(); } catch (SolrServerException e) { e.printStackTrace(); } return book; }
增加刪除修改都差不多,增加和修改可以通過add(SolrInputDocument)和addBean,根據主鍵是否存在來判斷是新增還是修改,刪除可以通過主鍵或者條件進行刪除。增刪改之後一定要記得commit!
主鍵是在schema中配置的,默認有 id欄位做主鍵,也可以自定義主鍵,在schema中配置。
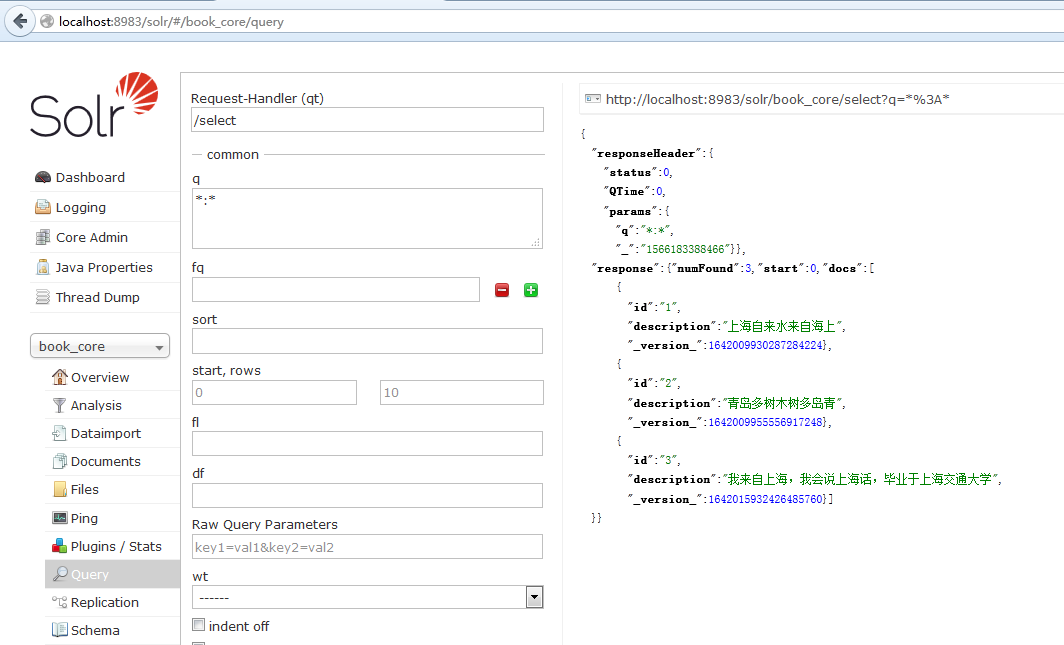
通過add方法加了幾個demo後,可以在solr管理頁面的查詢出查看添加的內容
3.3查詢
查詢則通過SolrQuery入參進行查詢
@Override public List<Book> queryAll() { List<Book> bookList = new ArrayList<Book>(); SolrQuery solrQuery = new SolrQuery(); solrQuery.setQuery("*:*"); try { QueryResponse queryResponse = solrClient.query(solrQuery); if (queryResponse != null){ bookList = queryResponse.getBeans(Book.class); } } catch (SolrServerException e) { e.printStackTrace(); } catch (IOException e) { e.printStackTrace(); } return bookList;
同時我寫了一個jsp頁面來展示查詢結果。

到此,增刪改查的基本操作都已經實現了,更多高級用法可以參考官方api文檔。
4、高亮
一開始在嘗試使用高亮時發現無法起作用,排查後發現高亮是在QueryResponse中的另一個結果集的。QueryResponse.getHighlighting()
取出來的欄位值為自定義前綴後綴拼接具體欄位值。
@Override public List<Book> query(String query) { List<Book> bookList = new ArrayList<Book>(); SolrQuery solrQuery = new SolrQuery(); //設置默認搜索的域 solrQuery.set("df", "description"); solrQuery.setQuery(query); //高亮顯示 solrQuery.setHighlight(true); //設置高亮顯示的域 solrQuery.addHighlightField("description"); //高亮顯示前綴 solrQuery.setHighlightSimplePre("<font color='red'>"); //後綴 solrQuery.setHighlightSimplePost("</font>"); try { QueryResponse queryResponse = solrClient.query(solrQuery); if (queryResponse == null){ return null; } SolrDocumentList solrDocumentList = queryResponse.getResults(); if (solrDocumentList.isEmpty()){ return null; } //獲取高亮 Map<String, Map<String, List<String>>> map = queryResponse.getHighlighting(); for (SolrDocument solrDocument : solrDocumentList){ Book book; List<String> list = map.get(solrDocument.get("id")).get("description"); if (!CollectionUtils.isEmpty(list)){ solrDocument.setField("description",list.get(0)); } String bookStr = JSONUtil.toJSON(solrDocument); book = JSON.parseObject(bookStr,Book.class); bookList.add(book); } } catch (SolrServerException e) { e.printStackTrace(); } catch (IOException e) { e.printStackTrace(); } return bookList; }
頁面展示如下:

搜索框分詞之後,搜索出來的帶有高亮的值。
增刪改查最基本的應用就差不多了,更高級的程式碼請查看官方api文檔。上文中所有程式碼都上傳至github,傳送門。
本人只是個小白,以上只是個人拙見,如果有問題還請大家指出,有更好的想法歡迎大家留言,一起進步,謝謝!
