基於vue手寫tree插件那點事
- 2019 年 10 月 3 日
- 筆記
Tree樹形控制項在前端開發中必不可少,對於數據的展示現在網站大都採取樹形展示。因為大數據全部展示出來對於用戶來說是不友好的。今天我們自己手寫一個Tree插件。
iview提供的控制項
- iview已經很成熟了,如果說我寫的控制項和iview提供的控制項誰更好,那肯定是選擇iview , 手寫控制項只是為了更好的了解vue父子組件之間的通訊的。 請讀者還是不要拿我的控制項和iview或者其他第三方的去對比。下面我們先來看看iview的Tree控制項如何使用
<template> <Tree :data="data2" show-checkbox></Tree> </template> <script> export default { data () { return { data2: [ { title: 'parent 1', expand: true, children: [ { title: 'parent 1-1', expand: true, children: [ { title: 'leaf 1-1-1' }, { title: 'leaf 1-1-2' } ] }, { title: 'parent 1-2', expand: true, children: [ { title: 'leaf 1-2-1' }, { title: 'leaf 1-2-1' } ] } ] } ] } } } </script> - 上述的程式碼形成的效果如下
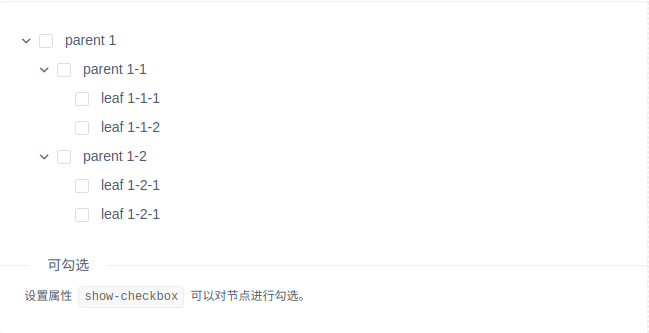
- 在使用Tree控制項時在Template中還有如下樹形可以使用(根據自己需求)
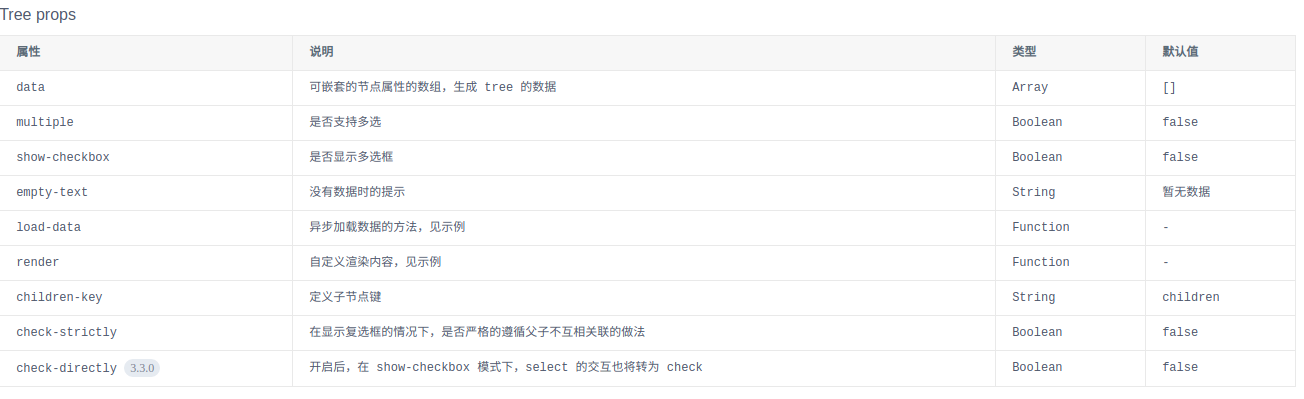
- 然後就是控制項的一些事件捕獲
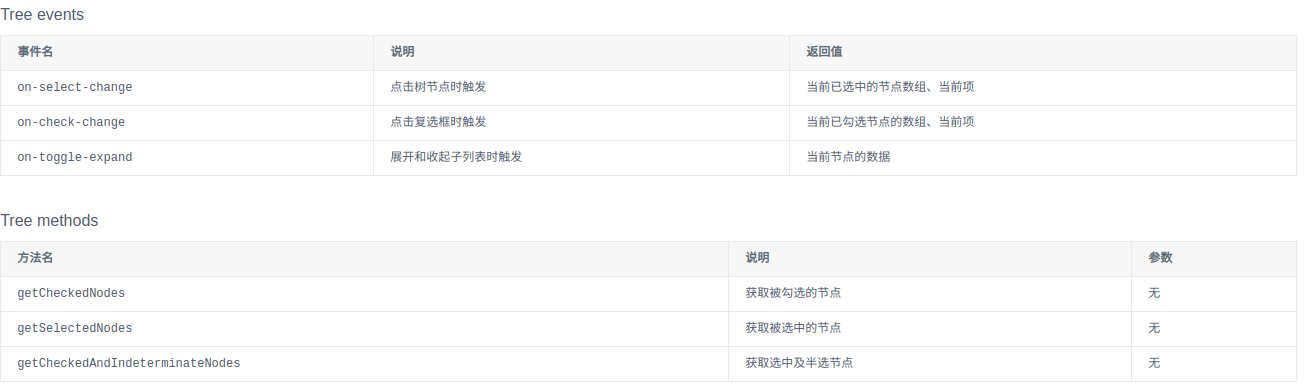
- 子節點的一些設置
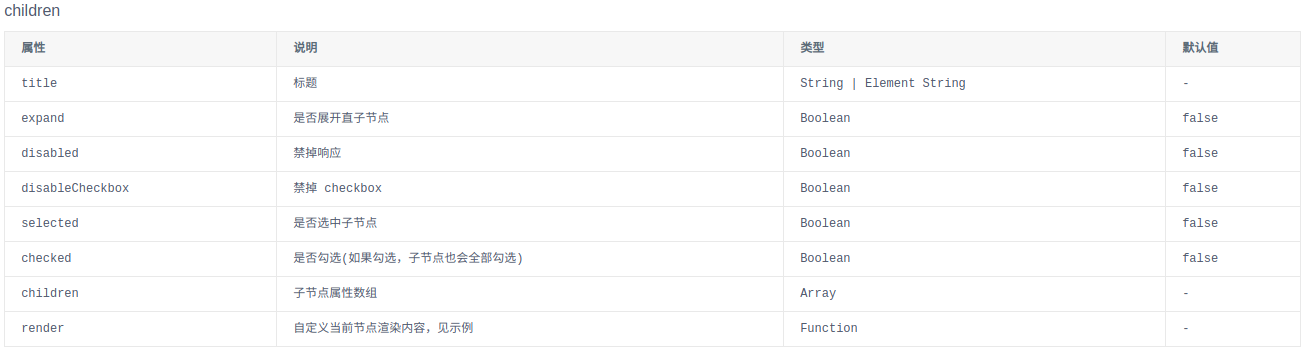
- 對於iview的Tree總結就是一句話:到位!。在這裡小編也推薦大家使用iview來開發。這個框架對於後端程式設計師來說是個福利。因為我們不需要了解太專業的前端的只是就能夠滿足80%的需求了。
手寫控制項
同樣的我們先來看看他的用法其實和iview一樣。用我們封裝好的模板就行了。下面是做一個部門樹。部門下面掛著人員這個功能。
<zxhtree v-if="userChange" class="item" treekey="deptId" treename="deptName" treechildren="children" :model="deptData" :ids="sysUserRole.deptIds" :names="sysUserRole.deptNames" @keyname="selectedUserObj" > </zxhtree> js就是去填補上述的數據,比如deptData、sysUserRole這些。至於這些屬性代表什麼意思我們先不著急看。先上個效果圖。

那麼我們的zxhtree控制項是在哪裡註冊的呢,這裡被我們抽離在component.js里。Vue.component('zxhtree', {});
繼續在zxhtree里看除綁定的節點是template: '#tree-template'。
tree-template的模板是在component.html中寫好的
<script type="text/x-template" id="tree-template"> <div> <tree-item class="item" :treekey="treekey" v-for="(model, index) in model" :treename="treename" :treechildren="treechildren" :model="model" :ids="ids" :names="names" @keyname="selectedObj" @data="synchdata" > </tree-item> </div> </script> 而在tree-template用到的tree-item控制項才是真正的tree控制項。這裡是為了將樹形包裹起來,所以才包裹了一層模板。
tree-item對應的模板程式碼是
<script type="text/x-template" id="item-template"> <ul class="ztree"> <li class="level0" @blur="blur" @focus="focus" tabindex="0" hidefocus="true" treenode=""> <input type="checkbox" :disabled="model.disabled" :ref="model[treename]" :checked="checkStatus" @click="selectedObj"/> <span title="" @click="toggle" :class="openStatus" treenode_switch=""></span> <a :class="selectClass" treenode_a="" onclick="" target="_blank" style="" :title="model[treename]"> <span title="" treenode_ico="" class="button ico_open" style=""></span> <span @dblclick="toggle" class="node_name">{{model[treename]}}</span> </a> <tree-item class="item" v-show="open" v-for="(model, index) in model[treechildren]" :key="index" :model="model" :treekey="treekey" :treename="treename" :vistreekey="vistreekey" :vistreename="vistreename" :treechildren="treechildren" ref="child" @keyname="keyname" > </tree-item> </li> </ul> </script> 可以很明顯的看到這裡我們使用了遞歸進行展示樹形結構。因為樹形結構你無法確定層級。所以在裡面又使用了針對子節點的展示tree-item.
| 屬性 | 含義 | 示例 |
|---|---|---|
| treekey | 內部樹形展示 | deptId |
| vistreekey | 樹形展示key | deptId |
| ids | 默認顯示的數據 | 無 |
| names | 默認顯示的數據 | 無 |
| treename | 內部真是展示數據 | deptName |
| vistreename | 樹形展示數據 | deptName |
| treechildren | 當前樹的子節點數據 | 無 |
| model | 當前樹的數據 | 無 |
| (M)keyname | 用於接受返回的數據 | 無 |
手寫控制項擴展
控制項接受數據處理邏輯
//接收到數據在外面套一層 if(this.model[this.treekey]==undefined){ this.treekey=this.vistreekey; } if(this.model[this.treename]==undefined){ this.treename=this.vistreename; } if (this.model.disabled == true) { this.model.disabled = 'disabled'; } console.log('組件註冊了嗎'); if ((','+this.ids+',').indexOf(','+this.model[this.treekey]+',') == -1) { this.checkStatus = false; this.model.checkStatus=this.checkStatus; } else { this.checkStatus=true; this.model.checkStatus=this.checkStatus; this.treekeys[this.model[this.treekey]]= this.checkStatus; this.treenames[this.model[this.treename]]= this.checkStatus; this.opt.key=this.treekeys; this.opt['name']=this.treenames; } if(this.ids!=''){ var idarr = this.ids; for(var index in idarr){ this.treekeys[idarr[index]]=true; } if (this.names.indexOf(",") == -1&&this.names!='') { this.treenames[this.names]=true; }else{ var namearr = this.names.split(","); for(var index in namearr){ this.treenames[namearr[index]]=true; } } } 渲染默認數據
var newOpt ={'key':{},'name':{}}; newOpt.key = Object.assign(this.opt.key, opt.key); newOpt.name = Object.assign(this.opt.name, opt.name); var flag=false; for(var index in this.model[this.treechildren]){ if(newOpt.key[this.model[this.treechildren][index][this.treekey]]!=true){ flag=true; } } if(!flag){ newOpt.key[this.model[this.treekey]]=true; newOpt.name[this.model[this.treename]]=true; this.checkStatus=true; this.model.checkStatus=true; } for(var key in newOpt){ this.filterRealCheck(newOpt[key]); } this.opt=newOpt; this.$emit('keyname', newOpt); 選擇節點數據處理
if(selected instanceof MouseEvent){ this.checkStatus=!this.checkStatus; }else{ this.checkStatus=selected; } this.model.checkStatus=this.checkStatus; if (this.model.expected != true) { this.treekeys[this.model[this.treekey]]= this.checkStatus; this.treenames[this.model[this.treename]]= this.checkStatus; this.opt.key=this.treekeys; this.opt['name']=this.treenames; } for(var index in this.$refs.child){ this.$refs.child[index].selectedObj(this.checkStatus); } this.$emit('keyname', this.opt); 手寫控制項總結
因為筆者是側重後端,所以前端知識不是很好,這個組件寫的也是很亂。這個組件是之前臨時寫的。裡面沒有進行系統的梳理,上述的邏輯也是很亂。讀者需要的可以選擇下列加入戰隊(#addMe)聯繫我
需要源碼的可關注下面公眾號發點擊進群後諮詢。
# 加入戰隊
微信公眾號

主題

