Netty源碼分析–記憶體模型(上)(十一)
- 2019 年 10 月 3 日
- 筆記
前兩節我們分別看了FastThreadLocal和ThreadLocal的源碼分析,並且在第八節的時候講到了處理一個客戶端的接入請求,一個客戶端是接入進來的,是怎麼註冊到多路復用器上的。那麼這一節我們來一起看下客戶端接入完成之後,是怎麼實現讀寫操作的?我們自己想一下,應該就是為剛剛讀取的數據分配一塊緩衝區,然後把channel中的資訊寫入到緩衝區中,然後傳入到各個handler鏈上,分別進行處理。那Netty是怎麼去分配一塊緩衝區的呢?這個就涉及到了Netty的記憶體模型。
當然,我們在第一節的時候,就詳細了講解了NIO的ByteBuffer。但是操作起來及其的繁瑣,比如我們從寫轉到讀,要必須執行flip()方法。因此,Netty看不下去了,自己寫了一個ByteBuf。這裡也簡單看下這個ByteBuf吧,看看方便在哪裡?看下ByteBuf的javadoc
* {@link ByteBuf} provides two pointer variables to support sequential * read and write operations - {@link #readerIndex() readerIndex} for a read * operation and {@link #writerIndex() writerIndex} for a write operation * respectively. The following diagram shows how a buffer is segmented into * three areas by the two pointers: * * <pre> * +-------------------+------------------+------------------+ * | discardable bytes | readable bytes | writable bytes | * | | (CONTENT) | | * +-------------------+------------------+------------------+ * | | | | * 0 <= readerIndex <= writerIndex <= capacity * </pre>
上面英文的大體意思就是, 說ByteBuf提供了兩個指針變數去支援讀和寫操作。 readerIndex 是針對讀操作, writerIndex 是針對寫操作, 上面的圖就是又這個兩個指針分割成的三部分。左邊是讀過的區域,可以認為是作廢的區域,中間是寫完但是沒有讀的區域,右邊是待寫的區域。 readerIndex 代表 讀到的位置, writerIndex 代表寫到的位置, capacity 最大容量。再看一個圖,理解一個方法。
* <pre> * BEFORE discardReadBytes() // 執行 discardReadBytes() 方法之前 , 假如是下面這樣 * * +-------------------+------------------+------------------+ * | discardable bytes | readable bytes | writable bytes | * +-------------------+------------------+------------------+ * | | | | * 0 <= readerIndex <= writerIndex <= capacity * * * AFTER discardReadBytes() // 執行之後 , 寫索引 =- 讀索引 ; 讀索引變成 0 * * +------------------+--------------------------------------+ * | readable bytes | writable bytes (got more space) | * +------------------+--------------------------------------+ * | | | * readerIndex (0) <= writerIndex (decreased) <= capacity * </pre>
* <pre> * BEFORE clear() // 執行clear()方法之前假如是下面這樣 * * +-------------------+------------------+------------------+ * | discardable bytes | readable bytes | writable bytes | * +-------------------+------------------+------------------+ * | | | | * 0 <= readerIndex <= writerIndex <= capacity * * * AFTER clear() // 執行之後 讀索引和寫索引都會變成0 , 那麼整個緩衝區都會變成可寫區域。 * * +---------------------------------------------------------+ * | writable bytes (got more space) | * +---------------------------------------------------------+ * | | * 0 = readerIndex = writerIndex <= capacity * </pre>
ByteBuf 先介紹到這, 有個讀寫索引之後,就會方便很多,不需要再執行flip類似的操作。
我們繼續按照之前的節奏來debug, 我們先啟動服務端,然後啟動一個客戶端。 斷點打在哪裡呢? 就先打在NioEventLoop的 processSelectedKey() 方法處理accept和read操作的那個判斷那裡。就是下面這裡

public final void read() { final ChannelConfig config = config(); // channel的配置,前面涉及到了,不說了 if (shouldBreakReadReady(config)) { clearReadPending(); return; } final ChannelPipeline pipeline = pipeline(); // 獲取channel對應的pipeline final ByteBufAllocator allocator = config.getAllocator(); // 獲取緩衝區分配器 ,這裡是PooledByteBufAllocator final RecvByteBufAllocator.Handle allocHandle = recvBufAllocHandle(); // 獲取之前在創建channel配置器的時候傳入的AdaptiveRecvByteBufAllocator,創建時候的程式碼如下圖 allocHandle.reset(config); // 重置一些變數 ByteBuf byteBuf = null; boolean close = false; try { do { byteBuf = allocHandle.allocate(allocator); // 這裡是重點,分配緩衝區,後面鋪開講。 allocHandle.lastBytesRead(doReadBytes(byteBuf)); // 將channel中的數據讀取到剛剛申請的緩衝區中,然後對剛剛讀取的位元組數進行一下記錄,方便下一次對獲取緩衝區的大小進行動態的調節 if (allocHandle.lastBytesRead() <= 0) { // 沒有讀取到數據,則釋放緩衝區 // nothing was read. release the buffer. byteBuf.release(); byteBuf = null; close = allocHandle.lastBytesRead() < 0; if (close) { // There is nothing left to read as we received an EOF. readPending = false; } break; } allocHandle.incMessagesRead(1); // 讀取的總資訊++ readPending = false; pipeline.fireChannelRead(byteBuf); // handler鏈表開始執行channelRead方法。 byteBuf = null; } while (allocHandle.continueReading()); allocHandle.readComplete(); pipeline.fireChannelReadComplete(); // handler鏈表開始執行channelReadComplete方法。 if (close) { closeOnRead(pipeline); } } catch (Throwable t) { handleReadException(pipeline, byteBuf, t, close, allocHandle); } finally { // Check if there is a readPending which was not processed yet. // This could be for two reasons: // * The user called Channel.read() or ChannelHandlerContext.read() in channelRead(...) method // * The user called Channel.read() or ChannelHandlerContext.read() in channelReadComplete(...) method // // See https://github.com/netty/netty/issues/2254 if (!readPending && !config.isAutoRead()) { removeReadOp(); } } } }
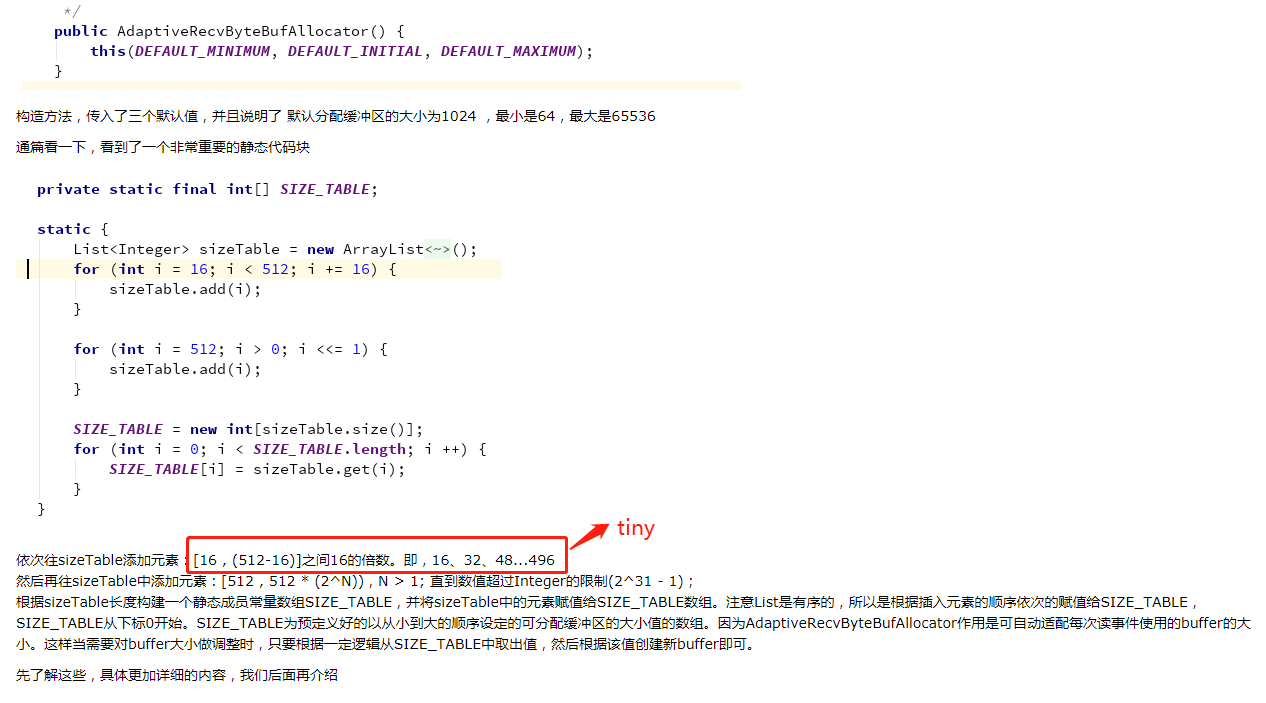
創建channel配置類的時候傳入的AdaptiveRecvByteBufAllocator()

上面重要的地方,我們展開來講,先看 PooledByteBufAllocator 。我們跟下去。發現這個分配器其實是給了一個默認的實例

繼續跟下去,我們看到了一段靜態程式碼塊,那麼我們直接debug看下

根據配置,給到了一個池化的分配器。繼續進去,進入到了 PooledByteBufAllocator 的構造函數。

發現創建了一個執行緒級別的 PoolThreadLocalCache , 並且傳入了true ,代表所有的執行緒都使用Cache。 既然看到了這裡,就直接看著這個快取是啥。
final class PoolThreadLocalCache extends FastThreadLocal<PoolThreadCache> {  // 繼承了 FastThreadLocal, 存儲的內容是 PoolThreadCache 。上節我們剛剛一起看了這個,這裡就很舒服了。          private final boolean useCacheForAllThreads;            PoolThreadLocalCache(boolean useCacheForAllThreads) {              this.useCacheForAllThreads = useCacheForAllThreads;          }            @Override          protected synchronized PoolThreadCache initialValue() {    // 在執行get方法的時候會執行initialValue()方法,來初始化數據。              final PoolArena<byte[]> heapArena = leastUsedArena(heapArenas); // 堆記憶體Arena; 這裡涉及到PoolArena ,我們後面會重點講, 這裡是比較所有PoolArena看下哪個被使用最少,找到最少那個,
                                                                            // 使得執行緒均等使用Arena。              final PoolArena<ByteBuffer> directArena = leastUsedArena(directArenas); // 直接記憶體Arena;  原理跟上面一樣                Thread current = Thread.currentThread();              if (useCacheForAllThreads || current instanceof FastThreadLocalThread) { // 執行緒是FastTreadLocalTread 這裡在NioEventLoop初始化的時候執行緒就被封裝過了。                  return new PoolThreadCache(                                          // 創建一個PoolTreadCache實例                          heapArena, directArena, tinyCacheSize, smallCacheSize, normalCacheSize,                          DEFAULT_MAX_CACHED_BUFFER_CAPACITY, DEFAULT_CACHE_TRIM_INTERVAL);              }              // No caching so just use 0 as sizes.              return new PoolThreadCache(heapArena, directArena, 0, 0, 0, 0, 0);          }            @Override          protected void onRemoval(PoolThreadCache threadCache) { // 釋放的時候,為子類提供的空方法              threadCache.free();          }            private <T> PoolArena<T> leastUsedArena(PoolArena<T>[] arenas) {              if (arenas == null || arenas.length == 0) {                  return null;              }                PoolArena<T> minArena = arenas[0];              for (int i = 1; i < arenas.length; i++) {                  PoolArena<T> arena = arenas[i];                  if (arena.numThreadCaches.get() < minArena.numThreadCaches.get()) {                      minArena = arena;                  }              }                return minArena;          }      }
再繼續說 PoolThreadCache 就說不下去了,一會再說,然後我們先看一個模型,涉及到的名詞有:PoolArena 、 Chunk、 Page、 subPage。
先看Chunk的模型,使用了和jemalloc一樣的分配演算法,夥伴分配演算法。

看上面的圖,把Chunk分割成了2048個Page, chunk 的大小是 16M, 那麼 每個Page 就是 8k, 樹的每個最左子節點 編號都是 2 的 層數 次方, 比如 11 層 第一個就是 2 ^ 11 = 2048 。
當然 page 的大小是 8k, 那麼能不能更加細粒度呢? 當然可以,那就是subPage, 最小單位,不能再分,最小切分單位為16B, 當然這裡 page 是怎麼劃分成subPage的呢? 其實是根據該Page第一次分配的大小決定的,比如 第一次是 16B, 那麼 就會被切分成 8k / 16B = 512 個SubPage, 如果第一次是 32B, 分成 8k / 32B = 256 個SubPage。
當然根據分配的請求大小,我們分為幾個級別:
Tiny : < 512B的請求 分為 16 32 48 64 ….
Small : 512B <= 且 < 8K(PageSize)的請求
Normal : 8K <= 且 <= 16MB(ChunkSize)的請求
Huge : > 16MB(ChunkSize)的請求
好了,大概知道這麼一個模型之後,我們繼續看 PooledByteBufAllocator 的構造方法,
1 public PooledByteBufAllocator(boolean preferDirect, int nHeapArena, int nDirectArena, int pageSize, int maxOrder, 2 int tinyCacheSize, int smallCacheSize, int normalCacheSize, 3 boolean useCacheForAllThreads, int directMemoryCacheAlignment) { 4 super(preferDirect); 5 threadCache = new PoolThreadLocalCache(useCacheForAllThreads); // 創建一個Cache實例,但是這裡並沒有調用initialValue()方法 6 this.tinyCacheSize = tinyCacheSize; // 512 這個其實是tiny快取隊列的長度, 後面我們在說PoolThreadCache時會再介紹 7 this.smallCacheSize = smallCacheSize; // 256 small隊列長度 8 this.normalCacheSize = normalCacheSize; // 64 normal隊列長度 9 chunkSize = validateAndCalculateChunkSize(pageSize, maxOrder); // 計算chunk大小 , 其中maxOrder 就是上面模型的層數 11 , 那麼chunkSize 其實就是 pageSize 左移 11位 , 10 // 也就是 8192 * 2^11 = 16M 11 12 if (nHeapArena < 0) { 13 throw new IllegalArgumentException("nHeapArena: " + nHeapArena + " (expected: >= 0)"); 14 } 15 if (nDirectArena < 0) { 16 throw new IllegalArgumentException("nDirectArea: " + nDirectArena + " (expected: >= 0)"); 17 } 18 19 if (directMemoryCacheAlignment < 0) { 20 throw new IllegalArgumentException("directMemoryCacheAlignment: " 21 + directMemoryCacheAlignment + " (expected: >= 0)"); 22 } 23 if (directMemoryCacheAlignment > 0 && !isDirectMemoryCacheAlignmentSupported()) { 24 throw new IllegalArgumentException("directMemoryCacheAlignment is not supported"); 25 } 26 27 if ((directMemoryCacheAlignment & -directMemoryCacheAlignment) != directMemoryCacheAlignment) { 28 throw new IllegalArgumentException("directMemoryCacheAlignment: " 29 + directMemoryCacheAlignment + " (expected: power of two)"); 30 } 31 32 int pageShifts = validateAndCalculatePageShifts(pageSize); // 2 ^ 13 = 8192 也就是pageSize 這裡的pageShifts = 13, 這裡怎麼算的呢,看下面的方法 33 34 if (nHeapArena > 0) { // 堆記憶體區域競技場數組個數 35 heapArenas = newArenaArray(nHeapArena); 36 List<PoolArenaMetric> metrics = new ArrayList<PoolArenaMetric>(heapArenas.length); 37 for (int i = 0; i < heapArenas.length; i ++) { 38 PoolArena.HeapArena arena = new PoolArena.HeapArena(this, 39 pageSize, maxOrder, pageShifts, chunkSize, 40 directMemoryCacheAlignment); 41 heapArenas[i] = arena; 42 metrics.add(arena); 43 } 44 heapArenaMetrics = Collections.unmodifiableList(metrics); 45 } else { 46 heapArenas = null; 47 heapArenaMetrics = Collections.emptyList(); 48 } 49 50 if (nDirectArena > 0) { // 直接記憶體競技場數組個數 51 directArenas = newArenaArray(nDirectArena); // 創建 PoolArena 數組 大小 8 52 List<PoolArenaMetric> metrics = new ArrayList<PoolArenaMetric>(directArenas.length); 53 for (int i = 0; i < directArenas.length; i ++) { 54 PoolArena.DirectArena arena = new PoolArena.DirectArena( 55 this, pageSize, maxOrder, pageShifts, chunkSize, directMemoryCacheAlignment); // 實例化 PoolArena ,一會我們詳細說這個 56 directArenas[i] = arena; 57 metrics.add(arena); 58 } 59 directArenaMetrics = Collections.unmodifiableList(metrics); // 一些資訊的測度統計,忽略不看這個 60 } else { 61 directArenas = null; 62 directArenaMetrics = Collections.emptyList(); 63 } 64 metric = new PooledByteBufAllocatorMetric(this); 65 } 66 67 private static int validateAndCalculatePageShifts(int pageSize) { 68 if (pageSize < MIN_PAGE_SIZE) { 69 throw new IllegalArgumentException("pageSize: " + pageSize + " (expected: " + MIN_PAGE_SIZE + ")"); 70 } 71 72 if ((pageSize & pageSize - 1) != 0) { 73 throw new IllegalArgumentException("pageSize: " + pageSize + " (expected: power of 2)"); 74 } 75 76 // Logarithm base 2. At this point we know that pageSize is a power of two. 77 return Integer.SIZE - 1 - Integer.numberOfLeadingZeros(pageSize); // Integer.numberOfLeadingZeros 該方法的作用是返回無符號整型i的最高非零位前面的0的個數,包括符號位在內; 78 // 比如說,8192的二進位表示為 0000 0000 0000 0000 0010 0000 0000 0000 java的整型長度為32位。那麼這個方法返回的就是 18 ,那麼整個方法 結果就是 32 - 1 - 18 = 13 79 }
上面既然提到了堆記憶體和堆外直接記憶體,也就是大家說的Netty的零拷貝。
1、Netty的接收和發送採用直接記憶體,就是使用堆外直接記憶體進行Socket讀寫,不需要進行位元組緩衝區的二次拷貝。如果使用傳統的堆記憶體進行Socket讀寫,JVM會將堆記憶體Buffer拷貝一份到直接記憶體中,然後才寫入Socket中。相比於堆外直接記憶體,消息在發送過程中多了一次緩衝區的記憶體拷貝。
2. Netty提供了組合Buffer對象,可以聚合多個ByteBuffer對象,用戶可以像操作一個Buffer那樣方便的對組合Buffer進行操作,避免了傳統通過記憶體拷貝的方式將幾個小Buffer合併成一個大的Buffer。
3. Netty的文件傳輸採用了transferTo方法,它可以直接將文件緩衝區的數據發送到目標Channel,避免了傳統通過循環write方式導致的記憶體拷貝問題。
跟我們理解的作業系統的這種普通零拷貝還不一樣, 我覺得Netty的這種零拷貝完全是在用戶空間的,當然這只是我自己的理解,不一定正確。
關於 AdaptiveRecvByteBufAllocator ,我在 Netty源碼分析–創建Channel(三) 最後有明確說明,所以這裡貼出來給大家回顧一下。
上面說到了,實例化PoolArena, 那我們就繼續看這個的構造函數
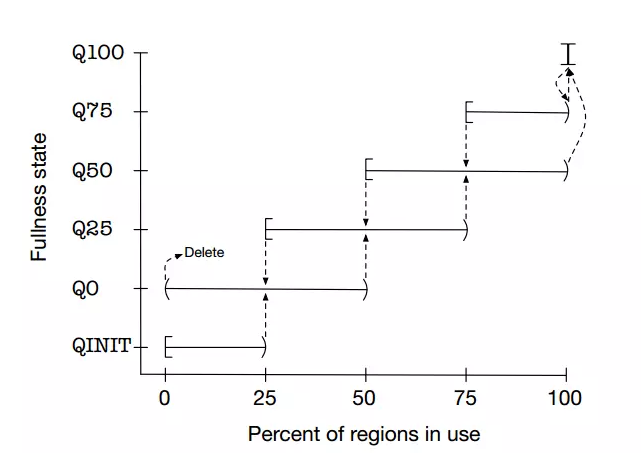
protected PoolArena(PooledByteBufAllocator parent, int pageSize, int maxOrder, int pageShifts, int chunkSize, int cacheAlignment) { this.parent = parent; this.pageSize = pageSize; // 根據上面的分析,這個是8192 this.maxOrder = maxOrder; // chunk 滿二叉樹高度 11 this.pageShifts = pageShifts; // 用於輔助計算的 13 ===> 2 ^ 13 = 8192 this.chunkSize = chunkSize; // 16M chunk 大小 directMemoryCacheAlignment = cacheAlignment; // 對齊基準 directMemoryCacheAlignmentMask = cacheAlignment - 1; // 用於對齊記憶體 subpageOverflowMask = ~(pageSize - 1); // -8192 用於判斷 是否是 tiny 和 small tinySubpagePools = newSubpagePoolArray(numTinySubpagePools); // subPage 雙向鏈表 numTinySubpagePools = 32 為啥是32呢? 上面提到是16為單位遞增,那麼就是 512/16 = 512 >>> 4 = 32 for (int i = 0; i < tinySubpagePools.length; i ++) { tinySubpagePools[i] = newSubpagePoolHead(pageSize); // 初始化鏈表 } numSmallSubpagePools = pageShifts - 9; // 13 - 9 = 4 smallSubpagePools = newSubpagePoolArray(numSmallSubpagePools); // subPage 雙向鏈表 numSmallSubpagePools = 4 也可以理解為 512 << 4 = 8192(Small最大值) 所以是 4 for (int i = 0; i < smallSubpagePools.length; i ++) { smallSubpagePools[i] = newSubpagePoolHead(pageSize); // 初始化鏈表 } q100 = new PoolChunkList<T>(this, null, 100, Integer.MAX_VALUE, chunkSize); // chunk的鏈表 隨著chunk使用率在這幾個鏈表下轉義,具體看底下我百度到的圖 q075 = new PoolChunkList<T>(this, q100, 75, 100, chunkSize); q050 = new PoolChunkList<T>(this, q075, 50, 100, chunkSize); q025 = new PoolChunkList<T>(this, q050, 25, 75, chunkSize); q000 = new PoolChunkList<T>(this, q025, 1, 50, chunkSize); qInit = new PoolChunkList<T>(this, q000, Integer.MIN_VALUE, 25, chunkSize); q100.prevList(q075); q075.prevList(q050); q050.prevList(q025); q025.prevList(q000); q000.prevList(null); qInit.prevList(qInit); List<PoolChunkListMetric> metrics = new ArrayList<PoolChunkListMetric>(6); metrics.add(qInit); metrics.add(q000); metrics.add(q025); metrics.add(q050); metrics.add(q075); metrics.add(q100); chunkListMetrics = Collections.unmodifiableList(metrics); }
為了提高記憶體分配效率並減少內部碎片,jemalloc演算法將Arena切分為小塊Chunk,根據每塊的記憶體使用率又將小塊組合為以下幾種狀態:QINIT,Q0,Q25,Q50,Q75,Q100。Chunk塊可以在這幾種狀態間隨著記憶體 使用率的變化進行轉移,記憶體使用率和狀態轉移可參見下圖:

說完上面的,還記得上面說的這段嗎?我們從這裡進入,


猜測下一次會分配多大記憶體,這裡默認是1024

剛剛說了 直接記憶體和 堆記憶體,這裡Netty默認走的是直接記憶體分支
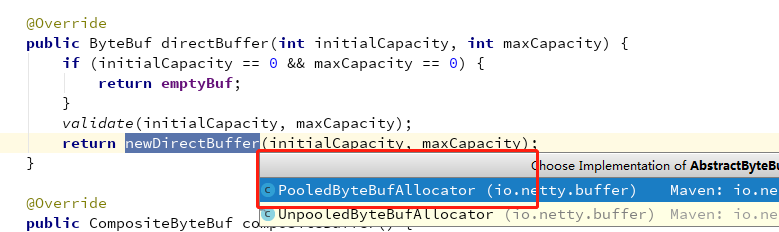
根據上面的分析,這裡是進入一個池化的分配器
1 protected ByteBuf newDirectBuffer(int initialCapacity, int maxCapacity) { 2 PoolThreadCache cache = threadCache.get();// 獲取快取,這裡的get方法會調用初始化方法 initialValue() ,會實例化 PoolThreadCache 3 PoolArena<ByteBuffer> directArena = cache.directArena; // 獲取直接記憶體競技場 4 5 final ByteBuf buf; 6 if (directArena != null) { // 肯定不為空 7 buf = directArena.allocate(cache, initialCapacity, maxCapacity); // 分配方法 8 } else { 9 buf = PlatformDependent.hasUnsafe() ? 10 UnsafeByteBufUtil.newUnsafeDirectByteBuf(this, initialCapacity, maxCapacity) : 11 new UnpooledDirectByteBuf(this, initialCapacity, maxCapacity); 12 } 13 14 return toLeakAwareBuffer(buf); 15 }
上面多次提到 PoolThreadCache ,那就分析一下, 先看構造方法
PoolThreadCache(PoolArena<byte[]> heapArena, PoolArena<ByteBuffer> directArena, int tinyCacheSize, int smallCacheSize, int normalCacheSize, int maxCachedBufferCapacity, int freeSweepAllocationThreshold) { if (maxCachedBufferCapacity < 0) { // 這個是最大快取容量大小 這裡默認是32K,後面我們解釋一下為啥會有這個限制 throw new IllegalArgumentException("maxCachedBufferCapacity: " + maxCachedBufferCapacity + " (expected: >= 0)"); } this.freeSweepAllocationThreshold = freeSweepAllocationThreshold; // 分配次數的閾值 this.heapArena = heapArena; this.directArena = directArena; if (directArena != null) { tinySubPageDirectCaches = createSubPageCaches( tinyCacheSize, PoolArena.numTinySubpagePools, SizeClass.Tiny); // 創建subPage快取數組 ,tinyCacheSize = 512 , PoolArena.numTinySubpagePools = 32 smallSubPageDirectCaches = createSubPageCaches( smallCacheSize, directArena.numSmallSubpagePools, SizeClass.Small); // 創建subPage快取數組 ,smallCacheSize = 256, PoolArena.numSmallSubpagePools = 4 numShiftsNormalDirect = log2(directArena.pageSize); // 2 ^ 13 = 8192 這裡是 13 normalDirectCaches = createNormalCaches( normalCacheSize, maxCachedBufferCapacity, directArena); // 創建Normal快取數組 , normalCacheSize = 64 , maxCachedBufferCapacity = 32K directArena.numThreadCaches.getAndIncrement(); } else { // No directArea is configured so just null out all caches tinySubPageDirectCaches = null; smallSubPageDirectCaches = null; normalDirectCaches = null; numShiftsNormalDirect = -1; } if (heapArena != null) { // Create the caches for the heap allocations tinySubPageHeapCaches = createSubPageCaches( tinyCacheSize, PoolArena.numTinySubpagePools, SizeClass.Tiny); smallSubPageHeapCaches = createSubPageCaches( smallCacheSize, heapArena.numSmallSubpagePools, SizeClass.Small); numShiftsNormalHeap = log2(heapArena.pageSize); normalHeapCaches = createNormalCaches( normalCacheSize, maxCachedBufferCapacity, heapArena); heapArena.numThreadCaches.getAndIncrement(); } else { // No heapArea is configured so just null out all caches tinySubPageHeapCaches = null; smallSubPageHeapCaches = null; normalHeapCaches = null; numShiftsNormalHeap = -1; } // Only check if there are caches in use. if ((tinySubPageDirectCaches != null || smallSubPageDirectCaches != null || normalDirectCaches != null || tinySubPageHeapCaches != null || smallSubPageHeapCaches != null || normalHeapCaches != null) && freeSweepAllocationThreshold < 1) { throw new IllegalArgumentException("freeSweepAllocationThreshold: " + freeSweepAllocationThreshold + " (expected: > 0)"); } }
解釋一下 tinyCacheSize = 512,smallCacheSize = 256,normalCacheSize = 64 是什麼呢? 每一個Cache中都有一個ByteBuf記憶體空間隊列,那麼這三個數就是TinySmallNormal 對應的隊列長度。一會就能看見
private static <T> MemoryRegionCache<T>[] createSubPageCaches( int cacheSize, int numCaches, SizeClass sizeClass) { if (cacheSize > 0 && numCaches > 0) { @SuppressWarnings("unchecked") MemoryRegionCache<T>[] cache = new MemoryRegionCache[numCaches]; // 創建 MemoryRegionCache 數組,TinySmall 數組大小是 324 for (int i = 0; i < cache.length; i++) { // TODO: maybe use cacheSize / cache.length cache[i] = new SubPageMemoryRegionCache<T>(cacheSize, sizeClass); // 初始化 } return cache; } else { return null; } }
private static <T> MemoryRegionCache<T>[] createNormalCaches(
        int cacheSize, int maxCachedBufferCapacity, PoolArena<T> area) {
    if (cacheSize > 0 && maxCachedBufferCapacity > 0) {
        int max = Math.min(area.chunkSize, maxCachedBufferCapacity); // 32K 和 16m 取小的 那就是 32K
        int arraySize = Math.max(1, log2(max / area.pageSize) + 1); // 32K 就是 8 k -> 16k -> 32 k 那麼 arraySize = 3

        @SuppressWarnings("unchecked")
        MemoryRegionCache<T>[] cache = new MemoryRegionCache[arraySize];
        for (int i = 0; i < cache.length; i++) {
            cache[i] = new NormalMemoryRegionCache<T>(cacheSize);
        }
        return cache;
    } else {
        return null;
    }
}
MemoryRegionCache(int size, SizeClass sizeClass) { this.size = MathUtil.safeFindNextPositivePowerOfTwo(size); // 對Size進行對齊, tiny = 512 Small = 256 queue = PlatformDependent.newFixedMpscQueue(this.size); // 創建隊列,長度是Size this.sizeClass = sizeClass; // 記錄類型 }
MPSC(Multiple Producer Single Consumer)隊列即多個生產者單一消費者隊列,之所以使用這種類型的隊列是因為:ByteBuf的分配和釋放可能在不同的執行緒中,這裡的多生產者即多個不同的釋放執行緒,這樣才能保證多個釋放執行緒同時釋放ByteBuf時所佔空間正確添加到隊列中。
這個隊列我簡單畫個圖理解一下
Tiny 的隊列 :
Queue : Tiny 16B ==> Buf1 – Buf2 – Buf3 – Buf4 … – Buf512
Tiny 32B ==> Buf1 – Buf2 – Buf3 – Buf4 … – Buf512
…
Tiny 496B ==> Buf1 – Buf2 – Buf3 – Buf4 … – Buf512
Small 的隊列
Queue : Small 512B ==> Buf1 – Buf2 – Buf3 – Buf4 … – Buf256
Small 1024B ==> Buf1 – Buf2 – Buf3 – Buf4 … – Buf256
Small 2048B ==> Buf1 – Buf2 – Buf3 – Buf4 … – Buf256
Small 4096B ==> Buf1 – Buf2 – Buf3 – Buf4 … – Buf256
Normal 的隊列
Queue : Normal 8K ==> Buf1 – Buf2 – Buf3 – Buf4 … – Buf64
Normal 16K ==> Buf1 – Buf2 – Buf3 – Buf4 … – Buf64
Normal 32K ==> Buf1 – Buf2 – Buf3 – Buf4 … – Buf64
不知道我畫明白了沒有。快取的數組創建好了。大家想一下這個數據是什麼時候放進去呢?肯定是ByteBuf用完後然後放在這個裡面,再看下這個類裡面,看到一個add方法。
在add方法上打個斷點,然後我們啟動一個客戶端, 看下方法棧是怎麼流轉的。

斷點進來了,我們繼續往上找。

前一步是PoolArena的free方法。
再往前找,找到一些熟悉的類,方便我們分析

我是找到了這個

在handler 的channelRead方法中進行了release釋放。從這個地方一直往裡跟就會到剛剛看到的free方法。那我們也就清楚了,就是handler處理完成後,就釋放記憶體。
至於為什麼是 MessageToMessageDecoder 這個handler ,是因為 我的 ProtobufEncoder 繼承了它。
分析了放入的時機,那我們就看下是怎麼放入的吧。
    boolean add(PoolArena<?> area, PoolChunk chunk, long handle, int normCapacity, SizeClass sizeClass) {          MemoryRegionCache<?> cache = cache(area, normCapacity, sizeClass); // 獲取快取對應的數組          if (cache == null) {              return false;          }          return cache.add(chunk, handle); //  添加到隊列中      }        private MemoryRegionCache<?> cache(PoolArena<?> area, int normCapacity, SizeClass sizeClass) {          switch (sizeClass) {          case Normal:              return cacheForNormal(area, normCapacity);          case Small:              return cacheForSmall(area, normCapacity);          case Tiny:              return cacheForTiny(area, normCapacity);          default:              throw new Error();          }      }
      private MemoryRegionCache<?> cacheForSmall(PoolArena<?> area, int normCapacity) {          int idx = PoolArena.smallIdx(normCapacity); // 獲取數組下標  比如  1024 就是 下邊為 1 , 512 是 0 , 2048 是 2          if (area.isDirect()) {              return cache(smallSubPageDirectCaches, idx);          }          return cache(smallSubPageHeapCaches, idx);      }        private MemoryRegionCache<?> cacheForNormal(PoolArena<?> area, int normCapacity) {          if (area.isDirect()) {              int idx = log2(normCapacity >> numShiftsNormalDirect);              return cache(normalDirectCaches, idx);          }          int idx = log2(normCapacity >> numShiftsNormalHeap);          return cache(normalHeapCaches, idx);      }        private static <T> MemoryRegionCache<T> cache(MemoryRegionCache<T>[] cache, int idx) {          if (cache == null || idx > cache.length - 1) {              return null;          }          return cache[idx]; // 根據數組下標,獲取對應Cache      }
public final boolean add(PoolChunk<T> chunk, long handle) { Entry<T> entry = newEntry(chunk, handle); // 新建ENTRY boolean queued = queue.offer(entry); // 添加隊列 if (!queued) { // 如果隊列滿了,直接回收,不快取 // If it was not possible to cache the chunk, immediately recycle the entry entry.recycle(); } return queued; }
好了,添加的這個說完了,還有一個問題,大家想一下這麼多快取是什麼時候釋放的呢??

PoolThreadLocalCache 是 繼承於 FastThreadLocal ,上一節我們看了FastThreadLocal的源碼。最後的時候講了是怎麼清除數據,防止記憶體泄漏的,就是通過remove方法。 也就是執行緒生命周期結束的時候,會通過remove方法進行釋放。
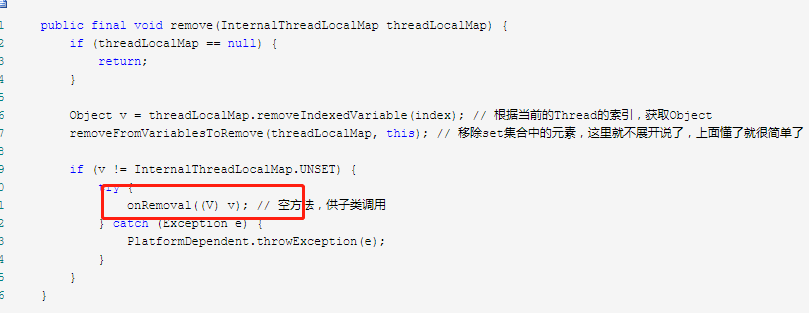
提供了onRemoval方法供子類重寫,那就看下是怎麼重寫的。
protected void onRemoval(PoolThreadCache threadCache) { threadCache.free(); }
void free() { // As free() may be called either by the finalizer or by FastThreadLocal.onRemoval(...) we need to ensure // we only call this one time. if (freed.compareAndSet(false, true)) { int numFreed = free(tinySubPageDirectCaches) + free(smallSubPageDirectCaches) + free(normalDirectCaches) + free(tinySubPageHeapCaches) + free(smallSubPageHeapCaches) + free(normalHeapCaches); if (numFreed > 0 && logger.isDebugEnabled()) { logger.debug("Freed {} thread-local buffer(s) from thread: {}", numFreed, Thread.currentThread().getName()); } if (directArena != null) { directArena.numThreadCaches.getAndDecrement(); } if (heapArena != null) { heapArena.numThreadCaches.getAndDecrement(); } } }
對所有的數組進行釋放,具體的free過程就不一起看了,比較簡單。ok, 下一節我們看下重點的分配方法。
buf = directArena.allocate(cache, initialCapacity, maxCapacity);
