SpringBoot第二十三篇:安全性之Spring Security
- 2019 年 10 月 3 日
- 筆記
作者:追夢1819
原文:https://www.cnblogs.com/yanfei1819/p/11350255.html
版權聲明:本文為部落客原創文章,轉載請附上博文鏈接!
引言
系統的安全的重要性人人皆知,其也成為評判系統的重要標準。
Spring Security 是基於 Spring 的安全框架。傳統的 Spring Security 框架需要配置大量的 xml 文件。而 SpringBoot 的出現,使其簡單、方便、上手快。
版本資訊
- JDK:1.8
- SpringBoot :2.1.6.RELEASE
- maven:3.3.9
- Thymelaf:2.1.4.RELEASE
- IDEA:2019.1.1
資料庫設計
系統的底層資料庫,設計的表格是五張:用戶表、角色表、用戶角色對應表、許可權表、角色許可權對應表。用戶與角色對應,角色與許可權對應,從而使用戶與許可權間接對應。同時考慮到了擴展性和健壯性。這就是底層設計的核心思想。
上述的底層設計基本上是千篇一律的,沒啥可以講的。不是本文的重點。本文的重點是通過項目的需求來演示完整的功能實現。
搭建環境
為了便於項目的演示,本章的實例用 SpringBoot + thymelaf 構建一個簡單的頁面。同時,由於功能點比較多,並保證能夠同時講解晚上功能,以下將分階段詳解各個功能點。
第一階段:
第一步,創建項目:
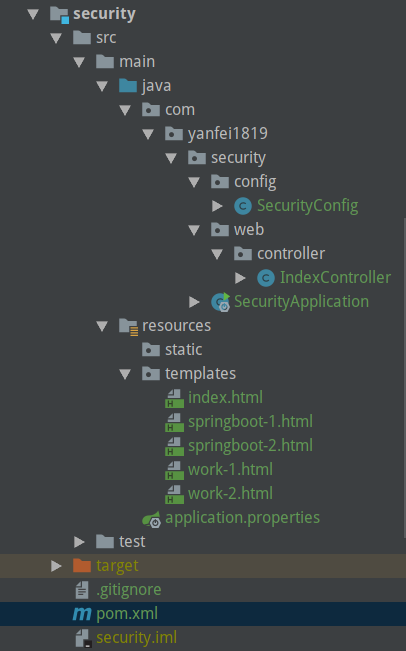
對以上的項目目錄說明:
com.yanfei1819.security.config.SecurityConfig:security配置
com.yanfei1819.security.web.controller.IndexController:測試介面
com.yanfei1819.security.SecurityApplication:啟動類
srcmainresourcestemplatesindex.html:首頁
srcmainresourcestemplatesspringboot-1.html:同以下三個頁面都是菜單的詳細頁,用來模擬菜單
srcmainresourcestemplatesspringboot-2.html:
srcmainresourcestemplateswork-1.html:
srcmainresourcestemplateswork-2.html:
srcmainresourcesapplication.properties:主配置文件
第二步,引入 maven 依賴:
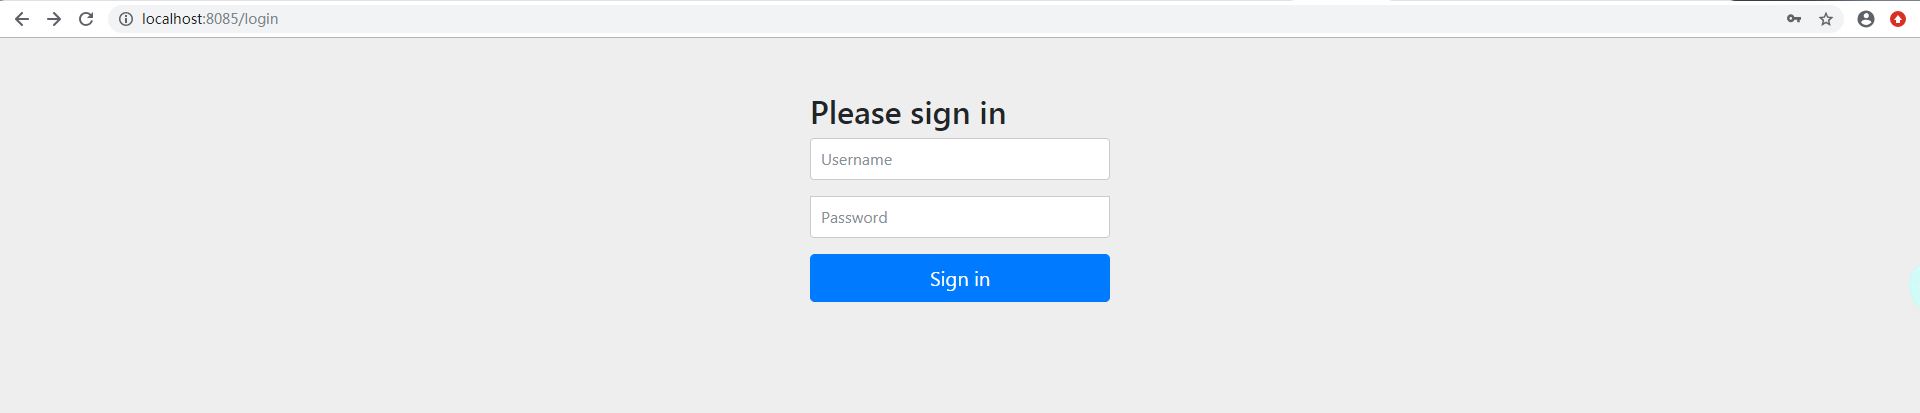
<dependency> <groupId>org.springframework.boot</groupId> <artifactId>spring-boot-starter-web</artifactId> </dependency> <dependency> <groupId>org.springframework.boot</groupId> <artifactId>spring-boot-starter-security</artifactId> </dependency> <dependency> <groupId>org.springframework.boot</groupId> <artifactId>spring-boot-starter-thymeleaf</artifactId> </dependency>注意,在引入 security 依賴後,如果沒有做配置,它會將所有的請求攔截,並跳轉到自定義的登錄介面(埠號被定義為8085)。如下圖:
第三步,創建配置類 SecurityConfig ,並繼承 WebSecurityConfigurerAdapter:
package com.yanfei1819.security.config; import org.springframework.security.config.annotation.authentication.builders.AuthenticationManagerBuilder; import org.springframework.security.config.annotation.web.builders.HttpSecurity; import org.springframework.security.config.annotation.web.configuration.EnableWebSecurity; import org.springframework.security.config.annotation.web.configuration.WebSecurityConfigurerAdapter; import org.springframework.security.crypto.bcrypt.BCryptPasswordEncoder; /** * Created by 追夢1819 on 2019-06-27. */ @EnableWebSecurity public class SecurityConfig extends WebSecurityConfigurerAdapter { @Override protected void configure(HttpSecurity http) throws Exception { // 訂製授權規則 http.authorizeRequests().antMatchers("/").permitAll(). // 所有角色可訪問 antMatchers("/springboot/**").hasAnyRole("admin","test"). // 只有xx角色才能訪問 antMatchers("/work/**").hasRole("admin"); // 只有xx角色才能訪問 } } 定義授權規則,需要重寫 configure(HttpSecurity http) 方法。該配置類的寫法,可以參照 Spring Security官網。該方法中是訂製授權規則。
hasAuthority([auth]):等同於hasRole
hasAnyAuthority([auth1,auth2]):等同於hasAnyRole
hasRole([role]):當前用戶是否擁有指定角色。
hasAnyRole([role1,role2]):多個角色是一個以逗號進行分隔的字元串。如果當前用戶擁有指定角色中的任意一個則返回true
Principle:代表當前用戶的principle對象
authentication:直接從SecurityContext獲取的當前Authentication對象
permitAll():總是返回true,表示允許所有的
denyAll():總是返回false,表示拒絕所有的
isAnonymous():當前用戶是否是一個匿名用戶
isAuthenticated():表示當前用戶是否已經登錄認證成功了
isRememberMe():表示當前用戶是否是通過Remember-Me自動登錄的
isFullyAuthenticated():如果當前用戶既不是一個匿名用戶,同時又不是通過Remember-Me自動登錄的,則返回true
hasPermission():當前用戶是否擁有指定許可權
第四步,定義介面:
package com.yanfei1819.security.web.controller; import org.springframework.stereotype.Controller; import org.springframework.web.bind.annotation.GetMapping; import org.springframework.web.bind.annotation.PathVariable; /** * Created by 追夢1819 on 2019-06-27. */ @Controller public class IndexController { @GetMapping("/") public String index(){ return "index"; } @GetMapping("/springboot/{id}") public String springbootById(@PathVariable int id){ return "springboot-"+id; } @GetMapping("/work/{id}") public String work(@PathVariable int id){ return "work-"+id; } }第五步,編寫頁面 index.html:
<!DOCTYPE html> <html lang="en" xmlns:th="http://www.thymeleaf.org"> <head> <meta charset="UTF-8"> <title>Title</title> </head> <body> <h1>我是首頁</h1> <di> <h3>追夢1819的部落格系列</h3> <ul> <li><a th:href="@{/springboot/1}">SpringBoot 第一章</a></li> <li><a th:href="@{/springboot/2}">SpringBoot 第二章</a></li> <li><a th:href="@{/work/1}">work 第一章</a></li> <li><a th:href="@{/work/2}">work 第二章</a></li> </ul> </di> </body> </html>SpringBoot-1.html:
<!DOCTYPE html> <html lang="en" xmlns:th="http://www.thymeleaf.org"> <head> <meta charset="UTF-8"> <title>Title</title> </head> <body> <h1>SpringBoot-1</h1> </body> </html>另外的 springboot-2.html、work-1.html、work-2.html 與以上類似,此不再贅述。
第六步,啟動類是:
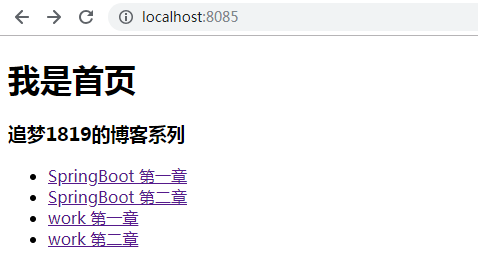
package com.yanfei1819.security; import org.springframework.boot.SpringApplication; import org.springframework.boot.autoconfigure.SpringBootApplication; @SpringBootApplication public class SecurityApplication { public static void main(String[] args) { SpringApplication.run(SecurityApplication.class, args); } }最後,啟動項目。直接訪問 http://localhost:8085/ ,進入首頁:
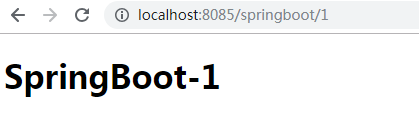
點擊其中任意一個鏈接:

可以看到是沒有許可權訪問的。因此,上述的 security 配置成功。
第二階段:
開啟自動配置的登錄功能,也就是在 SecurityConfig 配置類中加入以下程式碼:
http.formLogin();該功能的作用是,進入首頁後,點擊菜單,如果沒有許可權,則跳轉到登錄頁。
第三階段:
下面闡述設置登錄帳號和密碼。
在 SecurityConfig 配置類重寫 configure(AuthenticationManagerBuilder auth) 方法:
// 定義認證規則 @Override protected void configure(AuthenticationManagerBuilder auth) throws Exception { auth.inMemoryAuthentication() .withUser("admin").password("123456").roles("admin", "test") .and().withUser("test").password("123456").roles("test"); }注意,此處會有一個問題。如以上地址認證規則,在使用配置的帳號登錄時會報錯:

這是由於在 Spring Security5.0 版本後,新增了加密方式,改變了密碼的格式。
在官網中有描述:
The general format for a password is:
Such that `id` is an identifier used to look up which `PasswordEncoder` should be used and `encodedPassword` is the original encoded password for the selected `PasswordEncoder`. The `id` must be at the beginning of the password, start with `{` and end with `}`. If the `id` cannot be found, the `id` will be null. For example, the following might be a list of passwords encoded using different `id`. All of the original passwords are "password".{bcrypt}$2a(10)dXJ3SW6G7P50lGmMkkmwe.20cQQubK3.HZWzG3YB1tlRy.fqvM/BG 1
{noop}password 2
{pbkdf2}5d923b44a6d129f3ddf3e3c8d29412723dcbde72445e8ef6bf3b508fbf17fa4ed4d6b99ca763d8dc 3
{scrypt}$e0801(8bWJaSu2IKSn9Z9kM+TPXfOc/9bdYSrN1oD9qfVThWEwdRTnO7re7Ei+fUZRJ68k9lTyuTeUp4of4g24hHnazw==)OAOec05+bXxvuu/1qZ6NUR+xQYvYv7BeL1QxwRpY5Pc= 4
{sha256}97cde38028ad898ebc02e690819fa220e88c62e0699403e94fff291cfffaf8410849f27605abcbc0 5
“`
1 The first password would have a PasswordEncoderid ofbcryptand encodedPassword of$2a$10$dXJ3SW6G7P50lGmMkkmwe.20cQQubK3.HZWzG3YB1tlRy.fqvM/BG. When matching it would delegate toBCryptPasswordEncoder2 The second password would have a PasswordEncoderid ofnoopand encodedPassword ofpassword. When matching it would delegate toNoOpPasswordEncoder3 The third password would have a PasswordEncoderid ofpbkdf2and encodedPassword of5d923b44a6d129f3ddf3e3c8d29412723dcbde72445e8ef6bf3b508fbf17fa4ed4d6b99ca763d8dc. When matching it would delegate toPbkdf2PasswordEncoder4 The fourth password would have a PasswordEncoderid ofscryptand encodedPassword of$e0801$8bWJaSu2IKSn9Z9kM+TPXfOc/9bdYSrN1oD9qfVThWEwdRTnO7re7Ei+fUZRJ68k9lTyuTeUp4of4g24hHnazw==$OAOec05+bXxvuu/1qZ6NUR+xQYvYv7BeL1QxwRpY5Pc=When matching it would delegate toSCryptPasswordEncoder5 The final password would have a PasswordEncoderid ofsha256and encodedPassword of97cde38028ad898ebc02e690819fa220e88c62e0699403e94fff291cfffaf8410849f27605abcbc0. When matching it would delegate toStandardPasswordEncoder
上面這段話的解釋了為什麼會報錯:There is no PasswordEncoder mapped for the id "null",同時給出了解決方案。也就是 configure(AuthenticationManagerBuilder auth) 方法修改為:
// 定義認證規則 @Override protected void configure(AuthenticationManagerBuilder auth) throws Exception { auth.inMemoryAuthentication().passwordEncoder(new BCryptPasswordEncoder()) .withUser("admin").password(new BCryptPasswordEncoder().encode("123456")).roles("admin","test") .and().passwordEncoder(new BCryptPasswordEncoder()) .withUser("test").password(new BCryptPasswordEncoder().encode("123456")).roles("test"); }修改後重啟項目,登錄可正常訪問:
訪問結果是:帳號 admin/123456 可以訪問所有菜單:SpringBoot 第一章、SpringBoot 第二章、work 第一章、work 第二章,帳號 test/123456 只能訪問 SpringBoot 第一章、SpringBoot 第二章。
第四階段:
開啟自動配置的註銷功能,並清除 session,在配置類 SecurityConfig 中的 configure(HttpSecurity http) 方法中添加:
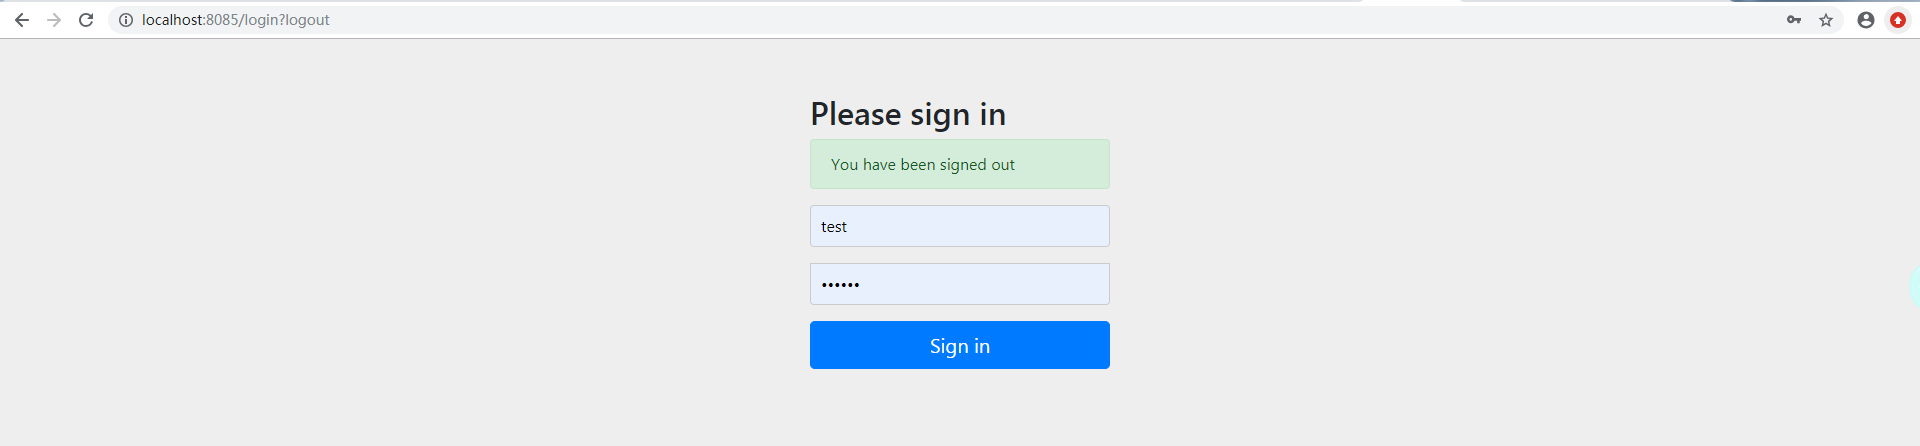
http.logout();然後在首頁 index.html 中添加一個註銷按鈕:
<!DOCTYPE html> <html lang="en" xmlns:th="http://www.thymeleaf.org"> <head> <meta charset="UTF-8"> <title>Title</title> </head> <body> <h1>我是首頁</h1> <di> <h3>追夢1819的部落格系列</h3> <ul> <li><a th:href="@{/springboot/1}">SpringBoot 第一章</a></li> <li><a th:href="@{/springboot/2}">SpringBoot 第二章</a></li> <li><a th:href="@{/work/1}">work 第一章</a></li> <li><a th:href="@{/work/2}">work 第二章</a></li> </ul> </di> <div> <form method="post" th:action="@{/logout}"> <input type="submit" value="logout"> </form> </div> </body> </html>啟動項目,進入首頁,點擊 【logout】,會跳轉到登錄介面,同時鏈接中帶了參數 ?logout:
當然,也可以跳轉到訂製的頁面,只要將屬性修改為:
http.logout() // 退出並清除session .logoutSuccessUrl("/");第五階段:
以上的功能基本都滿足了我們項目中的需求。不過只講述了功能點。下面我們將闡述如何在頁面展示以上功能。
首先,我們必須引入以下依賴,以便使用 sec:authentication和sec:authorize 屬性。
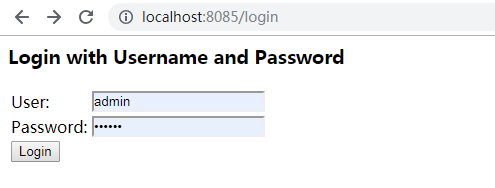
<dependency> <groupId>org.thymeleaf.extras</groupId> <artifactId>thymeleaf-extras-springsecurity4</artifactId> </dependency>注意: 此處有版本衝突問題,以上的演示的 SpringBoot 用的版本都是 2.1.6.RELEASE。但是在此如果繼續使用該版本,則無法使用以上依賴中的 sec:authentication和sec:authorize 屬性。作者在做此演示時,對 SpringBoot 版本作了降級處理,版本為 2.1.4.RELEASE。而舊的版本有很多不同的地方,例如舊版本的登錄介面是:
此處需要特別注意!
引入上述依賴後,我們將首頁進行改造:
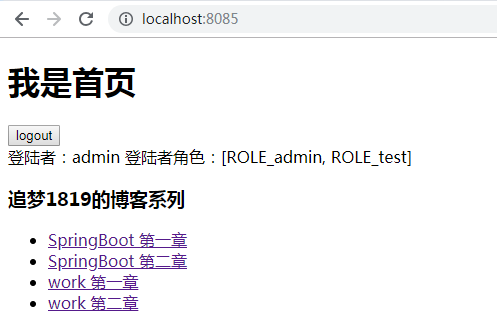
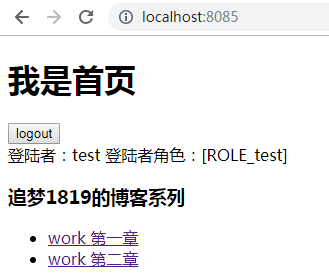
<!DOCTYPE html> <html lang="en" xmlns:th="http://www.thymeleaf.org" xmlns:sec="https://www.thymeleaf.org/thymeleaf-extras-springsecurity4"> <head> <meta charset="UTF-8"> <title>Title</title> </head> <body> <h1>我是首頁</h1> <!--沒有登錄--> <div sec:authorize="!isAuthenticated()"> <a th:href="@{/login}">login</a> </div> <!--已登錄--> <div sec:authorize="isAuthenticated()"> <div> <form method="post" th:action="@{/logout}"> <input type="submit" value="logout"> </form> </div> 登陸者:<span sec:authentication="name"></span> 登陸者角色:<span sec:authentication="principal.authorities"></span> </div> <div> <h3>追夢1819的部落格系列</h3> <ul> <!-- 通過角色判斷是否展示--> <div sec:authorize="hasRole('admin')"> <li><a th:href="@{/springboot/1}">SpringBoot 第一章</a></li> <li><a th:href="@{/springboot/2}">SpringBoot 第二章</a></li> </div> <div sec:authorize="hasRole('test')"> <li><a th:href="@{/work/1}">work 第一章</a></li> <li><a th:href="@{/work/2}">work 第二章</a></li> </div> </ul> </div> </body> </html>啟動項目,分別用不登錄、 admin/123456、test/123456 登錄,查看效果:

第六階段:
最後我們講解一個常用的功能,就是登陸的記住功能,配置很簡單,在配置類 SecurityConfig 中的 configure(HttpSecurity http) 方法中添加即可:
http.rememberMe() // 記住功能 .rememberMeParameter("remember") //自定義rememberMe的name值,默認remember-Me .tokenValiditySeconds(10); // 記住時間進入登陸介面:
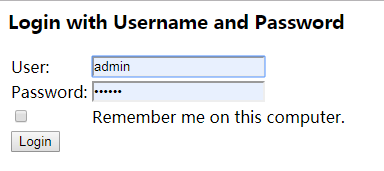
添加該方法後,登錄頁會出現記住功能的複選框。
總結
還有很多詳細的功能。由於篇幅所限,本章中不做一一細解。如果想了解更多,作者給讀者的建議是,可以多看看 WebSecurityConfigurerAdapter 、HttpSecurity、AuthenticationManagerBuilder 等類的源碼,比較簡單,很容易上手。另外就是其文檔非常的詳細、清晰(文檔詳細是Spring的一個特色)。可以讓大家先感受一下 Spring 源碼文檔的強大:
功能描述、示例一應俱全。
結語
其實對以上功能的了解,不算很難。但是這篇部落格前後寫了六七個小時。作者看了翻閱了不少的資料,通讀對應的官方文檔,聽了一些比較好的課程,然後自己一一校驗,思考,排版,解決版本衝突等。最終是希望讓讀者能夠看到一篇準確、美觀、較詳細的資料,不至於陷入網上的亂七八糟的資料中無法自拔。
參考
- Spring Security Reference
- Hello Spring Security with Boot
WebSecurityConfigurerAdapter、HttpSecurity、AuthenticationManagerBuilder等類的源碼