使用Azure人臉API對圖片進行人臉識別
人臉識別是人工智慧機器學習比較成熟的一個領域。人臉識別已經應用到了很多生產場景。比如生物認證,人臉考勤,人流監控等場景。對於很多中小功能由於技術門檻問題很難自己實現人臉識別的演算法。Azure人臉API對人臉識別機器學習演算法進行封裝提供REST API跟SDK方便用戶進行自定義開發。
Azure人臉API可以對影像中的人臉進行識別,返回面部的坐標、性別、年齡、情感、憤怒還是高興、是否微笑,是否帶眼鏡等等非常有意思的資訊。
Azure人臉API也是一個免費服務,每個月30000次事務的免費額度。
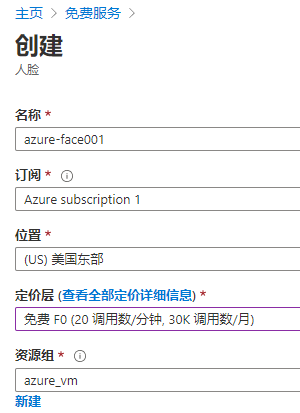
創建人臉服務

填寫實例名,選擇一個區域,同樣選離你近的。
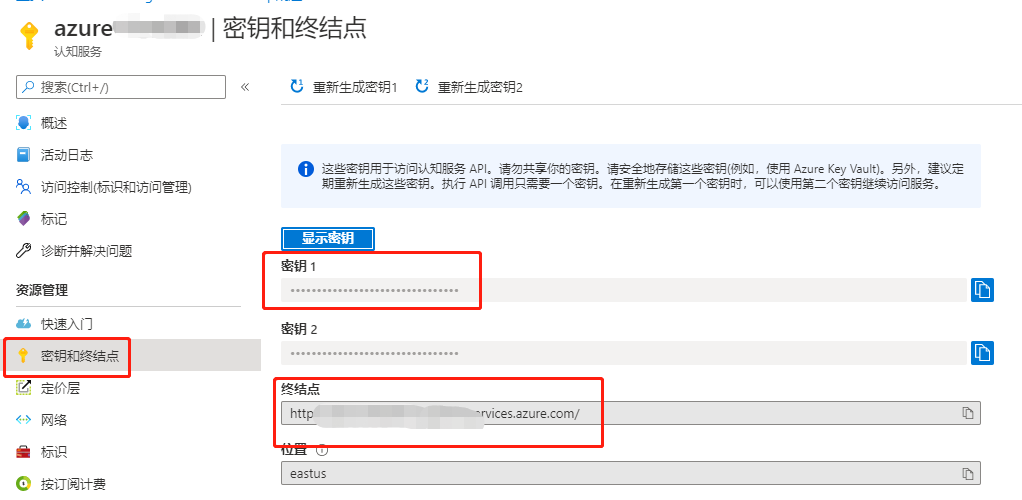
獲取秘鑰跟終結點

選中側邊菜單「秘鑰於終結點」,獲取資訊,這2個資訊後面再sdk調用中需要用到。
新建WPF應用
新建一個WPF應用實現以下功能:
- 選擇圖片後把原圖顯示出來
- 選中後馬上進行識別
- 識別成功後把臉部用紅框描述出來
- 當滑鼠移動到紅框內的時候顯示詳細臉部資訊
安裝SDK
使用nuget安裝對於的sdk包:
Install-Package Microsoft.Azure.CognitiveServices.Vision.Face -Version 2.5.0-preview.2
實現介面
編輯MainWindow.xml放置影像顯示區域、文件選中、描述顯示區域
<Window x:Class="FaceWpf.MainWindow"
        xmlns="//schemas.microsoft.com/winfx/2006/xaml/presentation"
        xmlns:x="//schemas.microsoft.com/winfx/2006/xaml"
        xmlns:d="//schemas.microsoft.com/expression/blend/2008"
        xmlns:mc="//schemas.openxmlformats.org/markup-compatibility/2006"
        xmlns:local="clr-namespace:FaceWpf"
        mc:Ignorable="d"
        Title="MainWindow" Height="600" Width="800">
    <Grid x:Name="BackPanel">
        <Image x:Name="FacePhoto" Stretch="Uniform" Margin="0,0,0,50" MouseMove="FacePhoto_MouseMove" />
        <DockPanel DockPanel.Dock="Bottom">
            <Button x:Name="BrowseButton" Width="72" Height="80" VerticalAlignment="Bottom" HorizontalAlignment="Left"
                     Content="選擇圖片..."
                     Click="BrowseButton_Click" />
            <StatusBar VerticalAlignment="Bottom">
                <StatusBarItem>
                    <TextBlock Name="faceDescriptionStatusBar" Height="80" FontSize="20" Text="" Width="500" TextWrapping="Wrap"/>
                </StatusBarItem>
            </StatusBar>
        </DockPanel>
    </Grid>
</Window>
構造函數
在編輯MainWindow類的構造函數初始化FaceClient等數據
   private IFaceClient _faceClient;

        //檢測到的人臉
        private IList<DetectedFace> _faceList;
        //人臉描述資訊
        private string[] _faceDescriptions;
        private double _resizeFactor;

        private const string _defaultStatusBarText =
            "滑鼠移動到面部顯示描述資訊.";
        public MainWindow()
        {
            InitializeComponent();
            //faceid的訂閱key
            string subscriptionKey = "";
            // faceid的終結的配置
            string faceEndpoint = "";
            _faceClient = new FaceClient(
                new ApiKeyServiceClientCredentials(subscriptionKey),
                new System.Net.Http.DelegatingHandler[] { });
            if (Uri.IsWellFormedUriString(faceEndpoint, UriKind.Absolute))
            {
                _faceClient.Endpoint = faceEndpoint;
            }
            else
            {
                MessageBox.Show(faceEndpoint,
                    "Invalid URI", MessageBoxButton.OK, MessageBoxImage.Error);
                Environment.Exit(0);
            }
        }
圖片選擇並顯示
  // 選擇圖片並上傳
        private async void BrowseButton_Click(object sender, RoutedEventArgs e)
        {
            var openDlg = new Microsoft.Win32.OpenFileDialog();

            openDlg.Filter = "JPEG Image(*.jpg)|*.jpg";
            bool? result = openDlg.ShowDialog(this);

            if (!(bool)result)
            {
                return;
            }

            // Display the image file.
            string filePath = openDlg.FileName;

            Uri fileUri = new Uri(filePath);
            BitmapImage bitmapSource = new BitmapImage();

            bitmapSource.BeginInit();
            bitmapSource.CacheOption = BitmapCacheOption.None;
            bitmapSource.UriSource = fileUri;
            bitmapSource.EndInit();

            FacePhoto.Source = bitmapSource;

            // Detect any faces in the image.
            Title = "識別中...";
            _faceList = await UploadAndDetectFaces(filePath);
            Title = String.Format(
                "識別完成. {0}個人臉", _faceList.Count);

            if (_faceList.Count > 0)
            {
                // Prepare to draw rectangles around the faces.
                DrawingVisual visual = new DrawingVisual();
                DrawingContext drawingContext = visual.RenderOpen();
                drawingContext.DrawImage(bitmapSource,
                    new Rect(0, 0, bitmapSource.Width, bitmapSource.Height));
                double dpi = bitmapSource.DpiX;
                // Some images don't contain dpi info.
                _resizeFactor = (dpi == 0) ? 1 : 96 / dpi;
                _faceDescriptions = new String[_faceList.Count];

                for (int i = 0; i < _faceList.Count; ++i)
                {
                    DetectedFace face = _faceList[i];

                    //畫方框
                    drawingContext.DrawRectangle(
                        Brushes.Transparent,
                        new Pen(Brushes.Red, 2),
                        new Rect(
                            face.FaceRectangle.Left * _resizeFactor,
                            face.FaceRectangle.Top * _resizeFactor,
                            face.FaceRectangle.Width * _resizeFactor,
                            face.FaceRectangle.Height * _resizeFactor
                            )
                    );

                    _faceDescriptions[i] = FaceDescription(face);
                }

                drawingContext.Close();

                RenderTargetBitmap faceWithRectBitmap = new RenderTargetBitmap(
                    (int)(bitmapSource.PixelWidth * _resizeFactor),
                    (int)(bitmapSource.PixelHeight * _resizeFactor),
                    96,
                    96,
                    PixelFormats.Pbgra32);

                faceWithRectBitmap.Render(visual);
                FacePhoto.Source = faceWithRectBitmap;

                faceDescriptionStatusBar.Text = _defaultStatusBarText;
            }
        }
調用SDK進行識別
指定需要識別的要素,調用sdk進行影像識別
   // 上傳圖片使用faceclient識別
        private async Task<IList<DetectedFace>> UploadAndDetectFaces(string imageFilePath)
        {
            IList<FaceAttributeType> faceAttributes =
                new FaceAttributeType[]
                {
            FaceAttributeType.Gender, FaceAttributeType.Age,
            FaceAttributeType.Smile, FaceAttributeType.Emotion,
            FaceAttributeType.Glasses, FaceAttributeType.Hair
                };

            using (Stream imageFileStream = File.OpenRead(imageFilePath))
            {
                IList<DetectedFace> faceList =
                    await _faceClient.Face.DetectWithStreamAsync(
                        imageFileStream, true, false, faceAttributes);
                return faceList;
            }
        }
顯示臉部的描述
對人臉識別後的結果資訊組裝成字元串,當滑鼠移動到人臉上的時候顯示這些資訊。
 /// <summary>
        /// 滑鼠移動顯示臉部描述
        /// </summary>
        /// <param name="sender"></param>
        /// <param name="e"></param>
        private void FacePhoto_MouseMove(object sender, MouseEventArgs e)
        {
            if (_faceList == null)
                return;

            Point mouseXY = e.GetPosition(FacePhoto);

            ImageSource imageSource = FacePhoto.Source;
            BitmapSource bitmapSource = (BitmapSource)imageSource;

            var scale = FacePhoto.ActualWidth / (bitmapSource.PixelWidth / _resizeFactor);

            bool mouseOverFace = false;

            for (int i = 0; i < _faceList.Count; ++i)
            {
                FaceRectangle fr = _faceList[i].FaceRectangle;
                double left = fr.Left * scale;
                double top = fr.Top * scale;
                double width = fr.Width * scale;
                double height = fr.Height * scale;

                if (mouseXY.X >= left && mouseXY.X <= left + width &&
                    mouseXY.Y >= top && mouseXY.Y <= top + height)
                {
                    faceDescriptionStatusBar.Text = _faceDescriptions[i];
                    mouseOverFace = true;
                    break;
                }
            }

            if (!mouseOverFace) faceDescriptionStatusBar.Text = _defaultStatusBarText;
        }
 /// <summary>
        /// 臉部描述
        /// </summary>
        /// <param name="face"></param>
        /// <returns></returns>
        private string FaceDescription(DetectedFace face)
        {
            StringBuilder sb = new StringBuilder();

            sb.Append("人臉: ");

            // 性別年齡
            sb.Append(face.FaceAttributes.Gender.Value == Gender.Female ? "女性" : "男性");
            sb.Append(", ");
            sb.Append(face.FaceAttributes.Age.ToString() + "歲");
            sb.Append(", ");
            sb.Append(String.Format("微笑 {0:F1}%, ", face.FaceAttributes.Smile * 100));

            // 顯示超過0.1的表情
            sb.Append("表情: ");
            Emotion emotionScores = face.FaceAttributes.Emotion;
            if (emotionScores.Anger >= 0.1f) sb.Append(
                String.Format("生氣 {0:F1}%, ", emotionScores.Anger * 100));
            if (emotionScores.Contempt >= 0.1f) sb.Append(
                String.Format("蔑視 {0:F1}%, ", emotionScores.Contempt * 100));
            if (emotionScores.Disgust >= 0.1f) sb.Append(
                String.Format("厭惡 {0:F1}%, ", emotionScores.Disgust * 100));
            if (emotionScores.Fear >= 0.1f) sb.Append(
                String.Format("恐懼 {0:F1}%, ", emotionScores.Fear * 100));
            if (emotionScores.Happiness >= 0.1f) sb.Append(
                String.Format("高興 {0:F1}%, ", emotionScores.Happiness * 100));
            if (emotionScores.Neutral >= 0.1f) sb.Append(
                String.Format("自然 {0:F1}%, ", emotionScores.Neutral * 100));
            if (emotionScores.Sadness >= 0.1f) sb.Append(
                String.Format("悲傷 {0:F1}%, ", emotionScores.Sadness * 100));
            if (emotionScores.Surprise >= 0.1f) sb.Append(
                String.Format("驚喜 {0:F1}%, ", emotionScores.Surprise * 100));

            sb.Append(face.FaceAttributes.Glasses);
            sb.Append(", ");

            sb.Append("頭髮: ");

            if (face.FaceAttributes.Hair.Bald >= 0.01f)
                sb.Append(String.Format("禿頭 {0:F1}% ", face.FaceAttributes.Hair.Bald * 100));

            IList<HairColor> hairColors = face.FaceAttributes.Hair.HairColor;
            foreach (HairColor hairColor in hairColors)
            {
                if (hairColor.Confidence >= 0.1f)
                {
                    sb.Append(hairColor.Color.ToString());
                    sb.Append(String.Format(" {0:F1}% ", hairColor.Confidence * 100));
                }
            }

            return sb.ToString();
        }
運行
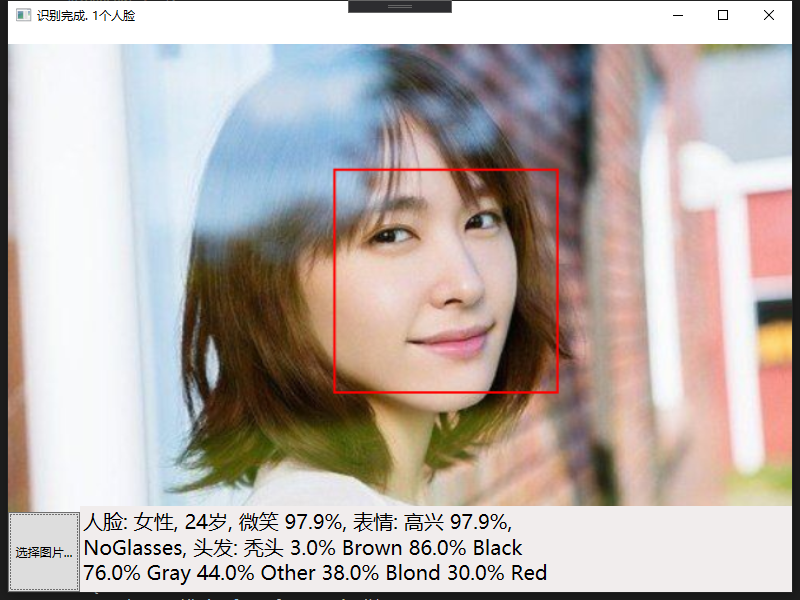
到此我們的應用打造完成了。先讓我們選擇一張結衣的圖片試試:

看看我們的結衣微笑率97.9%。
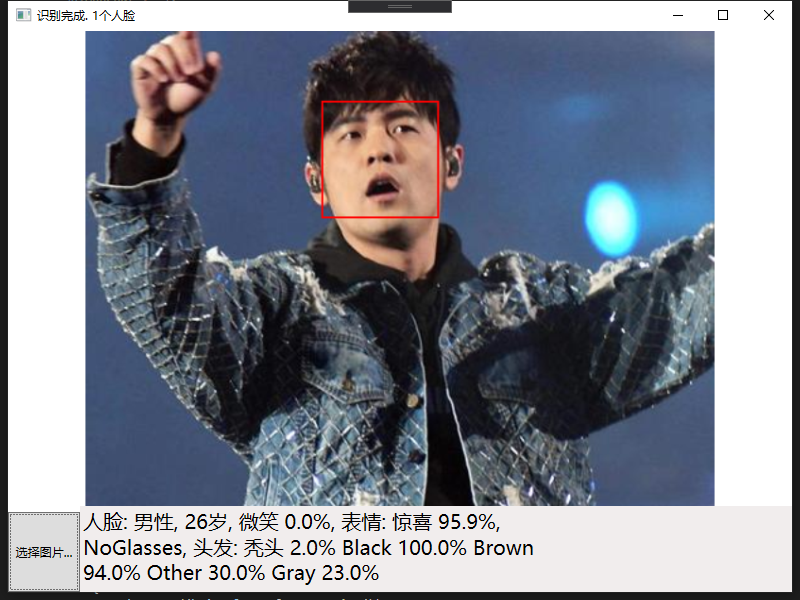
再選一張杰倫的圖片試試:

嗨,杰倫就是不喜歡笑,微笑率0% 。。。
總結
通過簡單的一個wpf的應用我們演示了如果使用Azure人臉API進行圖片中的人臉檢測,真的非常方便,識別程式碼只有1行而已。如果不用C# sdk還可以使用更加通用的rest api來調用,這樣可以適配任何開發語言。Azure人臉API除了能對圖片中的人臉進行檢測,還可以對多個人臉進行比對,檢測是否是同一個人,這樣就可以實現人臉考勤等功能了,這個下次再說吧。

