spring5 源碼深度解析—– Spring事務 是怎麼通過AOP實現的?(100%理解Spring事務)
- 2019 年 10 月 14 日
- 筆記
此篇文章需要有SpringAOP基礎,知道AOP底層原理可以更好的理解Spring的事務處理。
自定義標籤
對於Spring中事務功能的程式碼分析,我們首先從配置文件開始人手,在配置文件中有這樣一個配置:<tx:annotation-driven/>。可以說此處配置是事務的開關,如果沒有此處配置,那麼Spring中將不存在事務的功能。那麼我們就從這個配置開始分析。
根據之前的分析,我們因此可以判斷,在自定義標籤中的解析過程中一定是做了一些輔助操作,於是我們先從自定義標籤入手進行分析。使用Idea搜索全局程式碼,關鍵字annotation-driven,最終鎖定類TxNamespaceHandler,在TxNamespaceHandler中的 init 方法中:
@Override public void init() { registerBeanDefinitionParser("advice", new TxAdviceBeanDefinitionParser()); registerBeanDefinitionParser("annotation-driven", new AnnotationDrivenBeanDefinitionParser()); registerBeanDefinitionParser("jta-transaction-manager", new JtaTransactionManagerBeanDefinitionParser()); }
在遇到諸如tx:annotation-driven為開頭的配置後,Spring都會使用AnnotationDrivenBeanDefinitionParser類的parse方法進行解析。
@Override @Nullable public BeanDefinition parse(Element element, ParserContext parserContext) { registerTransactionalEventListenerFactory(parserContext); String mode = element.getAttribute("mode"); if ("aspectj".equals(mode)) { // mode="aspectj" registerTransactionAspect(element, parserContext); if (ClassUtils.isPresent("javax.transaction.Transactional", getClass().getClassLoader())) { registerJtaTransactionAspect(element, parserContext); } } else { // mode="proxy" AopAutoProxyConfigurer.configureAutoProxyCreator(element, parserContext); } return null; }
在解析中存在對於mode屬性的判斷,根據程式碼,如果我們需要使用AspectJ的方式進行事務切入(Spring中的事務是以AOP為基礎的),那麼可以使用這樣的配置:
<tx:annotation-driven transaction-manager="transactionManager" mode="aspectj"/>
註冊 InfrastructureAdvisorAutoProxyCreator
我們以默認配置為例進行分析,進人AopAutoProxyConfigurer類的configureAutoProxyCreator:
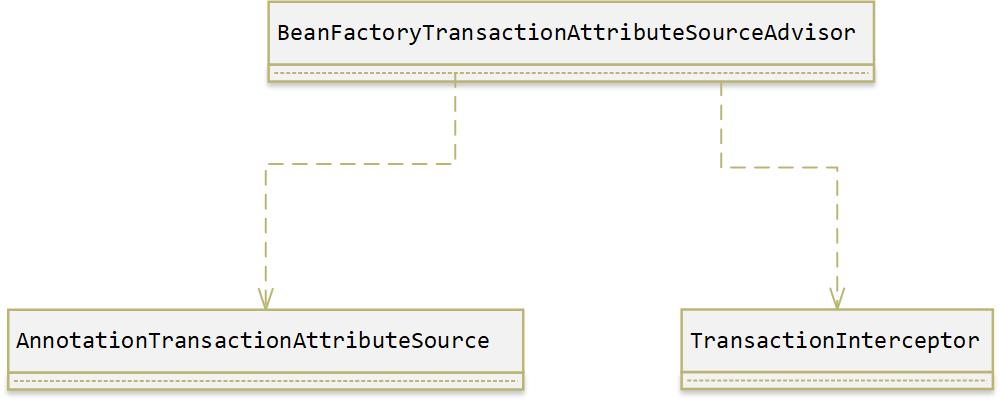
public static void configureAutoProxyCreator(Element element, ParserContext parserContext) { //向IOC註冊InfrastructureAdvisorAutoProxyCreator這個類型的Bean AopNamespaceUtils.registerAutoProxyCreatorIfNecessary(parserContext, element); String txAdvisorBeanName = TransactionManagementConfigUtils.TRANSACTION_ADVISOR_BEAN_NAME; if (!parserContext.getRegistry().containsBeanDefinition(txAdvisorBeanName)) { Object eleSource = parserContext.extractSource(element); // Create the TransactionAttributeSource definition. // 創建AnnotationTransactionAttributeSource類型的Bean RootBeanDefinition sourceDef = new RootBeanDefinition("org.springframework.transaction.annotation.AnnotationTransactionAttributeSource"); sourceDef.setSource(eleSource); sourceDef.setRole(BeanDefinition.ROLE_INFRASTRUCTURE); String sourceName = parserContext.getReaderContext().registerWithGeneratedName(sourceDef); // Create the TransactionInterceptor definition. // 創建TransactionInterceptor類型的Bean RootBeanDefinition interceptorDef = new RootBeanDefinition(TransactionInterceptor.class); interceptorDef.setSource(eleSource); interceptorDef.setRole(BeanDefinition.ROLE_INFRASTRUCTURE); registerTransactionManager(element, interceptorDef); interceptorDef.getPropertyValues().add("transactionAttributeSource", new RuntimeBeanReference(sourceName)); String interceptorName = parserContext.getReaderContext().registerWithGeneratedName(interceptorDef); // Create the TransactionAttributeSourceAdvisor definition. // 創建BeanFactoryTransactionAttributeSourceAdvisor類型的Bean RootBeanDefinition advisorDef = new RootBeanDefinition(BeanFactoryTransactionAttributeSourceAdvisor.class); advisorDef.setSource(eleSource); advisorDef.setRole(BeanDefinition.ROLE_INFRASTRUCTURE); // 將上面AnnotationTransactionAttributeSource類型Bean注入進上面的Advisor advisorDef.getPropertyValues().add("transactionAttributeSource", new RuntimeBeanReference(sourceName)); // 將上面TransactionInterceptor類型Bean注入進上面的Advisor advisorDef.getPropertyValues().add("adviceBeanName", interceptorName); if (element.hasAttribute("order")) { advisorDef.getPropertyValues().add("order", element.getAttribute("order")); } parserContext.getRegistry().registerBeanDefinition(txAdvisorBeanName, advisorDef); // 將上面三個Bean註冊進IOC中 CompositeComponentDefinition compositeDef = new CompositeComponentDefinition(element.getTagName(), eleSource); compositeDef.addNestedComponent(new BeanComponentDefinition(sourceDef, sourceName)); compositeDef.addNestedComponent(new BeanComponentDefinition(interceptorDef, interceptorName)); compositeDef.addNestedComponent(new BeanComponentDefinition(advisorDef, txAdvisorBeanName)); parserContext.registerComponent(compositeDef); } }
這裡分別是註冊了三個Bean,和一個InfrastructureAdvisorAutoProxyCreator,其中三個Bean支撐了整個事務的功能。
我們首先需要回顧一下AOP的原理,AOP中有一個 Advisor 存放在代理類中,而Advisor中有advise與pointcut資訊,每次執行被代理類的方法時都會執行代理類的invoke(如果是JDK代理)方法,而invoke方法會根據advisor中的pointcut動態匹配這個方法需要執行的advise鏈,遍歷執行advise鏈,從而達到AOP切面編程的目的。
BeanFactoryTransactionAttributeSourceAdvisor:首先看這個類的繼承結構,可以看到這個類其實是一個Advisor,其實由名字也能看出來,類中有幾個關鍵地方注意一下,在之前的註冊過程中,將兩個屬性注入進這個Bean中:
// 將上面AnnotationTransactionAttributeSource類型Bean注入進上面的Advisor advisorDef.getPropertyValues().add("transactionAttributeSource", new RuntimeBeanReference(sourceName)); // 將上面TransactionInterceptor類型Bean注入進上面的Advisor advisorDef.getPropertyValues().add("adviceBeanName", interceptorName);
那麼它們被注入成什麼了呢?進入BeanFactoryTransactionAttributeSourceAdvisor一看便知。
@Nullable private TransactionAttributeSource transactionAttributeSource;
在其父類中有屬性:
@Nullable private String adviceBeanName;
也就是說,這裡先將上面的TransactionInterceptor的BeanName傳入到Advisor中,然後將AnnotationTransactionAttributeSource這個Bean注入到Advisor中,那麼這個Source Bean有什麼用呢?可以繼續看看BeanFactoryTransactionAttributeSourceAdvisor的源碼。
private final TransactionAttributeSourcePointcut pointcut = new TransactionAttributeSourcePointcut() { @Override @Nullable protected TransactionAttributeSource getTransactionAttributeSource() { return transactionAttributeSource; } };
看到這裡應該明白了,這裡的Source是提供了pointcut資訊,作為存放事務屬性的一個類注入進Advisor中,到這裡應該知道註冊這三個Bean的作用了吧?首先註冊pointcut、advice、advisor,然後將pointcut和advice注入進advisor中,在之後動態代理的時候會使用這個Advisor去尋找每個Bean是否需要動態代理(取決於是否有開啟事務),因為Advisor有pointcut資訊。
- InfrastructureAdvisorAutoProxyCreator:在方法開頭,首先就調用了AopNamespeceUtils去註冊了這個Bean,那麼這個Bean是幹什麼用的呢?還是先看看這個類的結構。這個類繼承了AbstractAutoProxyCreator,看到這個名字,熟悉AOP的話應該已經知道它是怎麼做的了吧?其次這個類還實現了BeanPostProcessor介面,凡事實現了這個BeanPost介面的類,我們首先關注的就是它的postProcessAfterInitialization方法,這裡在其父類也就是剛剛提到的AbstractAutoProxyCreator這裡去實現。(這裡需要知道Spring容器初始化Bean的過程,關於BeanPostProcessor的使用我會另開一篇講解。如果不知道只需了解如果一個Bean實現了BeanPostProcessor介面,當所有Bean實例化且依賴注入之後初始化方法之後會執行這個實現Bean的postProcessAfterInitialization方法)
進入這個函數:
public static void registerAutoProxyCreatorIfNecessary( ParserContext parserContext, Element sourceElement) { BeanDefinition beanDefinition = AopConfigUtils.registerAutoProxyCreatorIfNecessary( parserContext.getRegistry(), parserContext.extractSource(sourceElement)); useClassProxyingIfNecessary(parserContext.getRegistry(), sourceElement); registerComponentIfNecessary(beanDefinition, parserContext); } @Nullable public static BeanDefinition registerAutoProxyCreatorIfNecessary(BeanDefinitionRegistry registry, @Nullable Object source) { return registerOrEscalateApcAsRequired(InfrastructureAdvisorAutoProxyCreator.class, registry, source); }
對於解析來的程式碼流程AOP中已經有所分析,上面的兩個函數主要目的是註冊了InfrastructureAdvisorAutoProxyCreator類型的bean,那麼註冊這個類的目的是什麼呢?查看這個類的層次,如下圖所示:
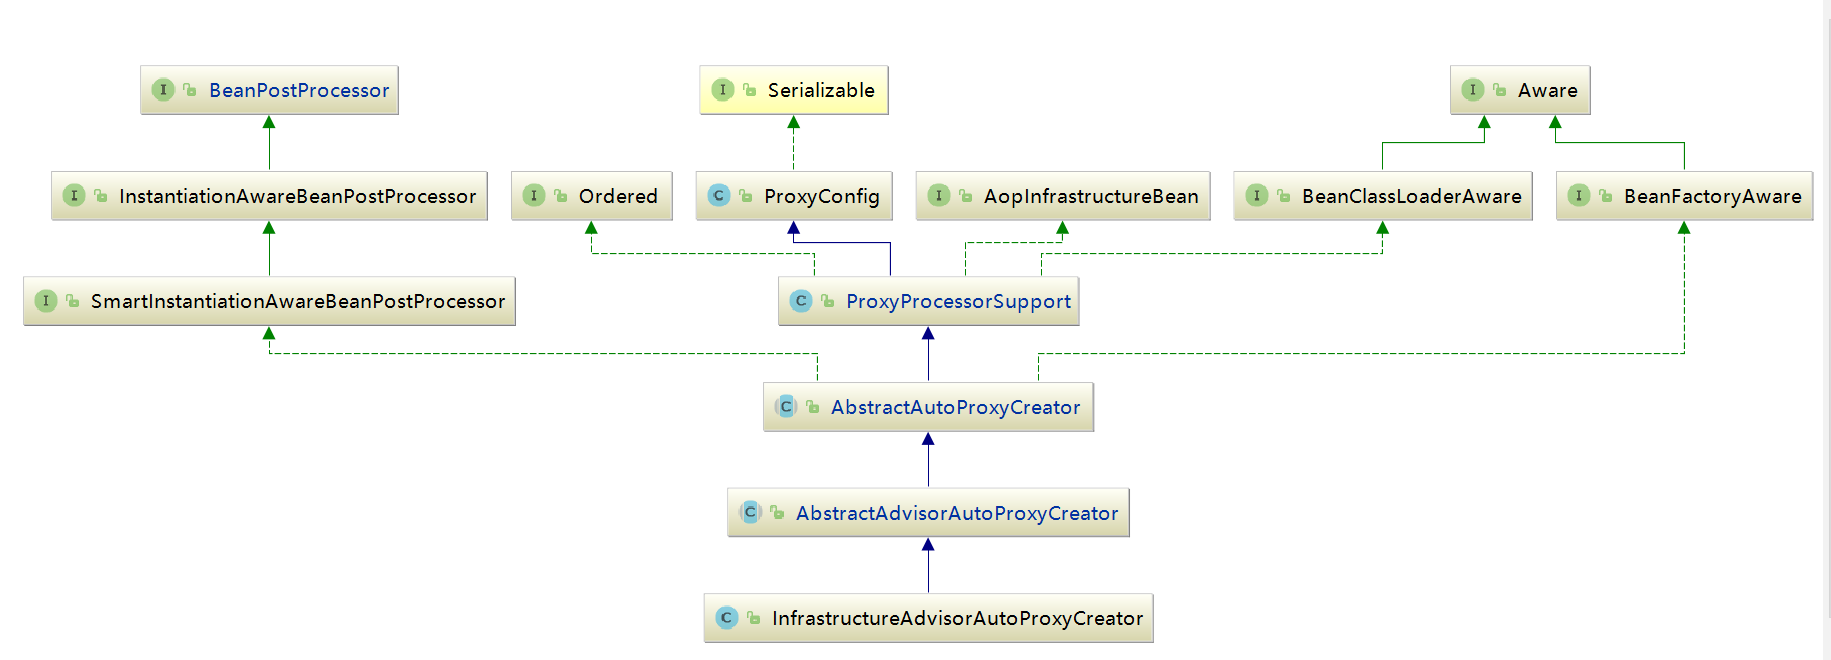
從上面的層次結構中可以看到,InfrastructureAdvisorAutoProxyCreator間接實現了SmartInstantiationAwareBeanPostProcessor,而SmartInstantiationAwareBeanPostProcessor又繼承自InstantiationAwareBeanPostProcessor,也就是說在Spring中,所有bean實例化時Spring都會保證調用其postProcessAfterInstantiation方法,其實現是在父類AbstractAutoProxyCreator類中實現。
以之前的示例為例,當實例化AccountServiceImpl的bean時便會調用此方法,方法如下:
@Override public Object postProcessAfterInitialization(@Nullable Object bean, String beanName) { if (bean != null) { // 根據給定的bean的class和name構建出key,格式:beanClassName_beanName Object cacheKey = getCacheKey(bean.getClass(), beanName); if (!this.earlyProxyReferences.contains(cacheKey)) { // 如果它適合被代理,則需要封裝指定bean return wrapIfNecessary(bean, beanName, cacheKey); } } return bean; }
這裡實現的主要目的是對指定bean進行封裝,當然首先要確定是否需要封裝,檢測與封裝的工作都委託給了wrapIfNecessary函數進行。
protected Object wrapIfNecessary(Object bean, String beanName, Object cacheKey) { // 如果處理過這個bean的話直接返回 if (StringUtils.hasLength(beanName) && this.targetSourcedBeans.contains(beanName)) { return bean; } // 之後如果Bean匹配不成功,會將Bean的cacheKey放入advisedBeans中 // value為false,所以這裡可以用cacheKey判斷此bean是否之前已經代理不成功了 if (Boolean.FALSE.equals(this.advisedBeans.get(cacheKey))) { return bean; } // 這裡會將Advise、Pointcut、Advisor類型的類過濾,直接不進行代理,return if (isInfrastructureClass(bean.getClass()) || shouldSkip(bean.getClass(), beanName)) { // 這裡即為不成功的情況,將false放入Map中 this.advisedBeans.put(cacheKey, Boolean.FALSE); return bean; } // Create proxy if we have advice. // 這裡是主要驗證的地方,傳入Bean的class與beanName去判斷此Bean有哪些Advisor Object[] specificInterceptors = getAdvicesAndAdvisorsForBean(bean.getClass(), beanName, null); // 如果有相應的advisor被找到,則用advisor與此bean做一個動態代理,將這兩個的資訊 // 放入代理類中進行代理 if (specificInterceptors != DO_NOT_PROXY) { this.advisedBeans.put(cacheKey, Boolean.TRUE); // 創建代理的地方 Object proxy = createProxy( bean.getClass(), beanName, specificInterceptors, new SingletonTargetSource(bean)); this.proxyTypes.put(cacheKey, proxy.getClass()); // 返回代理對象 return proxy; } // 如果此Bean沒有一個Advisor匹配,將返回null也就是DO_NOT_PROXY // 也就是會走到這一步,將其cacheKey,false存入Map中 this.advisedBeans.put(cacheKey, Boolean.FALSE); // 不代理直接返回原bean return bean; }
wrapIfNecessary函數功能實現起來很複雜,但是邏輯上理解起來還是相對簡單的,在wrapIfNecessary函數中主要的工作如下:
(1)找出指定bean對應的增強器。
(2)根據找出的增強器創建代理。
聽起來似乎簡單的邏輯,Spring中又做了哪些複雜的工作呢?對於創建代理的部分,通過之前的分析相信大家已經很熟悉了,但是對於增強器的獲取,Spring又是怎麼做的呢?
獲取對應class/method的增強器
獲取指定bean對應的增強器,其中包含兩個關鍵字:增強器與對應。也就是說在 getAdvicesAndAdvisorsForBean函數中,不但要找出增強器,而且還需要判斷增強器是否滿足要求。
@Override @Nullable protected Object[] getAdvicesAndAdvisorsForBean( Class<?> beanClass, String beanName, @Nullable TargetSource targetSource) { List<Advisor> advisors = findEligibleAdvisors(beanClass, beanName); if (advisors.isEmpty()) { return DO_NOT_PROXY; } return advisors.toArray(); } protected List<Advisor> findEligibleAdvisors(Class<?> beanClass, String beanName) { List<Advisor> candidateAdvisors = findCandidateAdvisors(); List<Advisor> eligibleAdvisors = findAdvisorsThatCanApply(candidateAdvisors, beanClass, beanName); extendAdvisors(eligibleAdvisors); if (!eligibleAdvisors.isEmpty()) { eligibleAdvisors = sortAdvisors(eligibleAdvisors); } return eligibleAdvisors; }
尋找候選增強器
protected List<Advisor> findCandidateAdvisors() { Assert.state(this.advisorRetrievalHelper != null, "No BeanFactoryAdvisorRetrievalHelper available"); return this.advisorRetrievalHelper.findAdvisorBeans(); } public List<Advisor> findAdvisorBeans() { // Determine list of advisor bean names, if not cached already. String[] advisorNames = this.cachedAdvisorBeanNames; if (advisorNames == null) { // 獲取BeanFactory中所有對應Advisor.class的類名 // 這裡和AspectJ的方式有點不同,AspectJ是獲取所有的Object.class,然後通過反射過濾有註解AspectJ的類 advisorNames = BeanFactoryUtils.beanNamesForTypeIncludingAncestors( this.beanFactory, Advisor.class, true, false); this.cachedAdvisorBeanNames = advisorNames; } if (advisorNames.length == 0) { return new ArrayList<>(); } List<Advisor> advisors = new ArrayList<>(); for (String name : advisorNames) { if (isEligibleBean(name)) { if (this.beanFactory.isCurrentlyInCreation(name)) { if (logger.isDebugEnabled()) { logger.debug("Skipping currently created advisor '" + name + "'"); } } else { try { //直接獲取advisorNames的實例,封裝進advisors數組 advisors.add(this.beanFactory.getBean(name, Advisor.class)); } catch (BeanCreationException ex) { Throwable rootCause = ex.getMostSpecificCause(); if (rootCause instanceof BeanCurrentlyInCreationException) { BeanCreationException bce = (BeanCreationException) rootCause; String bceBeanName = bce.getBeanName(); if (bceBeanName != null && this.beanFactory.isCurrentlyInCreation(bceBeanName)) { if (logger.isDebugEnabled()) { logger.debug("Skipping advisor '" + name + "' with dependency on currently created bean: " + ex.getMessage()); } continue; } } throw ex; } } } } return advisors; }
首先是通過BeanFactoryUtils類提供的工具方法獲取所有對應Advisor.class的類,獲取辦法無非是使用ListableBeanFactory中提供的方法:
String[] getBeanNamesForType(@Nullable Class<?> type, boolean includeNonSingletons, boolean allowEagerInit);
在我們講解自定義標籤時曾經註冊了一個類型為 BeanFactoryTransactionAttributeSourceAdvisor 的 bean,而在此 bean 中我們又注入了另外兩個Bean,那麼此時這個 Bean 就會被開始使用了。因為 BeanFactoryTransactionAttributeSourceAdvisor同樣也實現了 Advisor介面,那麼在獲取所有增強器時自然也會將此bean提取出來, 並隨著其他增強器一起在後續的步驟中被織入代理。
候選增強器中尋找到匹配項
當找出對應的增強器後,接下來的任務就是看這些增強器是否與對應的class匹配了,當然不只是class,class內部的方法如果匹配也可以通過驗證。
public static List<Advisor> findAdvisorsThatCanApply(List<Advisor> candidateAdvisors, Class<?> clazz) { if (candidateAdvisors.isEmpty()) { return candidateAdvisors; } List<Advisor> eligibleAdvisors = new ArrayList<>(); // 首先處理引介增強 for (Advisor candidate : candidateAdvisors) { if (candidate instanceof IntroductionAdvisor && canApply(candidate, clazz)) { eligibleAdvisors.add(candidate); } } boolean hasIntroductions = !eligibleAdvisors.isEmpty(); for (Advisor candidate : candidateAdvisors) { // 引介增強已經處理 if (candidate instanceof IntroductionAdvisor) { // already processed continue; } // 對於普通bean的處理 if (canApply(candidate, clazz, hasIntroductions)) { eligibleAdvisors.add(candidate); } } return eligibleAdvisors; } public static boolean canApply(Advisor advisor, Class<?> targetClass, boolean hasIntroductions) { if (advisor instanceof IntroductionAdvisor) { return ((IntroductionAdvisor) advisor).getClassFilter().matches(targetClass); } else if (advisor instanceof PointcutAdvisor) { PointcutAdvisor pca = (PointcutAdvisor) advisor; return canApply(pca.getPointcut(), targetClass, hasIntroductions); } else { // It doesn't have a pointcut so we assume it applies. return true; } }
BeanFactoryTransactionAttributeSourceAdvisor 間接實現了PointcutAdvisor。 因此,在canApply函數中的第二個if判斷時就會通過判斷,會將BeanFactoryTransactionAttributeSourceAdvisor中的getPointcut()方法返回值作為參數繼續調用canApply方法,而 getPoint()方法返回的是TransactionAttributeSourcePointcut類型的實例。對於 transactionAttributeSource這個屬性大家還有印象嗎?這是在解析自定義標籤時注入進去的。
private final TransactionAttributeSourcePointcut pointcut = new TransactionAttributeSourcePointcut() { @Override @Nullable protected TransactionAttributeSource getTransactionAttributeSource() { return transactionAttributeSource; } };
那麼,使用TransactionAttributeSourcePointcut類型的實例作為函數參數繼續跟蹤canApply。
public static boolean canApply(Pointcut pc, Class<?> targetClass, boolean hasIntroductions) { Assert.notNull(pc, "Pointcut must not be null"); if (!pc.getClassFilter().matches(targetClass)) { return false; } // 此時的pc表示TransactionAttributeSourcePointcut // pc.getMethodMatcher()返回的正是自身(this) MethodMatcher methodMatcher = pc.getMethodMatcher(); if (methodMatcher == MethodMatcher.TRUE) { // No need to iterate the methods if we're matching any method anyway... return true; } IntroductionAwareMethodMatcher introductionAwareMethodMatcher = null; if (methodMatcher instanceof IntroductionAwareMethodMatcher) { introductionAwareMethodMatcher = (IntroductionAwareMethodMatcher) methodMatcher; } Set<Class<?>> classes = new LinkedHashSet<>(); if (!Proxy.isProxyClass(targetClass)) { classes.add(ClassUtils.getUserClass(targetClass)); } //獲取對應類的所有介面 classes.addAll(ClassUtils.getAllInterfacesForClassAsSet(targetClass)); //對類進行遍歷 for (Class<?> clazz : classes) { //反射獲取類中所有的方法 Method[] methods = ReflectionUtils.getAllDeclaredMethods(clazz); for (Method method : methods) { //對類和方法進行增強器匹配 if (introductionAwareMethodMatcher != null ? introductionAwareMethodMatcher.matches(method, targetClass, hasIntroductions) : methodMatcher.matches(method, targetClass)) { return true; } } } return false; }
通過上面函數大致可以理清大體脈絡,首先獲取對應類的所有介面並連同類本身一起遍歷,遍歷過程中又對類中的方法再次遍歷,一旦匹配成功便認為這個類適用於當前增強器。
到這裡我們不禁會有疑問,對於事物的配置不僅僅局限於在函數上配置,我們都知道,在類或介面上的配置可以延續到類中的每個函數,那麼,如果針對每個函數迸行檢測,在類本身上配罝的事務屬性豈不是檢測不到了嗎?帶著這個疑問,我們繼續探求matcher方法。
做匹配的時候 methodMatcher.matches(method, targetClass)會使用 TransactionAttributeSourcePointcut 類的 matches 方法。
@Override public boolean matches(Method method, Class<?> targetClass) { if (TransactionalProxy.class.isAssignableFrom(targetClass)) { return false; } // 自定義標籤解析時注入 TransactionAttributeSource tas = getTransactionAttributeSource(); return (tas == null || tas.getTransactionAttribute(method, targetClass) != null); }
此時的 tas 表示 AnnotationTransactionAttributeSource 類型,這裡會判斷tas.getTransactionAttribute(method, targetClass) != null,而 AnnotationTransactionAttributeSource 類型的 getTransactionAttribute 方法如下:
@Override @Nullable public TransactionAttribute getTransactionAttribute(Method method, @Nullable Class<?> targetClass) { if (method.getDeclaringClass() == Object.class) { return null; } Object cacheKey = getCacheKey(method, targetClass); Object cached = this.attributeCache.get(cacheKey); //先從快取中獲取TransactionAttribute if (cached != null) { if (cached == NULL_TRANSACTION_ATTRIBUTE) { return null; } else { return (TransactionAttribute) cached; } } else { // 如果快取中沒有,工作又委託給了computeTransactionAttribute函數 TransactionAttribute txAttr = computeTransactionAttribute(method, targetClass); // Put it in the cache. if (txAttr == null) { // 設置為空 this.attributeCache.put(cacheKey, NULL_TRANSACTION_ATTRIBUTE); } else { String methodIdentification = ClassUtils.getQualifiedMethodName(method, targetClass); if (txAttr instanceof DefaultTransactionAttribute) { ((DefaultTransactionAttribute) txAttr).setDescriptor(methodIdentification); } if (logger.isDebugEnabled()) { logger.debug("Adding transactional method '" + methodIdentification + "' with attribute: " + txAttr); } //加入快取中 this.attributeCache.put(cacheKey, txAttr); } return txAttr; } }
嘗試從快取載入,如果對應資訊沒有被快取的話,工作又委託給了computeTransactionAttribute函數,在computeTransactionAttribute函數中我們終於看到了事務標籤的提取過程。
提取事務標籤
@Nullable protected TransactionAttribute computeTransactionAttribute(Method method, @Nullable Class<?> targetClass) { // Don't allow no-public methods as required. if (allowPublicMethodsOnly() && !Modifier.isPublic(method.getModifiers())) { return null; } // The method may be on an interface, but we need attributes from the target class. // If the target class is null, the method will be unchanged. // method代表介面中的方法,specificMethod代表實現類中的方法 Method specificMethod = AopUtils.getMostSpecificMethod(method, targetClass); // First try is the method in the target class. // 查看方法中是否存在事務聲明 TransactionAttribute txAttr = findTransactionAttribute(specificMethod); if (txAttr != null) { return txAttr; } // Second try is the transaction attribute on the target class. // 查看方法所在類中是否存在事務聲明 txAttr = findTransactionAttribute(specificMethod.getDeclaringClass()); if (txAttr != null && ClassUtils.isUserLevelMethod(method)) { return txAttr; } // 如果存在介面,則到介面中去尋找 if (specificMethod != method) { // Fallback is to look at the original method. // 查找介面方法 txAttr = findTransactionAttribute(method); if (txAttr != null) { return txAttr; } // Last fallback is the class of the original method. // 到介面中的類中去尋找 txAttr = findTransactionAttribute(method.getDeclaringClass()); if (txAttr != null && ClassUtils.isUserLevelMethod(method)) { return txAttr; } } return null; }
對於事務屬性的獲取規則相信大家都已經很清楚,如果方法中存在事務屬性,則使用方法上的屬性,否則使用方法所在的類上的屬性,如果方法所在類的屬性上還是沒有搜尋到對應的事務屬性,那麼在搜尋介面中的方法,再沒有的話,最後嘗試搜尋介面的類上面的聲明。對於函數computeTransactionAttribute中的邏輯與我們所認識的規則並無差別,但是上面函數中並沒有真正的去做搜尋事務屬性的邏輯,而是搭建了個執行框架,將搜尋事務屬性的任務委託給了 findTransactionAttribute 方法去執行。
@Override @Nullable protected TransactionAttribute findTransactionAttribute(Class<?> clazz) { return determineTransactionAttribute(clazz); } @Nullable protected TransactionAttribute determineTransactionAttribute(AnnotatedElement ae) { for (TransactionAnnotationParser annotationParser : this.annotationParsers) { TransactionAttribute attr = annotationParser.parseTransactionAnnotation(ae); if (attr != null) { return attr; } } return null; }
this.annotationParsers 是在當前類 AnnotationTransactionAttributeSource 初始化的時候初始化的,其中的值被加入了 SpringTransactionAnnotationParser,也就是當進行屬性獲取的時候其實是使用 SpringTransactionAnnotationParser 類的 parseTransactionAnnotation 方法進行解析的。
@Override @Nullable public TransactionAttribute parseTransactionAnnotation(AnnotatedElement ae) { AnnotationAttributes attributes = AnnotatedElementUtils.findMergedAnnotationAttributes( ae, Transactional.class, false, false); if (attributes != null) { return parseTransactionAnnotation(attributes); } else { return null; } }
至此,我們終於看到了想看到的獲取註解標記的程式碼。首先會判斷當前的類是否含有 Transactional註解,這是事務屬性的基礎,當然如果有的話會繼續調用parseTransactionAnnotation 方法解析詳細的屬性。
protected TransactionAttribute parseTransactionAnnotation(AnnotationAttributes attributes) { RuleBasedTransactionAttribute rbta = new RuleBasedTransactionAttribute(); Propagation propagation = attributes.getEnum("propagation"); // 解析propagation rbta.setPropagationBehavior(propagation.value()); Isolation isolation = attributes.getEnum("isolation"); // 解析isolation rbta.setIsolationLevel(isolation.value()); // 解析timeout rbta.setTimeout(attributes.getNumber("timeout").intValue()); // 解析readOnly rbta.setReadOnly(attributes.getBoolean("readOnly")); // 解析value rbta.setQualifier(attributes.getString("value")); ArrayList<RollbackRuleAttribute> rollBackRules = new ArrayList<>(); // 解析rollbackFor Class<?>[] rbf = attributes.getClassArray("rollbackFor"); for (Class<?> rbRule : rbf) { RollbackRuleAttribute rule = new RollbackRuleAttribute(rbRule); rollBackRules.add(rule); } // 解析rollbackForClassName String[] rbfc = attributes.getStringArray("rollbackForClassName"); for (String rbRule : rbfc) { RollbackRuleAttribute rule = new RollbackRuleAttribute(rbRule); rollBackRules.add(rule); } // 解析noRollbackFor Class<?>[] nrbf = attributes.getClassArray("noRollbackFor"); for (Class<?> rbRule : nrbf) { NoRollbackRuleAttribute rule = new NoRollbackRuleAttribute(rbRule); rollBackRules.add(rule); } // 解析noRollbackForClassName String[] nrbfc = attributes.getStringArray("noRollbackForClassName"); for (String rbRule : nrbfc) { NoRollbackRuleAttribute rule = new NoRollbackRuleAttribute(rbRule); rollBackRules.add(rule); } rbta.getRollbackRules().addAll(rollBackRules); return rbta; }
至此,我們終於完成了事務標籤的解析。回顧一下,我們現在的任務是找出某個增強器是否適合於對應的類,而是否匹配的關鍵則在於是否從指定的類或類中的方法中找到對應的事務屬性,現在,我們以AccountServiceImpl為例,已經在它的介面AccountServiceImp中找到了事務屬性,所以,它是與事務增強器匹配的,也就是它會被事務功能修飾。
至此,事務功能的初始化工作便結束了,當判斷某個bean適用於事務增強時,也就是適用於增強器BeanFactoryTransactionAttributeSourceAdvisor
BeanFactoryTransactionAttributeSourceAdvisor 作為 Advisor 的實現類,自然要遵從 Advisor 的處理方式,當代理被調用時會調用這個類的增強方法,也就是此bean的Advice,又因為在解析事務定義標籤時我們把Transactionlnterceptor類的bean注人到了 BeanFactoryTransactionAttributeSourceAdvisor中,所以,在調用事務增強器增強的代理類時會首先執行Transactionlnterceptor進行增強,同時,也就是在Transactionlnterceptor類中的invoke方法中完成了整個事務的邏輯。