Springboot + Mysql8實現讀寫分離
- 2019 年 10 月 11 日
- 筆記
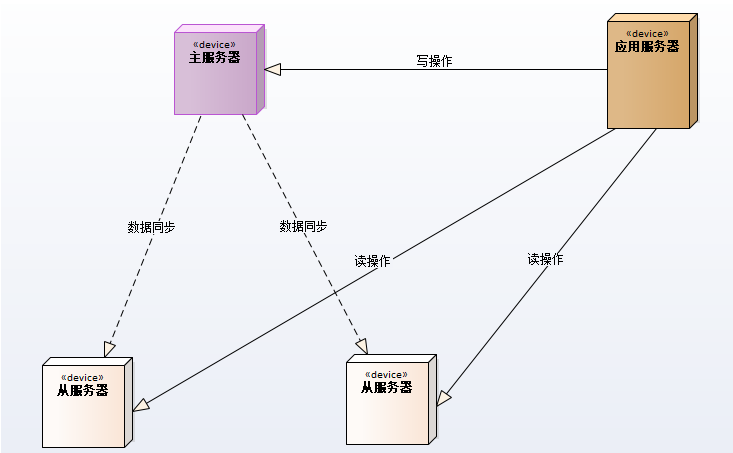
在實際的生產環境中,為了確保資料庫的穩定性,我們一般會給資料庫配置雙機熱備機制,這樣在master資料庫崩潰後,slave資料庫可以立即切換成主資料庫,通過主從複製的方式將數據從主庫同步至從庫,在業務程式碼中編寫程式碼實現讀寫分離(讓主資料庫處理 事務性增、改、刪操作,而從資料庫處理查詢操作)來提升資料庫的並發負載能力。
下面我們使用最新版本的Mysql資料庫(8.0.16)結合SpringBoot實現這一完整步驟(一主一從)。
安裝配置mysql
-
從
https://dev.mysql.com/downloads/mysql/頁面下載mysql安裝包,我這裡下載的是mysql8.0.16 Linux-Generic. - 準備兩台虛擬機用作安裝mysql,並將下載後的文件
mysql-8.0.16-linux-glibc2.12-x86_64.tar.xz上傳至伺服器/app/mysql- 192.168.249.131 CENTOS7 主
- 192.168.249.129 CENTOS7 從
- 查看防火牆狀態,如果啟動需要先關閉防火牆
service firewalld status ## 查看防火牆狀態 service firewalld stop ## 關閉防火牆-
使用如下命令將xz文件解壓成tar文件
xz -d mysql-8.0.16-linux-glibc2.12-x86_64.tar.xz -
解壓安裝包
tar -xvf mysql-8.0.16-linux-gl-ibc2.12-x86_64.tar -
在/app/mysql下建立data文件夾,用於存放數據
- 創建mysql用戶組和mysql用戶
groupadd mysql ## 創建用戶組 useradd -g mysql -d /app/mysql mysql ## 在用戶組下創建mysql用戶並授權相關目錄 groupdel mysql ## 刪除用戶組名(若報已存在相關用戶組) userdel mysql ## 刪除用戶(若報已存在相關用戶)-
初始化安裝mysql資料庫
./mysql-8.0.16-linux-glibc2.12-x86_64/bin/mysqld --user=mysql --basedir=/app/mysql --datadir=/app/mysql/data --initialize2019-07-01T02:05:52.681626Z 0 [Warning] [MY-011070] [Server] 'Disabling symbolic links using --skip-symbolic-links (or equivalent) is the default. Consider not using this option as it' is deprecated and will be removed in a future release. 2019-07-01T02:05:52.681694Z 0 [System] [MY-013169] [Server] /app/mysql/mysql-8.0.16-linux-glibc2.12-x86_64/bin/mysqld (mysqld 8.0.16) initializing of server in progress as process 1479 2019-07-01T02:05:52.681726Z 0 [ERROR] [MY-010338] [Server] Can't find error-message file '/app/mysql/share/errmsg.sys'. Check error-message file location and 'lc-messages-dir' configuration directive. 2019-07-01T02:05:55.713747Z 5 [Note] [MY-010454] [Server] A temporary password is generated for root@localhost: xa6(H>rK/r<E 2019-07-01T02:05:57.303240Z 0 [System] [MY-013170] [Server] /app/mysql/mysql-8.0.16-linux-glibc2.12-x86_64/bin/mysqld (mysqld 8.0.16) initializing of server has completed注意,此時mysql會生成一個默認的臨時密碼,如上所示,需要先保存下來然後修改
-
建立mysql服務並增加執行許可權
cp mysql-8.0.16-linux-glibc2.12-x86_64/support-files/mysql.server /etc/init.d/mysqld -
修改mysql配置文件 vi /etc/my.cnf 增加如下配置
[mysqld] port=3306 basedir=/app/mysql/mysql-8.0.16-linux-glibc2.12-x86_64 datadir=/app/mysql/data socket=/tmp/mysql.sock symbolic-links=0 [mysqld_safe] log-error=/app/mysql/data/log/error.log pid-file=/app/mysql/data/mysql.pid user=mysql tmpdir=/tmp character_set_server=utf8 default-storage-engine=INNODB init_connect='SET NAMES utf8' !includedir /etc/my.cnf.d如果報日誌許可權相關錯誤,請先建立對應日誌文件,並給mysql用戶授權
chown -R mysql:mysql /app/mysql/data/log/error.log -
啟動mysql服務
service mysqld start -
建立mysql客戶端軟連接
ln -s /app/mysql/mysql-8.0.16-linux-glibc2.12-x86_64/bin/mysql /usr/local/bin/mysql - 登錄mysql修改密碼
mysql -uroot -p密碼 ## 登錄 ALTER USER 'root'@'localhost' IDENTIFIED WITH mysql_native_password BY '000000';- 設置遠程登錄
use mysql; update user set host='%' where user='root' limit 1; flush privileges;配置mysql主從同步(binlog)
複製原理
- Master將數據改變記錄到二進位日誌(binary log)中,也就是配置文件log-bin指定的文件,這些記錄叫做二進位日誌事件(binary log events)
- Slave通過I/O執行緒讀取Master中的binary log events並寫入到它的中繼日誌(relay log)
- Slave重做中繼日誌中的事件,把中繼日誌中的事件資訊一條一條的在本地執行一次,完成數據在本地的存儲,從而實現將改變反映到它自己的數據(數據重放)
複製要求
- 主從伺服器作業系統版本和位數一致
- Master和Slave資料庫的版本要一致
- Master和Slave資料庫中的數據要一致
- Master開啟二進位日誌,Master和Slave的server_id在區域網內必須唯一
配置步驟
主資料庫(192.168.249.131)
- 創建同步用戶並授權
CREATE USER 'slave'@'192.168.249.129' IDENTIFIED WITH 'mysql_native_password' BY '000000'; GRANT REPLICATION SLAVE, REPLICATION CLIENT ON *.* TO 'slave'@'192.168.249.129'; FLUSH PRIVILEGES;注意這裡創建用戶時需要選用mysql_native_password加密方式插件,否則默認會使用caching_sha2_password加密方式,這樣在同步的時候需要使用SSL的身份進行驗證,為了方便簡單,我們直接採用mysql_native_password方式
-
修改配置/etc/my.cnf,新增如下配置,開啟binlog,並重啟mysql服務
[mysqld] # 開啟二進位日誌功能 log-bin=mysql-bin # 設置server_id,,注意在網段內要唯一 server-id=131 #(可選配置)要同步的資料庫名,要同步多個資料庫,就多加幾個replicate-db-db=資料庫名 binlog-do-db=mydb #(可選配置)要忽略的資料庫 binlog-ignore-db=mysql -
查看主伺服器狀態
show master status

注意看裡面的參數,特別前面兩個File和Position,在從伺服器(Slave)配置主從關係會有用到的。
從資料庫(192.168.249.129)
- 修改/etc/my.cnf,新增如下配置,並重啟服務
[mysqld] server-id=129 log-bin=mysql-bin replicate-do-db=mydb replicate-ignore-db=mysql- 在slave中設置master資訊,指定同步位置
stop slave; change master to master_host='192.168.249.131',master_user='slave',master_password='000000',master_log_file='mysql-bin.000001',master_log_pos=155; start slave;參數說明:
master_host=’192.168.249.131′ ## Master的IP地址
master_user=’slave’ ## 用於同步數據的用戶(在Master中授權的用戶)
master_password=’000000′ ## 同步數據用戶的密碼
master_port=3306 ## Master資料庫服務的埠
masterlogfile=’mysql-bin.000001′ ##指定Slave從哪個日誌文件開始讀複製數據(Master上執行命令的結果的File欄位)
masterlogpos=155 ## 從哪個POSITION號開始讀(Master上執行命令的結果的Position欄位)
masterconnectretry=30 ##當重新建立主從連接時,如果連接建立失敗,間隔多久後重試。單位為秒,默認設置為60秒,同步延遲調優參數。
-
查看從伺服器狀態
show slave statusG;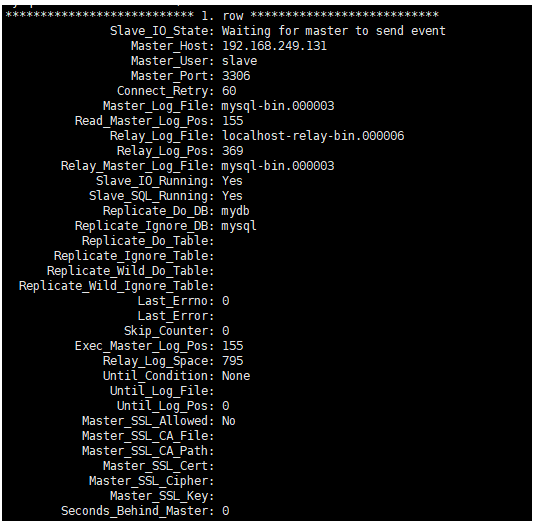
至此資料庫層面主從配置完成。
SpringBoot中配置主從讀寫分離
在主從模式下請遵守如下規則:
主資料庫 只執行 INSERT,UPDATE,DELETE 操作
從資料庫 只執行SELECT操作
我們這裡使用開源項目[dynamic-datasource-spring-boot-starter](https://gitee.com/baomidou/dynamic-datasource-spring-boot-starter/wikis/)作為讀寫分離的工具包使用方法
- 在mydb主資料庫中建立一個簡單數據表user,建好後從資料庫會自動同步
DROP TABLE IF EXISTS `user`; CREATE TABLE `user` ( `id` int(11) NOT NULL AUTO_INCREMENT, `account` varchar(255) COLLATE utf8mb4_unicode_ci DEFAULT NULL, `name` varchar(255) COLLATE utf8mb4_unicode_ci DEFAULT NULL, `position` varchar(255) COLLATE utf8mb4_unicode_ci DEFAULT NULL, PRIMARY KEY (`id`) ) ENGINE=InnoDB AUTO_INCREMENT=5 DEFAULT CHARSET=utf8mb4 COLLATE=utf8mb4_unicode_ci;- 引入相關依賴
<dependencies> <dependency> <groupId>org.springframework.boot</groupId> <artifactId>spring-boot-starter</artifactId> </dependency> <dependency> <groupId>org.springframework.boot</groupId> <artifactId>spring-boot-starter-web</artifactId> </dependency> <dependency> <groupId>org.mybatis.spring.boot</groupId> <artifactId>mybatis-spring-boot-starter</artifactId> <version>2.0.1</version> </dependency> <dependency> <groupId>com.baomidou</groupId> <artifactId>dynamic-datasource-spring-boot-starter</artifactId> <version>2.5.5</version> </dependency> <dependency> <groupId>mysql</groupId> <artifactId>mysql-connector-java</artifactId> <version>8.0.15</version> </dependency> <dependency> <groupId>org.projectlombok</groupId> <artifactId>lombok</artifactId> <optional>true</optional> </dependency> <dependency> <groupId>org.springframework.boot</groupId> <artifactId>spring-boot-starter-test</artifactId> <scope>test</scope> </dependency> </dependencies>- 配置數據源
spring: datasource: dynamic: primary: master #設置默認的數據源或者數據源組,默認值即為master strict: false #設置嚴格模式,默認false不啟動. 啟動後再為匹配到指定數據源時候回拋出異常,不啟動會使用默認數據源. datasource: master: type: com.zaxxer.hikari.HikariDataSource url: jdbc:mysql://192.168.249.131:3306/mydb?characterEncoding=utf8&zeroDateTimeBehavior=convertToNull&useSSL=false username: root password: '000000' driver-class-name: com.mysql.cj.jdbc.Driver slave_1: type: com.zaxxer.hikari.HikariDataSource url: jdbc:mysql://192.168.249.129:3306/mydb?characterEncoding=utf8&zeroDateTimeBehavior=convertToNull&useSSL=false username: root password: '000000' driver-class-name: com.mysql.cj.jdbc.Driver- 在啟動類入口加入mybatis掃描包
@SpringBootApplication@MapperScan("com.jianzh5.dynamic.mapper") public class DynamicDatsourceBootstrap { public static void main(String[] args) { SpringApplication.run(DynamicDatsourceBootstrap.class, args); } }- 建立實體類User
@Data public class User { private int id; private String account; private String name; private String position; }- 建立mapper介面文件,新增兩個方法
addUser(User user),getById(int id)
public interface UserDao { @Insert("INSERT INTO user(account, name, position) VALUES(#{account}, #{name}, #{position})") @Options(useGeneratedKeys = true,keyProperty = "id") int addUser(User user); @Select("SELECT * FROM user WHERE id = #{id}") User getById(int id); }- 建立Service服務層相關實現
public interface UserService { int addUser(User user); User getById(int id); } @Service public class UserServiceImpl implements UserService { @Resource private UserDao userDao; @Override public int addUser(User user) { return userDao.addUser(user); } @DS("slave") @Override public User getById(int id) { return userDao.getById(id); } }由於在數據源中配置了primary: master,默認操作都會從主庫執行,使用註解@DS切換數據源,此註解也可直接用於類文件上,同時存在方法註解優先於類上註解。
- 編寫單元測試進行測試
``` public class UserServiceTest extends DynamicDatsourceBootstrapTests { @Autowired private UserService userService; @Test public void testAddUser(){ User user = new User(); user.setName("李四"); user.setAccount("sili"); user.setPosition("JAVA開發工程師"); int i = userService.addUser(user); System.out.println(user); } @Test public void testGetById(){ int id = 4; User user = userService.getById(id); Assert.assertEquals("sanzhang",user.getAccount()); } } ```- 通過觀察執行日誌,發現讀寫資料庫會根據@DS註解進行切換,至此Springboot集成資料庫主從讀寫分離完成。
請關注個人公眾號:JAVA日知錄
