ZooKeeper單機服務端的啟動源碼閱讀
- 2019 年 10 月 3 日
- 筆記
程式的入口QuorumPeerMain
public static void main(String[] args) { // QuorumPeerMain main = new QuorumPeerMain(); try { // 初始化服務端,並運行服務端 // todo 跟進去看他如何處理 服務端的配置文件,以及根據服務端的配置文件做出來那些動作 main.initializeAndRun(args);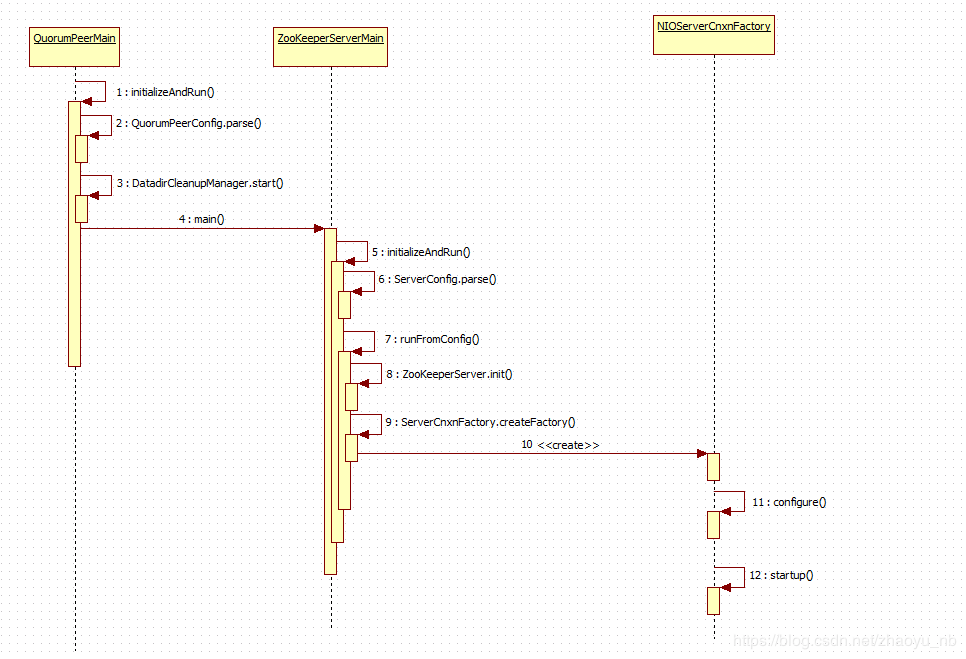
初始化和啟動總覽
跟進initializeAndRun()方法 , 這個方法中主要做了如下三件事
- 從
args[0]解析出配置文件的位置,創建QuorumPeerConfig配置類對象(可以把這個對象理解成單個ZK server的配置對象),然後將配置文件中的內容載入進記憶體,並完成對java配置類的屬性的賦值 - 開啟,啟動並清除計劃任務的邏輯
- 根據從記憶體中讀取配置文件實例化好的配置類,啟動ZKserver
protected void initializeAndRun(String[] args) throws ConfigException, IOException { // todo 這個類是關聯配置文件的類, 我們在配置文件中輸入的各種配置都是他的屬性 QuorumPeerConfig config = new QuorumPeerConfig(); if (args.length == 1) { // todo config.parse(args[0]); } // Start and schedule the the purge task // todo 啟動並清除計劃任務 DatadirCleanupManager purgeMgr = new DatadirCleanupManager(config .getDataDir(), config.getDataLogDir(), config .getSnapRetainCount(), config.getPurgeInterval()); purgeMgr.start(); // todo config.servers.size() > 0 說明添加了關於集群的配置 if (args.length == 1 && config.servers.size() > 0) { // todo 根據配置啟動伺服器, 跟進去, 就在下面 runFromConfig(config); } else { // todo 沒添加集群的配置 LOG.warn("Either no config or no quorum defined in config, running " + " in standalone mode"); // there is only server in the quorum -- run as standalone // todo 啟動單機 ZooKeeperServerMain.main(args); } }讀取配置文件
下面跟進parse, 這個方法的目的是將磁碟上的配置資訊讀取到文件中,完成對QuorumPeerConfig的初始化主要做了如下兩件事
- 因為ZK的配置文件是
.properties結尾的,因此呢選擇了Properties.java(格式是 key=value)來解析讀取配置文件 parseProperties()方法,對解析出來的配置文件進行進一步的處理
public void parse(String path) throws ConfigException { File configFile = new File(path); LOG.info("Reading configuration from: " + configFile); try { if (!configFile.exists()) { throw new IllegalArgumentException(configFile.toString() + " file is missing"); } Properties cfg = new Properties(); FileInputStream in = new FileInputStream(configFile); try { // todo 使用 Properties 按行讀取出配置文件內容 cfg.load(in); } finally { in.close(); } // todo 將按行讀取處理出來的進行分隔處理, 對當前的配置類進行賦值 parseProperties(cfg); } catch (IOException e) { throw new ConfigException("Error processing " + path, e); } catch (IllegalArgumentException e) { throw new ConfigException("Error processing " + path, e); } }解析配置文件

看一看,他是如何處理已經被載入到記憶體的配置文件的,
- 首先看一下上圖中我截取的配置文件的截圖,可以看到通過下面的if-else分支語句將配置文件的中的資訊一對一的讀取出來,完成對當前配置類的初始化
- if (value.toLowerCase().equals("observer")) {..}這個分支就是判斷當前的配置文件是不是Observer的配置文件,比較推薦的observer的配置,就是添加一條配置寫
peerType=observer,但是這是為了人們查看方便設計的,換句話說,一個普通的Follower的配置文件,即便是添加上了這條配置文件,它同樣不是observer,後續還會有進一步的檢驗,因為zk集群的配置文件大同小異,一開始即便是我們不添加這個配置,observer角色的server依然會成為observer,但是對於人們來說,就不用點開dataDir中的myid文件查看究竟當前的server是不是Observer了 else if (key.startsWith("server."))標記著配置文件中有關集群的配置資訊開始了,它根據不同的配置資訊,將不同身份的server存放進兩個map中,就像下面那樣,如果是Observer類型的,就存放在observers中,如果是Follower類型的就添加進serversmap中- 它這樣做是為了下一步實現ZAB協議,過半檢查. 而設計的, 什麼是過半檢查機制呢? 首先是集群中的server存在一半以上健康時,集群才可用
- 其次是,Leader發起的決議,需要有一半的Follower同意決議才能通過,注意這裡是Follower,而不是OBserver+Follower,因為OBserver不參加投票,因此在這個半數協議中,它不作數, 所以再看他現在的做法,就是創建過半檢查機制封裝類
QuorumVerifer時,使用servers的容量
- 合併servers和observers, 雖然後者不參加決議投票,但是它同樣需要提供服務
- 讀取myid文件,最終確定不同的server的身份劃分,哪個是myid配置文件呢? 它是我們在配置集群資訊時在dataDir中創建的, 裡面僅僅存放一個數據,這個數字不是亂寫的,對應的是配置文件的server.n中的n, 啟動時會讀取這個文件,拿到裡面的數據與 zoo.cfg 裡面的配置資訊比較從而判斷到底是那個server,只是一個標識作用。
public void parseProperties(Properties zkProp) throws IOException, ConfigException { int clientPort = 0; String clientPortAddress = null; for (Entry<Object, Object> entry : zkProp.entrySet()) { String key = entry.getKey().toString().trim(); String value = entry.getValue().toString().trim(); if (key.equals("dataDir")) { dataDir = value; } else if (key.equals("dataLogDir")) { dataLogDir = value; } else if (key.equals("clientPort")) { clientPort = Integer.parseInt(value); } else if (key.equals("clientPortAddress")) { clientPortAddress = value.trim(); } else if (key.equals("tickTime")) { . . . . } else if (key.equals("peerType")) { if (value.toLowerCase().equals("observer")) { // todo 這是推薦配置做法在 observer 的配置文件中配置上添加 peerType=observer //todo 但是如果給一台不是observer的機器加上了這個配置, 它也不會是observer. 在這個函數的最後會有校驗 peerType = LearnerType.OBSERVER; } else if (value.toLowerCase().equals("participant")) { peerType = LearnerType.PARTICIPANT; } else { throw new ConfigException("Unrecognised peertype: " + value); } . . . } else if (key.startsWith("server.")) { // todo 全部以server.開頭的配置全部放到了 servers int dot = key.indexOf('.'); long sid = Long.parseLong(key.substring(dot + 1)); String parts[] = splitWithLeadingHostname(value); if ((parts.length != 2) && (parts.length != 3) && (parts.length !=4)) { LOG.error(value + " does not have the form host:port or host:port:port " + " or host:por . . . // todo 不論是普通節點,還是觀察者節點,都是 QuorumServer, 只不過添加進到不同的容器 if (type == LearnerType.OBSERVER){ // todo 如果不是觀察者的話,就不會放在 servers, // todo server.1=localhost:2181:3887 // todo server.2=localhost:2182:3888 // todo server.3=localhost:2183:3889 // todo port是對外提供服務的埠 electionPort是用於選舉的port // todo 查看zk的數據一致性我們使用的埠是 port observers.put(Long.valueOf(sid), new QuorumServer(sid, hostname, port, electionPort, type)); } else { // todo 其他的普通節點放在 servers servers.put(Long.valueOf(sid), new QuorumServer(sid, hostname, port, electionPort, type)); } . . . . /* * Default of quorum config is majority */ if(serverGroup.size() > 0){ if(servers.size() != serverGroup.size()) throw new ConfigException("Every server must be in exactly one group"); /* * The deafult weight of a server is 1 */ for(QuorumServer s : servers.values()){ if(!serverWeight.containsKey(s.id)) serverWeight.put(s.id, (long) 1); } /* * Set the quorumVerifier to be QuorumHierarchical */ quorumVerifier = new QuorumHierarchical(numGroups, serverWeight, serverGroup); } else { /* * The default QuorumVerifier is QuorumMaj */ // todo 默認的仲裁方式, 過半機制中,是不包含 observer 的數量的 LOG.info("Defaulting to majority quorums"); quorumVerifier = new QuorumMaj(servers.size()); } // Now add observers to servers, once the quorums have been // figured out // todo 最後還是將 Observers 添加進了 servers servers.putAll(observers); /** * todo 當時搭建偽集群時,在每一個節點的dataDir文件中都添加進去了一個 myid文件 * 分別在zk、zk2、zk3、的dataDir中新建myid文件, 寫入一個數字, 該數字表示這是第幾號server. * 該數字必須和zoo.cfg文件中的server.X中的X一一對應. * myid的值是zoo.cfg文件里定義的server.A項A的值, * Zookeeper 啟動時會讀取這個文件,拿到裡面的數據與 zoo.cfg 裡面的配置資訊比較從而判斷到底是那個server,只是一個標識作用。 * */ // todo 找到當前節點的dataDir 下面的 myid文件 File myIdFile = new File(dataDir, "myid"); if (!myIdFile.exists()) { throw new IllegalArgumentException(myIdFile.toString() + " file is missing"); } BufferedReader br = new BufferedReader(new FileReader(myIdFile)); String myIdString; try { // todo 讀取出myid裡面的內容 myIdString = br.readLine(); } finally { br.close(); } try { // todo myid文件中存到的數據就是 配置文件中server.N 中的 N這個數字 serverId = Long.parseLong(myIdString); MDC.put("myid", myIdString); } catch (NumberFormatException e) { throw new IllegalArgumentException("serverid " + myIdString + " is not a number"); } // todo 通過檢查上面的Observers map 中是否存在 serverId, 這個serverId其實就是myid, 對應上了後,就將它的 // Warn about inconsistent peer type LearnerType roleByServersList = observers.containsKey(serverId) ? LearnerType.OBSERVER : LearnerType.PARTICIPANT; if (roleByServersList != peerType) { LOG.warn("Peer type from servers list (" + roleByServersList + ") doesn't match peerType (" + peerType + "). Defaulting to servers list."); peerType = roleByServersList; }根據配置文件啟動ZKServer
在一開始的QuorumPeerMain.java類中的Initializer()方法中,存在如下的邏輯,判斷是單機版本啟動還是集群的啟動
if (args.length == 1 && config.servers.size() > 0) { // todo 根據配置啟動伺服器, 跟進去, 就在下面 runFromConfig(config); } else { // todo 沒添加集群的配置 LOG.warn("Either no config or no quorum defined in config, running " + " in standalone mode"); // there is only server in the quorum -- run as standalone // todo 啟動單機 ZooKeeperServerMain.main(args); }如果是單機版本的話,會進入else塊從此構建ZookeeperServerMain對象, 可以把這個ZooKeeperServerMain理解成一個輔助類,經過它,初始化並啟動一個ZooKeeperServer.java的對象
繼續跟進
public static void main(String[] args) { // todo 使用無參的構造方法實例化服務端, 單機模式 ZooKeeperServerMain main = new ZooKeeperServerMain(); try { // todo 跟進去看他如何解析配置文件 main.initializeAndRun(args);繼續跟進
protected void initializeAndRun(String[] args) throws ConfigException, IOException { try { ManagedUtil.registerLog4jMBeans(); } catch (JMException e) { LOG.warn("Unable to register log4j JMX control", e); } // todo 這個配置類, 對應著單機模式的配置類 , 裡面的配置資訊很少 ServerConfig config = new ServerConfig(); if (args.length == 1) { config.parse(args[0]); } else { // todo 單機版本 config.parse(args); } // todo 讀取配置,啟動單機節點 runFromConfig(config); }啟動單節點
這次再進入這個方法,我們直接跳過它是如果從配置文件中讀取出配置資訊了,然後直接看它的啟動方法
runFromConfig方法主要做了如下幾件事
- 創建
ZooKeeperServer它是單機ZK服務端的實例
如下的ZooKeeperServer相關的屬性 private FileTxnSnapLog txnLogFactory = null; private ZKDatabase zkDb; protected RequestProcessor firstProcessor 以及它可以構建DataTree- 創建
ZooKeeperServerShutdownHandler監控ZkServer關閉狀態的處理器 - 創建
FileTxnSnapLog文件快照相關的工具類 - 給ZKServer綁定上
單位時間trickTime(節點心跳交流的時間) - 初始化 ZKServer
處理事務,快照相關的工具類 - 創建上下文的工廠
- 通過工廠,啟動上下文
public void runFromConfig(ServerConfig config) throws IOException { LOG.info("Starting server"); FileTxnSnapLog txnLog = null; try { // Note that this thread isn't going to be doing anything else, // so rather than spawning another thread, we will just call run() in this thread. // todo 請注意,當前執行緒不會做其他任何事情,因此我們只在當前執行緒中調用Run方法,而不是開啟新執行緒 // create a file logger url from the command line args // todo 根據命令中的args 創建一個logger文件 final ZooKeeperServer zkServer = new ZooKeeperServer(); // Registers shutdown handler which will be used to know the server error or shutdown state changes. // todo 註冊一個shutdown handler, 通過他了解server發生的error或者了解shutdown 狀態的更改 final CountDownLatch shutdownLatch = new CountDownLatch(1); zkServer.registerServerShutdownHandler( new ZooKeeperServerShutdownHandler(shutdownLatch)); // todo FileTxnSnapLog工具類, 與 文件快照相關 txnLog = new FileTxnSnapLog(new File(config.dataLogDir), new File(config.dataDir)); txnLog.setServerStats(zkServer.serverStats()); zkServer.setTxnLogFactory(txnLog); zkServer.setTickTime(config.tickTime); zkServer.setMinSessionTimeout(config.minSessionTimeout); zkServer.setMaxSessionTimeout(config.maxSessionTimeout); // todo 創建Server上下文的工廠,工廠方法模式 // todo ServerCnxnFactory是個抽象類,他有不同是實現, NIO版本的 Netty版本的 cnxnFactory = ServerCnxnFactory.createFactory(); // todo 建立socket,默認是NIOServerCnxnFactory(是一個執行緒) cnxnFactory.configure(config.getClientPortAddress(), config.getMaxClientCnxns()); // todo 跟進這個方法 cnxnFactory.startup(zkServer); - 看一下如何創建處理事務,快照日誌相關的數據文件的邏輯,可以看到,直接去關聯我們配置的dataDir,snapDir,對應著日誌存儲的目錄已經快照存儲的目錄, 然後封裝進
FileSnap和FileTxnLog對象中
public FileTxnSnapLog(File dataDir, File snapDir) throws IOException { LOG.debug("Opening datadir:{} snapDir:{}", dataDir, snapDir); // todo 關聯上指定數據文件和日誌文件 // todo 給FileTxnSnapLog賦值 this.dataDir = new File(dataDir, version + VERSION); this.snapDir = new File(snapDir, version + VERSION); if (!this.dataDir.exists()) { ... . . // todo 將這兩個文件封裝進 FileTxnLog 給當前類維護的兩種事務快照( TnxnSnap ) 賦值 txnLog = new FileTxnLog(this.dataDir); snapLog = new FileSnap(this.snapDir);- 上下文工廠
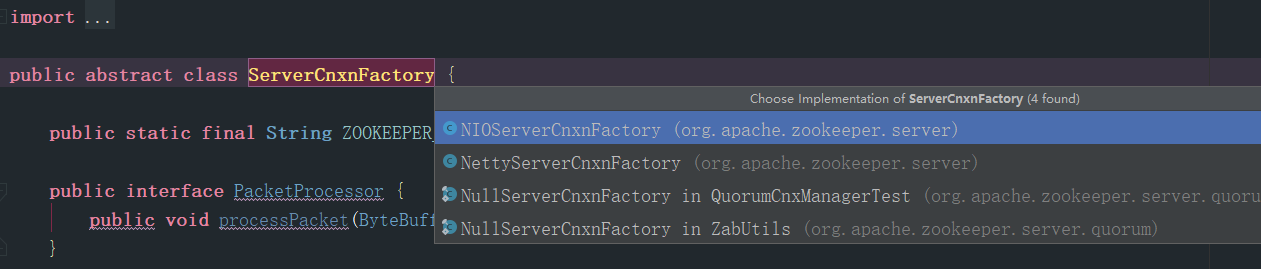
如上圖,將ServerCnxnFactory.java的繼承圖,不同的上下文工廠的實現可以創建出不同的上下文,通過這個圖可以看到,netty不僅支援傳統的NIO,還有一套Netty的實現,當前我選擇的是原生的實現NIOServerCnxnFactory的實現,那麼由他創建出來的就是NIOServerCnxn
啟動流程如下圖
上下文工廠實例化服務端的NIOSocket
在這個方法中創建了ZooKeeperThread,這個類ZK中設計的執行緒類,幾乎全部的執行緒都由此類完成,當前方法中的做法是將創建的Thread賦值給了當前的類的引用,實際上約等於當前類就是執行緒類,還有需要注意的地方就是雖然進行了初始化,但是並沒有開啟
此處看到的就是java原生的NIO Socket編程, 當前執行緒類被設置成守護執行緒
Thread thread; @Override public void configure(InetSocketAddress addr, int maxcc) throws IOException { configureSaslLogin(); // todo 把當前類作為執行緒 thread = new ZooKeeperThread(this, "NIOServerCxn.Factory:" + addr); //todo 所以這裡的這個執行緒是為了和JVM生命周期綁定,只剩下這個執行緒時已經沒有意義了,應該關閉掉。 thread.setDaemon(true); maxClientCnxns = maxcc; // todo 看到了NIO原生的程式碼,使用打開服務端的 Channel, 綁定埠,設置為非阻塞,註冊上感興趣的事件是 accept 連接事件 this.ss = ServerSocketChannel.open(); ss.socket().setReuseAddress(true); LOG.info("binding to port " + addr); ss.socket().bind(addr); ss.configureBlocking(false); ss.register(selector, SelectionKey.OP_ACCEPT); }- 由上下文工廠實例化的
NIOServerCnxn
下面是它的屬性,可以看到其實這個上下文涵蓋的很全面,甚至服務端的ZK都被他維護著,
NIOServerCnxnFactory factory; final SocketChannel sock; protected final SelectionKey sk; boolean initialized; ByteBuffer lenBuffer = ByteBuffer.allocate(4); ByteBuffer incomingBuffer = lenBuffer; LinkedBlockingQueue<ByteBuffer> outgoingBuffers = new LinkedBlockingQueue<ByteBuffer>(); int sessionTimeout; protected final ZooKeeperServer zkServer; 上下文工廠(ServerFactoryCnxn)啟動
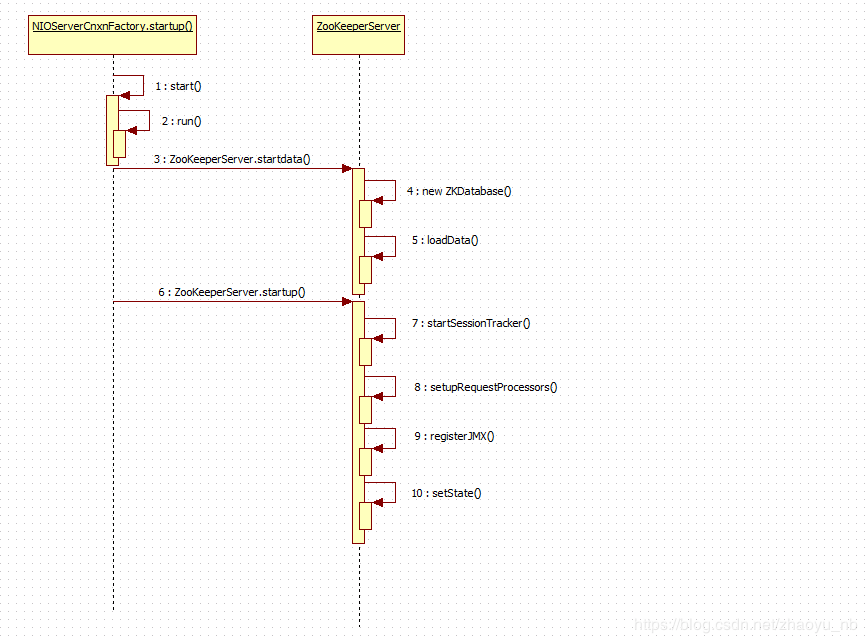
看完了ZooKeeperServerMain中runFromConfig方法中的創建ZKServer,FileTxnSnapLog等重要對象的邏輯,下面,上下文啟動, 直接點擊去查看這個方法,肯定直接進入ServerFactoryCnxn,我們選擇的是它的實現了NIOServerCnxnFactory
public void runFromConfig(ServerConfig config) throws IOException { . . . cnxnFactory.startup(zkServer); 下面是NIOServerCnxnFactory的實現,它做的第一件事就是開啟上面實例化的所說的執行緒類,這條執行緒的開啟標記著,服務端從此可以接收客戶端發送的請求了
這個方法還做了如下三件事
- 將ZooKeeperServer交給上下文維護
- 因為這個是啟動,所以從磁碟中完成數據的恢復
- 繼續運行
- 創建計時器
- 開啟計時器
- 開啟三條處理器
- 註冊JMX
- 修改運行的狀態
- 喚醒全部執行緒
public void startup(ZooKeeperServer zks) throws IOException, InterruptedException { // todo start(); ==> run() 開啟執行緒 start(); //todo 實現在上面, 到目前為止服務端已經可以接受客戶端的請求了 // todo 將ZKS 交給NIOServerCnxnFactory管理,意味著NIOServerCnxnFactory是目前來說,服務端功能最多的對象 setZooKeeperServer(zks); // todo 因為是服務端剛剛啟動,需要從從disk將數據恢復到記憶體 zks.startdata(); // todo 繼續跟進 zks.startup(); }
完成數據的恢復
跟進startData()方法, 看到先創建ZKDatabase,這個對象就是存在於記憶體中的對象,對磁碟中數據可視化描述
// todo 將數據載入進快取中 public void startdata() throws IOException, InterruptedException { //check to see if zkDb is not null if (zkDb == null) { // todo 如果沒初始化的話就初始化 zkDb = new ZKDatabase(this.txnLogFactory); } if (!zkDb.isInitialized()) { // todo 恢複數據 loadData(); } }跟進創建ZKDataBase的邏輯, 最直觀的可以看見,這個DB維護了DataTree和SnapLog
public ZKDatabase(FileTxnSnapLog snapLog) { // todo 創建了DataTree 數據樹的空對象 dataTree = new DataTree(); sessionsWithTimeouts = new ConcurrentHashMap<Long, Integer>(); //todo 用初始化好了的存有關於系統事務日誌將snaplog初始化 this.snapLog = snapLog; }loaddata()
public void loadData() throws IOException, InterruptedException { // todo zkDatabase 已經初始化了 if(zkDb.isInitialized()){ // todo zxid = 最近的一次znode的事務id setZxid(zkDb.getDataTreeLastProcessedZxid()); } else { //todo zkDB 沒有初始化就使用 zkDb.loadDataBase() , 跟進去看, 他從快照中獲取數據 setZxid(zkDb.loadDataBase()); } // Clean up dead sessions LinkedList<Long> deadSessions = new LinkedList<Long>(); for (Long session : zkDb.getSessions()) { if (zkDb.getSessionWithTimeOuts().get(session) == null) { deadSessions.add(session); } } zkDb.setDataTreeInit(true); for (long session : deadSessions) { // XXX: Is lastProcessedZxid really the best thing to use? killSession(session, zkDb.getDataTreeLastProcessedZxid()); } }- 繼續啟動
zks.startup();它的源碼在下面,其中的計時器類也是一個執行緒類
// todo 繼續啟動, 服務端和客戶端建立連接後會保留一個session, 其中這個sessiion的生命周期倒計時就在下面的 createSessionTracker(); public synchronized void startup() { if (sessionTracker == null) { // todo 創建session計時器 createSessionTracker(); } // todo 開啟計時器 startSessionTracker(); // todo 設置請求處理器, zookeeper中存在不同的請求處理器, 就在下面 setupRequestProcessors(); //todo 是一個為應用程式、設備、系統等植入管理功能的框架。 //todo JMX可以跨越一系列異構作業系統平台、系統體系結構和網路傳輸協議,靈活的開發無縫集成的系統、網路和服務管理應用 registerJMX(); // todo 修改狀態 --> running setState(State.RUNNING); // todo 喚醒所有執行緒, 因為前面有一個執行緒等待處理器 睡了一秒 notifyAll(); }設置請求處理器
著重看一下它的setupRequestProcessors()添加請求處理器,單機模式下僅僅存在三個處理器,除了最後一個不是執行緒類之外,其他兩個都是執行緒類
- PrepRequestProcessor
- 校驗許可權
- 修改請求的狀態
- SyncRequestProcessor
- 將request持久化日誌文件
- 打快照
- FinalRequestProcessor
- 響應客戶端的請求
protected void setupRequestProcessors() { // todo 下面的三個處理器的第二個參數是在指定 下一個處理器是誰 RequestProcessor finalProcessor = new FinalRequestProcessor(this); RequestProcessor syncProcessor = new SyncRequestProcessor(this, finalProcessor); // todo 在服務端, 數據的處理 socket -> packet -> request -> queue // todo 然後由下面的requestprocessor 鏈 進行下一步處理request // todo 開啟新執行緒, 服務端接收的客戶端的請求都放在了 隊列中,用處理器非同步處理 ((SyncRequestProcessor)syncProcessor).start(); //todo 第一個處理器 , 下一個處理器是 syncProcessor 最後一個處理器 finalProcessor firstProcessor = new PrepRequestProcessor(this, syncProcessor); // todo 開啟新執行緒 服務端接收的客戶端的請求都放在了 隊列中,用處理器非同步處理 ((PrepRequestProcessor)firstProcessor).start(); }重理思路
程式碼看到這裡,重新調整一下思路接著往下看,首先作為服務端我們看到了上面的NIOServerCnxnFactory.java類中的開啟了本類維護的新執行緒,讓服務端有了接收新連接的能力
既然是執行緒類,就存有Run方法,ZK的設計思路就是在NIOServerCnxnFactory.java的run()方法中檢測客戶端有感興趣的事件時,就進入DoIO()從bytebuffer中將用戶的請求解析出來,然後交由最後面的三個處理器排隊處理
NIOServerCnxnFactory.java的run方法部分程式碼如下
} else if ((k.readyOps() & (SelectionKey.OP_READ | SelectionKey.OP_WRITE)) != 0) { // todo 接收數據,這裡會間歇性的接收到客戶端ping NIOServerCnxn c = (NIOServerCnxn) k.attachment(); // todo 跟進去, 和客戶端的那一套很相似了 c.doIO(k); } else {繼續跟進readPayload()–>readRequest()–>zkServer.processPacket(this, incomingBuffer), 如下是processPacket()方法的部分源碼
else { // todo 將上面的資訊包裝成 request Request si = new Request(cnxn, cnxn.getSessionId(), h.getXid(), h.getType(), incomingBuffer, cnxn.getAuthInfo()); si.setOwner(ServerCnxn.me); // todo 提交request, 其實就是提交給服務端的 process處理器進行處理 submitRequest(si); }繼續跟進submitRequest(),終於可以看到它嘗試將這個request交給第一個處理器處理,但是因為這是在伺服器啟動的過程中,服務端並不確定伺服器的第一個處理器執行緒到底有沒有開啟,因此它先驗證,甚至會等一秒,直到處理器執行緒完成了啟動的邏輯
// todo 交由伺服器做出request的處理動作 public void submitRequest(Request si) { // todo 如果 firstProcessor 不存在,就報錯了 if (firstProcessor == null) { synchronized (this) { try { while (state == State.INITIAL) { wait(1000); } } catch (InterruptedException e) { LOG.warn("Unexpected interruption", e); } if (firstProcessor == null || state != State.RUNNING) { throw new RuntimeException("Not started"); } } } try { touch(si.cnxn); // todo 驗證合法性 boolean validpacket = Request.isValid(si.type); if (validpacket) { // todo request合法的化,交給firstProcessor (實際是PrepRequestProcessor)處理 跟進去 firstProcessor.processRequest(si); if (si.cnxn != null) { incInProcess(); }經過上面的閱讀,不難發現,最終來自於客戶端的request都將會流經服務端的三個處理器,下面就看看它們到底做了哪些事
PrepRequestProcessor(執行緒類)
因為他本身就是執行緒類,我們直接看他的run(),最直接的可以看到,它將請求交給了pRequest(req)處理
public void run() { try { while (true) { // todo 取出請求 Request request = submittedRequests.take(); long traceMask = ZooTrace.CLIENT_REQUEST_TRACE_MASK; //todo 處理請求 if (request.type == OpCode.ping) { traceMask = ZooTrace.CLIENT_PING_TRACE_MASK; } if (LOG.isTraceEnabled()) { ZooTrace.logRequest(LOG, traceMask, 'P', request, ""); } if (Request.requestOfDeath == request) { break; } // todo 著重看這裡, 跟進去 pRequest(request); }下面跟進它的pRequest(),下面是它的源碼,通過switch分支針對不同類型的請求做出不同的處理,下面用create類型的請求舉例
protected void pRequest(Request request) throws RequestProcessorException { // LOG.info("Prep>>> cxid = " + request.cxid + " type = " + // request.type + " id = 0x" + Long.toHexString(request.sessionId)); request.hdr = null; request.txn = null; // todo 下面的不同類型的資訊, 對應這不同的處理器方式 try { switch (request.type) { case OpCode.create: // todo 創建每條記錄對應的bean , 現在還是空的, 在面的pRequest2Txn 完成賦值 CreateRequest createRequest = new CreateRequest(); // todo 跟進這個方法, 再從這個方法出來,往下運行,可以看到調用了下一個處理器 pRequest2Txn(request.type, zks.getNextZxid(), request, createRequest, true); break; . . . request.zxid = zks.getZxid(); // todo 調用下一個處理器處理器請求 SyncRequestProcessor nextProcessor.processRequest(request);總覽思路,現在當前的處理器進行狀態的相關處理,處理完之後移交給下一個處理器
跟進pRequest2Txn(request.type, zks.getNextZxid(), request, createRequest, true);依然是用create類型距離, 它在下面的方法中做了如下幾件事
- 因為create是事務類型的請求,它在一開始就給request構建了事務頭 txnHeader
- 將request中的屬性反序列化進
CreateRequest類中 - 校驗一下許可權,檢查一下訪問時是否需要訪問許可權,如果需要,當前訪問者有沒有足夠的許可權
- 根據用戶想create新node而輸入的string,進行截取取出它的父級路徑,因為創建新節點時,需在修改父路徑對應節點的相關資訊
- 校驗父節點是否是臨時節點
- 修改父節點是屬性
- 更新zxid(創建znode事務id)
- childCount++
- 更新cversion(針對當前子節點修改的次數)
- 將這條記錄添加到
outstandingChanges集合中
// todo 第二個參數位置上的 record 是上一步new 出來的空對象--> protected void pRequest2Txn(int type, long zxid, Request request, Record record, boolean deserialize) throws KeeperException, IOException, RequestProcessorException { // todo 使用request的相關屬性,創建出 事務Header request.hdr = new TxnHeader(request.sessionId, request.cxid, zxid, Time.currentWallTime(), type); switch (type) { case OpCode.create: // todo 校驗session的情況 zks.sessionTracker.checkSession(request.sessionId, request.getOwner()); CreateRequest createRequest = (CreateRequest)record; if(deserialize) // todo 反序列化 ByteBufferInputStream.byteBuffer2Record(request.request, createRequest); // todo 獲取出request中的path String path = createRequest.getPath(); int lastSlash = path.lastIndexOf('/'); if (lastSlash == -1 || path.indexOf('�') != -1 || failCreate) { LOG.info("Invalid path " + path + " with session 0x" + Long.toHexString(request.sessionId)); throw new KeeperException.BadArgumentsException(path); } // todo 進行許可權的驗證 List<ACL> listACL = removeDuplicates(createRequest.getAcl()); if (!fixupACL(request.authInfo, listACL)) { throw new KeeperException.InvalidACLException(path); } // todo 獲取父級路徑 String parentPath = path.substring(0, lastSlash); // todo 跟進這個方法, 跟進父節點的路徑找到 parentRecord ChangeRecord parentRecord = getRecordForPath(parentPath); // todo 校驗 checkACL(zks, parentRecord.acl, ZooDefs.Perms.CREATE, request.authInfo); // todo 取出父節點的C version (子節點的version) int parentCVersion = parentRecord.stat.getCversion(); CreateMode createMode = CreateMode.fromFlag(createRequest.getFlags()); if (createMode.isSequential()) { path = path + String.format(Locale.ENGLISH, "%010d", parentCVersion); } validatePath(path, request.sessionId); try { if (getRecordForPath(path) != null) { throw new KeeperException.NodeExistsException(path); } } catch (KeeperException.NoNodeException e) { // ignore this one } // todo 判斷當前的父節點 是不是臨時節點 boolean ephemeralParent = parentRecord.stat.getEphemeralOwner() != 0; if (ephemeralParent) { // todo 父節點如果是臨時節點, 直接拋異常結束 throw new KeeperException.NoChildrenForEphemeralsException(path); } // todo 父節點不是臨時節點, 將創建的節點的VCersion 就是在父節點的基礎上+1 int newCversion = parentRecord.stat.getCversion()+1; request.txn = new CreateTxn(path, createRequest.getData(), listACL, createMode.isEphemeral(), newCversion); StatPersisted s = new StatPersisted(); if (createMode.isEphemeral()) { s.setEphemeralOwner(request.sessionId); } // todo 修改了父節點的一些元資訊 parentRecord = parentRecord.duplicate(request.hdr.getZxid()); parentRecord.childCount++; parentRecord.stat.setCversion(newCversion); //todo 添加兩條修改記錄 addChangeRecord(parentRecord); addChangeRecord(new ChangeRecord(request.hdr.getZxid(), path, s, 0, listACL)); break;SyncRequestProcessor(執行緒類)
一個create請求經過第一個處理器進行狀態相關的處理之後,就來到當前這個第二個處理器, 當前處理器的主要作用就是負責同步持久化,將request持久化到磁碟,人們說的打快照,也就是將DataTree序列化後持久化的工作,他的主要邏輯都在下面的Run方法中
- 首先是
while(true)保證了作為執行緒類的它可以無休止的一直運行下去 - 嘗試從隊列中取出request
- 隊列為空,阻塞等待,直接不為空取出req再處理
- 隊列不為空,直接取出一個req,接著處理
- 請求被取出來之後通過
if-else分支進行不同的處理- 如果是事務類型的
- 非事務類型的request
public void run() { try { // todo 寫日誌的初始數量 int logCount = 0; // we do this in an attempt to ensure that not all of the serversin the ensemble take a snapshot at the same time // todo 設置RandRoll的大小, 確保所有伺服器在同一個時間不使用同一個快照 setRandRoll(r.nextInt(snapCount / 2)); //todo 這個處理器擁有自己的無限循環 while (true) { // todo 初始請求為null Request si = null; // todo toFlush是一個LinkedList, 裡面存放著需要 持久化到磁碟中的request if (toFlush.isEmpty()) { // todo 沒有需要刷新進disk的 // todo 這個take()是LinkedList原生的方法 // todo 從請求隊列中取出一個請求,如果隊列為空就會阻塞在這裡 si = queuedRequests.take(); } else { // todo 如果隊列為空,直接取出request, 並不會阻塞 si = queuedRequests.poll(); if (si == null) { //todo 刷新進磁碟 flush(toFlush); continue; } } // todo 在關閉處理器之前,會添加requestOfDeadth,表示關閉後不再接收任何請求 if (si == requestOfDeath) { break; } //todo 成功的從隊列中取出了請求 if (si != null) { // track the number of records written to the log // todo 將request 追加到日誌文件, 只有事物性的請求才會返回true if (zks.getZKDatabase().append(si)) { // todo 剛才的事物日誌放到請求成功後,添加一次, log數+1 logCount++; // todo 當持久化的request數量 > (快照數/2 +randRoll) 時, 創建新的日誌文件 if (logCount > (snapCount / 2 + randRoll)) { setRandRoll(r.nextInt(snapCount / 2)); // todo roll the log // todo 跟進去這個方法, 最終也會執行 this.logStream.flush(); // todo 新生成一個日誌文件 // todo 調用rollLog函數翻轉日誌文件 zks.getZKDatabase().rollLog(); // todo 拍攝日誌快照 if (snapInProcess != null && snapInProcess.isAlive()) { LOG.warn("Too busy to snap, skipping"); } else { // todo 創建執行緒處理快照 snapInProcess = new ZooKeeperThread("Snapshot Thread") { public void run() { try { // todo 打快照, 跟進去 zks.takeSnapshot(); } catch (Exception e) { LOG.warn("Unexpected exception", e); } } }; // todo 開啟快照執行緒 snapInProcess.start(); } // todo 重置為0 logCount = 0; } } else if (toFlush.isEmpty()) { // todo 如果等待被刷新進disk的request為空 // optimization for read heavy workloads // iff this is a read, and there are no pending // flushes (writes), then just pass this to the next // processor // todo 查看此時toFlush是否為空,如果為空,說明近段時間讀多寫少,直接響應 if (nextProcessor != null) { // todo 最終也會調用 nextProcessor 處理request FinalRequestProcess nextProcessor.processRequest(si); if (nextProcessor instanceof Flushable) { ((Flushable) nextProcessor).flush(); } } continue; } // todo 流裡面的內容不了立即刷新, 調用 toFlush.add(si); 累積request toFlush.add(si); if (toFlush.size() > 1000) { // todo 當toFlush中的 request數量 > 1000 將會flush flush(toFlush); } } }究竟是不是 事務類型的req,是在上面的程式碼中的zks.getZKDatabase().append(si)實現的,true表示屬於事務類型,跟進這個方法,最終回來到FileTxnLog.java的append(),源碼如下
程式碼是挺長的,但是邏輯也算是請求,如下
- 根據有沒有request的頭,判斷是否是事務類型,對於查詢一類的非實物類型的請求來說,直接返回false退出,也不用往日誌文件中添加什麼資訊,事實上確實如此,就直接進入非事務類型的req,也可以看到
continue沒有一點持久化到磁碟的邏輯 - 其他類型的會對服務端的數據狀態造成改變的事務性請求,會在這裡被持久化進logDir中的日誌文件,,還有個細節第一次的事務類型的請求會在這裡完成持久化進磁碟的操作,除了第一次之外,其他的都會被批處理,原酒就是下面程式碼中的這一行
if (logStream==null) { - 滿足這個條件
if (logCount > (snapCount / 2 + randRoll))之後,就會進行一次日誌文件的滾動,說白了,就是現在的日誌文件體積太大了,然後得保存原來的就日誌文件,創建一個新的空的日誌文件繼續使用 - 打快照, 實際上就是將記憶體中的DataBase序列化後持久保存進記憶體中,這樣做對數據的恢復是很有幫助的,比如集群的Follower可以通過Leader的快照迅速完成數據的同步
public synchronized boolean append(TxnHeader hdr, Record txn) throws IOException { if (hdr == null) { return false; } if (hdr.getZxid() <= lastZxidSeen) { LOG.warn("Current zxid " + hdr.getZxid() + " is <= " + lastZxidSeen + " for " + hdr.getType()); } else { lastZxidSeen = hdr.getZxid(); } // todo 第一次來==null。 再執行過來就不進來了,等著在 SyncRequestProcessor中批量處理 // todo logStream == BufferedOutputStream if (logStream==null) { if(LOG.isInfoEnabled()){ LOG.info("Creating new log file: " + Util.makeLogName(hdr.getZxid())); } // todo 關聯上 我們指定的logdir位置的日誌文件 logFileWrite = new File(logDir, Util.makeLogName(hdr.getZxid())); // todo 包裝進文件輸出流 fos = new FileOutputStream(logFileWrite); logStream=new BufferedOutputStream(fos); oa = BinaryOutputArchive.getArchive(logStream); FileHeader fhdr = new FileHeader(TXNLOG_MAGIC,VERSION, dbId); fhdr.serialize(oa, "fileheader"); // Make sure that the magic number is written before padding. logStream.flush(); filePadding.setCurrentSize(fos.getChannel().position()); streamsToFlush.add(fos); } filePadding.padFile(fos.getChannel()); byte[] buf = Util.marshallTxnEntry(hdr, txn); if (buf == null || buf.length == 0) { throw new IOException("Faulty serialization for header " + "and txn"); } Checksum crc = makeChecksumAlgorithm(); crc.update(buf, 0, buf.length); oa.writeLong(crc.getValue(), "txnEntryCRC"); Util.writeTxnBytes(oa, buf); return true; }FinalRequestProcessor
終於來到了FinalRequestProcessor處理器,它並不是執行緒類,但是它確實是和前兩個執行緒類並列的,單機模式下最後一個處理器類
它處理request的邏輯那是相當長我挑著貼在下面,只是關注下面的幾個點,程式碼並不完整哦
它的解釋我寫在源碼的下面
public void processRequest(Request request) { ProcessTxnResult rc = null; // 看一看!!!!!!!!! // 看一看!!!!!!!!! // 看一看!!!!!!!!! // 它在消費 outstandingChanges 隊列, 沒錯,這個隊列中對象, 就是第一個個處理器調用addChange()方法添加進去的record // 看一看!!!!!!!!! // 看一看!!!!!!!!! // 看一看!!!!!!!!! synchronized (zks.outstandingChanges) { // todo outstandingChanges不為空且首個元素的zxid小於等於請求的zxid while (!zks.outstandingChanges.isEmpty() && zks.outstandingChanges.get(0).zxid <= request.zxid) { //todo 移除並返回第一個元素 ChangeRecord cr = zks.outstandingChanges.remove(0); // todo 如果record的zxid < request.zxid 警告 if (cr.zxid < request.zxid) { LOG.warn("Zxid outstanding " + cr.zxid + " is less than current " + request.zxid); } // todo 根據路徑得到Record並判斷是否為cr if (zks.outstandingChangesForPath.get(cr.path) == cr) { // 移除cr的路徑對應的記錄 zks.outstandingChangesForPath.remove(cr.path); } } //todo 請求頭不為空 if (request.hdr != null) { // 獲取請求頭 TxnHeader hdr = request.hdr; // 獲取事務 Record txn = request.txn; // todo 跟進這個方法-----<--!!!!!!-----處理事務的邏輯,在這裡面有向客戶端發送事件的邏輯, 回調客戶端的watcher----!!!!!!--> // todo 在這個方法裡面更新了記憶體 rc = zks.processTxn(hdr, txn); } // do not add non quorum packets to the queue. // todo 只將quorum包(事務性請求)添加進隊列 if (Request.isQuorum(request.type)) { zks.getZKDatabase().addCommittedProposal(request); } } if (request.cnxn == null) { return; } ServerCnxn cnxn = request.cnxn; String lastOp = "NA"; zks.decInProcess(); Code err = Code.OK; Record rsp = null; boolean closeSession = false; // todo 根據請求頭的不同類型進行不同的處理 switch (request.type) { //todo PING case OpCode.ping: { //todo 更新延遲 zks.serverStats().updateLatency(request.createTime); lastOp = "PING"; //todo 更新響應的狀態 cnxn.updateStatsForResponse(request.cxid, request.zxid, lastOp, request.createTime, Time.currentElapsedTime()); cnxn.sendResponse(new ReplyHeader(-2, zks.getZKDatabase().getDataTreeLastProcessedZxid(), 0), null, "response"); return; } . . . // todo 如果是create , 在這裡返回給客戶端 結果 case OpCode.create: { lastOp = "CREA"; rsp = new CreateResponse(rc.path); // todo 在下面程式碼的最後 返回出去 rsp err = Code.get(rc.err); break; } long lastZxid = zks.getZKDatabase().getDataTreeLastProcessedZxid(); ReplyHeader hdr = new ReplyHeader(request.cxid, lastZxid, err.intValue()); zks.serverStats().updateLatency(request.createTime); cnxn.updateStatsForResponse(request.cxid, lastZxid, lastOp, request.createTime, Time.currentElapsedTime()); // todo 在這裡將向客戶端返回資訊, 跟進去查看就能看到socket相關的內容 cnxn.sendResponse(hdr, rsp, "response"); - 第一點,更新記憶體在記憶體DataTree中創建新的節點,回調watcher
rc = zks.processTxn(hdr, txn); - 第二點響應客戶端
cnxn.sendResponse(hdr, rsp, "response");
