Pytorch入門教程
- 2019 年 10 月 8 日
- 筆記
記得剛開始學TensorFlow的時候,那給我折磨的呀,我一直在想這個TensorFlow官方為什麼搭建個網路還要畫什麼靜態圖呢,把簡單的事情弄得麻煩死了,直到這幾天我開始接觸Pytorch,發現Pytorch是就是不用搭建靜態圖的Tensorflow版本,就想在用numpy一樣,並且封裝了很多深度學習高級API,numpy數據和Tensor數據相互轉換不用搭建會話了,只需要一個轉換函數,搭建起了numpy和TensorFlow愛的橋樑。
Pytorch自17年推出以來,一度有趕超TensorFlow的趨勢,是因為Pytorch採用動態圖機制,替代Numpy使用GPU的功能,搭建網路靈活。
Pytorch和TensorFlow的區別:
- TensorFlow是基於靜態計算圖的,靜態計算圖是先定義後運行,一次定義多次運行(Tensorflow 2.0也開始使用動態計算圖)
- PyTorch是基於動態圖的,是在運行的過程中被定義的,在運行的時候構建,可以多次構建多次運行
張量
Pytorch中的Tensor和ndarray類似,區別在於ndarray不能再GPU上加速,而Tensor可以使用GPU加速
構建一個未初始化3*3的矩陣
import torch
x = torch.empty(3,3)  # tensor([[1.0469e-38, 5.9694e-39, 8.9082e-39],  #         [1.0194e-38, 9.1837e-39, 4.6837e-39],  #         [9.9184e-39, 9.0000e-39, 1.0561e-38]])
構建一個3*3的隨機矩陣
x = torch.rand(3, 3) # tensor([[0.4289, 0.6872, 0.2781], # [0.2129, 0.7520, 0.3994], # [0.0995, 0.9080, 0.7868]])
dtype long的全零矩陣:
x = torch.zeros(5, 3, dtype=torch.long) # tensor([[0, 0, 0], # [0, 0, 0], # [0, 0, 0]])
把數據[5.5, 3]變成Tensor
x = torch.tensor([5.5, 3]) # tensor([5.5000, 3.0000])
得到數組的shape
print(x.size()) # torch.Size([2])
torch.Size 實際上是一個元組,因此它支援所有元組操作。
Operation操作
加法
import torch # ------------- 方法一 -------------# x = torch.rand(2, 2) # 構建一個(2,2)的隨機數組 y = torch.rand(2, 2) # 構建一個(2,2)的隨機數組 print(x + y) # ------------- 方法二 -------------# print(torch.add(x, y)) # ------------- 方法三 -------------# result = torch.empty(2, 2) torch.add(x, y, out=result) print(result) # ------------- 方法四 -------------# # 把x加到y上 y.add_(x) print(y) # 所有的結果都等於 # tensor([[0.5464, 0.5692], # [0.7211, 1.2168]])
Pytorch的索引和python一樣,
調整shape
torch.view() 調整數組shape
torch.size() 查看數據shape
import torch x = torch.randn(4, 4) y = x.view(16) print(y.size()) # torch.Size([16]) z = x.view(-1, 8) print(z.size()) # torch.Size([2, 8])
如果我們的張量只有一個數值,可以使用.item()獲取
import torch x = torch.randn(1) print(x) # tensor([-0.8504]) print(x.item()) # -0.8503872156143188
Numpy數組和Torch Tensor轉換
將Torch張量轉換為NumPy數組
ndarray.numpy():Torch Tensor–>ndarray
import torch a = torch.ones(5) print(a) # tensor([1., 1., 1., 1., 1.]) # torch tensor-->ndarray b = a.numpy() print(b, type(b)) # [1. 1. 1. 1. 1.] <class 'numpy.ndarray'>
將NumPy數組轉換為Torch張量
torch.from_numpy(ndarray):ndarray–Torch Tensor
import torch import numpy as np a = np.ones(5) # [1. 1. 1. 1. 1.] b = torch.from_numpy(a) print(b) # tensor([1., 1., 1., 1., 1.], dtype=torch.float64)
Autograd自動微分
自動微分Autograd用於自動計算複雜函數的梯度,用於神經網路的優化,
如果設置torch.tensor_1(requires_grad=True),那麼會追蹤所有對該張量tensor_1的所有操作。
import torch # 創建一個張量並設置 requires_grad=True 用來追蹤他的計算歷史 x = torch.ones(2, 2, requires_grad=True) print(x) # tensor([[1., 1.], # [1., 1.]], requires_grad=True)
當Tensor完成一個計算過程,每個張量都會自動生成一個.grad_fn屬性
# 對張量進行計算操作,grad_fn已經被自動生成了。 y = x + 2 print(y) # tensor([[3., 3.], # [3., 3.]], grad_fn=<AddBackward>) print(y.grad_fn) # <AddBackward object at 0x00000232535FD860> # 對y進行一個乘法操作 z = y * y * 3 out = z.mean() print(z) # tensor([[27., 27.], # [27., 27.]], grad_fn=<MulBackward>) print(out) # tensor(27., grad_fn=<MeanBackward1>)
.requires_grad_(…) 可以改變張量的requires_grad屬性。
import torch a = torch.randn(2, 2) a = ((a * 3) / (a - 1)) print(a.requires_grad) # 默認是requires_grad = False a.requires_grad_(True) print(a.requires_grad) # True b = (a * a).sum() print(b.grad_fn) # <SumBackward0 object at 0x000002325360B438>
梯度
回顧到上面
import torch # 創建一個張量並設置 requires_grad=True 用來追蹤他的計算歷史 x = torch.ones(2, 2, requires_grad=True) print(x) # tensor([[1., 1.], # [1., 1.]], requires_grad=True) # 對張量進行計算操作,grad_fn已經被自動生成了。 y = x + 2 print(y) # tensor([[3., 3.], # [3., 3.]], grad_fn=<AddBackward>) print(y.grad_fn) # <AddBackward object at 0x00000232535FD860> # 對y進行一個乘法操作 z = y * y * 3 out = z.mean() print(z) # tensor([[27., 27.], # [27., 27.]], grad_fn=<MulBackward>) print(out) # tensor(27., grad_fn=<MeanBackward1>)
讓我們來反向傳播,運行 out.backward() ,等於out.backward(torch.tensor(1.))
對out進行方向傳播,$out = frac{1}{4}sum_i z_i$,其中$z_i = 3(x_i+2)^2$,因為方向傳播中torch.tensor=1(out.backward中的參數)因此$z_ibigrrvert_{x_i=1} = 27$
對於梯度$frac{partial out}{partial x_i} = frac{3}{2}(x_i+2)$,把$x_i=1$代入$frac{partial out}{partial x_i}bigrrvert_{x_i=1} = frac{9}{2} = 4.5$
print(out) # tensor(27., grad_fn=<MeanBackward1>) print("*"*50) out.backward() # 列印梯度 print(x.grad) # tensor([[4.5000, 4.5000], # [4.5000, 4.5000]])
對吃栗子找到規律,才能看懂
import torch x = torch.randn(3, requires_grad=True) y = x * 2 while y.data.norm() < 1000: y = y * 2 print(y) # tensor([-920.6895, -115.7301, -867.6995], grad_fn=<MulBackward>) gradients = torch.tensor([0.1, 1.0, 0.0001], dtype=torch.float) # 把gradients代入y的反向傳播中 y.backward(gradients) # 計算梯度 print(x.grad) # tensor([ 51.2000, 512.0000, 0.0512])
為了防止跟蹤歷史記錄,可以將程式碼塊包裝在with torch.no_grad():中。 在評估模型時特別有用,因為模型的可訓練參數的屬性可能具有requires_grad = True,但是我們不需要梯度計算。
print(x.requires_grad) # True print((x ** 2).requires_grad) # True with torch.no_grad(): print((x ** 2).requires_grad) # False
神經網路
神經網路是基於自動梯度 (autograd)來定義一些模型。一個 nn.Module 包括層和一個 forward(input) 它會返回輸出(output)。
一個典型的神經網路訓練過程包括以下幾點:
- 定義一個包含可訓練參數的神經網路
- 迭代整個輸入
- 通過神經網路處理輸入
- 計算損失(loss)
- 反向傳播梯度到神經網路的參數
- 更新網路的參數,典型的用一個簡單的更新方法:weight = weight – learning_rate *gradient
我們先來定義一個網路,處理輸入,調用backword
import torch import torch.nn as nn import torch.nn.functional as F class Net(nn.Module): def __init__(self): super(Net, self).__init__() # 1 input image channel, 6 output channels, 3x3 square convolution # kernel self.conv1 = nn.Conv2d(1, 6, 3) self.conv2 = nn.Conv2d(6, 16, 3) # an affine operation: y = Wx + b self.fc1 = nn.Linear(16 * 6 * 6, 120) # 6*6 from image dimension self.fc2 = nn.Linear(120, 84) self.fc3 = nn.Linear(84, 10) def forward(self, x): # (2, 2)大小的最大池化層 x = F.max_pool2d(F.relu(self.conv1(x)), (2, 2)) # 如果大小是正方形,則只能指定一個數字 x = F.max_pool2d(F.relu(self.conv2(x)), 2) x = x.view(-1, self.num_flat_features(x)) x = F.relu(self.fc1(x)) x = F.relu(self.fc2(x)) x = self.fc3(x) return x def num_flat_features(self, x): print(x.size()) # torch.Size([1, 16, 6, 6]) size = x.size()[1:] # 除batch維度外的所有維度 print(size) # torch.Size([16, 6, 6]) num_features = 1 for s in size: num_features *= s return num_features net = Net() print(net) # 列印模型結構 # Net( # (conv1): Conv2d(1, 6, kernel_size=(3, 3), stride=(1, 1)) # (conv2): Conv2d(6, 16, kernel_size=(3, 3), stride=(1, 1)) # (fc1): Linear(in_features=576, out_features=120, bias=True) # (fc2): Linear(in_features=120, out_features=84, bias=True) # (fc3): Linear(in_features=84, out_features=10, bias=True))
torch.nn只支援批輸入,格式:sSamples * nChannels * Height * Width(樣本數*通道數*高*寬)
如果我們只有一個樣本,只需使用 ``input.unsqueeze(0)`` 來添加其它的維數
一個模型可訓練的參數可以通過調用 net.parameters() 返回:
params = list(net.parameters()) print(len(params)) # 10 print(params[0].size()) # 第一個卷積層的權重 torch.Size([6, 1, 3, 3])
讓我們嘗試隨機生成一個 32×32 的輸入
input = torch.randn(1, 1, 32, 32) out = net(input) print(out) # tensor([[ 0.1464, 0.0453, 0.0269, 0.0078, 0.1960, -0.1795, 0.1265, # -0.0742, -0.0649, 0.0592]], grad_fn=<AddmmBackward>)
把所有參數梯度快取器置零,用隨機的梯度來反向傳播
# 把所有參數梯度快取器置零 net.zero_grad() # 用隨機的梯度來反向傳播 out.backward(torch.randn(1, 10))
損失函數
計算均方誤差 $loss=nn.MSELoss(模型預測值-目標)$
output = net(input) # torch.Size([1, 10]) target = torch.randn(10) # 隨便取一個target target = target.view(1, -1) # 讓target和output的shape一樣 criterion = nn.MSELoss() loss = criterion(output, target) print(loss) # tensor(0.8695, grad_fn=<MseLossBackward>)
現在,如果你跟隨損失到反向傳播路徑,可以使用它的 .grad_fn 屬性,你將會看到一個這樣的計算圖:
input -> conv2d -> relu -> maxpool2d -> conv2d -> relu -> maxpool2d -> view -> linear -> relu -> linear -> relu -> linear -> MSELoss -> loss
所以,當我們調用 loss.backward(),整個圖都會微分,而且所有的在圖中的requires_grad=True 的張量將會讓他們的 grad 張量累計梯度。
為了演示,我們將跟隨以下步驟來反向傳播。
print(loss.grad_fn) # MSELoss # <MseLossBackward object at 0x7fab77615278> print(loss.grad_fn.next_functions[0][0]) # Linear # <AddmmBackward object at 0x7fab77615940> print(loss.grad_fn.next_functions[0][0].next_functions[0][0]) # ReLU # <AccumulateGrad object at 0x7fab77615940>
反向傳播
為了實現反向傳播損失,我們所有需要做的事情僅僅是使用 loss.backward()。你需要清空現存的梯度,要不然將會和現存的梯度累計到一起。
現在我們調用 loss.backward() ,然後看一下 con1 的偏置項在反向傳播之前和之後的變化。
net.zero_grad() # 將所有參數的梯度緩衝區歸零 print('conv1.bias.grad 反向傳播之前') print(net.conv1.bias.grad) # tensor([0., 0., 0., 0., 0., 0.]) loss.backward() print('conv1.bias.grad 反向傳播之後') print(net.conv1.bias.grad) # tensor([-0.0118, 0.0125, -0.0085, -0.0225, 0.0125, 0.0235])
隨機梯度下降,更新神經網路參數:
基於python實現
weight = weight - learning_rate * gradient learning_rate = 0.01 for f in net.parameters(): f.data.sub_(f.grad.data * learning_rate)
使用torch.optim實現,torch.optim中包含SGD, Nesterov-SGD, Adam, RMSProp, 等優化器
import torch.optim as optim # create your optimizer optimizer = optim.SGD(net.parameters(), lr=0.01) # in your training loop: optimizer.zero_grad() # zero the gradient buffers output = net(input) loss = criterion(output, target) loss.backward() optimizer.step() # Does the update
影像分類器
torch有一個叫做totchvision 的包,支援載入類似Imagenet,CIFAR10,MNIST 等公共數據集的數據載入模組 torchvision.datasets
支援載入影像數據數據轉換模組 torch.utils.data.DataLoader。
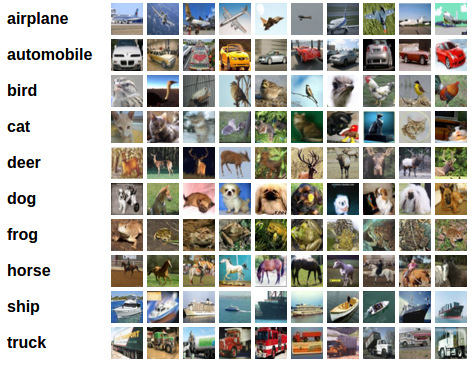
本節我們使用CIFAR10數據集,它包含十個類別:‘airplane’, ‘automobile’, ‘bird’, ‘cat’, ‘deer’, ‘dog’, ‘frog’, ‘horse’, ‘ship’, ‘truck’。CIFAR-10 中的影像尺寸為33232,也就是RGB的3層顏色通道,每層通道內的尺寸為32*32。
訓練一個影像分類器
我們將按次序的做如下幾步:
- 使用torchvision載入並且歸一化CIFAR10的訓練和測試數據集
- 定義一個卷積神經網路
- 定義一個損失函數
- 在訓練樣本數據上訓練網路
- 在測試樣本數據上測試網路
torchvision 數據集的輸出是範圍在[0,1]之間的 PILImage,我們將他們轉換成歸一化範圍為[-1,1]之間的張量 Tensors。
import torch import torchvision import torchvision.transforms as transforms transform = transforms.Compose( [transforms.ToTensor(), transforms.Normalize((0.5, 0.5, 0.5), (0.5, 0.5, 0.5))]) # 下載訓練數據集 trainset = torchvision.datasets.CIFAR10(root='./data', train=True, download=True, transform=transform) # 下載測試數據集 testset = torchvision.datasets.CIFAR10(root='./data', train=False, download=True, transform=transform) trainloader = torch.utils.data.DataLoader(trainset, batch_size=4, shuffle=True, num_workers=2) testloader = torch.utils.data.DataLoader(testset, batch_size=4, shuffle=False, num_workers=2) classes = ('plane', 'car', 'bird', 'cat', 'deer', 'dog', 'frog', 'horse', 'ship', 'truck')
讓我們來展示其中的一些訓練圖片
import matplotlib.pyplot as plt import numpy as np # 展示圖片 def imshow(img): img = img / 2 + 0.5 # unnormalize npimg = img.numpy() plt.imshow(np.transpose(npimg, (1, 2, 0))) plt.show() # 獲取一些隨機的訓練圖片 dataiter = iter(trainloader) images, labels = dataiter.next() imshow(torchvision.utils.make_grid(images)) # show images # 列印 labels print(' '.join('%5s' % classes[labels[j]] for j in range(4))) # cat plane ship frog
定義一個卷積神經網路 在這之前先 從神經網路章節 複製神經網路,並修改它為3通道的圖片(在此之前它被定義為1通道)
import torch.nn as nn import torch.nn.functional as F class Net(nn.Module): def __init__(self): super(Net, self).__init__() self.conv1 = nn.Conv2d(3, 6, 5) self.pool = nn.MaxPool2d(2, 2) self.conv2 = nn.Conv2d(6, 16, 5) self.fc1 = nn.Linear(16 * 5 * 5, 120) self.fc2 = nn.Linear(120, 84) self.fc3 = nn.Linear(84, 10) def forward(self, x): x = self.pool(F.relu(self.conv1(x))) x = self.pool(F.relu(self.conv2(x))) x = x.view(-1, 16 * 5 * 5) x = F.relu(self.fc1(x)) x = F.relu(self.fc2(x)) x = self.fc3(x) return x net = Net()
定義一個損失函數和優化器 讓我們使用交叉熵Cross-Entropy 作損失函數,優化器使用SGD
import torch.optim as optim criterion = nn.CrossEntropyLoss() optimizer = optim.SGD(net.parameters(), lr=0.001, momentum=0.9)
我們只需要在數據迭代器上將數據循環傳給網路和優化器 就可以。
for epoch in range(2): # 多次循環數據集 running_loss = 0.0 for i, data in enumerate(trainloader, 0): # 獲取輸入 inputs, labels = data # 把參數梯度歸零 optimizer.zero_grad() # 前向傳播(forward) + 反向傳播(backward) + 優化器(optimize) outputs = net(inputs) # 前向傳播 loss = criterion(outputs, labels) loss.backward() # 反向傳播 optimizer.step() # 優化器 running_loss += loss.item() if i % 2000 == 1999: # 每2000個小batch列印一次 print('[%d, %5d] loss: %.3f' % (epoch + 1, i + 1, running_loss / 2000)) running_loss = 0.0 print('Finished Training') # [1, 2000] loss: 2.187 # [1, 4000] loss: 1.852 # [1, 6000] loss: 1.672 # [1, 8000] loss: 1.566 # [1, 10000] loss: 1.490 # [1, 12000] loss: 1.461 # [2, 2000] loss: 1.389 # [2, 4000] loss: 1.364 # [2, 6000] loss: 1.343 # [2, 8000] loss: 1.318 # [2, 10000] loss: 1.282 # [2, 12000] loss: 1.286 # Finished Training
在測試集上測試網路 我們已經通過訓練數據集對網路進行了2次訓練,但是我們需要檢查網路是否已經學到了東西。
我們將用神經網路的輸出作為預測的類標來檢查網路的預測性能,用樣本的真實類標來校對。如果預測是正確的,我們將樣本添加到正確預測的列表裡。
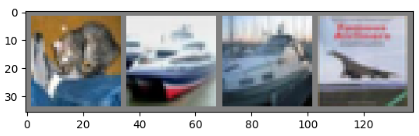
好的,第一步,讓我們從測試集中顯示一張影像來熟悉它。
GroundTruth: cat ship ship plane
測試
輸出是預測與十個類的近似程度,與某一個類的近似程度越高,網路就越認為影像是屬於這一類別。所以讓我們列印其中最相似類別類標:
outputs = net(images) _, predicted = torch.max(outputs, 1) print('Predicted: ', ' '.join('%5s' % classes[predicted[j]] for j in range(4))) # Predicted: cat ship car ship # GroundTruth: cat ship ship plane
預測對了兩個,讓我們看看網路在整個數據集上的表現。
correct = 0 total = 0 with torch.no_grad(): for data in testloader: images, labels = data outputs = net(images) _, predicted = torch.max(outputs.data, 1) total += labels.size(0) correct += (predicted == labels).sum().item() print('Accuracy of the network on the 10000 test images: %d %%' % ( 100 * correct / total)) # Accuracy of the network on the 10000 test images: 54 %
正確率有54%,看來網路學到了東西。隨機預測出為10類中的哪一類:
class_correct = list(0. for i in range(10)) class_total = list(0. for i in range(10)) with torch.no_grad(): for data in testloader: images, labels = data outputs = net(images) _, predicted = torch.max(outputs, 1) c = (predicted == labels).squeeze() for i in range(4): label = labels[i] class_correct[label] += c[i].item() class_total[label] += 1 for i in range(10): print('Accuracy of %5s : %2d %%' % ( classes[i], 100 * class_correct[i] / class_total[i])) # Accuracy of plane : 57 % # Accuracy of car : 73 % # Accuracy of bird : 49 % # Accuracy of cat : 54 % # Accuracy of deer : 18 % # Accuracy of dog : 20 % # Accuracy of frog : 58 % # Accuracy of horse : 74 % # Accuracy of ship : 70 % # Accuracy of truck : 66 %
在GPU上跑這些神經網路?
在GPU上訓練,我么要將神經網路轉到GPU上。前提條件是CUDA可以用,讓我們首先定義下我們的設備為第一個可見的cuda設備。
device = torch.device("cuda:0" if torch.cuda.is_available() else "cpu") # Assume that we are on a CUDA machine, then this should print a CUDA device: print(device) # cuda:0
接著這些方法會遞歸地遍歷所有模組,並將它們的參數和緩衝器轉換為CUDA張量。
net.to(device)
記住你也必須在每一個步驟向GPU發送輸入和目標:
inputs, labels = inputs.to(device), labels.to(device)
CUDA張量
使用該.to方法可以將張量移動到任何設備上。只有在有CUDA的情況下我們才能運行這個函數
# 我們將使用“torch.device”對象來移動GPU中的張量 if torch.cuda.is_available(): device = torch.device("cuda") # CUDA設備對象 y = torch.ones_like(x, device=device) # 直接在GPU上創建張量 x = x.to(device) # 或者只使用 ``.to("cuda") z = x + y print(z) print(z.to("cpu", torch.double)) # " ".to()還可以更改數據類型 # tensor([0.7032], device='cuda:0') # tensor([0.7032], dtype=torch.float64)
數據並行處理
本章節教大家如何使用DataParallel來使用多GPU。
我們把模型放入GPU中
device = torch.device("cuda:0") model.to(device)
將所有張量複製到GPU
mytensor = my_tensor.to(device)
在多 GPU 中執行前向、方向操作是非常自然的。儘管如此,PyTorch 默認只會使用一個 GPU。因此我們要使用DataParallel讓模型在多個GPU上並行運行。
輸入和參數
import torch import torch.nn as nn from torch.utils.data import Dataset, DataLoader input_size = 5 output_size = 2 batch_size = 30 data_size = 100 # 設備 device = torch.device("cuda:0" if torch.cuda.is_available() else "cpu")
製造一個隨機的數據集
class RandomDataset(Dataset): def __init__(self, size, length): self.len = length self.data = torch.randn(length, size) def __getitem__(self, index): return self.data[index] def __len__(self): return self.len rand_loader = DataLoader(dataset=RandomDataset(input_size, data_size), batch_size=batch_size, shuffle=True)
搭建一個簡單的模型,我們的模型僅獲取輸入,執行線性運算並給出輸出,
class Model(nn.Module): def __init__(self, input_size, output_size): super(Model, self).__init__() self.fc = nn.Linear(input_size, output_size) def forward(self, input): output = self.fc(input) print("tIn Model: input size", input.size(), "output size", output.size()) return output
創建模型和數據並行
我們先要檢查模型是否有多個GPU,如果有我們再使用nn.DataParallel,然後我們可以把模型放在GPU上model.to(device)
model = Model(input_size, output_size) if torch.cuda.device_count() > 1: print("我們有", torch.cuda.device_count(), "個GPUs!") # dim = 0 [30, xxx] -> [10, ...], [10, ...], [10, ...] on 3 GPUs model = nn.DataParallel(model) model.to(device) # 我們有2個GPU
運行模型,現在我們可以看到輸入和輸出張量的大小了
for data in rand_loader: input = data.to(device) output = model(input) print("Outside: input size", input.size(), "output_size", output.size())
輸出
In Model: input size torch.Size([15, 5]) output size torch.Size([15, 2]) In Model: input size torch.Size([15, 5]) output size torch.Size([15, 2]) Outside: input size torch.Size([30, 5]) output_size torch.Size([30, 2]) In Model: input size torch.Size([15, 5]) output size torch.Size([15, 2]) In Model: input size torch.Size([15, 5]) output size torch.Size([15, 2]) Outside: input size torch.Size([30, 5]) output_size torch.Size([30, 2]) In Model: input size torch.Size([15, 5]) output size torch.Size([15, 2]) In Model: input size torch.Size([15, 5]) output size torch.Size([15, 2]) Outside: input size torch.Size([30, 5]) output_size torch.Size([30, 2]) In Model: input size torch.Size([5, 5]) output size torch.Size([5, 2]) In Model: input size torch.Size([5, 5]) output size torch.Size([5, 2]) Outside: input size torch.Size([10, 5]) output_size torch.Size([10, 2])
如果我們有2個GPU我們可以看到以下結果
# on 2 GPUs Let's use 2 GPUs! In Model: input size torch.Size([15, 5]) output size torch.Size([15, 2]) In Model: input size torch.Size([15, 5]) output size torch.Size([15, 2]) Outside: input size torch.Size([30, 5]) output_size torch.Size([30, 2]) In Model: input size torch.Size([15, 5]) output size torch.Size([15, 2]) In Model: input size torch.Size([15, 5]) output size torch.Size([15, 2]) Outside: input size torch.Size([30, 5]) output_size torch.Size([30, 2]) In Model: input size torch.Size([15, 5]) output size torch.Size([15, 2]) In Model: input size torch.Size([15, 5]) output size torch.Size([15, 2]) Outside: input size torch.Size([30, 5]) output_size torch.Size([30, 2]) In Model: input size torch.Size([5, 5]) output size torch.Size([5, 2]) In Model: input size torch.Size([5, 5]) output size torch.Size([5, 2]) Outside: input size torch.Size([10, 5]) output_size torch.Size([10, 2])
數據並行自動拆分了你的數據並且將任務單發送到多個 GPU 上。當每一個模型都完成自己的任務之後,DataParallel 收集並且合併這些結果,然後再返回給你。
PyTroc官方文檔:https://pytorch.org/
PyTroch中文文檔:https://pytorch-cn.readthedocs.io/zh/latest/
簡單易上手的PyTorch中文文檔:https://github.com/fendouai/pytorch1.0-cn
