VueRouter小手冊
一. 了解router
VueRouter 是Vue的插件,它可以通過根據地址欄動態的變換進而實現對不同路由組件進行切換。
比如:http:localhost:8080/path/123?username=xxx&password=xxx#route
在上面的url中,#後面部分我們稱之為錨點,也稱為hash值,而vue-route就是根據這個錨點去動態的在不同的組件之間切換。
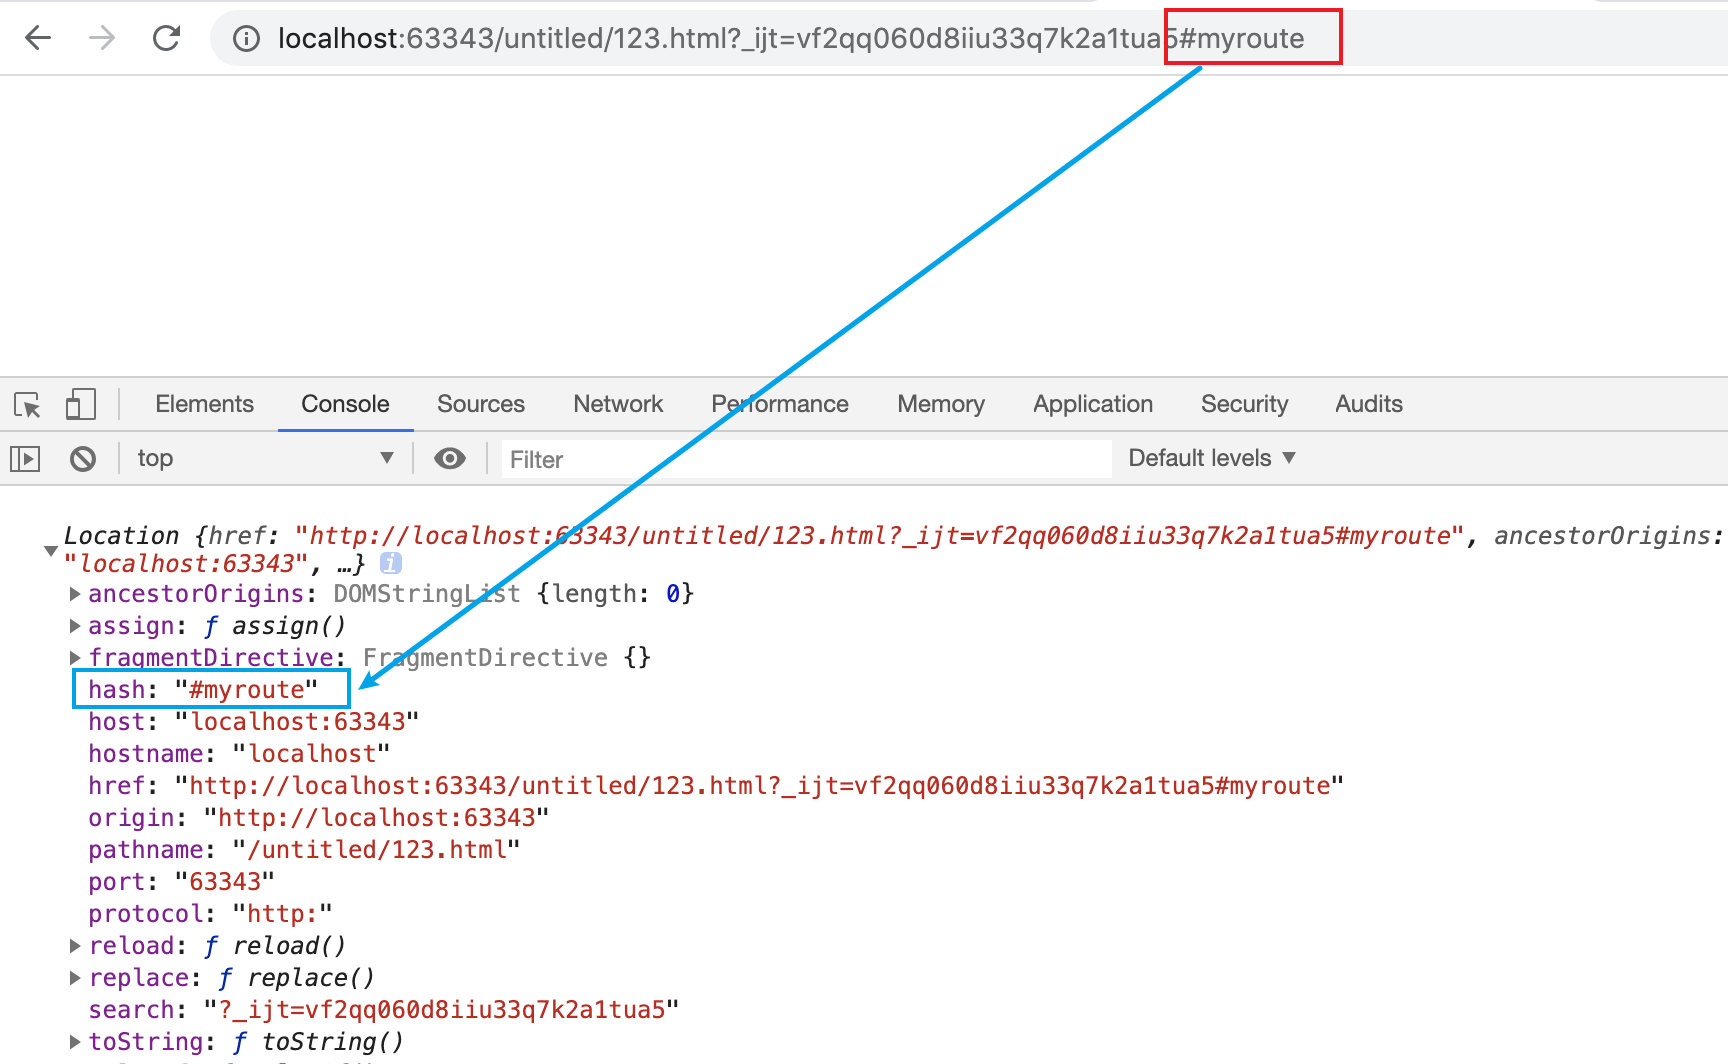
當然,url中的hash資訊我們是可以通過js獲取出來的,如下:
console.log(window.location)
在控制台上的輸入如下:
我們在日常的開發中大多數情況下是在編寫 xxx.vue, 然後這個vue文件中會如下的三部分。這其實就是一個vue 的模版/組件, 每個組件是有name或者是path的,那VueRouter實際上要解決的問題就是根據不同的錨點找到不同的組件, 這也就是所謂的路由分發。
路由分發就面臨著幾個問題:
- 傳遞參數
- 進行事件的處理和調用
路由底層的實現依賴了window.history對象
<template>
	<div>
      ...
  </div>
</template>

<script>
	    ...
</script>

<style>
			...
</style>
二. 工作流程
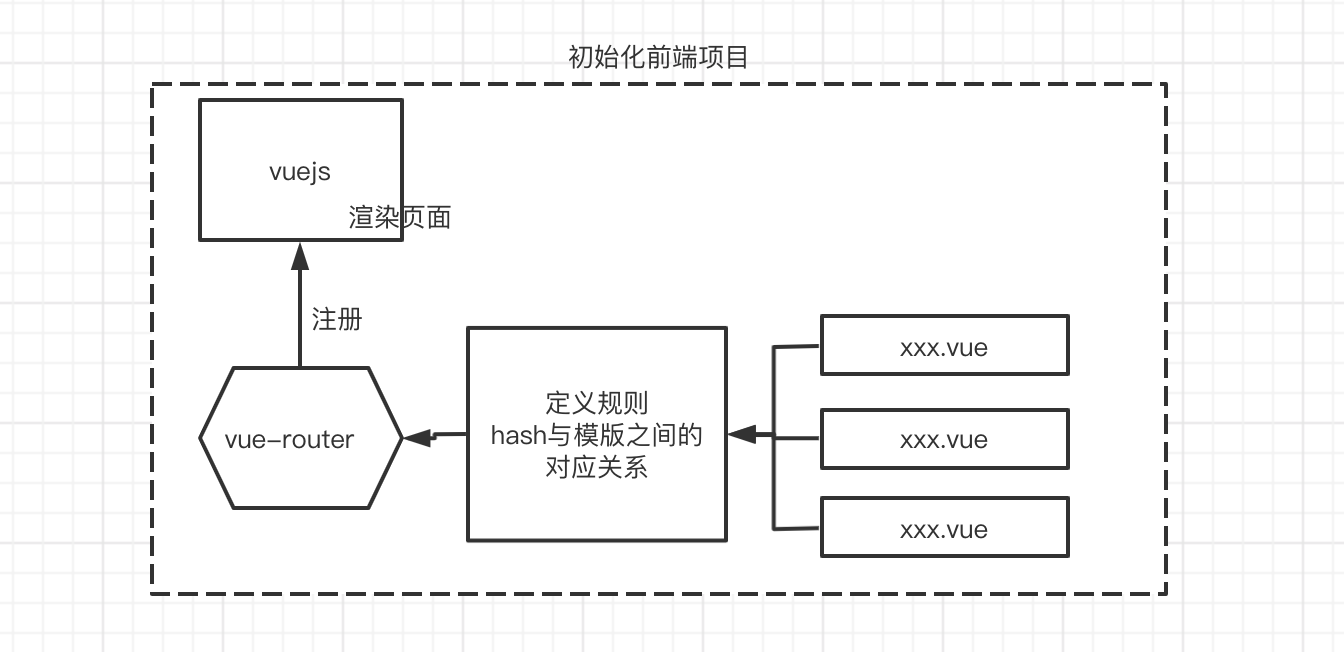
- 首先我們的初始化一個前端項目
- 下載vuejs,他是我們的核心
- 下載vue-router, router是vue的插件,因此我們要將下載好的vue-router註冊進vue
- vue-router中定義規則。根據這個規則可以實現根據頁面上的hash值找到對應的模版。
- 在頁面中可以通過a標籤定義轉發的路由
- 通過
<router-view>對路由對應模版的內容進行佔位
三. 簡單的Demo
<!DOCTYPE html>
<html lang="en">
<head>
    <meta charset="UTF-8">
    <title>Title</title>
    <script src="//unpkg.com/vue/dist/vue.js"></script>
    <script src="//unpkg.com/vue-router/dist/vue-router.js"></script>
    <style>
        body {
            background-color: #eee;
        }

        li {
            list-style: none;
            display: inline-block;
        }

        nav {
            text-align: center;
        }

        a {
            color: #333333;
            text-decoration: none;
            display: inline-block;
            padding-left: 5px;
            text-align: center;
        }

        .content {
            text-align: center;
        }
    </style>
</head>
<body>
<div id="app">
    <nav>
        <!--四種定義請求地址-->
        <ul>
            <li><a href="#/bar"> Bar </a></li>
            <li><a href="#/about"> About </a></li>
            <li><a href="#/">Home</a></li>
            <li>
                <router-link to="/notfound">Not Found</router-link>
            </li>
            <li>
                <router-link to="/foo">Foo</router-link>
            </li>
        </ul>
    </nav>
    <hr>
    <div class="content">
        <!--通過路由,組件最終被渲染的位置-->
        <router-view></router-view>
    </div>
</div>
</body>
<script>
    // 創建模版
    const NotFound = {template: `<p>Page not found</p>`}
    const Home = {template: '<p>Home page</p>'}
    const About = {template: '<p>About page</p>'}
    const Foo = {template: '<div>foo</div>'}
    const Bar = {template: '<div>bar</div>'}


    // 將我們的模版和hash值進程綁定,封裝成對象數組
    const routes = [
        {path: '/', component: Home},
        {path: "/about", component: About},
        {path: "/notfound", component: NotFound},
        {path: "/foo", component: Foo},
        {path: "/bar", component: Bar}
    ]

    // new路由對象
    const router = new VueRouter({
        // 將存貯有 hash和組件的數組註冊進路由器
        routes
    })


    var app = new Vue({
        el: "#app",
        router, // ES6語法糖,相當於 router:router
        data: {
            title: "this is title"
        }
    })

</script>
</html>
實現的效果:點擊nav中的標籤,下面的內容會隨著變化

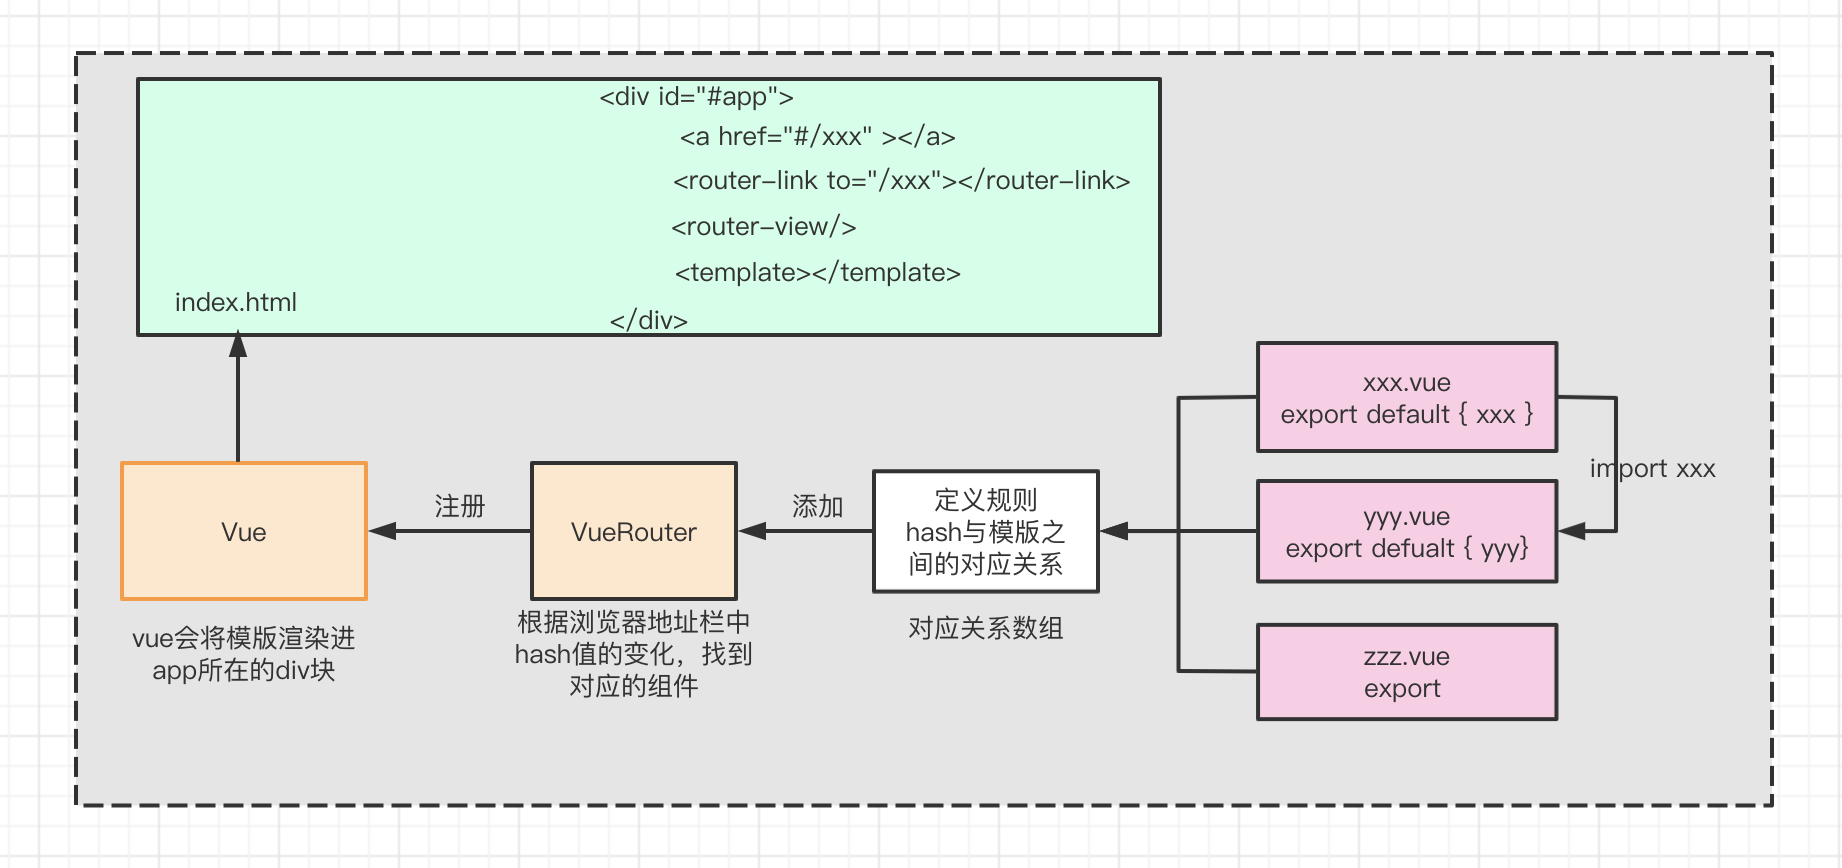
上面的例子是必須要理解的,不然真的就是僅僅知道有這麼個效果,但是前因後果,以及對我們在做什麼是不清楚的。大概的思路就是,我們首先創建組件,然後為每一個組件找一個唯一的hash值組成一個對象,多個組件+路由就可以形成一個數組,我們將這個數組註冊進VueRouter對象,再把VueRouter對象以插件的形式註冊進Vue對象。 此時環境就搭建好了。
我們再去點擊這種連接時,瀏覽器的地址欄中就會出現#xxx 的錨點
<a href="#/">Home</a>
<router-link to="/notfound">Not Found</router-link>
流程如下:

四. 理解template和route的組合
通過如下的例子理解template和route是如何配合使用的, 我把理解寫在程式碼中的注釋上
<!DOCTYPE html>
<html lang="en">
<head>
<meta charset="UTF-8">
<title>Title</title>
<script src="//unpkg.com/vue/dist/vue.js"></script>
<script src="//unpkg.com/vue-router/dist/vue-router.js"></script>
<style>
body {
background-color: #eee;
}
li {
list-style: none;
display: inline-block;
}
nav {
text-align: center;
}
a {
color: #333333;
text-decoration: none;
display: inline-block;
padding-left: 5px;
text-align: center;
}
.content {
text-align: center;
}
</style>
</head>
<body>
<div id="app">
<nav>
<!--四種定義請求地址-->
<ul>
<li><a href="#/bar"> 靜態模版 </a></li>
<li><a href="#/dynamic"> 動態模版 </a></li>
</ul>
</nav>
<hr>
<div class="content">
<!--通過路由,組件最終被渲染的位置-->
<router-view></router-view>
</div>
</div>
</body>
<script>
// 靜態模版,之所以叫他靜態模版是因為我們可以直接看到它裡面的數據全部是寫死的,換句話說,這中靜態模版除非我們真的僅僅是做一個展示頁面,不需要和後端互動數據。除此之外,再無他用
const Bar = {template: '<div>bar</div>'}
// 動態模版
// 可以看到,這種模版其實就是我們在開發中大量自己編寫的模版,一般他們都會被抽出去單獨稱為一個 xxx.vue的文件。在這裡我們可以得心應手的編寫和後端交互的邏輯,作為一個完整vue組件的它擁有包括vue組件生命周期在內的所有函數
// 第一個問題:這個動態組件是如何註冊進Vue中的呢?
// 回答: 往下看看下面new Vue()部分的程式碼。將當前的動態組件註冊在Vue的components部分即可。
// 第二個問題:如何找到這個動態組件並將其渲染在頁面上的呢?
// 回答:首先來說,路由的跳轉肯定是依賴於瀏覽器地址蘭中 hash值的變化,所以我們得先通過a標籤,或者router-link標籤發送請求,讓瀏覽器的地址欄hash值發生變化,具體的編碼往上看。當地址欄中hash值發生變化後vue-router拿著變化的hash值去找對應的組件,找不到就報錯,找到了就渲染
// 第三個問題:vue-router獲取到hash值後,是和Vue對象的components中的註冊資訊的name比對,還是去跟vue-router中的path資訊去比對? 還是去跟vue-router中的定義的name去比對呢?
// 回答:和vue-router中的path比對,命中後才算數
// 第四個問題:vue對象的components部分的name有什麼用呢?
// 回答:能問這個問題,恐怕你是忘記了,組件需要映射成標籤才能用,而這個name就是標籤名,是可以自定義的
// 第五個問題:VueRouter中的路由對象中的name叫啥呢?
// 回答:首先這個router並不是必填項,如果有了那麼,我們稱其為具名路由
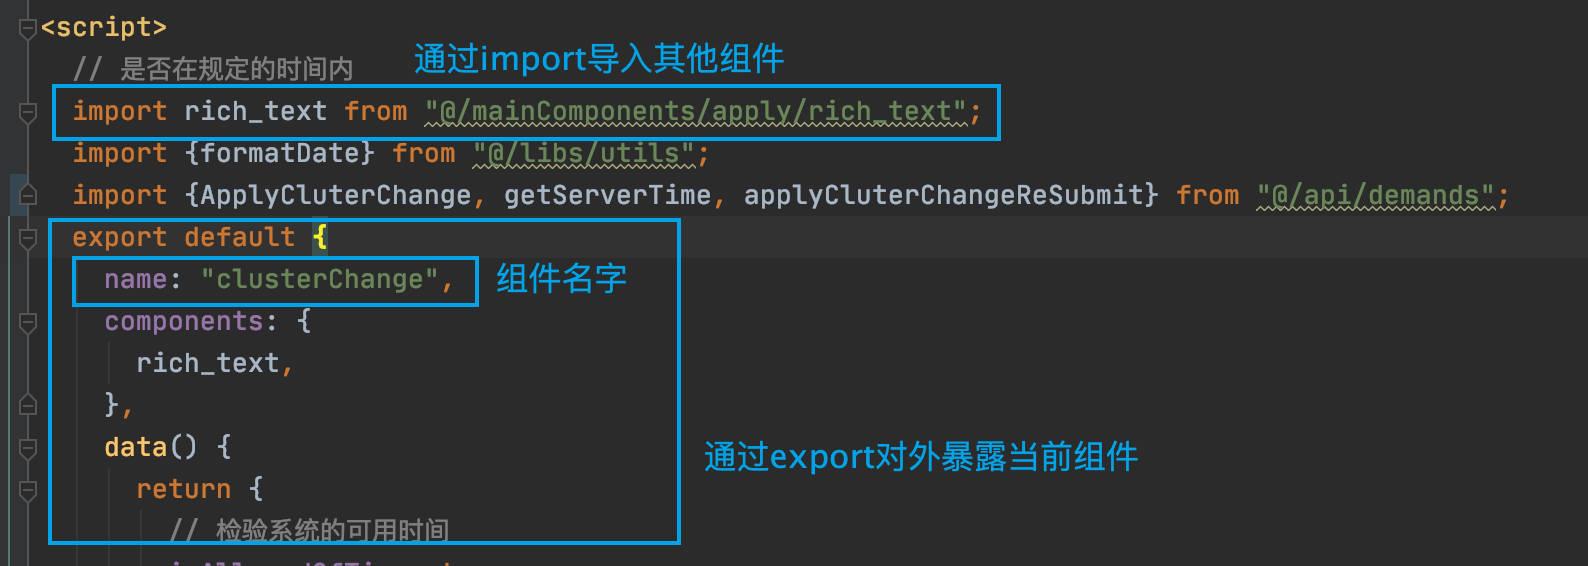
// 第六個問題:當我們把如下的部分單獨抽取成單獨的文件時,如果對外暴露這個組件呢?
// 回答:這個問題在下面通過一張圖片直觀的看出來。
const Home = {
template: '<div>{{title}}</div>',
data: function () {
return {
title: "this is a title"
}
},
methods: xxx ,
computed: xxx ,
}
// 將我們的模版和hash值進程綁定,封裝成對象數組
const routes = [
{path: "/bar", component: Bar},
{path: "/dynamic", component: Home}
]
// new路由對象
const router = new VueRouter({
// 將存貯有 hash和組件的數組註冊進路由器
routes
})
var app = new Vue({
el: "#app",
components:{
"dynamic":Home
},
router, // ES6語法糖,相當於 router:router
})
</script>
</html>
實現的效果如圖:

如何將動態組件抽取出去?如何導入其他抽取出去的組件使用?
像上圖中我們導入其他的組件後,註冊進當前組件的 components部分,就是,通過這種方式vue可以將組件映射成標籤。
其實現在就能小結一下,畫一張不完整的圖,來理解這個過程
五. Vue-Router-GoBack記錄返回
Vue-Router-GoBack指的是路由的記錄返回。比如我們依此點擊路由: 從1 跳轉到 2 跳轉到 3 跳轉到 4 ,goback就可以實現路由分別從 4 3 2 1會退回來。
vue-router-goback底層依賴的就是瀏覽器的內置對象 window.history
問題1: window.history的作用。
可以很直觀的認為它裡面會存儲著瀏覽器地址欄中曾經訪問過的地址
常用的api如下:
window.history.forword() // 前進
window.history.back() // 回退
當然這兩個api能起作用的前提是,瀏覽器中確實存在歷史記錄才行。
問題2: vue-router-goback 如果實現回退呢?
如下:
// 一個{component + path}是一個路由對象
// 如下程式碼中的 this.$router即路由器對象,也就是多個路由對象的集合
window.history.length > 1 ? this.$router.go(-1) : this.$router.push("/")
六. Router-Link
不怕多嘴,因為必須得知道:路由的切換是根據瀏覽器地址欄url中的hash值而定的
在早期的vue中,通過設置a標籤中的href屬性以#/開頭,來實現瀏覽器地址欄的變化
vue2.x後,router-link標籤的誕生,就是為了替換掉a標籤
看下router-link的源碼如下:
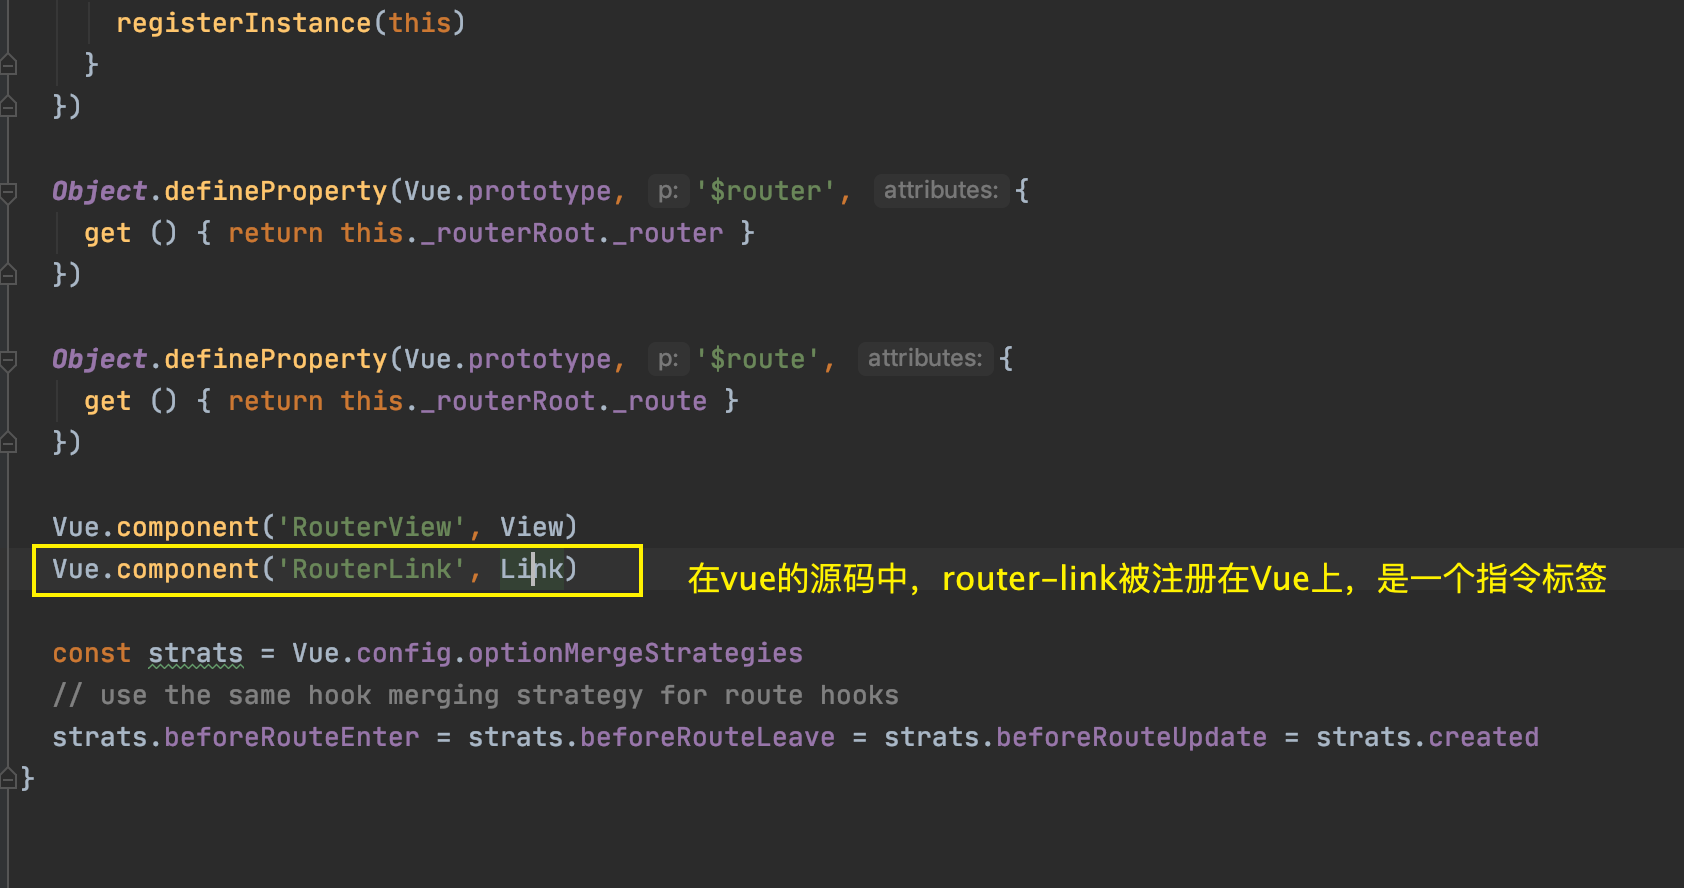
router-link以一個指令標籤的方式被註冊在vue上,name是RouterLink,實體是 Link
不知道大家有沒有多想一下,因為如果是一個自定義的組件的話,我們想將其映射成標籤,在html元素中使用,需要我們手動的將把它註冊在vue組件的 components部分。 上面標黃色的部分,就是為什麼我們可以直接使用類似下面的標籤
<router-view> </router-view>
<router-link to=「/xxx/」> </router-link>
看看Link的詳情
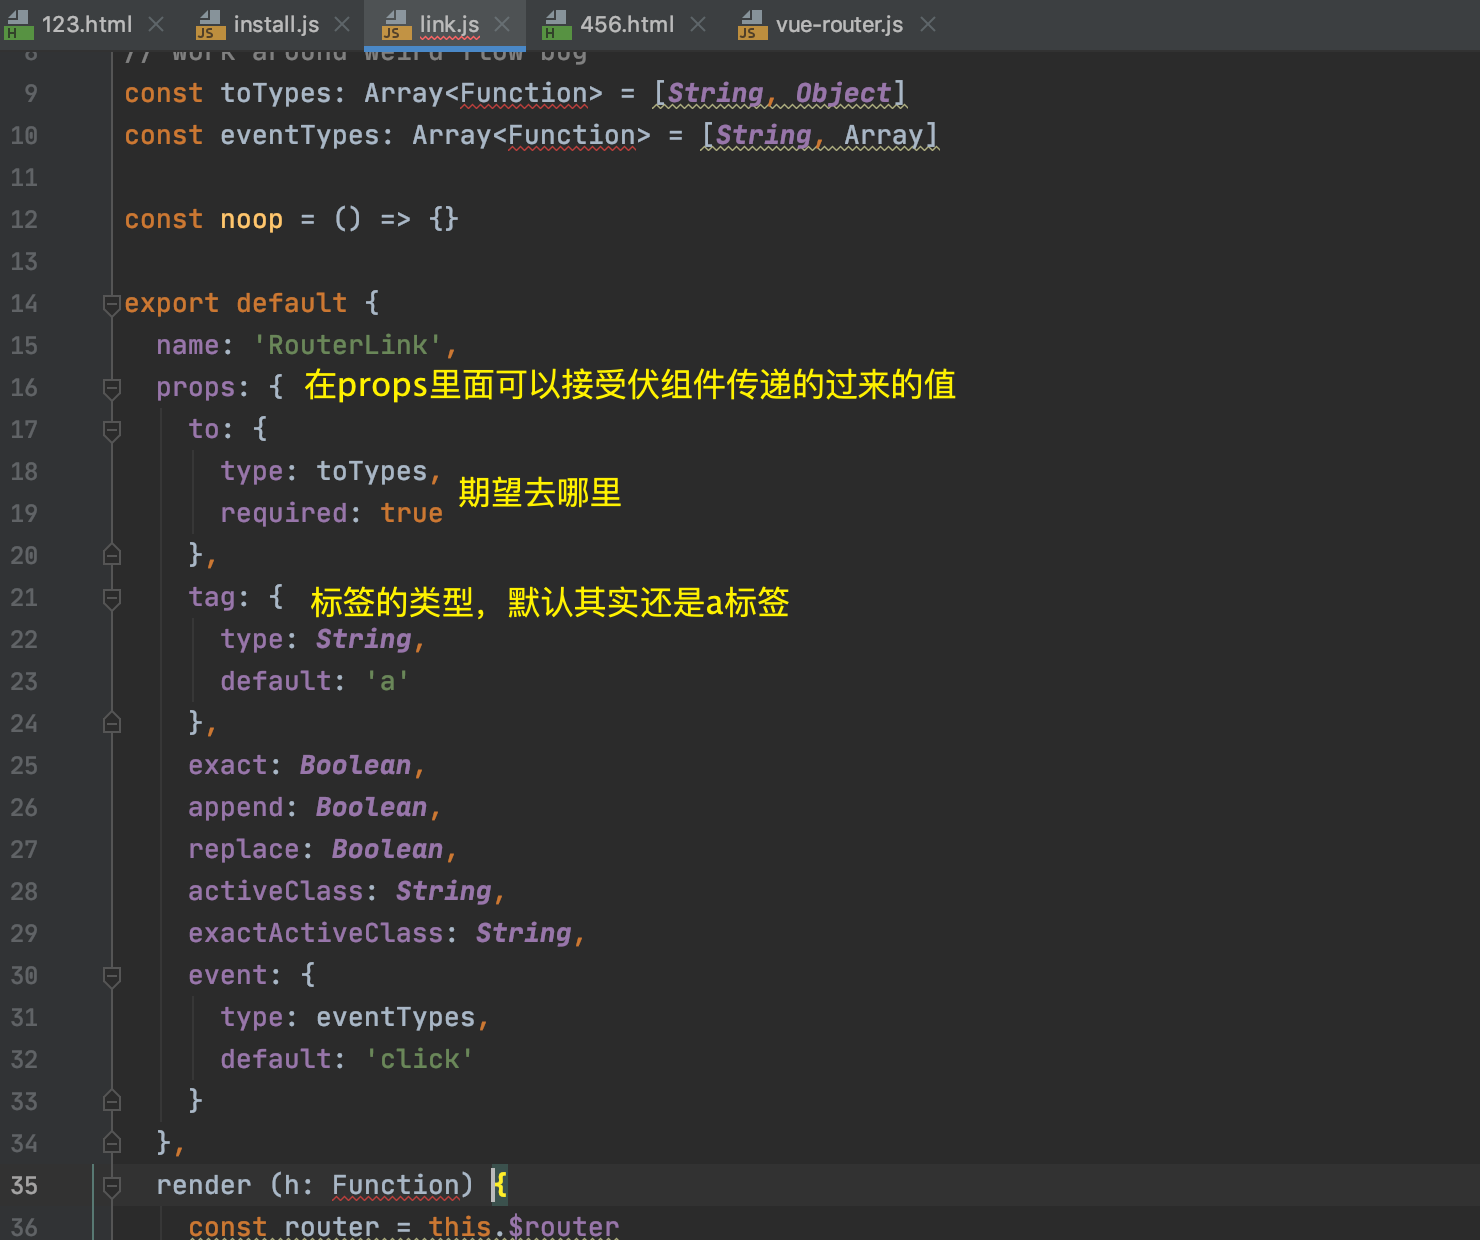
模擬實現router-link
   <div>
        <my-link to="/bar"> 自定義指令 </my-link>
    </div>

   <script>
	  // 自定義comonent
    const myLink = {
        props: [
            'to'
        ],
        template:"<a :href='\"#\"+to'><slot></slot></a>"
    }

    Vue.component("my-link", myLink)
    ...
	 </script>
七. 具名路由
還是這個例子:
<!DOCTYPE html>
<html lang="en">
<head>
    <meta charset="UTF-8">
    <title>Title</title>
    <!--    <script src="//unpkg.com/vue/dist/vue.js"></script>
        <script src="//unpkg.com/vue-router/dist/vue-router.js"></script>   -->
    <script src="./vue/dist/vue.js"></script>
    <script src="./vue-router/dist/vue-router.js"></script>
    <style>
        body {
            background-color: #eee;
        }

        li {
            list-style: none;
            display: inline-block;
        }

        nav {
            text-align: center;
        }

        a {
            color: #333333;
            text-decoration: none;
            display: inline-block;
            padding-left: 5px;
            text-align: center;
        }

        .content {
            text-align: center;
        }
    </style>
</head>
<body>
<div id="app">
    <nav>
        <!--四種定義請求地址-->
        <ul>
            <li><a href="#/bar"> 靜態模版 </a></li>
            <li>
            <router-link :to={name:'Dynamic'}> 動態模版</router-link>
            </li>
            <li>
                <router-link v-bind:to={name:'Dynamic'}> 動態模版</router-link>
            </li>
        </ul>
    </nav>
    <hr>
    <div class="content">
        <!--通過路由,組件最終被渲染的位置-->
        <router-view></router-view>
    </div>
</div>
</body>
<script>

    // 靜態模版
    const Bar = {template: '<div>bar</div>'}

    // 動態模版
    const Home = {
        template: '<div>{{title}}</div>',
        data: function () {
            return {
                title: "this is a title"
            }
        }
    }

    // 將我們的模版和hash值進程綁定,封裝成對象數組
    const routes = [
        {path: "/bar", component: Bar},
        {path: "/dynamic",name: "Dynamic", component: Home}
    ]

    // new路由對象
    const router = new VueRouter({
        // 將存貯有 hash和組件的數組註冊進路由器
        routes
    })

    var app = new Vue({
        el: "#app",
        components: {
            "com-dynamic": Home
        },
        router, // ES6語法糖,相當於 router:router
    })

</script>
</html>
具名路由就是說我們在創建一個route時,給他添加上name屬性。
const routes = [
	{
		path: '/xxx',
		component: xxx,
		name: 'yyy'
	},
]
然後我們在頁面上使用這個路由時,可以route-link的to的動態數據綁定,將name傳遞給他。
// 這時一定要使用動態數據綁定
<router-link v-bind:to={name:'Dynamic'}> 動態模版</router-link>
// v-bind可以簡寫省略
<router-link :to={name:'Dynamic'}> 動態模版</router-link>
其實到這裡具名路由到底是怎麼回事就已經說完了,然後下面引出一個問題?
問:為什麼一定得v-bind或者 :to這種動態數據類型綁定呢?
回答:
首先說,這個v-bind,它肯定是vue能識別的屬性,它的作用就是:實現將model中的data單向的綁在在view上,當vue解析到這個v-bind屬性時,知道這是個單向動態綁定,就不會使用後面的整體作為一個字元串去使用,而是去解析他,使用屬性中的value作為路由值
其實你可以試一下,如果我們不使用動態數據綁定,vue肯定是不會解析{name:"xxx"} , 於是我們發出的請求就成了下面的樣子。

八. 路由激活狀態 ActiveClass
參照下圖:
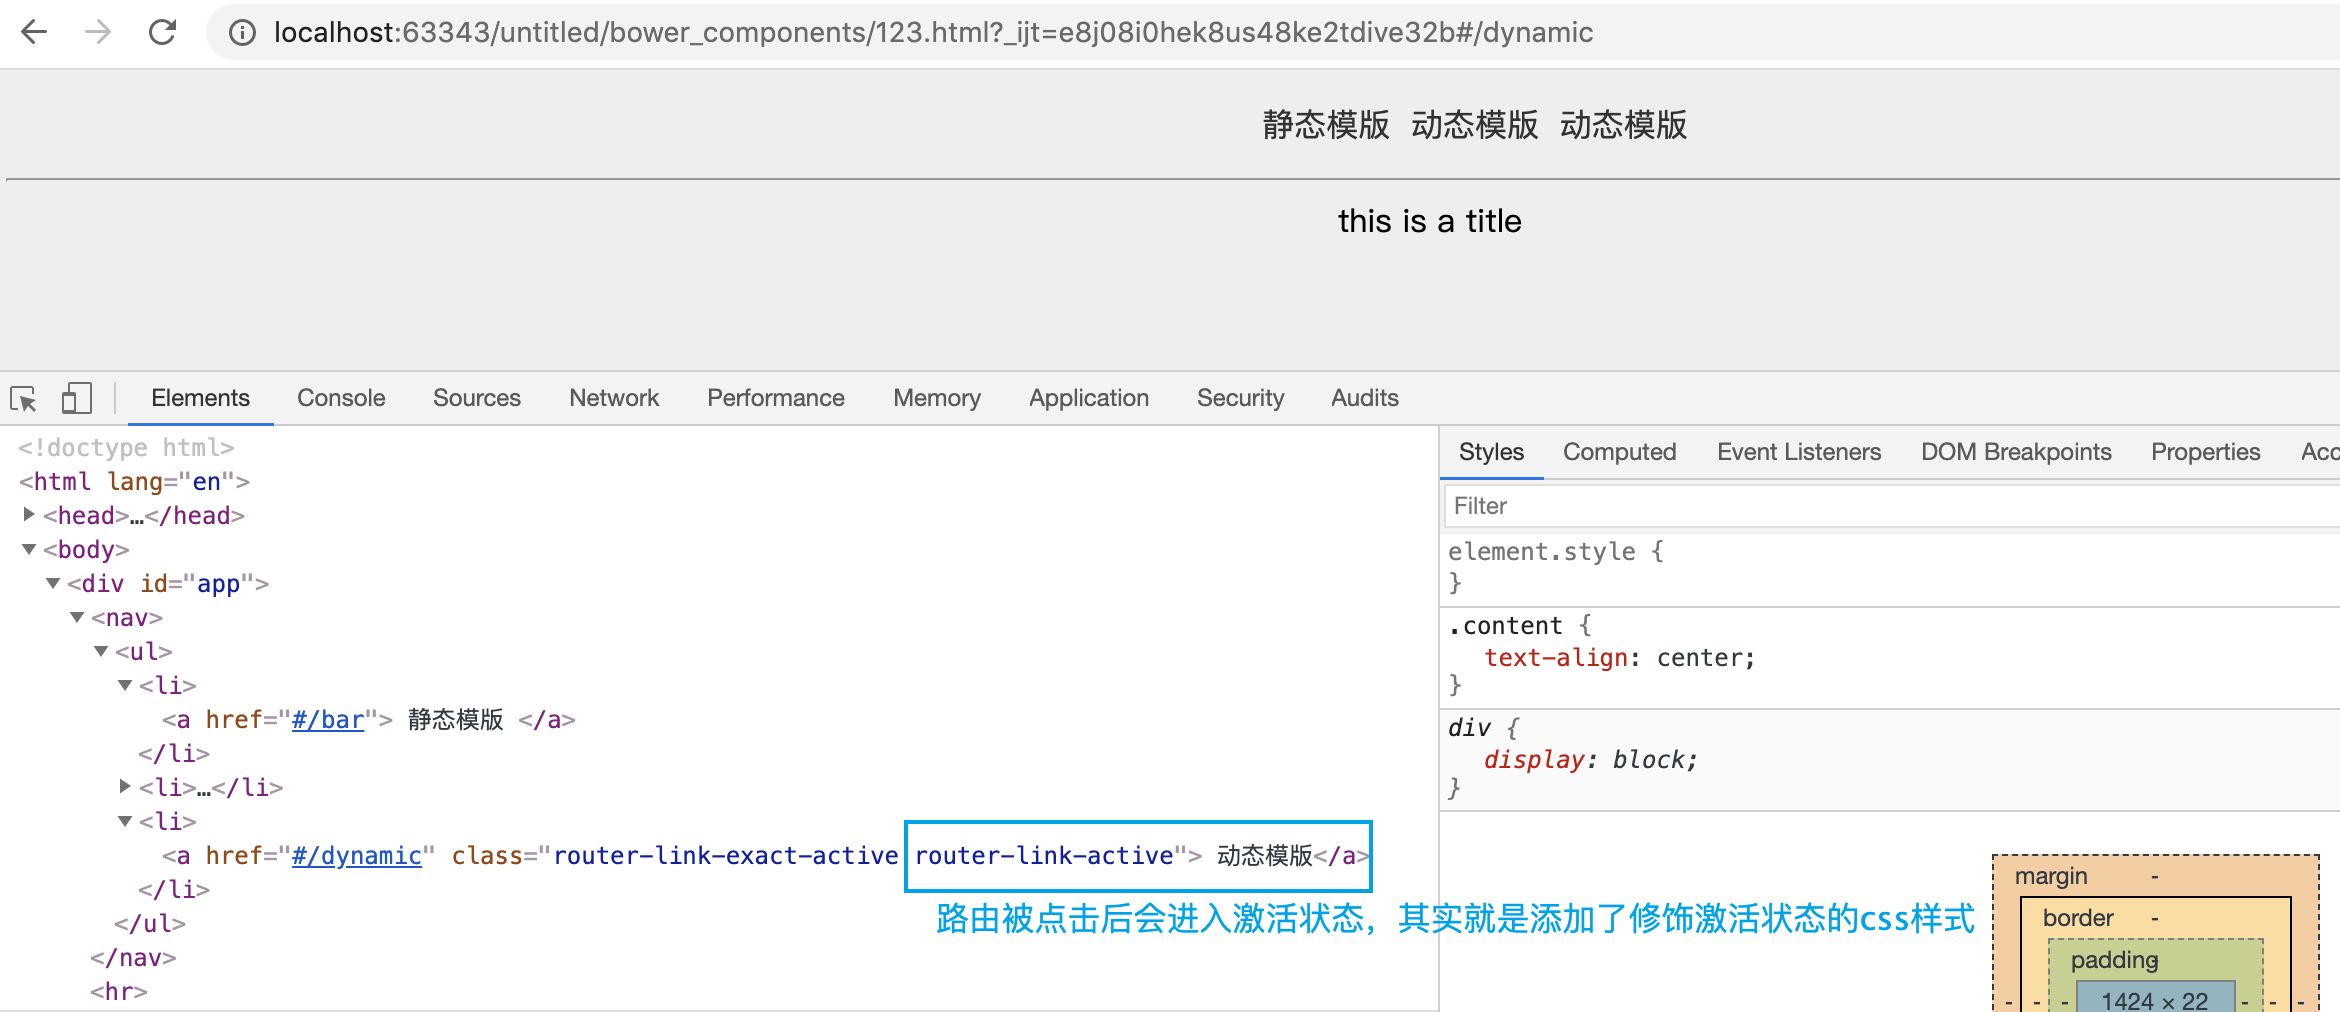
知道了這個屬性叫啥,我們就可以進一步對齊進行覆蓋,修飾。
比如:將激活狀態的文字顏色改成紅色
        .router-link-active {
            color: #E95659;
        }
更進一步:可以進入到<router-link><router-link>標籤的源碼中。
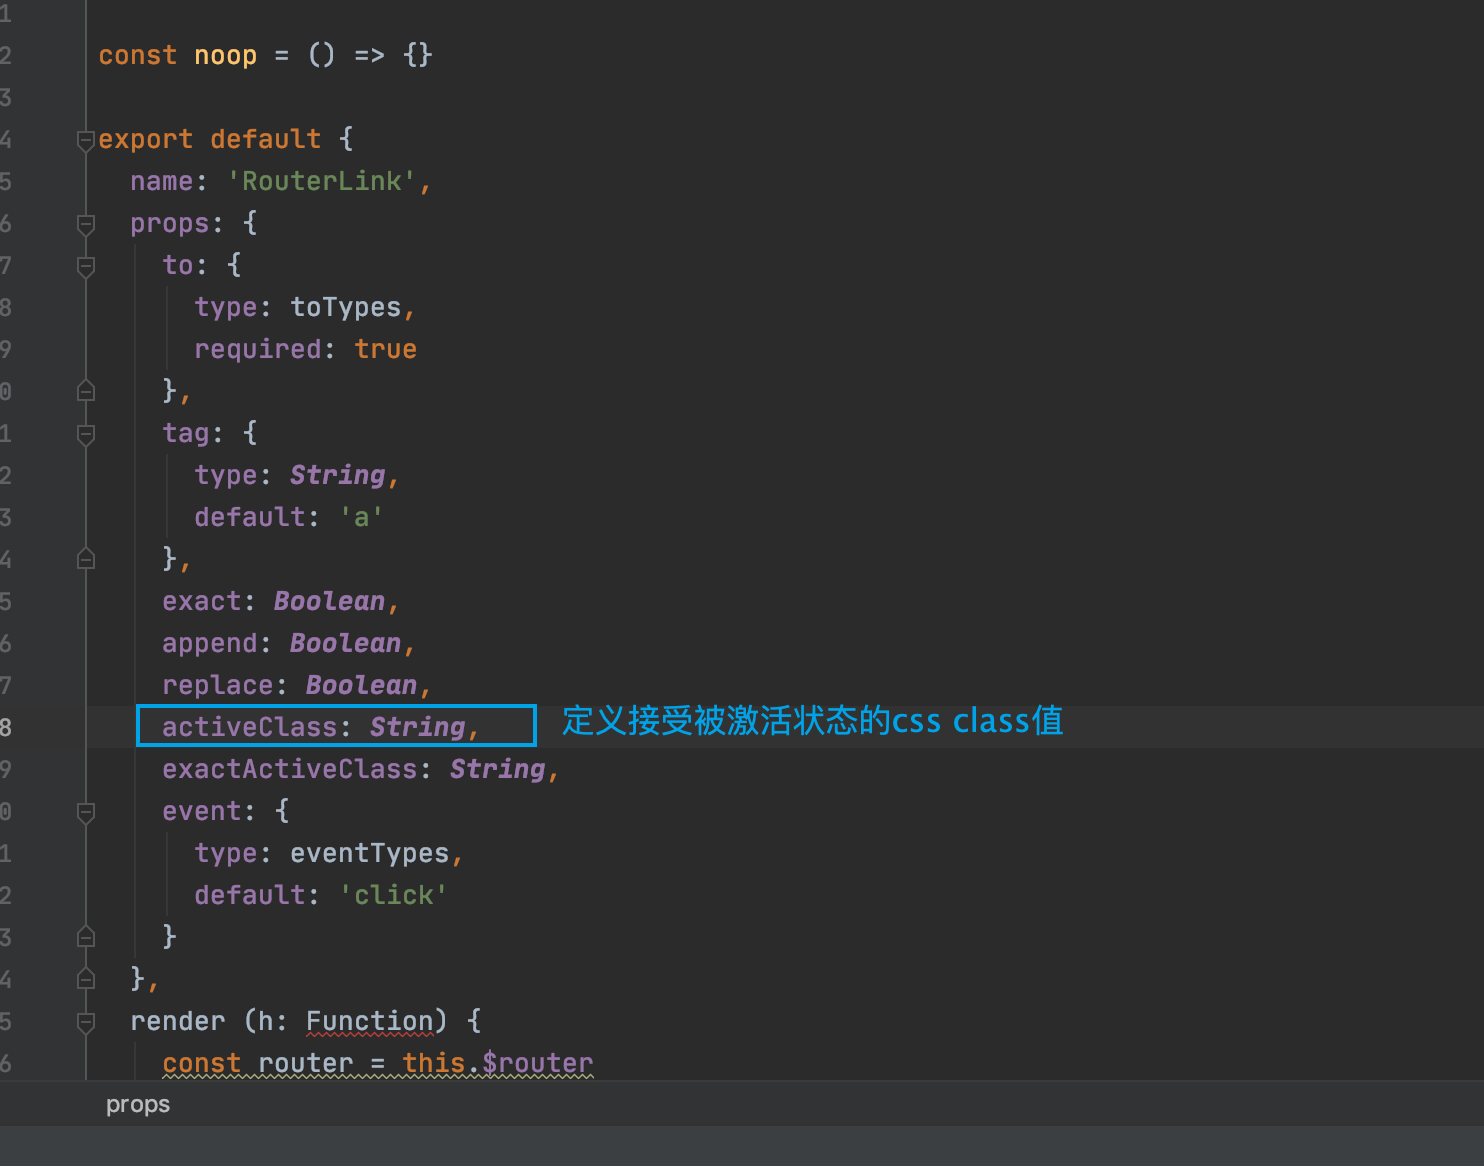
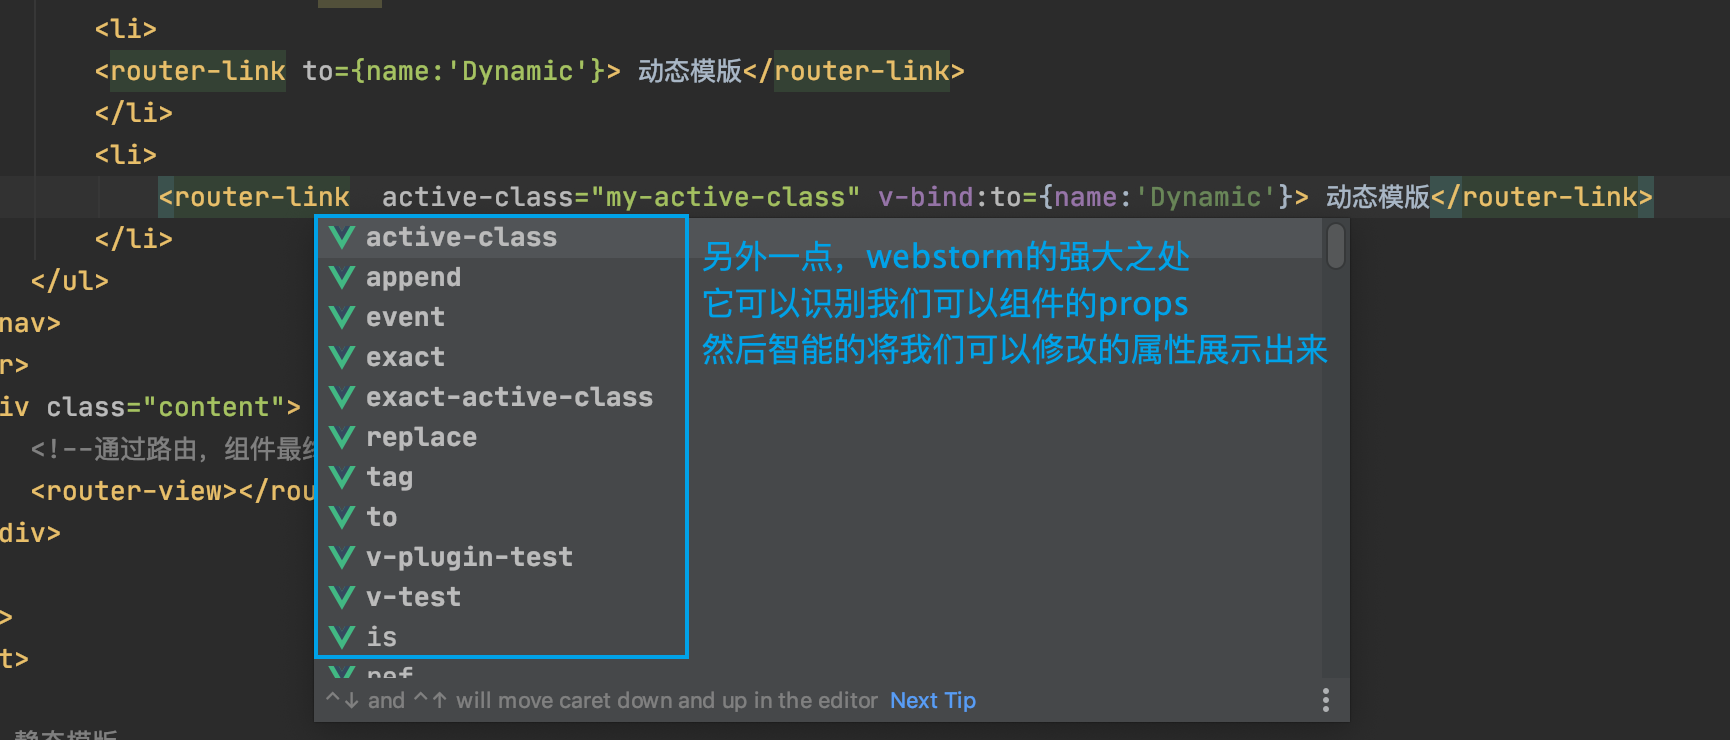
在props塊中定義了上面藍線圈出來的屬性,既然在props裡面說明它可以接受父組件(通過數據綁定,或者是路由傳參)傳遞過來的值,誰是父組件呢? 這個問題和沒問一樣,在哪個vue標籤中使用route-link標籤,誰就是它的父組件唄
我們主要是看下這個叫activeClass的屬性,然後它可以接受一個String類型的值。
多想一步,知道這個可以做什麼呢? 其實就是意味著我們可以自定義 activeClass的name,換句話說,就是用我們自己定義的名字,替換掉它默認的名字 router-link-active
如下:
  <router-link active-class="my-active-class" v-bind:to={name:'Dynamic'}>
    	動態模版
  </router-link>
再補充一點:
九. 路由的重定向問題
路由的重定向問題解決了一個什麼事呢?
假設,用戶在瀏覽器的地址欄中隨意輸入了一個地址
//localhost:63343/bower_components/123.html?#/dynamic123123
這時,我們沒有任何一個組件對應的hash值是dynamic123123
為了提高用戶的體驗,我們就可以這樣處理:當用戶輸入一個不存在的hash值時我們將其重定向到指定的組件。
做法如下:
    const routes = [
        {path: "/bar", component: Bar},
        {path: "/dynamic",name: "Dynamic", component: Home},
        {path: "*", component: XXX}
    ]
如果用戶輸入的hash值可以在VueRouter中匹配到了相關的組件,直接渲染那個組件就好了。
如果用戶輸入的hash值沒有匹配到任何hash,就會來到最後的*,這個*可以匹配任意hash,緊接著就可以將XXX組件呈現給用戶
十. 路由的參數和動態路由
實現下面的demo,完成對路由參數的傳遞,動態路由的學習。
示例程式碼:
<!DOCTYPE html>
<html lang="en">
<head>
<meta charset="UTF-8">
<title>Title</title>
<script src="./vue/dist/vue.js"></script>
<script src="./vue-router/dist/vue-router.js"></script>
<style>
body {
background-color: #eee;
}
li {
list-style: none;
/*display: inline-block;*/
}
nav {
text-align: center;
}
a {
color: #333333;
text-decoration: none;
/* display: inline-block;*/
padding-left: 5px;
text-align: center;
}
.content {
text-align: center;
}
.router-link-active {
color: #E95659;
}
</style>
</head>
<body>
<div id="app">
<nav>
<ul>
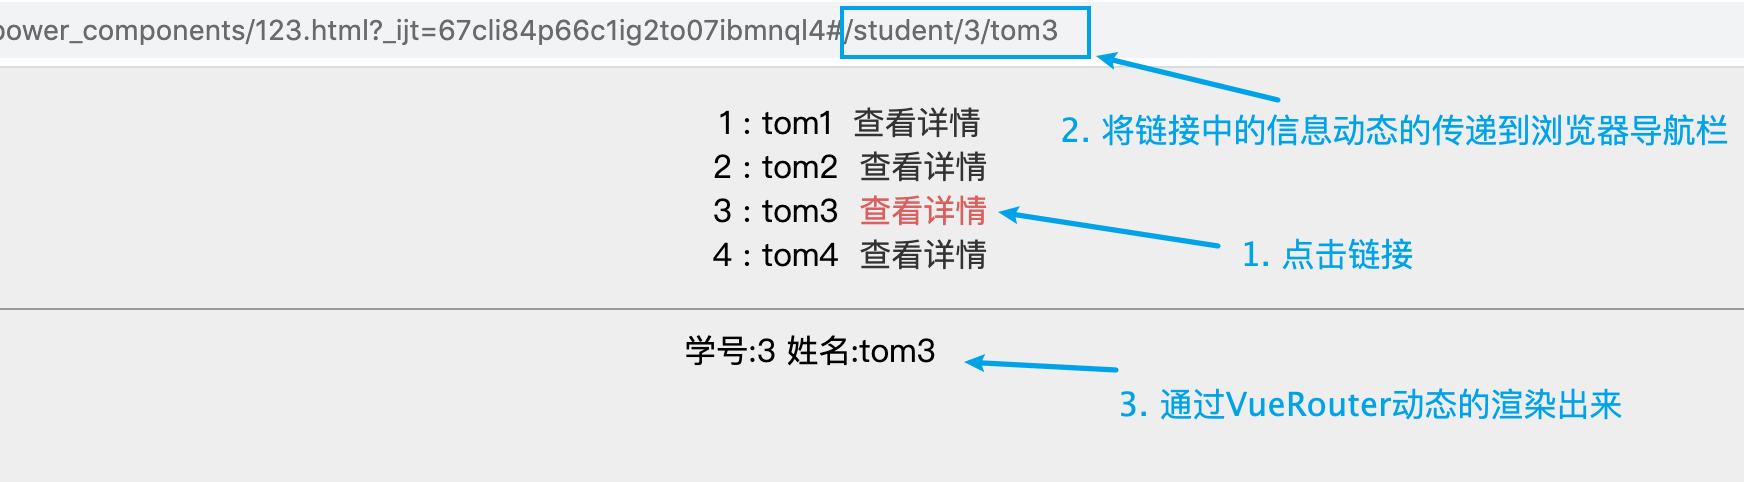
<li v-for="student in students">
<span>{{student.id}} : {{student.name}}</span>
<router-link
:to='{"name":"stu",params:{"id":student.id,"name":student.name}}'>
查看詳情
</router-link>
</li>
</ul>
</nav>
<hr>
<div class="content">
<router-view></router-view>
</div>
</div>
</body>
<script>
// 接受傳遞進來的參數
const Student = {
template: '<div><span>學號:{{student.id}}</span> <span>姓名:{{student.name}}</span> </div>',
computed: {
student: function f() {
var paramId = this.$route.params.id
var paramName = this.$route.params.name
return {
name: paramName,
id: paramId
}
}
},
// data 有如下兩種寫法
data: function () {
// data中要返回一個對象
return {
}
}
}
// 將我們的模版和hash值進程綁定,封裝成對象數組
const routes = [
{path: "/student/:id/:name",name:'stu', component: Student},
]
// new路由對象
// router註冊進VueRouter的過程中會產生一個 $router 對象,這個對象就是路由器對象, 通過this.$router可以獲取到它,
// 而這個$router對象就叫做路由器對象,他是所有的$route對象的全集,它裡面每一個單獨的個體都是一個$route對象
// 這個$route對象就是一個單獨的路由實例,包含path + component
// 同時我們可以在像路由傳遞參數, 傳遞的參數最終可以通過 this.$route.params.xxx 獲取到, 這個xxx,我們傳遞的什麼,這裡就能獲取到什麼
const router = new VueRouter({
// 將存貯有 hash和組件的數組註冊進路由器
routes
})
var app = new Vue({
router, // ES6語法糖,相當於 router:router
data: {
students: [
{id: 1, name: 'tom1'},
{id: 2, name: 'tom2'},
{id: 3, name: 'tom3'},
{id: 4, name: 'tom4'},
]
}
}).$mount("#app")
</script>
</html>
像這個需求肯定是很常見的需求,在業務方面的需求就是,前端通過ajax向後端發送請求,拉去學生的資訊,拉去到的數據肯定會被存放在Vue中的Data對象中。 也就是上面的 students中。
基於vue組件化的設計風格,我們將展示學生詳情的頁面抽取出去做成一個vue的動態組件。
    // 接受傳遞進來的參數
    const Student = {
        template: '<div><span>學號:{{student.id}}</span> <span>姓名:{{student.name}}</span> </div>',
        computed: {
            student: function f() {
                var paramId = this.$route.params.id
                var paramName = this.$route.params.name
                return {
                    name: paramName,
                    id: paramId
                }
            }
        },
        // data 有如下兩種寫法
        data: function () {
            return {}
        }
    }
我們需要關心的就是,如何向通過路由向其他組件傳遞參數
推薦的做法是: <router-link></router-link> + 具名路由(給 route添加一個name屬性)
 <li v-for="student in students">
                <span>{{student.id}} : {{student.name}}</span>
                <router-link
                  :to='{"name":"stu",params{"id":student.id,"name":student.name}}'>
                  查看詳情
   						  </router-link>
</li>
其實到這裡參數的傳遞就已經實現了,然後我們再捋一捋,參數的傳遞到底是怎麼回事???
首先說的就是路由器對象,也就是 $router 對象。當我們把VueRouter註冊進Vue時,就會產生一個 $router 對象。(其實就是上面程式碼中,我們new的VueRouter對象) 通過this.$router可以獲取到,這個對象是一個集合,它裡面有很多 $route 對象,$route對象就是 path+component對象的結合體。
其中每一個 $route 對象中都一個params屬性,通過this.$route.params可以獲取到,這個params屬性中就存儲著我們傳遞給他的所有的參數,也就是下圖中黃色線圈出來的參數
具體到那個參數我們通過this.$route.params.xxx 來獲取,這個xxx,在Router中的path部分使用 :xxx 定義。
通過路由傳遞參數可以通過 this.$route.params獲取出來,還可以通過像下面這樣,使用props進行映射。然後能直接使用通過路由傳遞過來的參數。
    // 接受傳遞進來的參數
    const Student = {
        template: '<div><span>學號:{{id}}</span> <span>姓名:{{name}}</span> </div>',
        // 通過將props,將路由中  {path: "/student/:id/:name",name:'stu', component: Student},
        // 將如上的id,name映射成下面的屬性
        props: [
         "id", "name",
        ],
        // data 有如下兩種寫法
        data: function () {
            // data中要返回一個對象
            return {

            }
        }
    }
props也會支援對象模式如下:
這種方式不會經常使用,因為它的props是我們硬編碼上去的一個對象。它的值不能動態的改變。
    const routes = [
        {   path: "/student",
            name:'stu',
            component: Student,
            props:{"id":"123","name":"tomcat"}
        },
    ]
props支援函數式
    // 將我們的模版和hash值進程綁定,封裝成對象數組
    const routes = [
        {   path: "/student/:id/:name",
            name:'stu',
            component: Student,
            props:function (router) {
                console.log(router)
                return router.params
            }
        },
    ]
其實你看這種函數的方式和方面直接寫一個對象的模式相仿,這個函數必須把這個對象的params返回出去。否則組件中的props快中的屬性是不能被附上值的。
通過函數的方式顯然要更靈活一些,畢竟可以在中間做一些其他的操作
此外:console.log(router)列印結果如下:

十一. 編程式路由導航
問:編程式路由導航說啥意思呢?
答:
就是用寫程式碼的方式控制路由的跳轉,前面的我們實現路由的跳轉不是使用a標籤就是使用 vue-link標籤實現。這種方式配合css樣式可以裝飾成按鈕,以用戶可見的狀態存在。
那麼編程式路由導航,其實說的是通過使用 諸如 this.$router.push(xxx)的方式去實現路由的跳轉,通常我們將其放置在事件的回調裡面,由我們程式碼中邏輯去控制該不該進行路由的跳轉。
本質上,聲明式路由導航和編程式路由導航是一樣的
再看一下這個router.push(location, onComplete?, onAbort?)方法。
這裡的router === this.$router
為什麼說他們相等呢? this就是vm對象,之所以他們相等,是因為我們在下面創建Vue時,使用router給Vue的router賦值了。
 const router = new VueRouter({
        // 將存貯有 hash和組件的數組註冊進路由器
        routes : [
            {path: "/student/:id/:name",name:'stu', component: Student},
        ]
    })

    var app = new Vue({
        router, // ES6語法糖,相當於 router:router
        data: {
            students: [
                {id: 1, name: 'tom1'},
            ]
        }
    }).$mount("#app")
使用 router.push 方法。這個方法會向 history 棧添加一個新的記錄,所以,當用戶點擊瀏覽器後退按鈕時,則回到之前的 URL。
push方法常見的使用方式有如下幾種:
// 字元串
// 下面兩種方式是等價的,都是根據path進行路由的切換
router.push('home')  ===  router.push({ path: 'home' })

// 根據路由名稱進行跳轉,如這個user,她是路由的名稱
// 注意這個name指的的在組件註冊進VueRouter中時給的那個名字
// {path:"xxx",name:"yyy",component:ZZZ}
// 		 -- name,而不是在組件中定義中export的name
//		 -- params 是將要傳遞給路由的參數對象集合
router.push({ name: 'user', params: { userId: '123' }})

// 帶查詢參數,變成 /register?plan=private
router.push({ path: 'register', query: { plan: 'private' }})

//也可以直接這樣
router.push("/register?plan=private")
問:向params傳參和向query傳參的區別是什麼???
-
比如我們這麼寫:
this.$router.push({name:'user',params:{userID:'123'}})最終的再url地址欄上的表現是:
xxx/user/123 -
如果我們這麼寫:
this.$router.push({pash:'register',query:{plan:'private'}})最終在地址欄上的表現上:
xxx/register?plan=private
但是無論我們選擇使用哪些方式,最終在我們都可以通過this.$router.params將其獲取出來。
最後補充和this.$router.push相似的還有replace,表示替換。
十二. 命名視圖
問:什麼是命名視圖?
具名路由指的是我們可以為<router-view>標籤指定具體的名字,梳理一下思路,前面我們通過a標籤或者是<router-link>標籤進行頁面路由的跳轉時,通常會留一個沒有名字的<router-view> 佔位,vue會自動根據當前瀏覽器地址欄上的hash值找到相對應的模版,然後渲染上去。
也就是說,<router-view> 本質上就是一個佔位符。也就是組件最終被渲染的位置。
那麼命名視圖其實就是為<router-view>標籤指定好具體的名字,讓他僅僅為hash的路由組件佔位。
問:這樣做有什麼好處呢?
好處肯定是有的,如果我們這樣做,那麼原生的html程式碼就讓我們抽取成vue的組件了。
問:命名視圖常用在什麼場景中?
顯然易見,如果我們將其用在布局和組件的拆分上,我們的程式碼將會很優雅。
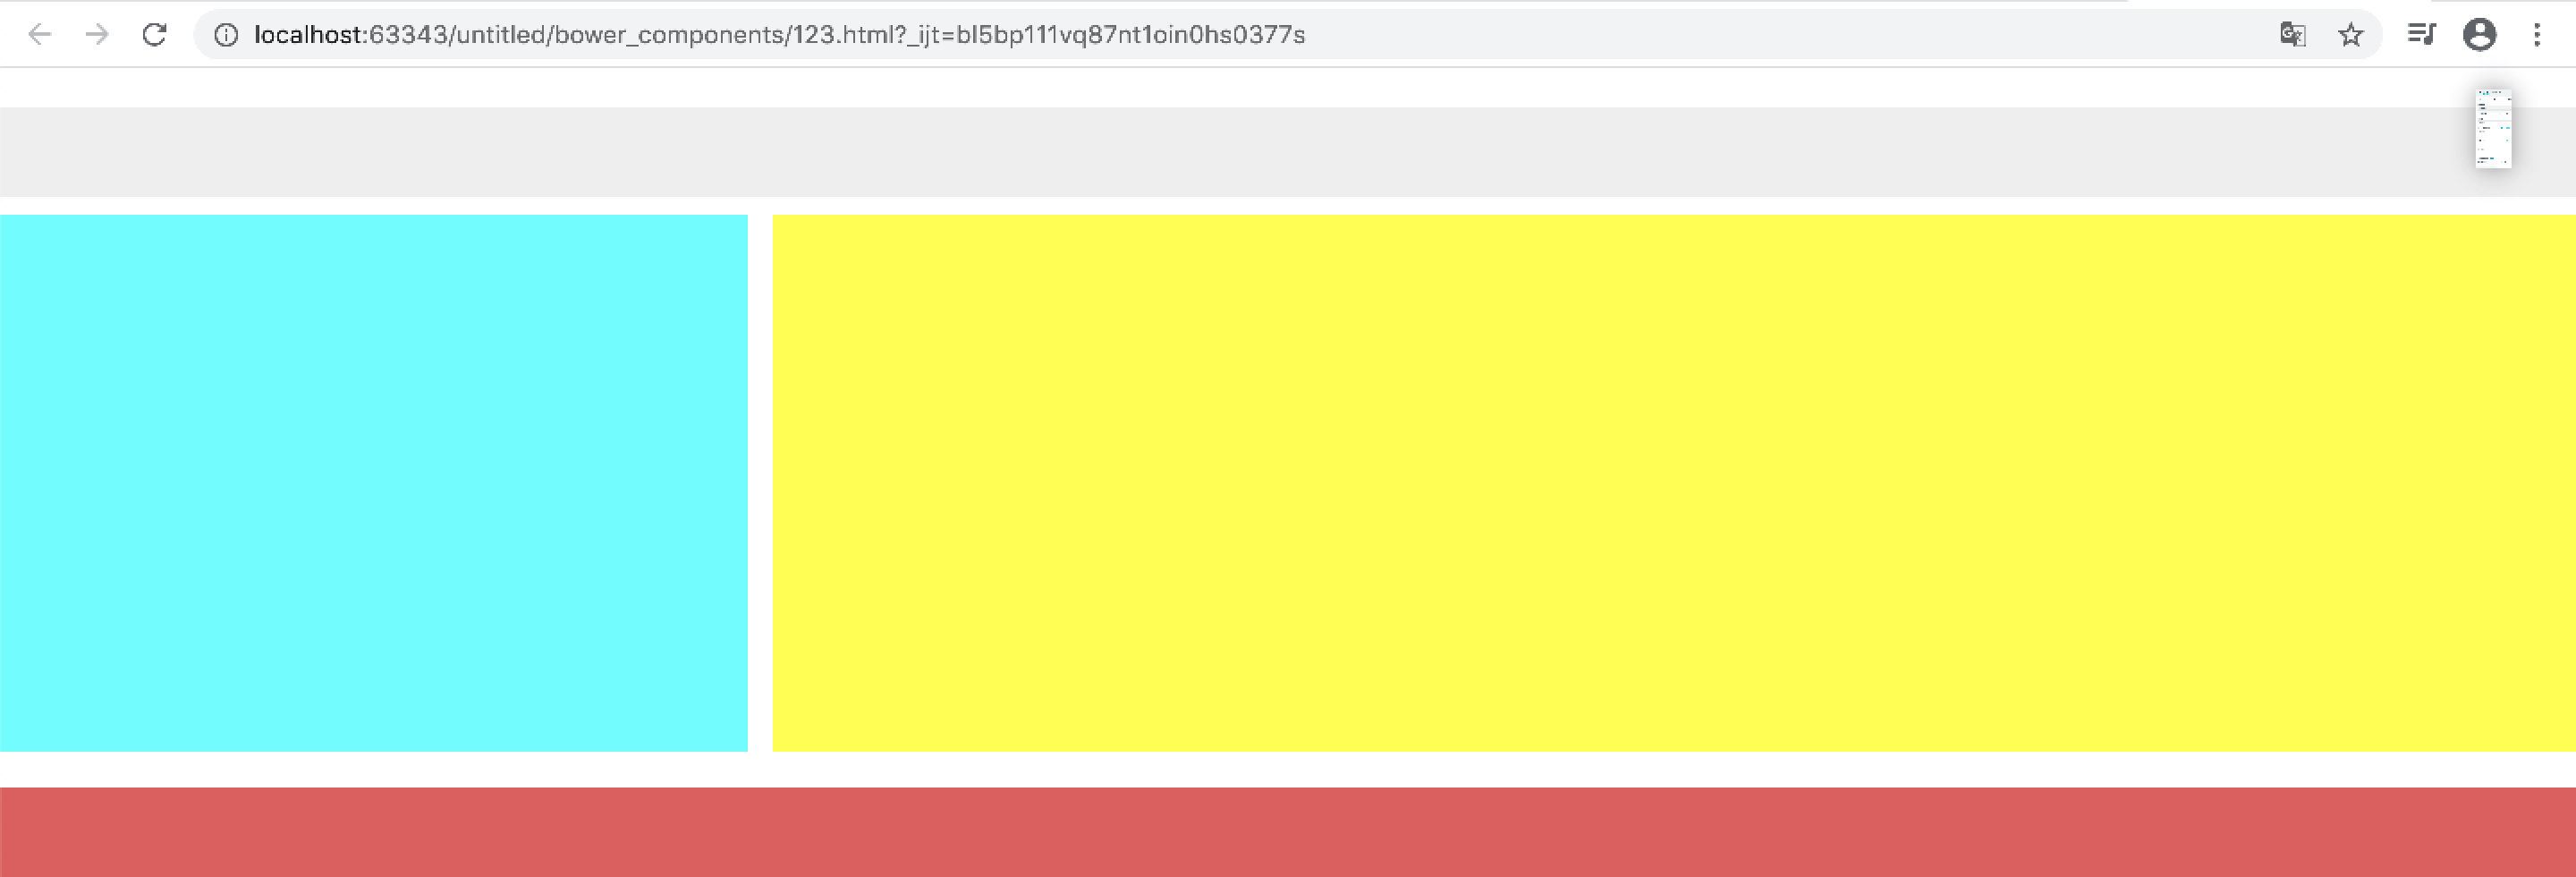
舉個例子: 如下程式碼是中規中矩的html程式碼
<!DOCTYPE html>
<html lang="en">
<head>
    <meta charset="UTF-8">
    <title>Title</title>
    <script src="./vue/dist/vue.js"></script>
    <script src="./vue-router/dist/vue-router.js"></script>
    <style>
        * ,#app{
            margin: 0;
            padding: 0;
        }
        a {
            color: #333333;
            text-decoration: none;
            /* display: inline-block;*/
            padding-left: 5px;
            text-align: center;
        }
        div {
            margin-bottom: 10px;
        }
        .header {
            height: 50px;
            background-color: #EEEEEE;
        }

        .banner {
            background-color: aqua;
            float: left;
            margin-right: 5px;
            height: 300px;
            width: 29%;
        }
        .content {
            background-color: yellow;
            float: right;
            height: 300px;
            width: 70%;
        }

        .footer {
            height: 50px;
            background-color: #E95659;
        }

    </style>
</head>
<body>
<div id="app">
   <div class="header"></div>
   <div style="overflow: hidden">
       <div class="banner"></div>
       <div class="content"></div>
   </div>
   <div class="footer"></div>
</div>
</body>
<script>
</script>
</html>
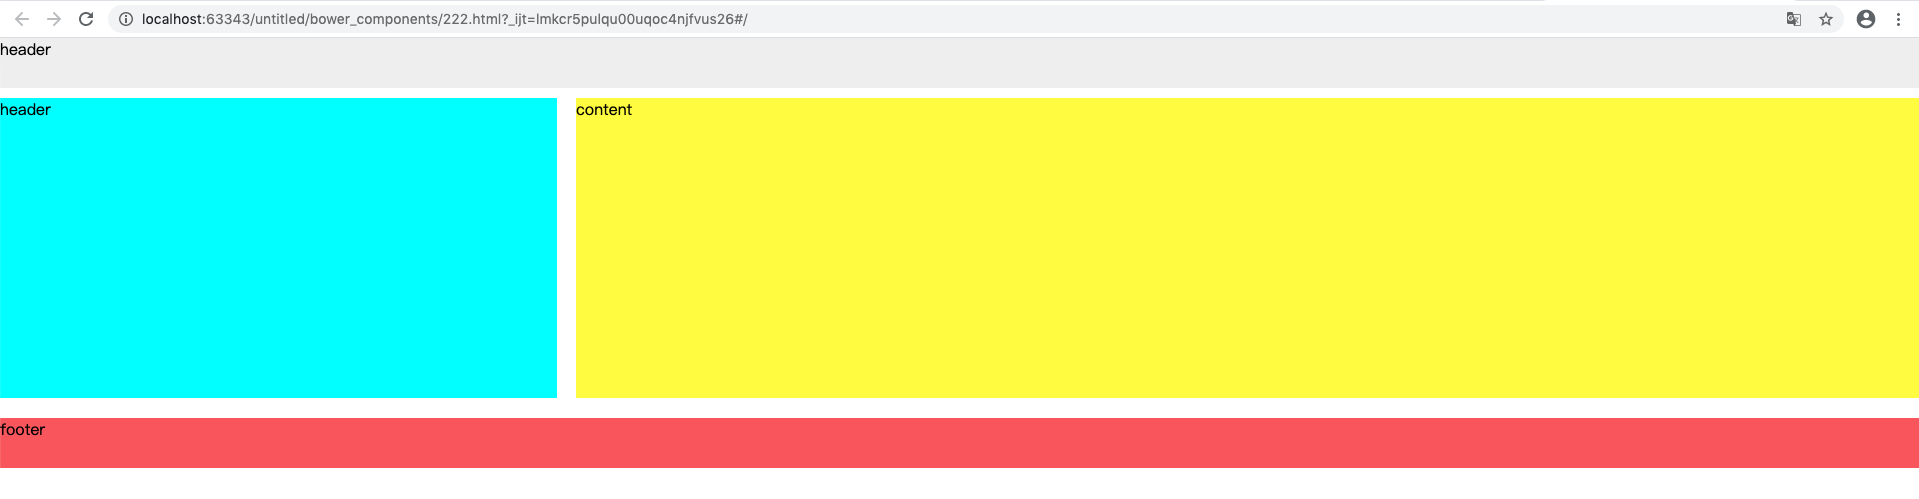
最終的渲染圖:
然後通過命名視圖,優化程式碼如下:
可以看到,上面程式碼中的html程式碼全部被抽取出去換成了vue組件,取而代之的是具名視圖組件<router-view name="xxx"> (具名影片只會為特定名稱的組件佔位)
<!DOCTYPE html>
<html lang="en">
<head>
    <meta charset="UTF-8">
    <title>Title</title>
    <script src="./vue/dist/vue.js"></script>
    <script src="./vue-router/dist/vue-router.js"></script>
    <style>
        *, #app {
            margin: 0;
            padding: 0;
        }

        a {
            color: #333333;
            text-decoration: none;
            padding-left: 5px;
            text-align: center;
        }

        div {
            margin-bottom: 10px;
        }

        .header {
            height: 50px;
            background-color: #EEEEEE;
        }

        .banner {
            background-color: aqua;
            float: left;
            margin-right: 5px;
            height: 300px;
            width: 29%;
        }

        .content {
            background-color: yellow;
            float: right;
            height: 300px;
            width: 70%;
        }

        .footer {
            height: 50px;
            background-color: #E95659;
        }


    </style>
</head>
<body>
<div id="app">
    <router-view class="view header" name="one">123</router-view>
    <div style="overflow: hidden">
        <router-view class="view banner" name="two"></router-view>
        <router-view class="view " name="three"></router-view>
    </div>
    <router-view class="view footer" name="four">456</router-view>
</div>
</body>
<script>

    const router = new VueRouter({
        routes: [
            {
                path: '/',
                components: {
                    one: {
                        template: "<div >header</div>"
                    },
                    two: {
                        template: "<div class='header'>header</div>"
                    },
                    three: {
                        template: "<div class='content'>content</div>"
                    },
                    four: {
                        template: "<div>footer</div>"
                    }
                }
            }
        ]
    })


    var app = new Vue({
        el: "#app",
        router,
        data: {
            title: "this is title"
        }
    })

</script>
</html>
效果圖:
問: <router-view class="view xxx" name="yyy"> 中的xxx和yyy是什麼?
xxx:是為當前組件綁定class屬性,當然也可以不這樣指定,可以在具體的vue組件中去添加css樣式
yyy:就是命名視圖中的名,它和components中的各個組件名一一對應。
十三. 嵌套路由
看如下的demo
<!DOCTYPE html>
<html lang="en">
<head>
    <meta charset="UTF-8">
    <title>Title</title>
    <script src="./vue/dist/vue.js"></script>
    <script src="./vue-router/dist/vue-router.js"></script>
    <style>
        * {
            margin: 0;
            padding: 0;
        }

        nav {
            height: 60px;
            background-color: #eee;
        }

        li {
            list-style: none;
            display: inline-block;
            padding-left: 10px;
            line-height: 60px;
        }

        nav a {
            text-decoration: none;
            color: black;
            padding-left: 10px;
            padding-right: 10px;
        }

        nav a:hover {
            display: inline-block;
            color: #ffffff;
            background-color: #444444;
        }
    </style>
</head>
<body>
<div id="app">
    <nav>
        <router-view></router-view>
    </nav>

</div>

</body>

<script>
    const navComponent = {
        template: `<div>
        <div>
            <ul>
                <li><a href="#/index">首頁</a></li>
                <li><a href="#">文章</a></li>
                <li><a href="#">友情鏈接</a></li>
                <li><a href="#">點我關注</a></li>
            </ul>
        </div>
        <div>
            <router-view></router-view>
        </div>
    </div>`,
        name: "nav"
    }

    const indexComponent = {
        template: `<div> this is 首頁 -->  index</div>`
    }

    const router = new VueRouter({
        // todo  如果說路由沒有載入出來,也不報錯,八成是VueRouter的這個屬性名被寫錯了
        routes: [
            {
                path: "/",
                component: navComponent,
                children: [
                    {
                        path: "/index",
                        component: indexComponent
                    }
                ]
            },
        ]
    })

    var app = new Vue({
        el: "#app",
        router: router,
        data: {}
    })
</script>

</html>
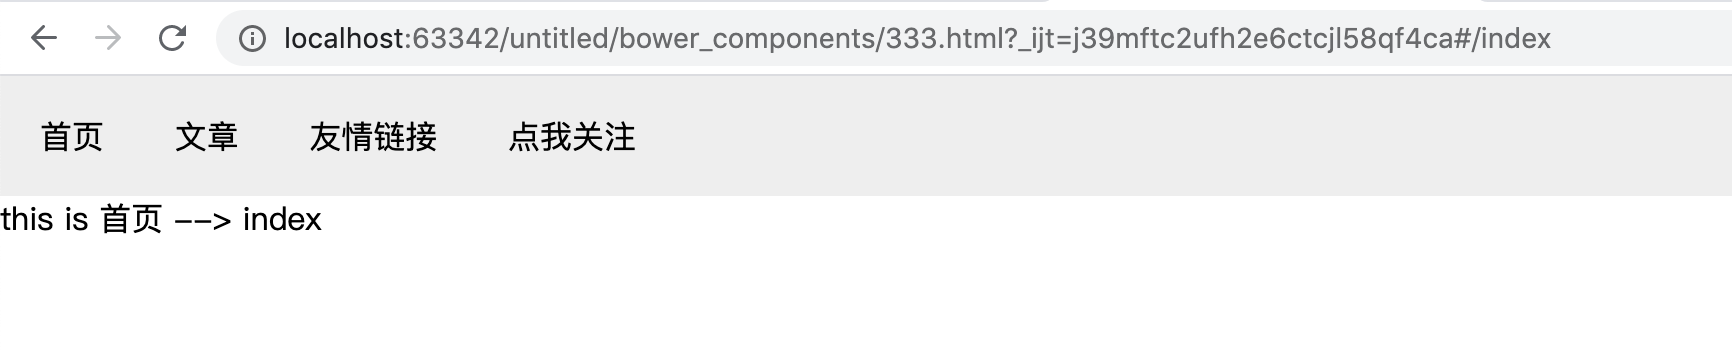
最終實現的效果就是:當我們點擊首頁時,在nav標籤的下面渲染出首頁組件的子組件。
效果圖:
說一下需要注意的地方:像下面樣通過children塊為當前路由註冊子路由。
const router = new VueRouter({
        // todo  如果說路由沒有載入出來,也不報錯,八成是VueRouter下面這個屬性名被寫錯了
        routes: [
            {
                path: "/",
                component: navComponent,
                children: [
                    {
                        path: "/index",
                        component: indexComponent
                    }
                ]
            },
        ]
    })
十四. params和query
首先:
第一:VueRouter根據瀏覽器地址欄中的hash值去匹配並渲染組件
第二:url中的含有:網路協議+埠+params+query
params+query相當於是hash
比如這個:
//localhost:63342/untitled#/index/12?id=10&name=tom
params : /index/12
query : ?id=10&name=tom
-
params參數的傳遞其實在上文中第十節路由參數傳遞模組已經說了多幾種情況了,這裡不再重複說
-
那麼query模式傳遞的參數一般怎麼處理呢?
參考如下程式碼:?id=1&name=tom的資訊被封裝進了router的query部分
  const indexComponent = {
        template: `<div> id:{{id}} name:{{name}}</div>`,
        props:["id","name"]
    }

    const router = new VueRouter({
        // todo  如果說路由沒有載入出來,也不報錯,八成是VueRouter的這個屬性名被寫錯了
        routes: [
            {
                path: "/",
                component: navComponent,
                children: [
                    {
                        path: "/index",
                        component: indexComponent,
                        props:function (router) {
                            console.log(router)
                            return router.query
                        }
                    }
                ]
            },
        ]
    })
router的列印結果如圖:
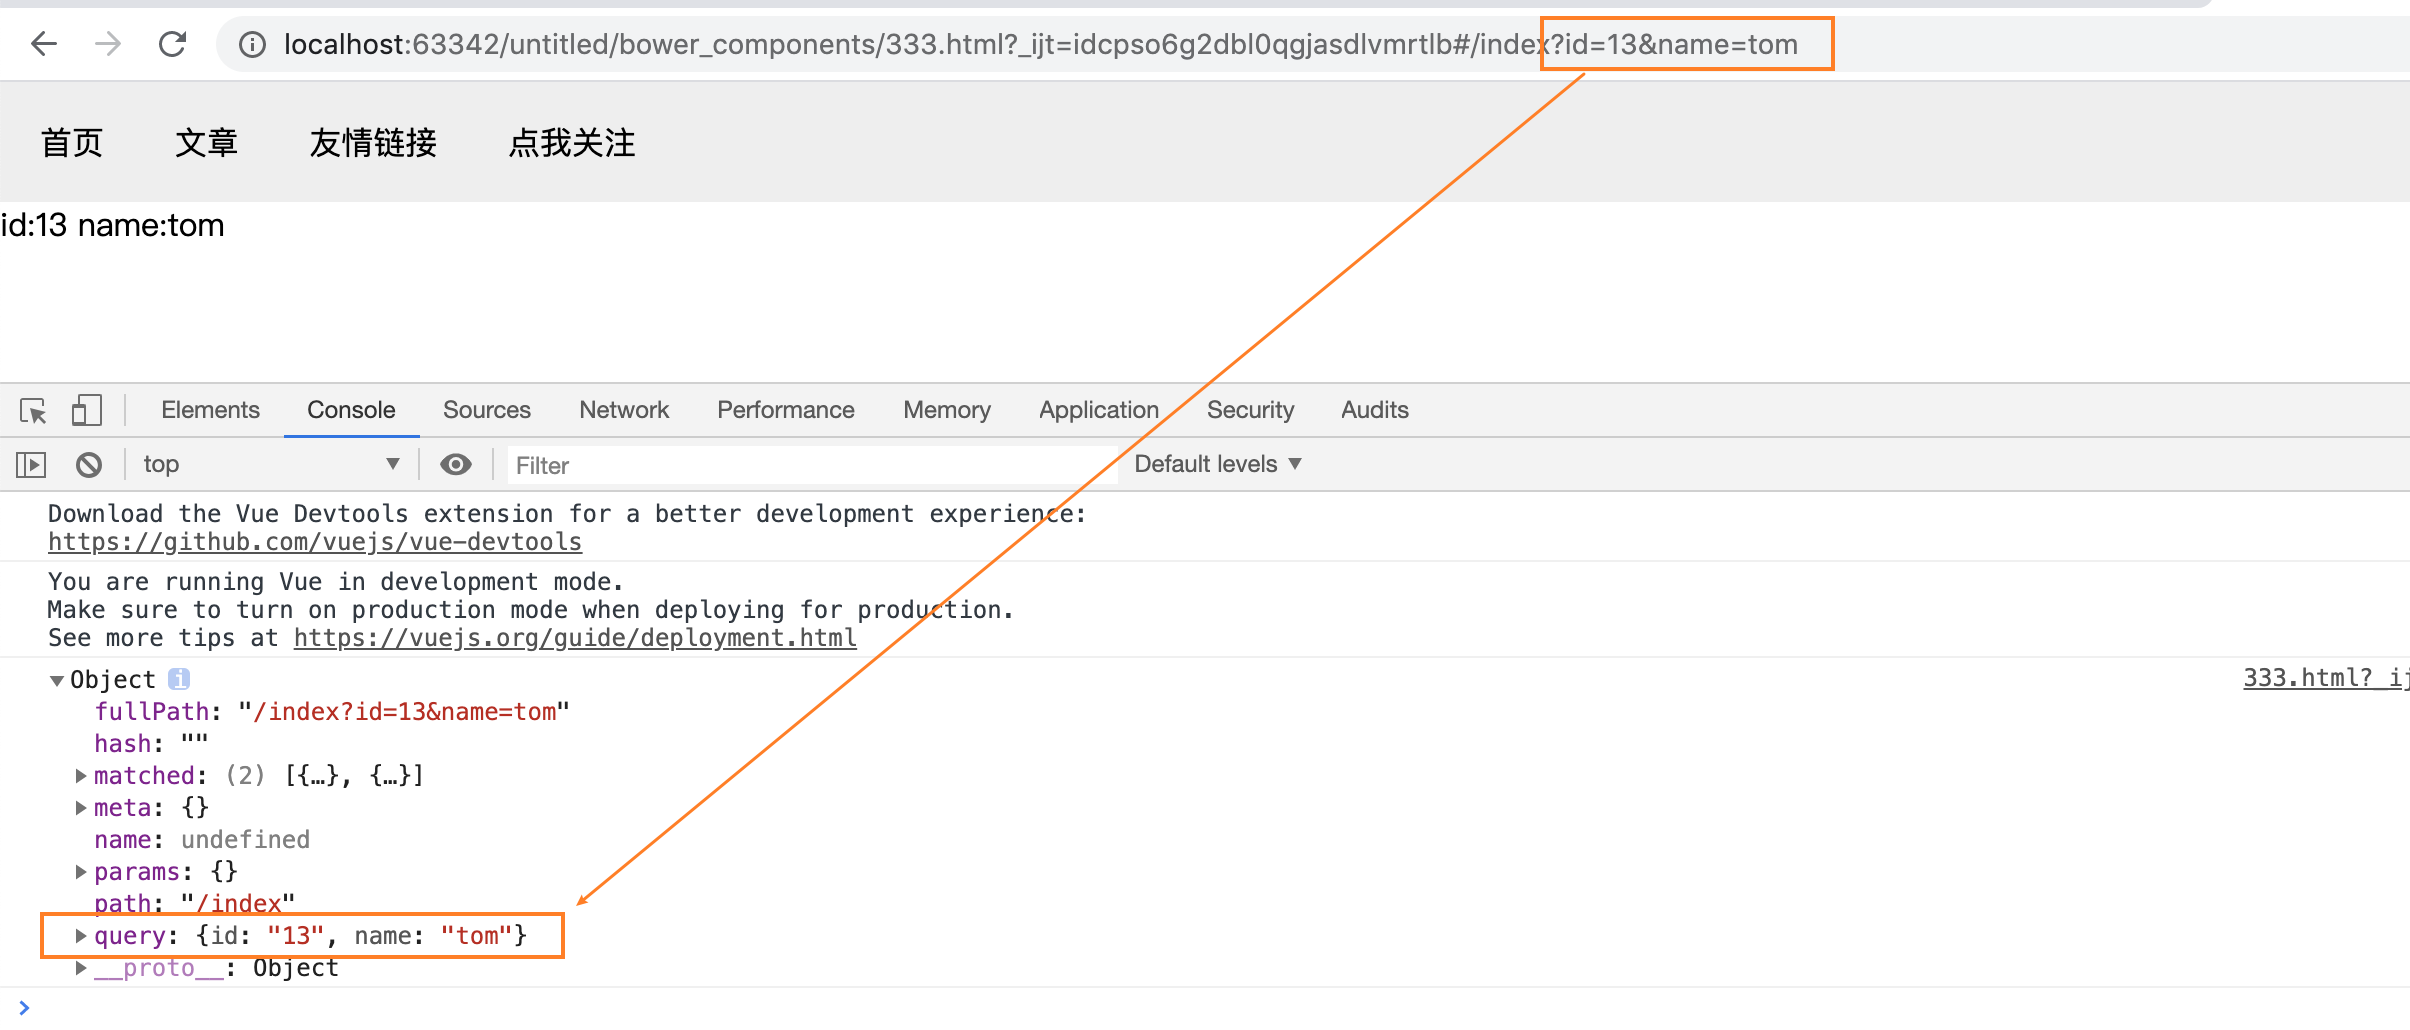
當然,它和params的用戶幾乎是相同的
總結一下,其實就是url中的path部分和參數部分,會被分別封裝進route對象的不同屬性中。這僅僅是為了可以實現兩種參數的區分,最終的目的都是為了可以傳遞參數。以及實現路由的跳轉
十五. 導航守衛
導航守衛也被稱作路由鉤子函數,他們指的都是router對象中的回調函數,他們會在路由所處的不同狀態被回調
如下是簡單的demo
為每個路由單獨寫回調
const router = new VueRouter({
// todo 如果說路由沒有載入出來,也不報錯,八成是VueRouter的這個屬性名被寫錯了
routes: [
{
path: "/",
component: navComponent,
children: [
{
path: "/index",
component: indexComponent,
props:function (router) {
console.log(router)
return router.query
},
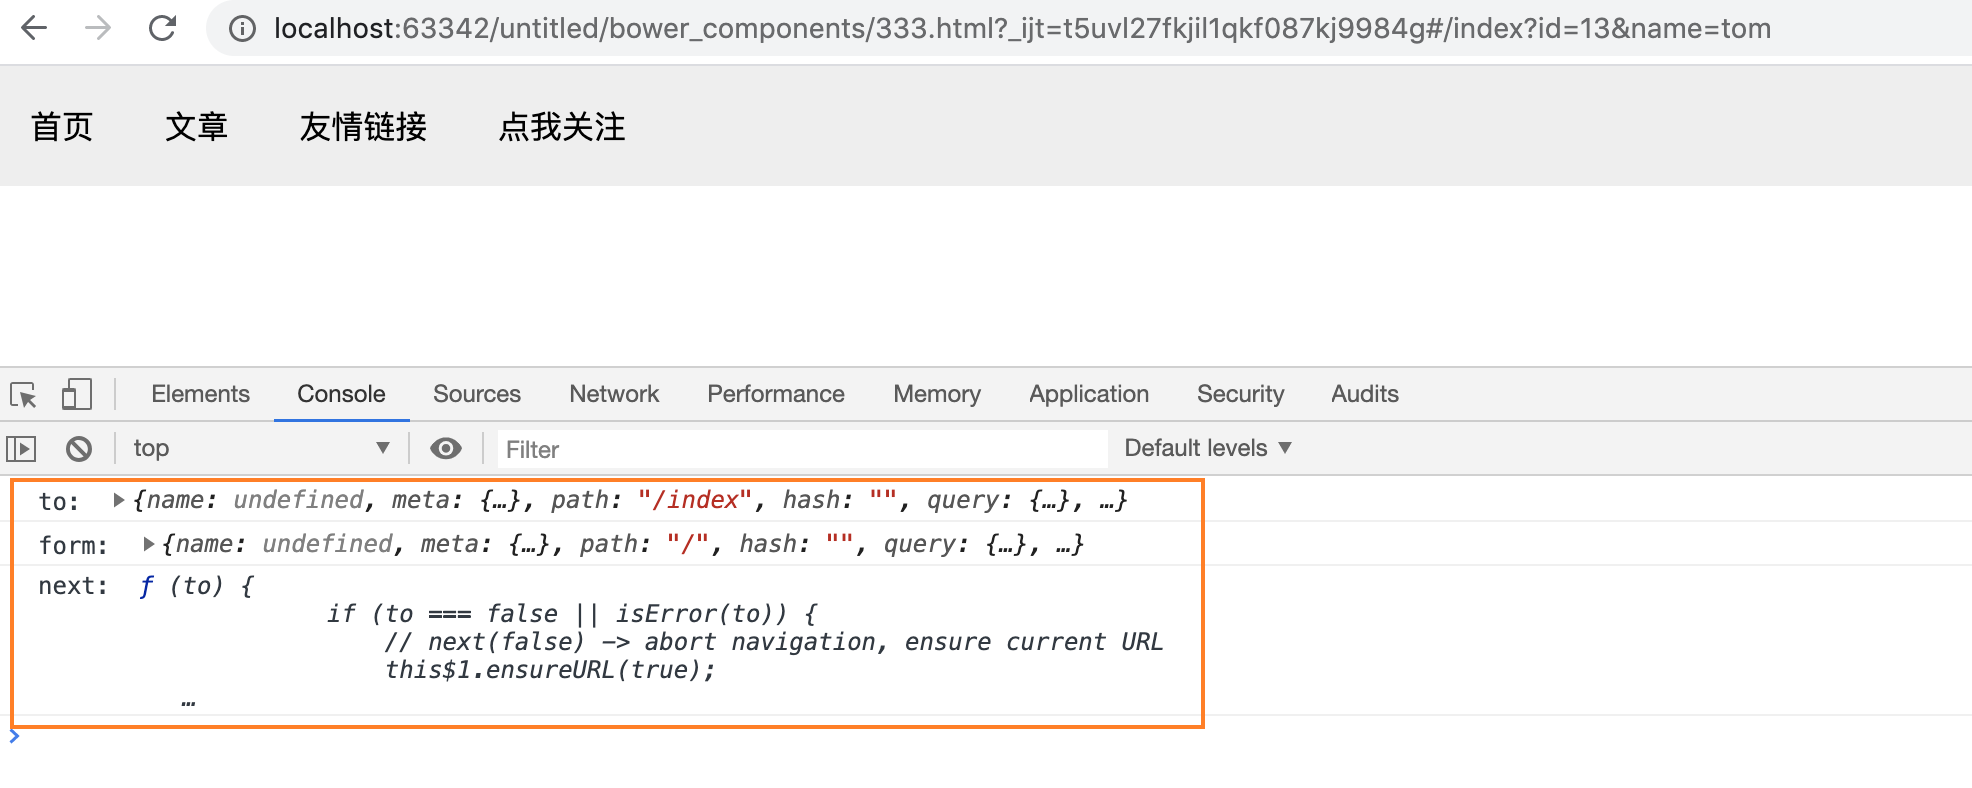
beforeEnter:function (to,from,next) {
console.log("to: ",to)
console.log("form: ",from)
// next是一個函數
console.log("next: ",next)
// next(true) 表示進行路由的跳轉
// next(false) 表示不進行路由的跳轉
}
}
]
},
]
})
當發生路由跳轉時,beforeEnter會被回調,查看控制台的列印結果:
通過next函數發起路由的跳轉,通常會使用這個特性幹什麼事呢? 比如我們可以在路由的跳轉之前判斷一下用戶是又已經登陸了,是否有許可權。
我們可以將其定義在模版中:
    const indexComponent = {
        template: `<div> id:{{id}} name:{{name}}</div>`,
        props:["id","name"],
        beforeRouteEnter:function (to,from,next) {
            console.log("to: ",to)
            console.log("form: ",from)
            // next是一個函數
            console.log("next: ",next)
            // next(true)  表示進行路由的跳轉
            // next(false)  表示不進行路由的跳轉
        },
        beforeRouteLeave:function (to,form,next) {
            console.log("to: ",to)
            console.log("form: ",from)
            // next是一個函數
            console.log("next: ",next)
            // next(true)  表示進行路由的跳轉
            // next(false)  表示不進行路由的跳轉
        }
    }
十六. 路由元資訊
路由的元資訊指是路由的 meta屬性。注意我們說的是路由而不是路由器。
路由:this.$route
路由器:this.$router
常見的我們可以基於路由的元資訊做安全驗證相關的操作:點擊看相關文章
下面再補充下,官網提供的demo :點擊進入參考鏈接
首先貼出VueRouter部分的程式碼:
    const router = new VueRouter({
        // todo  如果說路由沒有載入出來,也不報錯,八成是VueRouter的這個屬性名被寫錯了
        routes: [
            {
                path: "/",
                component: navComponent,
                children: [
                    {
                        path: "/index",
                        component: indexComponent,
                        props: function (router) {
                            console.log(router)
                            return router.query
                        },
                        meta: {requiresAuth: true}

                    }
                ]
            },
        ]
    })

    router.beforeEach((to, form, next) => {
        console.log("to: ", to)
        console.log("form: ", form)
        next()
    })
最終可以實現的效果如圖:
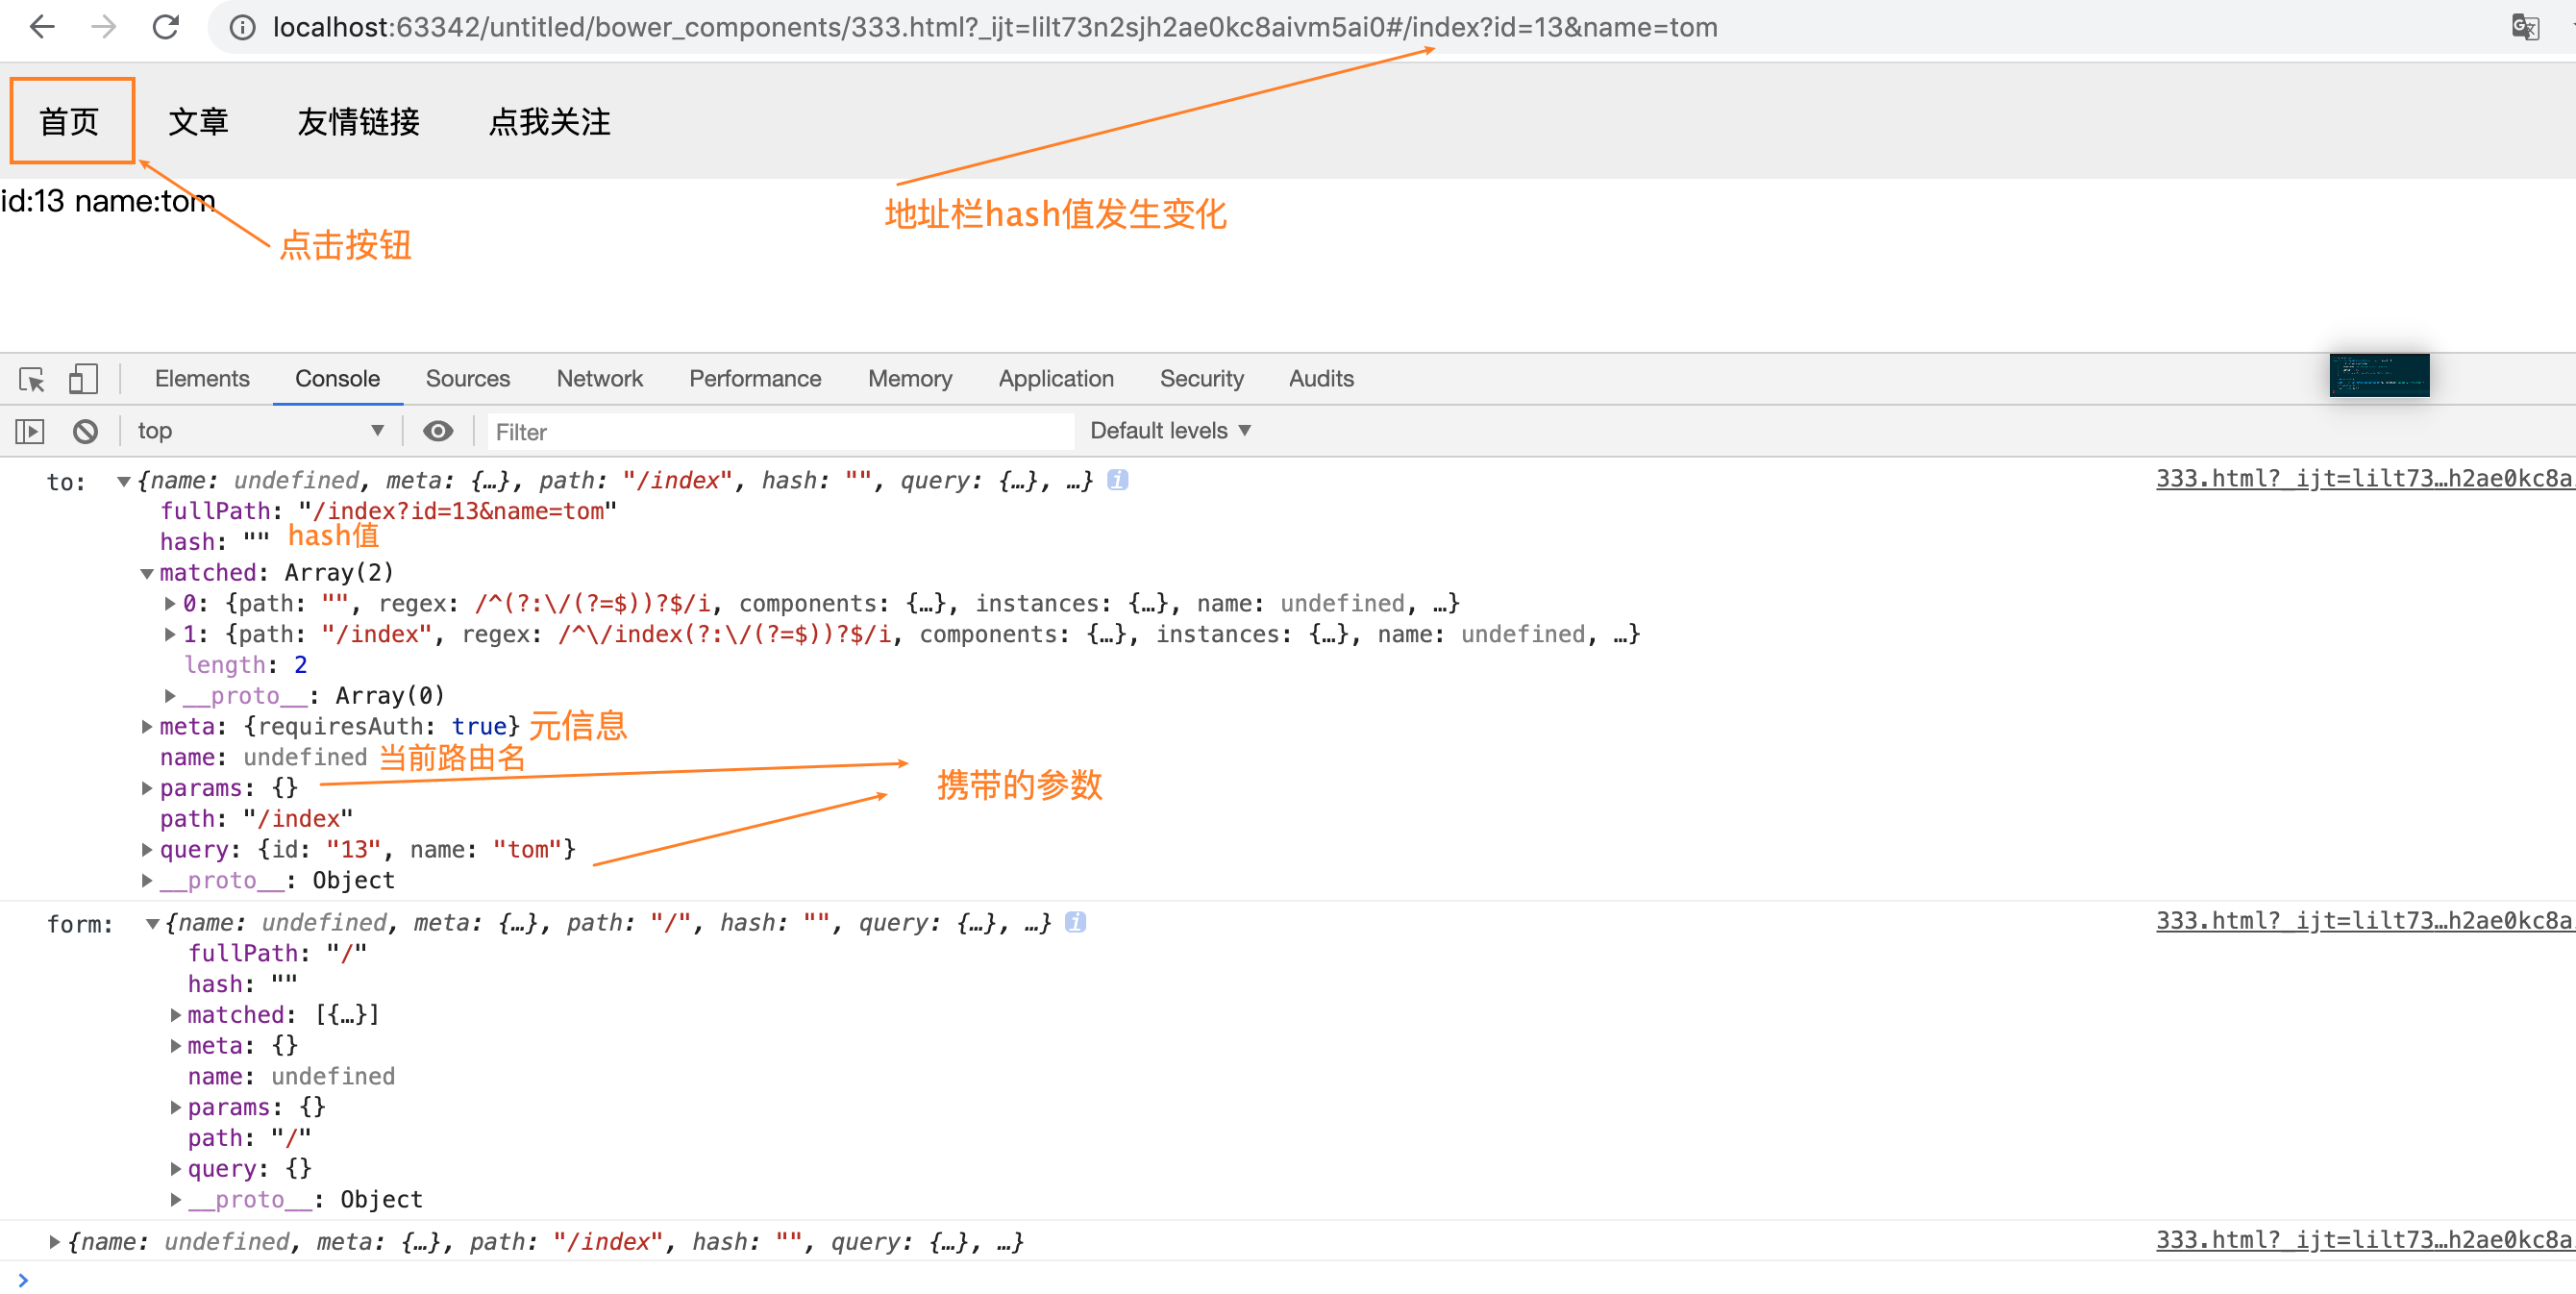
貼著張圖是啥意思呢?其一是可以比較完成的看到route的各個屬性,其二是我們可以看到他有個屬性叫做match 它是個數組。裡面記錄著匹配到的route的資訊。 看上圖的目的很大一部分原因是去看看這個matched屬性是個數組。因為在官方的demo中編碼如下:
const router = new VueRouter({
  routes: [
    {
      path: '/foo',
      component: Foo,
      children: [
        {
          path: 'bar',
          component: Bar,
          // a meta field
          meta: { requiresAuth: true }
        }
      ]
    }
  ]
})

router.beforeEach((to, from, next) => {
  if (to.matched.some(record => record.meta.requiresAuth)) {
    // this route requires auth, check if logged in
    // if not, redirect to login page.
    if (!auth.loggedIn()) {
      next({
        path: '/login',
        query: { redirect: to.fullPath }
      })
    } else {
      next()
    }
  } else {
    next() // 確保一定要調用 next()
  }
})
在官方的demo中,路由的全局守衛使用到了這個matched屬性以及Array的some方法,some方法的入參接受一個函數,官網demo中的實現採用了ES6的新特性去實現的。
致至為止,相信我們都能很好的理解這個demo了。
十七. VueRouter中的數據獲取
VueRouter中的數據的指的是我們何時像後端發送請求,將組件中需要的數據獲取到進而渲染組件。
通常來說有兩個時機:
-
導航完成之後獲取
導航完成之後說明我們已經找到對應的組件了。而組件中又需要渲染一些動態的數據,這時我們只能選擇在組件相應的生命周期回調中(比如created,mounted)向後端發送請求完成拉去數據。
如果想讓用戶有個良好的體驗,我們可以添加上進度條,或者是loding標記。
-
導航完成之前渲染
這種方式指的是在路由的守衛中完成數據的拉取,數據獲取到之後,再進行導航。
十八. VueRouter的滾動行為
VueRouter支援我們自定義切換到一個新的路由時頁面的滾動方式。
比如像下面的這個例子,當我們在同步的路由之間切換時,默認的瀏覽器的下拉框總會定位到上次我們所在的位置。
<!DOCTYPE html>
<html lang="en">
<head>
    <meta charset="UTF-8">
    <title>Title</title>
    <script src="./vue/dist/vue.js"></script>
    <script src="./vue-router/dist/vue-router.js"></script>
</head>
<body>
<div id="app">
    <router-view></router-view>
</div>

</body>

<script>
    const home = {
        template: `
      <div>
        <h1>文章:</h1>
        <p>學習 vuerouter 的滾動行為</p>
        <p>學習 vuerouter 的滾動行為</p>
        <p>學習 vuerouter 的滾動行為</p>
        <p>學習 vuerouter 的滾動行為</p>
        <p>學習 vuerouter 的滾動行為</p>
        <p>學習 vuerouter 的滾動行為</p>
        <p>學習 vuerouter 的滾動行為</p>
        <p>學習 vuerouter 的滾動行為</p>
        <p>學習 vuerouter 的滾動行為</p>
        <p>學習 vuerouter 的滾動行為</p>
        <p>學習 vuerouter 的滾動行為</p>
        <p>學習 vuerouter 的滾動行為</p>
        <p>學習 vuerouter 的滾動行為</p>
        <p>學習 vuerouter 的滾動行為</p>
        <p>學習 vuerouter 的滾動行為</p>
        <router-link to="/detail">點擊進入detail</router-link>
    </div>
        `
    }
    const detail = {
        template: `
    <div>
       <h1>this is detail</h1>
       <p>this is detail</p>
          <p>this is detail</p>
          <p>this is detail</p>
          <p>this is detail</p>
          <p>this is detail</p>
          <p>this is detail</p>
          <p>this is detail</p>
          <p>this is detail</p>
          <p>this is detail</p>
          <p>this is detail</p>
          <p>this is detail</p>
          <p>this is detail</p>
          <p>this is detail</p>
          <p>this is detail</p>
          <p>this is detail</p>
          <p>this is detail</p>
       <router-link to="/">點擊進入首頁</router-link>
     </div>`
    }
    const router = new VueRouter({
        routes: [
            {
                path: "/",
                component: home
            },
            {
                path: "/detail",
                component: detail
            }

        ]
    })
    var app = new Vue({
        el: "#app",
        router,
        data: {}
    })
</script>
</html>
Vue-Router支援我們訂製這個滾動的集體位置。
訂製這個滾動的具體位置需要藉助一個VueRouter的函數:scrollBehavior
const router = new VueRouter({
  routes: [...],
  scrollBehavior (to, from, savedPosition) {
    // return 期望滾動到哪個的位置
    return { x: number, y: number }

    // (offset 只在 2.6.0+ 支援)
		return { selector: string, offset? : { x: number, y: number }}

		// 返回按下前進/後退按鈕時,瀏覽器記錄下的原生狀態
		return savedPosition
  }
})
如果頁面中有錨點,也能像下面這樣模擬hash錨點定位
scrollBehavior (to, from, savedPosition) {
  if (to.hash) {
    return {
      selector: to.hash
    }
  }
}
當然也支援非同步滾動
scrollBehavior (to, from, savedPosition) {
  return new Promise((resolve, reject) => {
    setTimeout(() => {
      resolve({ x: 0, y: 0 })
    }, 500)
  })
}
