spring源碼解析之前置知識點
- 2020 年 5 月 17 日
- 筆記
- Spring Framework
本文是作者原創,版權歸作者所有.若要轉載,請註明出處.
最近在看spring源碼,但是spring的體系太龐大了,在這裡記錄一下閱讀源碼中遇到知識點
@PostConstruct
被註解的方法,在對象載入完依賴注入後執行
看個demo
package com.day01.config;

import org.springframework.context.annotation.ComponentScan;
import org.springframework.context.annotation.Configuration;

@Configuration
@ComponentScan("com.day01")
public class SpringConfig {

}
IndexDao
package com.day01.service;

import org.springframework.stereotype.Component;

@Component
public class IndexDao {

    public IndexDao(){
        System.out.println("IndexDao  構造方法");
    }
}
IndexService
@Service
public class IndexService {
    @Autowired
    private IndexDao indexDao;


    public IndexService(){
        System.out.println("IndexService  構造方法");
    }

    @PostConstruct
    public void init(){
        System.out.println("IndexService  init方法");
    }


    public void hello(){
        System.out.println("IndexService");
    }

}
Testday01
public static void main(String[] args) {
        AnnotationConfigApplicationContext applicationContext=new AnnotationConfigApplicationContext(SpringConfig.class);
        IndexService indexService = (IndexService) applicationContext.getBean("indexService");
        indexService.hello();
    }
看結果

可以看出在spring項目中,在一個bean的初始化過程中,方法執行先後順序為Constructor > @Autowired > @PostConstruct
BeanPostProcessor
BeanPostProcessor是Spring框架的提供的一個擴展點,通過實現BeanPostProcessor介面,程式設計師就可插手bean實例化的過程
看demo
@Component
public class TestBeanPostProcessor implements BeanPostProcessor {

    /**
     * 在bean初始化之前執行
     */
    @Override
    public Object postProcessBeforeInitialization(Object bean, String beanName) throws BeansException {
        if (beanName.equals("indexService")){
            System.out.println("indexService  postProcessBeforeInitialization");
        }
        //這裡也可以產生代理對象 Proxy.newProxyInstance(),也是aop實現的原理
        return bean;
    }

    /**
     * 初始化之後
     */
    @Override
    public Object postProcessAfterInitialization(Object bean, String beanName) throws BeansException {
        if (beanName.equals("indexService")){
            System.out.println("indexService  postProcessAfterInitialization");
        }
        return bean;
    }

}
運行上文的Testday01,看下結果
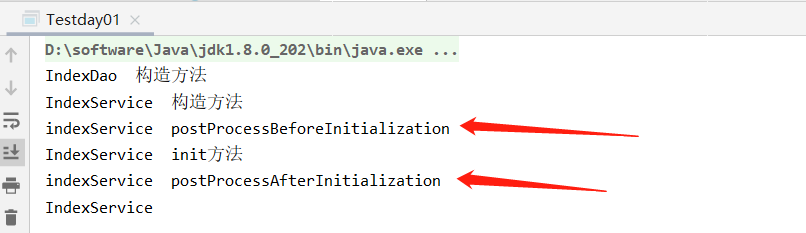
可以看出
===Spring IOC容器實例化Bean===
===調用BeanPostProcessor的postProcessBeforeInitialization方法===
===調用bean實例的初始化方法===
===調用BeanPostProcessor的postProcessAfterInitialization方法===
值得說明的是這個介面可以設置多個,會形成一個列表,那麼如何確定他們的執行順序呢?
Ordered和PriorityOrdered
Spring提供了Ordered和PriorityOrdered介面,來處理相同介面實現類的優先順序問題
看個demo
TestBeanPostProcessor
@Component
public class TestBeanPostProcessor implements BeanPostProcessor , PriorityOrdered {

    /**
     * 在bean初始化之前執行
     */
    @Override
    public Object postProcessBeforeInitialization(Object bean, String beanName) throws BeansException {
        if (beanName.equals("indexService")){
            System.out.println("indexService  postProcessBeforeInitialization");
        }
        //這裡也可以產生代理對象 Proxy.newProxyInstance(),也是aop實現的原理
        return bean;
    }

    /**
     * 在bean初始化之前執行
     */
    @Override
    public Object postProcessAfterInitialization(Object bean, String beanName) throws BeansException {
        if (beanName.equals("indexService")){
            System.out.println("indexService  postProcessAfterInitialization");
        }
        return bean;
    }

    @Override
    public int getOrder() {
        return 100;//注意這裡
    }
}
TestBeanPostProcessor2
@Component
public class TestBeanPostProcessor2 implements BeanPostProcessor , PriorityOrdered {

    /**
     * 在bean初始化之前執行
     */
    @Override
    public Object postProcessBeforeInitialization(Object bean, String beanName) throws BeansException {
        if (beanName.equals("indexService")){
            System.out.println("indexService  postProcessBeforeInitialization2");
        }
        //這裡也可以產生代理對象 Proxy.newProxyInstance(),也是aop實現的原理
        return bean;
    }

    /**
     * 在bean初始化之前執行
     */
    @Override
    public Object postProcessAfterInitialization(Object bean, String beanName) throws BeansException {
        if (beanName.equals("indexService")){
            System.out.println("indexService  postProcessAfterInitialization2");
        }
        return bean;
    }

    @Override
    public int getOrder() {
        return 99;
    }
}
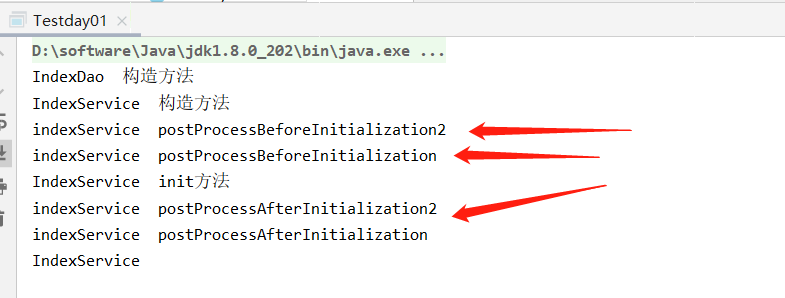
運行test類,看結果
這段程式碼的邏輯:
1. 若對象o1是Ordered介面類型,o2是PriorityOrdered介面類型,那麼o2的優先順序高於o1
2. 若對象o1是PriorityOrdered介面類型,o2是Ordered介面類型,那麼o1的優先順序高於o2
3. 其他情況,若兩者都是Ordered介面類型或兩者都是PriorityOrdered介面類型,調用Ordered介面的getOrder方法得到order值,order值越大,優先順序越小
若2個對象中有一個對象實現了PriorityOrdered介面,那麼這個對象的優先順序更高。
若2個對象都是PriorityOrdered或Ordered介面的實現類,那麼比較Ordered介面的getOrder方法得到order值,值越低,優先順序越高
BeanFactoryPostProcessor
spring的擴展點之一:實現該介面,可以在spring的bean創建之前修改beandefinitions屬性。
例如可以把bean的scope從singleton改為prototype,也可以把property的值給修改掉。
可以同時配置多個BeanFactoryPostProcessor,並通過設置’order’屬性來控制各個BeanFactoryPostProcessor的執行次序
看個demo
@Component
public class TestBeanFactoryPostProcessor implements BeanFactoryPostProcessor {
    @Override
    public void postProcessBeanFactory(ConfigurableListableBeanFactory beanFactory) throws BeansException {
        System.out.println("===============TestBeanFactoryPostProcessor============");

    }
}
測試類
public static void main(String[] args) {
        AnnotationConfigApplicationContext applicationContext=new AnnotationConfigApplicationContext(SpringConfig.class);
        //AnnotationConfigApplicationContext applicationContext=new AnnotationConfigApplicationContext(IndexService.class);
        IndexService indexService = (IndexService) applicationContext.getBean("indexService");
        indexService.hello();
        IndexService indexService2 = (IndexService) applicationContext.getBean("indexService");
        System.out.println(indexService);
        System.out.println(indexService2);
    }
運行一下,看結果

可以看到,spring管理的bean默認是單例的,我們把indexService改成prototype試一下
@Component
public class TestBeanFactoryPostProcessor implements BeanFactoryPostProcessor {
    @Override
    public void postProcessBeanFactory(ConfigurableListableBeanFactory beanFactory) throws BeansException {
        System.out.println("===============TestBeanFactoryPostProcessor============");
        BeanDefinition indexService = beanFactory.getBeanDefinition("indexService");
        String scope = indexService.getScope();
        System.out.println(scope);//singleton
        //indexService.setScope("singleton");
        indexService.setScope("prototype");//設置為原型
        System.out.println(scope);//singleton
    }
}
看下結果

BeanDefinitionRegistryPostProcessor
BeanDefinitionRegistryPostProcessor繼承了BeanFactoryPostProcessor介面,並可以註冊bean到spring容器中,一共要實現以下兩個方法:
void postProcessBeanFactory(ConfigurableListableBeanFactory beanFactory) throws BeansException:
該方法的實現中,主要用來對bean定義做一些改變。

void postProcessBeanDefinitionRegistry(BeanDefinitionRegistry registry) throws BeansException:
該方法用來註冊更多的bean到spring容器中,詳細觀察入參BeanDefinitionRegistry介面,看看這個參數能帶給我們什麼能力。
看個demo
public class IndexService2  {

    private ApplicationContext applicationContext;
    public IndexService2(){
        System.out.println("IndexService2  構造方法");
    }

    @PostConstruct
    public void init(){
        System.out.println("IndexService2  init方法");
    }


    public void hello(){
        System.out.println("IndexService2 hello");
    }

}
注意:IndexService2並沒有@Component註解,說明這個類並沒有交給spring管理,繼續
@Component
public class MyBeanDefinitionRegistryPostProcessor implements BeanDefinitionRegistryPostProcessor {

    @Override
    public void postProcessBeanDefinitionRegistry(BeanDefinitionRegistry registry) throws BeansException {
        GenericBeanDefinition genericBeanDefinition = new GenericBeanDefinition();
        genericBeanDefinition.setScope("singleton");
        genericBeanDefinition.setBeanClass(IndexService2.class);//將IndexService2交給spring管理
        registry.registerBeanDefinition("indexService2",genericBeanDefinition);
    }

    @Override
    public void postProcessBeanFactory(ConfigurableListableBeanFactory beanFactory) throws BeansException {
        System.out.println("===============MyBeanDefinitionRegistryPostProcessor============");
    }
}
注意上述程式碼中通過BeanDefinitionRegistryPostProcessor 將IndexService2手動註冊交給spring管理
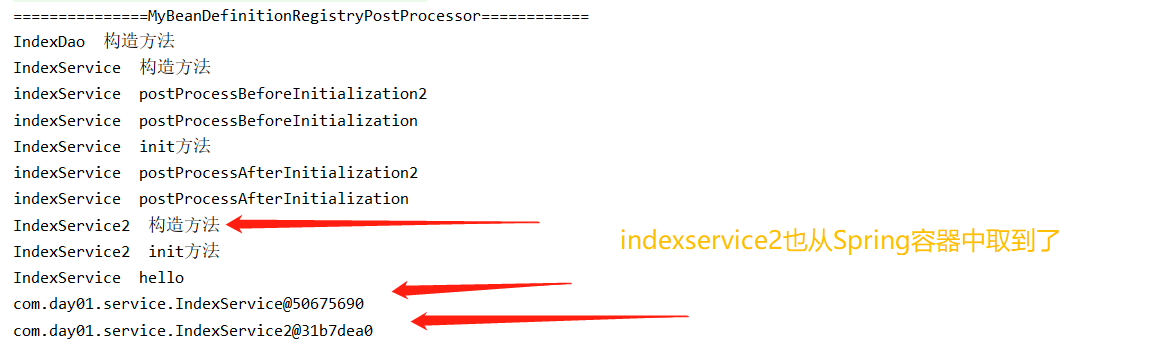
運行test類
public static void main(String[] args) {
        AnnotationConfigApplicationContext applicationContext=new AnnotationConfigApplicationContext(SpringConfig.class);
        //AnnotationConfigApplicationContext applicationContext=new AnnotationConfigApplicationContext(IndexService.class);
        IndexService indexService = (IndexService) applicationContext.getBean("indexService");
        indexService.hello();
        IndexService2 indexService2 = (IndexService2) applicationContext.getBean("indexService2");
        System.out.println(indexService);
        System.out.println(indexService2);
    }
看結果
ApplicationContextAware
我們可以通過註解@Autowired 很簡單方便獲取bean,雖然這種方法很簡單方便,但是有些特殊場景用不了,比如靜態方法中不能使用

此時可以藉助ApplicationContextAware獲取bean
看個demo
@Service
public class TestServiceImpl {

    public String hello(){
        return "hello world";
    }

}
這裡無法注入TestServiceImpl 無法使用,看demo
@Component
public class ApplicationContextUtil implements ApplicationContextAware {

    private static ApplicationContext applicationContext = null;
    @Autowired
    private TestServiceImpl testService;

    /**
     * 實現ApplicationContextAware介面, 注入Context到靜態變數中.
     */
    @Override
    public void setApplicationContext(ApplicationContext applicationContext) throws BeansException {
        ApplicationContextUtil.applicationContext = applicationContext;
    }

    /**
     * 獲取靜態變數中的ApplicationContext.
     */
    public static ApplicationContext getApplicationContext() {
        return applicationContext;
    }

    /**
     * 從靜態變數applicationContext中得到Bean, 自動轉型為所賦值對象的類型.
     */
    @SuppressWarnings("unchecked")
    public static <T> T getBean(String name) {
        return (T) applicationContext.getBean(name);
    }

    /**
     * 從靜態變數applicationContext中得到Bean, 自動轉型為所賦值對象的類型.
     */
    public static <T> T getBean(Class<T> requiredType) {
        return applicationContext.getBean(requiredType);
    }

    /*public static String test(){
        String hello = testService.hello();
    }*/
}
看測試類
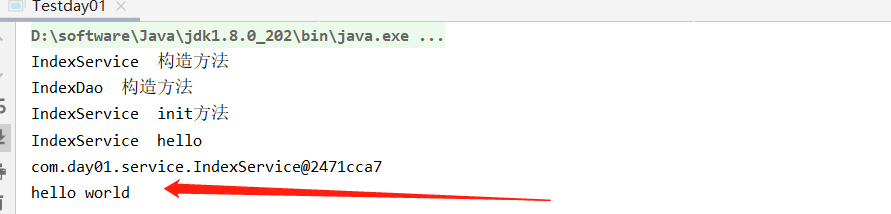
public static void main(String[] args) {
        AnnotationConfigApplicationContext applicationContext=new AnnotationConfigApplicationContext(SpringConfig.class);
        //AnnotationConfigApplicationContext applicationContext=new AnnotationConfigApplicationContext(IndexService.class);
        IndexService indexService = (IndexService) applicationContext.getBean("indexService");
        indexService.hello();
        System.out.println(indexService);
        /*IndexService2 indexService2 = (IndexService2) applicationContext.getBean("indexService2");
        System.out.println(indexService2);*/
        String testServiceImpl = ((TestServiceImpl) ApplicationContextUtil.getBean("testServiceImpl")).hello();
        System.out.println(testServiceImpl);
    }
看結果
ok,今天就先到這裡,以後有新的內容隨時補充吧

