netty 入門
近期公司通過
TCP連接的的方式接了一個硬體設備,用了最基礎的ServerSocket類,參考的oracle的文檔 。 實現的比較簡單,放在github 上,不過這裡應該用Netty才是正解。所以,過一下Netty的入門文檔。本文demo
序言
問題
我們一般會用Http客戶端庫來調用web服務,獲取數據。如果一個東西是出於一般性目的設計出來的,那麼他在某些方面可能就不是最合適的。比如獲取大文件,收發郵件,展示實時的金融數據,遊戲數據傳輸等。為了實現這些需求,需要一個為其高度優化的特定協議。還有一個無法避免的問題是你可能需要調用老系統的數據,但是他的協議又是特定。重點來了,如何在不犧牲可靠性和性能的前提下快速實現這麼一個系統。
解決方案
用Netty。用Netty。用Netty。重要的事情說3遍。
Netty是一個非同步 事件驅動 網路框架 ,可以用來快速開發易維護,高性能,可擴展的服務端/客戶端。換句話說他簡化了TCP和UDP 等服務的網路開發。
容易開發或者快速開發並不意味著他會犧牲可維護性或者是面臨性能問題。Netty吸取了大量用於實現FTP,SMTP,HTTP協議的經驗,並且仔細小心謹慎的設計。所以,他在易於開發,追求性能,確保穩定性和靈活性上並沒有對任何一點有所妥協。
有人可能會說別的框架他們也這麼說自己,那Netty到底或者為什麼和他們不一樣。答案是他的設計理念。Netty提供的API用起來就非常舒服。現在可能不是那麼直觀,但是當你使用的時候就會體會到。
開始使用
這節會圍繞Netty的核心構建過程,用幾個例子來讓你快速上手。學完這節你會可以在Netty框架的基礎上學會寫client和server。
如果你想學的深入一點,了解一下他的底層實現,第二節,架構概覽是個不錯的起點。
開始之前
這節需要兩個東西,新版的Netty和jdk1.6+。Netty下載地址。
<dependencies>
    <!-- //mvnrepository.com/artifact/io.netty/netty-all -->
    <dependency>
        <groupId>io.netty</groupId>
        <artifactId>netty-all</artifactId>
        <version>4.1.49.Final</version>
    </dependency>
</dependencies>
隨著你不斷往下看,你能會對這節引入的類有疑惑,你可以隨時通過API文檔來了解更多。類名都是帶鏈接的,可以直接點過去。
編寫一個Discard Server
前半部分
世界上最簡單的協議並不是輸出Hello world,而是Discard,就是過來什麼都直接丟棄,並且不給任何回復。下面讓我們直接從Netty提供的handler實現來處理IO事件。
package io.netty.example.discard;

import io.netty.buffer.ByteBuf;
import io.netty.channel.ChannelHandlerContext;
import io.netty.channel.ChannelInboundHandlerAdapter;

public class DiscardServerHandler extends ChannelInboundHandlerAdapter {//1
    @Override
    public void channelRead(ChannelHandlerContext ctx, Object msg) throws Exception {//2
//        super.channelRead(ctx, msg);
        ((ByteBuf) msg).release();//3
    }

    @Override
    public void exceptionCaught(ChannelHandlerContext ctx, Throwable cause) throws Exception {//4
//        super.exceptionCaught(ctx, cause);
        cause.printStackTrace();
        ctx.close();
    }
}
有以下幾點:
-
我們寫一個
DiscardServerHandler類繼承自ChannelInboundHandlerAdapter,這個ChannelInboundHandlerAdapter繼承自抽象類ChannelHandlerAdapter並且實現了介面ChannelInboundHandler。ChannelInboundHandler提供了各種各樣的可重寫的事件handler方法。這裡只要使用ChannelInboundHandlerAdapter對ChannelInboundHandler的默認實現就好,不需要自己去實現所有的ChannelInboundHandler方法。 -
channelRead方法我們重寫掉了,這個方法會在收到客戶端消息的時候調用。例子中,消息msg的類型為ByteBuf。ByteBuf是對byte[]的一種抽象,可以讓我們訪問數組內容。 -
我們這裡需要實現的是Discard協議,就是丟棄協議,所以需要忽略收到的所有消息。ByteBuf是一種
reference-counted的對象(可以簡單理解指針之類的東西),必須通過顯式調用其release方法來釋放。通常,我們的channelRead方法是下面這樣的@Override public void channelRead(ChannelHandlerContext ctx, Object msg) throws Exception { try{ //對msg做一些處理 }finally { ReferenceCountUtil.release(msg); } } -
Netty在處理IO的遇到exception就會進入
exceptionCaught方法。通常,需要做一下日誌記錄,然後把相關的channel(通道)關閉。這裡做法也不是固定的,你可以先發一個帶code的Response然後再關閉。
後半部分
到這一步,我們已經實現了Discard服務的前半部分,剩下的就是寫一個main方法然後來啟動這個DiscardServerHandler服務。
package io.netty.example.discard;

import io.netty.bootstrap.ServerBootstrap;
import io.netty.channel.ChannelFuture;
import io.netty.channel.ChannelInitializer;
import io.netty.channel.ChannelOption;
import io.netty.channel.EventLoopGroup;
import io.netty.channel.nio.NioEventLoopGroup;
import io.netty.channel.socket.SocketChannel;
import io.netty.channel.socket.nio.NioServerSocketChannel;

public class DiscardServer {
    private int port;

    public DiscardServer(int port) {
        this.port = port;
    }

    public void run() throws InterruptedException {
        EventLoopGroup bossGroup = new NioEventLoopGroup();//1
        EventLoopGroup workerGroup = new NioEventLoopGroup();
        try {
            ServerBootstrap b = new ServerBootstrap();//2
            b.group(bossGroup, workerGroup)
                    .channel(NioServerSocketChannel.class)//3
                    .childHandler(new ChannelInitializer<SocketChannel>() {//4
                        protected void initChannel(SocketChannel socketChannel) throws Exception {
                            socketChannel.pipeline().addLast(new DiscardServerHandler());
                        }
                    })
                    .option(ChannelOption.SO_BACKLOG, 128)//5 最大連接數128
                    .childOption(ChannelOption.SO_KEEPALIVE, true);//6

            //綁定埠啟動服務
            ChannelFuture f = b.bind(port).sync();//7
            //server關閉的時候調用。因為這裡是Discard 服務,所以永遠不會調用。
            f.channel().closeFuture().sync();
        } finally {
            workerGroup.shutdownGracefully();
            bossGroup.shutdownGracefully();
        }
    }

    public static void main(String[] args) throws InterruptedException {
        int port = 8080;
        if (args.length > 0)
            port = Integer.parseInt(args[0]);

        new DiscardServer(port).run();
    }
}
有以下幾點:
-
NioEventLoopGroup是一個多執行緒的event loop(事件環?)。Netty針對不同的情況提供了多(18)種
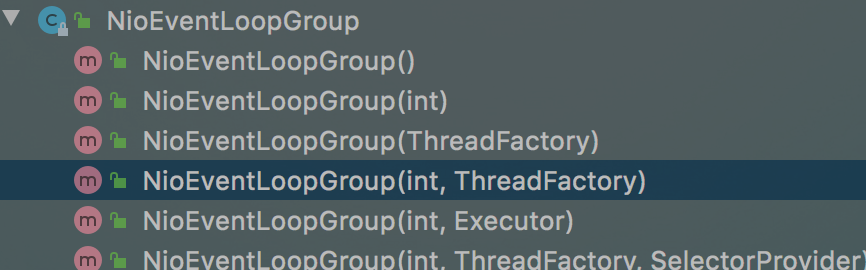
EventLoopGroup的實現,因為這裡是一個服務端應用,所以使用NioEventLoopGroup。new出來兩個對象,通常第一個叫boss,接收進來的連接。第二個,通常叫worker,因為當boss接收了連接之後會把鏈接註冊給worker,讓worker來處理後面的通訊。每個EventLoopGroup使用執行緒數以及他們如何被映射到Channel由EventLoopGroup的實現決定,並且可能可以通過構造函數來指定。 -
ServerBootstarp是一個配置server的幫助類,你可以使用Channel自己來配置,但是會比較枯燥,所以,大多數情況下直接使用這個
ServerBootstrap就好。 -
NioServerSocketChannel是一個Channel的實例,用來處理進來的連接(上面說的channel的功能)。 -
ChannelInitializer是一個特殊的Handler,作用是幫助用戶配置Channel。通常的作用是把ChannelHandler放到ChannelPipeline(管道)裡面,請求會進入到Pipeline,處理就按照這個Pipeline配置的Handler來。
DiscardServerHandler就是一種Handler。 -
用來配置Channel的參數。順道看一下
ServerBootstrap的定義,這個ServerBootstrap是用來啟動ServerChannel,ServerChannel實際上就是一個Channel。我們這裡實現的是一個TCP/IP server,所以,可以設置tcpNoDelay和keepAlive等參數。具體設置看文檔。public class ServerBootstrap extends AbstractBootstrap<ServerBootstrap, ServerChannel>{} -
option的為接收連接的配置,也就是給boss用,後面的childOption為worker配置選項。
-
萬事俱備,只欠把綁定埠配置上去然後啟動服務。
main方法裡面。
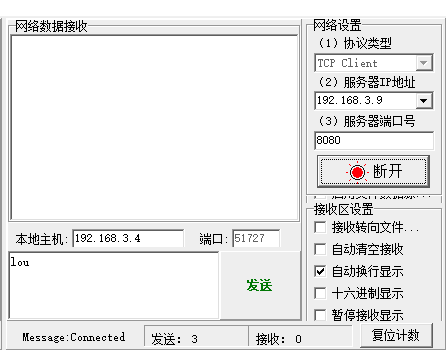
恭喜,搞定。用個tcp 客戶端連接試試~~可以看到連接成功,發送了3位元組,然後因為是Discard,所以沒有返回。
收到的數據
讓我們稍微修改一下程式碼,以便看看我們收到的數據。按照之前的例子,需要再channelRead方法裡面做修改。
@Override
public void channelRead(ChannelHandlerContext ctx, Object msg) throws Exception {
    final ByteBuf in = (ByteBuf) msg;
    try {
        System.out.println(in.toString(CharsetUtil.US_ASCII));
    } finally {
        in.release();
    }
}
msg可以直接轉換成ByteBuf對象,然後用ByteBuf的toString方法,設置ASCII參數裝成string列印出來。
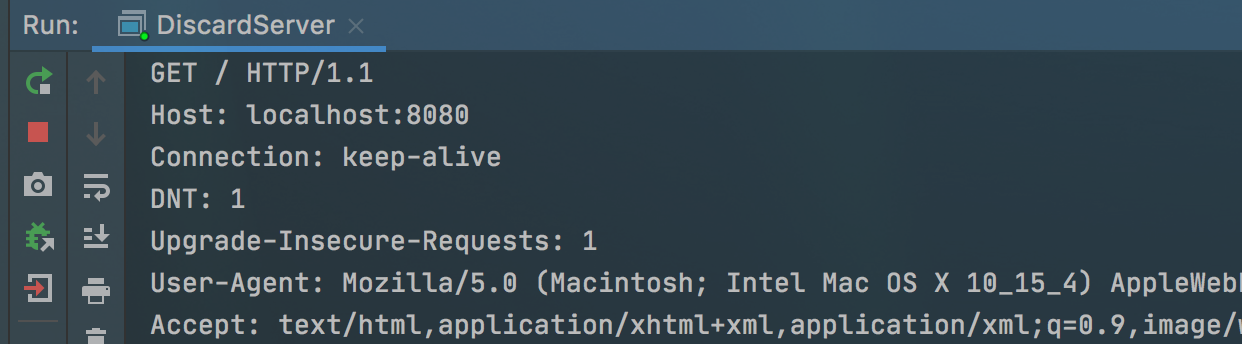
運行起來然後可以直接在瀏覽器輸入localhost:8080訪問,就能看到傳過來的數據。
寫一個Echo Server
我們寫一個Echo服務,客戶端輸入什麼,我們就回復什麼。
public class EchoServerHandler extends ChannelInboundHandlerAdapter {
    @Override
    public void channelRead(ChannelHandlerContext ctx, Object msg) throws Exception {
        ctx.write(msg);//1
        ctx.flush();//2
    }
}
- 通過ChannelHandlerContext對象,我們可以觸發一些IO事件或者執行一些操作。這裡我們不需要手動release msg,因為當我們執行了
wirte方法,Netty會幫我們釋放。 ctx.write(Object)會把內容寫到緩衝區,在調用flush後再輸出出去。可以用writeAndFlush方法代替。
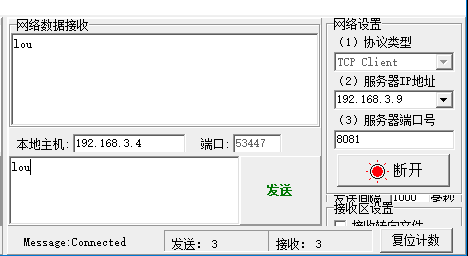
測試一下,發送3個位元組,收到3個位元組的回復。
寫一個TIME Server
這個例子用來實現一個Time協議。通過實現這個協議,我們可以了解Netty如何構造和發送數據。根據RFC868協議,Time協議有這麼幾步
- 伺服器監聽37埠
- 客戶端連接
- 服務端返回一個4位元組的int時間數據
- 客戶端接收到這個數據
- 客戶端關閉連接
- 服務端關閉連接。
這裡服務端忽略收到的任何客戶端數據,而是當客戶端一建立連接就返回數據,所以這裡不使用channelRead方法,而是channelActive方法。
package io.netty.example.time;

import io.netty.buffer.ByteBuf;
import io.netty.channel.ChannelFuture;
import io.netty.channel.ChannelFutureListener;
import io.netty.channel.ChannelHandlerContext;
import io.netty.channel.ChannelInboundHandlerAdapter;

public class TimeServerHandler extends ChannelInboundHandlerAdapter {
    @Override
    public void channelActive(final ChannelHandlerContext ctx) throws Exception {//1
        final ByteBuf timeBuf = ctx.alloc().buffer(4);//2
        timeBuf.writeInt((int) (System.currentTimeMillis() / 1000L + 2208988800L));

        final ChannelFuture channelFuture = ctx.writeAndFlush(timeBuf);//3
        channelFuture.addListener(new ChannelFutureListener() {
            public void operationComplete(ChannelFuture future) throws Exception {
                assert channelFuture == future;
                ctx.close();
            }
        });//4

    }

    @Override
    public void exceptionCaught(ChannelHandlerContext ctx, Throwable cause) throws Exception {
        cause.printStackTrace();
        ctx.close();
    }
}
-
重寫的是
channelActive方法,這個方法會在連接進來的時候調用。 -
因為要返回一個int值,所以需要4個位元組,通過
ChannelHandlerContext分配,然後writeAndFlush方法寫入並發送。 -
把數據發送給非阻塞IO流的時候不需要調用
java.nio.ByteBuffer.flip()方法,Netty的ByteBuf沒有提供這個方法,因為他不需要。ByteBuf內部有兩個指針,一個用於讀,一個用於寫。write的時候讀指針移動,寫指針不動,反之同理。在使用ByteBuffer的時候如果沒有flip,數據就會亂。Netty裡面所有的IO操作都是非同步的,這樣可能會導致write沒有開始(或者沒有完成)之前就連接就close掉了。比如下面的程式碼:
Channel ch = ...; ch.writeAndFlush(message); ch.close();//這也不是立馬關閉,也是一個ChannelFuture對象write(writeAndFlush)返回的是一個ChannelFuture對象,來大致看下這個對象的解釋。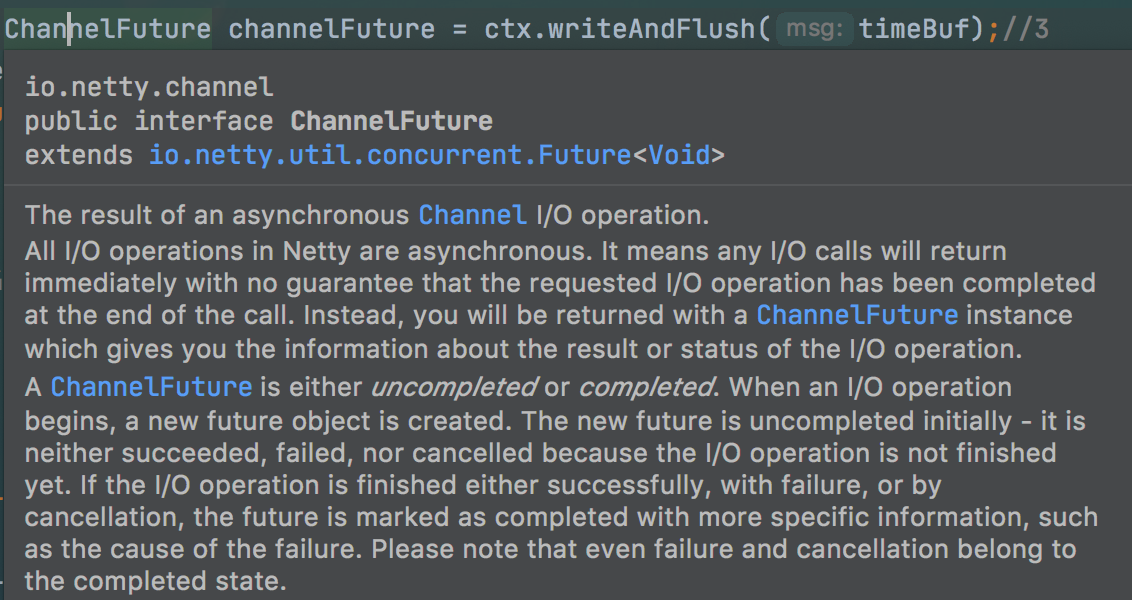
繼承自Future,表示一個Channel的IO操作的結果,不過他還沒完成,只是表示已經創建。【詳細的以後再講。】
-
如何能知道這個IO操作的結果呢?我們可以給這個ChannelFuture增加一個
ChannelFutureListener的實例(介面),然後實現它的operationComplete方法。這裡面的方法比較簡單,就是close掉這個ChannelHandlerContext,所以,可以使用定義好的ChannelFutureListener.CLOSE方法。像下面這樣channelFuture.addListener(ChannelFutureListener.CLOSE); -
用rdate 測試一下。測試通過。


寫一個TIME Client
寫完server之後就要寫client了。client程式和server程式最大的不同在於選擇的Bootstrap和Channel的實現類的差異。
package io.netty.example.time;

import io.netty.bootstrap.Bootstrap;
import io.netty.channel.ChannelFuture;
import io.netty.channel.ChannelInitializer;
import io.netty.channel.ChannelOption;
import io.netty.channel.EventLoopGroup;
import io.netty.channel.nio.NioEventLoopGroup;
import io.netty.channel.socket.SocketChannel;
import io.netty.channel.socket.nio.NioSocketChannel;

public class TimeClient {
    public static void main(String[] args) throws InterruptedException {
        int port = 37;
        String host = "192.168.1.181";
        EventLoopGroup workerGroup = new NioEventLoopGroup();

        try {
            final Bootstrap bootstrap = new Bootstrap();//1
            bootstrap.group(workerGroup);//2
            bootstrap.channel(NioSocketChannel.class);//3
            bootstrap.option(ChannelOption.SO_KEEPALIVE, true);//4
            bootstrap.handler(new ChannelInitializer<SocketChannel>() {
                protected void initChannel(SocketChannel ch) throws Exception {
                    ch.pipeline().addLast(new TimeClientHandler());//6
                }
            });

            final ChannelFuture connectFuture = bootstrap.connect(host, port).sync();//5

            connectFuture.channel().closeFuture().sync();
        } finally {
            workerGroup.shutdownGracefully();
        }
    }
}
-
Bootstrap和前面的ServerBootstrap類似,不過這個不是給
non-server非伺服器用,而是給客戶端或者connectionless非連接的用。 -
客戶端就不需要boss
EventLoopGroup了。其實前面的Server中group能用同一個。serverBootstrap.group(workGroup, workGroup);//同一個group -
channel也需要換成
NioSocketChannel,而不是NioServerSocketChannel。 -
這裡直接用option方法,而不是childOption和option,因為對應client,沒有childOption的概念。
-
client需要去connect,而不是bind來監聽。
看一下TimeClientHander.java
package io.netty.example.time;

import io.netty.buffer.ByteBuf;
import io.netty.channel.ChannelHandlerContext;
import io.netty.channel.ChannelInboundHandlerAdapter;

import java.util.Date;

public class TimeClientHandler extends ChannelInboundHandlerAdapter {
    @Override
    public void channelRead(ChannelHandlerContext ctx, Object msg) throws Exception {
        final ByteBuf m = (ByteBuf) msg;//1
        try {
            final long currentTimeMills = (m.readUnsignedInt() - 2208988800L) * 1000L;//2
            System.out.println(new Date(currentTimeMills));
            ctx.close();
        } finally {
            m.release();
        }
    }

    @Override
    public void exceptionCaught(ChannelHandlerContext ctx, Throwable cause) throws Exception {
        cause.printStackTrace();
        ctx.close();
    }
}
- 對象轉換成
ByteBuf。 - 直接通過
readUnsignedInt()方法讀取數值。
程式碼看起來比較簡單,但是一定可能性(小概率)會有IndexOutOfBoundsException異常,我們下節討論。
處理基於stream的傳輸
Socket Buffer的一個問題
TCP/IP是一個典型的stream-based協議,接收數據然後放到socket buffer裡面。但是這個buffer隊列存的是byte,而不是packet數據包。所以,就算髮了兩個packet,在系統看來,他就是一堆byte。所以,沒有辦法保證你讀取到的東西和發過來的一定一樣。
舉個例子,假設收到了3個數據包,ABC,DEF,GHI

有可能收到的是下面這樣的

所以,server和client需要一種規則來劃分數據包,然後對方就知道每個包到底是啥樣的。
第一種解決方案
其實道理上來說因為int數據包也就4個位元組,所以不太會被分片,不太容易出現IndexOutOfBoundsException異常。但是,隨著數據包變大,分片的可能性就會增加,到時候異常出現的概率就會增大。
因為我們知道收到的數據是4個位元組,所以,我們可以分配一個4自己的空間,等到一滿,我們就知道已經收到該有的數據包了,就直接處理就好。來改一下我們的TimeClientHandler
package io.netty.example.time;

import io.netty.buffer.ByteBuf;
import io.netty.channel.ChannelHandlerContext;
import io.netty.channel.ChannelInboundHandlerAdapter;

import java.util.Date;

public class TimeClientHandler2 extends ChannelInboundHandlerAdapter {
    private ByteBuf buf;

    @Override
    public void handlerAdded(ChannelHandlerContext ctx) throws Exception {
        buf = ctx.alloc().buffer(4);//1
    }

    @Override
    public void handlerRemoved(ChannelHandlerContext ctx) throws Exception {
        buf.release();//1
        buf = null;
    }

    @Override
    public void channelRead(ChannelHandlerContext ctx, Object msg) throws Exception {
        final ByteBuf m = (ByteBuf) msg;
        buf.writeBytes(m);//2
        m.release();

        if (buf.readableBytes() >= 4) {//3
            final long currentTimeMillis = (buf.readUnsignedInt() - 2208988800L) * 1000L;
            System.out.println(new Date(currentTimeMillis));
            ctx.close();
        }
    }

    @Override
    public void exceptionCaught(ChannelHandlerContext ctx, Throwable cause) throws Exception {
        cause.printStackTrace();
        ctx.close();
    }
}
- 重寫了
handlerAdded和handlerRemoved方法,在這兩個方法裡面初始化或者銷毀buf對象。只要這兩個方法不會阻塞太長時間,是沒有關係的。 - 把收到的內容寫到buf對象裡面。
- 每次有數據過來的時候會進入channelRead方法(不同的連接不會串),做一個業務邏輯判斷。
第二種解決方案
雖然上面的問題是解決了,但是因為我們曉得發過來的數據是4個位元組的(就一個欄位),所以比較好處理。但是,如果這個對象是一個比較複雜的業務對象,那麼要維護這個類就會比較麻煩。
我們可以對這個TimeClientHandler2的功能拆解成2部分。
TimeDecoder專門處理數據包分片的問題。TimeClientHandler2還是保持簡單。
package io.netty.example.time;

import io.netty.buffer.ByteBuf;
import io.netty.channel.ChannelHandlerContext;
import io.netty.handler.codec.ByteToMessageDecoder;

import java.util.List;

public class TimeDecoder  extends ByteToMessageDecoder {//1
    protected void decode(ChannelHandlerContext ctx, ByteBuf in, List<Object> out) throws Exception {//2
        if (in.readableBytes()<4)
            return;//3
        out.add(in.readBytes(4));//4
    }
}
- ByteToMessageDecoder繼承自ChannelInboundHandlerAdapter,實現了ChannelInboundHandler介面,所以這個Decoder對象也是一個
ChannelHandler對象。他專門用來處理分片問題。 ByteToMessageDecoder會在有新的數據進來的時候調用decode方法,內部維護一個buffer。ByteToMessageDecoder可以根據自己的業務邏輯來執行。- 假設進來的位元組數據大於4,那麼他就會調用這個decode多次,每次處理4個位元組。
使用POJO而不是ByteBuf
前面的例子讀寫數據的核心都是ByteBuf類,在ChannelHandler裡面直接把object msg 轉成ByteBuf,然後操作。如果我們能通過POJO來操作,那麼,程式碼的可維護性明顯會高一些。讓我們來改造一下我們的程式碼。
第一步,定義一個UnixTime類,來表示我們要處理的對象。
package io.netty.example.time2;

import java.util.Date;

public class UnixTime {
    private final long value;

    public UnixTime() {
        this(System.currentTimeMillis() / 1000L + 2208988800L);
    }

    public UnixTime(long value) {
        this.value = value;
    }

    public long getValue() {
        return value;
    }

    @Override
    public String toString() {
        return "轉換出來的時間是:"+ new Date((getValue() - 2208988800L) * 1000L).toString();
    }
}
第二步,我們改一下我們的TimeDecoder來產生一個UnixTime對象。
package io.netty.example.time2.client;

import io.netty.buffer.ByteBuf;
import io.netty.channel.ChannelHandlerContext;
import io.netty.handler.codec.ByteToMessageDecoder;

import java.util.List;

public class TimeDecoder extends ByteToMessageDecoder {
    @Override
    protected void decode(ChannelHandlerContext ctx, ByteBuf in, List<Object> out) throws Exception {
        if (in.readableBytes()<4)
            return;
        out.add(new UnixTime(in.readUnsignedInt()));
    }
}
第三步,在ChannelHandler裡面我們直接按照UnixTime對象操作。
package io.netty.example.time2.client;

import io.netty.channel.ChannelHandlerContext;
import io.netty.channel.ChannelInboundHandlerAdapter;

public class TimeClientHandler extends ChannelInboundHandlerAdapter {
    @Override
    public void channelRead(ChannelHandlerContext ctx, Object msg) throws Exception {
        UnixTime time = (UnixTime) msg;
        System.out.println(time);
        ctx.close();
    }
}
第四步,同理,server端也可以類似的修改。
package io.netty.example.time2.server;

import io.netty.channel.ChannelFuture;
import io.netty.channel.ChannelFutureListener;
import io.netty.channel.ChannelHandlerContext;
import io.netty.channel.ChannelInboundHandlerAdapter;

public class TimeServerHandler extends ChannelInboundHandlerAdapter {
    @Override
    public void channelActive(ChannelHandlerContext ctx) throws Exception {
        ChannelFuture channelFuture = ctx.writeAndFlush(new UnixTime());
        channelFuture.addListener(ChannelFutureListener.CLOSE);
    }
}
相較於以前的分配空間的操作,明顯簡單了許多。
第五步,現在,還缺一個東西,一個encoder,用來把UnixTime轉成ByteBuf,這個是逃不開的,哈哈。
package io.netty.example.time2.server;

import io.netty.buffer.ByteBuf;
import io.netty.channel.ChannelHandlerContext;
import io.netty.channel.ChannelOutboundHandlerAdapter;
import io.netty.channel.ChannelPromise;

public class TimeEncoder extends ChannelOutboundHandlerAdapter {
    @Override
    public void write(ChannelHandlerContext ctx, Object msg, ChannelPromise promise) throws Exception {
        UnixTime m = (UnixTime) msg;
        ByteBuf buffer = ctx.alloc().buffer(4);
        buffer.writeInt((int)m.getValue());
        ctx.write(buffer,promise);//1
    }
}
- 這一行裡面有一些比較重要的事情。
- 這裡有個ChannelPromise對象,來標記write成功與否。
- 我們沒有手動調用
flush方法,因為ChannelOutboundHandlerAdapter有個flush會自動調用。
其實這個用MessageToByteEncoder
package io.netty.example.time2.server;

import io.netty.buffer.ByteBuf;
import io.netty.channel.ChannelHandlerContext;
import io.netty.handler.codec.MessageToByteEncoder;

public class TimeEncoder2 extends MessageToByteEncoder<UnixTime> {
    @Override
    protected void encode(ChannelHandlerContext ctx, UnixTime msg, ByteBuf out) throws Exception {
        out.writeInt((int) msg.getValue());
    }
}
MessageToByteEncoder是一個ChannelOutboundHandlerAdapter的實現抽象類,專門負責把POJO對象轉成ByteBuf。
最後一步,把Encoder像之前Decoder一樣加到ChannelPipeline裡面。你懂的。
client.handler(new ChannelInitializer<SocketChannel>() {
    @Override
    protected void initChannel(SocketChannel ch) throws Exception {
        ch.pipeline().addLast(new TimeDecoder(), new TimeClientHandler());//客戶端解碼 加進去
    }
});
server.group(bossGroup, workerGroup)
        .channel(NioServerSocketChannel.class)
        .childHandler(new ChannelInitializer<SocketChannel>() {
            @Override
            protected void initChannel(SocketChannel ch) throws Exception {
                ch.pipeline().addLast(new TimeEncoder2(), new TimeServerHandler());//服務端直接操作UnixTime,需要編碼,加進去
            }
        })
        .option(ChannelOption.SO_BACKLOG, 128)
        .childOption(ChannelOption.SO_KEEPALIVE, true);
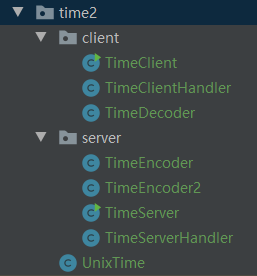
程式碼結構看起來是這樣的
關閉程式
關閉比較簡單,調用shutdownGracefully()即可,然後會返回一個Future對象。
小結
強烈建議看看官方的例子。

