ASP .NET Core 建立列表和表單View
前幾篇文章對控制器Controller以及布局頁_Layout相關的程式碼與作用介紹了一下。接下來就是建立控制器對應的列表和對應的表單。
建立Department文件夾,在文件夾下面建立普通的Index.cshtml。

此視圖對應Department控制器裡面的Index方法,返回的值是IEnumerable,所有在視圖去接收部門數據的時候先去轉一下。

視圖Index程式碼:
@using WebApplication1.Models
@model IEnumerable<Department>

<div class="row">
    <div class="col-md-10 offset-md-2">
        <table class="table">
            <tr>
                <th>Name</th>
                <th>Location</th>
                <th>Employee Count</th>
                <th>操作</th>
            </tr>
            @Html.DisplayForModel() //HtmlHelper 用於展示數據,為了展示數據要寫一個模板。模板如下
        </table>
    </div>
</div>
<div class="row">
    <div class="col-md-2">
        @await  Component.InvokeAsync("CompanySummary")
    </div>

    <div class="col-md-4 offset-md-2">
        <a asp-action="Add">Add</a> //asp-action指向的方法是Add,因為Add是在本控制器中存在Add方法所以進行頁面跳轉只需要使用as-acion即可
    </div>
</div>

在Department文件夾下面建立DisplayTemplates文件夾在文件夾下面再建立一個Department.cshtml用於顯示數據

@model WebApplication1.Models.Department
<tr>
    <td>@Model.Name</td>
    <td>@Model.Location</td>
    <td>@Model.EmployeeCount</td>
    <td>
     //打開部門列出部門下的所有員工
     //asp-controller:指向控制器,asp-action:指向對應的視圖,asp-route-departmentId:傳遞參數
        <a asp-controller="Employee" asp-action="Index" asp-route-depart mentId="@Model.Id">Employees</a>
    </td>
</tr>
如圖:

運行看看效果:

接下來就是寫Employee控制器對應的視圖了。首先還是員工的Index,建立Employee文件夾再建立對應的Index視圖。總體內容還是喝部門Index基本上一樣。
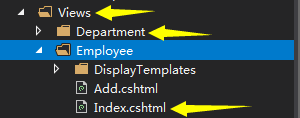
員工Index:
@using WebApplication1.Models
@model  IEnumerable<Employee>
    <div class="row">
        <div class="col-md-10 offset-md-2">
            <table class="table">
                <tr>
                    <th>First Name</th>
                    <th>Last Name</th>
                    <th>Gender</th>
                    <th>Is Fired</th>
                    <th>操作</th>
                </tr>
          //作用和部門中的DisplayForModel一樣用於顯示數據
                @Html.DisplayForModel()
            </table>
        </div>
    </div>
    <div class="row">
        <div class="col-md-4 offset-md-2">
            <a asp-action="Add" asp-route-departmentId="@ViewBag.DepartmentId">Add</a>
        </div>
    </div>
模板的建立:

Employee.cshtml模板內容:
@model  WebApplication1.Models.Employee
    <tr>
        <td>@Model.FirstName</td>
        <td>@Model.LastName</td>
        <td>@Model.Gender</td>
        <td>@(Model.Fired?"是":"")</td>
        <td>
            @if (!Model.Fired)
            {
                <a asp-action="Fire" asp-route-employeeId="@Model.Id">
                    Fire
                </a>
            }
        </td>
    </tr>
現在就可以通過點擊部門,就可以查看部門下的所有員工了。

有關Index的視圖頁面已經搞定了。現在準備建立Add添加方法對應的視圖頁面。具體操作還是一樣建立Add.cshtml視圖頁面。首先是建立Add部門視圖
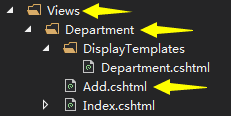
程式碼如下:
@using WebApplication1.Models
@model Department
    <form asp-action="Add">
        <div class="row form-group">
            <div class="col-md-2 offset-md-2">
           //asp-for指向實體類中的註解Display名稱 ,如下圖
                <label asp-for="Name"></label>
            </div>
            <div class="col-md-6">
                <input class="form-control" asp-for="Name" />
            </div>
        </div>
        <div class="row form-group">
            <div class="col-md-2 offset-md-2">
                <label asp-for="Location"></label>
            </div>
            <div class="col-md-6">
                <input class="form-control" asp-for="Location" />
            </div>
        </div>
        <div class="row form-group">
            <div class="col-md-2 offset-md-2">
                <label asp-for="EmployeeCount"></label>
            </div>
            <div class="col-md-6">
                <input class="form-control" asp-for="EmployeeCount" />
            </div>
        </div>

        <div class="row">
            <div class="col-md-6">
                <button type="submit" class="btn btn-primary">Add</button>
            </div>
        </div>
    </form>

現在來運行添加一個部門:
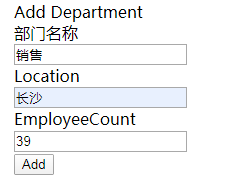
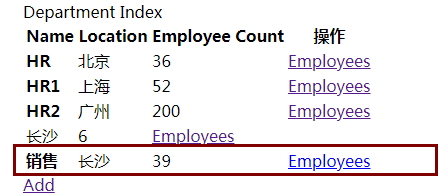
如上圖已經添加成功,到這裡新增部門已經完成。接下來就是新增部門對應的員工了。

因為新增員工操作必須要到部門Id所有:

這個ViewBag在員工的Index已經用ViewBag存好了,所有在點擊新增是只需要帶帶新增視圖頁面就搞定了。

看看員工Add視圖程式碼(和部門差不多):唯一的區別就是添加了一個隱藏的文本hidden
@using WebApplication1.Models
@model Employee
    <form asp-action="Add">
        <input type="hidden" asp-for="DepartmentId" />
        <div class="row form-group">
            <div class="col-md-2 offet-md-2">
                <lable asp-for="FirstName"></lable>
            </div>
            <div class="col-md-6">
                <input class="form-control" asp-for="FirstName" />
            </div>
        </div>

        <div class="row form-group">
            <div class="col-md-2 offet-md-2">
                <lable asp-for="LastName"></lable>
            </div>
            <div class="col-md-6">
                <input class="form-control" asp-for="LastName" />
            </div>
        </div>

        <div class="row form-group">
            <div class="col-md-2 offet-md-2">
                <lable asp-for="Gender"></lable>
            </div>
            <div class="col-md-6">
          //性別下拉框
                <select class="form-control"
                        asp-for="Gender"
                        asp-items="Html.GetEnumSelectList<Gender>()">
                </select>
            </div>
        </div>

        <div class="row">
            <div class="col-md-2 offset-md-2">
                <button type="submit" class="btn btn-primary">Add</button>
            </div>
        </div>
    </form>
運行來看看效果:
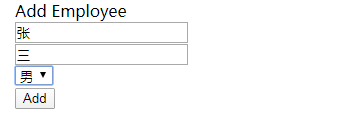
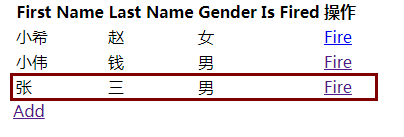
如圖,它已經添加成功了。到這裡整個小栗子的列表顯示和視圖的建立已經搞定了。

