要做小程式的訂閱推送 本篇 從小程式到後端!!!
- 2020 年 4 月 29 日
- 筆記
小程式模板消息即將被廢棄掉,於是有了新介面wx.requestSubscribeMessage —-訂閱消息推送
本篇將帶你感受一下訂閱推送的坑坑窪窪
前期準備工作申請訂閱消息模板 id appid 等自行準備 這準備不好的話 別幹了兄弟轉行吧 我不讓白嫖!!!!!
話不多說直接上程式碼!!!!!!!!!!!!!!!!!!!!!!!!!!!!!!!!!!!!!!!!!!!!!!!!!!!!
小程式端
app.js
//app.js
App({
  onLaunch: function () {
    // 展示本地存儲能力
    var logs = wx.getStorageSync('logs') || []
    logs.unshift(Date.now())
    wx.setStorageSync('logs', logs)

    var that = this
    var user = wx.getStorageSync('user') || {};
    var userInfo = wx.getStorageSync('userInfo') || {};

    // 登錄
    wx.login({
      success: res => {
        // 發送 res.code 到後台換取 openId, sessionKey, unionId
        //獲取openid___________________________________________開始
        that.globalData.code = res.code
            if (res.code) {

              wx.getUserInfo({
                success: function (res) {

                  var objz = {};
                  objz.avatarUrl = res.userInfo.avatarUrl;
                  objz.nickName = res.userInfo.nickName;

                  wx.setStorageSync('userInfo', objz);//存儲userInfo

                },
                fail: function (e) {

                }
              });

              var d = that.globalData;//這裡存儲了appid、secret、token串

              var l = '//api.weixin.qq.com/sns/jscode2session?appid=' + d.appid + '&secret=' + d.secret + '&js_code=' + res.code + '&grant_type=authorization_code';
              wx.request({
                url: l,
                data: {},
                method: 'GET', // OPTIONS, GET, HEAD, POST, PUT, DELETE, TRACE, CONNECT
                // header: {}, // 設置請求的 header
                success: function (res) {

                  var obj = {};
                  obj.openid = res.data.openid;
                  obj.expires_in = Date.now() + res.data.expires_in;
                  console.log(obj.openid);
                  wx.setStorageSync('userop', obj);//存儲openid
                }
              });
            } else {
              console.log('獲取用戶登錄態失敗!' + res.errMsg)
            }
            //獲取openid___________________________________________結束
      }
    })
    // 獲取用戶資訊
    wx.getSetting({
      success: res => {
        if (res.authSetting['scope.userInfo']) {
          // 已經授權,可以直接調用 getUserInfo 獲取頭像昵稱,不會彈框
          wx.getUserInfo({
            success: res => {
              // 可以將 res 發送給後台解碼出 unionId
              this.globalData.userInfo = res.userInfo

              // 由於 getUserInfo 是網路請求,可能會在 Page.onLoad 之後才返回
              // 所以此處加入 callback 以防止這種情況
              if (this.userInfoReadyCallback) {
                this.userInfoReadyCallback(res)
              }
            }
          })
        }
      }
    })
  },
  globalData: {
       url:"//192.168.0.199:8888/app",
       appid: '微信appid',//微信appid
       secret: '秘鑰',//秘鑰
       userInfo: null
  }
})
index.js
//登錄
  login:function(){
    if(!this.data.userName){
      wx.showToast({
        title: '用戶名不能為空',
        icon:'none'
      })
      return;
    }
    if (!this.data.pwd) {
      wx.showToast({
        title: '密碼不能為空',
        icon: 'none'
      })
      return;
    }
    wx.showLoading({});
    wx.setStorageSync("cid",this.guid());
    wx.request({
      url: app.globalData.url + '/Login/appLogin',
      data:{
        username: this.data.userName,
        password: this.data.pwd,
        clientId: wx.getStorageSync("cid"),
        openid: wx.getStorageSync('userop').openid
      },
      header: {
        'content-type': 'application/x-www-form-urlencoded',
        'X-Requested-With':'XMLHttpRequest'
      },
      method:"POST",
      success:function(res){
        if(res.data.status == 200){
          wx.setStorageSync("user", res.data.user);
          wx.removeStorageSync('sessionid');
          wx.setStorageSync("sessionid", res.cookies[1]);
          wx.switchTab({
            url: '/pages/main/main'
          });
          return;
        }else{
          wx.showToast({
            title: '用戶名或密碼錯誤',
            icon: 'none'
          })
        }
      }
    });
獲取到openid之後直接就從你的登錄方法往後端傳就行 後端接收後存到相應的表裡 下次登錄給掛個標識 表裡對應的useid有就不存了 沒有就存 如果有redis可以做快取 避免給資料庫造成太大的壓力
當然這只是小程式獲取openi的第一步
後端程式碼給您您
微信個推的工具類 自己寫的用的話可以根據自己的需求改改
 1 package com.jeesite.modules.sys.utils;
 2
 3 import com.alibaba.fastjson.JSONObject;
 4 import com.jeesite.common.wx.TemplateDataVo;
 5 import com.jeesite.common.wx.WxMssVo;
 6 import lombok.extern.slf4j.Slf4j;
 7 import org.springframework.http.ResponseEntity;
 8 import org.springframework.stereotype.Component;
 9 import org.springframework.web.client.RestTemplate;
10 import java.util.HashMap;
11 import java.util.Map;
12
13 /**
14  * @Author wm
15  * @Description wx小程式發送工具
16  * @Date 2020/4/278:22
17  **/
18
19 @Slf4j
20 @Component
21 public class WeChatPushUtils {
22
23
24
25     /**
26      *
27      * @param openid 用戶openid
28      * @param templateDataVo 模板消息
29      * @return
30      */
31     public static String pushOneUser( String openid,TemplateDataVo templateDataVo) {
32         RestTemplate restTemplate = new RestTemplate();
33         //自動獲取token
34         String access_token = getAccess_token();
35         String url = "//api.weixin.qq.com/cgi-bin/message/subscribe/send?access_token=" + access_token; //微信請求介面
36         //封裝模板數據
37         WxMssVo wxMssVo = new WxMssVo();
38         //用戶openid
39         wxMssVo.setTouser(openid);
40         Map<String,Object> data = new HashMap<>();
41         data.put("number2",templateDataVo.getNumber2());
42         data.put("name1",templateDataVo.getName1());
43         wxMssVo.setData(data);
44         ResponseEntity<String> responseEntity = restTemplate.postForEntity(url,JSONObject.toJSON(wxMssVo).toString(),String.class);
45         log.info("小程式推送結果={}", responseEntity.getBody());
46         return responseEntity.getBody();
47     }
48
49     /**
50      * 獲取access_token
51      * appid和appsecret到小程式後台獲取,當然也可以讓小程式開發人員給你傳過來
52      * */
53     public static   String getAccess_token() {
54         RestTemplate restTemplate = new RestTemplate();
55         //獲取access_token
56         String appid = "微信appid";
57         String appsecret = "密鑰";
58         String url = "//api.weixin.qq.com/cgi-bin/token?grant_type=client_credential" +
59                 "&appid=" + appid + "&secret=" + appsecret; //獲取token
60         if(restTemplate==null){
61             restTemplate = new RestTemplate();
62         }
63         String json = restTemplate.getForObject(url, String.class);
64         JSONObject myJson = JSONObject.parseObject(json);
65         return myJson.get("access_token").toString();
66     }
67 }
這裡面不得不說的幾個坑 我的天那選的模板 一定一定要根據微信公眾平台提供的例子去封裝 一定一定一定 別自己隨便去封裝什麼實體 最底層的key就是value
不解釋了我截個圖去
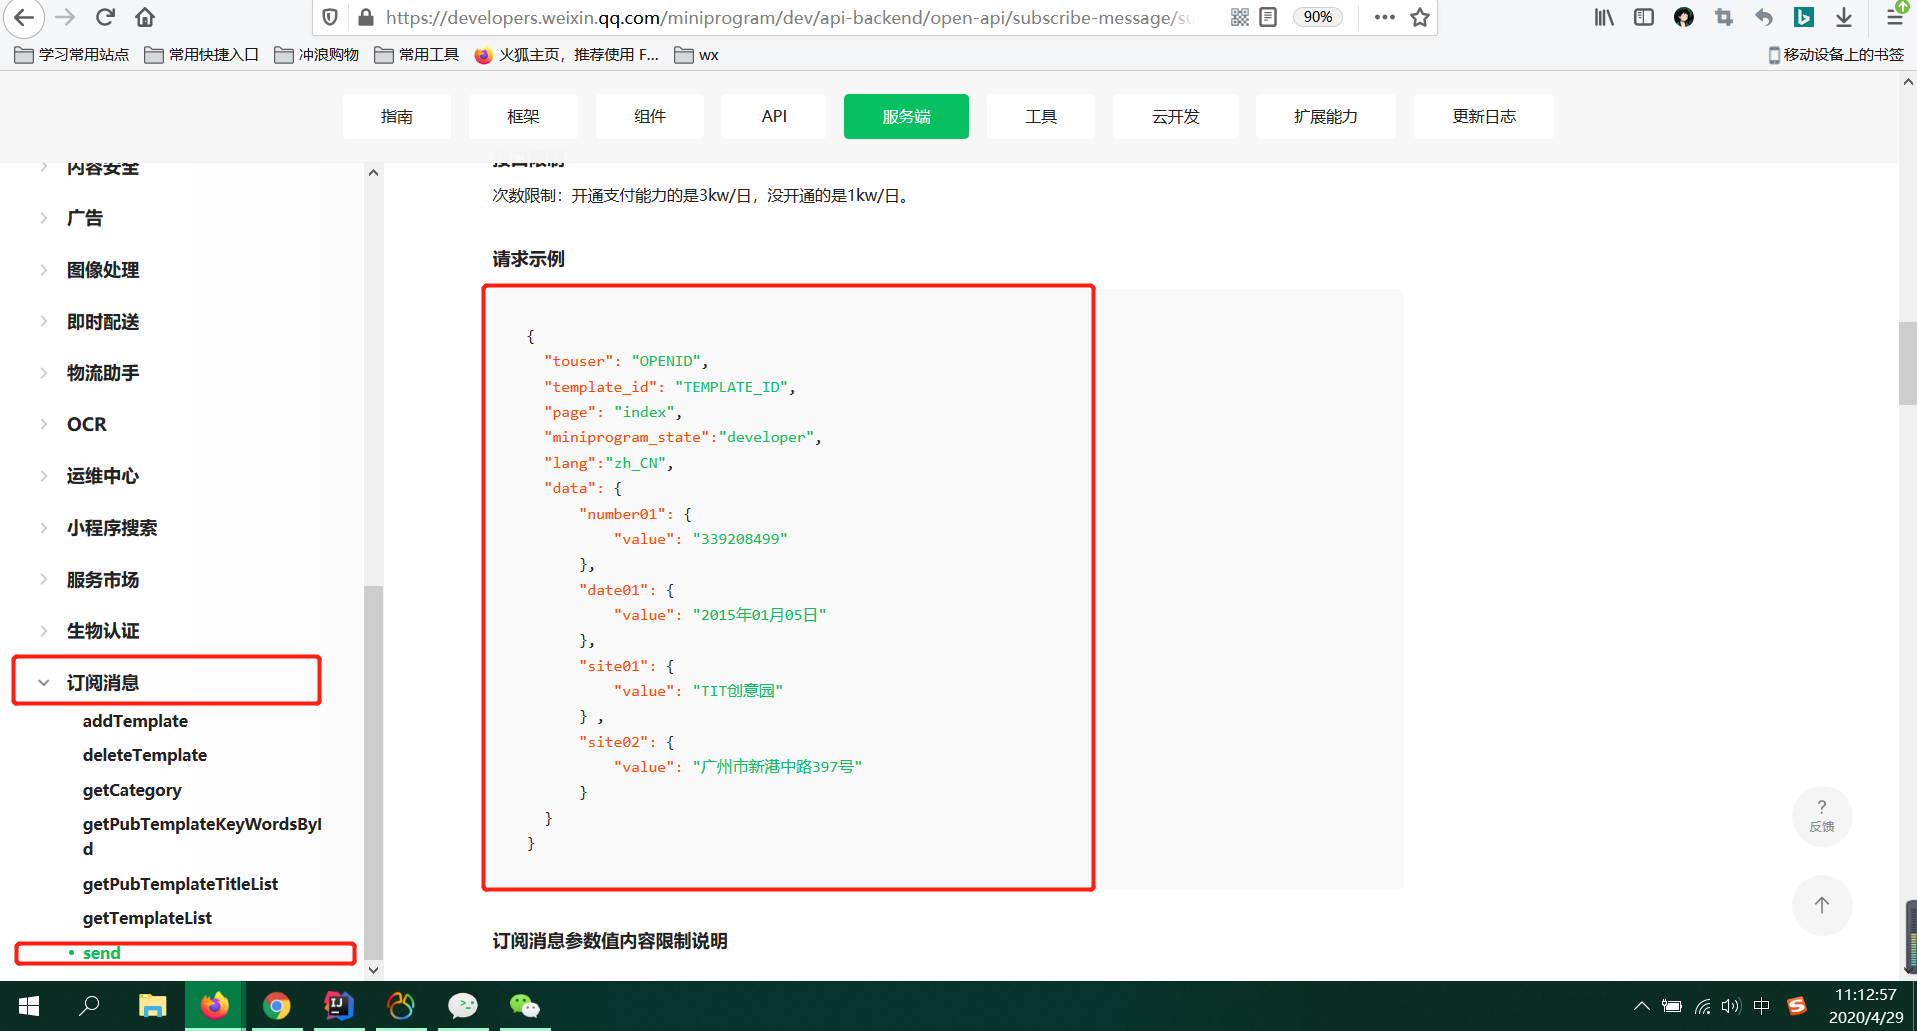
也別說了 看圖寶貝 介面很隱秘網址先po出來//developers.weixin.qq.com/miniprogram/dev/api-backend/open-api/subscribe-message/subscribeMessage.send.html
看右邊大紅框裡面的data值 就是你申請的模板對應的相關欄位 data 比如你申請的欄位是 thing1 name你寫的方式就是
data{
thing1:{
value:"thing1的值"
}
}
對沒錯 value 就是每個欄位值的key
這就是那個坑封裝的坑 如果想實體封裝太麻煩 建議JSONOBJECT簡單粗暴
但是!!!!但是 到了這一步即使你傳進去了模板id openid 想發請求 不好意思 不行行!!!!!!!!
下面我們來看看原因
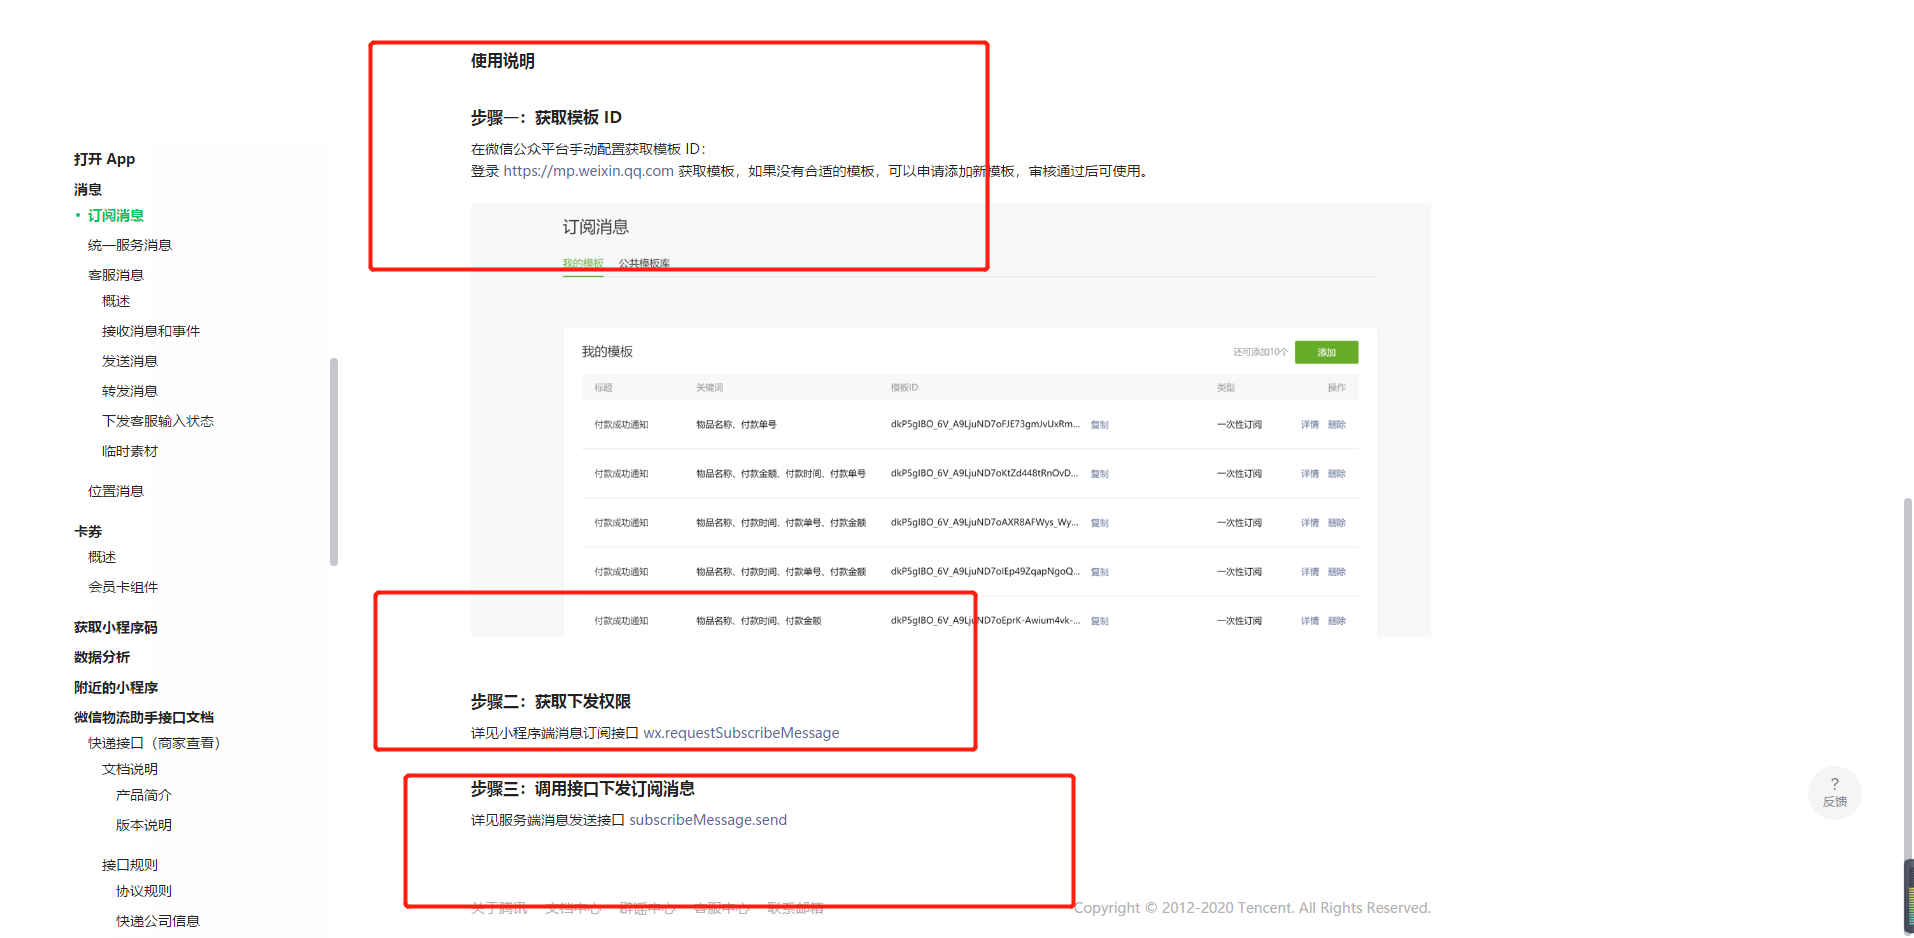
還是看圖 步驟一的數據都有了 詳情網址://developers.weixin.qq.com/miniprogram/dev/framework/open-ability/subscribe-message.html
那他媽步驟二呢 用戶沒訂閱發個蛋蛋…………
下面就得讓openid這個用戶訂閱一下
上!!!代!!!!碼!!!!!
我是這樣做的

加了一個按鈕 ,用戶點了就是這樣的
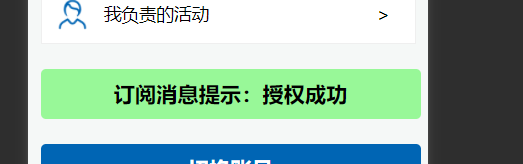
雖然有點丑 功能是有了
程式碼標籤
1 <button bindtap="subTap" type="defaults" style=" background-color:#98F898;width:95%;margin:20px 10px;">訂閱消息<text>{{textcontent}}</text></button>
函數
 1 //訂閱消息開啟
 2 data: {
 3   textcontent: '提示:未開啟'
 4 },
 5
 6 // 檢測是否開啟  更新提示
 7 testingTap: function() {
 8   let that = this;
 9   wx.getSetting({
10     withSubscriptions: true,
11     success(res) {
12       console.log(res)
13       if (res.subscriptionsSetting.mainSwitch) {
14         if (res.subscriptionsSetting.itemSettings != null) {
15           let item = res.subscriptionsSetting.itemSettings.模板id
16           console.log(item)
17           if (item == "reject") {
18             that.setData({
19               textcontent: '提示:您已經拒絕訂閱消息'
20             })
21           } else if (item == "accept") {
22             that.setData({
23               textcontent: '提示:您已經開啟訂閱消息'
24             })
25           } else if (item == "ban") {
26             that.setData({
27               textcontent: '提示:您已經被後台封禁'
28             })
29           }
30         }
31       } else {
32         that.setData({
33           textcontent: '提示:訂閱消息未開啟'
34         })
35       }
36     }
37   })
38 },
39
40 //授權
41 subTap: function() {
42   let that = this;
43   wx.requestSubscribeMessage({
44     tmplIds: ['模板id'],
45     success(res) {
46       if(res.模板id=="accept"){
47         that.setData({
48           textcontent: '提示:授權成功'
49         })
50       }else{
51         that.setData({
52           textcontent: '提示:未授權'
53         })
54       }
55     },
56     fail(res) {
57
58       that.setData({
59         textcontent: '提示:授權失敗'
60       })
61     }
62   })
63 }
這樣用戶訂閱了之後才能發送 ………快去試試吧
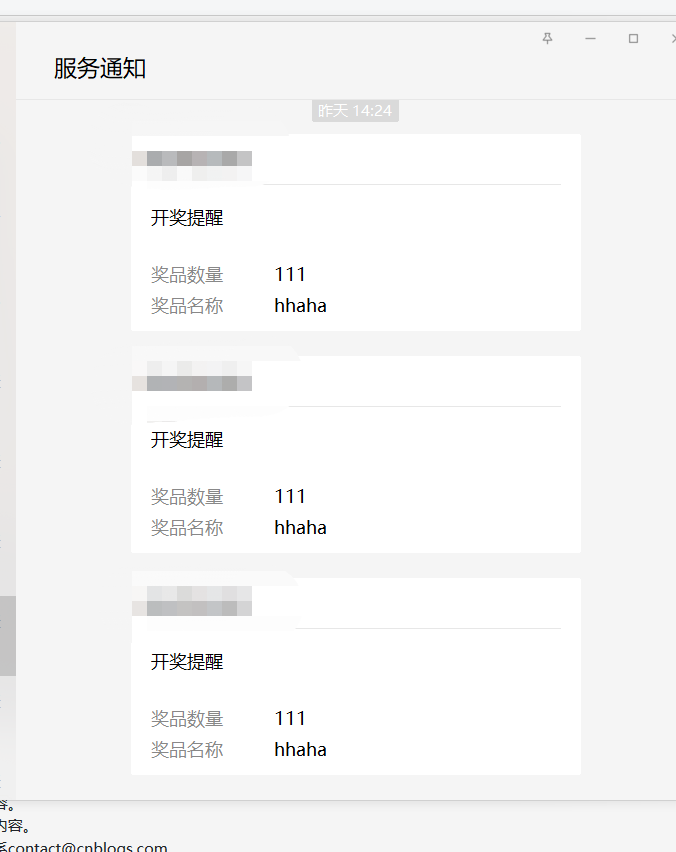
本文為原創當然寫的時候太草率 有諸多問題沒有說明 但是程式碼你只要有點基礎 放對地方了絕對 下面附成功圖
如果有什麼問題加QQ:592322684 我樂於助人 有啥不會的咱倆一塊不會………嘿嘿


