曹工说mini-dubbo(1)–为了实践动态代理,我写了个简单的rpc框架
- 2020 年 3 月 16 日
- 笔记
相关背景及资源:
之前本来一直在写spring源码解析这块,如下,aop部分刚好写完。以前零散看过一些文章,知道rpc调用基本就是使用动态代理,比如rmi,dubbo,feign调用等。自己也就想着试一下,于是有了mini-dubbo这个东西,暂时也不能称为一个框架,因为还不是生产级的,目前只是实现了一部分小功能,也没有监控,也没有xxx,反正就是缺的比较多。
曹工说Spring Boot源码(22)– 你说我Spring Aop依赖AspectJ,我依赖它什么了
我就说下,里面用到的知识点吧,有兴趣的,可以克隆源码下来看看:
- 动态代理
- 服务注册和消费,使用redis作为注册中心,其中使用了redisson作为redis客户端,其中涉及到BeanFactoryPostProcessor的使用
- 因为传输层使用netty和mina,是异步的,但是上层又需要等待结果,所以用到了同步转异步
- spring的xml解析,bean definition注册,spring 扩展xml 命名空间
- 自定义的spi的相关知识
- 分层思想,从dubbo借鉴了其分层,但是mini-dubbo要少几层,因为我暂时不是很清楚dubbo的每一层的具体职责,所以我按我自己理解分的层。上层依赖下层,只通过下层的接口,查找下层接口时,直接在spring容器中查找bean即可,类似于spring mvc的设计。当下层有多个实现时,通过类似spi机制来指定具体要使用的下层实现。
- 基于第5点,所以本框架非常容易替换各层的实现,只要自己自定义一个spring bean,实现对应的接口,然后在spi文件中指定本实现的类名即可。
- netty和mina的tcp粘包拆包工作。
概要
代码我放在了如下位置:
https://gitee.com/ckl111/mini-dubbo
我介绍下代码的整体结构:
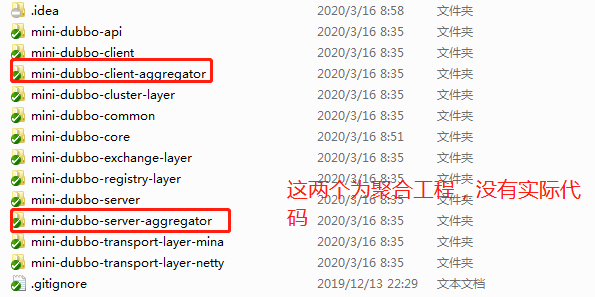
服务端聚合工程比较简单,目前也没时间去仔细弄,包含了如下module:
<modules> <!--业务层api--> <module>../mini-dubbo-api</module> <!--业务层,服务端demo--> <module>../mini-dubbo-server</module> <!--配置层,解析xml的工作,在本层完成--> <module>../mini-dubbo-core</module> <module>../mini-dubbo-common</module> </modules> 目前的大部分实现,是在客户端,包含了如下module:
<modules> <!--业务层api--> <module>../mini-dubbo-api</module> <!--业务层,测试demo--> <module>../mini-dubbo-client</module> <!--配置层,解析xml的工作,在本层完成--> <module>../mini-dubbo-core</module> <module>../mini-dubbo-common</module> <!--注册中心层--> <module>../mini-dubbo-registry-layer</module> <!--集群层,完成事情:负载均衡策略,集群容错策略等--> <module>../mini-dubbo-cluster-layer</module> <!--信息交换层,主要完成同步转异步的操作,因为下层的mina和netty为异步,本层同步等待结果--> <module>../mini-dubbo-exchange-layer</module> <!--传输层如使用netty实现,则需包含如下module--> <module>../mini-dubbo-transport-layer-netty</module> <!--传输层如使用mina实现,则需包含如下module--> <module>../mini-dubbo-transport-layer-mina</module> </modules>其中,模块间的依赖关系如下:
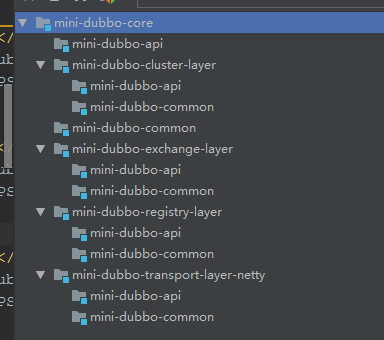
业务模块,一般只需要依赖mini-dubbo-core模块,mini-dubbo-core主要依赖了如下模块:
为什么这么划分,因为mini-dubbo-core模块,其实主要是完成解析业务模块(比如client)中的xml,根据其xml配置,注册对应的bean到spring 容器中,而具体的bean实现,就是放在各个模块的,比如,xml里配置netty作为传输层实现,那么mini-dubbo-core就得解析为mini-dubbo-transport-layer-netty中的一个实现类作为bean,注册到spring容器,供上层使用。
目前的分层,只是暂时的,后续可能会略有调整。
一次客户端调用的大体思路
-
业务module中,配置xml,示例如下:
<dubbo:registry address="redis://127.0.0.1:6379"/> <dubbo:reference id="gpsLocationUpdateService" interface="dubbo.learn.IGpsLocationUpdateService"/> <context:component-scan base-package="dubbo"></context:component-scan>其中的dubbo:reference就代表了一个远端的服务,业务代码中可以自动注入该接口,当调用该接口时,实际就会发起rpc调用。
熟悉的同学已经知道了,这块肯定是生成了一个动态代理。
-
继续之前,我们看看dubbo的十层架构:

可以看到,我们这边是比dubbo少了几层,首先proxy,目前直接用了jdk动态代理,没有其他技术,所以就没有抽出一层;然后monitor层,现在肯定是没有的,这部分其实才是一个框架的重头戏,但是我也不会前端,所以这块估计暂时没有;接下来是protocol层,我暂时不太清楚dubbo的设计,所以就没弄这层。
-
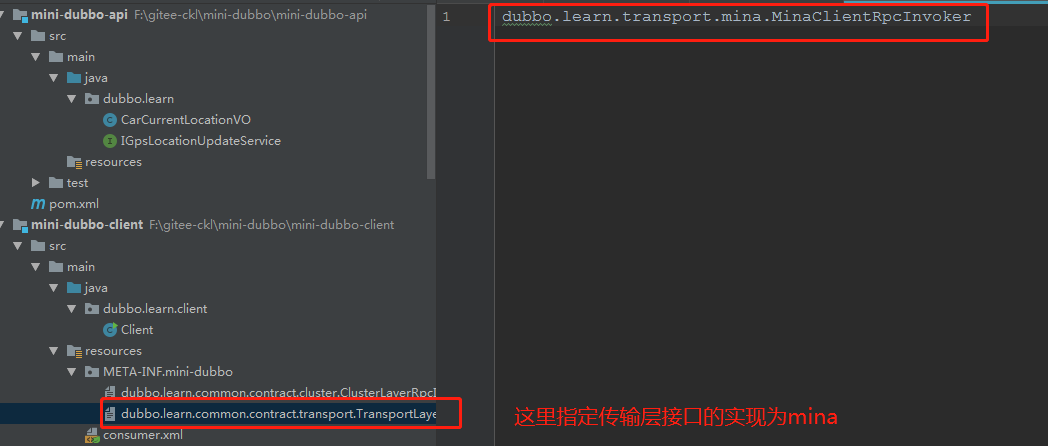
知道了分层结构后,我们可以回到第一点,即动态代理那里,我们的动态代理,只依赖下层的接口。目前,各层之间的接口,放在mini-dubbo-common模块中,定义如下:
-
注册中心层,负责接收上层传来的调用参数等上下文,并返回结果
/** * 注册中心层的rpc调用者 * 1:接收上层传下来的业务参数,并返回结果 * * 本层:会根据不同实现,去相应的注册中心,获取匹配的服务提供者列表,传输给下一层 */ public interface RegistryLayerRpcInvoker { Object invoke(RpcContext rpcContext); } -
集群层,接收上层注册中心层传来的服务提供者列表和rpc调用上下文,并返回最终结果
public interface ClusterLayerRpcInvoker { /** * 由注册中心层提供对应service的服务提供者列表,本方法可以根据负载均衡策略,进行筛选 * @param providerList * @param rpcContext * @return */ Object invoke(List<ProviderHostAndPort> providerList, RpcContext rpcContext); } -
exchange层,上层集群层,会替我们选好某一台具体的服务提供者,然后让我们去调用,本层完成同步转异步
public interface ExchangeLayerRpcInvoker { /** * * @param providerHostAndPort 要调用的服务提供者的地址 * @param rpcContext rpc上下文,包含了要调用的参数等 * @return rpc调用的结果 */ Object invoke(ProviderHostAndPort providerHostAndPort, RpcContext rpcContext); } -
传输层,本层目前有两个简单实现,netty和mina。
/** * * 本层为传输层,上层为exchange层。 * 上层exchange,目前有一个默认实现,主要是完成同步转异步的操作。 * 上层将具体的传输工作交给底层的传输层,比如netty和mina,然后在一个future上等待传输层完成工作 * * 本层会完成实际的发送工作和接收返回响应的工作 */ public interface TransportLayerRpcInvoker { /** * * @param providerHostAndPort 要调用的服务提供者的地址 * @param rpcContext rpc上下文,包含了要调用的参数等 * @return rpc调用的结果 */ Object invoke(ProviderHostAndPort providerHostAndPort, RpcContext rpcContext); }其中,我们的最上边的动态代理层,只依赖于下层,其中,示例代码如下:
@Override public Object invoke(Object proxy, Method method, Object[] args) { // 1.从spring容器中,获取下层的实现bean;如果有多个,则根据spi文件中指定的为准 RegistryLayerRpcInvoker registryLayerRpcInvoker = SpiServiceLoader.loadService(RegistryLayerRpcInvoker.class); RpcContext rpcContext = new RpcContext(); rpcContext.setProxy(proxy); rpcContext.setMethod(method); rpcContext.setArgs(args); rpcContext.setServiceName(method.getDeclaringClass().getName()); // 2.调用下层 Object o = registryLayerRpcInvoker.invoke(rpcContext); return o; }这里1处,可以看到,我们通过SpiServiceLoader.loadService(RegistryLayerRpcInvoker.class)去获取具体的下层实现,这是我们自定义的一个工具类,其内部实现一会再说。
2处调用下层实现,获取结果。
-
-
registry,注册中心层的实现
@Service public class RedisRegistryRpcInvoker implements RegistryLayerRpcInvoker { @Autowired private RedisRegistry redisRegistry; @Override public Object invoke(RpcContext rpcContext) { //1.获取集群层实现 ClusterLayerRpcInvoker clusterLayerRpcInvoker = SpiServiceLoader.loadService(ClusterLayerRpcInvoker.class); //2.从redis中,根据服务名,获取服务提供者列表 List<ProviderHostAndPort> list = redisRegistry.getServiceProviderList(rpcContext.getServiceName()); if (CollectionUtils.isEmpty(list)) { throw new RuntimeException(); } //2.调用集群层实现,获取结果 Object o = clusterLayerRpcInvoker.invoke(list, rpcContext); return o; } } -
集群层实现,本层我也不算懂,模仿dubbo实现了一下。
主要实现了以下两种:
- Failover,出现失败,立即重试其他服务器。可以设置重试次数。
- Failfast,请求失败以后,返回异常结果,不进行重试。
以failover为例:
@Slf4j @Service public class FailoverClusterLayerRpcInvoker implements ClusterLayerRpcInvoker { @Autowired private LoadBalancePolicy loadBalancePolicy; @Override public Object invoke(List<ProviderHostAndPort> providerList, RpcContext rpcContext) { ExchangeLayerRpcInvoker exchangeLayerRpcInvoker = SpiServiceLoader.loadService(ExchangeLayerRpcInvoker.class); int retryTimes = 3; for (int i = 0; i < retryTimes; i++) { // 1.根据负载均衡策略,选择1台服务提供者 ProviderHostAndPort providerHostAndPort = loadBalancePolicy.selectOne(providerList); try { // 调用下层,获取结果 Object o = exchangeLayerRpcInvoker.invoke(providerHostAndPort, rpcContext); return o; } catch (Exception e) { log.error("fail to invoke {},exception:{},will try another", providerHostAndPort,e); // 2.如果调用失败,进入下一次循环 continue; } } throw new RuntimeException("fail times extend"); } }其中,一共会尝试3次,每次的逻辑:根据负载均衡策略,选择1台去调用;如果有问题,则换一台。
调用下层时,获取了下层的接口:ExchangeLayerRpcInvoker
-
exchange层,这层完成同步转异步的操作,目前只有一个实现:
@Service public class Sync2AsyncExchangeImpl implements ExchangeLayerRpcInvoker { public static ConcurrentHashMap<String, CompletableFuture<Object>> requestId2futureMap = new ConcurrentHashMap<>(); @Override public Object invoke(ProviderHostAndPort providerHostAndPort, RpcContext rpcContext) { String requestId = UUID.randomUUID().toString(); rpcContext.setRequestId(requestId); rpcContext.setRequestId2futureMap(requestId2futureMap); CompletableFuture<Object> completableFuture = new CompletableFuture<>(); requestId2futureMap.put(requestId, completableFuture); /** * 交给具体的底层去解决 */ TransportLayerRpcInvoker transportLayerRpcInvoker = SpiServiceLoader.loadService(TransportLayerRpcInvoker .class); transportLayerRpcInvoker.invoke(providerHostAndPort, rpcContext); Object s = null; try { s = completableFuture.get(); } catch (InterruptedException | ExecutionException e) { e.printStackTrace(); } return s; } }这层大家可以简单理解为:主线程调用传输层之前,生成一个id和一个completablefuture,放到一个全局map,然后将id传给下层,然后在completablefuture上阻塞;下层拿到id后,在消息里传输;服务端再将id传输回来,然后客户端拿着id找到completablefuture,并唤醒主线程。
-
信息传输层,以netty为例,具体的netty相关的知识,大家就得自己先学习一下:
简单步骤如下:
//1.初始化客户端连接 public void initChannel() { Bootstrap b = configBootStrap(); ChannelFuture future = null; try { future = b.connect(providerHostAndPort.getHost(), providerHostAndPort.getPort()).sync(); if (future.isSuccess()) { channel = future.channel(); return; } } catch (InterruptedException e) { ... } throw new RuntimeException(); } private Bootstrap configBootStrap() { EventLoopGroup group = new NioEventLoopGroup(); Bootstrap b = new Bootstrap(); b.group(group) .channel(NioSocketChannel.class) .option(ChannelOption.TCP_NODELAY, true) .handler(new ChannelInitializer<SocketChannel>() { @Override public void initChannel(SocketChannel ch) throws Exception { ChannelPipeline p = ch.pipeline(); p.addLast("lengthFieldPrepender", new LengthFieldPrepender(2)); p.addLast("lengthFieldBasedFrameDecoder", new LengthFieldBasedFrameDecoder( 65536, 0, 2, 0, 2)); p.addLast("decoder", new StringDecoder()); p.addLast("encoder", new StringEncoder()); p.addLast(new ClientHandler()); }//拦截器设置 }); return b; }使用连接的channle,发送数据:
public void sendMessage(String messageContent) { synchronized (lockObj) { if (channel == null) { initChannel(); } } ChannelFuture channelFuture = channel.writeAndFlush(messageContent); channelFuture.addListener(new GenericFutureListener<Future<? super Void>>() { @Override public void operationComplete(Future<? super Void> future) throws Exception { System.out.println("发送请求消息成功"); } }); } -
netty接收到服务端相应后,根据requestId来获取future,唤醒上层线程
@Slf4j public class ClientHandler extends ChannelInboundHandlerAdapter { @Override public void channelActive(ChannelHandlerContext cx) { log.info("channelActive,local address:{},remote address:{}", cx.channel().localAddress(),cx.channel().remoteAddress()); } /** * 读取信息 * * @param ctx 渠道连接对象 * @param msg 信息 * @throws Exception */ @Override public void channelRead(ChannelHandlerContext ctx, Object msg) throws Exception { ResponseVO responseVO = JSONObject.parseObject((String) msg, ResponseVO.class); String requestId = responseVO.getRequestId(); //1.获取future CompletableFuture<Object> completableFuture = Netty4ClientRpcInvoker.requestId2futureMap .get(requestId); //2.将结果塞进future,在此future上阻塞的线程被唤醒 completableFuture.complete(responseVO.getContent()); log.info("client channelRead,thread:{}", Thread.currentThread()); log.info("客户端端读写远程地址是-----------" + ctx.channel().remoteAddress() + "信息是:" + msg.toString()); } }
如何根据spi进行切换
之前我们提到了可以根据spi,随意切换实现,比如我们想使用mina来传输的话:
这里的spi的原理也很简单:
dubbo.learn.common.spi.SpiServiceLoader#loadService public static <T> T loadService(Class<T> clazz) { //先查找缓存 Object cached = spiName2ServiceMap.get(clazz.getName()); if (cached != null) { return (T) cached; } //2.从spring容器获取该class的全部实现bean Map<String, T> map = applicationContext.getBeansOfType(clazz); if (CollectionUtils.isEmpty(map)) { return null; } if (map.size() == 1) { Object o = map.values().iterator().next(); return clazz.cast(o); } //读取spi文件,获取用户指定的实现 String s = SpiParser.getSpiForSpecifiedService(clazz); if (StringUtils.isEmpty(s)) { log.error("发现多个服务实现bean:{},且在spi中未指定要使用的bean",map); throw new RuntimeException(); } // 根据用户spi中的实现,来返回相应的bean Object specifiedServiceInSpiFile = map.values().stream().filter(v -> Objects.equals(v.getClass().getName(), s)) .findFirst().orElse(null); if (specifiedServiceInSpiFile == null) { log.error("spi中指定的服务在bean集合中未找到。" + "发现多个服务实现bean:{},在spi中指定的服务为:{}",map,s); throw new RuntimeException(); } spiName2ServiceMap.put(clazz.getName(),specifiedServiceInSpiFile); return (T) specifiedServiceInSpiFile; }总结
里面细节比较多,最近工作比较忙,所以,大家可以先把代码弄下来,直接自己运行下,依赖的就只有一个redis而已。
后续我会接着优化该框架,欢迎大家加进来,一起开发;如果觉得还不错,就star一下吧。
源码路径:
https://gitee.com/ckl111/mini-dubbo