Tomcat源码分析三:Tomcat启动加载过程(一)的源码解析
- 2019 年 10 月 25 日
- 笔记
Tomcat启动加载过程(一)的源码解析
今天,我将分享用源码的方式讲解Tomcat启动的加载过程,关于Tomcat的架构请参阅《Tomcat源码分析二:先看看Tomcat的整体架构》一文。
先看看应用情况
在《Servlet与Tomcat运行示例》一文中,我详细的记录了Tomcat是如何启动一个Servlet的程序的步骤。其中,第6步骤是启动Tomcat,也就是在windows系统上执行startup.bat, 在linux操作系统上执行startup.sh的脚本。那么,我们就从这个脚本出发,走进Tomcat,看看它是如何启动的?这里,我们以startup.sh为例,windows端的startup.bat类似。
startup.sh的内容是什么?
我们先看看tomcat的启动脚本startup.sh的内容是什么,先看看其脚本内容(省略部分注释),如下:
#!/bin/sh # ----------------------------------------------------------------------------- # Start Script for the CATALINA Server # ----------------------------------------------------------------------------- # Better OS/400 detection: see Bugzilla 31132 os400=false case "`uname`" in OS400*) os400=true;; esac # resolve links - $0 may be a softlink PRG="$0" while [ -h "$PRG" ] ; do ls=`ls -ld "$PRG"` link=`expr "$ls" : '.*-> (.*)$'` if expr "$link" : '/.*' > /dev/null; then PRG="$link" else PRG=`dirname "$PRG"`/"$link" fi done PRGDIR=`dirname "$PRG"` EXECUTABLE=catalina.sh # Check that target executable exists if $os400; then # -x will Only work on the os400 if the files are: # 1. owned by the user # 2. owned by the PRIMARY group of the user # this will not work if the user belongs in secondary groups eval else if [ ! -x "$PRGDIR"/"$EXECUTABLE" ]; then echo "Cannot find $PRGDIR/$EXECUTABLE" echo "The file is absent or does not have execute permission" echo "This file is needed to run this program" exit 1 fi fi exec "$PRGDIR"/"$EXECUTABLE" start "$@" 提取其中主要的几句:
PRGDIR=`dirname "$PRG"` EXECUTABLE=catalina.sh exec "$PRGDIR"/"$EXECUTABLE" start "$@"简而概之,该脚本的执行内容为:调用catalina.sh脚本。下面,我们继续来看下catalina.sh脚本的内容
catalina.sh脚本
由于catalina.sh脚本内容比较多,这里提取一些重要的内容,然后解释其用途:
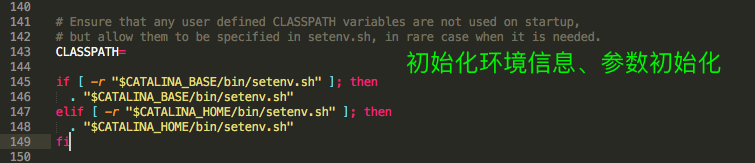
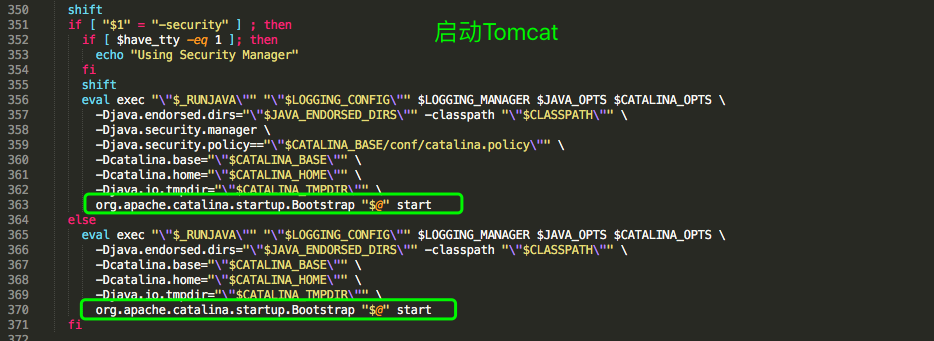
再简要的描述下在catalina.sh中作用:完成环境检查、环境初始化、参数初始化、启动操作步骤。注意一下上图中被绿色框出来的内容,可以看到其调用执行的是org.apache.catalina.startup.Bootstrap类,并且传输过去的command指令为start。
回归Java代码
Bootstrap类进行了什么操作呢?
接下来,我们带着这几个问题来去探索一下Bootstrap类:
- Bootstrap类在接收到start指令后要去干什么?
- Bootstrap类在启动过程中的职责是什么?
下面,我们带着上面的几个问题来具体的探讨一下Tomcat的源码。先来看看Bootstrap类的main方法:
public static void main(String args[]) { synchronized (daemonLock) { if (daemon == null) { // Don't set daemon until init() has completed Bootstrap bootstrap = new Bootstrap(); try { bootstrap.init(); } catch (Throwable t) { handleThrowable(t); t.printStackTrace(); return; } daemon = bootstrap; } else { Thread.currentThread().setContextClassLoader(daemon.catalinaLoader); } } try { String command = "start"; if (args.length > 0) { command = args[args.length - 1]; } if (command.equals("startd")) { args[args.length - 1] = "start"; daemon.load(args); daemon.start(); } else if (command.equals("stopd")) { args[args.length - 1] = "stop"; daemon.stop(); } else if (command.equals("start")) { daemon.setAwait(true); daemon.load(args); daemon.start(); if (null == daemon.getServer()) { System.exit(1); } } else if (command.equals("stop")) { daemon.stopServer(args); } else if (command.equals("configtest")) { daemon.load(args); if (null == daemon.getServer()) { System.exit(1); } System.exit(0); } else { log.warn("Bootstrap: command "" + command + "" does not exist."); } } catch (Throwable t) { // Unwrap the Exception for clearer error reporting if (t instanceof InvocationTargetException && t.getCause() != null) { t = t.getCause(); } handleThrowable(t); t.printStackTrace(); System.exit(1); } }从这段代码中,可以看出,其主要实现了两个功能:
- 初始化一个守护进程变量daemon
- 加载catalina.sh传递过来的参数,解析catalina.sh传递过来的指令,并按照指令执行程序,控制守护进程daemon的启停等操作
bootstrap.init();有什么操作呢?
针对上面的两个功能,我们进入到 init()方法看下有什么操作,先看下init()方法的代码:
public void init() throws Exception { initClassLoaders(); Thread.currentThread().setContextClassLoader(catalinaLoader); SecurityClassLoad.securityClassLoad(catalinaLoader); // Load our startup class and call its process() method if (log.isDebugEnabled()) log.debug("Loading startup class"); Class<?> startupClass = catalinaLoader.loadClass("org.apache.catalina.startup.Catalina"); Object startupInstance = startupClass.getConstructor().newInstance(); // Set the shared extensions class loader if (log.isDebugEnabled()) log.debug("Setting startup class properties"); String methodName = "setParentClassLoader"; Class<?> paramTypes[] = new Class[1]; paramTypes[0] = Class.forName("java.lang.ClassLoader"); Object paramValues[] = new Object[1]; paramValues[0] = sharedLoader; Method method = startupInstance.getClass().getMethod(methodName, paramTypes); method.invoke(startupInstance, paramValues); catalinaDaemon = startupInstance; }在init()方法中,首先执行的方法initClassLoaders()的作用是初始化三个类加载器,代码如下:
/** * Daemon reference. */ private Object catalinaDaemon = null; ClassLoader commonLoader = null; ClassLoader catalinaLoader = null; ClassLoader sharedLoader = null; private void initClassLoaders() { try { commonLoader = createClassLoader("common", null); if (commonLoader == null) { // no config file, default to this loader - we might be in a 'single' env. commonLoader = this.getClass().getClassLoader(); } catalinaLoader = createClassLoader("server", commonLoader); sharedLoader = createClassLoader("shared", commonLoader); } catch (Throwable t) { handleThrowable(t); log.error("Class loader creation threw exception", t); System.exit(1); } } private ClassLoader createClassLoader(String name, ClassLoader parent) throws Exception { String value = CatalinaProperties.getProperty(name + ".loader"); if ((value == null) || (value.equals(""))) return parent; value = replace(value); List<Repository> repositories = new ArrayList<>(); String[] repositoryPaths = getPaths(value); for (String repository : repositoryPaths) { // Check for a JAR URL repository try { @SuppressWarnings("unused") URL url = new URL(repository); repositories.add(new Repository(repository, RepositoryType.URL)); continue; } catch (MalformedURLException e) { // Ignore } // Local repository if (repository.endsWith("*.jar")) { repository = repository.substring (0, repository.length() - "*.jar".length()); repositories.add(new Repository(repository, RepositoryType.GLOB)); } else if (repository.endsWith(".jar")) { repositories.add(new Repository(repository, RepositoryType.JAR)); } else { repositories.add(new Repository(repository, RepositoryType.DIR)); } } return ClassLoaderFactory.createClassLoader(repositories, parent); } // catalina.properties common.loader="${catalina.base}/lib","${catalina.base}/lib/*.jar","${catalina.home}/lib","${catalina.home}/lib/*.jar"- commonLoader: 根据common.loader属性的配置(通过代码
CatalinaProperties.getProperty(name + ".loader");读取:catalina.properties), 创建commonLoader类加载器, 默认情况下顺序加载 ${catalina.base}/lib, ${catalina.base}/lib/.jar, ${catalina.home}/lib, ${catalina.home}/lib/.jar 四个目录下的class和jar. - catalinaLoader: 根据server.loader属性的配置, 创建catalinaLoader类加载器,其父类加载其为commonLoader, 默认server.loader属性为空, 直接使用commonLoader.
- sharedLoader:根据shared.loader属性配置,创建sharedLoader类加载器,其父类加载其为commonLoader, 默认shared.loader属性为空, 直接使用commonLoader.
当执行完initClassLoaders()方法之后,调用Thread.currentThread().setContextClassLoader(catalinaLoader);设置上下文类加载器为catalinaLoader,从上面解析的情况看,其实设置的上下文类加载器为catalinaLoader的父类commonLoader。
SecurityClassLoad.securityClassLoad(catalinaLoader) 的作用是如果有SecurityManager,提前加载部分类。
之后,通过使用catalinaLoader加载org.apache.catalina.startup.Catalina类,创建实例Catalina并利用反射调用方法setParentClassLoader(),设置Catalina实例的parentClassLoader属性为sharedLoader类加载器(也就是commonLoader)。
最后,设置daemon为新创建的实例Bootstrap。接下来,看一下main()方法下的指令处理。
传递过来的command指令是如何处理的呢?
我们观察一下main()方法的后半段,这里贴一下代码:
try { String command = "start"; if (args.length > 0) { command = args[args.length - 1]; } if (command.equals("startd")) { args[args.length - 1] = "start"; daemon.load(args); daemon.start(); } else if (command.equals("stopd")) { args[args.length - 1] = "stop"; daemon.stop(); } else if (command.equals("start")) { daemon.setAwait(true); daemon.load(args); daemon.start(); if (null == daemon.getServer()) { System.exit(1); } } else if (command.equals("stop")) { daemon.stopServer(args); } else if (command.equals("configtest")) { daemon.load(args); if (null == daemon.getServer()) { System.exit(1); } System.exit(0); } else { log.warn("Bootstrap: command "" + command + "" does not exist."); } } catch (Throwable t) { // ...... 省略 }可以看到,其默认指令为start, 然后,其根据接收到的参数区分为startd、stopd、start、stop、configtest和其他6种指令情况。这里我们主要看一下start指令的执行逻辑。
- daemon.setAwait(true) :这句代码有什么含义呢,下面我们来具体的分析一下:
/** * Set flag. * @param await <code>true</code> if the daemon should block * @throws Exception Reflection error */ public void setAwait(boolean await) throws Exception { Class<?> paramTypes[] = new Class[1]; paramTypes[0] = Boolean.TYPE; Object paramValues[] = new Object[1]; paramValues[0] = Boolean.valueOf(await); Method method = catalinaDaemon.getClass().getMethod("setAwait", paramTypes); method.invoke(catalinaDaemon, paramValues); }这段代码的主要作用是通过反射调用Catalina.setAwait(true),主要目的是当启动完成后, 阻塞main线程,等待stop命令到来。 如果不设置daemon.setAwait(true), 则main线程执行完之后就 直接退出了。
- daemon.load(args)
daemon.load(args);其实是最终执行的Catalina.load(),在Catalina.load()方法中,主要功能是首先初始化temp目录,然后再初始化naming的一些系统属性,然后获取server.xml配置文件, 创建Digester实例, 开始解析server.xml的操作。
/** * Start a new server instance. */ public void load() { if (loaded) { return; } loaded = true; long t1 = System.nanoTime(); initDirs(); // Before digester - it may be needed initNaming(); // Set configuration source ConfigFileLoader.setSource(new CatalinaBaseConfigurationSource(Bootstrap.getCatalinaBaseFile(), getConfigFile())); File file = configFile(); // Create and execute our Digester Digester digester = createStartDigester(); try (ConfigurationSource.Resource resource = ConfigFileLoader.getSource().getServerXml()) { InputStream inputStream = resource.getInputStream(); InputSource inputSource = new InputSource(resource.getURI().toURL().toString()); inputSource.setByteStream(inputStream); digester.push(this); digester.parse(inputSource); } catch (Exception e) { log.warn(sm.getString("catalina.configFail", file.getAbsolutePath()), e); if (file.exists() && !file.canRead()) { log.warn(sm.getString("catalina.incorrectPermissions")); } return; } getServer().setCatalina(this); getServer().setCatalinaHome(Bootstrap.getCatalinaHomeFile()); getServer().setCatalinaBase(Bootstrap.getCatalinaBaseFile()); // Stream redirection initStreams(); // Start the new server try { getServer().init(); } catch (LifecycleException e) { if (Boolean.getBoolean("org.apache.catalina.startup.EXIT_ON_INIT_FAILURE")) { throw new java.lang.Error(e); } else { log.error(sm.getString("catalina.initError"), e); } } long t2 = System.nanoTime(); if(log.isInfoEnabled()) { log.info(sm.getString("catalina.init", Long.valueOf((t2 - t1) / 1000000))); } } - daemon.start(): 启动Tomcat
通过调用daemon.start()启动Tomcat,其内容如下:
/** * Start the Catalina daemon. * @throws Exception Fatal start error */ public void start() throws Exception { if (catalinaDaemon == null) { init(); } Method method = catalinaDaemon.getClass().getMethod("start", (Class [])null); method.invoke(catalinaDaemon, (Object [])null); }程序通过反射的方式调用Catalina.start()方式启动Tomcat,下面,我们看下Catalina.start()方法的实现逻辑:
/** * Start a new server instance. */ public void start() { if (getServer() == null) { load(); } if (getServer() == null) { log.fatal(sm.getString("catalina.noServer")); return; } long t1 = System.nanoTime(); // Start the new server try { getServer().start(); } catch (LifecycleException e) { log.fatal(sm.getString("catalina.serverStartFail"), e); try { getServer().destroy(); } catch (LifecycleException e1) { log.debug("destroy() failed for failed Server ", e1); } return; } long t2 = System.nanoTime(); if(log.isInfoEnabled()) { log.info(sm.getString("catalina.startup", Long.valueOf((t2 - t1) / 1000000))); } // Register shutdown hook if (useShutdownHook) { if (shutdownHook == null) { shutdownHook = new CatalinaShutdownHook(); } Runtime.getRuntime().addShutdownHook(shutdownHook); // If JULI is being used, disable JULI's shutdown hook since // shutdown hooks run in parallel and log messages may be lost // if JULI's hook completes before the CatalinaShutdownHook() LogManager logManager = LogManager.getLogManager(); if (logManager instanceof ClassLoaderLogManager) { ((ClassLoaderLogManager) logManager).setUseShutdownHook( false); } } if (await) { await(); stop(); } } 可以看出,程序调用getServer().start()启动,getServer()方法返回的是一个StandardServer类,继而其调用的是StandardServer.startInternal()方法,在StandardServer中,又调用到StandardService.startInternal()方法。
// StandardServer.java protected void startInternal() throws LifecycleException { fireLifecycleEvent(CONFIGURE_START_EVENT, null); setState(LifecycleState.STARTING); globalNamingResources.start(); // Start our defined Services synchronized (servicesLock) { for (int i = 0; i < services.length; i++) { services[i].start(); } } // ......省略部分代码 } protected void startInternal() throws LifecycleException { if(log.isInfoEnabled()) log.info(sm.getString("standardService.start.name", this.name)); setState(LifecycleState.STARTING); // Start our defined Container first if (engine != null) { synchronized (engine) { engine.start(); } } synchronized (executors) { for (Executor executor: executors) { executor.start(); } } mapperListener.start(); // Start our defined Connectors second synchronized (connectorsLock) { for (Connector connector: connectors) { // If it has already failed, don't try and start it if (connector.getState() != LifecycleState.FAILED) { connector.start(); } } } }注意,这里为什么不是start()方法,而是startInternal()方法呢?原因是StandardServer和StandService类都继承了LifecycleMBeanBase类,而LifecycleMBeanBase类又继承了LifecycleBase类。下面看下LifecycleBase类的start()方法:
public final synchronized void start() throws LifecycleException { if (LifecycleState.STARTING_PREP.equals(state) || LifecycleState.STARTING.equals(state) || LifecycleState.STARTED.equals(state)) { if (log.isDebugEnabled()) { Exception e = new LifecycleException(); log.debug(sm.getString("lifecycleBase.alreadyStarted", toString()), e); } else if (log.isInfoEnabled()) { log.info(sm.getString("lifecycleBase.alreadyStarted", toString())); } return; } if (state.equals(LifecycleState.NEW)) { init(); } else if (state.equals(LifecycleState.FAILED)) { stop(); } else if (!state.equals(LifecycleState.INITIALIZED) && !state.equals(LifecycleState.STOPPED)) { invalidTransition(Lifecycle.BEFORE_START_EVENT); } try { setStateInternal(LifecycleState.STARTING_PREP, null, false); startInternal(); if (state.equals(LifecycleState.FAILED)) { // This is a 'controlled' failure. The component put itself into the // FAILED state so call stop() to complete the clean-up. stop(); } else if (!state.equals(LifecycleState.STARTING)) { // Shouldn't be necessary but acts as a check that sub-classes are // doing what they are supposed to. invalidTransition(Lifecycle.AFTER_START_EVENT); } else { setStateInternal(LifecycleState.STARTED, null, false); } } catch (Throwable t) { // This is an 'uncontrolled' failure so put the component into the // FAILED state and throw an exception. handleSubClassException(t, "lifecycleBase.startFail", toString()); } } 可以看出,调用start()方法,最终都会调用到startInternal()方法。在下篇文章中,我们将详细看下StandardService.java中的engine.start()、executor.start()、connector.start()都分别启动了什么?敬请期待!
微信公众号: 源码湾
欢迎关注本人微信公众号: 源码湾。 本公众号将不定期进行相关源码及相关开发技术的分享,共同成长,共同进步~

Blog:
- 简书: https://www.jianshu.com/u/91378a397ffe
- csdn: https://blog.csdn.net/ZhiyouWu
- 开源中国: https://my.oschina.net/u/3204088
- 掘金: https://juejin.im/user/5b5979efe51d451949094265
- 博客园: https://www.cnblogs.com/zhiyouwu/
- 微信公众号: 源码湾
- 微信: WZY1782357529 (欢迎沟通交流)