在线电影项目介绍
- 2020 年 12 月 24 日
- 笔记
- mybatis, Spring Boot, Spring Cloud, 在线电影
在线电影项目
知识点
- 网站的主要开发模式
- 在线电影系统项目介绍
- 项目的初始创建和 Mybatis 插件的使用
- Mybatis 一级缓存及二级缓存的介绍及使用
网站开发模式
B2C 会员模式
商家到用户,这种模式是自己制作大量自有版权的视频,放在自有平台上,让用户按月付费或者按年付费。 这种模式简单,快速,只要专心录制大量视频即可快速发展。特别适合在线电影系统产品设计。
B2B2C(商家到商家到用户)
平台链接第三方视频机构和用户,平台一般不直接提供视频内容,而是更多承担发布的互联网载体角色,为用户体验过程各个环节提供全方位支持和服务。
特点
B2C 模式的在线视频平台,由于担任视频自营主体的角色,一般以相对垂直的视频领域为主要产品,如视频剪辑培训视频,职业培训视频,技能培训视频和短视频等。
众所周知,高质量的视频内容往往成本高、周期长、效果慢,令人望而生畏。在线视频观看最大的特点就是可以重复观看,理论上越来越多的用户观看就能够实现费用摊平,边际成本越来越低。
C2C 模式(Consumer To Consumer 平台模式 )
用户到用户,这种模式本质是将自己的流量或者用户转卖给视频或者直播的内容提供者,通过出售内容分成获利。
平台模式避开了非常沉重的内容和服务,扩张迅速,但实际这种模式也有缺陷,在线视频这两年的发展使内容迅速贬值,比较难带来更免费用户和流量。
特点
- 平台模式本质是连接供需。
- 平台轻资产,不负责产品供应,作为中介人只要解决信息匹配问题就可以了。在整个环节中,很多功能可能都需要由供应商完成。
- 平台模式下,成本结构以固定成本为重,当搭建好平台,随着用户数增加,成本将逐步下降。当平台形成规模,达到垄断地位,那么议价权一定掌握在平台手里,实现利润增长就是一件水到渠成的事情。
在线电影系统介绍
简介
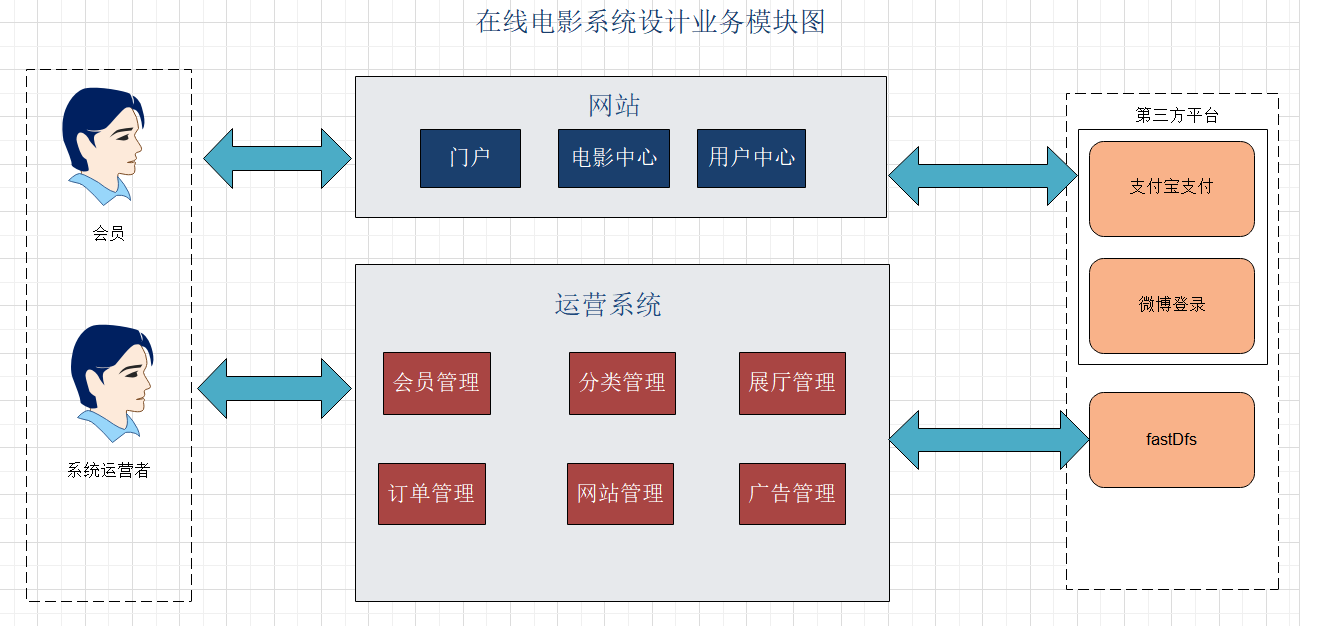
在线电影系统是一个使用 B2C 的网站开发模式的在线视频观看及在线电影购票系统,主要分为前台用户平台和后台运营管理平台。
前后端系统的主要功能模块
系统架构技术
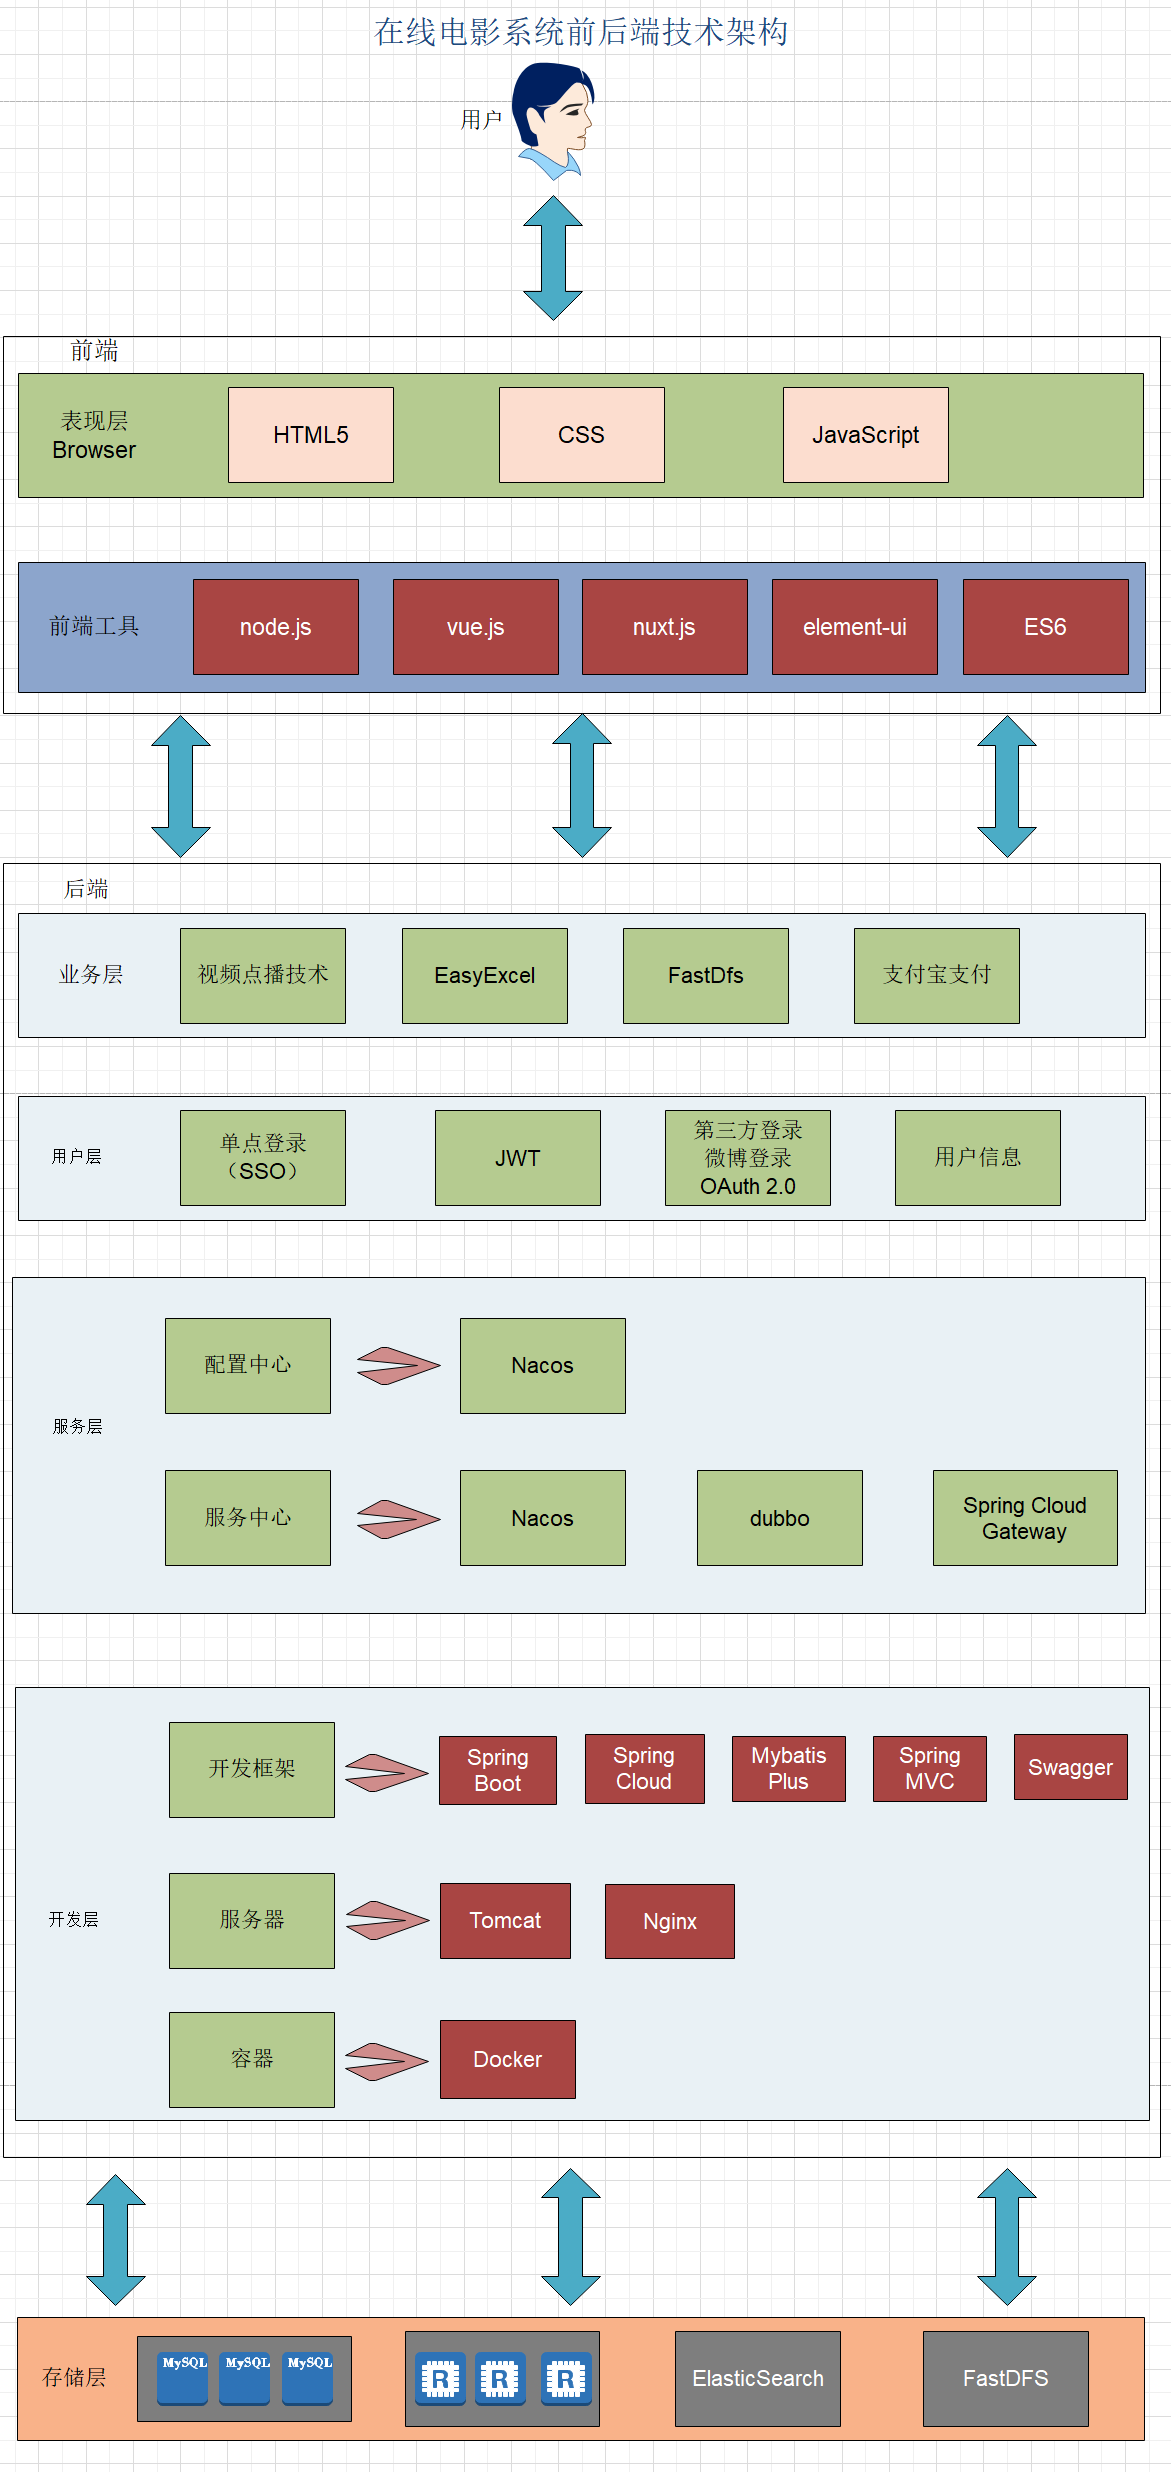
项目的具体描述
在线电影系统分为前台门户平台和后台管理平台,使用B2C模式,微服务技术架构,前后端分离开发。
前台的主要技术架构是:vue.js 、Nuxt.js 、Element-UI
后端的主要技术架构是:SpringBoot + SpringCloud + MyBatis-Plus + Dubbo + MySQL + Spring Cloud Getaway
其他涉及到的中间件包括 Redis 、ElasticSearch 、令牌桶算法、FFMPEG 对视频的解码;业务中使用 EasyExcel 完成分类批量添加、JWT 用于前台门户的分布式单点登录;
项目前后端分离开发,后端采用 Spring Cloud 微服务架构,持久层用的是 MyBatis-Plus,服务与服务之间使用 dubbo 进行 RPC 通信及使用 Swagger 技术生成各服务的接口文档。前端系统则分为前台用户系统和后台管理系统两部分。
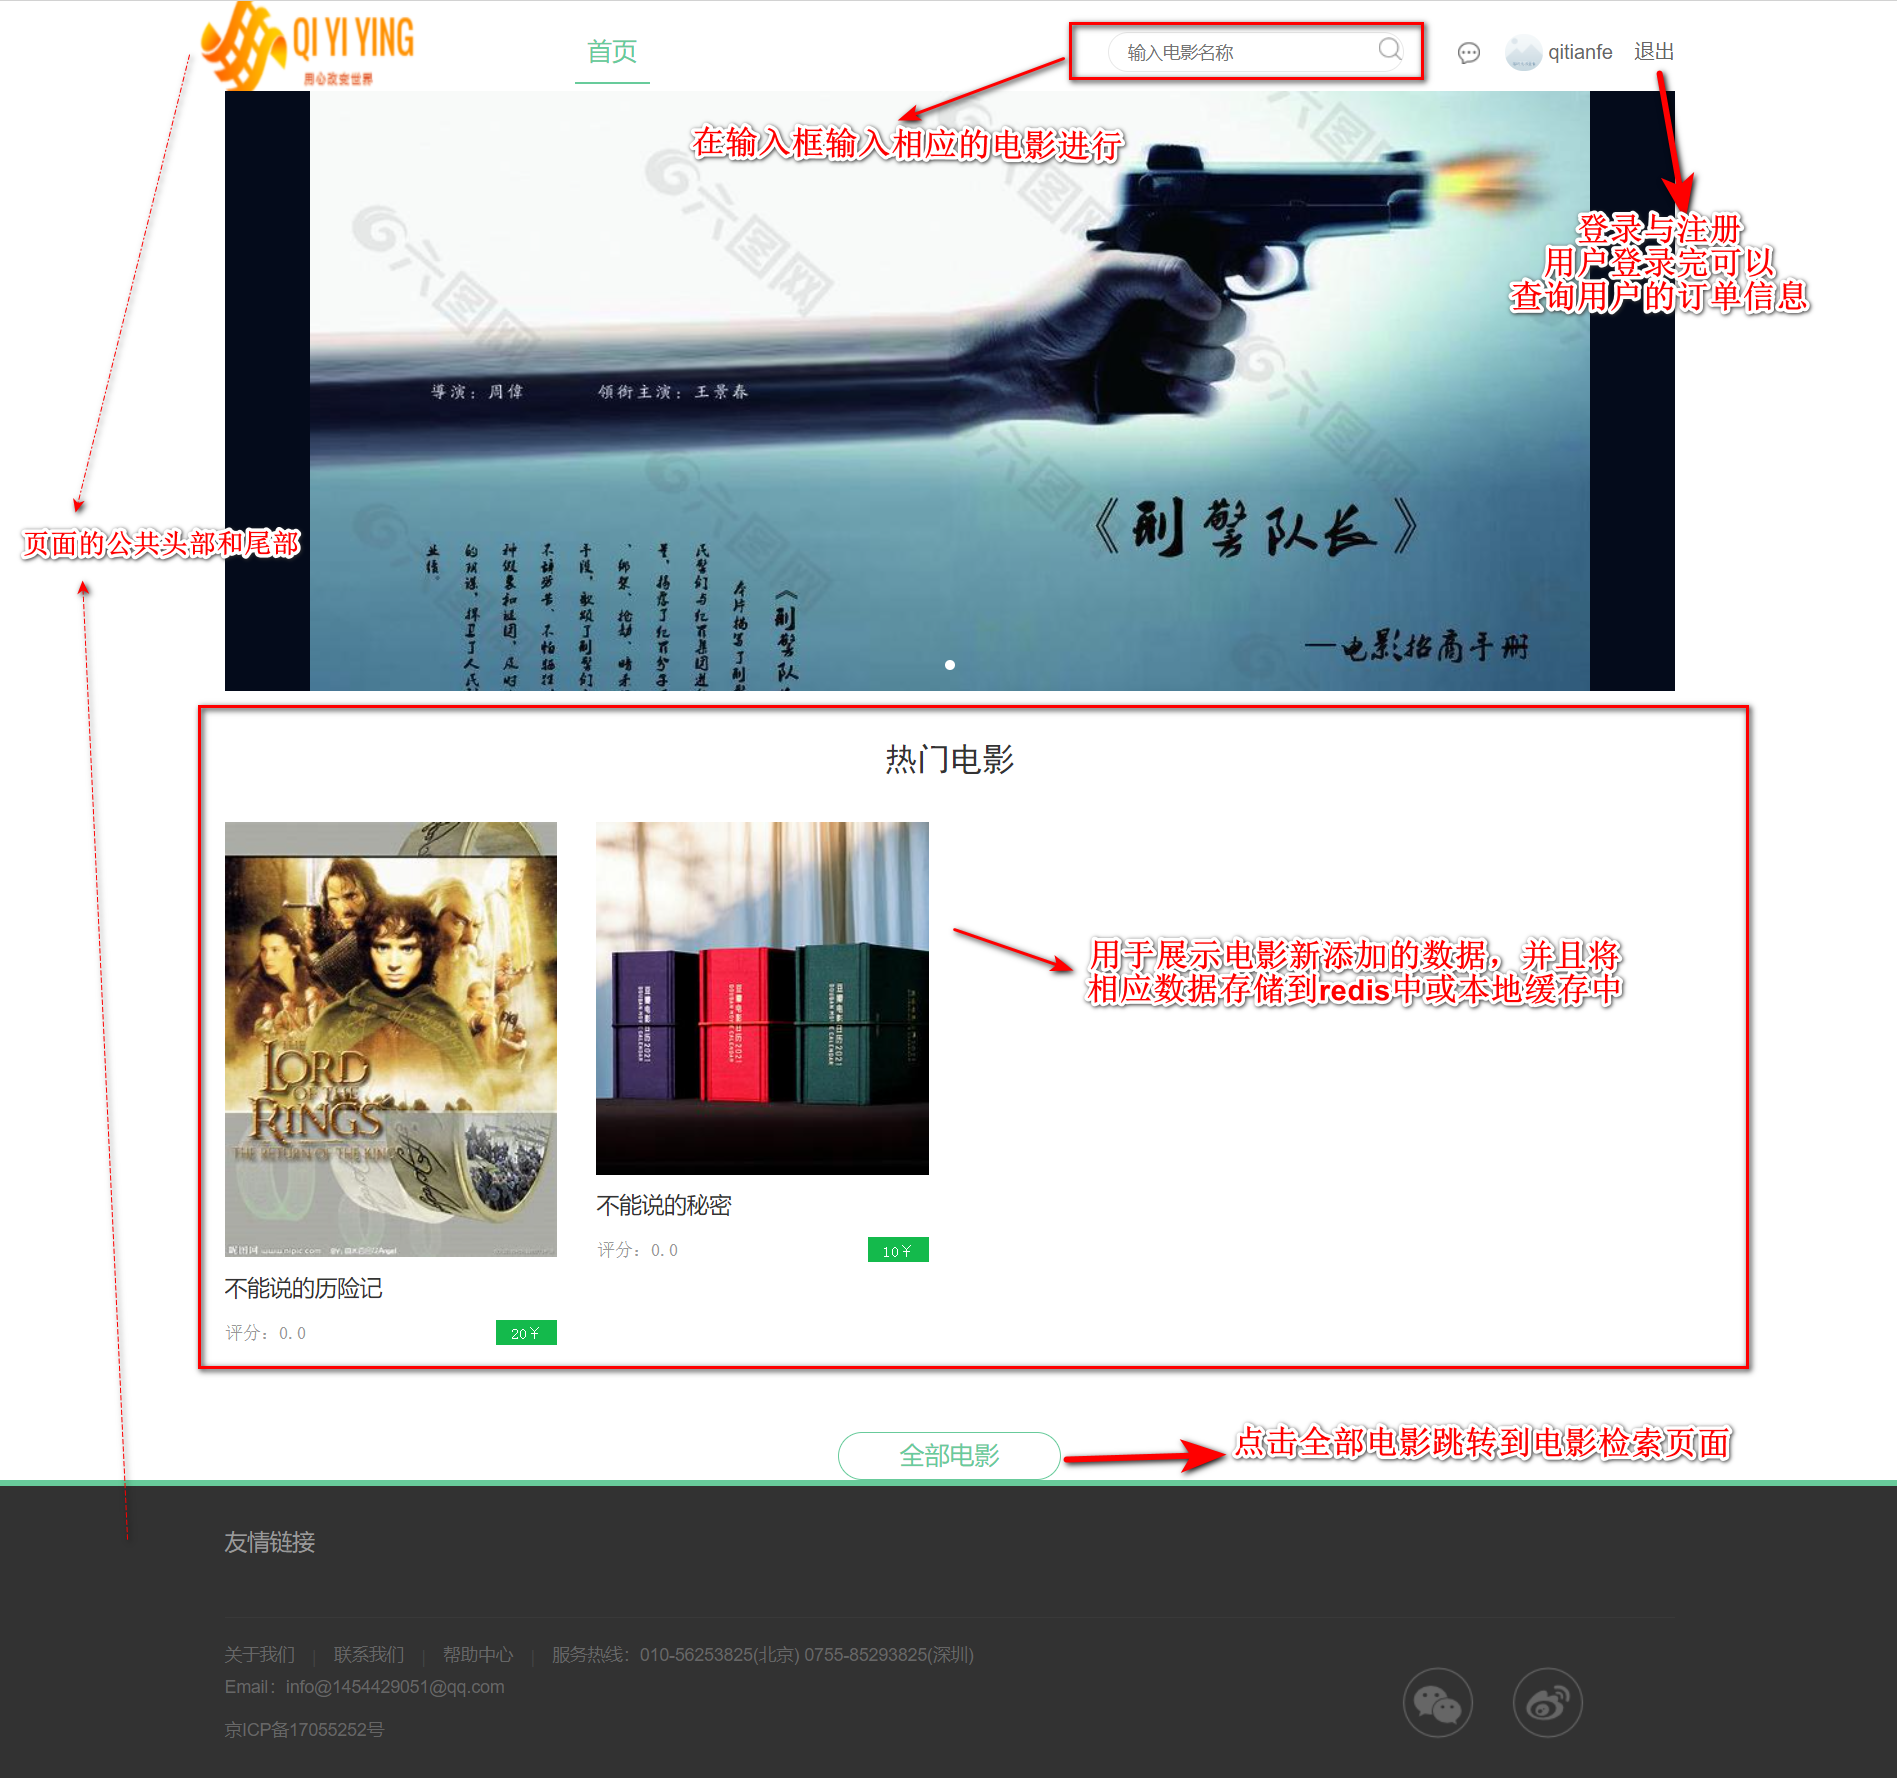
- 前台系统包括:首页、电影中心、用户中心。
其中首页的主要分布为以下几个部分
- 公共头部和公共尾部
- 中间的广告模块
- 下方的电影展示模块
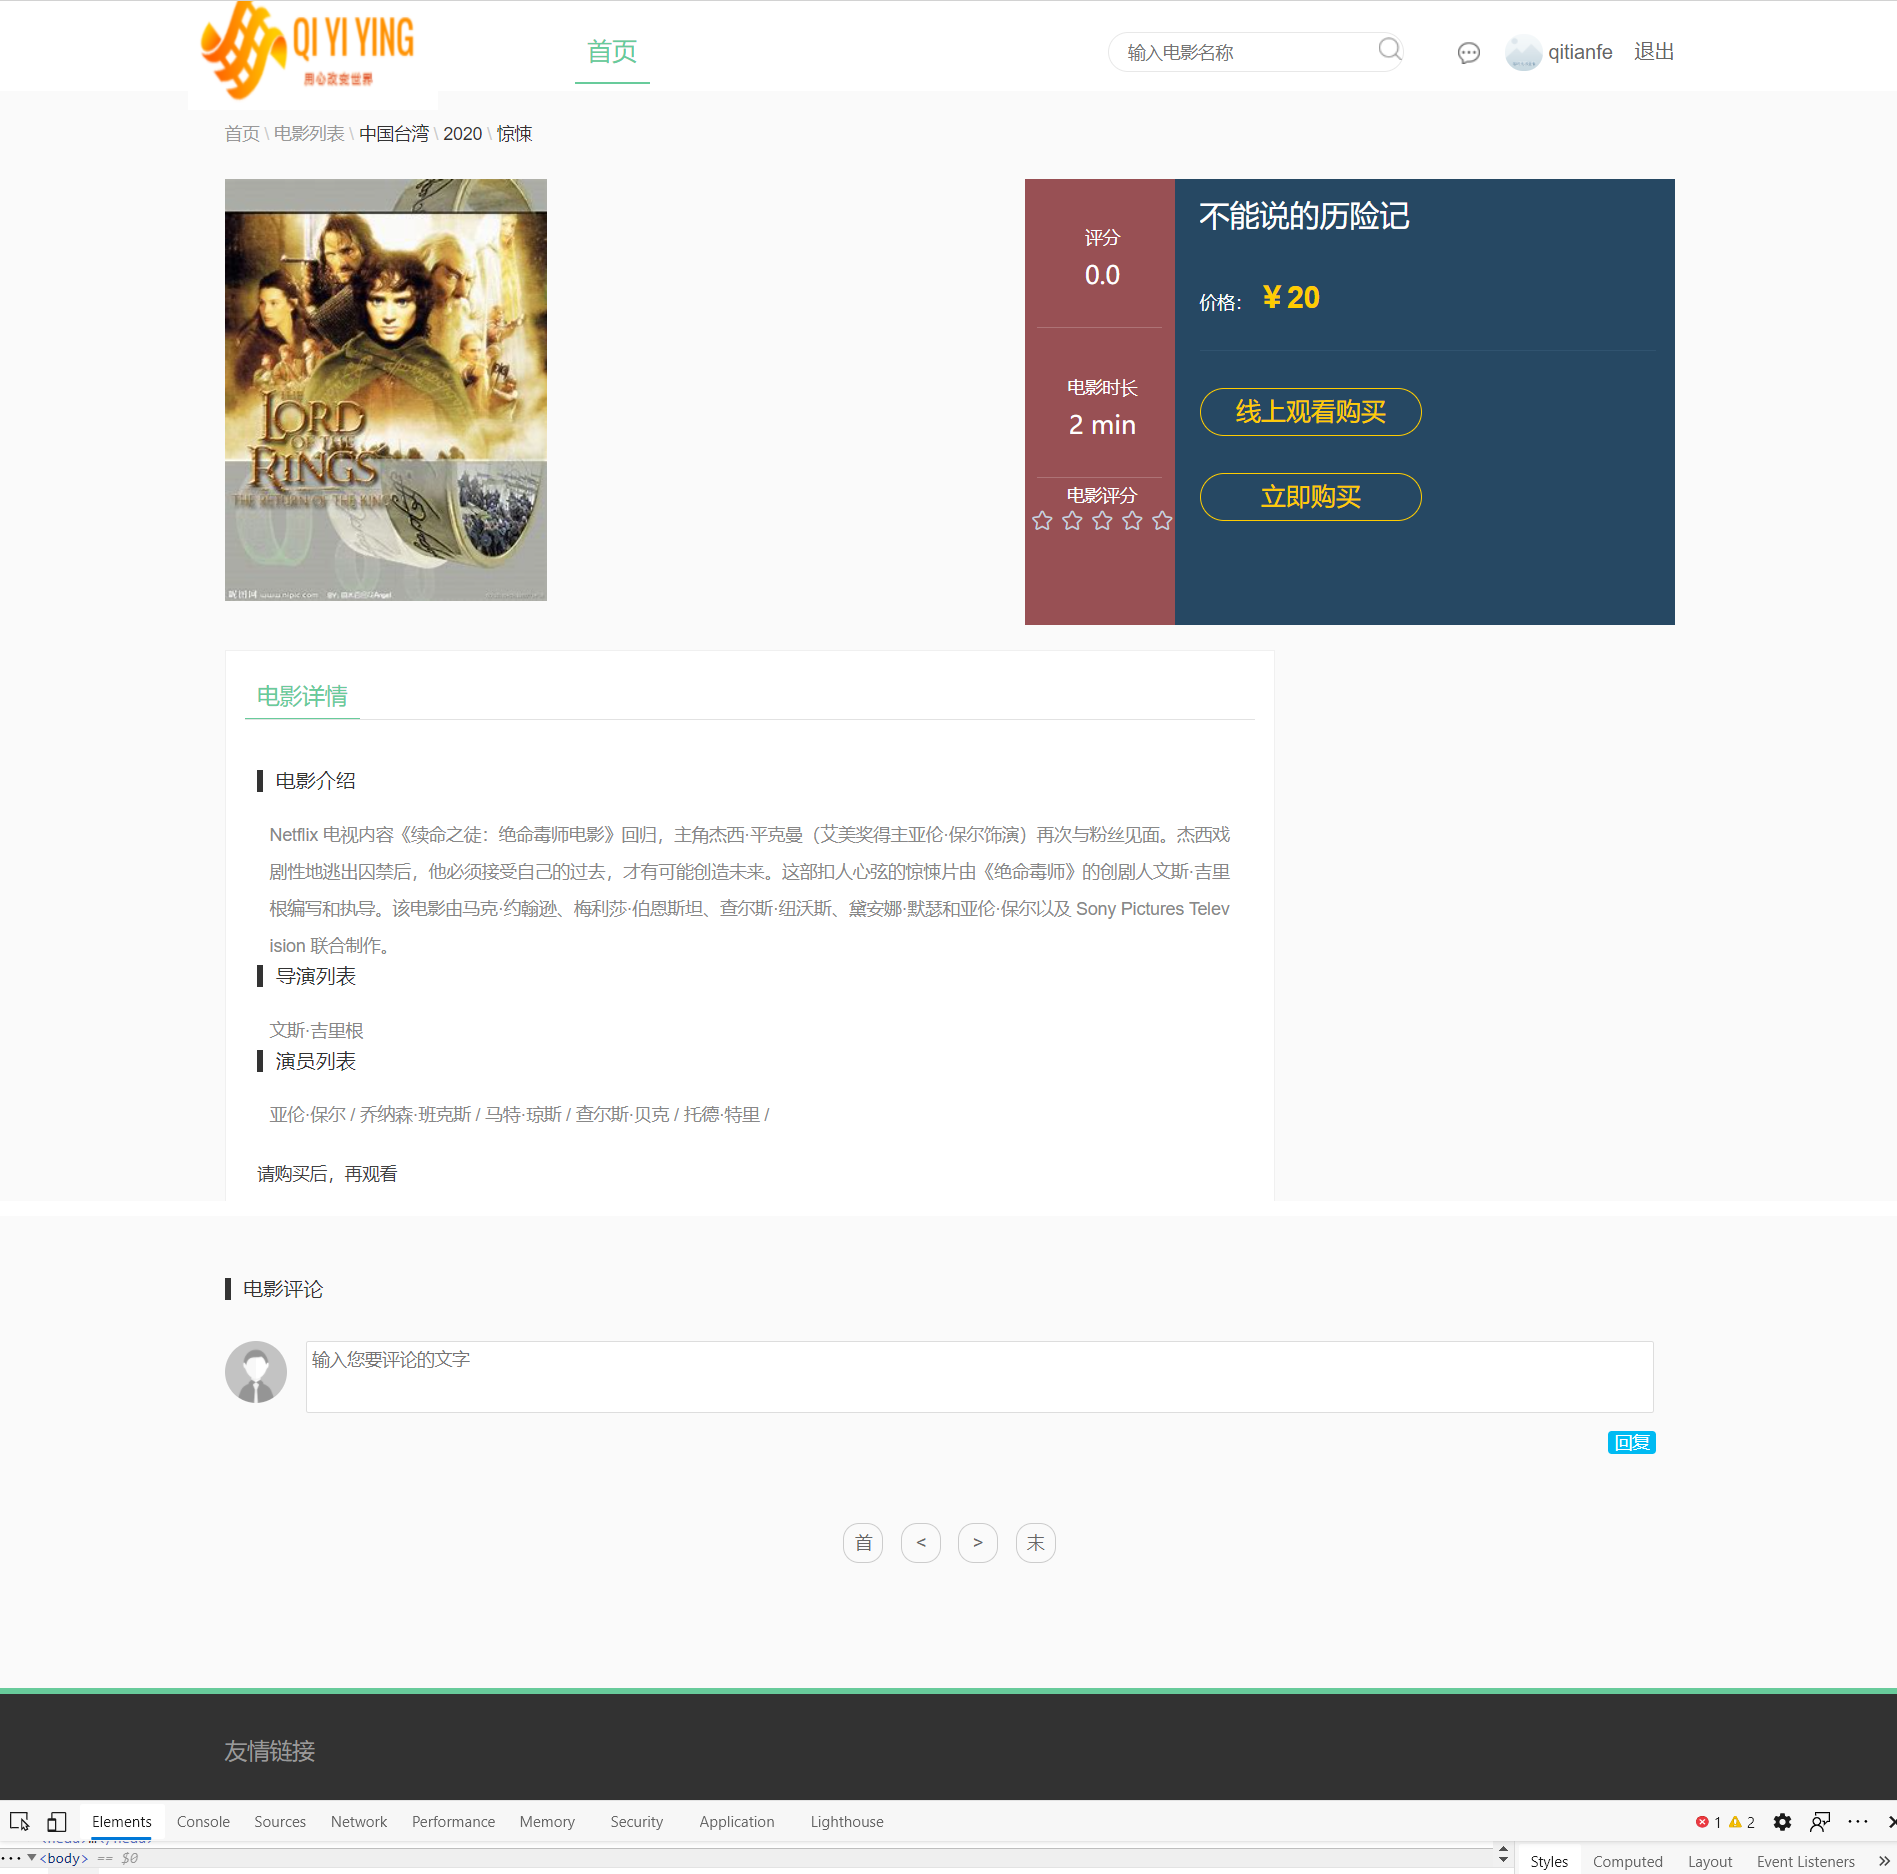
电影中心包括电影检索页面及电影的详细信息页面
其中电影的详情页面主要为用户展示电影的基本信息:
电影的搜索页面会将电影的分类信息进行展示,方便用户对感兴趣的分类信息进行检索查看,并且查询的关键字会进行高亮处理,给用户带来新的体验效果。
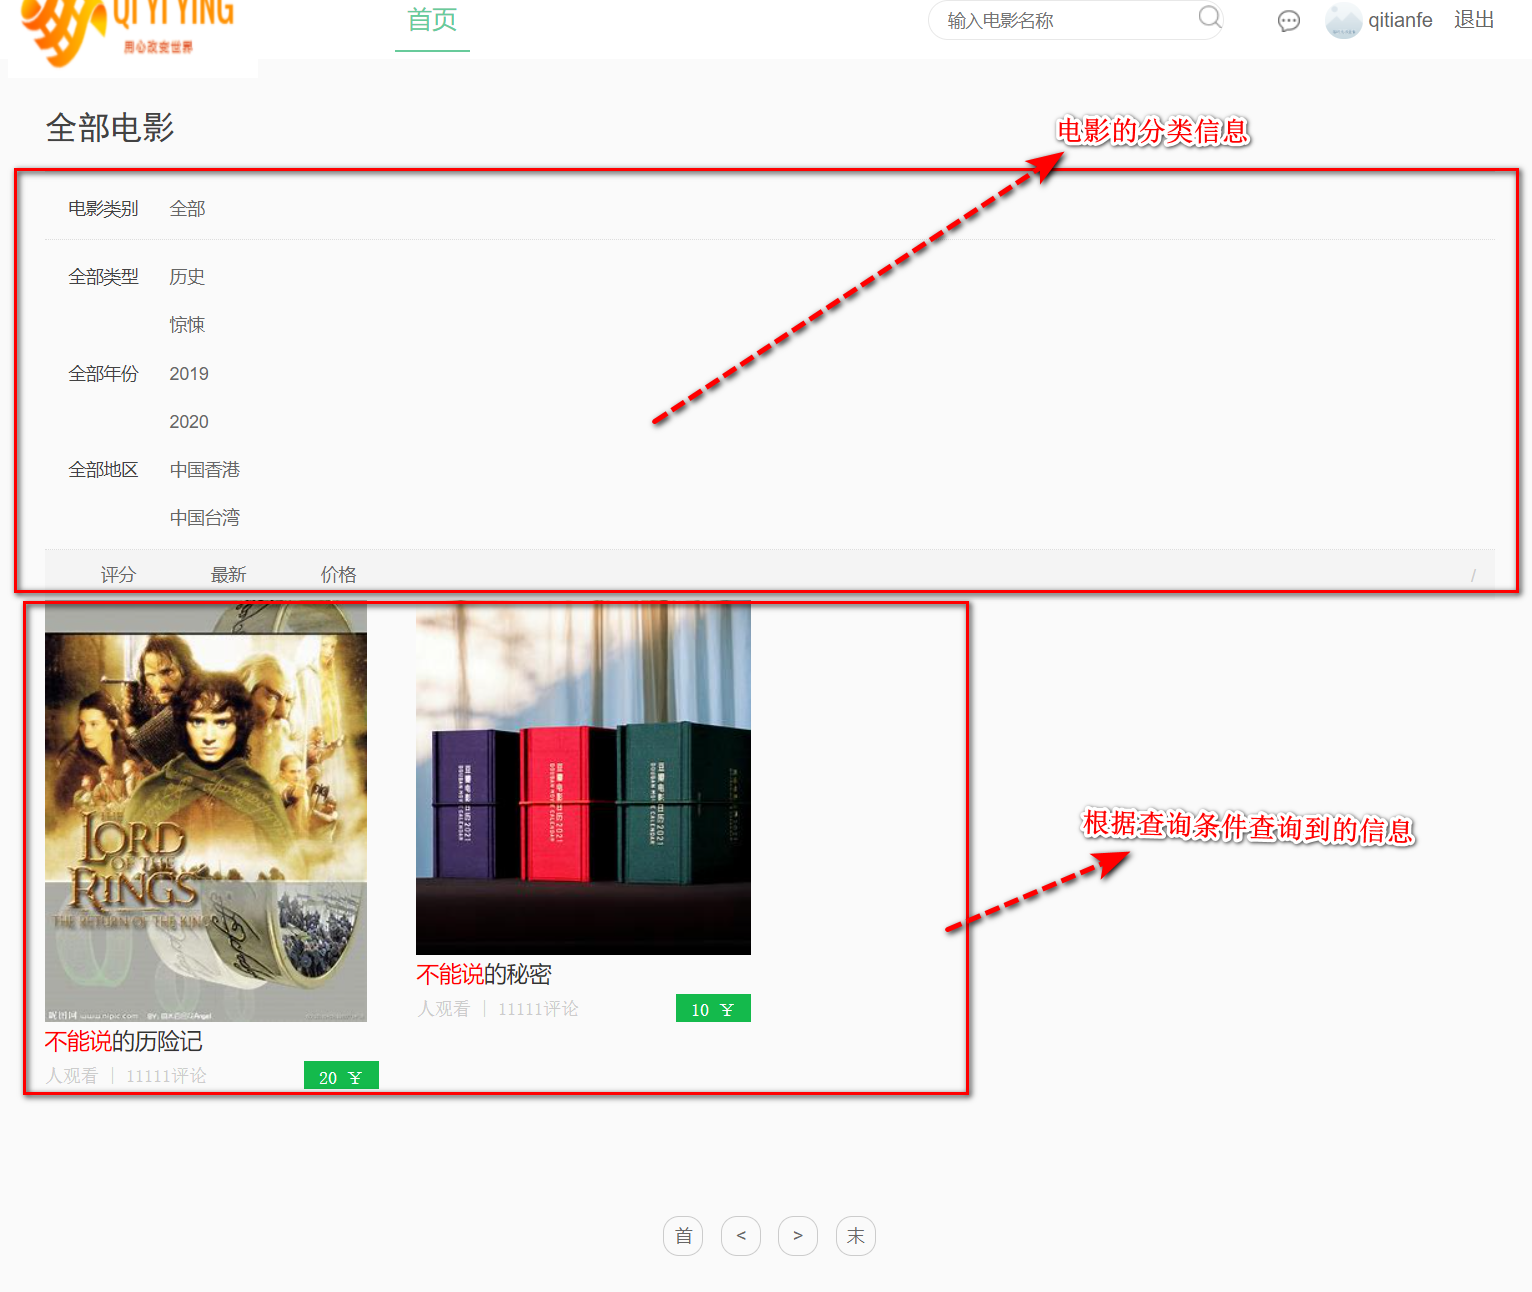
电影的下单页面分为两个页面
- 在线电影购票页面,涉及座位的选座过程,以及动态计算选座过程的价格,实现真正的电影院选座和购买。
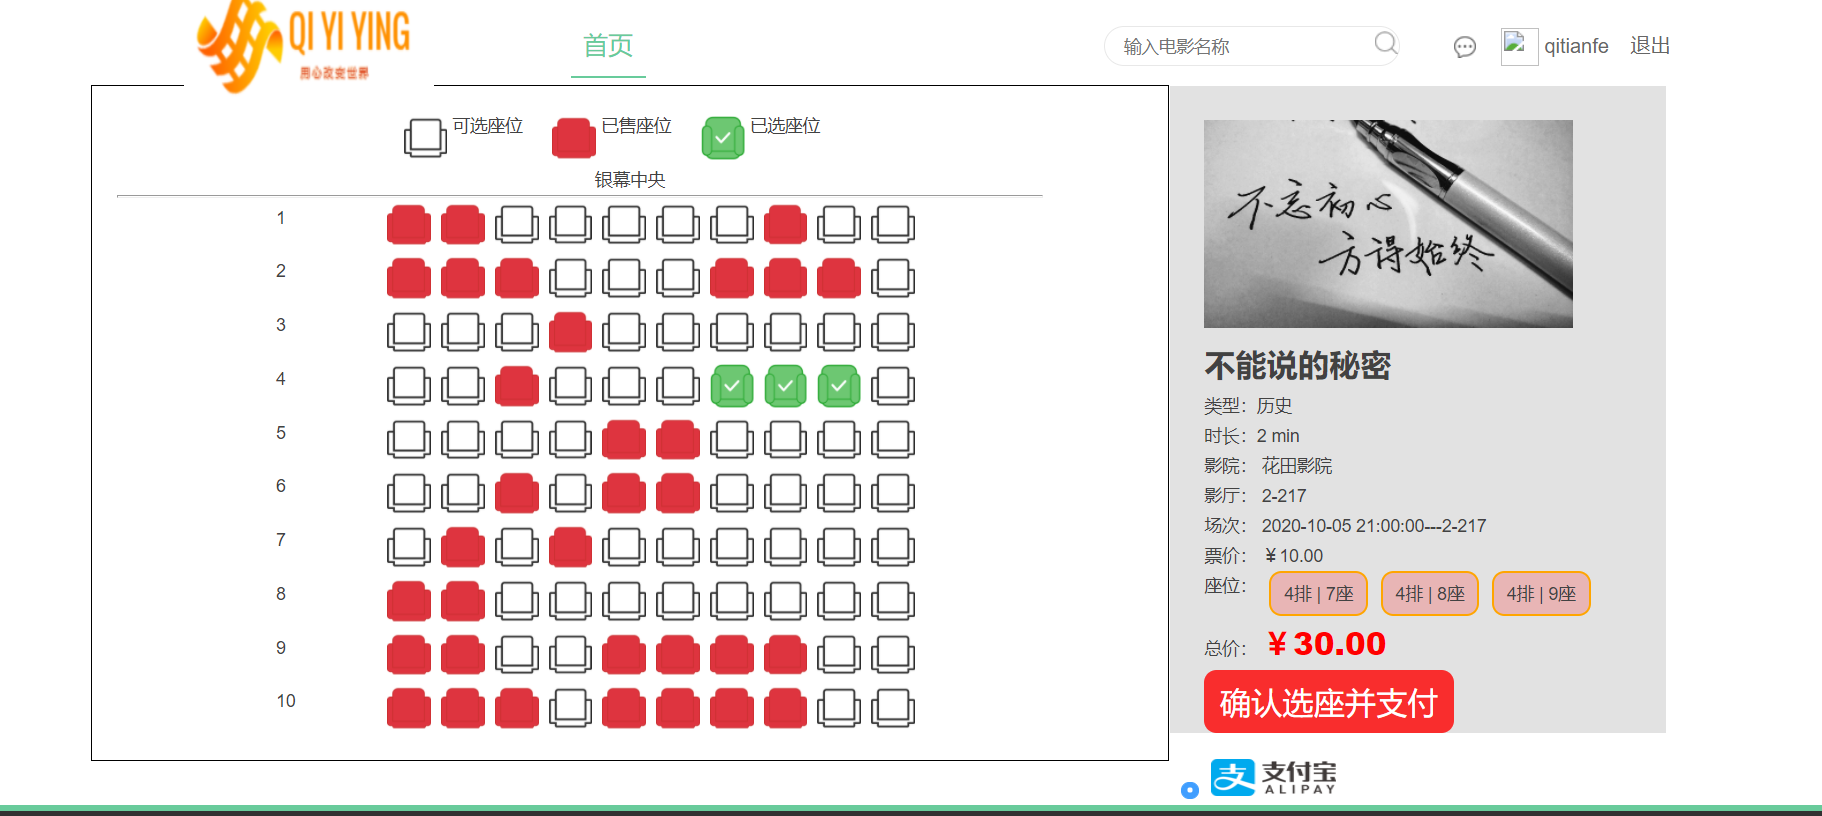
- 在线电影观看购买页面
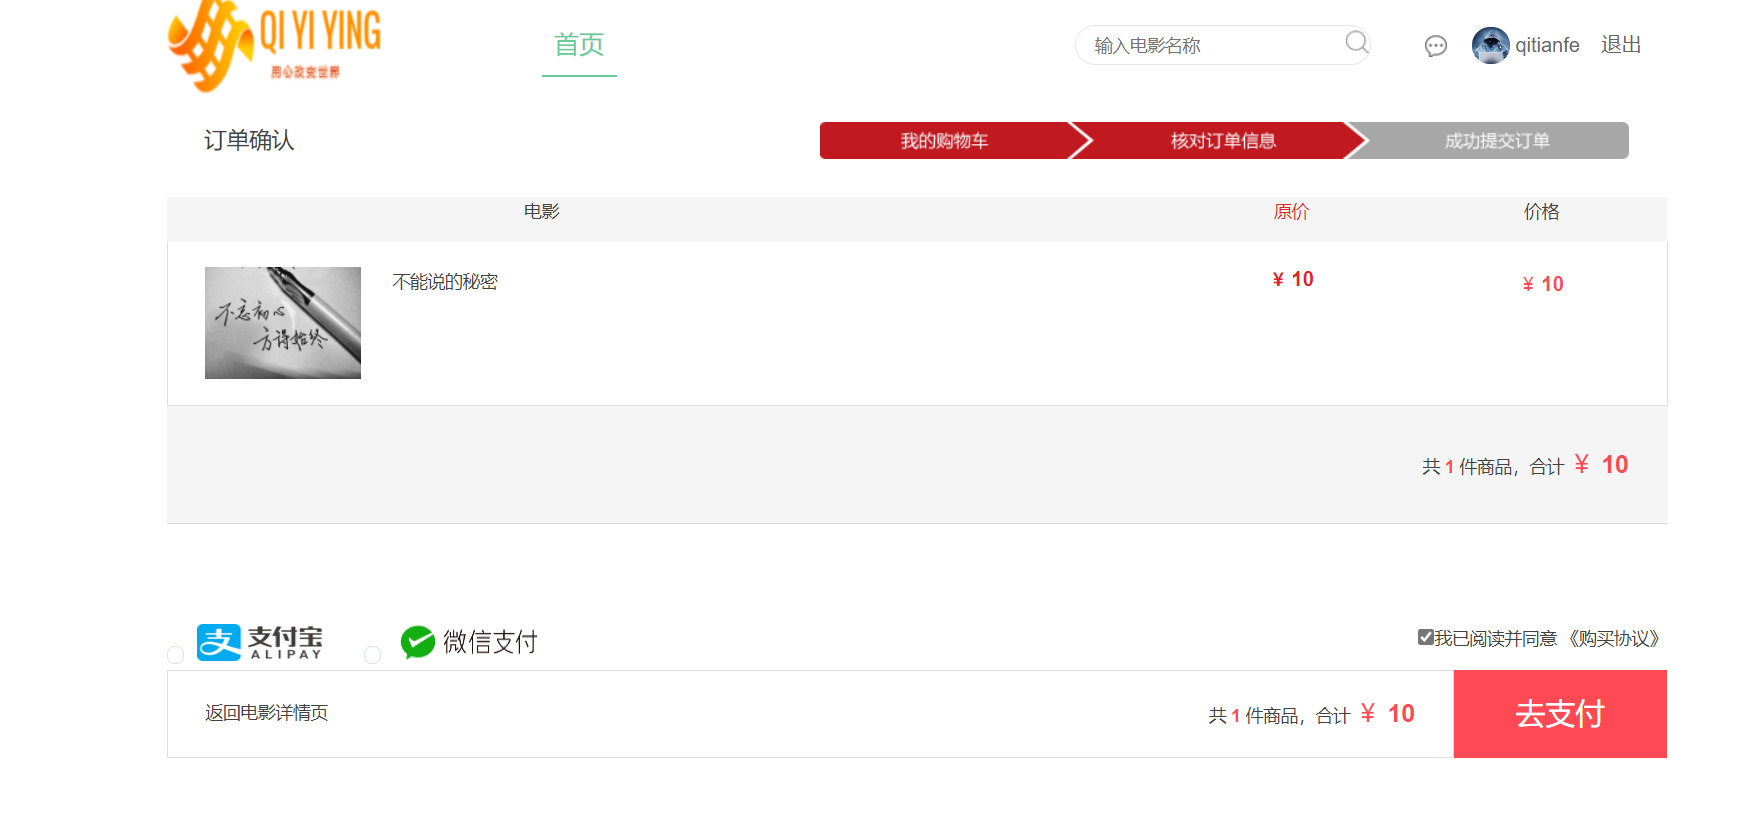
用户中心:注册与登录
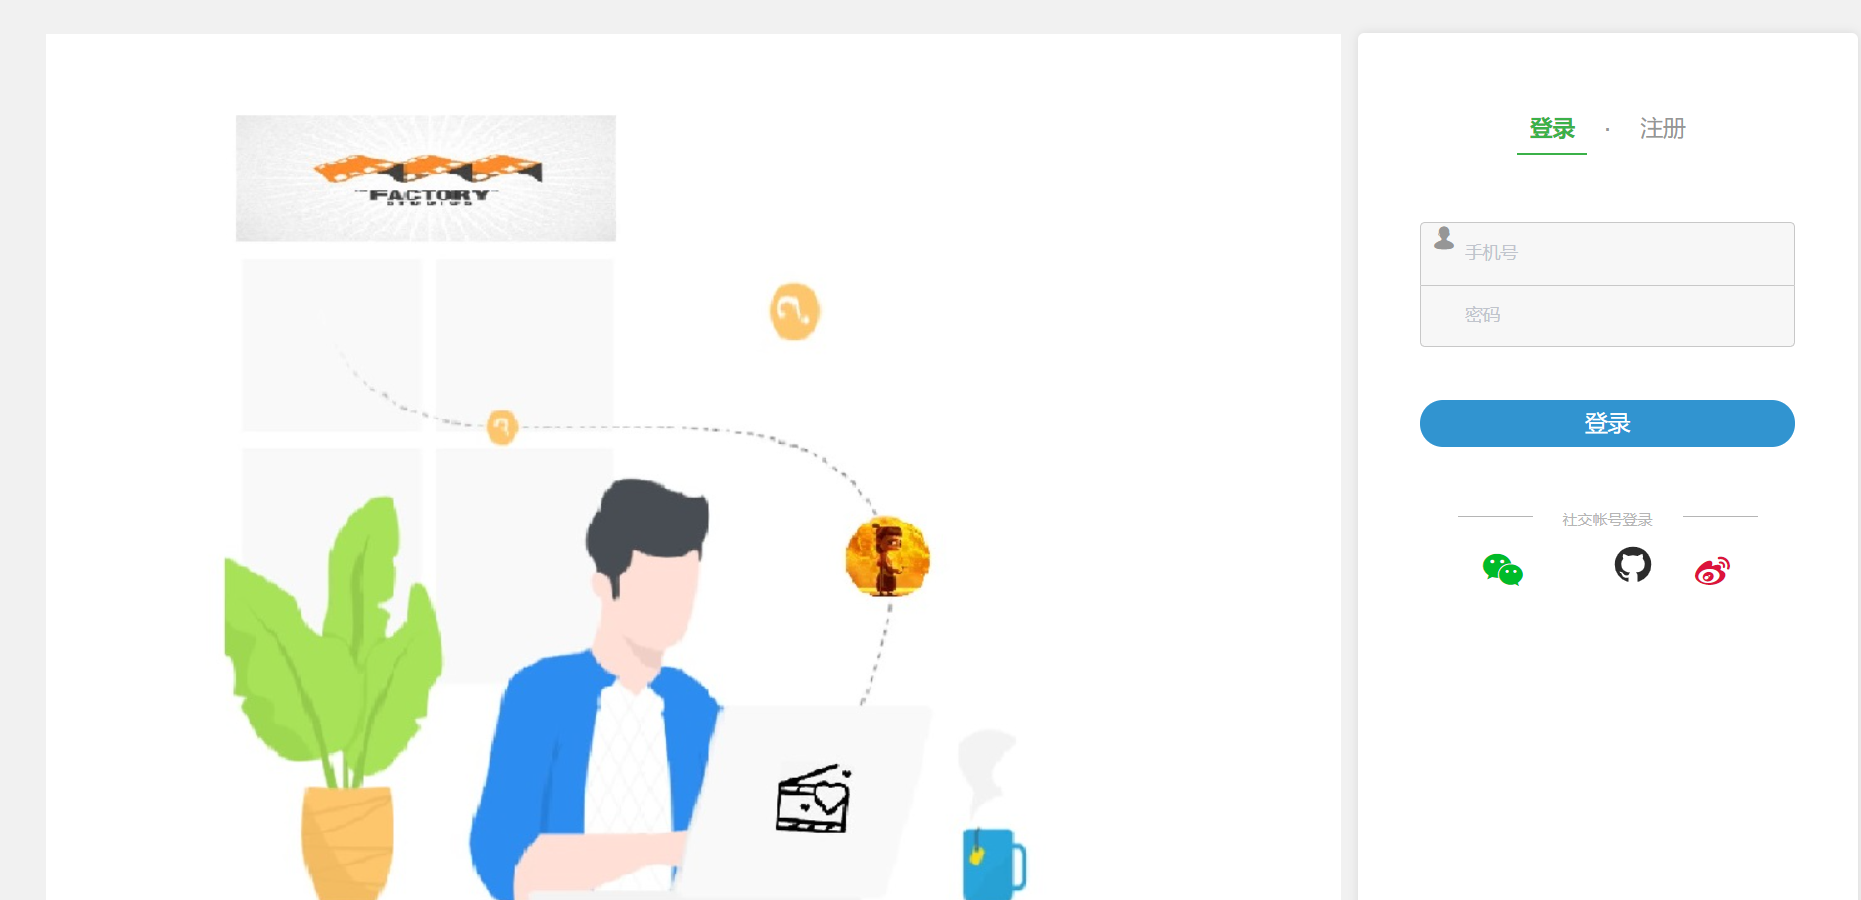
- 后台管理系统包括:电影管理、电影分类管理、电影展厅管理
电影分类界面和电影展厅界面使用excel技术,将excel里的信息转化进而存储到数据库中
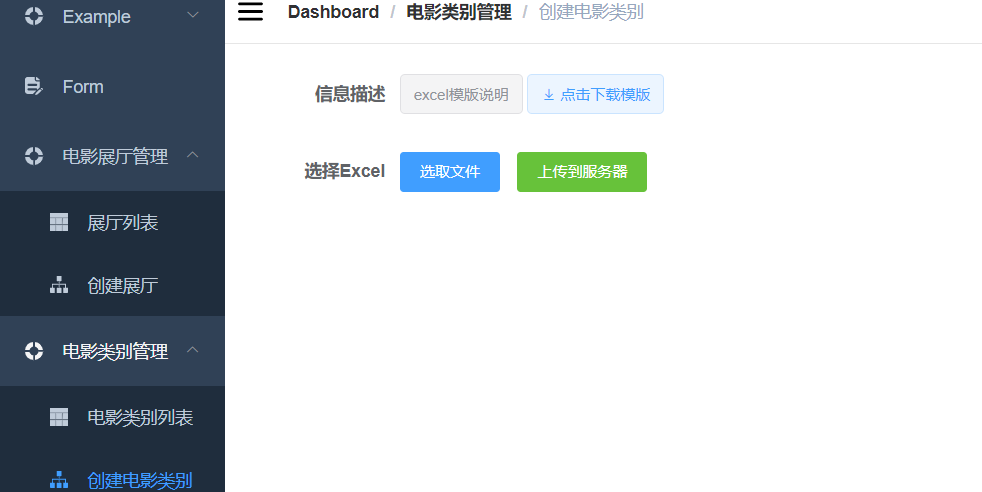
电影展厅展示界面

电影管理主要用于添加新电影的基本信息,以及使用FFMPEG技术对上传的视频进行进一步的操作,进而发布完整电影信息

电影正式发布后的界面

项目初始化
使用WebIDE搭建项目
-
使用命令 mvn archetype:generate -DgroupId=com.yiying -DartifactId=yiying-parent -DarchetypeArtifactId=maven-archetype-quickstart -DinteractiveMode=false
(1)对命令相关参数的说明:
- mvn:maven命令
- archetype:generate:这是一个Maven插件,原型 archetype 插件是一个Maven项目模板工具包,可以用它创建基本的java项目结构。
- -DgourpId: 组织名,公司网址的反写 + 项目名称
- -DartifactId: 项目名(模块名)
- -Dversion:项目版本号
- -DinteractiveMode:是否使用交互模式:false不使用,直接创建;true使用,需要根据提示输入相关信息
(2)修改 pom 文件
- 添加
jar ,将项目打成jar包
-
导入 mybatis 相关依赖包,可以在//mvnrepository.com网站中查询 mybatis 的包版本号
  <dependencies>
	<!-- Mybatis依赖包 3.5.3版本-->
        <dependency>
            <groupId>org.mybatis</groupId>
            <artifactId>mybatis</artifactId>
            <version>3.5.3</version>
        </dependency>
	<!-- Mysql版本依赖包-->
        <dependency>
            <groupId>mysql</groupId>
            <artifactId>mysql-connector-java</artifactId>
            <version>5.1.47</version>
            <scope>runtime</scope>
        </dependency>
	<!-- Lombok版本依赖包-->
        <dependency>
            <groupId>org.projectlombok</groupId>
            <artifactId>lombok</artifactId>
            <version>1.18.12</version>
        </dependency>
	<!-- Junit测试依赖包-->
        <dependency>
            <groupId>junit</groupId>
            <artifactId>junit</artifactId>
            <version>4.12</version>
        </dependency>
    </dependencies>
再使用命令
mvn install进行依赖打包 -
创建数据库以及创建表
--- 创建数据库 CREATE DATABASE test; --- 使用数据库 USE test; --- 创建相关表结构 CREATE TABLE `user` ( `id` char(19) NOT NULL COMMENT '会员id', `name` varchar(50) DEFAULT NULL COMMENT '昵称', `age` tinyint(3) unsigned DEFAULT NULL COMMENT '年龄', PRIMARY KEY (`id`) ) ENGINE=InnoDB DEFAULT CHARSET=utf8mb4 COMMENT='会员表'; 使用show tables 命令查看表是否创建成功 -
在resource文件下创建
mybatis-config.xml配置文件<?xml version="1.0" encoding="UTF-8" ?> <!DOCTYPE configuration PUBLIC "-//mybatis.org//DTD Config 3.0//EN" "//mybatis.org/dtd/mybatis-3-config.dtd"> <configuration> <!-- 设置驼峰匹配 --> <settings> <!--开启二级缓存--> <setting name="cacheEnabled" value="true"/> </settings> <!-- 设置包扫描(别名) --> <typeAliases> <package name="com.yiying.entity"/> </typeAliases> <!-- 配置环境:可以配置多个环境,default:配置某一个环境的唯一标识,表示默认使用哪个环境 --> <environments default="development"> <environment id="development"> <transactionManager type="JDBC"/> <dataSource type="POOLED"> <!--POOLED使用了连接池技术 type=”POOLED”: MyBatis 会创建 PooledDataSource 实例 type = "UNPOOLED" mybatis会创建UnpooledDataSource实例 type = "JNDI"mybatis会从JNDI服务上查找DataSource实例,然后返回使用 --> <!-- 配置连接信息 --> <property name="driver" value="com.mysql.jdbc.Driver"/> <property name="url" value="jdbc:mysql://localhost:3306/test"/> <property name="username" value="root"/> <property name="password" value="xxx"/> </dataSource> </environment> </environments> <!-- 配置映射文件:用来配置sql语句和结果集类型等 --> <mappers> <!--映射器2 使用相对于类路径的资源 <mapper resource="mapper/UserMapper.xml"/> 使用mapper接口的类路径 <mapper class=""/> 扫描指定包下的mapper <package name=""></package> --> <mapper resource="mapper/UserMapper.xml"/> </mappers> </configuration> -
创建 Mapper 对数据库进行增删改查操作
- 创建数据库表的映射类
//数据库中有多少字段对应类有多少属性,不然会报错 @Data //lombok的注解,用此注解可以不用对属性的getter和setter方法进行重写 public class User { private String id; private String name; private String age; }- 创建 UserMapper 类
@Mapper public interface UserMapper { //@Param 对传入的数据进行绑定,当参数为一个时,可以选择不加注解 //根据id查询用户信息 public User getInfo(@Param("id") String id); //查询数据库所有的用户信息 List<User> findAll(); //增加一条用户信息 boolean insert(User user); //根据用户id更新用户信息 boolean updateUser(User user); //根据用户id删除用户信息 boolean removeById(String id); //模糊查询 List<User> findByName(String username); } -
在 resource/mapper 文件下创建 xml 文件
<?xml version="1.0" encoding="UTF-8"?> <!DOCTYPE mapper PUBLIC "-//mybatis.org//DTD Mapper 3.0//EN" "//mybatis.org/dtd/mybatis-3-mapper.dtd"> <!--命名空间需要与对应mapper类的路径一致--> <mapper namespace="com.yiying.mapper.UserMapper"> <!--根据id查询用户信息--> <select id="getInfo" resultType="com.yiying.entity.User" parameterType="java.lang.String"> SELECT id, name,age FROM user WHERE id = #{id} </select> <resultMap id="userMap" type="user"> <id column="id" property="id"/> <result column="name" property="name"/> <result column="age" property="age"/> </resultMap> <!--查询所有用户信息--> <select id="findAll" resultMap="userMap" useCache="true"> select * from user </select> <!--模糊查询--> <select id="findByName" resultType="com.yiying.entity.User"> select * from user where name like '%${name}%' </select> <!--添加一条记录--> <insert id="insert" parameterType="com.yiying.entity.User"> insert into user(id,name,age) values(#{id},#{name},#{age}) </insert> <!--根据用户id修改用户信息--> <update id="updateUser" parameterType="com.yiying.entity.User"> update user set name=#{name},age=#{age} where id = #{id} </update> <!--根据用户id删除用户--> <delete id="removeById" parameterType="java.lang.String"> delete from user where id = #{id} </delete> </mapper> -
对增删改查操作进行测试
// 首先需要在 test 文件夹中创建测试类
//在处理测试时,先加载 init()  处理完测试后,加载 destory()
 //在执行方法前执行
    @Before
    public void init() throws Exception {
        //1.读取配置文件
        in = Resources.getResourceAsStream("mybatis-config.xml");
        //2.创建构建者对象
        SqlSessionFactoryBuilder builder = new SqlSessionFactoryBuilder();
        //3.创建 SqlSession 工厂对象
        factory = builder.build(in);
        //4.创建 Dao 接口的实现类
        sqlSession = factory.openSession();
        //5.创建代理对象
        userMapper= sqlSession.getMapper(UserMapper.class);
    }
	/**
     * 执行完方法后执行
     */
    @After
    public void destory(){
        sqlSession.commit();
        try {
            sqlSession.close();
            //释放资源
            in.close();
        } catch (IOException e) {
            e.printStackTrace();
        }
    }
   //查询

   public class Test {

    private InputStream in;
       private SqlSessionFactory factory;
       SqlSession sqlSession;
       private UserMapper userMapper;

   //根据id查询
       @Test
       public void test1(){
           User user = userMapper.getInfo("1");
        System.out.println(user);
       }

     @Test
       public void test2(){
        List<User> userList = userMapper.findAll();
           System.out.println("查询的所有数据:" + userList.toString());
       }

    //模糊查询
       @Test
       public void test3(){
             List<User>  user = userMapper.findByName("张三");
           System.out.println("根据名字模糊查询结果为:"+user.toString());
       }
   }


//新增一条记录
@Test
    public void test4(){
        User user = new User();
        user.setId("2");
        user.setName("张三四");
        user.setAge(21);
        boolean a = userMapper.insert(user);
        if(a){
            System.out.println("插入成功!!!!!!");
        } else {
            System.out.println("插入失败!!!!!!");
        }
    }

//根据 id 更新用户信息
	@Test
    public void test5(){
        User user = new User();
        user.setId("1");
        user.setName("张三四五");
        user.setAge(20);
        boolean a = userMapper.updateUser(user);
         if(a){
            System.out.println("修改成功!!!!!!");
        } else {
            System.out.println("修改失败!!!!!!");
        }
    }

//根据id删除用户信息
@Test
 @Test
    public void test6(){
        boolean a = userMapper.removeById("2");
       if(a){
            System.out.println("插入成功!!!!!!");
        } else {
            System.out.println("插入失败!!!!!!");
        }
    }

Mybatis的一级缓存和二级缓存
一级缓存
一级缓存介绍
在应用运行过程中,我们有可能在一次数据库会话中,执行多次查询条件完全相同的 SQL,MyBatis 提供了一级缓存的方案优化这部分场景,如果是相同的 SQL 语句,会优先命中一级缓存,避免直接对数据库进行查询,提高性能。具体执行过程如下图所示。
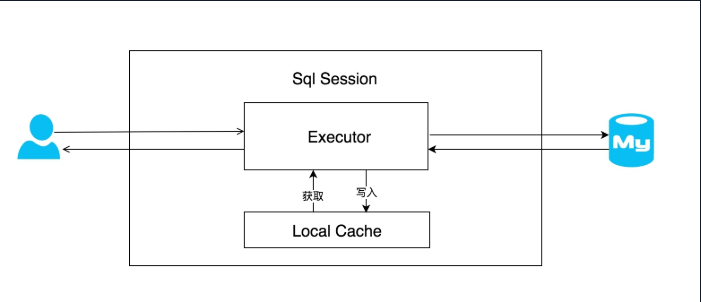
每个 SqlSession 中持有了 Executor,每个 Executor 中有一个 LocalCache。当用户发起查询时,MyBatis 根据当前执行的语句生成 MappedStatement,在 Local Cache 进行查询,如果缓存命中的话,直接返回结果给用户,如果缓存没有命中的话,查询数据库,结果写入 Local Cache,最后返回结果给用户。具体实现类的类关系图如下图所示。

一级缓存配置
我们来看看如何使用 MyBatis 一级缓存。开发者只需在MyBatis的配置文件中,添加如下语句,就可以使用一级缓存。共有两个选项,SESSION或者 STATEMENT,默认是 SESSION 级别,即在一个 MyBatis 会话中执行的所有语句,都会共享这一个缓存。一种是 STATEMENT 级别,可以理解为缓存只对当前执行的这一个 Statement 有效。
<setting name="localCacheScope" value="SESSION"/>
一级缓存实验
接下来通过实验,了解 MyBatis 一级缓存的效果,每个单元测试后都请恢复被修改的数据。
首先是创建示例表 student,创建对应的 POJO 类和增改的方法,具体可以在 entity 包和 mapper 包中查看。
CREATE TABLE `student` (
  `id` int(11) unsigned NOT NULL AUTO_INCREMENT,
  `name` varchar(200) COLLATE utf8_bin DEFAULT NULL,
  `age` tinyint(3) unsigned DEFAULT NULL,
  PRIMARY KEY (`id`)
) ENGINE=InnoDB AUTO_INCREMENT=4 DEFAULT CHARSET=utf8 COLLATE=utf8_bin;
在以下实验中,id为1的学生名称是凯伦。
实验1
开启一级缓存,范围为会话级别,调用三次 getStudentById,代码如下所示:
public void getStudentById() throws Exception {
        SqlSession sqlSession = factory.openSession(true); // 自动提交事务
        StudentMapper studentMapper = sqlSession.getMapper(StudentMapper.class);
        System.out.println(studentMapper.getStudentById(1));
        System.out.println(studentMapper.getStudentById(1));
        System.out.println(studentMapper.getStudentById(1));
    }
执行结果:

我们可以看到,只有第一次真正查询了数据库,后续的查询使用了一级缓存。
实验2
增加了对数据库的修改操作,验证在一次数据库会话中,如果对数据库发生了修改操作,一级缓存是否会失效。
@Test
public void addStudent() throws Exception {
        SqlSession sqlSession = factory.openSession(true); // 自动提交事务
        StudentMapper studentMapper = sqlSession.getMapper(StudentMapper.class);
        System.out.println(studentMapper.getStudentById(1));
        System.out.println("增加了" + studentMapper.addStudent(buildStudent()) + "个学生");
        System.out.println(studentMapper.getStudentById(1));
        sqlSession.close();
}
执行结果:

我们可以看到,在修改操作后执行的相同查询,查询了数据库,一级缓存失效。
实验3
开启两个 SqlSession,在 sqlSession1 中查询数据,使一级缓存生效,在sqlSession2 中更新数据库,验证一级缓存只在数据库会话内部共享。
@Test
public void testLocalCacheScope() throws Exception {
        SqlSession sqlSession1 = factory.openSession(true);
        SqlSession sqlSession2 = factory.openSession(true);

        StudentMapper studentMapper = sqlSession1.getMapper(StudentMapper.class);
        StudentMapper studentMapper2 = sqlSession2.getMapper(StudentMapper.class);

        System.out.println("studentMapper读取数据: " + studentMapper.getStudentById(1));
        System.out.println("studentMapper读取数据: " + studentMapper.getStudentById(1));
        System.out.println("studentMapper2更新了" + studentMapper2.updateStudentName("小岑",1) + "个学生的数据");
        System.out.println("studentMapper读取数据: " + studentMapper.getStudentById(1));
        System.out.println("studentMapper2读取数据: " + studentMapper2.getStudentById(1));
}

sqlSession2 更新了id为1的学生的姓名,从凯伦改为了小岑,但 session1 之后的查询中,id为1的学生的名字还是凯伦,出现了脏数据,也证明了之前的设想,一级缓存只在数据库会话内部共享。
二级缓存
二级缓存介绍
在上文中提到的一级缓存中,其最大的共享范围就是一个 SqlSession 内部,如果多个 SqlSession之间需要共享缓存,则需要使用到二级缓存。开启二级缓存后,会使用 CachingExecutor 装饰Executor,进入一级缓存的查询流程前,先在 CachingExecutor 进行二级缓存的查询,具体的工作流程如下所示。

二级缓存开启后,同一个 namespace 下的所有操作语句,都影响着同一个 Cache,即二级缓存被多个 SqlSession 共享,是一个全局的变量。
当开启缓存后,数据的查询执行的流程就是 二级缓存 -> 一级缓存 -> 数据库。
二级缓存配置
要正确的使用二级缓存,需完成如下配置的。
- 在MyBatis的配置文件中开启二级缓存。
<setting name="cacheEnabled" value="true"/>
- 在 MyBatis 的映射 XML 中配置 cache 或者 cache-ref 。
cache标签用于声明这个 namespace 使用二级缓存,并且可以自定义配置。
<cache/>
type:cache使用的类型,默认是PerpetualCache,这在一级缓存中提到过。eviction: 定义回收的策略,常见的有 FIFO,LRU。flushInterval: 配置一定时间自动刷新缓存,单位是毫秒。size: 最多缓存对象的个数。readOnly: 是否只读,若配置可读写,则需要对应的实体类能够序列化。blocking: 若缓存中找不到对应的key,是否会一直blocking,直到有对应的数据进入缓存。cache-ref代表引用别的命名空间的Cache配置,两个命名空间的操作使用的是同一个 Cache。
<cache-ref namespace="mapper.StudentMapper"/>
二级缓存实验
接下来我们通过实验,了解 MyBatis 二级缓存在使用上的一些特点。
在本实验中,id 为1的学生名称初始化为点点。
实验1
测试二级缓存效果,不提交事务,sqlSession1 查询完数据后,sqlSession2 相同的查询是否会从缓存中获取数据。
@Test
public void testCacheWithoutCommitOrClose() throws Exception {
        SqlSession sqlSession1 = factory.openSession(true);
        SqlSession sqlSession2 = factory.openSession(true);

        StudentMapper studentMapper = sqlSession1.getMapper(StudentMapper.class);
        StudentMapper studentMapper2 = sqlSession2.getMapper(StudentMapper.class);

        System.out.println("studentMapper读取数据: " + studentMapper.getStudentById(1));
        System.out.println("studentMapper2读取数据: " + studentMapper2.getStudentById(1));
}
执行结果:

我们可以看到,当 sqlsession 没有调用 commit() 方法时,二级缓存并没有起到作用。
实验2
测试二级缓存效果,当提交事务时,sqlSession1 查询完数据后,sqlSession2 相同的查询是否会从缓存中获取数据。
@Test
public void testCacheWithCommitOrClose() throws Exception {
        SqlSession sqlSession1 = factory.openSession(true);
        SqlSession sqlSession2 = factory.openSession(true);

        StudentMapper studentMapper = sqlSession1.getMapper(StudentMapper.class);
        StudentMapper studentMapper2 = sqlSession2.getMapper(StudentMapper.class);

        System.out.println("studentMapper读取数据: " + studentMapper.getStudentById(1));
        sqlSession1.commit();
        System.out.println("studentMapper2读取数据: " + studentMapper2.getStudentById(1));
}

从图上可知,sqlsession2 的查询,使用了缓存,缓存的命中率是0.5。
实验3
测试 update 操作是否会刷新该 namespace 下的二级缓存。
@Test
public void testCacheWithUpdate() throws Exception {
        SqlSession sqlSession1 = factory.openSession(true);
        SqlSession sqlSession2 = factory.openSession(true);
        SqlSession sqlSession3 = factory.openSession(true);

        StudentMapper studentMapper = sqlSession1.getMapper(StudentMapper.class);
        StudentMapper studentMapper2 = sqlSession2.getMapper(StudentMapper.class);
        StudentMapper studentMapper3 = sqlSession3.getMapper(StudentMapper.class);

        System.out.println("studentMapper读取数据: " + studentMapper.getStudentById(1));
        sqlSession1.commit();
        System.out.println("studentMapper2读取数据: " + studentMapper2.getStudentById(1));

        studentMapper3.updateStudentName("方方",1);
        sqlSession3.commit();
        System.out.println("studentMapper2读取数据: " + studentMapper2.getStudentById(1));
}

我们可以看到,在 sqlSession3 更新数据库,并提交事务后,sqlsession2 的StudentMapper namespace 下的查询走了数据库,没有走Cache。
实验4
验证MyBatis的二级缓存不适应用于映射文件中存在多表查询的情况。
通常我们会为每个单表创建单独的映射文件,由于MyBatis的二级缓存是基于 namespace 的,多表查询语句所在的 namspace 无法感应到其他 namespace 中的语句对多表查询中涉及的表进行的修改,引发脏数据问题。
@Test
public void testCacheWithDiffererntNamespace() throws Exception {
        SqlSession sqlSession1 = factory.openSession(true);
        SqlSession sqlSession2 = factory.openSession(true);
        SqlSession sqlSession3 = factory.openSession(true);

        StudentMapper studentMapper = sqlSession1.getMapper(StudentMapper.class);
        StudentMapper studentMapper2 = sqlSession2.getMapper(StudentMapper.class);
        ClassMapper classMapper = sqlSession3.getMapper(ClassMapper.class);

        System.out.println("studentMapper读取数据: " + studentMapper.getStudentByIdWithClassInfo(1));
        sqlSession1.close();
        System.out.println("studentMapper2读取数据: " + studentMapper2.getStudentByIdWithClassInfo(1));

        classMapper.updateClassName("特色一班",1);
        sqlSession3.commit();
        System.out.println("studentMapper2读取数据: " + studentMapper2.getStudentByIdWithClassInfo(1));
}
执行结果:

在这个实验中,我们引入了两张新的表,一张 class,一张 classroom。class 中保存了班级的 id 和班级名,classroom中保存了班级 id 和学生 id。我们在 StudentMapper 中增加了一个查询方法 getStudentByIdWithClassInfo,用于查询学生所在的班级,涉及到多表查询。在 ClassMapper 中添加了 updateClassName,根据班级 id 更新班级名的操作。
当 sqlsession1 的 studentmapper 查询数据后,二级缓存生效。保存在 StudentMapper的 namespace 下的 cache 中。当 sqlSession3 的 classMapper`的 updateClassName 方法对class表进行更新时,updateClassName 不属于StudentMapper 的 namespace,所以 StudentMapper 下的cache没有感应到变化,没有刷新缓存。当 StudentMapper 中同样的查询再次发起时,从缓存中读取了脏数据。
实验5
为了解决实验4的问题呢,可以使用 Cache ref,让 ClassMapper 引用 StudenMapper 命名空间,这样两个映射文件对应的 SQL 操作都使用的是同一块缓存了。
执行结果:

不过这样做的后果是,缓存的粒度变粗了,多个 Mapper namespace 下的所有操作都会对缓存使用造成影响。


