Spring(DI,AOP) 理解(一)
- 2020 年 4 月 17 日
- 筆記
感覺自己的spring理解的不好.所以重新開始學習.
這篇文章主要是來理解DI(依賴注入),Aop(切面)
一.DI(依賴注入,這裡沒有涉及到注釋.只是用xml文件和Bean的方法來註冊pojo,)
依賴注入就是將創建bean對象的權利交給spring框架(控制反轉) 然後用Applicationcontext.getBean() 來獲取對象.
容器:spring容器創建對象,管理對象,並負責管理對象的生命周期. 容器有兩種 BeanFactiory ..ApplicationContext ..多的就不解釋了,BeanFactiory 比較low,這裡使用ApplicaitonContext
ApplicaitonContext:
1 FileSystemXmlApplicationContext:以基於文件系統的XML配置文件創建ApplicationContext實例。
2 ClassPathXmlApplicationContext:以類加載路徑下的XML配置文件創建的ApplicationContext實例
3 XmlWebApplicationContext:從web應用下的一個或者多個xml配置文件加載創建ApplicationContext實例
4 AnnotationConfigApplicationContext 從一個或者多個基於java的配置類中加載Spring ApplicaitonContext實例
5 AnnotationConfigWebApplicationContext 基於一個或者多個java的配置類來創建spring web 的應用上下文
二. Aop :面向切面編程.(將復用性很強的模塊抽離出來,然後通過配置,將抽離出來的模塊(比如日誌模塊),覆蓋到其他需要日誌模塊的服務上)
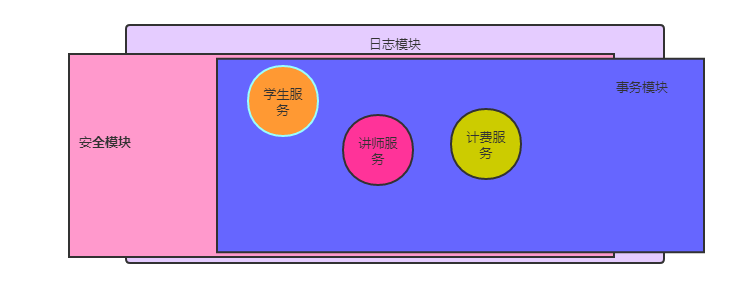
一個項目假設有講師服務,學生服務,計費服務…….還有日誌模塊,安全模塊,事務模塊
講師服務,學生服務,計費服務 每一個服務都需要與日誌模塊,安全模塊,事務模塊 進行耦合…..如果這個樣子,,每一個服務裏面的代碼不能夠專註於解決本服務的問題.需要調用日誌模塊,安全模塊,事務模塊的代碼.
這樣,代碼的復用性會很低,耦合性很高.

創建一個Person類…裏面有一個doSomething方法
package com.start.demo;
/**
 * 男孩,女孩,工程師,程序員....
 */
public class Person {
    private String name;
    private int age;
    private Play play;

    public Person(Play p) {
        this.play = p;
    }

    public String getName() {
        return name;
    }

    public void setName(String name) {
        this.name = name;
    }

    public int getAge() {
        return age;
    }

    public void setAge(int age) {
        this.age = age;
    }

    void doSomething() {
        System.out.println(" we can  play " + play.getType() +"together");
    }
}
創建一個Play類 type 表示可以做的事情
package com.start.demo;

/**
 * 各種活動,,玩遊戲,讀書,看電視.....
 */
public class Play {
    private String type="computer game";

    public String getType() {
        return type;
    }

    public void setType(String type) {
        this.type = type;
    }
}
測試Aop的一個類
package com.start.demo;

/**
 * 這個類是用來測試Aop.在切點之前,之後,分別調用對應的方法
 */
public class Asker {
    private String name;
     void doSomethingBefore(){
        System.out.println("what can we do ");
    }
    void  doSomethingAfter(){
        System.out.println("that's fine");
    }
}
裝配bean的xml
<?xml version="1.0" encoding="UTF-8"?>
<beans xmlns="//www.springframework.org/schema/beans"
       xmlns:xsi="//www.w3.org/2001/XMLSchema-instance"
       xmlns:aop="//www.springframework.org/schema/aop"
       xsi:schemaLocation="//www.springframework.org/schema/beans //www.springframework.org/schema/beans/spring-beans.xsd
        //www.springframework.org/schema/aop //www.springframework.org/schema/aop/spring-aop.xsd">
     <!--裝配bean-->
    <bean id="person" class="com.start.demo.Person">
        <constructor-arg ref="play"/>
    </bean>
    <bean id="play" class="com.start.demo.Play"/>
    <bean id="asker" class="com.start.demo.Asker"/>
    <aop:config>
        <aop:aspect ref="asker">
            <!-- pointcut 的id 不能與 配置切點bean的id一樣了,會報錯.-->
            <aop:pointcut id="personPointcut"
                          expression="execution(* *.doSomething())"/><!--execution(* * .doSomething(..)) 要是有參數,需要在方法體裏面加 ..-->
            <aop:before pointcut-ref="personPointcut" method="doSomethingBefore"/>
            <aop:after pointcut-ref="personPointcut" method="doSomethingAfter"/>
        </aop:aspect>
    </aop:config>

</beans>
用javaBean來裝配對象
package com.start.confBean;

import com.start.demo.Person;
import com.start.demo.Play;
import org.springframework.context.annotation.Bean;
import org.springframework.context.annotation.Configuration;

@Configuration
public class PersonConf {
    @Bean
    public Person person() {
        return new Person(play());
    }

    @Bean
    public Play play() {
        return new Play();
    }
}
測試Main類
package com.start.demo;

import com.start.confBean.PersonConf;
import org.springframework.context.annotation.AnnotationConfigApplicationContext;
import org.springframework.context.support.ClassPathXmlApplicationContext;

public class TestMain {
    public static void main(String[] args) {
        ClassPathXmlApplicationContext appcontext = new ClassPathXmlApplicationContext("beans.xml");    //從beans.xml 文件獲取ApplicaitonContext
//        AnnotationConfigApplicationContext annotationApplicationContext = new AnnotationConfigApplicationContext(PersonConf.class);//PersonConf.java 文件獲取ApplicaitonContext
//        Person person1 = annotationApplicationContext.getBean(Person.class);  //獲取bean ,直接指定Bean 為Person
//        Person person = (Person) appcontext.getBean("person");//獲取bean   person 為配置文件裏面的 id
        Person pers = (Person) appcontext.getBean("person");
        pers.doSomething();
    }
}
這些代碼雖然很簡單,卻讓我認識清楚了DI和Aop的作用


