廣告行業中那些趣事系列8:詳解BERT中分類器源碼
- 2020 年 4 月 7 日
- 筆記

最新最全的文章請關注我的微信公眾號:數據拾光者。
摘要:BERT是近幾年NLP領域中具有里程碑意義的存在。因為效果好和應用範圍廣所以被廣泛應用於科學研究和工程項目中。廣告系列中前幾篇文章有從理論的方面講過BERT的原理,也有從實戰的方面講過使用BERT構建分類模型。本篇從源碼的角度從整體到局部分析BERT模型中分類器部分的源碼。
目錄
01 整體模塊劃分
02 數據處理模塊
03 特徵處理模塊
04 模型構建模塊
05 模型運行模塊
06 其他模塊
總結
01 整體模塊劃分
對於機器學習工程師來說,會調包跑程序應該是萬里長征的第一步。這一步主要是幫助我們迅速將模型應用到實際業務中,並且提升自信心,但這還遠遠不夠。要想根據不同的業務場景更好的使用模型,我們需要深層次的理解模型,讀點源碼才能走的更遠。
本篇解讀的是BERT開源項目中分類器部分的源碼,從最開始的數據輸入到模型運行整個流程主要可以分成數據處理模塊、特徵處理模塊、模型構建模塊和模型運行模塊。具體如下圖所示:
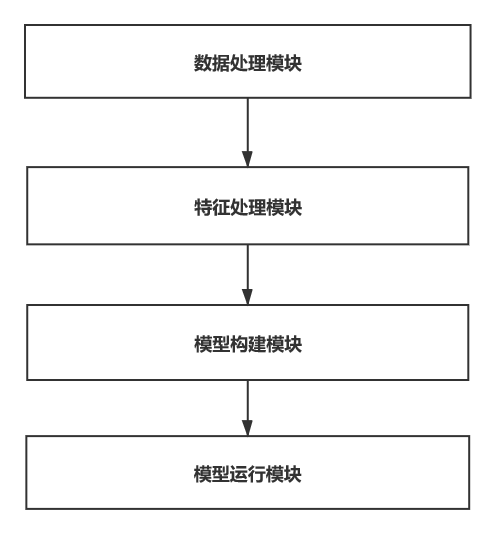 圖1 BERT分類器整體模塊劃分
因為原生態BERT預訓練模型動輒幾百兆甚至上千兆的大小,模型訓練速度非常慢,對於BERT模型線上化非常不友好,所以使用目前比較火的BERT最新派生產品ALBERT來完成BERT線上化服務。ALBERT使用參數減少技術來降低內存消耗從而最終達到提高BERT的訓練速度,並且在主要基準測試中均名列前茅,可謂跑的快,還跑的好。本篇解讀的BERT源碼也是基於ALBERT開源項目。
項目開源的github工程:https://github.com/wilsonlsm006/albert_zh
主要解讀分類器部分的源碼,代碼及注釋在run_classifier.py文件,歡迎小夥伴們fork。
02 數據處理模塊
數據處理模塊主要負責數據讀入和預處理功能。
數據處理主要由數據處理器DataProcessor來完成。根據不同的任務會有不同的數據處理器子類,這裡的不同表現在數據讀入方式和數據預處理方面。
1. 數據讀入方式
實際項目中數據讀入的方式多種多樣,比如csv、tsv、txt等。比如有的項目是需要讀取csv文件,而有的則需要tsv或者txt格式。我們可以構建自定義的數據處理器來完成不同的項目需求。
2. 數據預處理
數據預處理是根據不同的NLP任務來完成不同的操作,比如單句分類任務我們需要的是text_a和label格式。而句子相似關係判斷任務需要的是text_a,text_b,label格式。其他任務也是類似的,根據不同的NLP任務來完成數據預處理操作。
通過一個類圖來講解源碼中的數據處理器:
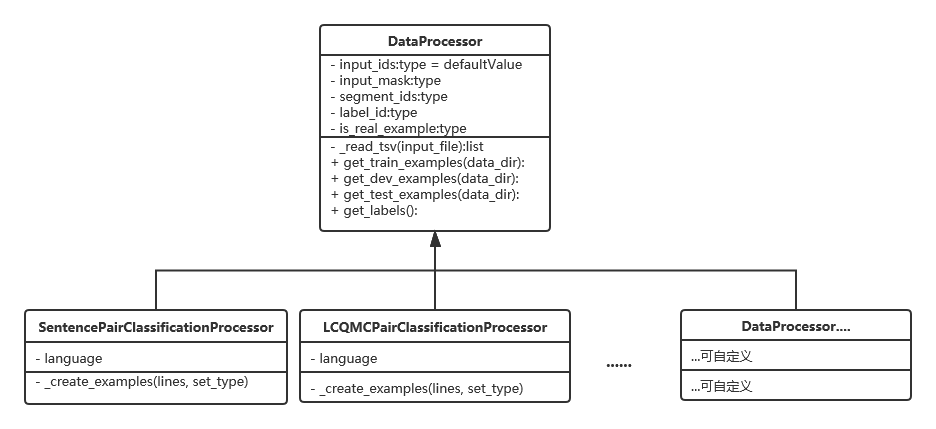 圖2 數據處理器類圖
對應到項目源碼中,我們有一個DataProcessor父類。父類中有五個方法,分別是讀取tsv文件、獲得訓練集、獲得驗證集、獲得測試集和獲得標籤。這裡可根據業務需求增刪改獲取文件類型的函數,比如讀取csv可以添加get_csv(input_file)等等。
1 class DataProcessor(object): 2 """Base class for data converters for sequence classification data sets.""" 3 def get_train_examples(self, data_dir): 4 """Gets a collection of `InputExample`s for the train set.""" 5 raise NotImplementedError() 6 def get_dev_examples(self, data_dir): 7 """Gets a collection of `InputExample`s for the dev set.""" 8 raise NotImplementedError() 9 def get_test_examples(self, data_dir): 10 """Gets a collection of `InputExample`s for prediction.""" 11 raise NotImplementedError() 12 def get_labels(self): 13 """Gets the list of labels for this data set.""" 14 raise NotImplementedError() 15 @classmethod 16 def _read_tsv(cls, input_file, quotechar=None): 17 """Reads a tab separated value file.""" 18 with tf.gfile.Open(input_file, "r") as f: 19 reader = csv.reader(f, delimiter="t", quotechar=quotechar) 20 lines = [] 21 for line in reader: 22 lines.append(line) 23 return lines
下面兩個子類,分別是處理句子關係判斷任務的SentencePairClassificationProcessor數據處理器和LCQMCPairClassificationProcessor分類的數據處理器。前面文章有講過如果需要做單句分類的任務我們可以在這裡添加一個SentenceClassifierProcess進行定製化開發。
對應到項目源碼中,因為我們是句子關係判斷任務,其實就是判斷兩句話是不是有關係,這裡我們得到的最終數據格式是列表類型,具體數據格式如下:
[(guid,text_a,text_b,label),(guid,text_a,text_b,label),….]
其中guid作為唯一識別text_a和text_b句子對的標誌,可以理解為該條樣例的唯一id;
text_a和text_b是需要判斷的兩個句子;
label字段就是標籤,如果兩句話相似則置為1,否則為0。
上面四個字段guid和text_a是必須的。text_b是可選的,如果為空則變成單句分類任務,不為空則是句子關係判斷任務。label在訓練集和驗證集是必須的,在測試集中可以不提供。
具體代碼在SentencePairClassificationProcessor子類的_create_examples函數:
1 def _create_examples(self, lines, set_type): 2 """Creates examples for the training and dev sets.""" 3 examples = [] 4 print("length of lines:", len(lines)) 5 for (i, line) in enumerate(lines): 6 # print('#i:',i,line) 7 if i == 0: 8 continue 9 guid = "%s-%s" % (set_type, i) 10 try: 11 label = tokenization.convert_to_unicode(line[2]) 12 text_a = tokenization.convert_to_unicode(line[0]) 13 text_b = tokenization.convert_to_unicode(line[1]) 14 examples.append( 15 InputExample(guid=guid, text_a=text_a, text_b=text_b, label=label)) 16 except Exception: 17 print('###error.i:', i, line) 18 return examples
03 特徵處理模塊
特徵處理模塊主要的功能是將數據處理模塊得到的數據轉化成特徵並持久化到TFRecord文件中,由file_based_convert_examples_to_features函數完成。
1 """ 2 將數據處理模塊得到的數據轉化成TFRecord文件 3 input: 4 examples:數據格式為[(guid,text_a,text_b,label),(guid,text_a,text_b,label),....] 5 label_list:標籤列表 6 max_seq_length:允許的句子最大長度 7 tokenizer:分詞器 8 output_file:TFRecord文件存儲路徑 9 output:持久化到TFRecord格式文件 10 """ 11 def file_based_convert_examples_to_features( 12 examples, 13 label_list, 14 max_seq_length, 15 tokenizer, output_file):
1. 預處理數據轉化成特徵
數據轉化成特徵的操作主要由函數convert_single_example完成。傳統的機器學習需要從數據中抽取特徵,NLP任務是對文本進行分詞等操作獲取特徵。BERT模型中默認每個字字就是一個詞。
1 """ 2 將預處理數據加工成模型需要的特徵 3 input: 4 ex_index:數據條數索引 5 example:數據格式為[(guid,text_a,text_b,label),(guid,text_a,text_b,label),....] 6 label_list:標籤列表 7 max_seq_length:允許的句子最大長度,這裡如果輸入句子長度不足則補0 8 tokenizer:分詞器 9 output: feature = InputFeatures( 10 input_ids=input_ids:token embedding:表示詞向量,第一個詞是CLS,分隔詞有SEP,是單詞本身 11 input_mask=input_mask:position embedding:為了令transformer感知詞與詞之間的位置關係 12 segment_ids=segment_ids:segment embedding:text_a與text_b的句子關係 13 label_id=label_id:標籤 14 is_real_example=True) 15 """ 16 def convert_single_example(ex_index, example, 17 label_list, max_seq_length,tokenizer): 18 .... 19 feature = InputFeatures( 20 input_ids=input_ids, 21 input_mask=input_mask, 22 segment_ids=segment_ids, 23 label_id=label_id, 24 is_real_example=True) 25 return feature
論文中BERT模型的輸入轉化成特徵如下圖所示:
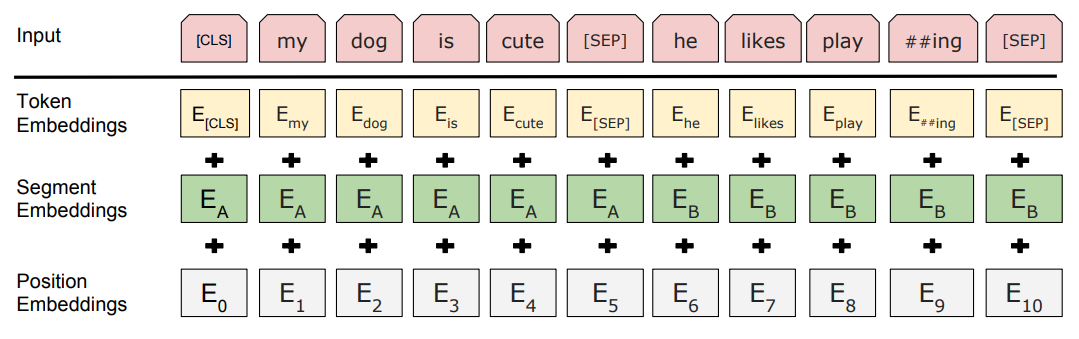 圖3 句子輸入轉化成三層Embedding
這裡需要注意下對text_a和text_b的預處理操作。首先會進行標記化將text_a和text_b轉化成tokens_a和tokens_b。如果tokens_b存在,那麼tokens_a和tokens_b的長度就不能超過max_seq_length-3,因為需要加入cls,sep,seq三個符號;如果tokens_b不存在,那麼tokens_a的長度不能超過 max_seq_length -2 ,因為需要加入 cls 和 sep符號。
這裡通過一條具體的數據轉化成特徵說明上述流程。現在我們的example中有一條數據,分別有三個字段:
text_a: 這種圖片是用什麼軟件製作的?
text_b: 這種圖片製作是用什麼軟件呢?
label: 1
經過分詞之後,我們會得到:
tokens: [CLS] 這 種 圖 片 是 用 什 么 軟 件 制 作 的 ? [SEP] 這 種 圖 片 制 作 是 用 什 么 軟 件 呢 ? [SEP]
其中[CLS]是模型額外增加的開始標誌,說明這是句首位置。[SEP]代表分隔符,我們會將兩句話拼接成一句話,通過分隔符來識別。第二句話拼接完成後也會加上一個分隔符。這裡需要注意的是BERT對於中文分詞是以每個字進行切分,並不是我們通常理解的按照中文實際的詞進行切分。
經過特徵提取之後變成了:
input_ids:101 6821 4905 1745 4275 3221 4500 784 720 6763 816 1169 868 46388043 102 6821 4905 1745 4275 1169 868 3221 4500 784 720 6763 816 1450 8043 1020 0 0 0 0 0 0 0 0 0 0 0 0 0 0 0 0 0 0 0 0 0 0 0 0 0 0 0 0 0 0 0 0 0 0 0 0 0 0 00 0 0 0 0 0 0 0 0 0 0 0 0 0 0 0 0 0 0 0 0 0 0 0 0 0 0 0 0 0 0 0 0 0 0 0 0 0 0 00 0 0 0 0 0 0 0 0 0 0 0 0 0 0 0 0
input_mask:1 1 1 1 1 1 1 1 1 1 1 1 1 1 1 1 1 1 1 1 1 1 1 1 1 1 1 1 1 1 1 0 0 00 0 0 0 0 0 0 0 0 0 0 0 0 0 0 0 0 0 0 0 0 0 0 0 0 0 0 0 0 0 0 0 0 0 0 0 0 0 0 00 0 0 0 0 0 0 0 0 0 0 0 0 0 0 0 0 0 0 0 0 0 0 0 0 0 0 0 0 0 0 0 0 0 0 0 0 0 0 00 0 0 0 0 0 0 0 0 0 0 0 0 0
segment_ids:0 0 0 0 0 0 0 0 0 0 0 0 0 0 0 0 1 1 1 1 1 1 1 1 1 1 1 1 1 1 1 0 0 00 0 0 0 0 0 0 0 0 0 0 0 0 0 0 0 0 0 0 0 0 0 0 0 0 0 0 0 0 0 0 0 0 0 0 0 0 0 0 00 0 0 0 0 0 0 0 0 0 0 0 0 0 0 0 0 0 0 0 0 0 0 0 0 0 0 0 0 0 0 0 0 0 0 0 0 0 0 00 0 0 0 0 0 0 0 0 0 0 0 0 0
label_id:1
這裡詳細說下我們真正給模型輸入的特徵是什麼。
input_ids代表詞向量編碼。NLP任務中我們會將文本轉化成詞向量的表徵形式提供給模型。通過BERT源碼中的tokenizer將句子拆分成字,並且將字映射成id。比如上面例子中第一句話有14個字,第二句話也有14個字,再加上一個開始標誌和兩個分隔符,一種有31個字。而上面例子中的input_ids列表中前31個位置都有每個字映射的id,並且相同字的映射的id也是一樣的。其他則通過添加0進行填充;
input_mask代表位置編碼。為了transformer感知詞與詞之間的位置關係,源碼中會將當前位置有字的設置為1,其他用0進行填充;
segment_ids代表句子關係編碼。如果是句子關係判斷任務則會將text_b位置對應的句子關係編碼置為1。這裡需要注意,只要是句子關係判斷任務,不管兩句話到底有沒有關係,即標籤是否為1都會將text_b位置對應的句子關係編碼置為1;
label_id就代表兩句話是不是有關係。如果有關係則標籤置為1,否則為0。
2. 特徵存儲在TFRecord格式文件
當我們進行模型訓練的時候,會將全部訓練數據加載到內存中。對於小規模數據集來說沒有問題,但是遇到大規模數據集時我們的內存並不能加載全部的數據,所以涉及到分批加載數據。Tensorflow給開發者提供了TFRecord格式文件。TFRecord內部採用二進制編碼,加載快,對大型數據轉換友好。
小結下,特徵處理模塊主要將預處理得到的數據轉化成特徵並存儲到TFRecord格式文件。BERT會將句子輸入轉化成三層Embedding編碼,第一層是詞編碼,主要表示詞本身;第二層編碼是位置編碼,主要為了transformer感知詞與詞之間的位置關係;第三層編碼則表示句與句之間關係。通過這三層編碼我們就得到了模型的特徵輸入。為了方便大數據集下模型訓練加載數據,我們將特徵持久化到TFRecord格式文件。
04 模型構建模塊
模型構建模塊主要分成模型構建和模型標準輸入。
1. 模型構建
通過函數model_fn_builder來構建自定義模型估計器。
1 """ 2 自定義模型估計器(model_fn_builder) 3 input:bert_config:bert相關的配置 4 num_labels:標籤的數量 5 init_checkpoint:預訓練模型 6 learning_rate:學習率 7 num_train_steps:模型訓練輪數 = (訓練集總數/batch_size)*epochs 8 num_warmup_steps:線性地增加學習率,num_warmup_steps = num_train_steps * warmup_proportion 9 use_tpu:是否使用TPU 10 output:構建好的模型 11 """ 12 def model_fn_builder(bert_config, num_labels, init_checkpoint, learning_rate, 13 num_train_steps, num_warmup_steps, use_tpu, 14 use_one_hot_embeddings): 15 """Returns `model_fn` closure for TPUEstimator.""" 16 ...... 17 return model_fn
這裡模型構建主要有create_model函數完成,主要完成兩件事:第一是調用modeling.py中的BertModel類創建模型;第二是計算交叉熵損失loss。交叉熵的值越小,兩個概率分佈就越接近。
1 """ 2 創建模型,主要完成兩件事:第一件事是調用modeling.py中國的BertModel類創建模型; 3 第二件事事計算交叉熵損失loss。交叉熵的值越小,兩個概率分佈就越接近。 4 """ 5 def create_model(bert_config, is_training, input_ids, input_mask, segment_ids, 6 labels, num_labels, use_one_hot_embeddings): 7 """Creates a classification model.""" 8 # 建立一個BERT分類模型(create_model) 9 model = modeling.BertModel( 10 config=bert_config, 11 is_training=is_training, 12 input_ids=input_ids, 13 input_mask=input_mask, 14 token_type_ids=segment_ids, 15 use_one_hot_embeddings=use_one_hot_embeddings) 16 ...... 17 return (loss, per_example_loss, logits, probabilities)
2. 模型標準輸入
因為源項目是基於Tensorflow框架開發,所以需要將前面得到的特徵轉化成標準的Tensorflow模型輸入格式。這塊主要由函數file_based_input_fn_builder來完成。通過輸入文件的不同可以完成訓練集、驗證集和測試集的輸入。
1 """ 2 模型標準輸入 3 從TFRecord格式文件中讀取特徵並轉化成TensorFlow標準的數據輸入格式 4 input:input_file: 5 input_file=train_file:輸入文件,可以是訓練集、驗證集和預測集 6 seq_length=FLAGS.max_seq_length:句子最大長度 7 is_training=True:是否訓練標誌 8 drop_remainder=True:表示在少於batch_size元素的情況下是否應刪除最後一批 ; 默認是不刪除。 9 output:TensorFlow標準的格式輸入 10 """ 11 def file_based_input_fn_builder(input_file, seq_length, is_training, 12 drop_remainder): 13 name_to_features = { 14 "input_ids": tf.FixedLenFeature([seq_length], tf.int64), 15 "input_mask": tf.FixedLenFeature([seq_length], tf.int64), 16 "segment_ids": tf.FixedLenFeature([seq_length], tf.int64), 17 "label_ids": tf.FixedLenFeature([], tf.int64), 18 "is_real_example": tf.FixedLenFeature([], tf.int64), 19 } 20 ...... 21 return input_fn
這裡需要注意的是is_training字段,對於訓練數據,需要大量的並行讀寫和打亂順序;而對於驗證數據,我們不希望打亂數據,是否並行也不關心。
小結下,模型構建模塊主要由模型構建和模型標準輸入兩部分。模型構建負責創建和配置BERT模型。模型標準輸入則讀取TFRecord格式文件並轉化成標準的模型輸入,根據輸入文件的不同完成訓練集、驗證集和測試集的標準輸入。
05 模型運行模塊
上面模型構建好了之後即可運行模型。Tensorflow中模型運行需要構建一個Estimator對象。主要通過源碼中tf.contrib.tpu.TPUEstimator()來構建。
1 """ 2 Estimator對象包裝由model_fn指定的模型 3 input:給定輸入和其他一些參數 4 use_tpu:是否使用TPU 5 model_fn:前面構建好的模型 6 config:模型運行相關的配置 7 train_batch_size:訓練batch大小 8 eval_batch_size:驗證batch大小 9 predict_batch_size:預測batch大小 10 output:需要進行訓練、計算,或預測的操作 11 """ 12 estimator = tf.contrib.tpu.TPUEstimator( 13 use_tpu=FLAGS.use_tpu, 14 model_fn=model_fn, 15 config=run_config, 16 train_batch_size=FLAGS.train_batch_size, 17 eval_batch_size=FLAGS.eval_batch_size, 18 predict_batch_size=FLAGS.predict_batch_size)
1. 模型訓練
模型訓練通過estimator.train即可完成:
1 if FLAGS.do_train: 2 train_input_fn = file_based_input_fn_builder( 3 input_file=train_file, 4 seq_length=FLAGS.max_seq_length, 5 is_training=True, 6 drop_remainder=True) 7 .... 8 estimator.train(input_fn=train_input_fn, max_steps=num_train_steps)
2. 模型驗證
模型驗證通過estimator.evaluate即可完成:
1 if FLAGS.do_eval: 2 eval_input_fn = file_based_input_fn_builder( 3 input_file=eval_file, 4 seq_length=FLAGS.max_seq_length, 5 is_training=False, 6 drop_remainder=eval_drop_remainder) 7 .... 8 result = estimator.evaluate(input_fn=eval_input_fn, steps=eval_steps, checkpoint_path=filename)
3. 模型預測
模型預測通過estimator.predict即可完成:
1 if FLAGS.do_predict: 2 predict_input_fn = file_based_input_fn_builder( 3 input_file=predict_file, 4 seq_length=FLAGS.max_seq_length, 5 is_training=False, 6 drop_remainder=predict_drop_remainder) 7 .... 8 result = estimator.predict(input_fn=predict_input_fn)
06 其他模塊
1. tf日誌模塊
1 import tensorflow as tf 2 # 日誌的顯示等級 3 tf.logging.set_verbosity(tf.logging.INFO) 4 # 打印提示日誌 5 tf.logging.info("***** Runningtraining *****") 6 # 打印傳參日誌 7 tf.logging.info(" Num examples = %d", len(train_examples))
2. 外部傳參模塊
1 import tensorflow as tf 2 flags = tf.flags 3 FLAGS = flags.FLAGS 4 flags.DEFINE_string( 5 "data_dir", None, 6 "The input data dir. Should contain the .tsv files (or other datafiles) " 7 "for thetask.") 8 # 設置哪些參數是必須要傳入的 9 flags.mark_flag_as_required("data_dir")
總結
本篇主要講解BERT中分類器部分的源碼。整體來看主要分成數據處理模塊、特徵處理模塊、模型構建模塊和模型運行模塊。數據處理模塊主要負責數據讀入和預處理工作;特徵處理模塊負責將預處理後的數據轉化成特徵並持久化到TFRecord格式文件中;模型構建模塊主要負責構建BERT模型和模型標準輸入數據準備;模型運行模塊主要負責模型訓練、驗證和預測。通過整體到局部的方式我們可以對BERT中的分類器源碼有深入的了解。後面可以根據實際的業務需求對分類器進行二次開發。

最新最全的文章請關注我的微信公眾號:數據拾光者。