shell腳本中的case條件語句介紹和使用案例
- 2020 年 4 月 2 日
- 筆記
#前言:這篇我們接着寫shell的另外一個條件語句case,上篇講解了if條件語句。case條件語句我們常用於實現系統服務啟動腳本等場景,case條件語句也相當於if條件語句多分支結構,多個選擇,case看起來更規範和易讀
#case條件語句的語法格式
case "變量" in 值1) 指令1... ;; 值2) 指令2... ;; *) 指令3... esac
#說明:當變量的值等於1時,那麼就會相應的執行指令1的相關命令輸出,值等於2時就執行指令2的命令,以此類推,如果都不符合的話,則執行*後面的指令,要注意內容的縮進距離
#簡單記憶
case "找工作條件" in 給的錢多) 給你工作... ;; 給股份) 給你工作... ;; 有發展前景) 可以試試... ;; *) bye bye !! esac
#實踐使用
實踐1.根據用戶的輸入判斷用戶輸入的是哪個數字,執行相應動作
#如果用戶輸入的是1-9的任意一個數字,則輸出對應輸入的數字,如果是別的字符,則提示輸出不正確並退出程序
[root@shell scripts]# cat num.sh #!/bin/bash #create by guoke #function number input read -p "please input a number:" num #打印信息提示用戶輸入,輸入信息賦值給num變量 case "$num" in 1) echo "The num you input is 1" ;; [2-5]) echo "The num you input is 2-5" ;; [6-9]) echo "The num you input is 6-9" ;; *) echo "please input number[1-9] int" exit; esac
#說明:使用read讀取用戶輸入的數據,然後使用case條件語句進行判斷,根據用戶輸入的值執行相關的操作
#執行效果
[root@shell scripts]# sh num.sh please input a number:1 The num you input is 1 [root@shell scripts]# sh num.sh please input a number:3 The num you input is 2-5 [root@shell scripts]# sh num.sh please input a number:4 The num you input is 2-5 [root@shell scripts]# sh num.sh please input a number:8 The num you input is 6-9 [root@shell scripts]# sh num.sh please input a number:a please input number[1-9] int
實踐2.打印一個如下的水果菜單
(1) banana
(2) apple
(3) orange
(4) cherry
#腳本編寫
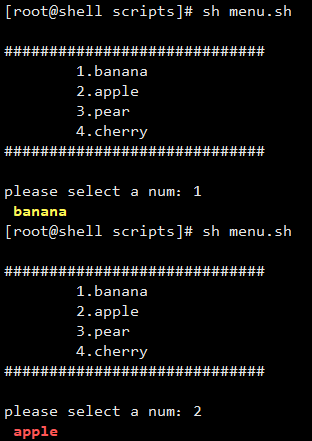
[root@shell scripts]# cat menu.sh #!/bin/bash #create by guoke #function print menu RED_COLOR='E[1;31m' GREEN_COLOR='E[1;32m' YELLOW_COLOR='E[1;33m' BLUE_COLOR='E[1;34m' RES='E[0m' echo ' #使用echo打印菜單 ############################# 1.banana 2.apple 3.pear 4.cherry ############################# ' read -p "please select a num:" num case "$num" in 1) echo -e "${YELLOW_COLOR} banana ${RES}" ;; 2) echo -e "${RED_COLOR} apple ${RES}" ;; 3) echo -e "${GREEN_COLOR} pear ${RES}" ;; 4) echo -e "${BLUE_COLOR} cherry ${RES}" ;; *) echo "please input {1|2|3|4}" esac
#說明:定義顏色,使用read讀取用戶輸入的數據,然後使用case條件語句進行判斷,根據用戶輸入的值執行相關的操作,給用戶輸入的水果添加顏色
#擴展:輸出菜單的另外種方式
cat<<-EOF =============================== 1.banana 2.apple 3.pear 4.cherry =============================== EOF
#執行效果
#如果輸入不正確或者不輸入的話就打印幫助
[root@shell scripts]# sh menu.sh ############################# 1.banana 2.apple 3.pear 4.cherry ############################# please select a num: please input {1|2|3|4}
#輸入選項中的數字,打印相關信息
實踐3.開發nginx啟動腳本
#主要思路:
#1.主要通過判斷nginx的pid文件有無存在,通過返回值查看有沒有運行
#2.通過case語句獲取參數進行判斷
#3.引入系統函數庫functions中的action函數
#4.對函數及命令運行的返回值進行處理
#5.設置開機自啟動
#附上nginx編譯安裝過程
#!/bin/bash yum install gcc pcre pcre-devel wget openssl openssl-devel.x86_64 -y mkdir -p /home/demo/tools cd /home/demo/tools/ wget -q http://nginx.org/download/nginx-1.6.3.tar.gz useradd nginx -s /sbin/nologin -M tar xf nginx-1.6.3.tar.gz cd nginx-1.6.3/ ./configure --user=nginx --group=nginx --prefix=/application/nginx --with-http_stub_status_module --with-http_ssl_module make make install ln -s /application/nginx-1.6.3 /application/nginx/ #做軟連接 /application/nginx/sbin/nginx -t #檢查語法 /application/nginx/sbin/nginx #啟動服務
#腳本編寫
[root@shell init.d]# chmod +x /etc/init.d/nginxd  [root@shell init.d]# cat nginxd  #!/bin/bash
#chkconfig: 2345 40 98   #設定2345級別,開機第40位啟動腳本,關機第98位關閉腳本    #create by guoke  #email:1075792988@qq.com  #function nginx start scripts    [ -f /etc/init.d/functions ] && source /etc/init.d/functions  #引入系統函數庫    PIDFILE=/application/nginx/logs/nginx.pid  #定義PID文件路徑  NGINX=/application/nginx/sbin/nginx  #定義啟動命令路徑    value(){  #定義返回值函數      RETVAL=$?      if [ $RETVAL -eq 0 ];then        action "Nginx is $1" /bin/true      else        action "Nginx is $1" /bin/true      fi  }    start(){ #定義啟動函數      if [ -f $PIDFILE ];then  #判斷PIDFILE存不存在,存在就打印運行,否則就啟動        echo "Nginx is running"      else        $NGINX        value start #調用返回值函數      fi  }    stop(){ #定義停止函數      if [ ! -f $PIDFILE ];then #也是通過判斷PID文件是否存在然後進行相關操作        echo "Nginx not running"      else        $NGINX -s stop        value stop      fi  }    reload(){ #定義重啟函數      if [ ! -f $PIDFILE ];then        echo "not open $PIDFILE no such directory"      else        $nginx -s reload        value reload      fi  }    case "$1" in  #使用case接收腳本傳參的字符串      start)  #如果第一個參數為start,調用start函數        start      ;;      stop)   #如果第一個參數為stop,調用stop函數        stop      ;;      reload)        stop        sleep 1        start      ;;      *)        echo "USAGE:$0 {stop|start|reload}"        exit 1  esac
#執行效果
[root@shell init.d]# sh nginx stop Nginx is stop [ OK ] [root@shell init.d]# sh nginx start Nginx is start [ OK ] [root@shell init.d]# sh nginx reload Nginx is stop [ OK ] Nginx is start [ OK ]
實踐4.開發跳板機
#要求用戶登錄到跳板機後只能執行管理員給定的選項動作,不能中斷腳本而到跳板機服務器上執行任何系統命令
#思路
1.首先做好ssh key驗證登錄 2.實現遠程連接菜單選擇腳本 3.利用Linux信號防止用戶在跳板機上操作 4.用戶登錄後就調用腳本
#操作過程
3.1.做ssh免密鑰登錄,發送到各個主機,如果機器多的話可以使用腳本進行循環發送
[demo@shell ~]$ ssh-keygen  -t dsa -P "" -f ~/.ssh/id_dsa    Generating public/private dsa key pair.  Enter file in which to save the key (/home/demo/.ssh/id_dsa):  Created directory '/home/demo/.ssh'.  Your identification has been saved in /home/demo/.ssh/id_dsa.  Your public key has been saved in /home/demo/.ssh/id_dsa.pub.  The key fingerprint is:  SHA256:BTFfcC2hMKBzuZeUYylC3qgza7z4X6j3RBlwq8Beoak demo@shell  The key's randomart image is:  +---[DSA 1024]----+  |    + o.*...+o   |  | . = B o O +. .  |  |  = B B * +  .   |  | o + = B +       |  |E = . + S        |  | . + o .         |  |  + . o          |  | o o.o           |  |..+o...          |  +----[SHA256]-----+  #命令說明:一鍵生成密鑰,不用按回車。-t:指定要創建的密鑰類型,-P:提供舊密碼,空表示不需要密碼,-f:指定位置
#將公鑰拷貝到其他服務器的demo用戶  [demo@shell ~]$ ssh-copy-id -i .ssh/id_dsa.pub "[email protected]"  [demo@shell ~]$ ssh-copy-id -i .ssh/id_dsa.pub "[email protected]"  [demo@shell ~]$ ssh-copy-id -i .ssh/id_dsa.pub "[email protected]"
#3.2.編寫腳本
[root@shell scripts]# cat tiaobanji.sh #!/bin/bash trapper(){ #定義屏蔽信號函數 trap '' INT QUIT TSTP TERM HUB } menu(){ #定義菜單列表函數 cat<<-EOF #加-後面的EOF就可以不用頂格 ==============Host List============== 1) 192.168.86.129 2) 192.168.86.130 3) 192.168.86.131 4) 192.168.86.132 5) exit ===================================== EOF } USER=demo host(){ #定義主機列表函數 case "$1" in 1) ssh $USER@192.168.86.129 ;; 2) ssh $USER@192.168.86.130 ;; 3) ssh $USER@192.168.86.131 ;; 4) ssh $USER@192.168.86.132 ;; 5) exit esac } main(){ #定義主函數 while : #while循環,一直循環 do trapper #調用trapper函數 clear #清屏 menu #調用菜單函數 read -p "please select a num:" num #獲取用戶輸入 host $num #調用主機列表函數和傳入的參數,進行遠程登錄 done } main #調用主函數
#3.3.編寫腳本進行判斷,判斷是否是root用戶登錄,如果不是root用戶就執行腳本,彈出跳板機界面
[root@shell ~]# cd /etc/profile.d/ [root@shell profile.d]# cat jump.sh #!/bin/bash [ $UID -ne 0 ] && . /scripts/tiaobanji.sh
#3.4.測試
#登錄demo普通用戶輸入密碼的時候就會直接跳到選項卡頁面了
#選項卡頁面
==============Host List============== 1) 192.168.86.129 2) 192.168.86.130 3) 192.168.86.131 4) 192.168.86.132 5) exit ===================================== please select a num:1 #進行選擇 Last login: Tue Mar 31 23:48:33 2020 from 192.168.86.128 [demo@mysql ~]$
#3.5.提示:跳板機的安全
1.禁止跳板機可以從外網IP進行登錄,只能從內網IP登錄 2.其他服務器也限制只能內網IP登錄,同時禁止root登錄,做完ssh key認證,將密碼登錄禁止,通過免密碼登錄到其他服務器
#總結:if條件語句主要用於取值判斷、比較,應用比較廣,case條件語句只要是寫服務的啟動腳本,各有各的優勢。好了,shell腳本的條件語句就講解到這裡了,接下來會繼續寫shell腳本的循環(包括for,while等),如果寫的不好的地方還望指出,多多交流提高,下次再會。。。