Mybatis詳解系列(一)–持久層框架解決了什麼及如何使用Mybatis
- 2020 年 3 月 31 日
- 筆記
簡介
Mybatis 是一個持久層框架,它對 JDBC 進行了高級封裝,使我們的代碼中不會出現任何的 JDBC 代碼,另外,它還通過 xml 或註解的方式將 sql 從 DAO/Repository 層中解耦出來,除了這些基本功能外,它還提供了動態 sql、延遲加載、緩存等功能。 相比 Hibernate,Mybatis 更面向數據庫,可以靈活地對 sql 語句進行優化。
針對 Mybatis 的分析,我會拆分成使用、配置、源碼、生成器等部分,都放在 Mybatis 這個系列裏,內容將持續更新。本文是這個系列的第一篇文章,將從以下兩個問題展開 :
-
持久層框架解決了哪些問題?
-
如何使用 Mybatis(這裡會從入門到深入)?
項目環境的說明
為了更好地分析 Mybatis 的特性,本項目不會引入任何的依賴注入框架,將使用比較原生態的方式來使用 Mybatis。
工程環境
JDK:1.8.0_231
maven:3.6.1
IDE:Spring Tool Suites4 for Eclipse 4.12 (裝有 Mybatipse 插件)
mysql:5.7.28
依賴引入
Mybatis 有自帶的連接池,但實際項目中建議還是引入第三方的比較好。
<!-- Mybatis --> <dependency> <groupId>org.Mybatis</groupId> <artifactId>Mybatis</artifactId> <version>3.5.4</version> </dependency> <!-- mysql驅動--> <dependency> <groupId>mysql</groupId> <artifactId>mysql-connector-java</artifactId> <version>8.0.15</version> </dependency> <!-- logback --> <dependency> <groupId>ch.qos.logback</groupId> <artifactId>logback-core</artifactId> <version>1.2.3</version> <type>jar</type> </dependency> <dependency> <groupId>ch.qos.logback</groupId> <artifactId>logback-classic</artifactId> <version>1.2.3</version> <type>jar</type> </dependency> <!-- 連接池 --> <dependency> <groupId>com.zaxxer</groupId> <artifactId>HikariCP</artifactId> <version>2.6.1</version> </dependency> <!-- junit --> <dependency> <groupId>junit</groupId> <artifactId>junit</artifactId> <version>4.12</version> <scope>test</scope> </dependency> 數據庫腳本
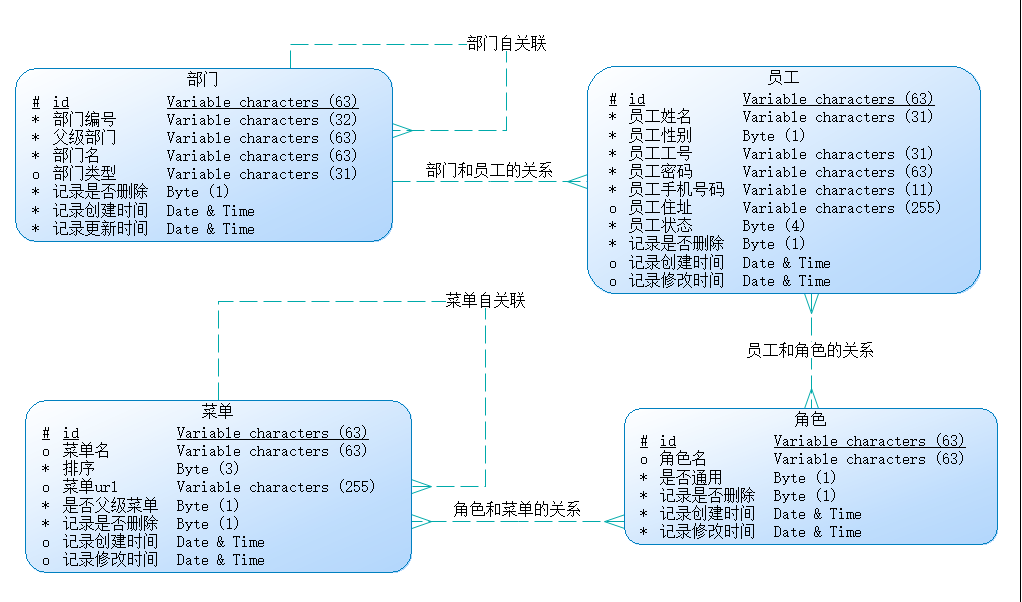
在這個項目裏面,我希望儘可能地模擬出實際項目的各種場景,例如,高級條件查詢、關聯查詢(一對一關聯、多對多關聯和自關聯),並研究在對應場景下如何使用 Mybatis 解決問題。本項目的 ER 圖如下,涉及到 4 張主表和 2 張中間表,具體的 sql 腳本也提供好了([腳本路徑]( https://github.com/ZhangZiSheng001/mybatis-projects /sql)):
持久層框架解決了哪些問題
在分析如何使用 mybatis 之前,我們先來研究一個問題:持久層框架解決了哪些問題?
假設沒有持久層框架,首先想到的就是使用 JDBC 來操作數據庫。這裡我簡單地引入一個需求,就是我想通過 id 查詢出一個員工對象。下面僅會從repository/DAO 層的角度來考慮如何實現,所以我們不需要去考慮 service 層中事務提交和連接關閉的問題,當然,這樣會遇到一個問題,就是我們必須保證 service 層的事務和持久層的是同一個,這一點會通過 **Utils 來解決,因為不是本文重點,這裡不展開。
用 JDBC 方式查詢一個員工
下面用 JDBC 查詢員工對象。
有人可能會問,就算你不適用持久層框架,你還可以使用 DBUtils 或者自己封裝 JDBC 代碼啊?這裡需要強調下,這種封裝其實是持久層框架應該做的事,我們自己手動封裝,其實已經在實現一個持久層框架了。所以,為了暴露純粹的 JDBC 實現的缺點,這裡盡量不去封裝。
@Override public Employee selectByPrimaryKey(String id) throws SQLException { Employee employee = null; PreparedStatement statement = null; ResultSet resultSet = null; // 創建sql String sql = "select * from demo_employee where id = ?"; try { // 獲得連接(JDBCUtils保證同一線程獲得同一個連接對象) Connection connection = JDBCUtils.getConnection(); // 獲得Statement對象 statement = connection.prepareStatement(sql); // 設置參數 statement.setObject(1, id); // 執行,獲取結果集 resultSet = statement.executeQuery(); if(resultSet.next()) { // 映射結果集 employee = convert(resultSet); } // 返回員工對象 return employee; } finally { // 釋放資源 JDBCUtils.release(null, statement, resultSet); } } /** * <p>通過結果集構造員工對象</p> * @author: zzs * @date: 2020年3月28日 下午12:20:02 * @param resultSet * @return: Employee * @throws SQLException */ private Employee convert(ResultSet resultSet) throws SQLException { Employee employee = new Employee(); employee.setId(resultSet.getString("id")); employee.setName(resultSet.getString("name")); employee.setGender(resultSet.getBoolean("gender")); employee.setNo(resultSet.getString("no")); employee.setAddress(resultSet.getString("address")); employee.setDeleted(resultSet.getBoolean("deleted")); employee.setDepartmentId(resultSet.getString("department_id")); employee.setPassword(resultSet.getString("password")); employee.setPhone(resultSet.getString("phone")); employee.setStatus(resultSet.getByte("status")); employee.setCreate(resultSet.getDate("gmt_create")); employee.setModified(resultSet.getDate("gmt_modified")); return employee; } 通過上面的代碼,我們可以看到兩個主要的問題:
- 每個 Repository/DAO 方法都會出現繁瑣、重複的 JDBC 代碼。
- sql 和 DAO/Repository 的程序代碼耦合度太高,不能統一管理。這裡的 sql 包括了 sql 的定義、參數設置和結果集映射,強調一點,不是說 sql 不能出現在 java 類中,而是說應該從 DAO/Repository 的程序代碼中解耦出來,進行集中管理。
說到這裡,我們可以總結出來,為了項目的方便和解耦,一個基本的持久層框架需要做到:
- 對 JDBC 代碼進行高級封裝,為我們提供更簡單的接口。
- 將 sql 從 DAO/Repository 中解耦出來。
Mybatis 作為一個優秀的持久層框架,針對以上問題提供了解決方案,下面我們再看看使用 Mybatis 如何實現上面的需求。
用 Mybatis 方式查詢一個員工
還是通過查詢員工的例子來說明,代碼如下:
@Override public Employee selectByPrimaryKey(String id) { // 獲取sqlSession SqlSession sqlSession = MybatisUtils.getSqlSession(); // 獲取Mapper EmployeeMapper baseMapper = sqlSession.getMapper(EmployeeMapper.class); // 執行,獲取員工對象 Employee employee = baseMapper.selectByPrimaryKey(id); // 返回對象 return employee; } 上面的代碼沒有出現任何的 JDBC 代碼和 sql 代碼,因為 Mybatis 對 JDBC 進行了高級封裝,並且採用 Mapper 的註解或 xml 文件來統一管理 sql 的定義、參數設置和結果集映射。下面看下 xml 文件的方式:
<!-- 基礎映射表 --> <resultMap id="BaseResultMap" type="cn.zzs.mybatis.entity.Employee"> <result column="id" property="id" javaType="string" jdbcType="VARCHAR"/> <result column="department_id" property="departmentId" javaType="string" jdbcType="VARCHAR"/> <result column="gmt_create" property="create" javaType="date" jdbcType="TIMESTAMP"/> <result column="gmt_modified" property="modified" javaType="date" jdbcType="TIMESTAMP"/> </resultMap> <!-- 基礎字段 --> <sql id="Base_Column_List"> e.id, e.`name`, e.gender, e.no, e.password, e.phone, e.address, e.status, e.deleted, e.department_id, e.gmt_create, e.gmt_modified </sql> <!-- 根據id查詢 --> <select id="selectByPrimaryKey" parameterType="java.lang.String" resultMap="BaseResultMap"> select <include refid="Base_Column_List" /> from demo_employee e where e.id = #{id} </select> 針對 sql 解耦的問題,早期的持久層框架都偏向於將 sql 獨立在配置文件中,後來才逐漸引入註解的支持,如下是Mybatis 的註解方式(EmployeeMapper 接口):
@Select("SELECT e.id, e.`name`, e.gender, e.no, e.password, e.phone, e.address, e.status, e.deleted, e.department_id, e.gmt_create, e.gmt_modified FROM demo_employee e WHERE id = #{id}") @resultMap("BaseResultMap") Employee selectByPrimaryKey(String id); 我認為,正如前面說到的,sql 在項目中存在形式不是重點,我們的目的是希望 sql 能被統一管理,基於這個目的實現的不同方案,都是合理的。
Mybatis 作為一款優秀的持久層框架,除了解決上面的兩個基本問題,還為我們提供了懶加載、緩存、動態語句、插件等功能,下文會講到。
補充
通過上面的內容,我們已經回答了問題:持久層框架解決了哪些問題?這裡需要補充一點:
本文只是指出持久層框架的需要解決的基本問題,並沒有強調必須使用 Mybatis 或 Hibernate 等通用框架。出於性能方面的考慮,部分開發者可能會採用更輕量的實現,而不是使用流行的通用框架。當然,這也是自己造輪子和使用通用輪子的區別了。
如何使用 Mybatis
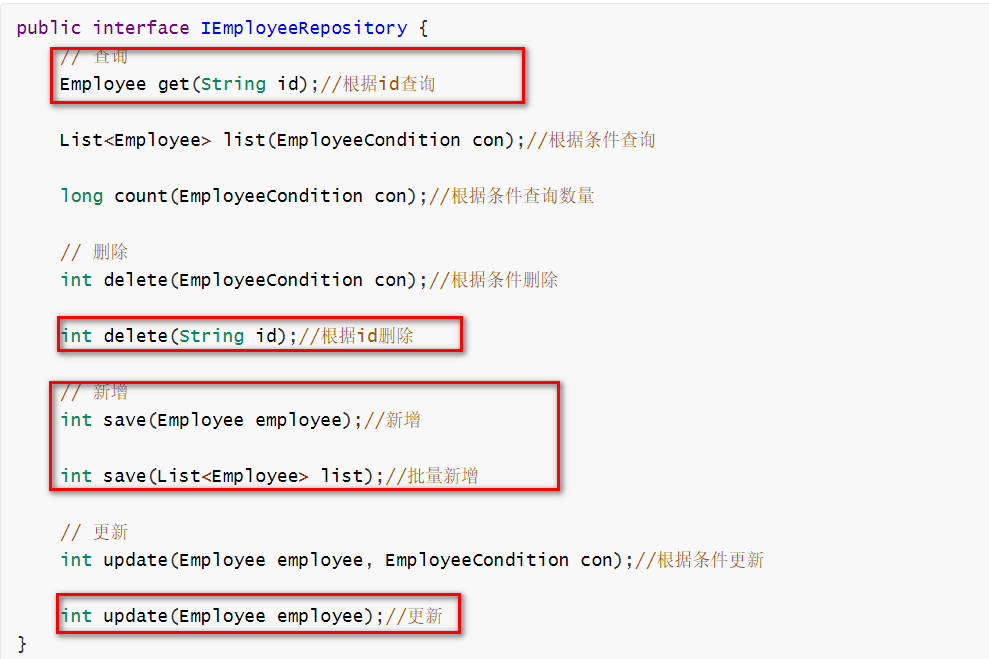
本項目會模擬實際開發的各種場景來研究 Mybatis 的使用方法。在我看來,在項目創建時,repository/DAO 層只要有以下幾個方法,已經可以滿足大部分使用需求。在 repository/DAO 層定義大量的*By*方法是非常低級和不負責任的,然而,我接觸過許多人都是這麼搞的。
public interface IEmployeeRepository { // 查詢 Employee get(String id);//根據id查詢 List<Employee> list(EmployeeCondition con);//根據條件查詢 long count(EmployeeCondition con);//根據條件查詢數量 // 刪除 int delete(EmployeeCondition con);//根據條件刪除 int delete(String id);//根據id刪除 // 新增 int save(Employee employee);//新增 int save(List<Employee> list);//批量新增 // 更新 int update(Employee employee, EmployeeCondition con);//根據條件更新 int update(Employee employee);//更新 } 下面的使用例子將針對這個接口進行展開,主要分成4個部分:
- 入門例子。通過 根據id查詢員工和新增員工 的例子說明;
- 高級條件查詢。
- 關聯查詢。這裡會查詢員工並帶出部門、角色,並且結合懶加載使用。
從入門例子開始
本文的包結構如下。test 里的測試簡單看成是 service 層在調用 respository 層的方法,由於我必須在 service 層 和 respository 層中拿到同一個「連接」來管理事務或釋放資源,所有 util 中將「連接」綁定到了當前線程。
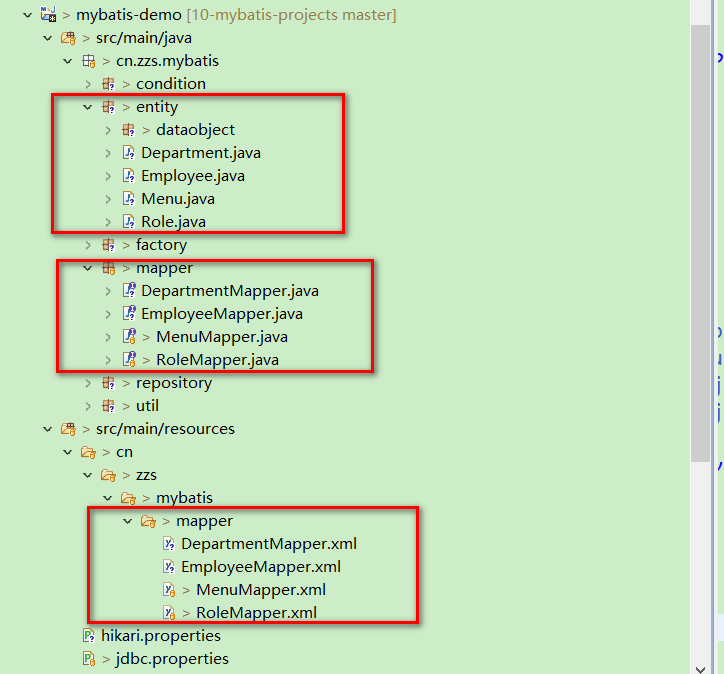
在進行下面工作之前,我們需要先創建好實體和 mapper 文件(如圖圈紅部分),實際項目中,我們可以使用 Mybatis-generator 或者自定義的代碼生成器生成,mapper 中將包含基本的 CRUD 代碼。
配置 configuration 文件
這個是 Mybatis 的主配置文件,它影響着 Mybatis 的行為和屬性信息。配置文件的層級結構如下:
configuration(配置)
- properties(屬性)
- settings(設置)
- typeAliases(類型別名)
- typeHandlers(類型處理器)
- objectFactory(對象工廠)
- plugins(插件)
- environments(環境配置)
- environment(環境變量)
- transactionManager(事務管理器)
- dataSource(數據源)
- environment(環境變量)
- databaseIdProvider(數據庫廠商標識)
- mappers(映射器)
作為入門例子,這裡只進行了簡單的配置,本系列的第二篇博客將詳細講解這些配置。
注意:configuration 的標籤必須按順序寫,不然會報錯。
<?xml version="1.0" encoding="UTF-8" ?> <!DOCTYPE configuration PUBLIC "-//Mybatis.org//DTD Config 3.0//EN" "http://Mybatis.org/dtd/Mybatis-3-config.dtd"> <!-- 注意:configuration的標籤必須按順序寫,不然會報錯 --> <!-- properties?,settings?,typeAliases?,typeHandlers?,objectFactory?,objectWrapperFactory? ,reflectorFactory?,plugins?,environments?,databaseIdProvider?,mappers? --> <configuration> <!-- 配置別名 --> <typeAliases> <package name="cn.zzs.Mybatis.entity"/> </typeAliases> <!-- 配置環境:可以有多個 --> <environments default="development"> <environment id="development"> <!-- 使用jdbc事務管理 --> <transactionManager type="JDBC"/> <!-- 數據源 --> <dataSource type="cn.zzs.Mybatis.factory.HikariDataSourceFactory"/> </environment> </environments> <!-- 映射器 --> <mappers> <package name="cn.zzs.Mybatis.mapper"/> </mappers> </configuration> 以上配置作用如下:
-
typeAliases:類型別名,僅在 *Mapper.xml 中使用。通過配置實體類的包名,我們可以在 xml 中直接通過 Employee 來表示員工類型,而不需要使用全限定類名;
-
environments:環境配置。下篇文章再詳細講吧。這裡簡單說下 dataSource,由於引入的是第三方數據源,所以得重寫 org.apache.ibatis.datasource.DataSourceFactory接口,如下:
public class HikariDataSourceFactory implements DataSourceFactory { private DataSource dataSource; public HikariDataSourceFactory() { super(); try { HikariConfig config = new HikariConfig("/hikari.properties"); dataSource = new HikariDataSource(config); } catch(Exception e) { throw new RuntimeException("創建數據源失敗", e); } } @Override public DataSource getDataSource() { return dataSource; } @Override public void setProperties(Properties props) { // TODO Auto-generated method stub } } - mappers:映射器。其實就是告訴 Mybatis 映射器放在哪裡,注意,Mapper 接口和 xml 文件編譯打包後必須在同一個路徑下。如果你的 xml 文件放在 src/main/java 中(不建議),需要在 pom 文件中增加以下配置:
<build> <resources> <resource> <directory>src/main/java</directory> <filtering>false</filtering> <includes> <include>**/mapper/*.xml</include> </includes> </resource> <resource> <directory>src/main/resources</directory> <includes> <include>**</include> </includes> </resource> </resources> </build> 配置 mapper xml文件
Mybatis 的映射文件只有很少的幾個頂級元素(按照應被定義的順序列出):
cache– 該命名空間的緩存配置。cache-ref– 引用其它命名空間的緩存配置。resultMap– 描述如何從數據庫結果集中加載對象,是最複雜也是最強大的元素。parameterMap– 老式風格的參數映射。此元素已被廢棄,並可能在將來被移除!請使用行內參數映射。文檔中不會介紹此元素。sql– 可被其它語句引用的可重用語句塊。insert– 映射插入語句。update– 映射更新語句。delete– 映射刪除語句。select– 映射查詢語句。
這裡也只進行了簡單的配置,本系列的第二篇博客再詳細講。
<!-- 基礎映射表 --> <resultMap id="BaseResultMap" type="cn.zzs.mybatis.entity.Employee"> <id column="id" property="id" /> <result column="department_id" property="departmentId" /> <result column="gmt_create" property="create" /> <result column="gmt_modified" property="modified"/> </resultMap> <!-- 基礎字段 --> <sql id="Base_Column_List"> e.id, e.`name`, e.gender, e.no, e.password, e.phone, e.address, e.status, e.deleted, e.department_id, e.gmt_create, e.gmt_modified </sql> <!-- 根據id查詢 --> <select id="selectByPrimaryKey" parameterType="string" resultMap="BaseResultMap"> select <include refid="Base_Column_List" /> from demo_employee e where e.id = #{id} </select> <!-- 新增 --> <insert id="insert" parameterType="Employee"> insert into demo_employee (id, name, gender,no, password, phone,address, status, deleted,department_id, gmt_create, gmt_modified) values ( #{id,jdbcType=VARCHAR}, #{name,jdbcType=VARCHAR}, #{gender,jdbcType=BIT}, #{no,jdbcType=VARCHAR}, #{password,jdbcType=VARCHAR}, #{phone,jdbcType=VARCHAR}, #{address,jdbcType=VARCHAR}, #{status,jdbcType=TINYINT}, #{deleted,jdbcType=BIT}, #{departmentId,jdbcType=VARCHAR}, #{create,jdbcType=TIMESTAMP}, #{modified,jdbcType=TIMESTAMP} ) </insert> 在以上配置中,使用了三個元素:
- resultMap:表列名(或查詢出來的別名)與實體屬性的映射關係。除了 id 和關聯對象字段外,只要表列名(或查詢出來的別名)與實體屬性一致,可以不用配置。
- sql: 用來定義可重用的 SQL 代碼片段,可以在查詢或變更語句中通過 include 引用。如果數據庫的字段名和實體類的不一致,需要設置列別名。
- select: 查詢語句。其中,id 是所在命名空間中唯一的標識符,可以被用來引用這條語句,與 mapper 文件中的,parameterType 是入參類型,resultMap 是映射表。
- insert:插入語句。
注意下參數符號 #{id }, 它告訴 Mybatis 創建一個預處理語句(PreparedStatement)參數,在 JDBC 中,這樣的一個參數在 SQL 中會由一個「?」來標識,並被傳遞到一個新的預處理語句中。不過有時你就是想直接在 SQL 語句中直接插入一個不轉義的字符串。 比如 ORDER BY 子句,這時候你可以使用 「$」 字符:
ORDER BY ${columnName} 獲取 SqlSession
在以下代碼中,存在三個主要對象:
SqlSessionFactoryBuilder:一旦創建了 SqlSessionFactory,就不再需要它了,因此 SqlSessionFactoryBuilder 實例的最佳作用域是方法作用域。SqlSessionFactory:一旦被創建就應該在應用的運行期間一直存在,沒有任何理由丟棄它或重新創建另一個實例, 因此 SqlSessionFactory 的最佳作用域是應用作用域。SqlSession:每個線程都應該有它自己的 SqlSession 實例。SqlSession 的實例不是線程安全的,因此是不能被共享的,所以它的最佳的作用域是請求或方法作用域。 SqlSession 的作用類似於 JDBC 的Connection,使用完後必須 close。
// 加載配置文件,初始化SqlSessionFactory對象 String resource = "Mybatis-config.xml"; InputStream in = Resources.getResourceAsStream(resource)); SqlSessionFactory sqlSessionFactory = new SqlSessionFactoryBuilder().build(in); // 獲取sqlSession 注意,這種方式獲取的 SqlSession 需手動提交事務。 SqlSession sqlSession = sqlSessionFactory.openSession(); 為了保證同一個線程在 service 和 repository 中拿到同一個 SqlSession 對象,本項目中定義了工具類 cn.zzs.Mybatis.util.MybatisUtils 來獲取 SqlSession。
public class MybatisUtils { private static SqlSessionFactory sqlSessionFactory; private static ThreadLocal<SqlSession> tl = new ThreadLocal<>(); private static final Object obj = new Object(); static { init(); } /** * * <p>獲取SqlSession對象的方法,線程安全</p> * @author: zzs * @date: 2019年8月31日 下午9:22:29 * @return: SqlSession */ public static SqlSession getSqlSession() { // 從當前線程中獲取連接對象 SqlSession sqlSession = tl.get(); // 判斷為空的話,創建連接並綁定到當前線程 if(sqlSession == null) { synchronized(obj) { if((sqlSession = tl.get()) == null) { sqlSession = sqlSessionFactory.openSession(); tl.set(sqlSession); } } } return sqlSession; } /** * <p>根據指定配置文件初始化SqlSessionFactory對象</p> * @author: zzs * @date: 2019年9月1日 上午10:53:05 * @return: void */ private static void init() { try (InputStream inputStream = Resources.getResourceAsStream("Mybatis-config.xml")) { // 加載配置文件,初始化SqlSessionFactory對象 sqlSessionFactory = new SqlSessionFactoryBuilder().build(inputStream); } catch(IOException e) { throw new RuntimeException("創建sqlSessionFactory失敗", e); } } } 編寫 Repository
repository 的代碼非常簡單,只需要拿到 SqlSessionn 對象,就能直接進行數據庫操作了。注意,這裡的 SqlSession 不能作為實例變量。
public class EmployeeRepository implements IEmployeeRepository { @Override public Employee get(String id) { return MybatisUtils.getSqlSession().getMapper(EmployeeMapper.class).selectByPrimaryKey(id); } @Override public int save(Employee employee) { return MybatisUtils.getSqlSession().getMapper(EmployeeMapper.class).insert(employee); } } 編寫測試類
測試類簡單看成是一個 service 類(當然,它不完全是),這裡需要手動地提交事務和釋放資源。
public class EmployeeRepositoryTest { private IEmployeeRepository employeeRepository = new EmployeeRepository(); @Test public void testGet() { String id = "cc6b08506cdb11ea802000fffc35d9fe"; try (SqlSession sqlSession = MybatisUtils.getSqlSession();) { // 執行,獲取員工對象 Employee employee = employeeRepository.get(id); // 打印 System.out.println(employee); } } } @Test public void testSave() { // 創建用戶 Employee employee = new Employee(UUID.randomUUID().toString().replace("-", ""), "zzs005", true, "zzs005", "admin", "18826****41", "廣東", (byte)1, false, "94e2d2e56cd811ea802000fffc35d9fa", new Date(), new Date()); try (SqlSession sqlSession = MybatisUtils.getSqlSession()) { // 保存 employeeRepository.save(employee); // 提交事務 sqlSession.commit(); } } 測試
測試上面兩個方法,會在控制台輸出了 sql。為了直觀點,我這裡格式化了一下。
2020-03-30 20:40:11.098 c.z.m.mapper.EmployeeMapper.selectByPrimaryKey - ==> Preparing: SELECT e.id, e.`name`, e.gender, e.no, e.password , e.phone, e.address, e.status, e.deleted, e.department_id , e.gmt_create, e.gmt_modified FROM demo_employee e WHERE e.id = ? 2020-03-30 20:40:11.121 c.z.m.mapper.EmployeeMapper.selectByPrimaryKey - ==> Parameters: cc6b08506cdb11ea802000fffc35d9fe(String) 2020-03-30 20:40:11.170 c.z.m.mapper.EmployeeMapper.selectByPrimaryKey - <== Total: 1 Employee [id=cc6b08506cdb11ea802000fffc35d9fe, name=zzf001, gender=false, no=zzf001, password=123456, phone=18826****41, address=北京, status=1, deleted=false, departmentId=65684a126cd811ea802000fffc35d9fa, create=Wed Sep 04 21:54:49 CST 2019, modified=Wed Sep 04 21:54:51 CST 2019] 2020-03-30 20:40:48.872 cn.zzs.Mybatis.mapper.EmployeeMapper.insert - ==> Preparing: INSERT INTO demo_employee (id, name, gender, no, password , phone, address, status, deleted, department_id , gmt_create, gmt_modified) VALUES (?, ?, ?, ?, ? , ?, ?, ?, ?, ? , ?, ?) 2020-03-30 20:40:48.899 cn.zzs.Mybatis.mapper.EmployeeMapper.insert - ==> Parameters: 517cabff75b24129b54048ce7d3280f9(String), zzs005(String), true(Boolean), zzs005(String), admin(String), 18826****41(String), 廣東(String), 1(Byte), false(Boolean), 94e2d2e56cd811ea802000fffc35d9fa(String), 2020-03-30 20:40:47.808(Timestamp), 2020-03-30 20:40:47.808(Timestamp) 2020-03-30 20:40:48.991 cn.zzs.Mybatis.mapper.EmployeeMapper.insert - <== Updates: 1 補充–批量新增
這裡我再補充下批量新增的實現。只要在上面 insert 語句的基礎上增加一個 foreach 標籤就可以,非常方便。在本系列第二篇文章中我將說到這些動態 sql 的用法。
<!-- 批量新增 --> <insert id="insertBatch" parameterType="Employee"> insert into demo_employee (id, name, gender,no, password, phone,address, status, deleted,department_id, gmt_create, gmt_modified) values <foreach item="item" index="index" collection="list" separator=","> ( #{item.id}, #{item.name}, #{item.gender}, #{item.no}, #{item.password}, #{item.phone}, #{item.address}, #{item.status}, #{item.deleted}, #{item.departmentId}, #{item.create}, #{item.modified} ) </foreach> </insert> 高級條件查詢
還是回到下面這個接口,經過上面的例子,圈紅的幾個方法,相信大家已經知道如何使用。現在看看高級條件查詢。
條件類和它的繼承體系
在項目中,條件類經常會被用來接收各種查詢條件,當業務比較複雜時,條件類會非常臃腫,大部分原因都是寫代碼不遵循規範。我們的條件封裝類的條件由三個部分組成(以員工條件類為例):
- 不同實體都會用到的條件,例如頁碼頁數;
- 對應實體的屬性,例如員工性別、電話號碼;
- 與對應實體關聯的實體屬性,例如員工所在部門名。
根據這種結構可以形成以下的繼承結構:
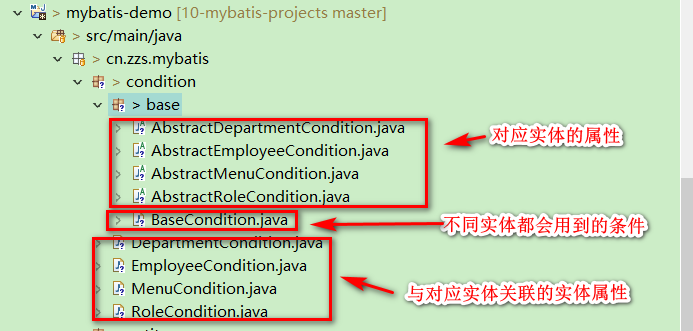
其中,BaseCondition中用於定義一些不同實體都通用的條件,如下:
public class BaseCondition { /** * 頁碼 */ private Integer pageNum; /** * 每頁記錄數 */ private Integer pageSize; /** * 排序語句 */ private String orderByClause; /** * 關鍵字 */ private String searchKeyWord; /** * 是否去重 */ private boolean distinct; // 省略setter/getter方法 } AbstractEmployeeCondition 中定義屬於員工類的條件,如下:
public abstract class AbstractEmployeeCondition extends BaseCondition { /** * 注意,這裡不要命名為id */ private String employeeId; private String name; private Boolean gender; private String no; private String password; private String phone; private String address; private Byte status; private Boolean deleted; private String departmentId; private Date createStart; private Date createEnd; private Date modifiedStart; private Date modifiedEnd; // 省略setter/getter方法 } 接下來是具體實現類 EmployeeCondition,這裡用於定義一些關聯實體的條件,也就是說使用到這些條件時必須 join 表。
public class EmployeeCondition extends AbstractEmployeeCondition { //============部門表============ /** * <p>部門編號</p> */ private String departmentNo; /** * <p>部門名</p> */ private String departmentName; public boolean isJoinDepartment() { return (departmentNo != null && !departmentNo.isEmpty()) || (departmentName != null && !departmentName.isEmpty()); } // 省略setter/getter方法 } 編寫 mapper xml文件
Mybatis 提供了豐富的動態 sql 語法,以下可以完成高級條件查詢的 sql 拼接。
<!-- AbstractEmployeeCondition查詢條件 --> <sql id="Abstract_Condition_Where_Clause"> <if test="con.name != null and con.name != ''"> and e.name = #{con.name} </if> <if test="con.gender != null"> and e.gender = #{con.gender} </if> <if test="con.no !=null and con.no != ''"> and e.no = #{con.no} </if> <if test="con.password != null and con.password != ''"> and e.password = #{con.password} </if> <if test="con.phone != null and con.phone != ''"> and e.phone = #{con.phone} </if> <if test="con.address != null and con.address != ''"> and e.address = #{con.address} </if> <if test="con.status != null"> and e.status = #{con.status} </if> <if test="con.deleted != null"> and e.deleted = #{con.deleted} </if> <if test="con.createStart != null"> and e.gmt_create > #{con.createStart} </if> <if test="con.createEnd != null"> and e.gmt_create < #{con.createEnd} </if> <if test="con.modifiedStart != null"> and e.gmt_modified > #{con.modifiedStart} </if> <if test="con.modifiedEnd != null"> and e.gmt_modified < #{con.modifiedEnd} </if> </sql> <!-- EmployeeCondition查詢條件 --> <sql id="Condition_Where_Clause"> <include refid="Abstract_Condition_Where_Clause"/> <if test="con.departmentNo != null and con.departmentNo != ''"> and d.no = #{con.departmentNo} </if> <if test="con.departmentName != null and con.departmentName != ''"> and d.name = #{con.departmentName} </if> </sql> <!-- 關聯表 --> <sql id="Join_Clause"> <if test="con.joinDepartment"> inner join demo_department d </if> </sql> <!-- 根據條件查詢 --> <select id="selectByCondition" parameterType="cn.zzs.Mybatis.condition.EmployeeCondition" resultMap="BaseResultMap"> select <if test="con.distinct"> distinct </if> <include refid="Base_Column_List" /> from demo_employee e <include refid="Join_Clause"></include> where 1=1 <include refid="Condition_Where_Clause" /> <if test="con.orderByClause != null"> order by ${con.orderByClause} </if> </select> 這裡的 sql 將條件分離出來複用,並沿用了條件實體的繼承關係,有利於後續項目維護和擴展。注意,千萬不要等到項目很臃腫時再進行 sql 的抽取復用。
上面高級條件查詢的代碼,實際項目中可以通過代碼生成器生成,擴展的條件再手動添加就行了。
編寫測試方法
其實,這裡存在一個問題,排序條件那裡 sql 語句滲透到了 service 層,實際項目中,排序規則不會經常變動,我們可以在 xml 里直接使用默認排序條件,條件類增加 userDefaultSort 屬性來判斷。總之要記住一點,在 service 層中滲透 sql 代碼,是非常不應該的!
@Test public void testList() { EmployeeCondition con = new EmployeeCondition(); // 設置條件 con.setGender(false); con.setAddress("北京"); con.setDeleted(false); con.setPhone("18826****41"); con.setDistinct(true); con.setDepartmentNo("202003230002"); // 設置排序規則 con.setOrderByClause("name desc");// 注意為數據庫字段 try (SqlSession sqlSession = MybatisUtils.getSqlSession()) { // 執行 List<Employee> list = employeeRepository.list(con); // 遍歷結果 list.forEach(System.out::println); } } 測試
測試以上方法,在控制台打印以下sql,我格式化了下,可以打看到 mybatis 幫我們拼接好了查詢條件。
SELECT DISTINCT e.id, e.`name`, e.gender, e.no, e.password , e.phone, e.address, e.status, e.deleted, e.department_id , e.gmt_create, e.gmt_modified FROM demo_employee e INNER JOIN demo_department d WHERE 1 = 1 AND e.gender = ? AND e.phone = ? AND e.address = ? AND e.deleted = ? AND d.no = ? ORDER BY name DESC 關聯查詢
以上基本講完 IEmployeeRepository 中的方法,我前面說過,IEmployeeRepository 接口中的方法可以滿足大部分的使用需求,但是,如果我響應給前端的數據中,除了員工的字段,還需要員工所在部門和員工擁有的角色的字段,這時 IEmployeeRepository 的方法不就應付不了了嗎?
這種場景涉及到的就是關聯查詢,我需要在 repository 層查詢員工對象時將部門和角色一併查出來,然後在前端轉換為具體的 VO 對象。
修改實體類
在員工的實體增加以下兩個屬性,項目中也可以創建一個 Employee 的子類,將關聯的屬性放入到子類里,以便於管理。
public class Employee { private Department department; private List<Role> roles = Collections.emptyList(); //······ } 修改 mapper xml文件
關聯查詢時,我們不需要修改原來的查詢語句,只需要修改 resultMap 就行。
<!-- 基礎映射表 --> <resultMap id="BaseResultMap" type="cn.zzs.Mybatis.entity.Employee"> <result column="id" property="id" javaType="string" jdbcType="VARCHAR"/> <result column="department_id" property="departmentId" javaType="string" jdbcType="VARCHAR"/> <result column="gmt_create" property="create" javaType="date" jdbcType="TIMESTAMP"/> <result column="gmt_modified" property="modified" javaType="date" jdbcType="TIMESTAMP"/> <association property="department" column="department_id" select="cn.zzs.Mybatis.mapper.DepartmentMapper.selectByPrimaryKey"/> <collection property="roles" column="id" select="cn.zzs.Mybatis.mapper.RoleMapper.selectByEmployeeId" /> </resultMap> 以上增加了兩個標籤,association 和 collection 分別用於配置一方和多方的關聯,其中 property 對應實體中的屬性,column 對應執行語句返回的字段(如果沒有使用別名的話,一般為列名),select 指向了其他 mapper 語句的 id。
編寫測試方法
我調用的還是 IEmployeeRepository 接口的 get 方法,只是增加了部門和角色的打印。
@Test public void testGetRelation() { String id = "cc6b08506cdb11ea802000fffc35d9fe"; try (SqlSession sqlSession = MybatisUtils.getSqlSession()) { // 執行,獲取員工對象 Employee employee = employeeRepository.get(id); // 打印員工 System.out.println(employee); // 打印部門 System.out.println(employee.getDepartment()); // 打印角色 employee.getRoles().forEach(System.out::println); } } 測試
測試上面的方法,可以看到控制台打印了三個查詢語句,分別對應員工、部門和角色,這樣,我們就可以在前端轉換 VO 時,將部門和角色的字段都給到 VO 了。
補充–延遲加載
上面的關聯查詢存在一個問題:如果我前端的 VO 只想要部門的字段而不需要角色,或者我就只要員工的字段,但是,這個時候還是會把部門和角色統統查出來,將會產生不必要的性能損耗。
這種情況,就需要使用延遲加載了。延遲加載可以保證關聯對象只有在用到的時候才去執行數據庫查詢。
配置延遲加載
Mybatis 延遲加載功能默認是不開啟的,但配置開啟也很簡單,只要在主配置文件中增加:
<!-- 全局配置 --> <settings> <setting name="lazyLoadingEnabled" value="true"/> <setting name="aggressiveLazyLoading" value="false"/> <!-- 為了演示效果才設置這一項,它默認是toString,equals,clone,hashCode,這裡暫時取消了toString的觸發 --> <setting name="lazyLoadTriggerMethods" value="equals,clone,hashCode"/> </settings> 編寫測試方法
還是使用前面的方法,這裡我把 role 部分的代碼注釋掉。
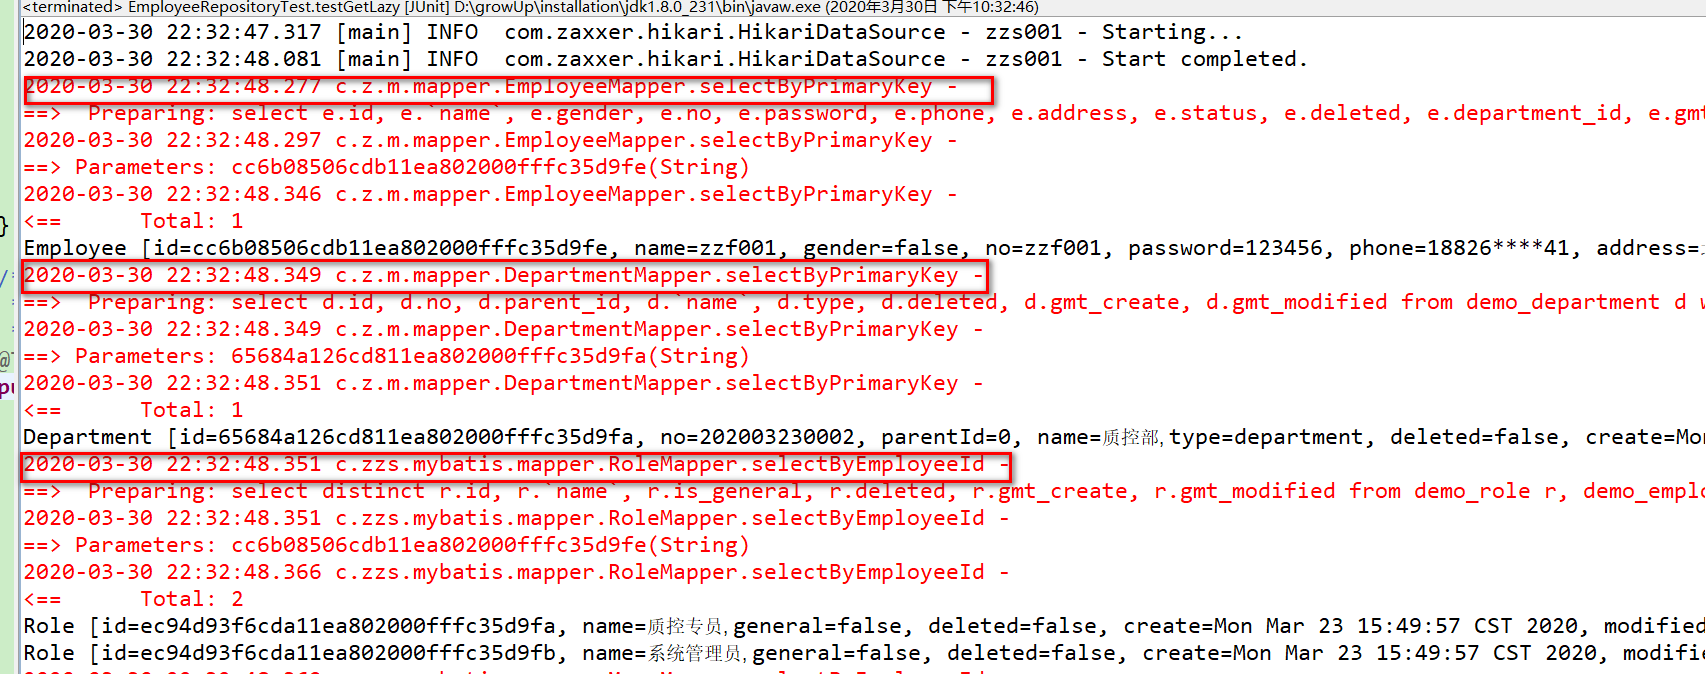
@Test public void testGetLazy() { String id = "cc6b08506cdb11ea802000fffc35d9fe"; try (SqlSession sqlSession = MybatisUtils.getSqlSession()) { // 執行,獲取員工對象 Employee employee = employeeRepository.get(id); // 打印員工 System.out.println(employee); // 打印部門 System.out.println(employee.getDepartment()); // 打印角色 // employee.getRoles().forEach(System.out::println); } } 測試
測試上面的方法,可以看到只關聯查出了部門,角色並沒有查出來,因為我們程序代碼中沒有觸發 getRoles() 或 lazyLoadTriggerMethods 的操作。實際項目中,我們在前端轉換 VO 時,如果需要用到關聯對象的字段,才會觸發查詢。

分頁查詢
最後再簡單查下分頁查詢,這裡使用 pagehelper 插件來實現。
引入插件依賴
在項目 pom.xml 文件中增加以下依賴。
<!-- 分頁插件 --> <dependency> <groupId>com.github.pagehelper</groupId> <artifactId>pagehelper</artifactId> <version>5.1.10</version> </dependency> 修改 mybatis 主配置文件
在 mybatis 主配置文件中增加 plugins 元素,並引入分頁插件。
<!-- 配置插件 --> <plugins> <!-- 分頁插件 --> <plugin interceptor="com.github.pagehelper.PageInterceptor"/> </plugins> 編寫測試方法
@Test public void testlistPage() { EmployeeCondition con = new EmployeeCondition(); // 設置條件 con.setGender(false); con.setAddress("北京"); con.setDeleted(false); con.setPhone("18826****41"); con.setDistinct(true); try (SqlSession sqlSession = MybatisUtils.getSqlSession()) { // 設置分頁信息 PageHelper.startPage(0, 3); // 執行查詢 List<Employee> list = employeeRepository.list(con); // 封裝分頁模型 PageInfo<Employee> pageInfo = new PageInfo<>(list); // 取分頁模型的數據 System.out.println("查詢總數" + pageInfo.getTotal()); } } 測試
測試上面的方法,可以看到先進行了總數的查詢,再進行分頁查詢。
2020-03-31 11:06:59.618 c.z.m.m.EmployeeMapper.selectByCondition_COUNT - ==> Preparing: SELECT COUNT(0) FROM ( SELECT DISTINCT e.id, e.`name`, e.gender, e.no, e.password , e.phone, e.address, e.status, e.deleted, e.department_id , e.gmt_create, e.gmt_modified FROM demo_employee e WHERE 1 = 1 AND e.gender = ? AND e.phone = ? AND e.address = ? AND e.deleted = ? ) table_count 2020-03-31 11:06:59.646 c.z.m.m.EmployeeMapper.selectByCondition_COUNT - ==> Parameters: false(Boolean), 18826****41(String), 北京(String), false(Boolean) 2020-03-31 11:06:59.678 c.z.m.m.EmployeeMapper.selectByCondition_COUNT - <== Total: 1 2020-03-31 11:06:59.693 c.z.m.mapper.EmployeeMapper.selectByCondition - ==> Preparing: SELECT DISTINCT e.id, e.`name`, e.gender, e.no, e.password , e.phone, e.address, e.status, e.deleted, e.department_id , e.gmt_create, e.gmt_modified FROM demo_employee e WHERE 1 = 1 AND e.gender = ? AND e.phone = ? AND e.address = ? AND e.deleted = ? LIMIT ? 2020-03-31 11:06:59.693 c.z.m.mapper.EmployeeMapper.selectByCondition - ==> Parameters: false(Boolean), 18826****41(String), 北京(String), false(Boolean), 3(Integer) 2020-03-31 11:06:59.724 c.z.m.mapper.EmployeeMapper.selectByCondition - <== Total: 3 查詢總數4 參考資料
相關源碼請移步:mybatis-demo
本文為原創文章,轉載請附上原文出處鏈接:https://www.cnblogs.com/ZhangZiSheng001/p/12603885.html

