Eureka 註冊中心看這一篇就夠了
- 2020 年 3 月 6 日
- 筆記
服務註冊中心是服務實現服務化管理的核心組件,類似於目錄服務的作用,主要用來存儲服務信息,譬如提供者 url 串、路由信息等。服務註冊中心是微服務架構中最基礎的設施之一。
在微服務架構流行之前,註冊中心就已經開始出現在分佈式架構的系統中。Dubbo 是一個在國內比較流行的分佈式框架,被大量的中小型互聯網公司所採用,它提供了比較完善的服務治理功能,而服務治理的實現主要依靠的就是註冊中心。
什麼是註冊中心
註冊中心可以說是微服務架構中的「通訊錄」,它記錄了服務和服務地址的映射關係。在分佈式架構中,服務會註冊到這裡,當服務需要調用其它服務時,就到這裡找到服務的地址,進行調用。
舉個現實生活中的例子,比如說,我們手機中的通訊錄的兩個使用場景:
當我想給張三打電話時,那我需要在通訊錄中按照名字找到張三,然後就可以找到他的手機號撥打電話。—— 服務發現
李四辦了手機號並把手機號告訴了我,我把李四的號碼存進通訊錄,後續,我就可以從通訊錄找到他。—— 服務註冊
通訊錄 —— ?什麼角色(提示:服務註冊中心)
總結:服務註冊中心的作用就是服務的註冊和服務的發現。
常見的註冊中心
- Netflix Eureka
- Alibaba Nacos
- HashiCorp Consul
- Apache ZooKeeper
- CoreOS Etcd
- CNCF CoreDNS
| 特性 | Eureka | Nacos | Consul | Zookeeper |
|---|---|---|---|---|
| CAP | AP | CP + AP | CP | CP |
| 健康檢查 | Client Beat | TCP/HTTP/MYSQL/Client Beat | TCP/HTTP/gRPC/Cmd | Keep Alive |
| 雪崩保護 | 有 | 有 | 無 | 無 |
| 自動註銷實例 | 支持 | 支持 | 不支持 | 支持 |
| 訪問協議 | HTTP | HTTP/DNS | HTTP/DNS | TCP |
| 監聽支持 | 支持 | 支持 | 支持 | 支持 |
| 多數據中心 | 支持 | 支持 | 支持 | 不支持 |
| 跨註冊中心同步 | 不支持 | 支持 | 支持 | 不支持 |
| SpringCloud集成 | 支持 | 支持 | 支持 | 支持 |
為什麼需要註冊中心
了解了什麼是註冊中心,那麼我們繼續談談,為什麼需要註冊中心。在分佈式系統中,我們不僅僅是需要在註冊中心找到服務和服務地址的映射關係這麼簡單,我們還需要考慮更多更複雜的問題:
- 服務註冊後,如何被及時發現
- 服務宕機後,如何及時下線
- 服務如何有效的水平擴展
- 服務發現時,如何進行路由
- 服務異常時,如何進行降級
- 註冊中心如何實現自身的高可用
這些問題的解決都依賴於註冊中心。簡單看,註冊中心的功能有點類似於 DNS 服務器或者負載均衡器,而實際上,註冊中心作為微服務的基礎組件,可能要更加複雜,也需要更多的靈活性和時效性。所以我們還需要學習更多 Spring Cloud 微服務組件協同完成應用開發。
註冊中心解決了什麼問題
- 服務管理
- 服務的依賴關係管理
什麼是 Eureka 註冊中心
Eureka 是 Netflix 開發的服務發現組件,本身是一個基於 REST 的服務。Spring Cloud 將它集成在其子項目 Spring Cloud Netflix 中,實現 Spring Cloud 的服務註冊與發現,同時還提供了負載均衡、故障轉移等能力。
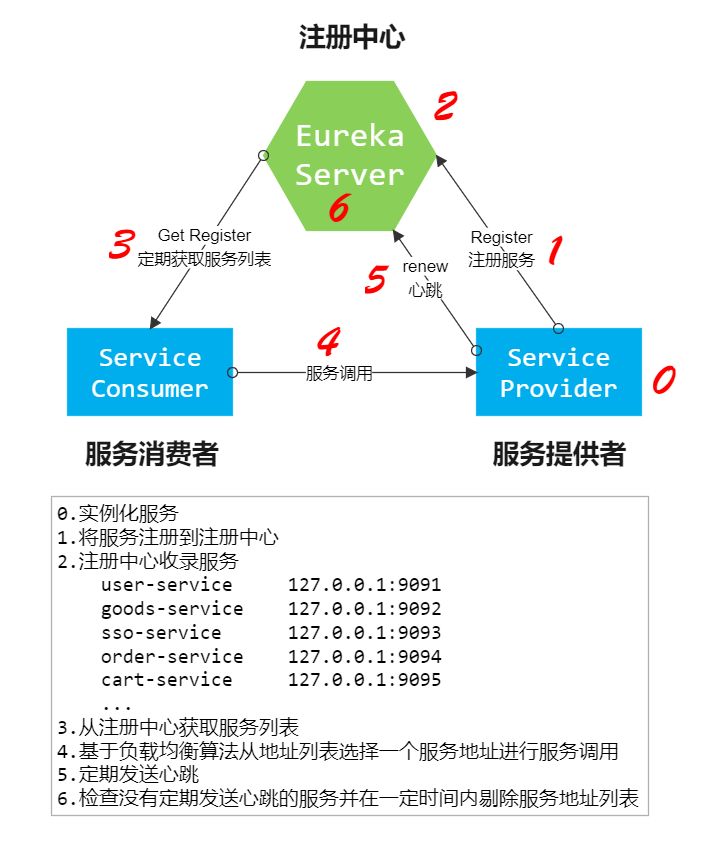
Eureka 註冊中心三種角色
Eureka Server
通過 Register、Get、Renew 等接口提供服務的註冊和發現。
Application Service(Service Provider)
服務提供方,把自身的服務實例註冊到 Eureka Server 中。
Application Client(Service Consumer)
服務調用方,通過 Eureka Server 獲取服務列表,消費服務。
Eureka 入門案例
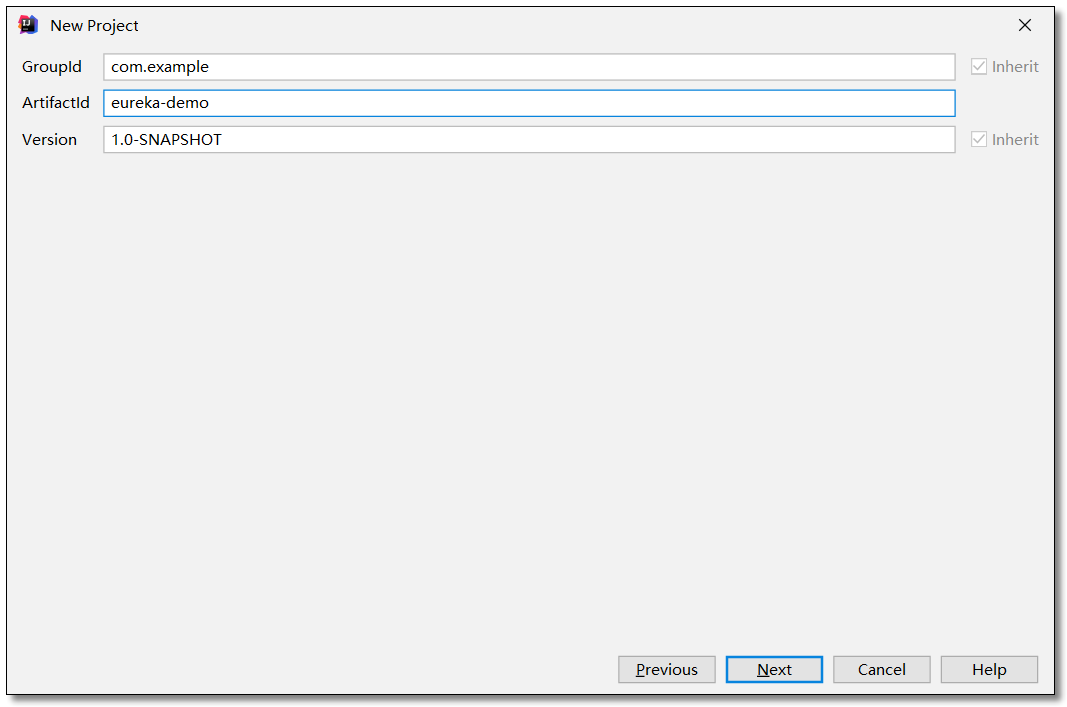
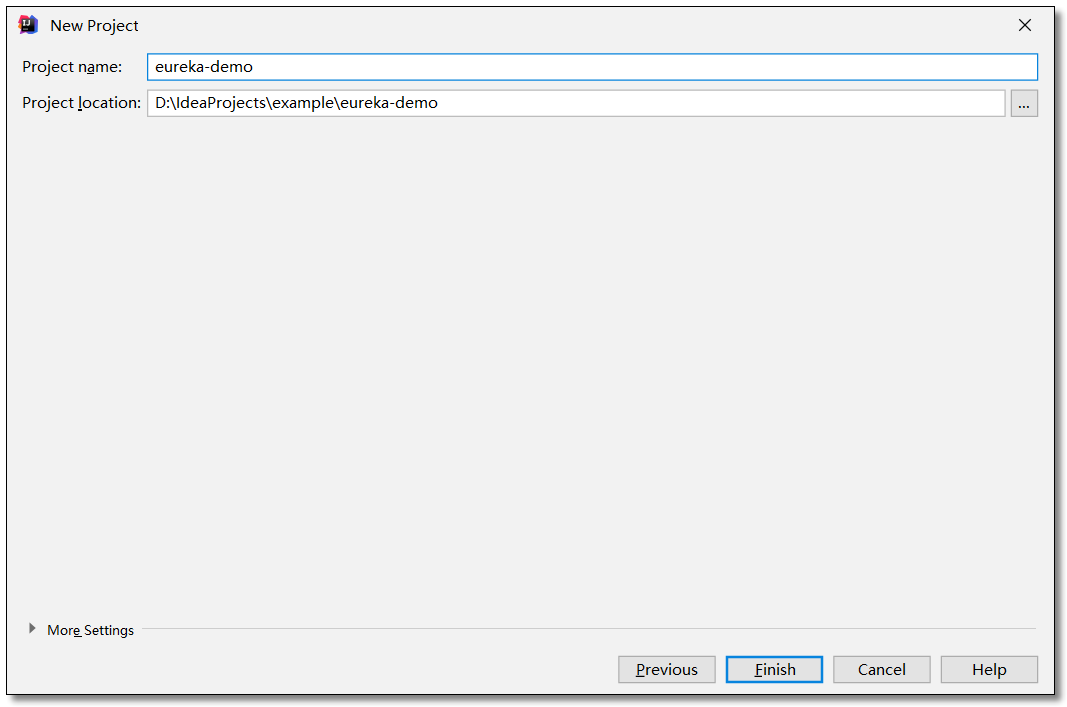
創建項目
我們創建聚合項目來講解 Eureka,首先創建一個 pom 父工程。

添加依賴
pom.xml
<?xml version="1.0" encoding="UTF-8"?> <project xmlns="http://maven.apache.org/POM/4.0.0" xmlns:xsi="http://www.w3.org/2001/XMLSchema-instance" xsi:schemaLocation="http://maven.apache.org/POM/4.0.0 http://maven.apache.org/xsd/maven-4.0.0.xsd"> <modelVersion>4.0.0</modelVersion> <!-- 項目坐標地址 --> <groupId>com.example</groupId> <!-- 項目模塊名稱 --> <artifactId>eureka-demo</artifactId> <!-- 項目版本名稱 快照版本SNAPSHOT、正式版本RELEASE --> <version>1.0-SNAPSHOT</version> <!-- 繼承 spring-boot-starter-parent 依賴 --> <!-- 使用繼承方式,實現復用,符合繼承的都可以被使用 --> <parent> <groupId>org.springframework.boot</groupId> <artifactId>spring-boot-starter-parent</artifactId> <version>2.2.4.RELEASE</version> </parent> <!-- 集中定義依賴組件版本號,但不引入, 在子工程中用到聲明的依賴時,可以不加依賴的版本號, 這樣可以統一管理工程中用到的依賴版本 --> <properties> <!-- Spring Cloud Hoxton.SR1 依賴 --> <spring-cloud.version>Hoxton.SR1</spring-cloud.version> </properties> <!-- 項目依賴管理 父項目只是聲明依賴,子項目需要寫明需要的依賴(可以省略版本信息) --> <dependencyManagement> <dependencies> <!-- spring cloud 依賴 --> <dependency> <groupId>org.springframework.cloud</groupId> <artifactId>spring-cloud-dependencies</artifactId> <version>${spring-cloud.version}</version> <type>pom</type> <scope>import</scope> </dependency> </dependencies> </dependencyManagement> </project>
註冊中心 eureka-server
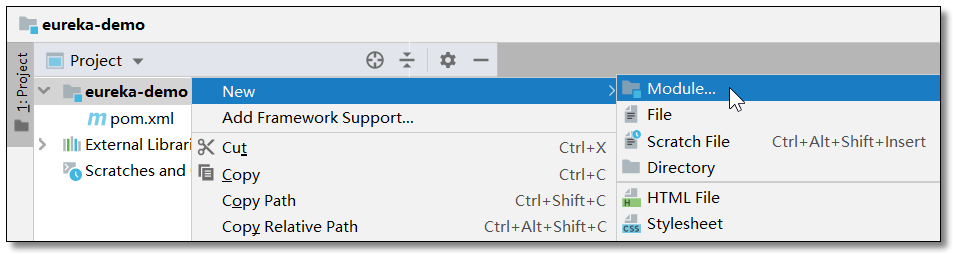
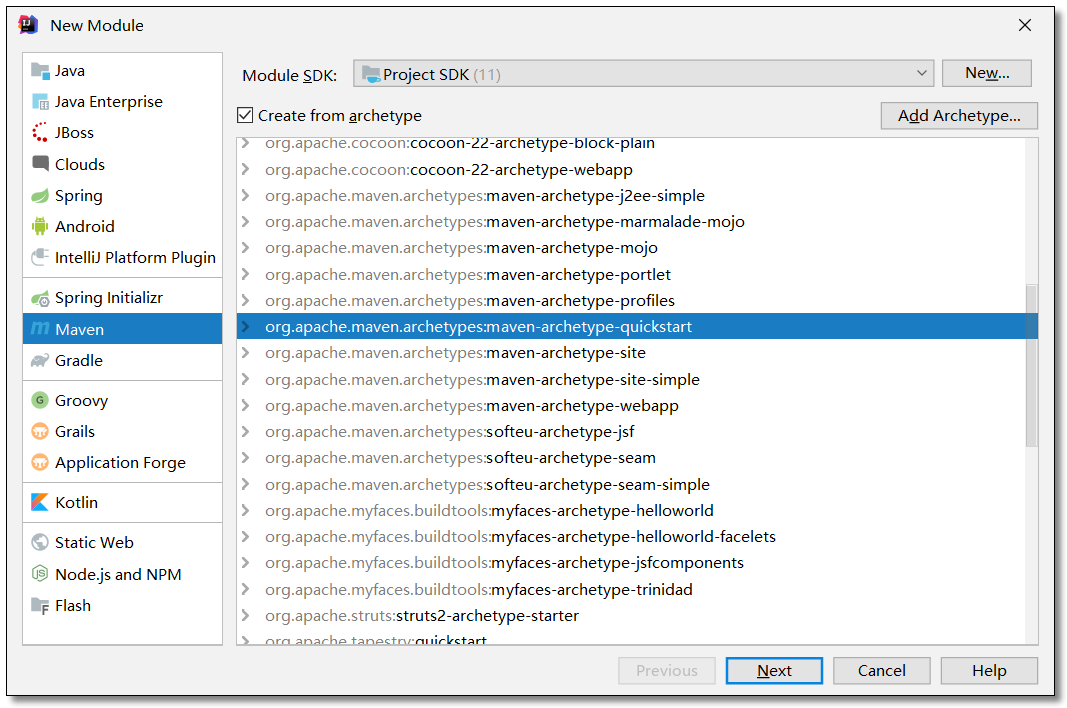
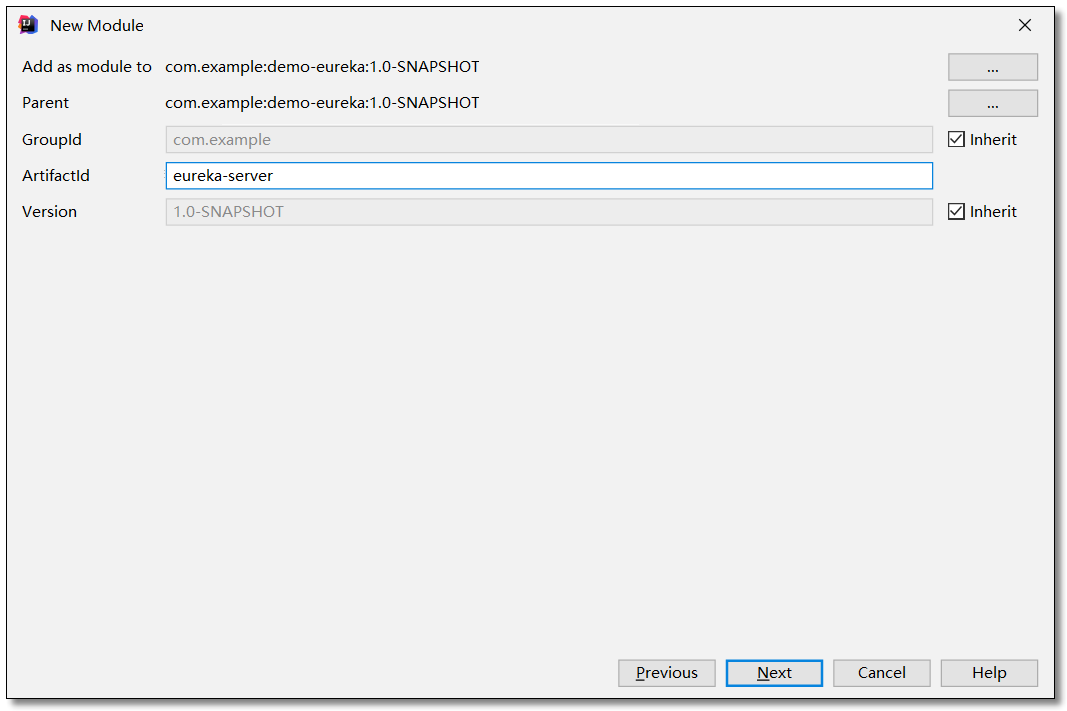
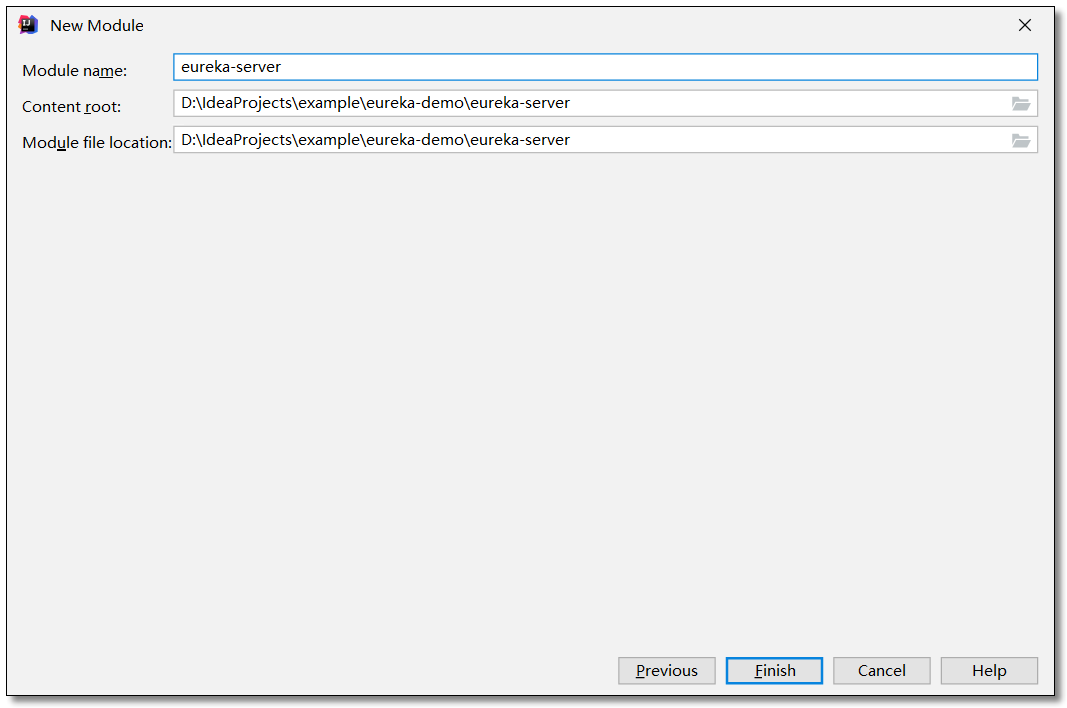
在剛才的父工程下創建 eureka-server 註冊中心的項目。
創建項目

添加依賴
pom.xml
<?xml version="1.0" encoding="UTF-8"?> <project xmlns="http://maven.apache.org/POM/4.0.0" xmlns:xsi="http://www.w3.org/2001/XMLSchema-instance" xsi:schemaLocation="http://maven.apache.org/POM/4.0.0 http://maven.apache.org/xsd/maven-4.0.0.xsd"> <modelVersion>4.0.0</modelVersion> <groupId>com.example</groupId> <artifactId>eureka-server</artifactId> <version>1.0-SNAPSHOT</version> <!-- 繼承父依賴 --> <parent> <groupId>com.example</groupId> <artifactId>eureka-demo</artifactId> <version>1.0-SNAPSHOT</version> </parent> <!-- 項目依賴 --> <dependencies> <!-- netflix eureka server 依賴 --> <dependency> <groupId>org.springframework.cloud</groupId> <artifactId>spring-cloud-starter-netflix-eureka-server</artifactId> </dependency> <!-- spring boot web 依賴 --> <dependency> <groupId>org.springframework.boot</groupId> <artifactId>spring-boot-starter-web</artifactId> </dependency> <!-- spring boot test 依賴 --> <dependency> <groupId>org.springframework.boot</groupId> <artifactId>spring-boot-starter-test</artifactId> <scope>test</scope> <exclusions> <exclusion> <groupId>org.junit.vintage</groupId> <artifactId>junit-vintage-engine</artifactId> </exclusion> </exclusions> </dependency> </dependencies> </project>
配置文件
application.yml
server: port: 8761 # 端口 spring: application: name: eureka-server # 應用名稱 # 配置 Eureka Server 註冊中心 eureka: instance: hostname: localhost # 主機名,不配置的時候將根據操作系統的主機名來獲取 client: register-with-eureka: false # 是否將自己註冊到註冊中心,默認為 true fetch-registry: false # 是否從註冊中心獲取服務註冊信息,默認為 true service-url: # 註冊中心對外暴露的註冊地址 defaultZone: http://${eureka.instance.hostname}:${server.port}/eureka/ 此時如果直接啟動項目是會報錯的,錯誤信息:com.sun.jersey.api.client.ClientHandlerException: java.net.ConnectException: Connection refused: connect,這是因為 Eureka 默認開啟了將自己註冊至註冊中心和從註冊中心獲取服務註冊信息的配置,如果該應用的角色是註冊中心並是單節點的話,要關閉這兩個配置項。
啟動類
EurekaServerApplication.java
package com.example; import org.springframework.boot.SpringApplication; import org.springframework.boot.autoconfigure.SpringBootApplication; import org.springframework.cloud.netflix.eureka.server.EnableEurekaServer; @SpringBootApplication // 開啟 EurekaServer 註解 @EnableEurekaServer public class EurekaServerApplication { public static void main(String[] args) { SpringApplication.run(EurekaServerApplication.class, args); } }
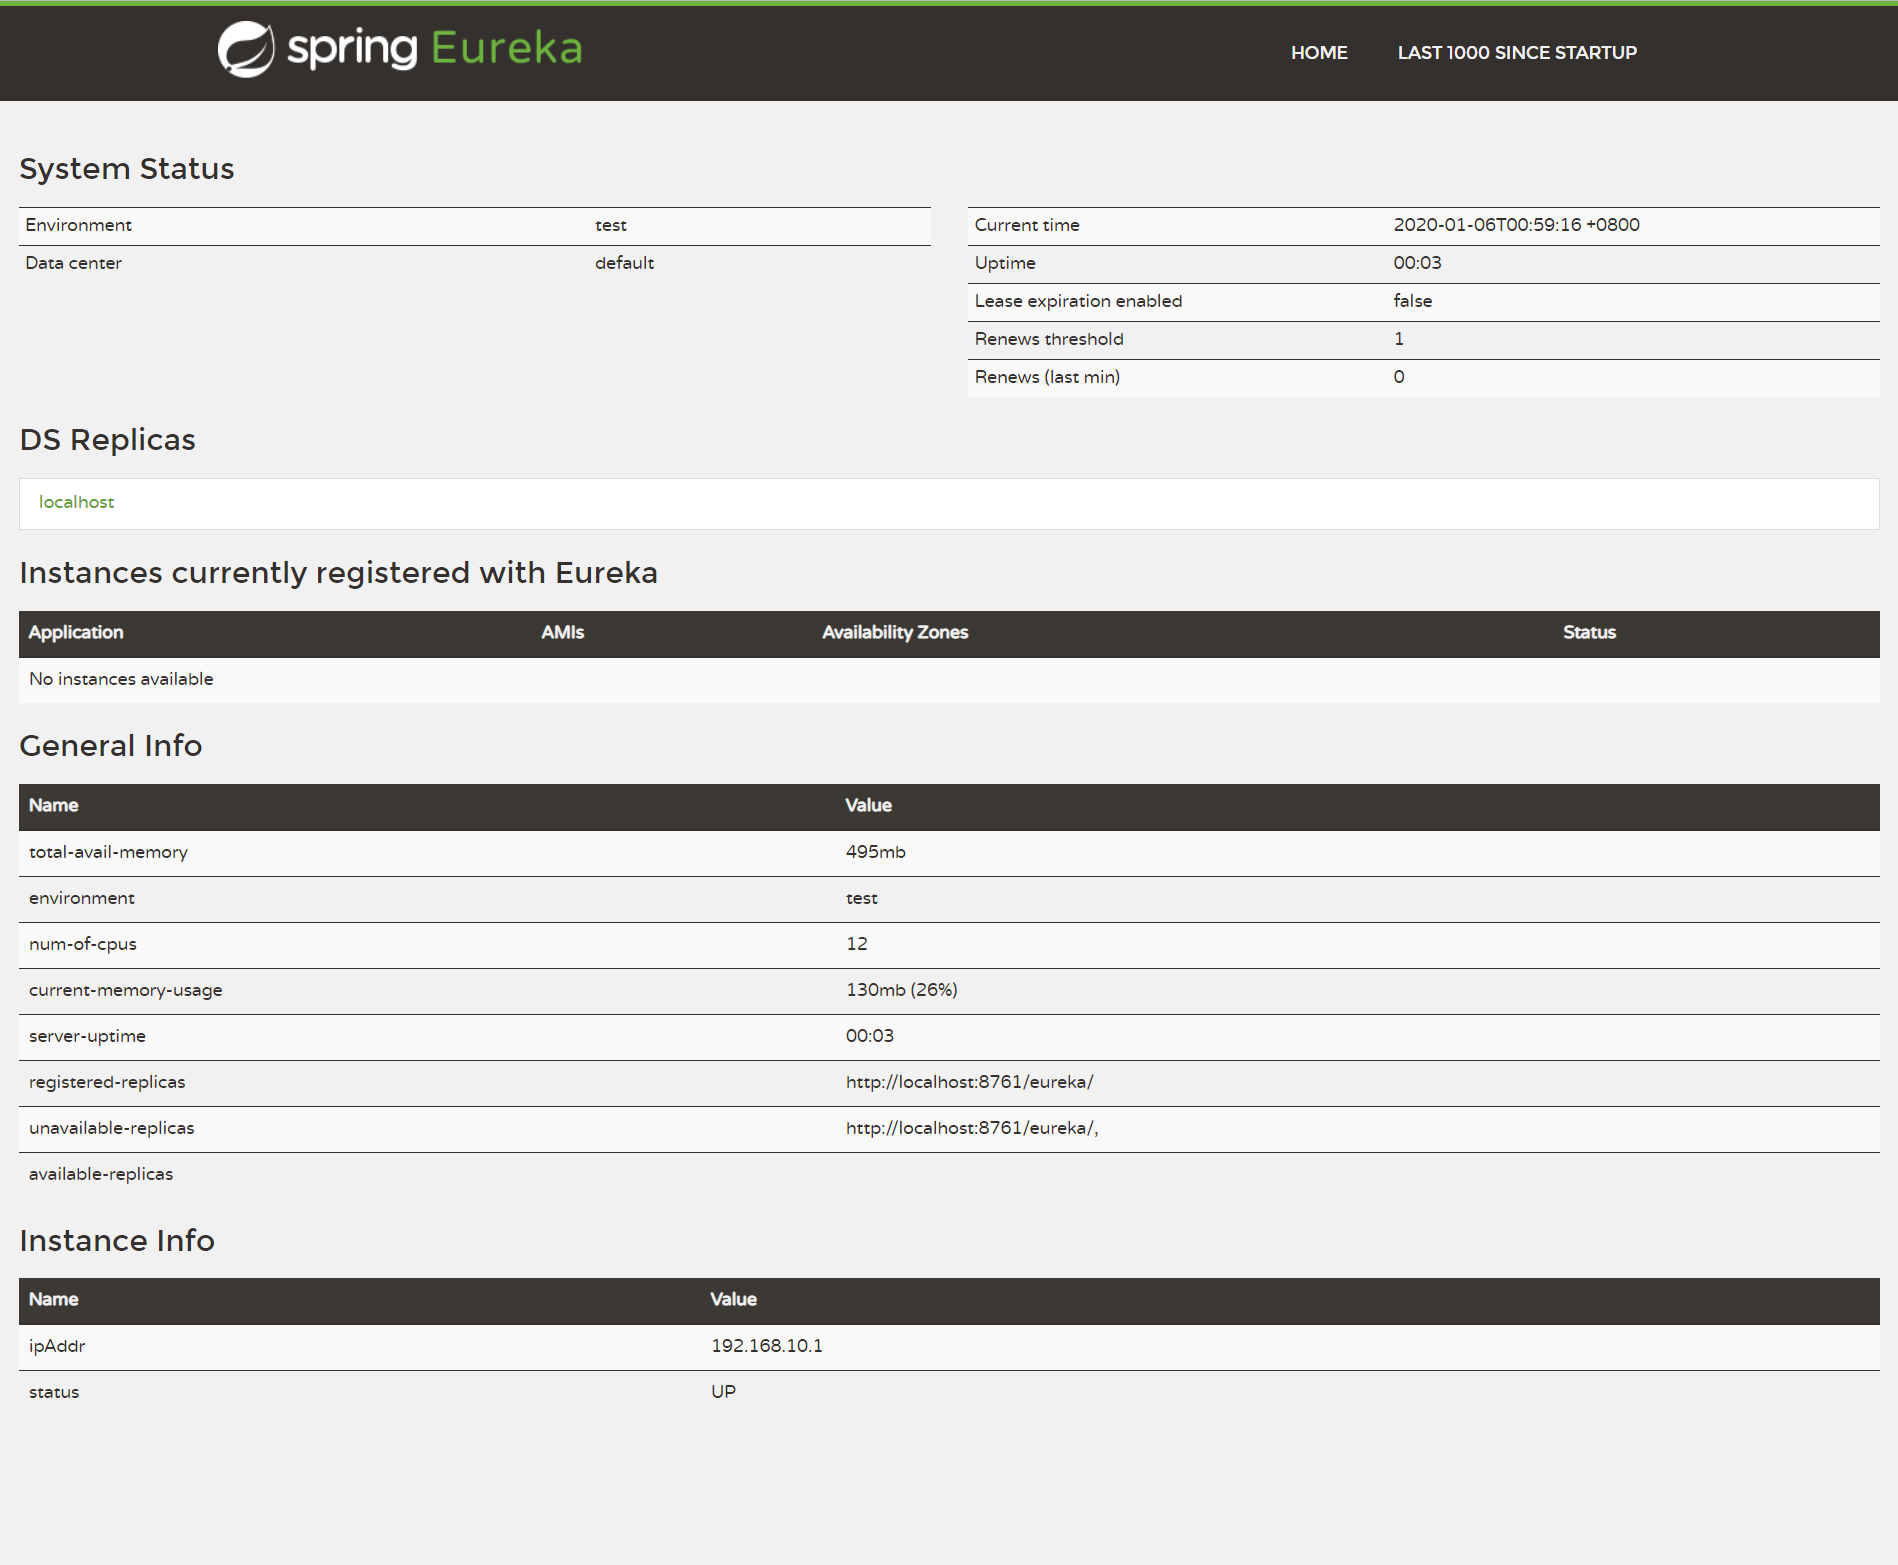
訪問
訪問:http://localhost:8761/
高可用 Eureka 註冊中心
註冊中心 eureka-server
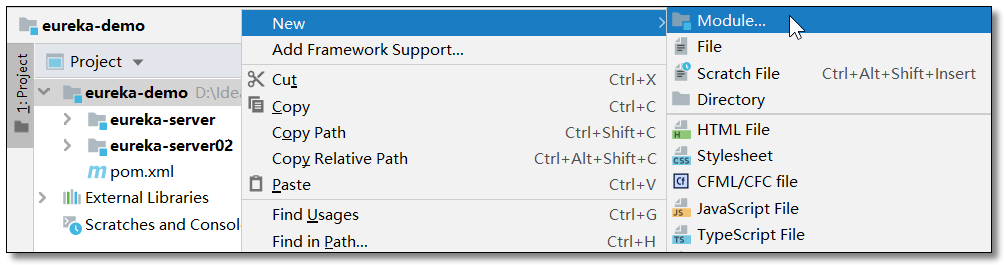
創建項目
在剛才的父工程下再創建一個 eureka-server02 註冊中心的項目,如果是多機器部署不用修改端口,通過 IP 區分服務,如果在一台機器上演示需要修改端口區分服務。
添加依賴
pom.xml
<?xml version="1.0" encoding="UTF-8"?> <project xmlns="http://maven.apache.org/POM/4.0.0" xmlns:xsi="http://www.w3.org/2001/XMLSchema-instance" xsi:schemaLocation="http://maven.apache.org/POM/4.0.0 http://maven.apache.org/xsd/maven-4.0.0.xsd"> <modelVersion>4.0.0</modelVersion> <groupId>com.example</groupId> <artifactId>eureka-server02</artifactId> <version>1.0-SNAPSHOT</version> <!-- 繼承父依賴 --> <parent> <groupId>com.example</groupId> <artifactId>eureka-demo</artifactId> <version>1.0-SNAPSHOT</version> </parent> <!-- 項目依賴 --> <dependencies> <!-- netflix eureka server 依賴 --> <dependency> <groupId>org.springframework.cloud</groupId> <artifactId>spring-cloud-starter-netflix-eureka-server</artifactId> </dependency> <!-- spring boot web 依賴 --> <dependency> <groupId>org.springframework.boot</groupId> <artifactId>spring-boot-starter-web</artifactId> </dependency> <!-- spring boot test 依賴 --> <dependency> <groupId>org.springframework.boot</groupId> <artifactId>spring-boot-starter-test</artifactId> <scope>test</scope> <exclusions> <exclusion> <groupId>org.junit.vintage</groupId> <artifactId>junit-vintage-engine</artifactId> </exclusion> </exclusions> </dependency> </dependencies> </project>
配置文件
集群配置下,註冊中心需要相互註冊實現信息的同步。
eureka-server 的 application.yml
server: port: 8761 # 端口 spring: application: name: eureka-server # 應用名稱(集群下相同) # 配置 Eureka Server 註冊中心 eureka: instance: hostname: eureka01 # 主機名,不配置的時候將根據操作系統的主機名來獲取 client: # 設置服務註冊中心地址,指向另一個註冊中心 service-url: # 註冊中心對外暴露的註冊地址 defaultZone: http://localhost:8762/eureka/
eureka-server02 的 application.yml
server: port: 8762 # 端口 spring: application: name: eureka-server # 應用名稱(集群下相同) # 配置 Eureka Server 註冊中心 eureka: instance: hostname: eureka02 # 主機名,不配置的時候將根據操作系統的主機名來獲取 client: # 設置服務註冊中心地址,指向另一個註冊中心 service-url: # 註冊中心對外暴露的註冊地址 defaultZone: http://localhost:8761/eureka/
啟動類
啟動類不變,啟動兩個 server。
訪問
訪問:http://localhost:8761/ 或者 http://localhost:8762/ 都出現如下圖說明互相註冊成功。
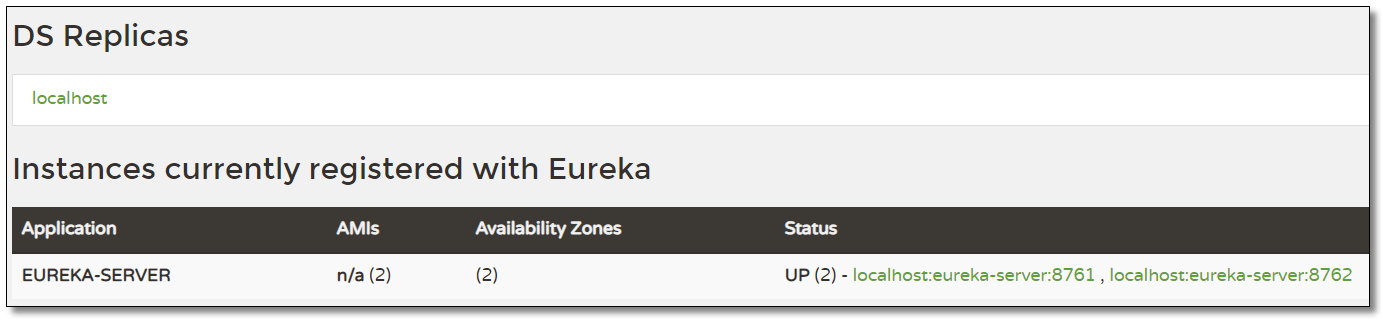
Status 顯示方式為默認值,如果想要清晰可見每個服務的 IP + 端口需要通過以下配置來實現。
顯示 IP + 端口
一個普通的 Netflix Eureka 實例註冊的 ID 等於其主機名(即,每個主機僅提供一項服務)。 Spring Cloud Eureka 提供了合理的默認值,定義如下:({spring.cloud.client.hostname}:){spring.application.name}:({spring.application.instance_id:){server.port}}},也就是:主機名:應用名:應用端口。
我們也可以可以自定義進行修改:
eureka: instance: prefer-ip-address: true # 是否使用 ip 地址註冊 instance-id: ${spring.cloud.client.ip-address}:${server.port} # ip:port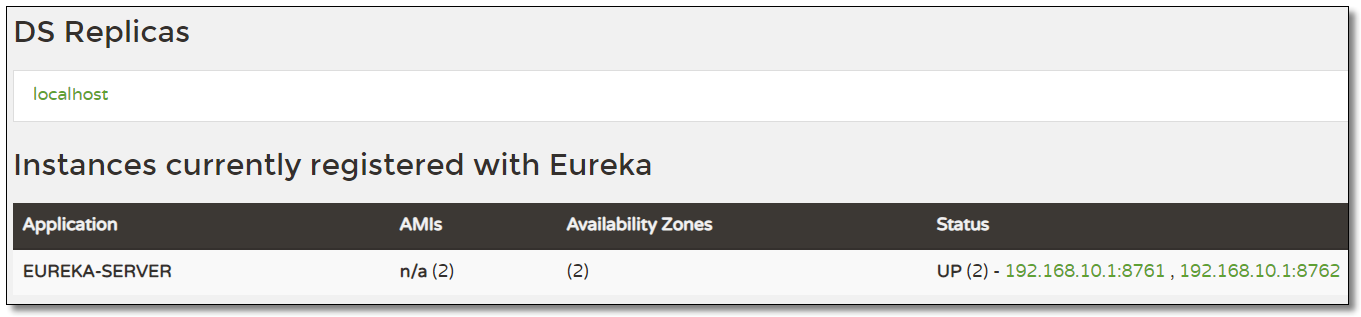
服務提供者 service-provider
創建項目
在剛才的父工程下創建一個 service-provider 服務提供者的項目。


添加依賴
pom.xml
<?xml version="1.0" encoding="UTF-8"?> <project xmlns="http://maven.apache.org/POM/4.0.0" xmlns:xsi="http://www.w3.org/2001/XMLSchema-instance" xsi:schemaLocation="http://maven.apache.org/POM/4.0.0 http://maven.apache.org/xsd/maven-4.0.0.xsd"> <modelVersion>4.0.0</modelVersion> <groupId>com.example</groupId> <artifactId>service-provider</artifactId> <version>1.0-SNAPSHOT</version> <!-- 繼承父依賴 --> <parent> <groupId>com.example</groupId> <artifactId>eureka-demo</artifactId> <version>1.0-SNAPSHOT</version> </parent> <!-- 項目依賴 --> <dependencies> <!-- netflix eureka client 依賴 --> <dependency> <groupId>org.springframework.cloud</groupId> <artifactId>spring-cloud-starter-netflix-eureka-client</artifactId> </dependency> <!-- spring boot web 依賴 --> <dependency> <groupId>org.springframework.boot</groupId> <artifactId>spring-boot-starter-web</artifactId> </dependency> <!-- lombok 依賴 --> <dependency> <groupId>org.projectlombok</groupId> <artifactId>lombok</artifactId> <scope>provided</scope> </dependency> <!-- spring boot test 依賴 --> <dependency> <groupId>org.springframework.boot</groupId> <artifactId>spring-boot-starter-test</artifactId> <scope>test</scope> <exclusions> <exclusion> <groupId>org.junit.vintage</groupId> <artifactId>junit-vintage-engine</artifactId> </exclusion> </exclusions> </dependency> </dependencies> </project>
配置文件
application.yml
server: port: 7070 # 端口 spring: application: name: service-provider # 應用名稱(集群下相同) # 配置 Eureka Server 註冊中心 eureka: instance: prefer-ip-address: true # 是否使用 ip 地址註冊 instance-id: ${spring.cloud.client.ip-address}:${server.port} # ip:port client: service-url: # 設置服務註冊中心地址 defaultZone: http://localhost:8761/eureka/,http://localhost:8762/eureka/
實體類
Product.java
package com.example.pojo; import lombok.AllArgsConstructor; import lombok.Data; import lombok.NoArgsConstructor; import java.io.Serializable; @Data @NoArgsConstructor @AllArgsConstructor public class Product implements Serializable { private Integer id; private String productName; private Integer productNum; private Double productPrice; }
編寫服務
ProductService.java
package com.example.service; import com.example.pojo.Product; import java.util.List; /** * 商品服務 */ public interface ProductService { /** * 查詢商品列表 * * @return */ List<Product> selectProductList(); }ProductServiceImpl.java
package com.example.service.impl; import com.example.pojo.Product; import com.example.service.ProductService; import org.springframework.stereotype.Service; import java.util.Arrays; import java.util.List; /** * 商品服務 */ @Service public class ProductServiceImpl implements ProductService { /** * 查詢商品列表 * * @return */ @Override public List<Product> selectProductList() { return Arrays.asList( new Product(1, "華為手機", 2, 5888D), new Product(2, "聯想筆記本", 1, 6888D), new Product(3, "小米平板", 5, 2666D) ); } }
控制層
ProductController.java
package com.example.controller; import com.example.pojo.Product; import com.example.service.ProductService; import org.springframework.beans.factory.annotation.Autowired; import org.springframework.web.bind.annotation.GetMapping; import org.springframework.web.bind.annotation.RequestMapping; import org.springframework.web.bind.annotation.RestController; import java.util.List; @RestController @RequestMapping("/product") public class ProductController { @Autowired private ProductService productService; /** * 查詢商品列表 * * @return */ @GetMapping("/list") public List<Product> selectProductList() { return productService.selectProductList(); } }該項目我們可以通過單元測試進行測試,也可以直接通過 url 使用 postman 或者瀏覽器來進行測試。
啟動類
ServiceProviderApplication.java
package com.example; import org.springframework.boot.SpringApplication; import org.springframework.boot.autoconfigure.SpringBootApplication; @SpringBootApplication // 開啟 EurekaClient 註解,目前版本如果配置了 Eureka 註冊中心,默認會開啟該註解 //@EnableEurekaClient public class ServiceProviderApplication { public static void main(String[] args) { SpringApplication.run(ServiceProviderApplication.class, args); } }
註冊中心
訪問註冊中心,可以看到用戶服務已經註冊至註冊中心。

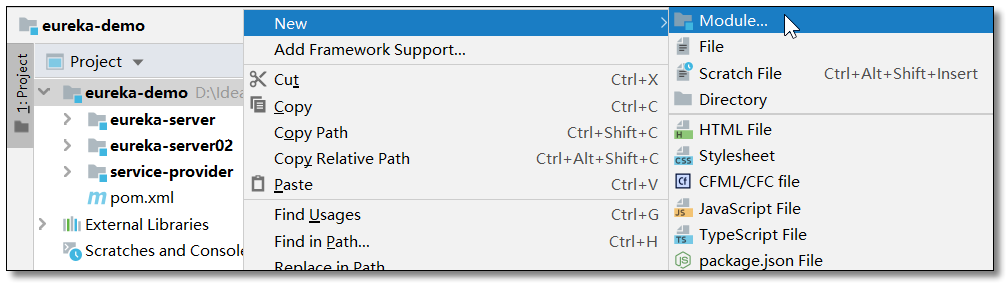
服務消費者 service-consumer
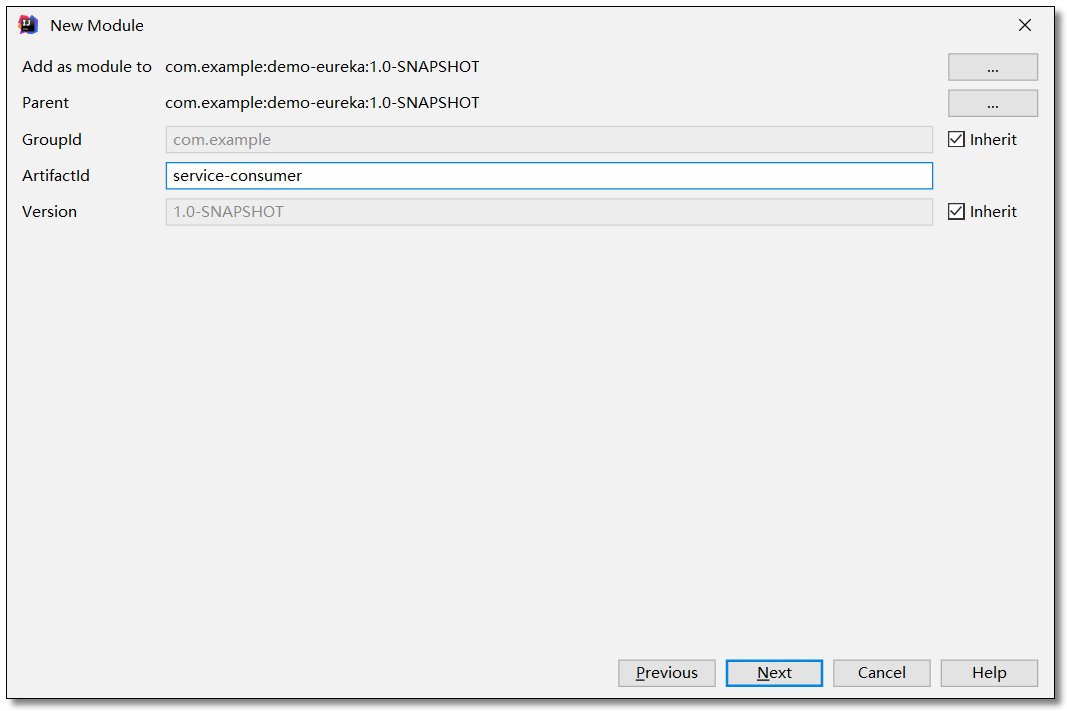
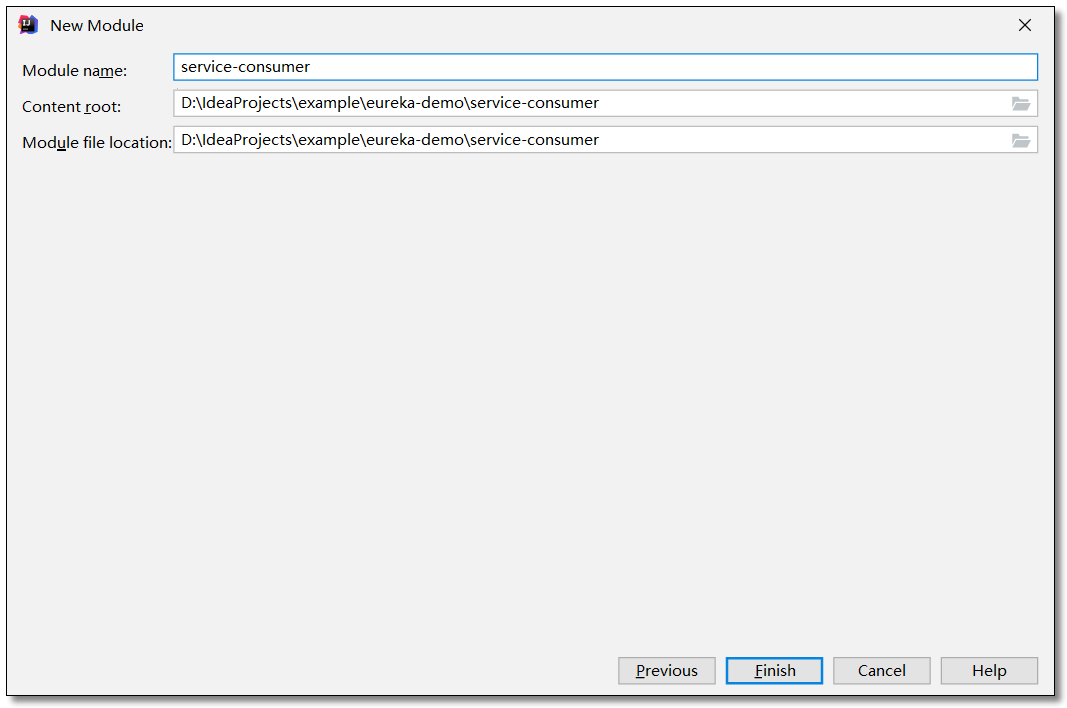
創建項目
在剛才的父工程下創建一個 service-consumer 服務消費者的項目。
添加依賴
pom.xml
<?xml version="1.0" encoding="UTF-8"?> <project xmlns="http://maven.apache.org/POM/4.0.0" xmlns:xsi="http://www.w3.org/2001/XMLSchema-instance" xsi:schemaLocation="http://maven.apache.org/POM/4.0.0 http://maven.apache.org/xsd/maven-4.0.0.xsd"> <modelVersion>4.0.0</modelVersion> <groupId>com.example</groupId> <artifactId>service-consumer</artifactId> <version>1.0-SNAPSHOT</version> <!-- 繼承父依賴 --> <parent> <groupId>com.example</groupId> <artifactId>eureka-demo</artifactId> <version>1.0-SNAPSHOT</version> </parent> <!-- 項目依賴 --> <dependencies> <!-- netflix eureka client 依賴 --> <dependency> <groupId>org.springframework.cloud</groupId> <artifactId>spring-cloud-starter-netflix-eureka-client</artifactId> </dependency> <!-- spring boot web 依賴 --> <dependency> <groupId>org.springframework.boot</groupId> <artifactId>spring-boot-starter-web</artifactId> </dependency> <!-- lombok 依賴 --> <dependency> <groupId>org.projectlombok</groupId> <artifactId>lombok</artifactId> <scope>provided</scope> </dependency> <!-- spring boot test 依賴 --> <dependency> <groupId>org.springframework.boot</groupId> <artifactId>spring-boot-starter-test</artifactId> <scope>test</scope> <exclusions> <exclusion> <groupId>org.junit.vintage</groupId> <artifactId>junit-vintage-engine</artifactId> </exclusion> </exclusions> </dependency> </dependencies> </project>
配置文件
application.yml
server: port: 9090 # 端口 spring: application: name: service-consumer # 應用名稱 # 配置 Eureka Server 註冊中心 eureka: client: register-with-eureka: false # 是否將自己註冊到註冊中心,默認為 true registry-fetch-interval-seconds: 10 # 表示 Eureka Client 間隔多久去服務器拉取註冊信息,默認為 30 秒 service-url: # 設置服務註冊中心地址 defaultZone: http://localhost:8761/eureka/,http://localhost:8762/eureka/
實體類
Product.java
package com.example.pojo; import lombok.AllArgsConstructor; import lombok.Data; import lombok.NoArgsConstructor; import java.io.Serializable; @Data @NoArgsConstructor @AllArgsConstructor public class Product implements Serializable { private Integer id; private String productName; private Integer productNum; private Double productPrice; }
Order.java
package com.example.pojo; import lombok.AllArgsConstructor; import lombok.Data; import lombok.NoArgsConstructor; import java.io.Serializable; import java.util.List; @Data @NoArgsConstructor @AllArgsConstructor public class Order implements Serializable { private Integer id; private String orderNo; private String orderAddress; private Double totalPrice; private List<Product> productList; }
消費服務
OrderService.java
package com.example.service; import com.example.pojo.Order; public interface OrderService { /** * 根據主鍵查詢訂單 * * @param id * @return */ Order selectOrderById(Integer id); }
對於服務的消費我們這裡講三種實現方式:
- DiscoveryClient:通過元數據獲取服務信息
- LoadBalancerClient:Ribbon 的負載均衡器
- @LoadBalanced:通過註解開啟 Ribbon 的負載均衡器
DiscoveryClient
Spring Boot 不提供任何自動配置的RestTemplate bean,所以需要在啟動類中注入 RestTemplate。
package com.example; import org.springframework.boot.SpringApplication; import org.springframework.boot.autoconfigure.SpringBootApplication; import org.springframework.context.annotation.Bean; import org.springframework.web.client.RestTemplate; @SpringBootApplication // 開啟 Eureka Client 註解,目前版本如果配置了 Eureka 註冊中心,默認會開啟該註解 //@EnableEurekaClient public class ServiceConsumerApplication { @Bean public RestTemplate restTemplate() { return new RestTemplate(); } public static void main(String[] args) { SpringApplication.run(ServiceConsumerApplication.class, args); } }
OrderServiceImpl.java
package com.example.service.impl; import com.example.pojo.Order; import com.example.pojo.Product; import com.example.service.OrderService; import org.springframework.beans.factory.annotation.Autowired; import org.springframework.cloud.client.ServiceInstance; import org.springframework.cloud.client.discovery.DiscoveryClient; import org.springframework.core.ParameterizedTypeReference; import org.springframework.http.HttpMethod; import org.springframework.http.ResponseEntity; import org.springframework.stereotype.Service; import org.springframework.util.CollectionUtils; import org.springframework.web.client.RestTemplate; import java.util.List; @Service public class OrderServiceImpl implements OrderService { @Autowired private RestTemplate restTemplate; @Autowired private DiscoveryClient discoveryClient; /** * 根據主鍵查詢訂單 * * @param id * @return */ @Override public Order selectOrderById(Integer id) { return new Order(id, "order-001", "中國", 31994D, selectProductListByDiscoveryClient()); } private List<Product> selectProductListByDiscoveryClient() { StringBuffer sb = null; // 獲取服務列表 List<String> serviceIds = discoveryClient.getServices(); if (CollectionUtils.isEmpty(serviceIds)) return null; // 根據服務名稱獲取服務 List<ServiceInstance> serviceInstances = discoveryClient.getInstances("service-provider"); if (CollectionUtils.isEmpty(serviceInstances)) return null; ServiceInstance si = serviceInstances.get(0); sb = new StringBuffer(); sb.append("http://" + si.getHost() + ":" + si.getPort() + "/product/list"); // ResponseEntity: 封裝了返回數據 ResponseEntity<List<Product>> response = restTemplate.exchange( sb.toString(), HttpMethod.GET, null, new ParameterizedTypeReference<List<Product>>() {}); return response.getBody(); } }
LoadBalancerClient
OrderServiceImpl.java
package com.example.service.impl; import com.example.pojo.Order; import com.example.pojo.Product; import com.example.service.OrderService; import org.springframework.beans.factory.annotation.Autowired; import org.springframework.cloud.client.ServiceInstance; import org.springframework.cloud.client.loadbalancer.LoadBalancerClient; import org.springframework.core.ParameterizedTypeReference; import org.springframework.http.HttpMethod; import org.springframework.http.ResponseEntity; import org.springframework.stereotype.Service; import org.springframework.web.client.RestTemplate; import java.util.List; @Service public class OrderServiceImpl implements OrderService { @Autowired private RestTemplate restTemplate; @Autowired private LoadBalancerClient loadBalancerClient; // Ribbon 負載均衡器 /** * 根據主鍵查詢訂單 * * @param id * @return */ @Override public Order selectOrderById(Integer id) { return new Order(id, "order-001", "中國", 31994D, selectProductListByLoadBalancerClient()); } private List<Product> selectProductListByLoadBalancerClient() { StringBuffer sb = null; // 根據服務名稱獲取服務 ServiceInstance si = loadBalancerClient.choose("service-provider"); if (null == si) return null; sb = new StringBuffer(); sb.append("http://" + si.getHost() + ":" + si.getPort() + "/product/list"); // ResponseEntity: 封裝了返回數據 ResponseEntity<List<Product>> response = restTemplate.exchange( sb.toString(), HttpMethod.GET, null, new ParameterizedTypeReference<List<Product>>() {}); return response.getBody(); } }
@LoadBalanced
啟動類注入 RestTemplate 時添加 @LoadBalanced 負載均衡註解,表示這個 RestTemplate 在請求時擁有客戶端負載均衡的能力。
package com.example; import org.springframework.boot.SpringApplication; import org.springframework.boot.autoconfigure.SpringBootApplication; import org.springframework.cloud.client.loadbalancer.LoadBalanced; import org.springframework.context.annotation.Bean; import org.springframework.web.client.RestTemplate; @SpringBootApplication // 開啟 Eureka Client 註解,目前版本如果配置了 Eureka 註冊中心,默認會開啟該註解 //@EnableEurekaClient public class ServiceConsumerApplication { @Bean @LoadBalanced // 負載均衡註解 public RestTemplate restTemplate() { return new RestTemplate(); } public static void main(String[] args) { SpringApplication.run(ServiceConsumerApplication.class, args); } }
OrderServiceImpl.java
package com.example.service.impl; import com.example.pojo.Order; import com.example.pojo.Product; import com.example.service.OrderService; import org.springframework.beans.factory.annotation.Autowired; import org.springframework.core.ParameterizedTypeReference; import org.springframework.http.HttpMethod; import org.springframework.http.ResponseEntity; import org.springframework.stereotype.Service; import org.springframework.web.client.RestTemplate; import java.util.List; @Service public class OrderServiceImpl implements OrderService { @Autowired private RestTemplate restTemplate; /** * 根據主鍵查詢訂單 * * @param id * @return */ @Override public Order selectOrderById(Integer id) { return new Order(id, "order-001", "中國", 31994D, selectProductListByLoadBalancerAnnotation()); } private List<Product> selectProductListByLoadBalancerAnnotation() { // ResponseEntity: 封裝了返回數據 ResponseEntity<List<Product>> response = restTemplate.exchange( "http://service-provider/product/list", HttpMethod.GET, null, new ParameterizedTypeReference<List<Product>>() {}); return response.getBody(); } }
控制層
OrderController.java
package com.example.controller; import com.example.pojo.Order; import com.example.service.OrderService; import org.springframework.beans.factory.annotation.Autowired; import org.springframework.web.bind.annotation.GetMapping; import org.springframework.web.bind.annotation.PathVariable; import org.springframework.web.bind.annotation.RequestMapping; import org.springframework.web.bind.annotation.RestController; @RestController @RequestMapping("/order") public class OrderController { @Autowired private OrderService orderService; /** * 根據主鍵查詢訂單 * * @param id * @return */ @GetMapping("/{id}") public Order selectOrderById(@PathVariable("id") Integer id) { return orderService.selectOrderById(id); } }
訪問
訪問:http://localhost:9090/order/1

Eureka 架構原理
- Register(服務註冊):把自己的 IP 和端口註冊給 Eureka。
- Renew(服務續約):發送心跳包,每 30 秒發送一次,告訴 Eureka 自己還活着。如果 90 秒還未發送心跳,宕機。
- Cancel(服務下線):當 Provider 關閉時會向 Eureka 發送消息,把自己從服務列表中刪除。防止 Consumer 調用到不存在的服務。
- Get Registry(獲取服務註冊列表):獲取其他服務列表。
- Replicate(集群中數據同步):Eureka 集群中的數據複製與同步。
- Make Remote Call(遠程調用):完成服務的遠程調用。

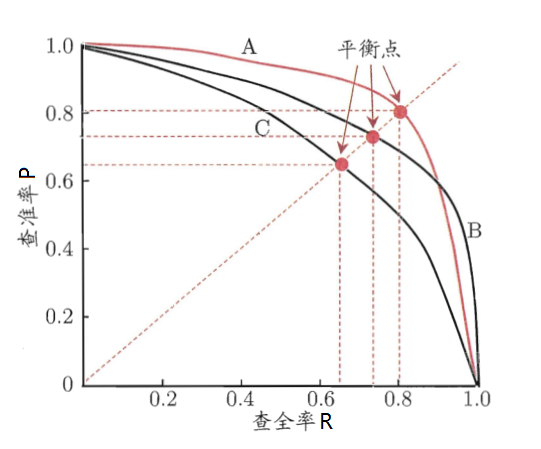
CAP 原則

CAP 原則又稱 CAP 定理,指的是在一個分佈式系統中具有以下其中兩個特性:
- Consistency (一致性)
- Availability (可用性)
- Partition tolerance(分區容錯性)
CAP 由 Eric Brewer 在 2000 年 PODC 會議上提出。該猜想在提出兩年後被證明成立,成為我們熟知的 CAP 定理。CAP 三者不可兼得。
| 特性 | 定理 |
|---|---|
| Consistency | 也叫做數據原子性,系統在執行某項操作後仍然處於一致的狀態。在分佈式系統中,更新操作執行成功後所有的用戶都應該讀到最新的值,這樣的系統被認為是具有強一致性的。等同於所有節點訪問同一份最新的數據副本。 |
| Availability | 每一個操作總是能夠在一定的時間內返回結果,這裡需要注意的是"一定時間內"和"返回結果"。一定時間內指的是,在可以容忍的範圍內返回結果,結果可以是成功或者是失敗。 |
| Partition tolerance | 在網絡分區的情況下,被分隔的節點仍能正常對外提供服務(分佈式集群,數據被分佈存儲在不同的服務器上,無論什麼情況,服務器都能正常被訪問)。 |
取捨策略
CAP 三個特性只能滿足其中兩個,那麼取捨的策略就共有三種:
- CA without P:如果不要求P(不允許分區),則C(強一致性)和A(可用性)是可以保證的。但放棄 P 的同時也就意味着放棄了系統的擴展性,也就是分佈式節點受限,沒辦法部署子節點,這是違背分佈式系統設計的初衷的。
- CP without A:如果不要求A(可用),相當於每個請求都需要在服務器之間保持強一致,而P(分區)會導致同步時間無限延長(也就是等待數據同步完才能正常訪問服務),一旦發生網絡故障或者消息丟失等情況,就要犧牲用戶的體驗,等待所有數據全部一致了之後再讓用戶訪問系統。設計成 CP 的系統其實不少,最典型的就是分佈式數據庫,如 Redis、HBase 等。對於這些分佈式數據庫來說,數據的一致性是最基本的要求,因為如果連這個標準都達不到,那麼直接採用關係型數據庫就好,沒必要再浪費資源來部署分佈式數據庫。
- AP without C:要高可用並允許分區,則需放棄一致性。一旦分區發生,節點之間可能會失去聯繫,為了高可用,每個節點只能用本地數據提供服務,而這樣會導致全局數據的不一致性。典型的應用就如某米的搶購手機場景,可能前幾秒你瀏覽商品的時候頁面提示是有庫存的,當你選擇完商品準備下單的時候,系統提示你下單失敗,商品已售完。這其實就是先在 A(可用性)方面保證系統可以正常的服務,然後在數據的一致性方面做了些犧牲,雖然多少會影響一些用戶體驗,但也不至於造成用戶購物流程的嚴重阻塞。
總結
現如今,對於多數大型互聯網應用的場景,主機眾多、部署分散,而且現在的集群規模越來越大,節點只會越來越多,所以節點故障、網絡故障是常態,因此分區容錯性也就成為了一個分佈式系統必然要面對的問題。那麼就只能在 C 和 A 之間進行取捨。但對於傳統的項目就可能有所不同,拿銀行的轉賬系統來說,涉及到金錢的對於數據一致性不能做出一絲的讓步,C 必須保證,出現網絡故障的話,寧可停止服務,可以在 A 和 P 之間做取捨。
總而言之,沒有最好的策略,好的系統應該是根據業務場景來進行架構設計的,只有適合的才是最好的。
Eureka 自我保護
啟動自我保護條件
一般情況下,服務在 Eureka 上註冊後,會每 30 秒發送心跳包,Eureka 通過心跳來判斷服務是否健康,同時會定期刪除超過 90 秒沒有發送心跳的服務。

有兩種情況會導致 Eureka Server 收不到微服務的心跳
- 微服務自身的原因
- 微服務與 Eureka 之間的網絡故障
自我保護模式
Eureka Server 在運行期間會去統計心跳失敗比例在 15 分鐘之內是否低於 85%,如果低於 85%,Eureka Server 會將這些實例保護起來,讓這些實例不會過期,同時提示一個警告。這種算法叫做 Eureka Server 的自我保護模式。
為什麼要啟動自我保護
- 因為同時保留"好數據"與"壞數據"總比丟掉任何數據要更好,當網絡故障恢復後,這個 Eureka 節點會退出"自我保護模式"。
- Eureka 還有客戶端緩存功能(也就是微服務的緩存功能)。即使 Eureka 集群中所有節點都宕機失效,微服務的 Provider 和 Consumer 都能正常通信。
- 微服務的負載均衡策略會自動剔除死亡的微服務節點。
如何關閉自我保護
註冊中心配置自我保護
eureka: server: enable-self-preservation: false # true:開啟自我保護模式,false:關閉自我保護模式 eviction-interval-timer-in-ms: 60000 # 清理間隔(單位:毫秒,默認是 60*1000)
Eureka 優雅停服
配置了優雅停服以後,將不需要 Eureka Server 中配置關閉自我保護。本文使用 actuator 實現。
添加依賴
服務提供者添加 actuator 依賴
<!-- spring boot actuator 依賴 --> <dependency> <groupId>org.springframework.boot</groupId> <artifactId>spring-boot-starter-actuator</artifactId> </dependency>
配置文件
服務提供者配置度量指標監控與健康檢查
# 度量指標監控與健康檢查 management: endpoints: web: exposure: include: shutdown # 開啟 shutdown 端點訪問 endpoint: shutdown: enabled: true # 開啟 shutdown 實現優雅停服
優雅停服
使用 POST 請求訪問:http://localhost:7070/actuator/shutdown 效果如下
Eureka 安全認證
添加依賴
註冊中心添加 security 依賴
<!-- spring boot security 依賴 --> <dependency> <groupId>org.springframework.boot</groupId> <artifactId>spring-boot-starter-security</artifactId> </dependency>
配置文件
註冊中心配置安全認證
spring: # 安全認證 security: user: name: root password: 123456
修改訪問集群節點的 url
註冊中心的配置文件
# 配置 Eureka Server 註冊中心 eureka: instance: hostname: eureka01 # 主機名,不配置的時候將根據操作系統的主機名來獲取 prefer-ip-address: true # 是否使用 ip 地址註冊 instance-id: ${spring.cloud.client.ip-address}:${server.port} # ip:port client: # 設置服務註冊中心地址,指向另一個註冊中心 service-url: # 註冊中心對外暴露的註冊地址 defaultZone: http://root:123456@localhost:8762/eureka/服務提供者的配置文件
# 配置 Eureka Server 註冊中心 eureka: instance: prefer-ip-address: true # 是否使用 ip 地址註冊 instance-id: ${spring.cloud.client.ip-address}:${server.port} # ip:port client: service-url: # 設置服務註冊中心地址 defaultZone: http://root:123456@localhost:8761/eureka/,http://root:123456@localhost:8762/eureka/服務消費者的配置文件
# 配置 Eureka Server 註冊中心 eureka: client: register-with-eureka: false # 是否將自己註冊到註冊中心,默認為 true registry-fetch-interval-seconds: 10 # 表示 Eureka Client 間隔多久去服務器拉取註冊信息,默認為 30 秒 service-url: # 設置服務註冊中心地址 defaultZone: http://root:123456@localhost:8761/eureka/,http://root:123456@localhost:8762/eureka/
過濾 CSRF
Eureka 會自動化配置 CSRF 防禦機制,Spring Security 認為 POST, PUT, and DELETE http methods 都是有風險的,如果這些 method 發送過程中沒有帶上 CSRF token 的話,會被直接攔截並返回 403 forbidden。
官方給出了解決的方法,具體可以參考 spring cloud issue 2754,裏面有大量的討論,這裡提供兩種解決方案。
首先註冊中心配置一個 @EnableWebSecurity 配置類,繼承 org.springframework.security.config.annotation.web.configuration.WebSecurityConfigurerAdapter,然後重寫 configure 方法。
方案一
使 CSRF 忽略 /eureka/** 的所有請求
package com.example.config; import org.springframework.security.config.annotation.web.builders.HttpSecurity; import org.springframework.security.config.annotation.web.configuration.EnableWebSecurity; import org.springframework.security.config.annotation.web.configuration.WebSecurityConfigurerAdapter; /** * 安全認證配置類 */ @EnableWebSecurity public class WebSecurityConfig extends WebSecurityConfigurerAdapter { @Override protected void configure(HttpSecurity http) throws Exception { super.configure(http); // 加這句是為了訪問 eureka 控制台和 /actuator 時能做安全控制 http.csrf().ignoringAntMatchers("/eureka/**"); // 忽略 /eureka/** 的所有請求 } }
方案二
保持密碼驗證的同時禁用 CSRF 防禦機制
package com.example.config; import org.springframework.security.config.annotation.web.builders.HttpSecurity; import org.springframework.security.config.annotation.web.configuration.EnableWebSecurity; import org.springframework.security.config.annotation.web.configuration.WebSecurityConfigurerAdapter; /** * 安全認證配置類 */ @EnableWebSecurity public class WebSecurityConfig extends WebSecurityConfigurerAdapter { @Override protected void configure(HttpSecurity http) throws Exception { // 注意,如果直接 disable 的話會把安全驗證也禁用掉 http.csrf().disable().authorizeRequests() .anyRequest() .authenticated() .and() .httpBasic(); } }
訪問
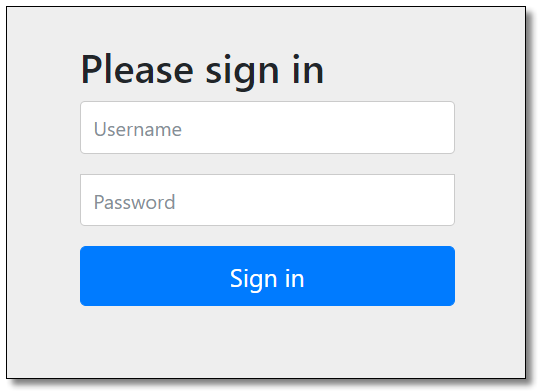
使用配置好的用戶名和密碼登錄以後可看到註冊中心界面,啟動服務提供者和服務消費者,功能正常使用,至此 Eureka 註冊中心所有的知識點就講解結束了。
大家可以通過 分類 查看更多關於 Spring Cloud 的文章。
本文採用 知識共享「署名-非商業性使用-禁止演繹 4.0 國際」許可協議。
✍️ 本章節到這裡就結束了,喜歡的話就點贊 ? 加轉發吧。
? 關注 哈嘍沃德先生,學習更多 IT 技術 ~