自動跑測試記錄後發送郵件提醒並自動解析數據
使用腳本自動跑實驗(Ubuntu),將實驗結果記錄在文件中,並在實驗結束之後將結果通過郵件發送到郵箱,最後在windows端自動解析成excel表格(因為要在windows的origin上作圖)。
SHELL
touch run.sh #創建但不編輯腳本
chmod 777 run.sh #給予腳本執行權限
gedit run.sh #編輯腳本- 腳本中可以創建變量,如直接
x='100'或r='rm -rf'即可,${x}在執行的時候以字符串形式讀取。
- 注意變量創建時使用單引號,等於號前後不要有空格,可以是命令,可以使變量,反正都是字符串。
- 如何以數字方式解析變量?被以
$(())包裹的變量將以數字形式解析,比如在某行中有這個參數:--num=$((${n}*1000000)),這裡${n}將被以數字形式解析。 - 變量為路徑:建議使用絕對路徑。如想創建用於接收結果文件
receive='/home/renjc/easy-test2.txt'之後touch ${receive},當然變量本質上是以字符串形式讀取的,用receive='../xx.txt'當然也行,還更靈活,就是程序容易整錯。
- 腳本中若想執行命令,直接新一行然後將命令打上去就可以了,不需要額外的東西,腳本本質上還是一行一行執行的
- 若命令中想帶參數,可以直接用變量替換
- 數組,
volumn='128 512 1024 2048'即是數組,也可以當做一串字符串來解析。
#遍曆數組,循環,遍歷文件夾
workloads="./works/workloada.spec ./works/workloadb.spec ./works/workloadf.spec"
for file_name in $workloads; do
  ./ycsbc -db redis -threads 1 -P $file_name
done
#下面這個是單純的for循環
for ((tn=1; tn<=8; tn=tn*2)); do
doneworkload
#下面這個是遍歷文件夾workload_dir中所有以workload開頭的spec文件
for file_name in $workload_dir/workload*.spec; do
done- 函數,函數直接寫在執行前就行
#函數作用是記錄name,當前時間,以及初步計算value
recordstart(){
time=$(date)
echo "db_name: ${1}" >> ${receive}
echo -n "start_time: ${time} and Value:" >> ${receive}
echo "scale=2;${3}*${4}/1024/1000"|bc >> ${receive}
#純shell對除法的支持比較粗糙,如果想要保留兩位小數,可以向上面這行一樣。
}$(date)代表當前時間,帶年月日時分秒的那種。- shell腳本的函數參數並不需要申明什麼的,
${1}就代表函數第一個參數,以此類推,其中按照慣例,${0}代表函數名(或者說程序名)。調用函數也很簡單,recordstart name ${v}即可調用,函數名後面的都是參數,在函數中使用${1},${2},${3}識別。 echo -n "xx" >> ${receive},只有echo的話,會輸出到控制台中,加上>> ${receive}會輸出到這個文件裏面,加上-n代表這一行不換行,因為echo默認是每次都換行的。
使用以上幾種組合基本可以完成絕大部分實驗與程序。以下作為例子
這個作為例子(已摺疊,可展開)
receive='/home/renjc/spkv/resault/easy-test2.txt'
touch ${receive}
ulimit -Sn 16384
ulimit -Hn 32768
#解除堆棧限制,可能需要,先預備
rocksdb_base='rocksdb-base/db_bench'
rocksdb_split='rocksdb-split/db_bench'
wisckey='WiscKey-master/WiscKey/out-static/db_bench'
# database="${rocksdb_base} ${rocksdb_split} ${wisckey}"
rmstore='rm -rf /home/renjc/spkv/db/*'
recordstart(){
#${1} db_name,${2} number of threads,${3} value_size,${4} number of rows
time=$(date)
echo "db_name: ${1}" >> ${receive}
echo "thread_num: ${2}" >> ${receive}
echo "value_size: ${3}" >> ${receive}
echo "num:${4}" >> ${receive}
echo "start_time: ${time}" >> ${receive}
echo -n "resault GB is:" >> ${receive}
echo "scale=2;${3}*${4}/1024/1000/1000"|bc >> ${receive}
}
recordend(){
time=$(date)
echo "done_time: ${time},----clean store and sleep 10s-------------------" >> ${receive}
${rmstore}
sleep 10s
}
#rocksdb 用一個杠兩個杠都行,leveldb/wisckey只能用兩個,統一採用兩個杠杠。
const_arg='--db=/home/renjc/spkv/db --bloom_bits=0 --write_buffer_size=134217728'
rocksdb_arg='--compression_type=none' #Wisckey do not support but rocksdb need
sperate_arg='--enable_blob_files=true' #rokcsdb的鍵值分離版本就是原來的版本上加一個參數,所以使用相同路徑加一個參數
benchmarks='--benchmarks=fillrandom,stats,readrandom,stats'
volumn='128 512 1024 2048'
num='5 10'
echo "test start" >> ${receive}
for v in ${volumn}
do
for n in ${num}
do
recordstart r_sperate 1 ${v} 10000000
./${rocksdb_base} ${const_arg} ${rocksdb_arg} --num=$((${n}*1000000)) --value_size=${v} ${benchmarks} ${sperate_arg} >> ${receive}
recordend
recordstart r_split 1 ${v} 10000000
./${rocksdb_split} ${const_arg} ${rocksdb_arg} --num=$((${n}*1000000)) --value_size=${v} ${benchmarks} >> ${receive}
recordend
recordstart wisckey 1 ${v} 10000000
./${wisckey} ${const_arg} --num=$((${n}*1000000)) --value_size=${v} ${benchmarks} >> ${receive}
recordend
done
done
echo "all done" >> ${receive}
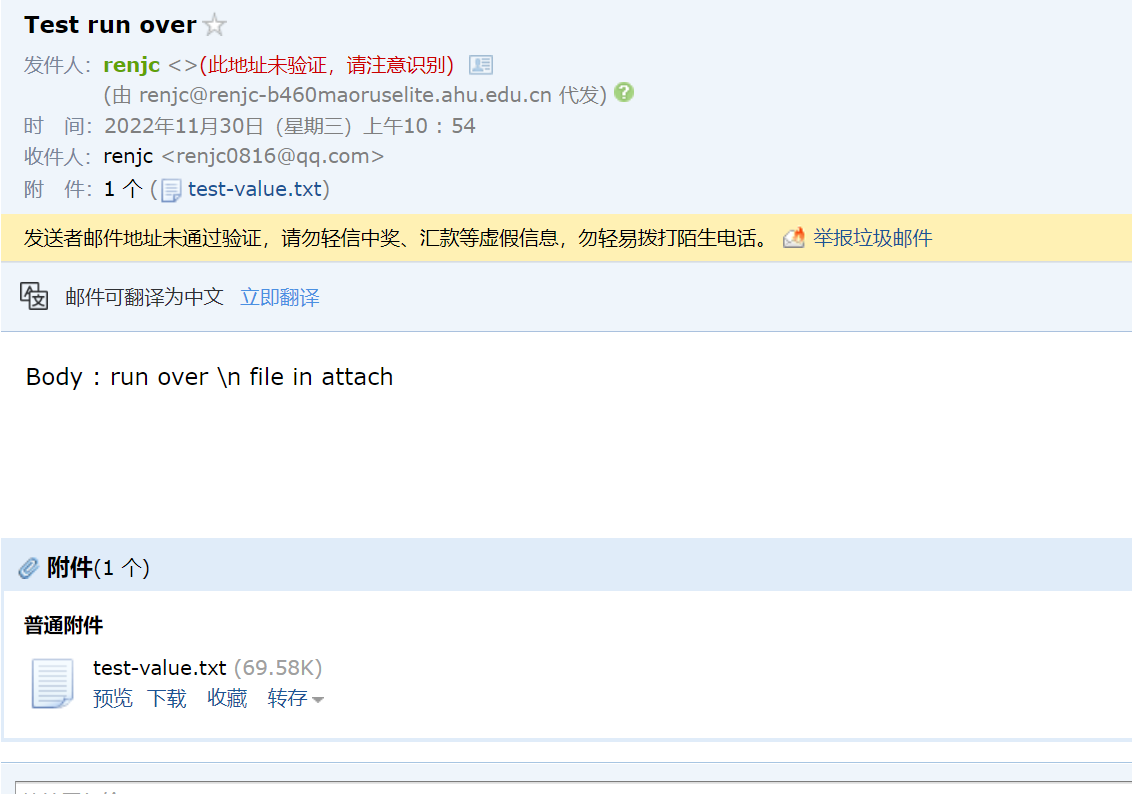
echo "run over \n file in attach" | mutt -s "Test run over" [email protected] -a ${receive}自動發送郵件
mail如何添加附件沒整成功,現在使用mutt命令實現,控制台執行:
sudo apt-get install mutt安裝
echo "Body : run over \n file in attach" | mutt -s "Test run over" [email protected] -a 'path'即可。
其中,”Body”開頭的是郵件內容,-s後面的是郵件標題,-a後面的'path'是附件地址,正常使用不用帶單引號,寫在腳本里時可以用之前創建的${receive}代替。郵件是立刻發送的,收件箱里找不到請到垃圾箱裏面找找。如下:
自動解析實驗結果生成excel表格
這個程序自己寫去
如何生成excel可讀取的文件?csv文件:csv文件可以被excel讀取,第一行表示excel的那個列名,用逗號分割,底下的數據也是,每一行代表excel表格內的一行,每一列的內容用逗號分割,英文的逗號。
至於解析實驗結果,就逐行讀取,然後捕捉自己想要的關鍵詞就行了,性能啥的就不用考慮優化了,咋簡單咋來。
下面的是自用的解析rocksdb的參數的,僅供參考
自用rocksdb參數解析(已摺疊,可展開)
 #include <iostream>
#include <string>
#include <sstream>
#include <vector>
#include <fstream>
#include <iomanip>

#define default_file_path "E:\\Code\\Windows\\FileOperate\\easy-test.txt"
#define resault_file_name "E:\\Code\\Windows\\FileOperate\\resault.csv"
using namespace std;

struct arguments {
  arguments(string s,string t):name(s),data(t){}
  string name;
  string data;
};

void readFile(vector<arguments>& resault,const string& file_path);
void trimEmpty(string &s);//用於去除字符串首尾空格
void recordString(const string& type, string& s,vector<arguments>& resault);//用于格式化並記錄data
void recordInFile(const vector<arguments>& resault);//解析結果記錄到文件中,測試用
void recordCSVMode(const vector<arguments>& resault);
void printInShell(const vector<arguments>& resault);//打印到控制台,測試用

//按順序存放需要捕捉的關鍵詞,問題在於只能順序
//如果該行以該關鍵詞結尾,那麼就將所有的東西記錄下來
//注意,這個數組並不是最終參數結果,有的一行記了兩三個參數
const static vector<string> key_words = {"db_name","thread_num","start_time","Values","Entries","RawSize","FileSize",
"fillrandom","Cumulative compaction","Cumulative writes","Cumulative stall",
"readrandom","Cumulative compaction","Cumulative writes","Cumulative stall","done_time"};
const static int length = key_words.size();

int main(int arg_count, char *arg_value[]){
  string file_path = default_file_path;   //默認路徑
  if(arg_count > 1) file_path = arg_value[1];
  //argv[0]為程序名,這點由shell傳統決定,argv[1]是程序名的輸入

  vector<arguments> resault;
  readFile(resault,file_path);

  // printInShell(resault);
  // recordInFile(resault);
  recordCSVMode(resault);

  // getchar();
  return 0;
}

void readFile(vector<arguments>& resault,const string& file_path){
  int flag = 0;
  string line;//按行讀取
  ifstream fp(file_path);

  while(getline(fp, line)) {
    string head = line.substr(0,line.find(":"));
    trimEmpty(head);
    if(key_words[flag] == head) {
      string tail = line.substr(line.find(":")+1);
      recordString(key_words[flag],tail,resault);
      // resault.push_back(arguments(key_words[flag],tail));
      flag = flag == length - 1 ? 0 : flag + 1;
    }
  }
}

void trimEmpty(string &s){
  //刪除字符串的前後空格
  if (!s.empty()){
    s.erase(0, s.find_first_not_of(" "));
    s.erase(s.find_last_not_of(" ") + 1);
  }
}

void recordString(const string& type, string& s,vector<arguments>& resault){
  //為什麼不使用精確的下表標位置
  //因為數據的長度不一定,所以必須使用標點符號等來相對定位。
  trimEmpty(s);
  if(type == "fillrandom" || type == "readrandom"){
    int start = s.find("op")+3;
    int len = s.find(";") - start;
    string kops = s.substr(start,len);
    resault.push_back(arguments("Kops",kops));
    start = s.find(";")+1;
    len = s.find_last_of("s")+1 - start;
    s = s.substr(start,len);
    trimEmpty(s);
    resault.push_back(arguments("Speed",s));
    return;
  }

  if(type == "Cumulative stall") {
    string stall_time = s.substr(0,s.find(" "));
    resault.push_back(arguments("Cumulative stall",stall_time));
    s = s.substr(s.find(",") + 2);
    resault.push_back(arguments("Average stall",s));
    return;
  }

  if(type == "start_time" || type == "done_time"){
    s = s.substr(s.find_last_of(":")-5,8);
  }else if(type == "Values"){
    s = s.substr(0,s.find(" "));
  }else if(type == "RawSize" || type == "FileSize"){
    s = s.substr(0,s.find_last_of(" "));
  }else if(type == "Cumulative compaction"){
    s = s.substr(0,s.find(" ")+3);
  }else if(type == "Cumulative writes"){
    int start = s.find_last_of(":") + 2;
    int length = s.find_last_of(",") - start;
    s = s.substr(start,length);
  }
  resault.push_back(arguments(type,s));
  return;
}

void recordInFile(const vector<arguments>& resault){
  ofstream record;
  remove(resault_file_name);
  record.open(resault_file_name, ios::app);
  for (size_t i = 0; i < resault.size(); i++) {
    record << left << setw(25) << setfill(' ') << resault[i].name;
    record << resault[i].data << endl;
  }
}

void recordCSVMode(const vector<arguments>& resault){
  //key_words的長度並不是最終參數的數量
  ofstream record;
  remove(resault_file_name);
  record.open(resault_file_name, ios::app);
  size_t point = 0,point_t = 0;
  string head = resault[0].name;
  while(resault[point+1].name != head){
    record << resault[point++].name << ",";
  }
  record << resault[point].name << endl;

  for (size_t i = 0; i < resault.size(); i++) {
    if(point_t < point) {
      ++point_t;
      record << resault[i].data << ",";
    } else {
      point_t = 0;
      record << resault[i].data << endl;
    }
  }
}

void printInShell(const vector<arguments>& resault){
  // 格式化輸出,left表示偏左,setw是設置寬度,stefill是設置填充字符
  for (size_t i = 0; i < resault.size(); i++) {
    cout << left << setw(25) << setfill(' ') << resault[i].name;
    cout << resault[i].data << endl;
  }
}
解析結果如下(這個花花綠綠的顏色是vscode的插件,創建csv文件之後就會提示安裝)

excel可以直接打開,wps沒下就沒試。excel打開如下:

剛打開可能數據顯得有點擁擠,可以另存為excel正常的格式進行調整,要不然調整了這csv文件也保存不下來的。
好了,這波整完就可以開始摸魚啦把實驗放那跑,跑完手機會收到郵件提示,回去自動解析一波就行,至於更多的分類啥的功能,都可以在程序中實現。
(>.o)

