SpringBoot 08: SpringBoot綜合使用 MyBatis, Dubbo, Redis
- 2022 年 11 月 15 日
- 筆記
- springboot
業務背景
Student表
CREATE TABLE `student` (
  `id` int(11) NOT NULL AUTO_INCREMENT,
  `name` varchar(255) COLLATE utf8_bin DEFAULT NULL,
  `phone` varchar(11) COLLATE utf8_bin DEFAULT NULL,
  `age` int(11) DEFAULT NULL,
  PRIMARY KEY (`id`)
) ENGINE=InnoDB AUTO_INCREMENT=6 DEFAULT CHARSET=utf8 COLLATE=utf8_bin;
兩個業務功能
針對上述student表, 綜合應用springboot, mybatis, dubbo, redis實現如下兩個業務功能
1. 註冊學生
-
要求:
-
註冊接口定義為:int saveStudent(Student student)
-
利用傳入的學生的手機號註冊,手機號必須唯一
-
如果已經存在了手機號, 註冊失敗, 返回2
-
如果手機號為空,註冊失敗,返回-1
-
註冊成功,返回0
2. 查詢學生
- 要求:
- 查詢接口定義為:Student queryStudent(Integer id)
- 根據id查詢目標學生
- 先到redis查詢學生,如果redis沒有,從數據庫查詢
- 如果數據庫有,把查詢到的學生放入到redis,返回該學生,後續再次查詢這個學生應該從redis就能獲取到
- 如果數據庫也沒有目標學生,返回空
其他要求
- 關於Dubbo
- 要求使用dubbo框架,addStudent, queryStudent是由服務提供者實現的
- 消費者可以是一個Controller,調用提供者的兩個方法, 實現學生的註冊和查詢
- 關於前端頁面
- 頁面使用html, ajax, jquery
- 通過postman發送post請求,來註冊學生
- 通過html頁面上的form表單,提供文本框輸入id, 進行查詢
- html, jquery.js都放到springboot項目的resources/static目錄中
編程實現
項目結構
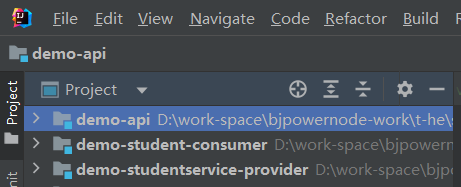
- 分佈式總體項目結構

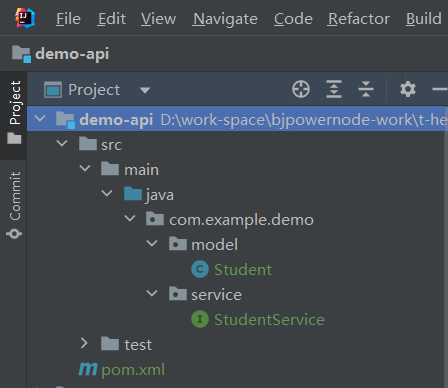
- 公共接口項目結構

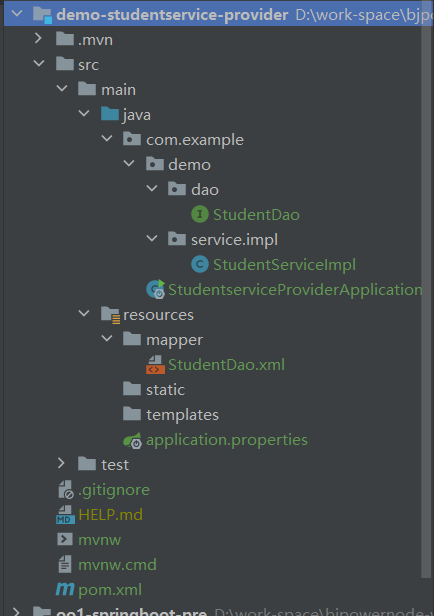
- 服務提供者項目結構

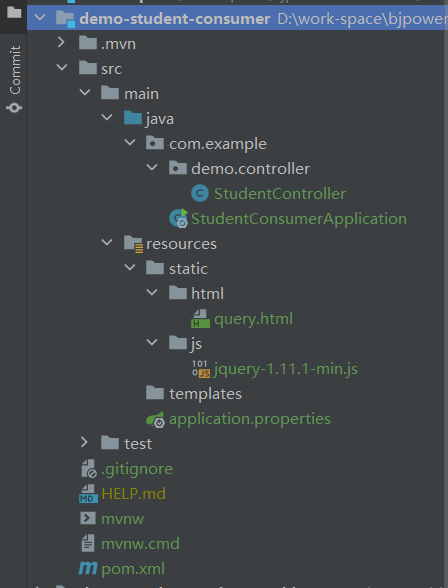
- 消費者項目結構

dubbo的公共接口項目
注意該項目為普通的maven項目即可
實體類
package com.example.demo.model;

import java.io.Serializable;

public class Student implements Serializable {
    private static final long serialVersionUID = -3272421320600950226L;
    private Integer id;
    private String name;
    private String phone;
    private Integer age;

    @Override
    public String toString() {
        return "Student{" +
                "id=" + id +
                ", name='" + name + '\'' +
                ", phone='" + phone + '\'' +
                ", age=" + age +
                '}';
    }

    //防止緩存穿透,可以獲取默認學生(學生信息故意設置不合法,後期在redis中一眼就能看出來是異常數據),填充到redis中
    public static Student getDefaultStudent(){
        Student student = new Student();
        student.setId(-1);
        student.setName("-");
        student.setPhone("-");
        student.setAge(0);
        return student;
    }

    public Integer getId() {
        return id;
    }

    public void setId(Integer id) {
        this.id = id;
    }

    public String getName() {
        return name;
    }

    public void setName(String name) {
        this.name = name;
    }

    public String getPhone() {
        return phone;
    }

    public void setPhone(String phone) {
        this.phone = phone;
    }

    public Integer getAge() {
        return age;
    }

    public void setAge(Integer age) {
        this.age = age;
    }

    public Student(Integer id, String name, String phone, Integer age) {
        this.id = id;
        this.name = name;
        this.phone = phone;
        this.age = age;
    }

    public Student() {
    }
}
提供的服務接口定義
package com.example.demo.service;

import com.example.demo.model.Student;

public interface StudentService {
    //保存學生信息
    int saveStudent(Student student);

    //根據id,查詢學生信息
    Student queryStudent(Integer id);
}
dubbo的服務提供者項目
注意:該項目為springboot項目,且在起步依賴里要勾選web(web依賴可以不選), redis, mysql, mybatis的起步依賴
項目配置
- 額外在pom.xml裏手動加入對公共接口項目以及dubbo和zookeeper的依賴
        <!-- 公共項目依賴 -->
        <dependency>
            <groupId>com.example.demo</groupId>
            <artifactId>demo-api</artifactId>
            <version>1.0.0</version>
        </dependency>

        <!--dubbo依賴-->
        <dependency>
            <groupId>org.apache.dubbo</groupId>
            <artifactId>dubbo-spring-boot-starter</artifactId>
            <version>2.7.8</version>
        </dependency>


        <!--zookeeper依賴-->
        <dependency>
            <groupId>org.apache.dubbo</groupId>
            <artifactId>dubbo-dependencies-zookeeper</artifactId>
            <version>2.7.8</version>
            <type>pom</type>
            <exclusions>
                <!-- 排除log4j的依賴-->
                <exclusion>
                    <artifactId>slf4j-log4j12</artifactId>
                    <groupId>org.slf4j</groupId>
                </exclusion>
            </exclusions>
        </dependency>
- 配置application.properties文件
########################### 配置dubbo
#配置提供的服務名稱
dubbo.application.name=student-service-provider

#配置需要掃描的包
dubbo.scan.base-packages=com.example.demo.service

#配置註冊中心
dubbo.registry.address=zookeeper://127.0.0.1:2181

########################### 配置redis
#redis服務的ip
spring.redis.host=127.0.0.1

#redis服務的端口
spring.redis.port=6379

########################### mybatis配置
#mybatis中mapper文件編譯到的資源路徑
mybatis.mapper-locations=classpath:mapper/*.xml

#mybatis日誌輸出
mybatis.configuration.log-impl=org.apache.ibatis.logging.stdout.StdOutImpl

############################ 數據源配置
spring.datasource.driver-class-name=com.mysql.cj.jdbc.Driver
spring.datasource.url=jdbc:mysql://數據庫服務器ip:3306/數據庫名?useUnicode=true&characterEncoding=UTF-8&serverTimezone=GMT%2B8
spring.datasource.username=XXX
spring.datasource.password=YYY
dao層
- dao接口
package com.example.demo.dao;

import com.example.demo.model.Student;
import org.apache.ibatis.annotations.Param;

public interface StudentDao {
    //以手機號作為查詢條件,判斷學生是否存在
    Student queryStudentByPhone(@Param("phone") String phone);

    //保存新創建的學生信息
    int saveStudent(Student student);

    //根據學生id,查詢學生信息
    Student queryStudentById(@Param("id") Integer id);
}
- dao接口對應的xml文件, 位於resources/mapper目錄下,這裡將dao接口和dao.xml文件分開管理
<?xml version="1.0" encoding="UTF-8" ?>
<!DOCTYPE mapper
        PUBLIC "-//mybatis.org//DTD Mapper 3.0//EN"
        "//mybatis.org/dtd/mybatis-3-mapper.dtd">
<mapper namespace="com.example.demo.dao.StudentDao">
    <!--
        以學生手機號碼為依據,判斷學生是否已經存在
    -->
    <select id="queryStudentByPhone" parameterType="string" resultType="com.example.demo.model.Student">
        select id, name, age, phone from student where phone = #{phone}
    </select>

    <!--
        保存新創建的學生
    -->
    <insert id="saveStudent" parameterType="com.example.demo.model.Student">
        insert into student(name, age, phone) values(#{name}, #{age}, #{phone})
    </insert>

    <!--
        根據學生id,查詢學生信息
    -->
    <select id="queryStudentById" parameterType="int" resultType="com.example.demo.model.Student">
        select id, name, age, phone from student where id = #{id}
    </select>

</mapper>
- 實現公共接口工程里對外提供的服務
package com.example.demo.service.impl;

import com.example.demo.dao.StudentDao;
import com.example.demo.model.Student;
import com.example.demo.service.StudentService;
import org.apache.dubbo.config.annotation.DubboService;
import org.springframework.data.redis.core.RedisTemplate;
import org.springframework.data.redis.serializer.Jackson2JsonRedisSerializer;
import org.springframework.data.redis.serializer.StringRedisSerializer;

import javax.annotation.Resource;

@DubboService(interfaceClass = StudentService.class, version = "1.0.0", timeout = 5000)
public class StudentServiceImpl implements StudentService {

    @Resource
    private StudentDao studentDao;

    @Resource
    private RedisTemplate redisTemplate;

    //保存新創建的學生
    @Override
    public int saveStudent(Student student) {
        int saveResult = 0;//表示保存學生信息的結果:1/添加成功 -1:手機號為空 2:手機號碼重複
        if(student.getPhone() == null){
            saveResult = -1;
        }else{
            Student queryStudentResult = studentDao.queryStudentByPhone(student.getPhone());
            if(queryStudentResult != null){
                saveResult = 2;
            }else{
                //該學生尚未存在,保存到數據庫中
                saveResult = studentDao.saveStudent(student);
            }
        }
        return saveResult;
    }

    @Override
    public Student queryStudent(Integer id) {
        redisTemplate.setKeySerializer(new StringRedisSerializer());
        redisTemplate.setValueSerializer(new Jackson2JsonRedisSerializer(Student.class));
        final String STUDENT_USER_KEY = "STUDENT:";
        String key = STUDENT_USER_KEY + id;
        //先嘗試從緩存獲取:按照key的格式來查
        Student student = (Student) redisTemplate.opsForValue().get(key);
        System.out.println("------- 從redis中查詢數據 ----------> : " + student);
        if(student == null){
            //緩存中沒有,需要到數據庫查詢:按照id格式來查詢
            student = studentDao.queryStudentById(id);
            System.out.println("------- 從數據庫中查詢數據 ---------> : " + student);
            if(student != null){
                //數據庫中有該數據,存一份數據到redis中:按照key的格式來存
                redisTemplate.opsForValue().set(key, student);
            }else{
                //防止緩存穿透:對既未在緩存又未在數據庫中的數據,設置默認值
                redisTemplate.opsForValue().set(key, Student.getDefaultStudent());
            }
        }
        return student;
    }
}
- springboot主啟動類上添加支持dubbo的註解並添加對dao接口掃描的註解
package com.example;

import org.apache.dubbo.config.spring.context.annotation.EnableDubbo;
import org.mybatis.spring.annotation.MapperScan;
import org.springframework.boot.SpringApplication;
import org.springframework.boot.autoconfigure.SpringBootApplication;

@SpringBootApplication
@EnableDubbo
@MapperScan(basePackages = "com.example.demo.dao")
public class StudentserviceProviderApplication {

    public static void main(String[] args) {
        SpringApplication.run(StudentserviceProviderApplication.class, args);
    }
}
dubbo消費者項目
該項目為springboot項目,啟動項依賴只要勾選web依賴
pom.xml中的額外依賴均與服務提供者相同
項目配置
- 配置application.properties
#springboot服務的基本配置
server.port=9090
server.servlet.context-path=/demo

#springboot中使用dubbo的配置
#消費者名稱
dubbo.application.name=student-service-consumer

#配置需要掃描的包
dubbo.scan.base-packages=com.example.demo.controller

#配置註冊中心
dubbo.registry.address=zookeeper://127.0.0.1:2181
- 同樣在springboot的啟動類上添加支持dubbo的註解
package com.example;

import org.apache.dubbo.config.spring.context.annotation.EnableDubbo;
import org.springframework.boot.SpringApplication;
import org.springframework.boot.autoconfigure.SpringBootApplication;

@SpringBootApplication
@EnableDubbo
public class StudentConsumerApplication {

    public static void main(String[] args) {
        SpringApplication.run(StudentConsumerApplication.class, args);
    }
}
controller層
- 消費者與前端交互的controller層, 採用RESTful接口風格
package com.example.demo.controller;

import com.example.demo.model.Student;
import com.example.demo.service.StudentService;
import org.apache.dubbo.config.annotation.DubboReference;
import org.springframework.web.bind.annotation.PostMapping;
import org.springframework.web.bind.annotation.RestController;

@RestController
public class StudentController {

    @DubboReference(interfaceClass = StudentService.class, version = "1.0.0")
    private StudentService studentService;

    @PostMapping("/student/add")
    public String addStudent(Student student){
        int saveStudentResult = studentService.saveStudent(student);
        String msg = "";
        if(saveStudentResult == 1){
            msg = "添加學生: " + student.getName() + " 成功";
        }else if(saveStudentResult == -1){
            msg = "手機號不能為空";
        }else if(saveStudentResult == 2){
            msg = "手機號: " + student.getPhone() + " 重複,請更換手機號後重試";
        }
        return msg;
    }

    @PostMapping("/student/query")
    public String queryStudent(Integer id){
        String msg = "";
        Student student = null;
        if(id != null && id > 0){
            student = studentService.queryStudent(id);
            if(student != null){
                msg = "查詢到的學生信息: " + student.toString();
            }else{
                msg = "未查詢到相關信息";
            }
        }else{
            msg = "輸入的id範圍不正確";
        }
        return msg;
    }
}
前端頁面
前端html頁面和js文件位於resources/static目錄下
-
可以藉助postman便捷的發送post請求來添加學生
-
查詢學生的請求可以藉助如下query.html頁面,通過ajax來發送查詢請求
<!DOCTYPE html>
<html lang="en">
<head>
    <meta charset="UTF-8">
    <title>query.html</title>
    <script src="../js/jquery-1.11.1-min.js"></script>
    <script type="text/javascript">
        $(function (){
            $("#stuBtn").click(function (){
                var id = $("#stuId").val();
                $.ajax({
                    url: "/demo/student/query",
                    data:{"id":id},
                    type:"post",
                    dataType:"text",
                    success:function (data){
                        alert(data);
                    }
                })
            });
        });
    </script>
</head>
<body>
<input type="text" id="stuId"><br>
<input type="button" id="stuBtn" value="查詢">
</body>
</html>

